display TOYOTA COROLLA HATCHBACK 2023 Owner's Manual
[x] Cancel search | Manufacturer: TOYOTA, Model Year: 2023, Model line: COROLLA HATCHBACK, Model: TOYOTA COROLLA HATCHBACK 2023Pages: 436, PDF Size: 8.72 MB
Page 84 of 436
842-1. Instrument cluster
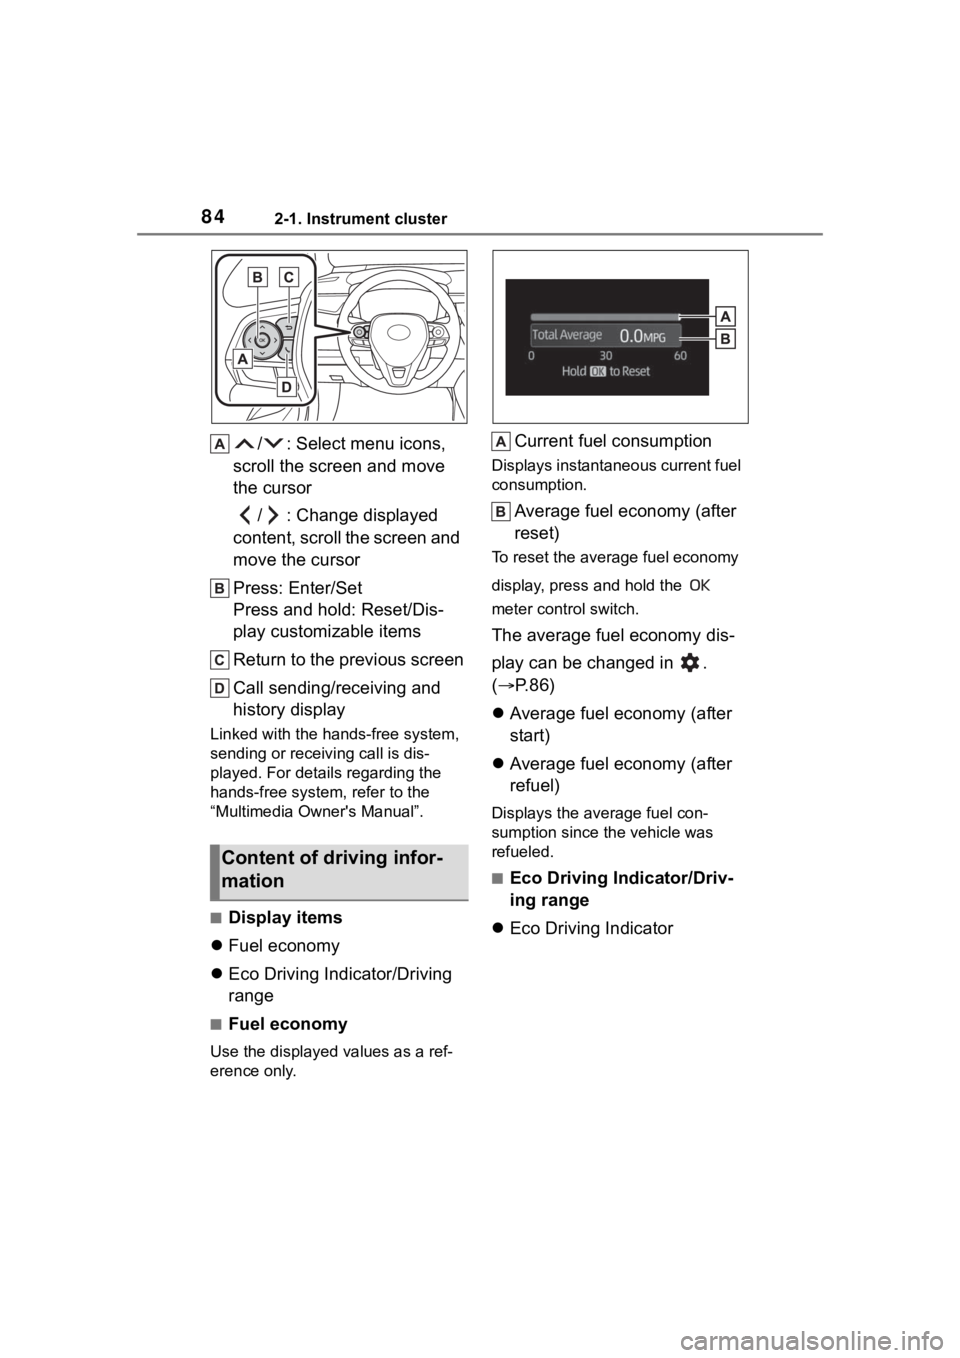
/ : Select menu icons,
scroll the screen and move
the cursor
/ : Change displayed
content, scroll the screen and
move the cursor
Press: Enter/Set
Press and hold: Reset/Dis-
play customizable items
Return to the previous screen
Call sending/receiving and
history display
Linked with the hands-free system,
sending or receiv ing call is dis-
played. For details regarding the
hands-free system, refer to the
“Multimedia Owner's Manual”.
■Display items
Fuel economy
Eco Driving Indicator/Driving
range
■Fuel economy
Use the displayed values as a ref-
erence only.
Current fuel consumption
Displays instantaneous current fuel
consumption.
Average fuel economy (after
reset)
To reset the average fuel economy
display, press and hold the
meter control switch.
The average fuel economy dis-
play can be changed in .
( P.86)
Average fuel economy (after
start)
Average fuel economy (after
refuel)
Displays the average fuel con-
sumption since the vehicle was
refueled.
■Eco Driving Indicator/Driv-
ing range
Eco Driving Indicator
Content of driving infor-
mation
Page 85 of 436
852-1. Instrument cluster
2
Vehicle status information and indicators
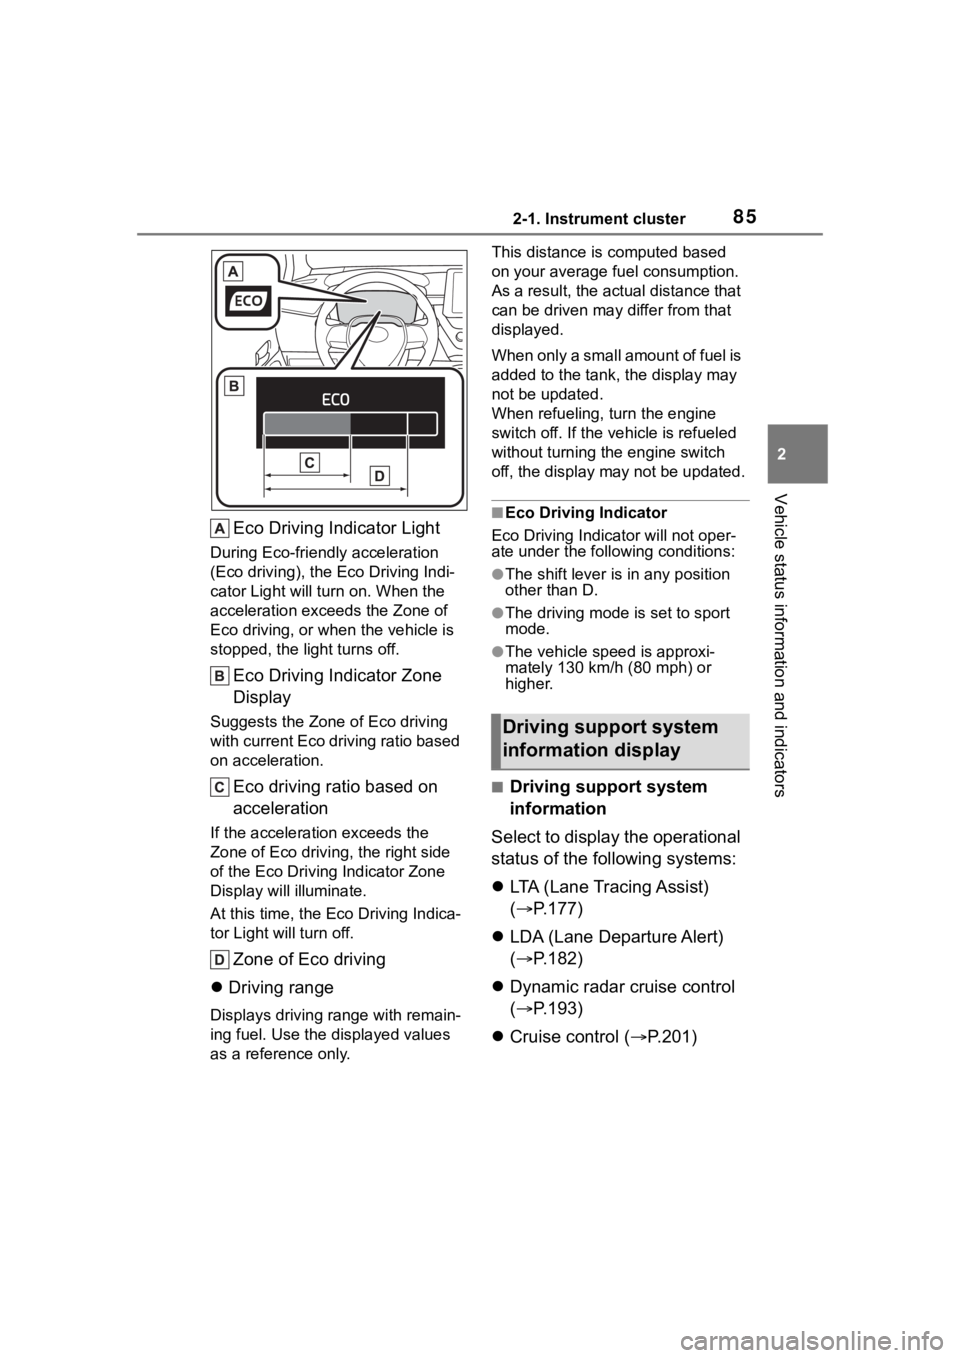
Eco Driving Indicator Light
During Eco-friendly acceleration
(Eco driving), the Eco Driving Indi-
cator Light will turn on. When the
acceleration exceeds the Zone of
Eco driving, or when the vehicle is
stopped, the light turns off.
Eco Driving Indicator Zone
Display
Suggests the Zone of Eco driving
with current Eco driving ratio based
on acceleration.
Eco driving ratio based on
acceleration
If the acceleration exceeds the
Zone of Eco driving, the right side
of the Eco Driving Indicator Zone
Display will illuminate.
At this time, the Eco Driving Indica-
tor Light will turn off.
Zone of Eco driving
Driving range
Displays driving range with remain-
ing fuel. Use the d isplayed values
as a reference only. This distance is computed based
on your average f
uel consumption.
As a result, the actual distance that
can be driven may differ from that
displayed.
When only a small amount of fuel is
added to the tank, the display may
not be updated.
When refueling, turn the engine
switch off. If the ve hicle is refueled
without turning the engine switch
off, the display may not be updated.
■Eco Driving Indicator
Eco Driving Indicator will not oper-
ate under the following conditions:
●The shift lever is in any position
other than D.
●The driving mode is set to sport
mode.
●The vehicle spe ed is approxi-
mately 130 km/h (80 mph) or
higher.
■Driving support system
information
Select to display the operational
status of the following systems:
LTA (Lane Tracing Assist)
( P.177)
LDA (Lane Departure Alert)
( P.182)
Dynamic radar cruise control
( P.193)
Cruise control ( P.201)
Driving support system
information display
Page 86 of 436
862-1. Instrument cluster
■Navigation system-linked
display (if equipped)
Select to display the following
navigation system-linked infor-
mation:
Route guidance to destination
Compass display (head-
ing-up display)
Select to enable selection of an
audio source or track on the
meter using the meter control
switches.
This menu icon can be set to be
displayed/not displayed in .
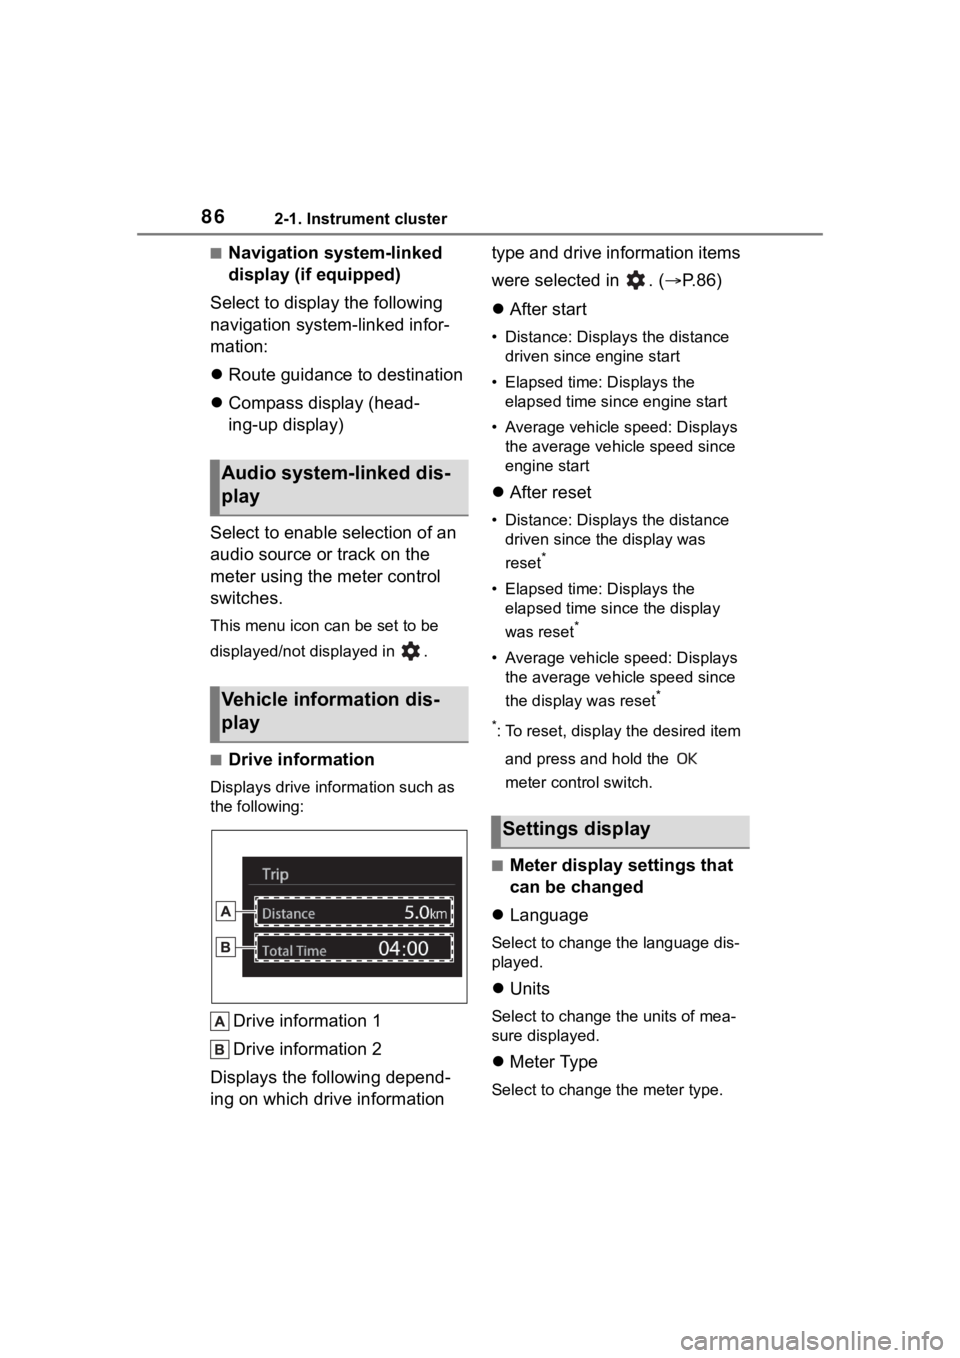
■Drive information
Displays drive information such as
the following:
Drive information 1
Drive information 2
Displays the following depend-
ing on which drive information type and drive information items
were selected in . (
P.86)
After start
• Distance: Displays the distance
driven since engine start
• Elapsed time: Displays the elapsed time since engine start
• Average vehicle speed: Displays the average vehicle speed since
engine start
After reset
• Distance: Displays the distance
driven since the display was
reset
*
• Elapsed time: Displays the elapsed time since the display
was reset
*
• Average vehicle speed: Displays the average vehicle speed since
the display was reset
*
*
: To reset, display the desired item and press and hold the
meter control switch.
■Meter display settings that
can be changed
Language
Select to change the language dis-
played.
Units
Select to change the units of mea-
sure displayed.
Meter Type
Select to change the meter type.
Audio system-linked dis-
play
Vehicle information dis-
play
Settings display
Page 87 of 436
872-1. Instrument cluster
2
Vehicle status information and indicators
Dial Type
Select to change the display of the
speedometer or tachometer.
Eco Driving Indicator Light
Select to enable/disable the Eco
Driving Indicator Light.
Fuel economy display
Select to change the average fuel
consumption display to any of the
following: trip ave rage/total aver-
age/tank average. ( P. 8 4 )
Select to display/not display the
audio system linked display.
Select to change the displayed con-
tent of the following:
• Drive information type
Select to change the drive informa-
tion type display between trip infor-
mation/total information.
• Drive information items
Select to set the first and second
items of the drive information dis-
play to any of the following: aver-
age vehicle
speed/distance/elapsed time.
Pop-up display
Select to enable/disable pop-up
displays for each relevant system.
Multi-information display off
Select to turn the m ulti-information
display off.
To turn the multi-in formation display
on again, press any of the following
meter control switches //// /.
Default setting
Select to reset the meter display
settings to the default setting.
■Vehicle functions and set-
tings that can be changed
P.386
■Suspension of the settings dis-
play
●Some settings cannot be changed
while driving. When changing set-
tings, park the vehicle in a safe
place.
●If a warning message is displayed,
operation of the settings display
will be suspended.
WARNING
■Cautions during setting up
the display
If the engine is running when
changing the dis play settings,
ensure that the vehicle is parked
in a place with adequate ventila-
tion. In a closed area such as a
garage, exhaust gases including
harmful carbon monoxide (CO)
may collect and enter the vehicle.
This may lead to death or a seri-
ous health hazard.
NOTICE
■During setting up the display
To prevent batte ry discharge,
ensure that the engine is running
while setting up the display fea-
tures.
Page 88 of 436
882-1. Instrument cluster
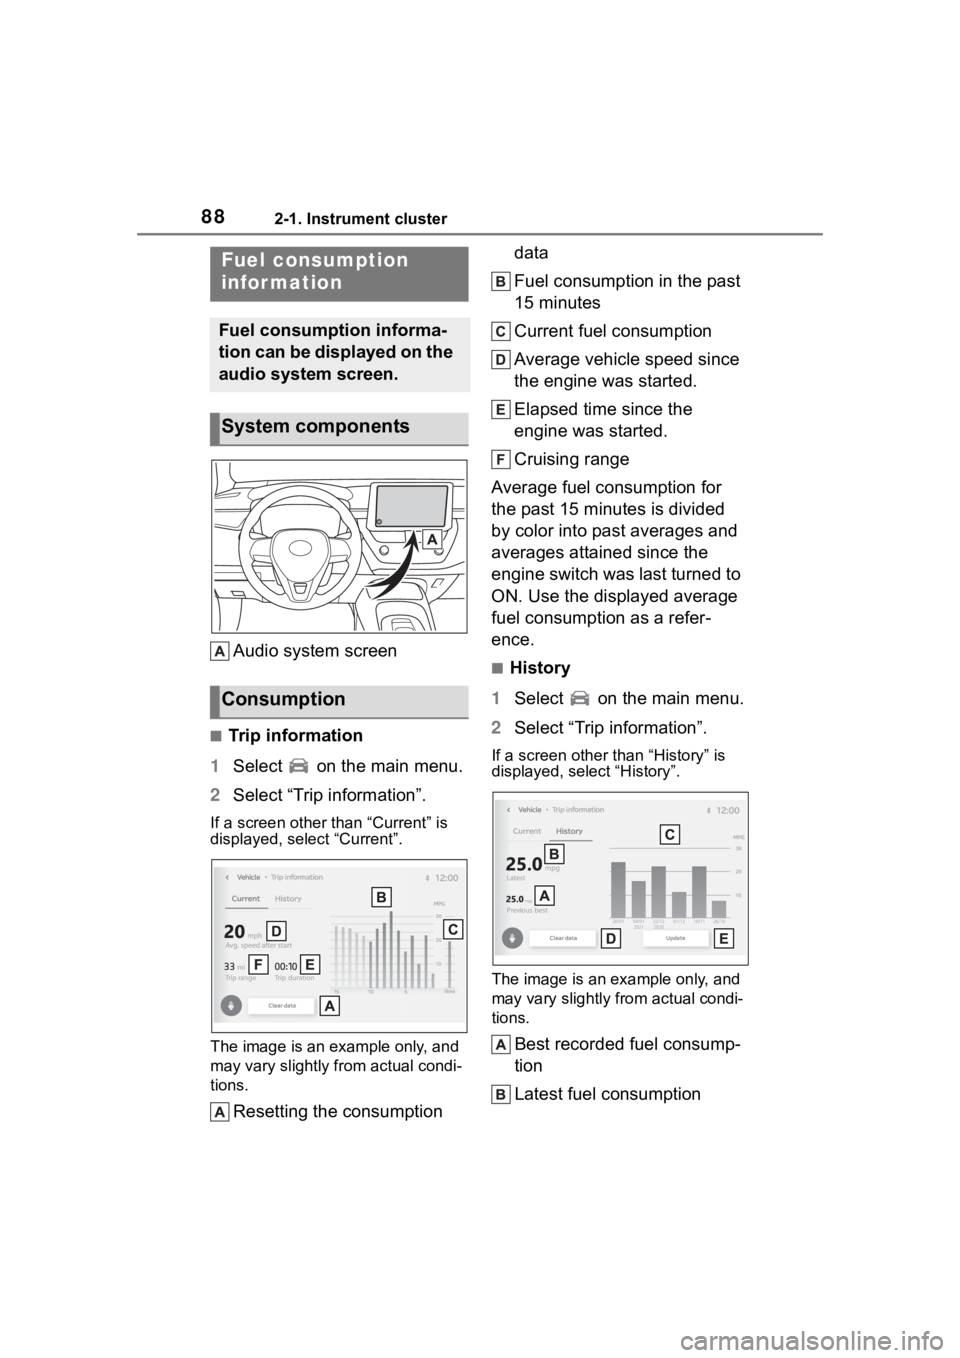
Audio system screen
■Trip information
1 Select on the main menu.
2 Select “Trip information”.
If a screen other than “Current” is
displayed, select “Current”.
The image is an example only, and
may vary slightly f rom actual condi-
tions.
Resetting the consumption data
Fuel consumption in the past
15 minutes
Current fuel consumption
Average vehicle speed since
the engine was started.
Elapsed time since the
engine was started.
Cruising range
Average fuel consumption for
the past 15 minutes is divided
by color into past averages and
averages attained since the
engine switch was last turned to
ON. Use the displayed average
fuel consumption as a refer-
ence.
■History
1 Select on the main menu.
2 Select “Trip information”.
If a screen other than “History” is
displayed, select “History”.
The image is an example only, and
may vary slightly from actual condi-
tions.
Best recorded fuel consump-
tion
Latest fuel consumption
Fuel consumption
infor mation
Fuel consumption informa-
tion can be displayed on the
audio system screen.
System components
Consumption
Page 89 of 436

892-1. Instrument cluster
2
Vehicle status information and indicators
Previous fuel consumption
record
Resetting the history data
Updating the latest fuel con-
sumption data
The average fuel consumption
history is divided by color into
past averages and the average
fuel consumption since the last
updated. Use the displayed
average fuel consumption as a
reference.
■Updating the history data
Update the latest fuel consumption
by selecting “Upda te” to measure
the current fuel consumption again.
■Resetting the data
The fuel consumption data can be
deleted by selecting “Clear”.
■Cruising range
Displays the estimated maximum
distance that can be driven with the
quantity of fuel remaining.
This distance is computed based on
your average fuel consumption.
As a result, the actual distance that
can be driven may differ from that
displayed.
Page 92 of 436
923-1. Key information
3-1.Key information
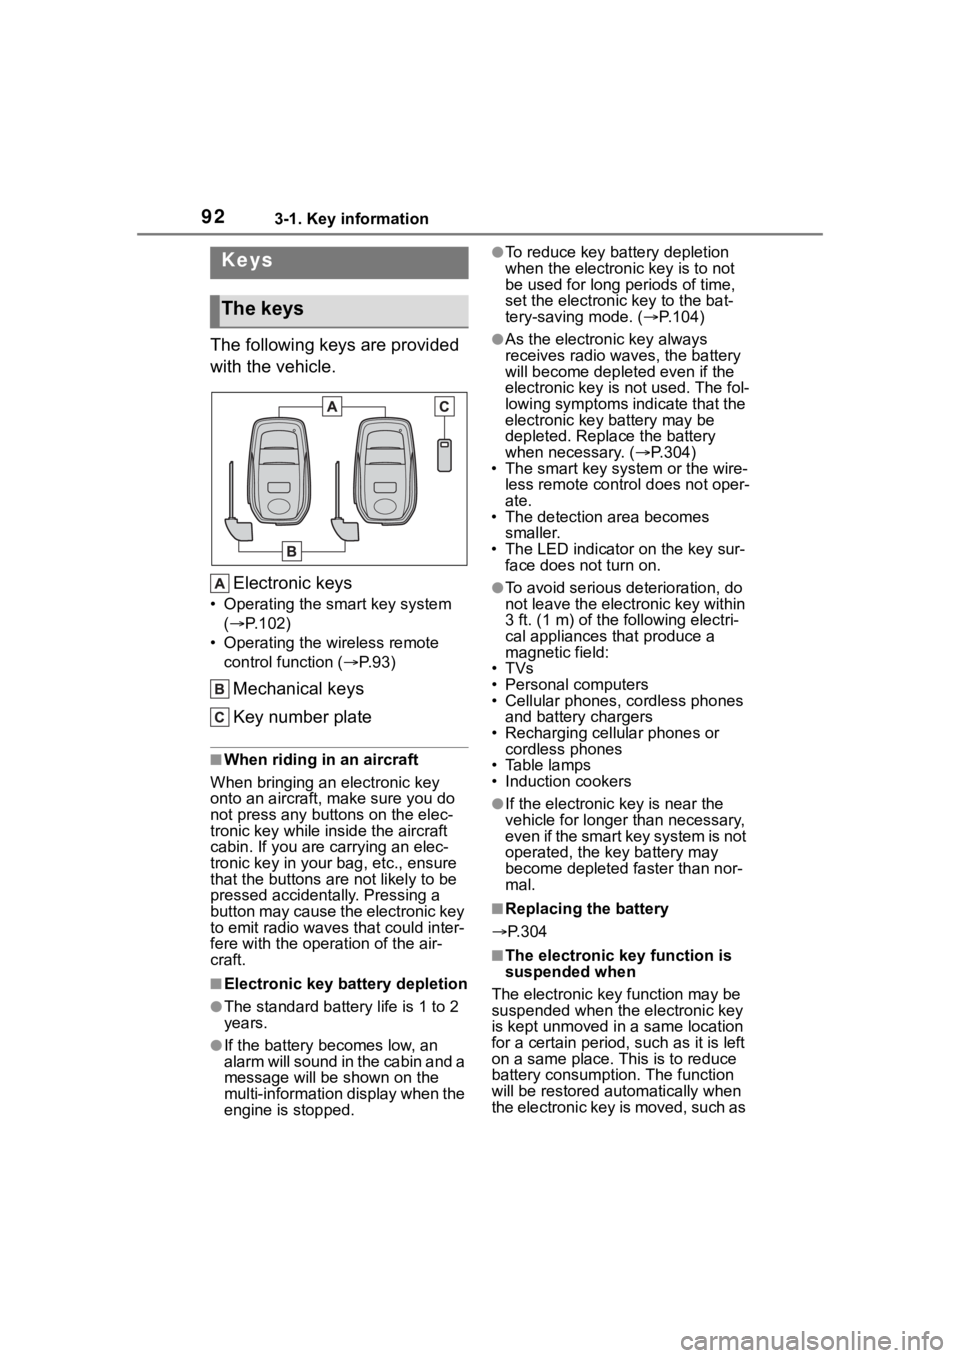
The following keys are provided
with the vehicle.Electronic keys
• Operating the smart key system ( P.102)
• Operating the wireless remote control function ( P. 9 3 )
Mechanical keys
Key number plate
■When riding in an aircraft
When bringing an electronic key
onto an aircraft, make sure you do
not press any buttons on the elec-
tronic key while inside the aircraft
cabin. If you are carrying an elec-
tronic key in your bag, etc., ensure
that the buttons are not likely to be
pressed accidentally. Pressing a
button may cause the electronic key
to emit radio waves that could inter-
fere with the oper ation of the air-
craft.
■Electronic key battery depletion
●The standard battery life is 1 to 2
years.
●If the battery becomes low, an
alarm will sound in the cabin and a
message will be s hown on the
multi-information display when the
engine is stopped.
●To reduce key battery depletion
when the electronic key is to not
be used for long periods of time,
set the electronic key to the bat-
tery-saving mode. ( P.104)
●As the electronic key always
receives radio waves, the battery
will become depleted even if the
electronic key is not used. The fol-
lowing symptoms indicate that the
electronic key battery may be
depleted. Replace the battery
when necessary. ( P.304)
• The smart key system or the wire-
less remote contro l does not oper-
ate.
• The detection area becomes
smaller.
• The LED indicator on the key sur- face does not turn on.
●To avoid serious deterioration, do
not leave the electronic key within
3 ft. (1 m) of the following electri-
cal appliances that produce a
magnetic field:
•TVs
• Personal computers
• Cellular phones, cordless phones and battery chargers
• Recharging cellular phones or cordless phones
• Table lamps
• Induction cookers
●If the electronic key is near the
vehicle for longer than necessary,
even if the smart key system is not
operated, the key battery may
become depleted faster than nor-
mal.
■Replacing the battery
P.304
■The electronic key function is
suspended when
The electronic key function may be
suspended when the electronic key
is kept unmoved in a same location
for a certain period, such as it is left
on a same place. This is to reduce
battery consumption. The function
will be restored automatically when
the electronic key is moved, such as
Keys
The keys
Page 93 of 436
933-1. Key information
3
Before driving
it is picked up.
■If “A New Key has been Regis-
tered Contact Your Dealer for
Details” is shown on the
multi-information display
This message will be displayed
each time the driver’s door is
opened when the doors are
unlocked from the outside for
approximately 10 days after a new
electronic key has been registered.
If this message is displayed but you
have not had a new electronic key
registered, ask your Toyota dealer to
check if an unknow n electronic key
(other than those in your posses-
sion) has been registered.
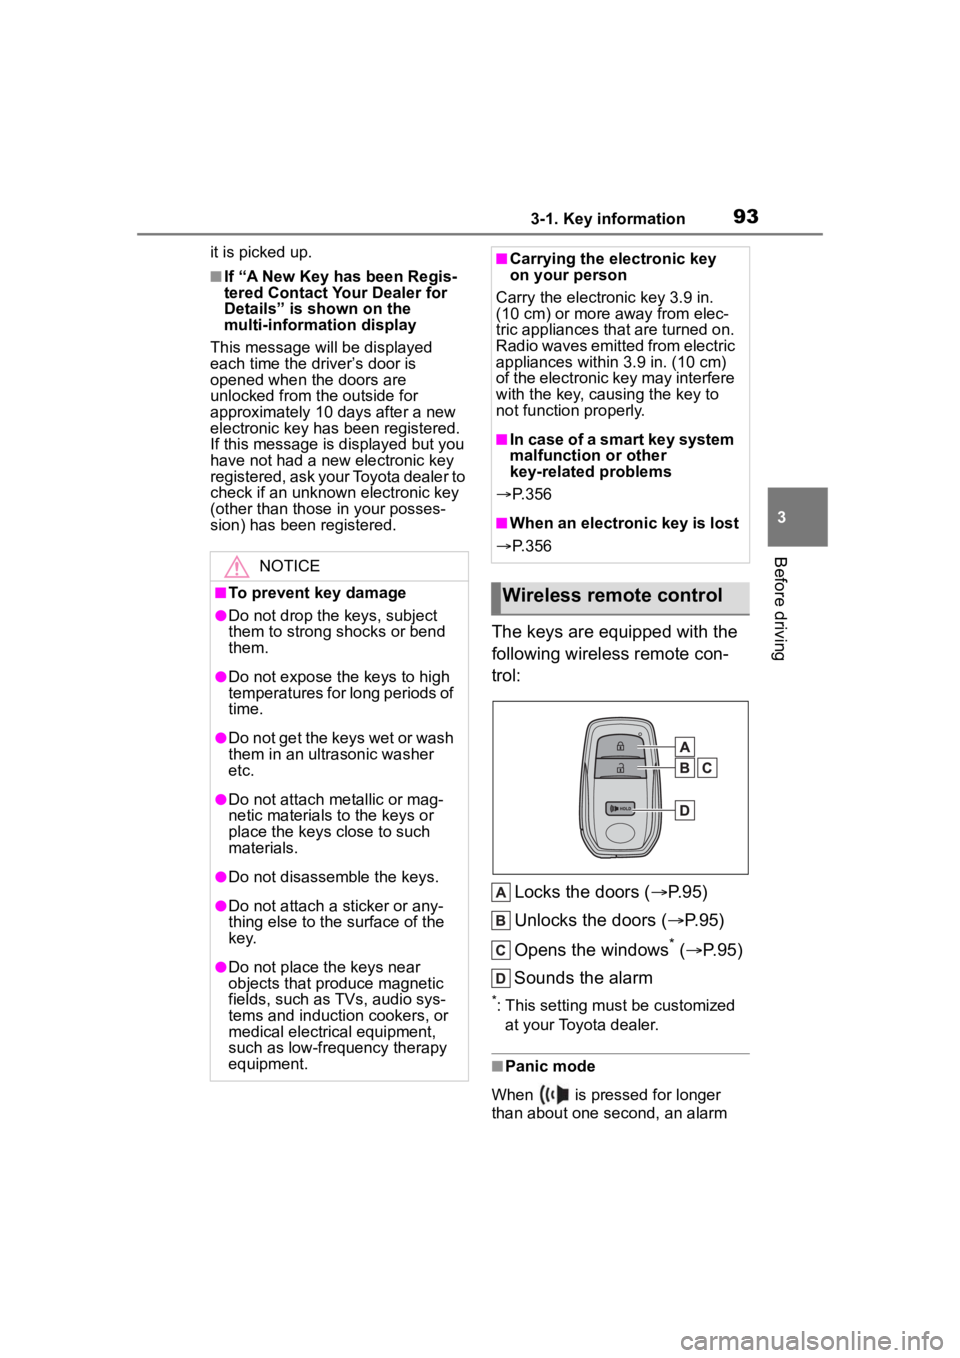
The keys are equipped with the
following wireless remote con-
trol:
Locks the doors ( P.95)
Unlocks the doors ( P.95)
Opens the windows
* ( P.95)
Sounds the alarm
*: This setting must be customized at your Toyota dealer.
■Panic mode
When is pressed for longer
than about one second, an alarm
NOTICE
■To prevent key damage
●Do not drop the keys, subject
them to strong shocks or bend
them.
●Do not expose the keys to high
temperatures for long periods of
time.
●Do not get the keys wet or wash
them in an ultrasonic washer
etc.
●Do not attach metallic or mag-
netic materials to the keys or
place the keys close to such
materials.
●Do not disassemble the keys.
●Do not attach a sticker or any-
thing else to the surface of the
k e y.
●Do not place th e keys near
objects that produce magnetic
fields, such as TVs, audio sys-
tems and induction cookers, or
medical electrical equipment,
such as low-frequency therapy
equipment.
■Carrying the electronic key
on your person
Carry the electronic key 3.9 in.
(10 cm) or more away from elec-
tric appliances that are turned on.
Radio waves emitte d from electric
appliances within 3.9 in. (10 cm)
of the electronic key may interfere
with the key, causing the key to
not function properly.
■In case of a smart key system
malfunction or other
key-related problems
P. 3 5 6
■When an electronic key is lost
P. 3 5 6
Wireless remote control
Page 96 of 436
963-2. Opening, closing and locking the doors
For vehicles with an alarm: To pre-
vent unintended triggering of the
alarm, unlock the doors using the
wireless remote control and open
and close a door once after the set-
tings have been changed. (If a door
is not opened within 60 seconds
after is press ed, the doors will
be locked again an d the alarm will
automatically be set.)
In case that the alarm is triggered,
immediately stop the alarm. ( P. 6 5 )
■Operation signals
A buzzer sounds and the emer-
gency flashers flash to indicate that
the doors have been
locked/unlocked using the entry
function or wireless remote control.
(Locked: Once; Unlocked: Twice)
A buzzer sounds to indicate that the
windows are operating.
■Security feature
If a door is not opened within
approximately 60 seconds after the vehicle is unlocked using the entry
function or wireles
s remote control,
the security featur e automatically
locks the vehicle again.
■When the door cannot be
locked by the lock sensor on
the surface of the front door
handle
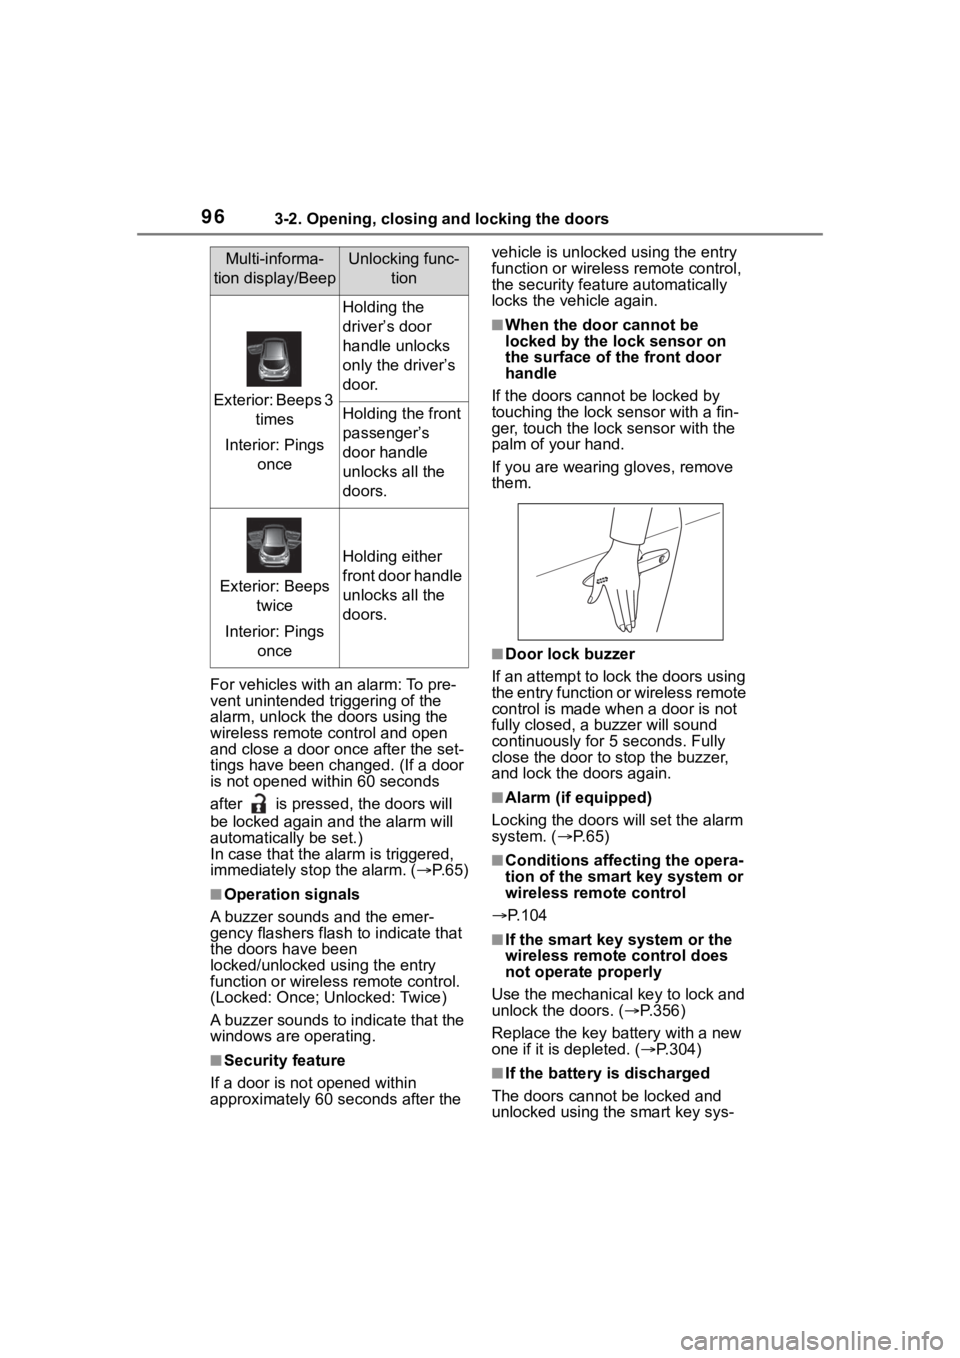
If the doors cannot be locked by
touching the lock se nsor with a fin-
ger, touch the lock sensor with the
palm of your hand.
If you are wearing gloves, remove
them.
■Door lock buzzer
If an attempt to lock the doors using
the entry function or wireless remote
control is made when a door is not
fully closed, a b uzzer will sound
continuously for 5 seconds. Fully
close the door to stop the buzzer,
and lock the doors again.
■Alarm (if equipped)
Locking the doors will set the alarm
system. ( P. 6 5 )
■Conditions affecting the opera-
tion of the smart key system or
wireless remote control
P.104
■If the smart key system or the
wireless remote control does
not operate properly
Use the mechanical key to lock and
unlock the doors. ( P.356)
Replace the key battery with a new
one if it is depleted. ( P.304)
■If the battery is discharged
The doors cannot be locked and
unlocked using the smart key sys-
Multi-informa-
tion display/BeepUnlocking func- tion
Exterior: Beeps 3 times
Interior: Pings once
Holding the
driver’s door
handle unlocks
only the driver’s
door.
Holding the front
passenger’s
door handle
unlocks all the
doors.
Exterior: Beeps twice
Interior: Pings once
Holding either
front door handle
unlocks all the
doors.
Page 97 of 436
973-2. Opening, closing and locking the doors
3
Before driving
tem or wireless remote control. Lock
or unlock the doors using the
mechanical key. (P.356)
■Rear seat reminder function
In order to remind you not to forget
luggage, etc. in the rear seat, when
the engine switch is turned off after
any of the following conditions are
met, a buzzer will sound and a mes-
sage will be displayed on the
multi-information di splay for approx-
imately 6 seconds.
●The engine is started within
approximately 10 minutes after
opening and closing a rear door.
●A rear door has been opened and
closed after the engine was
started.
However, if a rear door is opened
and then closed within approxi-
mately 2 seconds , the rear seat
reminder function may not operate.
The rear seat rem inder function
determines that luggage, etc. has
been placed in a rear seat based on
opening and closing of a rear door.
Therefore, depending on the situa-
tion, the rear seat reminder function
may not operate and you may still
forget luggage, etc. in the rear seat,
or it may operate unnecessarily.
■Customization
Some functions can be customized.
( P.386)
WARNING
■To prevent an accident
Observe the following precautions
while driving t he vehicle.
Failure to do so m ay result in a
door opening and an occupant
being thrown out of the vehicle,
resulting in death or serious injury.
●Ensure that all doors are prop-
erly closed and locked.
●Do not pull the inside door han-
dle while driving.
Be especially careful of the front
doors, as the doors may be
opened even if the inside lock
buttons are in the locked posi-
tion.
●Set the rear door child-protector
locks when children are seated
in the rear seats.
■When opening or closing a
door
Check the surroundings of the
vehicle such as wh ether the vehi-
cle is on an incline, whether there
is enough space for a door to
open and whether a strong wind
is blowing. When opening or clos-
ing the door, hold the door handle
tightly to prepare for any unpre-
dictable movement.
■When using the wireless
remote control and operating
the power windows
Operate the power windows after
checking to make sure that there
is no possibility of any passenger
having any of their body parts
caught in the windows. Also, do
not allow children to operate the
wireless remote control. It is pos-
sible for children and other pas-
sengers to get caught in the
power windows.