light TOYOTA COROLLA HATCHBACK 2023 Service Manual
[x] Cancel search | Manufacturer: TOYOTA, Model Year: 2023, Model line: COROLLA HATCHBACK, Model: TOYOTA COROLLA HATCHBACK 2023Pages: 436, PDF Size: 8.72 MB
Page 88 of 436
882-1. Instrument cluster
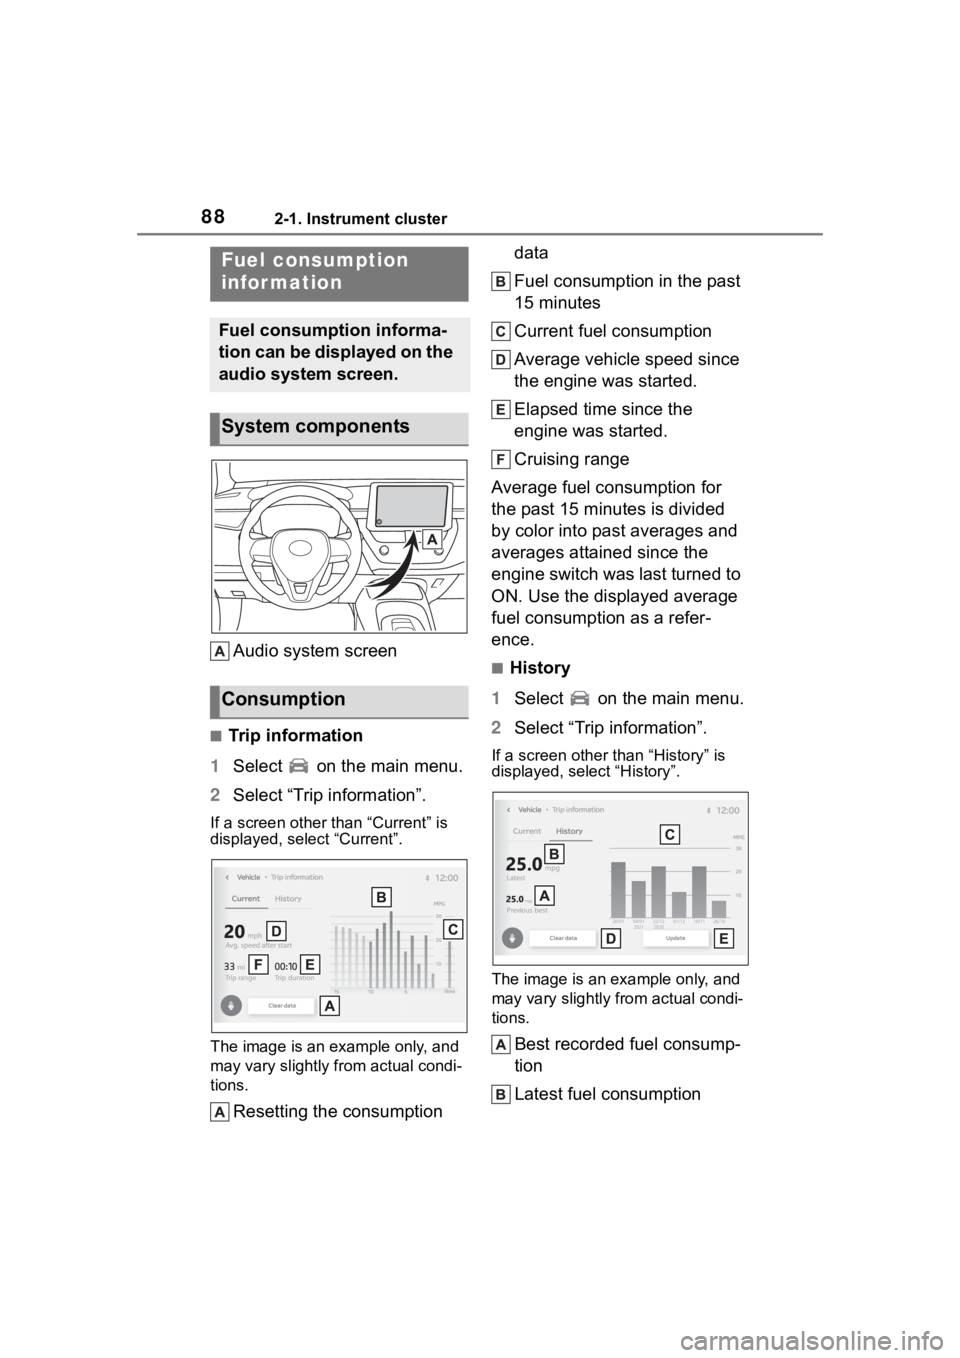
Audio system screen
■Trip information
1 Select on the main menu.
2 Select “Trip information”.
If a screen other than “Current” is
displayed, select “Current”.
The image is an example only, and
may vary slightly f rom actual condi-
tions.
Resetting the consumption data
Fuel consumption in the past
15 minutes
Current fuel consumption
Average vehicle speed since
the engine was started.
Elapsed time since the
engine was started.
Cruising range
Average fuel consumption for
the past 15 minutes is divided
by color into past averages and
averages attained since the
engine switch was last turned to
ON. Use the displayed average
fuel consumption as a refer-
ence.
■History
1 Select on the main menu.
2 Select “Trip information”.
If a screen other than “History” is
displayed, select “History”.
The image is an example only, and
may vary slightly from actual condi-
tions.
Best recorded fuel consump-
tion
Latest fuel consumption
Fuel consumption
infor mation
Fuel consumption informa-
tion can be displayed on the
audio system screen.
System components
Consumption
Page 94 of 436
943-1. Key information
will sound intermittently and the
vehicle lights will flash to deter any
person from trying to break into or
damage your vehicle.
To stop the alarm, press any button
on the wireless re mote control.
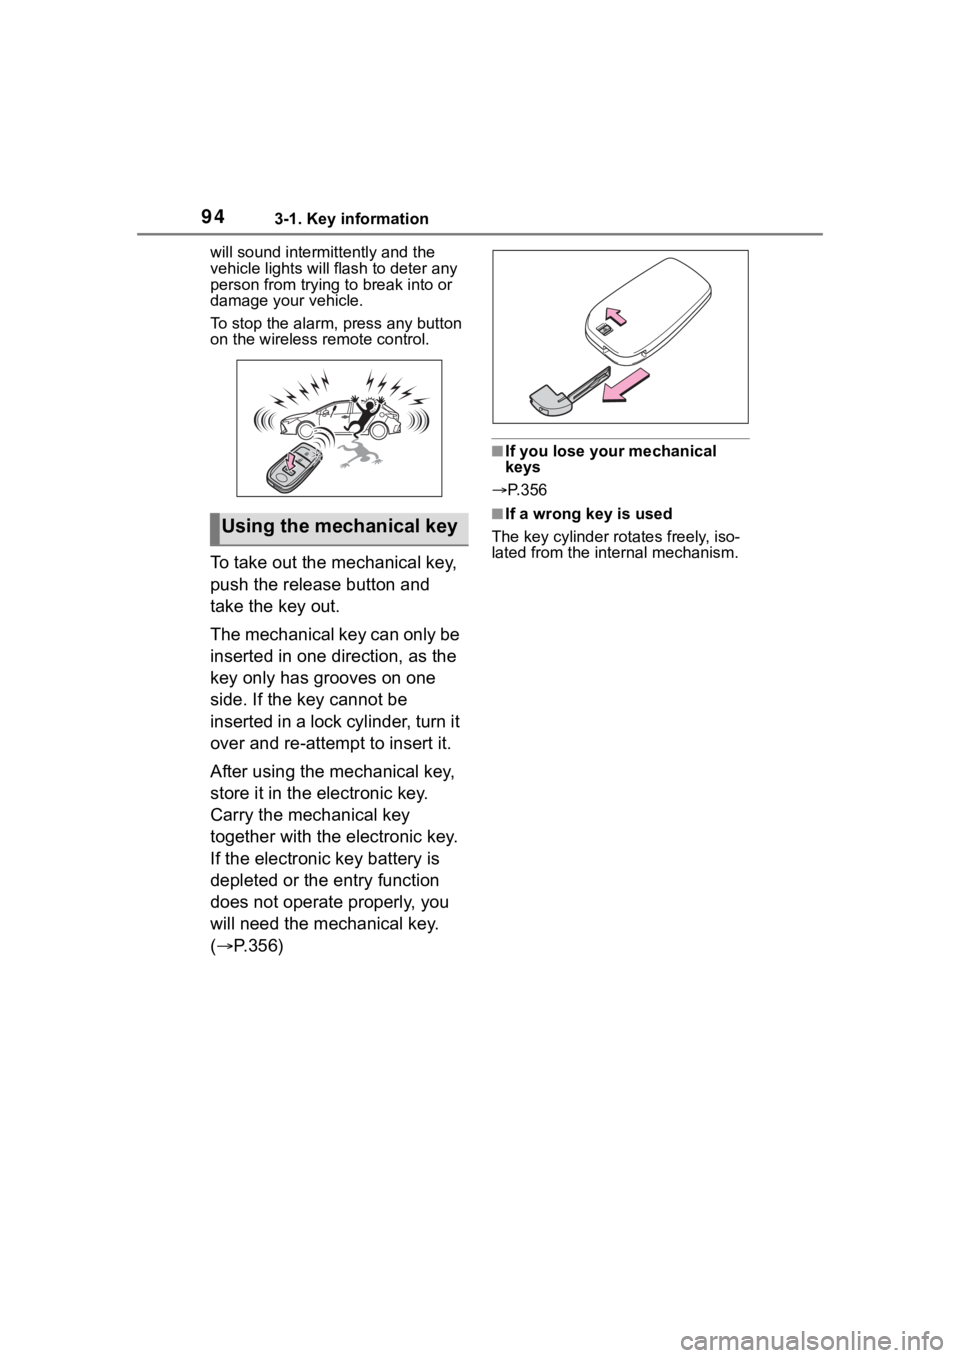
To take out the mechanical key,
push the release button and
take the key out.
The mechanical key can only be
inserted in one direction, as the
key only has grooves on one
side. If the key cannot be
inserted in a lock cylinder, turn it
over and re-attempt to insert it.
After using the mechanical key,
store it in the electronic key.
Carry the mechanical key
together with the electronic key.
If the electronic key battery is
depleted or the entry function
does not operate properly, you
will need the mechanical key.
(P.356)
■If you lose your mechanical
keys
P.356
■If a wrong key is used
The key cylinder rotates freely, iso-
lated from the internal mechanism.Using the mechanical key
Page 95 of 436
953-2. Opening, closing and locking the doors
3
Before driving
3-2.Opening, closing and locking the doors
■Smart key system
Carry the electronic key to
enable this function.
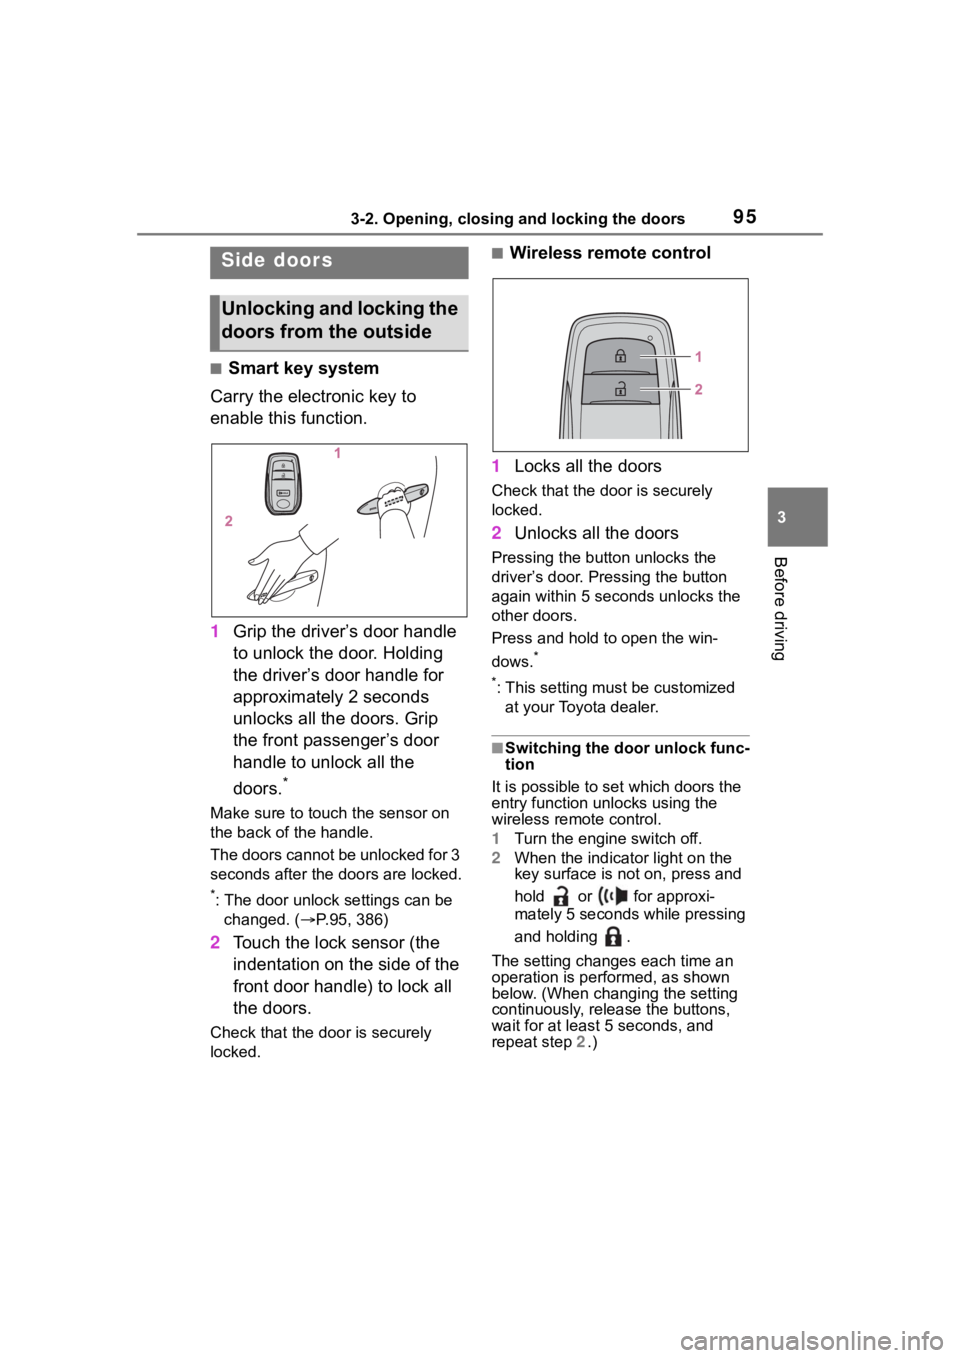
1 Grip the driver’s door handle
to unlock the door. Holding
the driver’s door handle for
approximately 2 seconds
unlocks all the doors. Grip
the front passenger’s door
handle to unlock all the
doors.
*
Make sure to touch the sensor on
the back of the handle.
The doors cannot be unlocked for 3
seconds after the doors are locked.
*: The door unlock settings can be
changed. ( P.95, 386)
2 Touch the lock sensor (the
indentation on the side of the
front door handle) to lock all
the doors.
Check that the door is securely
locked.
■Wireless remote control
1 Locks all the doors
Check that the d oor is securely
locked.
2 Unlocks all the doors
Pressing the button unlocks the
driver’s door. Pressing the button
again within 5 seconds unlocks the
other doors.
Press and hold to open the win-
dows.
*
*
: This setting must be customized at your Toyota dealer.
■Switching the door unlock func-
tion
It is possible to set which doors the
entry function unlocks using the
wireless remote control.
1 Turn the engine switch off.
2 When the indicator light on the
key surface is not on, press and
hold or for approxi-
mately 5 seconds while pressing
and holding .
The setting changes each time an
operation is per formed, as shown
below. (When changing the setting
continuously, release the buttons,
wait for at least 5 seconds, and
repeat step 2 .)
Side doors
Unlocking and locking the
doors from the outside
Page 100 of 436
1003-2. Opening, closing and locking the doors
WARNING
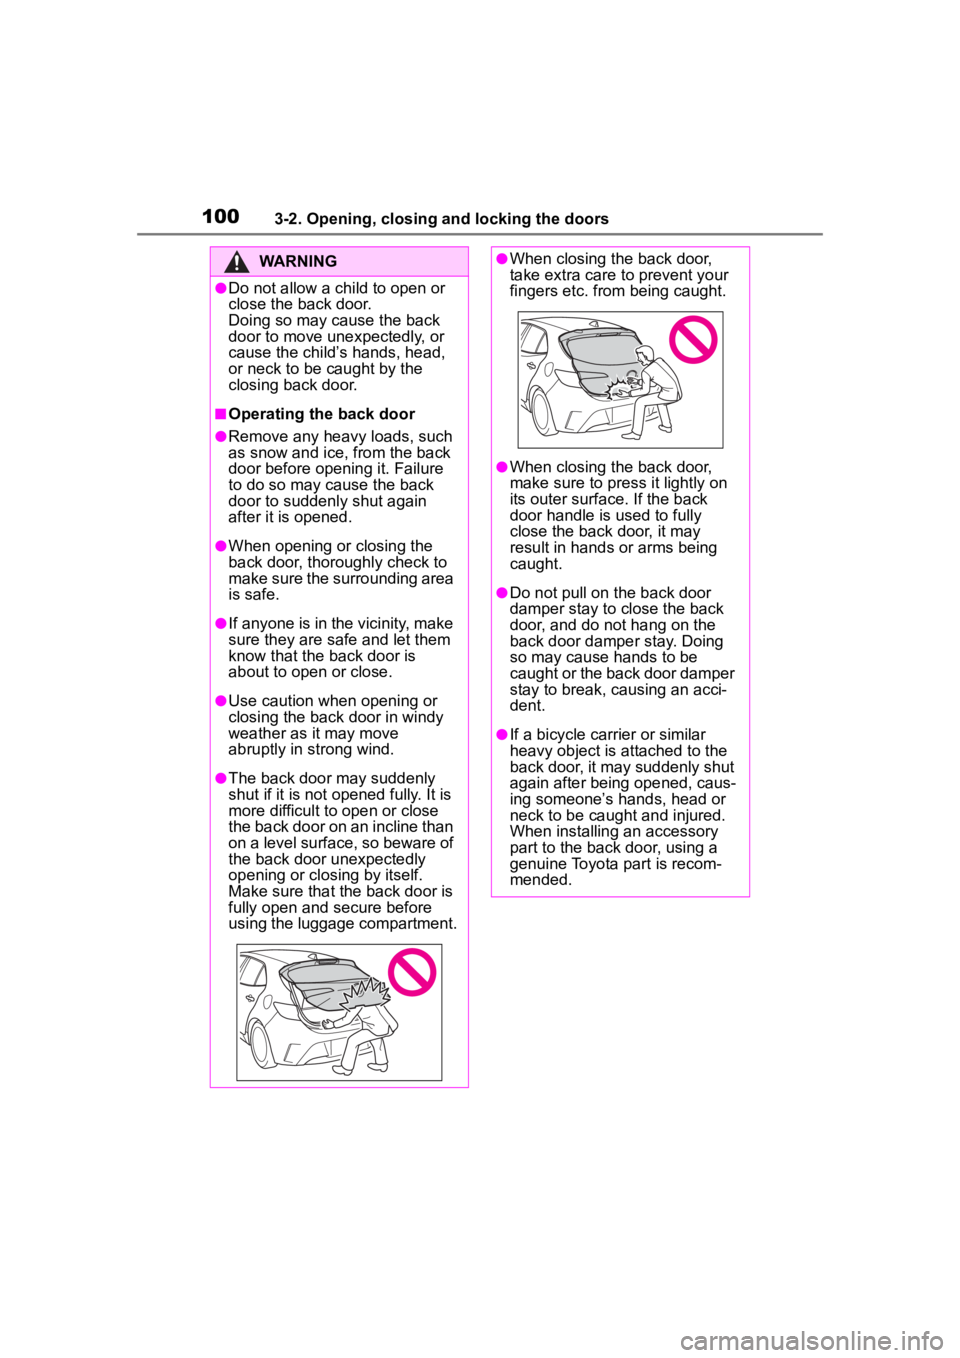
●Do not allow a child to open or
close the back door.
Doing so may cause the back
door to move unexpectedly, or
cause the child’s hands, head,
or neck to be caught by the
closing back door.
■Operating the back door
●Remove any heavy loads, such
as snow and ice, from the back
door before opening it. Failure
to do so may cause the back
door to suddenly shut again
after it is opened.
●When opening or closing the
back door, thoroughly check to
make sure the surrounding area
is safe.
●If anyone is in the vicinity, make
sure they are safe and let them
know that the back door is
about to open or close.
●Use caution when opening or
closing the back door in windy
weather as it may move
abruptly in strong wind.
●The back door may suddenly
shut if it is not opened fully. It is
more difficult to open or close
the back door on an incline than
on a level surface, so beware of
the back door unexpectedly
opening or closing by itself.
Make sure that the back door is
fully open and secure before
using the luggage compartment.
●When closing the back door,
take extra care to prevent your
fingers etc. from being caught.
●When closing the back door,
make sure to press it lightly on
its outer surface. If the back
door handle is used to fully
close the back door, it may
result in hands or arms being
caught.
●Do not pull on the back door
damper stay to close the back
door, and do not hang on the
back door damper stay. Doing
so may cause hands to be
caught or the back door damper
stay to break, causing an acci-
dent.
●If a bicycle carrier or similar
heavy object is attached to the
back door, it may suddenly shut
again after being opened, caus-
ing someone’s hands, head or
neck to be caught and injured.
When installing an accessory
part to the back door, using a
genuine Toyota part is recom-
mended.
Page 101 of 436
1013-2. Opening, closing and locking the doors
3
Before driving
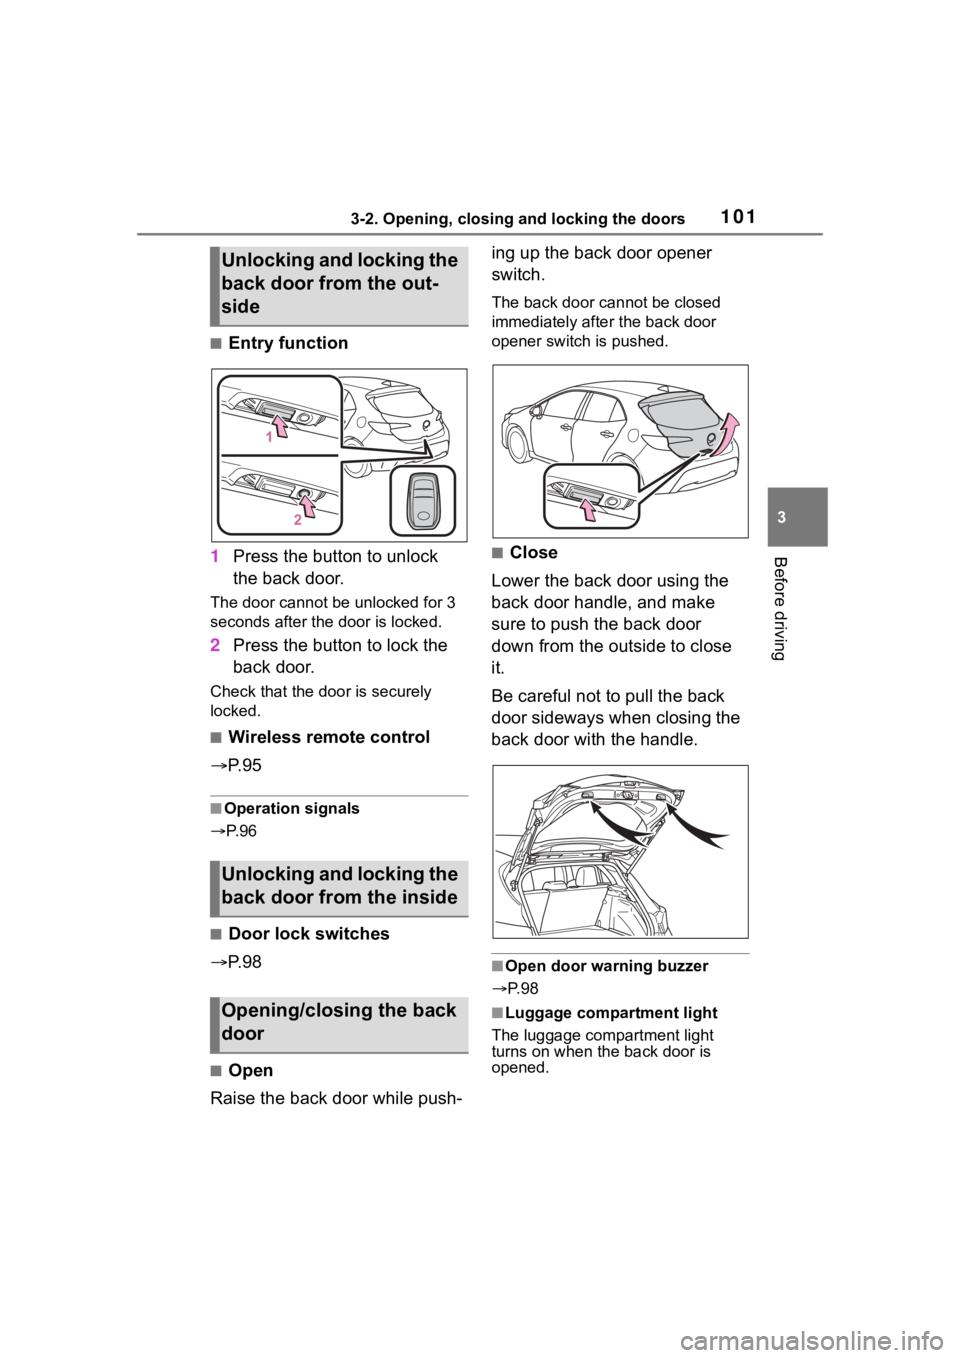
■Entry function
1 Press the button to unlock
the back door.
The door cannot be unlocked for 3
seconds after the door is locked.
2Press the button to lock the
back door.
Check that the door is securely
locked.
■Wireless remote control
P. 9 5
■Operation signals
P. 9 6
■Door lock switches
P. 9 8
■Open
Raise the back door while push- ing up the back door opener
switch.
The back door cannot be closed
immediately after the back door
opener switch is pushed.
■Close
Lower the back door using the
back door handle, and make
sure to push the back door
down from the outside to close
it.
Be careful not to pull the back
door sideways when closing the
back door with the handle.
■Open door warning buzzer
P. 9 8
■Luggage compartment light
The luggage compartment light
turns on when the back door is
opened.
Unlocking and locking the
back door from the out-
side
Unlocking and locking the
back door from the inside
Opening/closing the back
door
Page 105 of 436

1053-2. Opening, closing and locking the doors
3
Before driving
■Note for the entry function
●Even when the electronic key is
within the effective range (detec-
tion areas), the system may not
operate properly in the following
cases:
• The electronic key is too close to the window or outside door han-
dle, near the ground, or in a high
place when the doors are locked
or unlocked.
• The electronic key is on the instru- ment panel, luggage cover or
floor, or in the door pockets or
glove box when the engine is
started or engine switch modes
are changed.
●Do not leave the electronic key on
top of the instrument panel or near
the door pockets when exiting the
vehicle. Depending on the radio
wave reception conditions, it may
be detected by the antenna out-
side the cabin and the door will
become lockable from the outside,
possibly trapping the electronic
key inside the vehicle.
●As long as the electronic key is
within the effective range, the
doors may be locked or unlocked
by anyone. However, only the
doors detecting the electronic key
can be used to unl ock the vehicle.
●Even if the electronic key is not
inside the vehicle, it may be possi-
ble to start the engine if the elec-
tronic key is near the window.
●The doors may unlock or lock if a
large amount of water splashes on
the door handle, such as in the
rain or in a car wash when the
electronic key is w ithin the effec-
tive range. (The doors will auto-
matically be locked after
approximately 60 seconds if the
doors are not opened and closed.)
●If the wireless remote control is
used to lock the doors when the
electronic key is near the vehicle,
there is a possib ility that the door
may not be unlocke d by the entry
function. (Use the wireless remote control to unlock the doors.)
●Touching the door lock or unlock
sensor while wearing gloves may
prevent lock or unlock operation.
●When the lock operation is per-
formed using the lock sensor, rec-
ognition signals will be shown up
to two consecutive times. After
this, no recognition signals will be
given.
●If the door handle becomes wet
while the electronic key is within
the effective range, the door may
lock and unlock repeatedly. In that
case, follow the
following correc-
tion procedures to wash the vehi-
cle:
• Place the electronic key in a loca-
tion 6 ft. (2 m) or more away from
the vehicle. (Take care to ensure
that the key is not stolen.)
• Set the electronic key to bat- tery-saving mode to disable the
smart key system. ( P.104)
●If the electronic key is inside the
vehicle and a door handle
becomes wet during a car wash, a
message may be shown on the
multi-information display and a
buzzer will sound outside the vehi-
cle. To turn off the alarm, lock all
the doors.
●The lock sensor may not work
properly if it comes into contact
with ice, snow, m ud, etc. Clean
the lock sensor and attempt to
operate it again.
●A sudden handle operation or a
handle operation immediately
after entering the effective range
may prevent the doors from being
unlocked. Touch the door unlock
sensor and check that the doors
are unlocked befo re pulling the
door handle again.
●If there is another electronic key in
the detection area, it may take
slightly longer to unlock the doors
after the door handle is gripped.
Page 109 of 436
1093-3. Adjusting the seats
3
Before driving
WARNING
■When folding the rear seat-
backs down
●Do not fold the seatbacks down
while driving.
●Stop the vehicle on level
ground, set the parking brake
and shift the shift lever to P.
●Do not allow anyone to sit on a
folded seatback or in the lug-
gage compartment while driv-
ing.
●Do not allow child ren to enter
the luggage compartment.
●Do not allow any one to sit on
the rear center seat if the rear
right seat is folded down, as the
seat belt buckle for the rear cen-
ter seat belt is then concealed
under the folded seat and can-
not be used.
●Be careful not to get your hand
caught when folding the rear
seatbacks.
●Adjust the position of the front
seats before folding down the
rear seatbacks so that the front
seats do not interfere with the
rear seatbacks when folding
down the rear seatbacks.
■After returning the rear seat-
back to the upright position
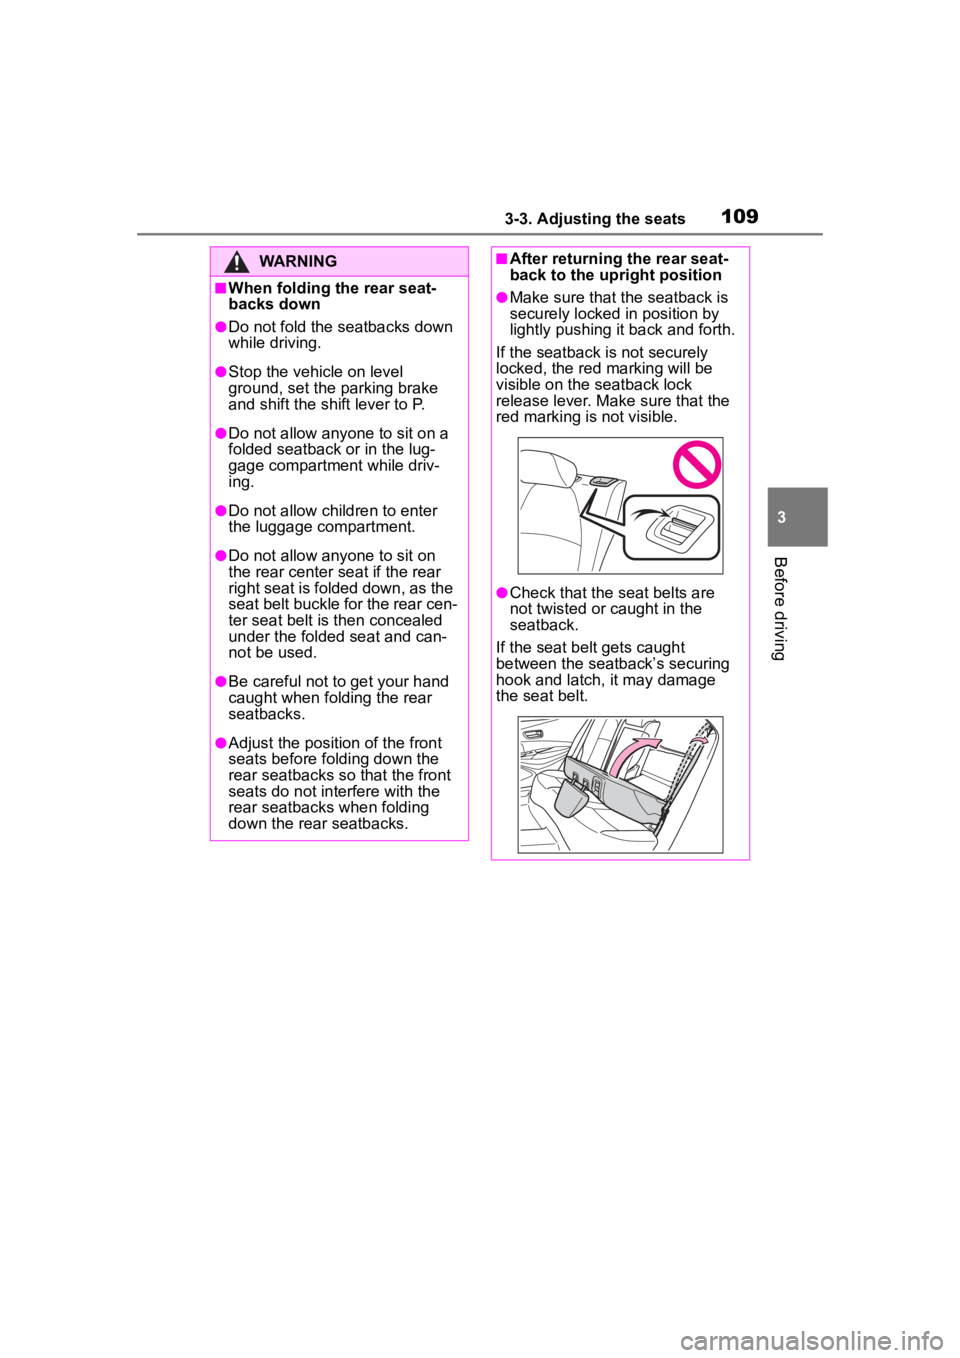
●Make sure that the seatback is
securely locked in position by
lightly pushing it back and forth.
If the seatback is not securely
locked, the red marking will be
visible on the seatback lock
release lever. Make sure that the
red marking is not visible.
●Check that the seat belts are
not twisted or caught in the
seatback.
If the seat belt gets caught
between the seatback’s securing
hook and latch, it may damage
the seat belt.
Page 114 of 436
1143-4. Adjusting the steering wheel and mirrors
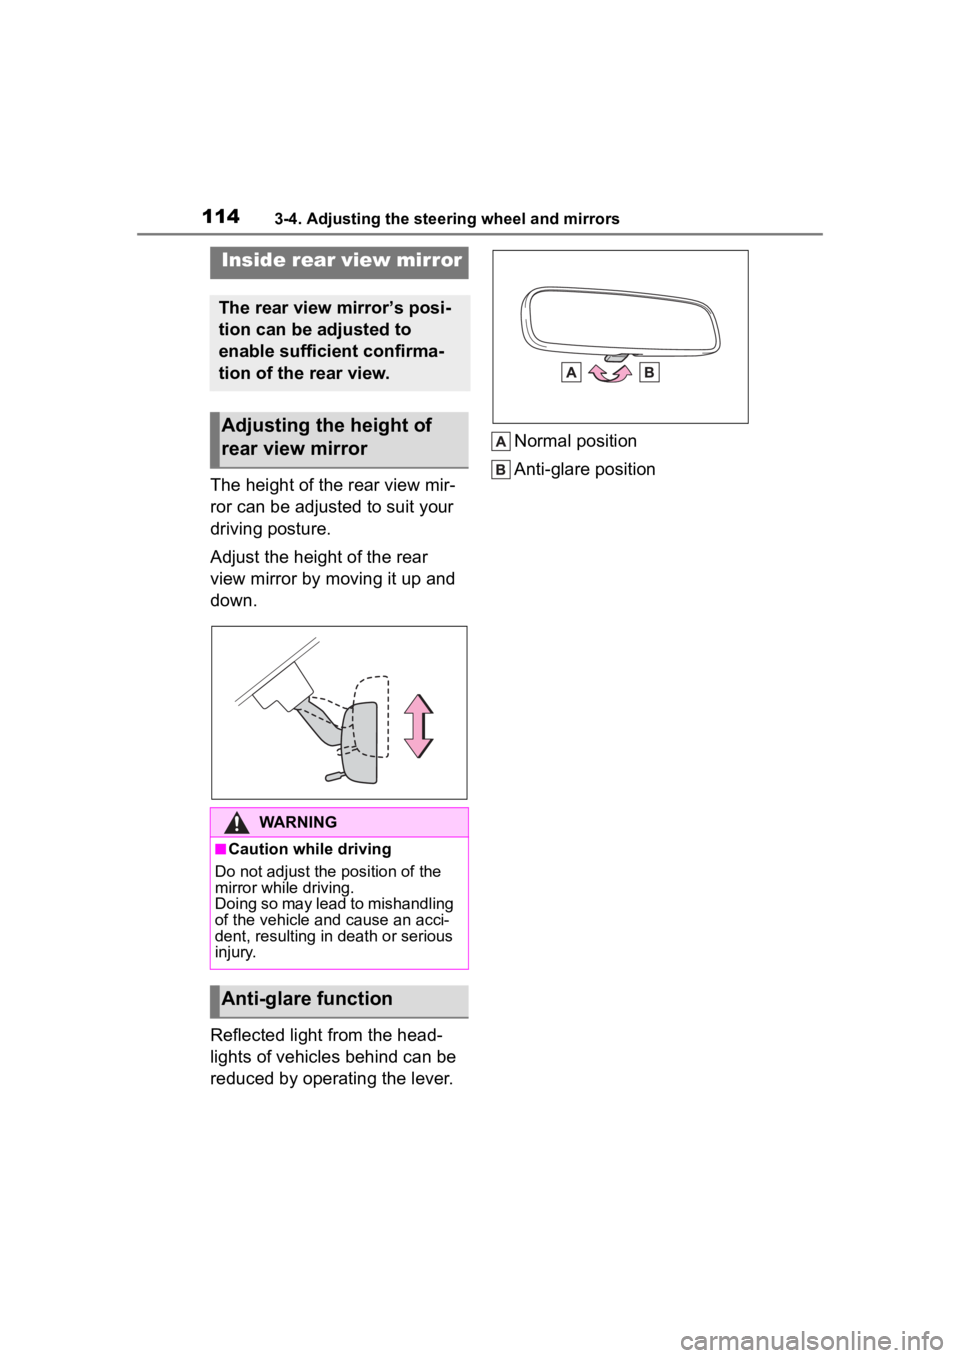
The height of the rear view mir-
ror can be adjusted to suit your
driving posture.
Adjust the height of the rear
view mirror by moving it up and
down.
Reflected light from the head-
lights of vehicles behind can be
reduced by operating the lever.Normal position
Anti-glare position
Inside rear view mirror
The rear view mirror’s posi-
tion can be adjusted to
enable sufficient confirma-
tion of the rear view.
Adjusting the height of
rear view mirror
WARNING
■Caution while driving
Do not adjust the position of the
mirror while driving.
Doing so may lead to mishandling
of the vehicle and cause an acci-
dent, resulting in death or serious
injury.
Anti-glare function
Page 117 of 436
1173-5. Opening and closing the windows
3
Before driving
3-5.Opening and closing the windows
The power windows can be
opened and closed using the
switches.
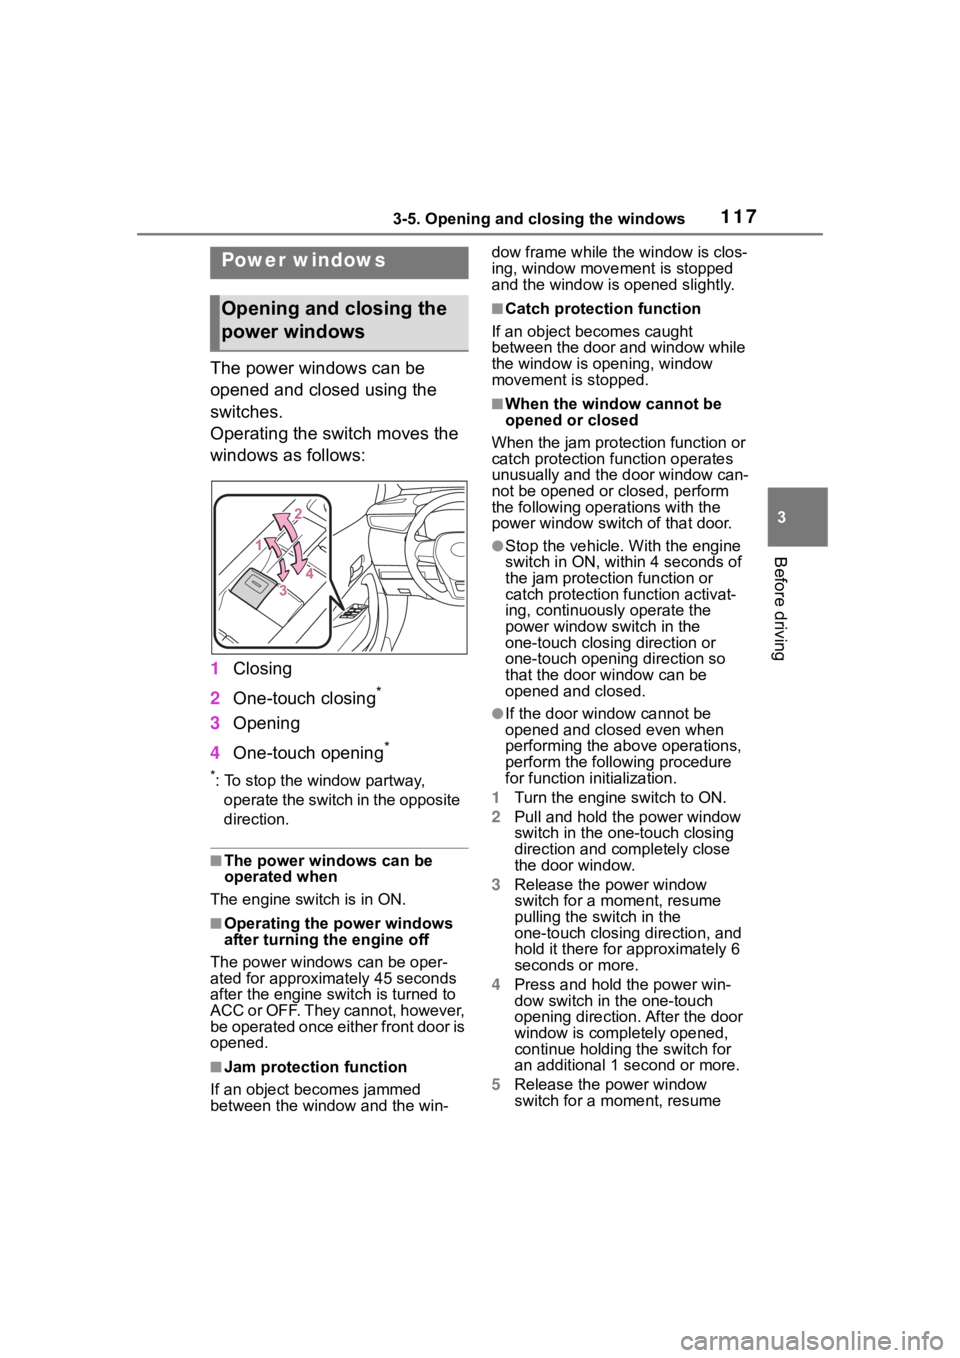
Operating the switch moves the
windows as follows:
1Closing
2 One-touch closing
*
3Opening
4 One-touch opening
*
*: To stop the window partway,
operate the switch in the opposite
direction.
■The power windows can be
operated when
The engine switch is in ON.
■Operating the power windows
after turning the engine off
The power windows can be oper-
ated for approximately 45 seconds
after the engine switch is turned to
ACC or OFF. They cannot, however,
be operated once either front door is
opened.
■Jam protection function
If an object becomes jammed
between the window and the win- dow frame while the
window is clos-
ing, window move ment is stopped
and the window is opened slightly.
■Catch protection function
If an object becomes caught
between the door and window while
the window is opening, window
movement is stopped.
■When the window cannot be
opened or closed
When the jam protection function or
catch protection function operates
unusually and the door window can-
not be opened or closed, perform
the following operations with the
power window swit ch of that door.
●Stop the vehicle. With the engine
switch in ON, within 4 seconds of
the jam protection function or
catch protection function activat-
ing, continuously operate the
power window switch in the
one-touch closing direction or
one-touch opening direction so
that the door window can be
opened and closed.
●If the door window cannot be
opened and closed even when
performing the above operations,
perform the follo wing procedure
for function initialization.
1 Turn the engine switch to ON.
2 Pull and hold the power window
switch in the on e-touch closing
direction and completely close
the door window.
3 Release the power window
switch for a m oment, resume
pulling the switch in the
one-touch closing direction, and
hold it there for approximately 6
seconds or more.
4 Press and hold the power win-
dow switch in the one-touch
opening direction. After the door
window is completely opened,
continue holding the switch for
an additional 1 second or more.
5 Release the power window
switch for a m oment, resume
Power windows
Opening and closing the
power windows
Page 121 of 436
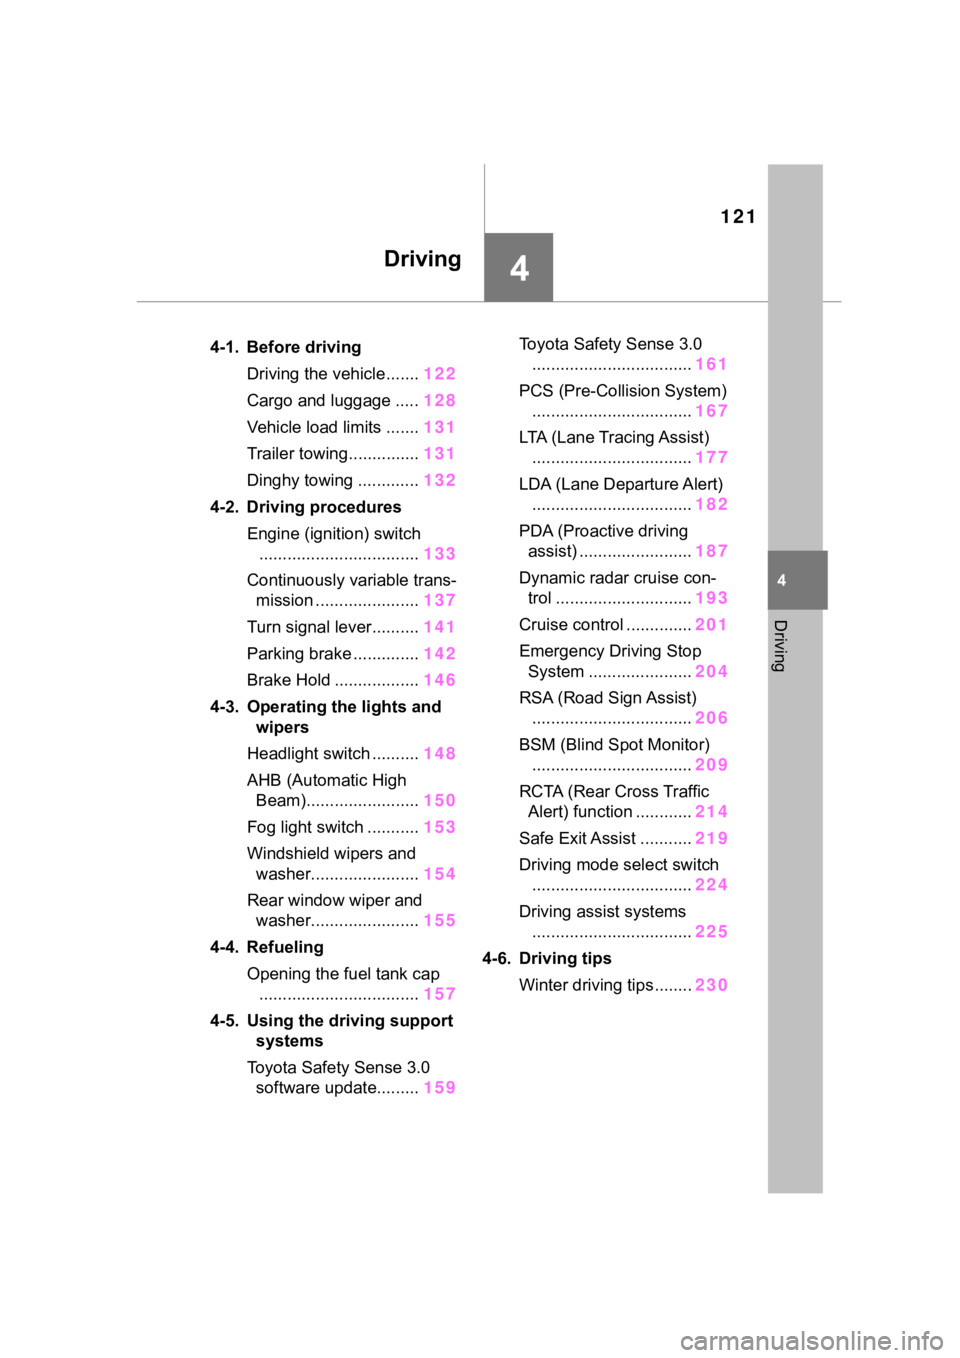
121
4
4
Driving
Driving
.4-1. Before drivingDriving the vehicle....... 122
Cargo and luggage ..... 128
Vehicle load limits ....... 131
Trailer towing............... 131
Dinghy towing ............. 132
4-2. Driving procedures Engine (ignition) switch.................................. 133
Continuously variable trans- mission ...................... 137
Turn signal lever.......... 141
Parking brake .............. 142
Brake Hold .................. 146
4-3. Operating the lights and wipers
Headlight switch .......... 148
AHB (Automatic High Beam)........................ 150
Fog light switch ........... 153
Windshield wipers and washer....................... 154
Rear window wiper and washer....................... 155
4-4. Refueling Opening the fuel tank cap.................................. 157
4-5. Using the driving support
systems
Toyota Safety Sense 3.0 software update......... 159Toyota Safety Sense 3.0
.................................. 161
PCS (Pre-Collision System) .................................. 167
LTA (Lane Tracing Assist) .................................. 177
LDA (Lane Departure Alert) .................................. 182
PDA (Proactive driving assist) ........................ 187
Dynamic radar cruise con- trol ............................. 193
Cruise control .............. 201
Emergency Driving Stop System ...................... 204
RSA (Road Sign Assist) .................................. 206
BSM (Blind Spot Monitor) .................................. 209
RCTA (Rear Cross Traffic Alert) function ............ 214
Safe Exit Assist ........... 219
Driving mode select switch .................................. 224
Driving assist systems .................................. 225
4-6. Driving tips Winter driving tips........ 230