run flat TOYOTA COROLLA HYBRID 2020 Owners Manual (in English)
[x] Cancel search | Manufacturer: TOYOTA, Model Year: 2020, Model line: COROLLA HYBRID, Model: TOYOTA COROLLA HYBRID 2020Pages: 556, PDF Size: 19.28 MB
Page 4 of 556

4TABLE OF CONTENTS
COROLLA HV_U
5-13. Phone operation (Hands-free system for cellular phones)
Quick reference .................. 317
Some basics ...................... 318
Placing a call using the Blue-
tooth
® hands-free system
......................................... 322
Receiving a call using the Blue-
tooth
® hands-free system
......................................... 325
Talking on the Bluetooth
®
hands-free system ........... 326
Bluetooth
® phone message
function ............................ 328
5-14. Phone settings Setup .................................. 332
5-15. What to do if... (Bluetooth
®)
Troubleshooting ................. 341
5-16. Toyota Entune overview Toyota Entune .................... 345
Type A: Function achieved by using a smart phone or DCM......................................... 346
Type B: Function achieved by using DCM and the system
......................................... 349
Type C: Function achieved by using DCM ....................... 350
5-17. Toyota Entune operation Toyota Entune App Suite Con-nect .................................. 351
5-18. Toyota Entune App Suite Con- nect settings
Setup .................................. 355
6-1. Using the air conditioning system and defogger
Automatic air conditioning sys-tem ................................... 358Heated steering wheel/seat
heaters ............................. 365
6-2. Using the interior lights Interior lights list ................. 367
6-3. Using the storage features List of storage features ...... 369
Trunk features .................... 372
6-4. Other interior features Other interior features ........ 373
Garage door opener........... 383
7-1. Maintenance and care Cleaning and protecting the vehicle exterior................. 392
Cleaning and protecting the vehicle interior.................. 394
7-2. Maintenance Maintenance requirements......................................... 397
General maintenance......... 398
Emission inspection and mainte- nance (I/M) programs ...... 401
7-3. Do-it-yourself maintenance Do-it-yourself service precau-tions ................................. 402
Hood .................................. 404
Positioning a floor jack ....... 405
Engine compartment .......... 406
Tires ................................... 413
Tire inflation pressure......... 422
Wheels ............................... 424
Air conditioning filter........... 426
Cleaning the hybrid battery (trac- tion battery) air intake vent and
filter .................................. 427
Electronic key battery......... 431
Checking and replacing fuses ......................................... 433
Light bulbs.......................... 435
6Interior features
7Maintenance and care
Page 14 of 556
14Pictorial index
COROLLA HV_U
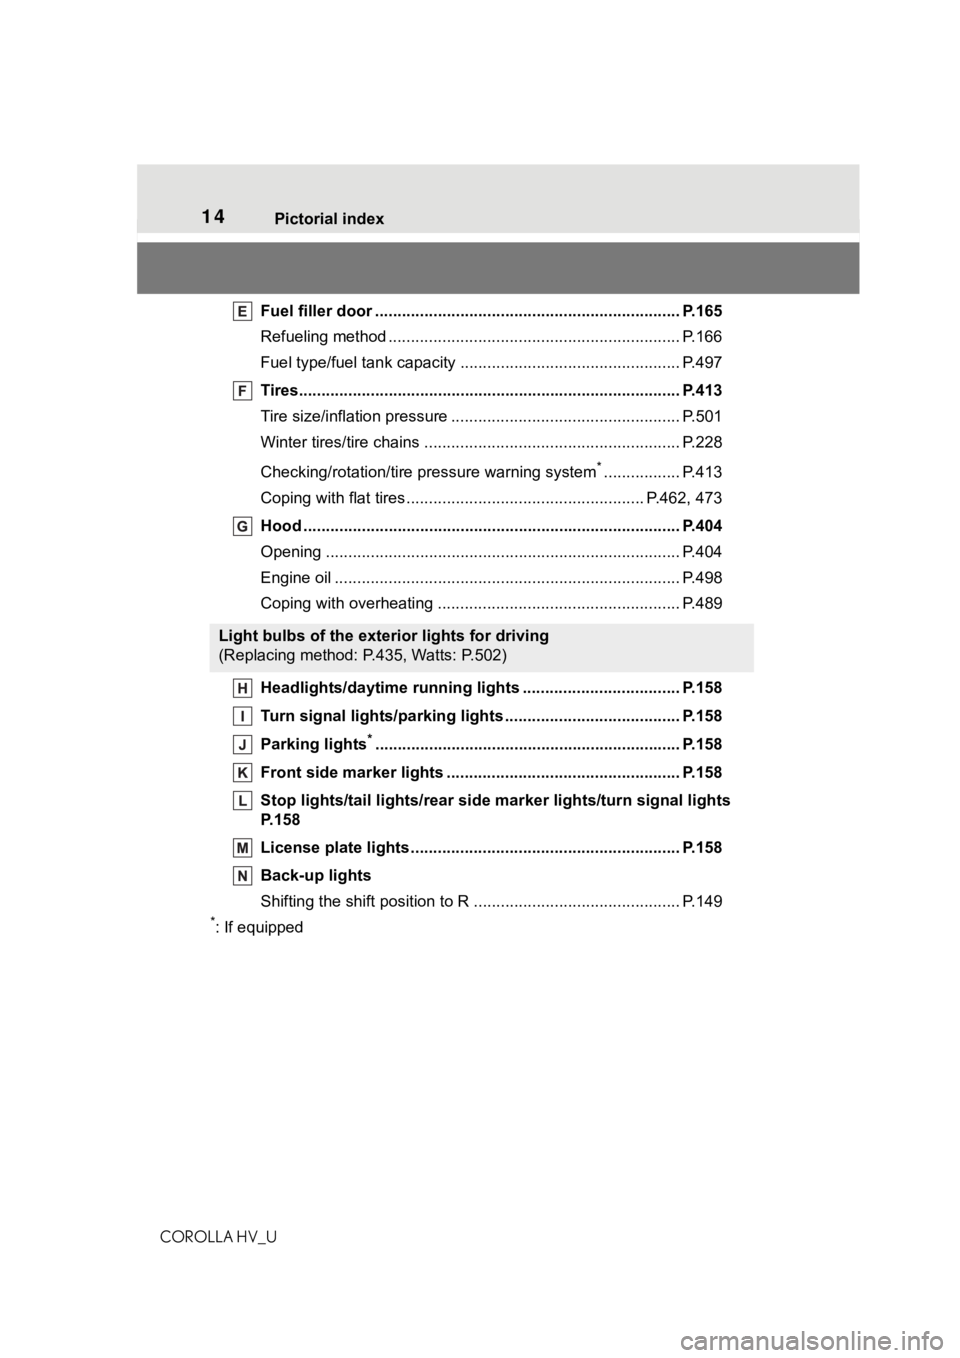
Fuel filler door ............................................... ..................... P.165
Refueling method ............................................... .................. P.166
Fuel type/fuel tan k capacity ................................... .............. P.497
Tires.......................................................... ........................... P.413
Tire size/inflation pressure ................................... ................ P.501
Winter tires/tire chains ....................................... .................. P.228
Checking/rotation/tire pressure warning system
*................. P.413
Coping with flat tires......................................... ............ P.462, 473
Hood ........................................................... ......................... P.404
Opening ............................................................................... P.404
Engine oil ..................................................... ........................ P.498
Coping with overheating ...................................................... P.489
Headlights/daytime running lights .............................. ..... P.158
Turn signal lights/parking lights .............................. ......... P.158
Parking lights
*............................................................... ..... P.158
Front side marker lights ....................................... ............. P.158
Stop lights/tail lights/rear side marker lights/turn signal lig hts
P. 1 5 8
License plate lights........................................... ................. P.158
Back-up lights
Shifting the shift position to R ............................... ............... P.149
*: If equipped
Light bulbs of the exterior lights for driving
(Replacing method: P.435, Watts: P.502)
Page 150 of 556
1504-2. Driving procedures
COROLLA HV_U
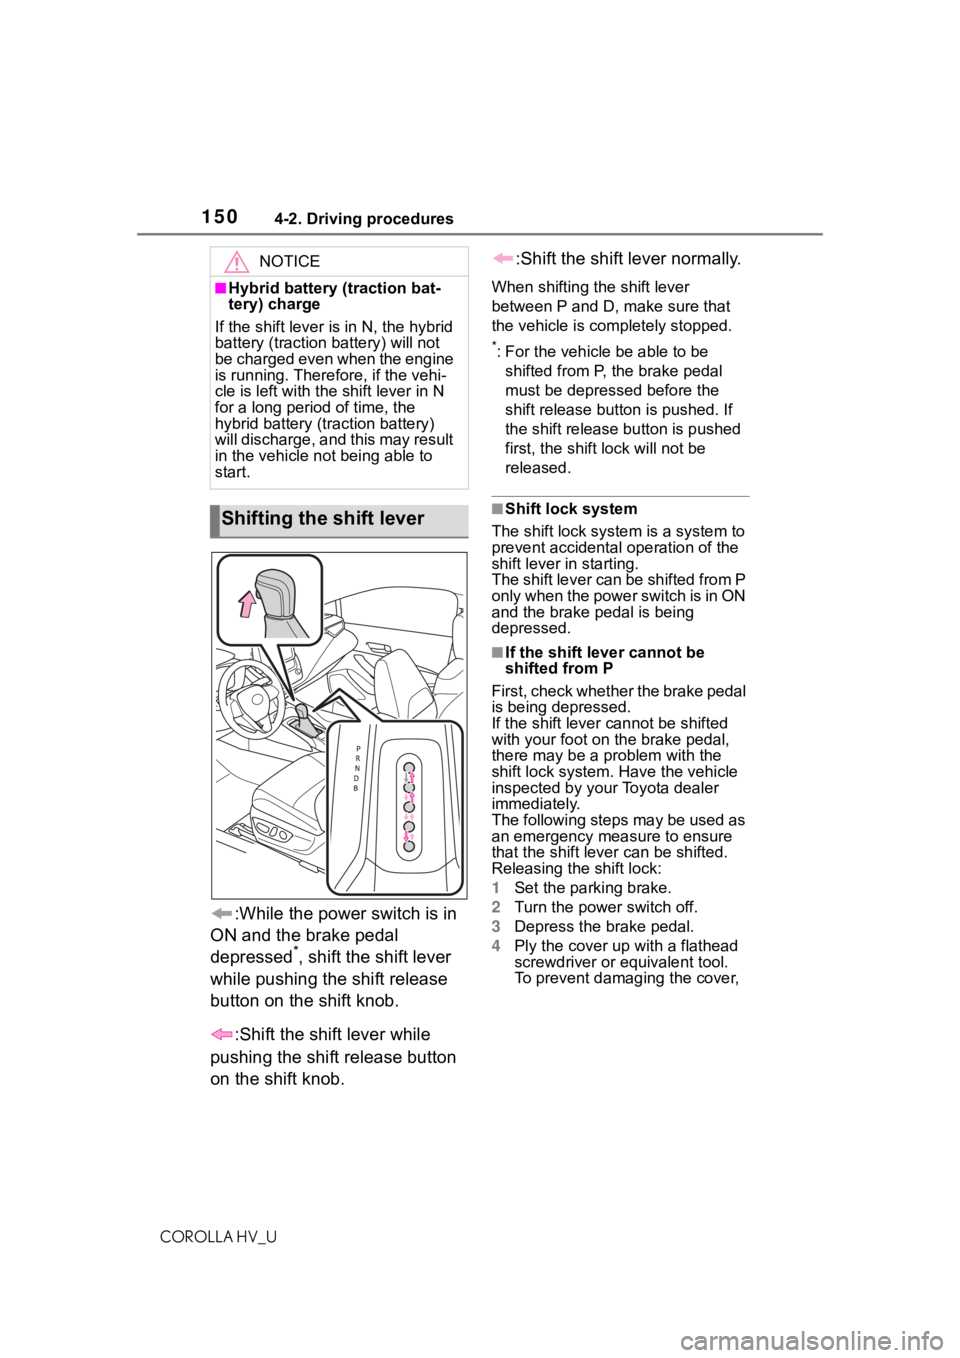
:While the power switch is in
ON and the brake pedal
depressed
*, shift the shift lever
while pushing the shift release
button on the shift knob.
:Shift the shift lever while
pushing the shift release button
on the shift knob. :Shift the shift lever normally.
When shifting the shift lever
between P and D, make sure that
the vehicle is completely stopped.
*: For the vehicle be able to be
shifted from P, the brake pedal
must be depressed before the
shift release button is pushed. If
the shift release button is pushed
first, the shift lock will not be
released.
■Shift lock system
The shift lock syste m is a system to
prevent accidental operation of the
shift lever in starting.
The shift lever can be shifted from P
only when the power switch is in ON
and the brake pedal is being
depressed.
■If the shift lever cannot be
shifted from P
First, check whether the brake pedal
is being depressed.
If the shift lever cannot be shifted
with your foot on the brake pedal,
there may be a p roblem with the
shift lock system. Have the vehicle
inspected by your Toyota dealer
immediately.
The following steps may be used as
an emergency measure to ensure
that the shift lev er can be shifted.
Releasing the shift lock:
1 Set the parking brake.
2 Turn the power switch off.
3 Depress the brake pedal.
4 Ply the cover up with a flathead
screwdriver or equivalent tool.
To prevent damaging the cover,
NOTICE
■Hybrid battery (traction bat-
tery) charge
If the shift lever is in N, the hybrid
battery (traction battery) will not
be charged even when the engine
is running. Theref ore, if the vehi-
cle is left with th e shift lever in N
for a long period of time, the
hybrid battery (tr action battery)
will discharge, and this may result
in the vehicle n ot being able to
start.
Shifting the shift lever
Page 218 of 556
2184-5. Using the driving support systems
COROLLA HV_U
WA R N I N G
■When using the rear view
monitor system
The rear view monitor system is a
supplemental device intended to
assist the driver when backing up.
When backing up, be sure to visu-
ally check all around the vehicle
both directly and using the mirrors
before proceeding. Observe the
following precautions to avoid an
accident that could result in death
or serious injuries.
●Never depend on t he rear view
monitor system entirely when
backing up. The image and the
position of the guide lines dis-
played on the screen may differ
from the actual state. Use cau-
tion, just as you would when
backing up any vehicle.
●Be sure to back up slowly,
depressing the brake pedal to
control vehicle speed.
●The instructions given are only
guide lines. When and how
much to turn the steering wheel
will vary according to traffic con-
ditions, road surface condi-
tions, vehicle condition, etc.
when parking. It is necessary to
be fully aware o f this before
using the rear view monitor sys-
tem.
●When parking, be sure to check
that the par king space will
accommodate your vehicle
before maneuveri ng into it.
●Do not use the rear view moni-
tor system in the following
cases:
• On icy or slick road surfaces, or in snow
• When using tire chains or emer- gency tires
• When the trunk is not closed completely
• On roads that are not flat or straight, such as curves or
slopes
●In low temperatures, the screen
may darken or the image may
become faint. The image could
distort when the vehicle is mov-
ing, or you may become unable
to see the image on the screen.
Be sure to visually check all
around the vehicle both directly
and using the mirrors before
proceeding.
●If the tire sizes are changed, the
position of the fixed guide lines
displayed on the screen may
change.
●The camera uses a special lens.
The distances between objects
and pedestrians that appear in
the image displayed on the
screen will differ from the actual
distances. ( P.213)
NOTICE
■How to use the camera
●The rear view monitor system
may not operate properly in the
following cases.
• If the back of the vehicle is hit, the position and mounting angle
of the camera may change.
• As the camera has a water proof construction, do not
detach, disassemble or modify
it. This may cause incorrect
operation.
Page 416 of 556

4167-3. Do-it-yourself maintenance
COROLLA HV_U
low tire inflation pressure before
serious problems arise.
If the tire pressure drops below
a predetermined level, the driver
is warned by a warning light.
(P.454)
■Routine tire inflation pressure
checks
The tire pressure warning system
does not replace routine tire inflation
pressure checks. Make sure to
check tire inflation pressure as part
of your routine of daily vehicle
checks.
■Situations in which the tire
pressure warning system may
not operate properly
●In the following cases, the tire
pressure warning system may not
operate properly.
• If non-genuine Toyota wheels are used.
• A tire has been replaced with a tire that is not an OE (Original
Equipment) tire.
• A tire has been replaced with a tire that is not of the specified size.
• Tire chains, etc. are equipped.
• An auxiliary-supported run-flat tire
is equipped.
• If a window tint that affects the radio wave signals is installed.
• If there is a lot of snow or ice on the vehicle, particularly around the
wheels or wheel housings.
• If the tire inflation pressure is extremely higher than the speci-
fied level.
• If tires not equipped with tire pres- sure warning valves and transmit-
ters are used.
• If the ID code on the tire pressure warning valves and transmitters is
not registered in the tire pressure
warning computer.
●Performance may be affected in
the following situations.
• Near a TV tower, electric power plant, gas station, radio station,
large display, airpo
rt or other facil-
ity that generates strong radio
waves or electrical noise.
• When carrying a portable radio, cellular phone, cordless phone or
other wireless communication
device.
●When the vehicle is parked, the
time taken for the warning to start
or go off could be extended.
●When tire inflation pressure
declines rapidly for example when
a tire has burst, the warning may
not function.
■Warning performance of the tire
pressure warning system
The warning of the tire pressure
warning system w ill change in
accordance with driving conditions.
For this reason, the system may
give a warning even if the tire pres-
sure does not reach a low enough
level, or if the p ressure is higher
than the pressure that was adjusted
to when the system w as initialized.
Page 437 of 556
4377-3. Do-it-yourself maintenance
COROLLA HV_U
7
Maintenance and care
3 When installing, reverse the
steps listed.
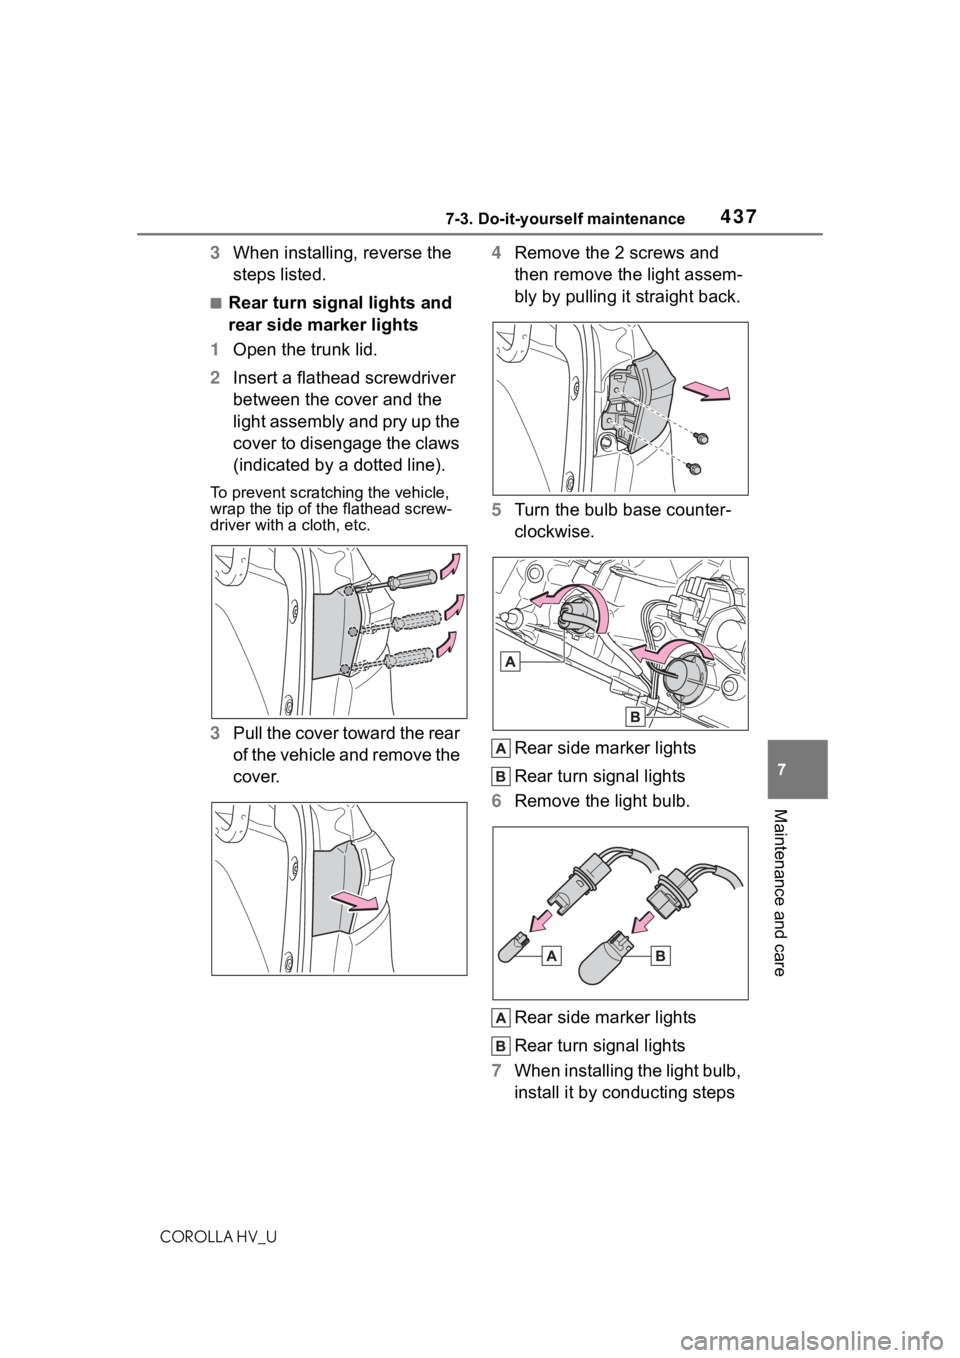
■Rear turn signal lights and
rear side marker lights
1 Open the trunk lid.
2 Insert a flathead screwdriver
between the cover and the
light assembly and pry up the
cover to disengage the claws
(indicated by a dotted line).
To prevent scratching the vehicle,
wrap the tip of the flathead screw-
driver with a cloth, etc.
3Pull the cover toward the rear
of the vehicle and remove the
cover. 4
Remove the 2 screws and
then remove the light assem-
bly by pulling it straight back.
5 Turn the bulb base counter-
clockwise.
Rear side marker lights
Rear turn signal lights
6 Remove the light bulb.
Rear side marker lights
Rear turn signal lights
7 When installing the light bulb,
install it by conducting steps
Page 448 of 556
4488-2. Steps to take in an emergency
COROLLA HV_U
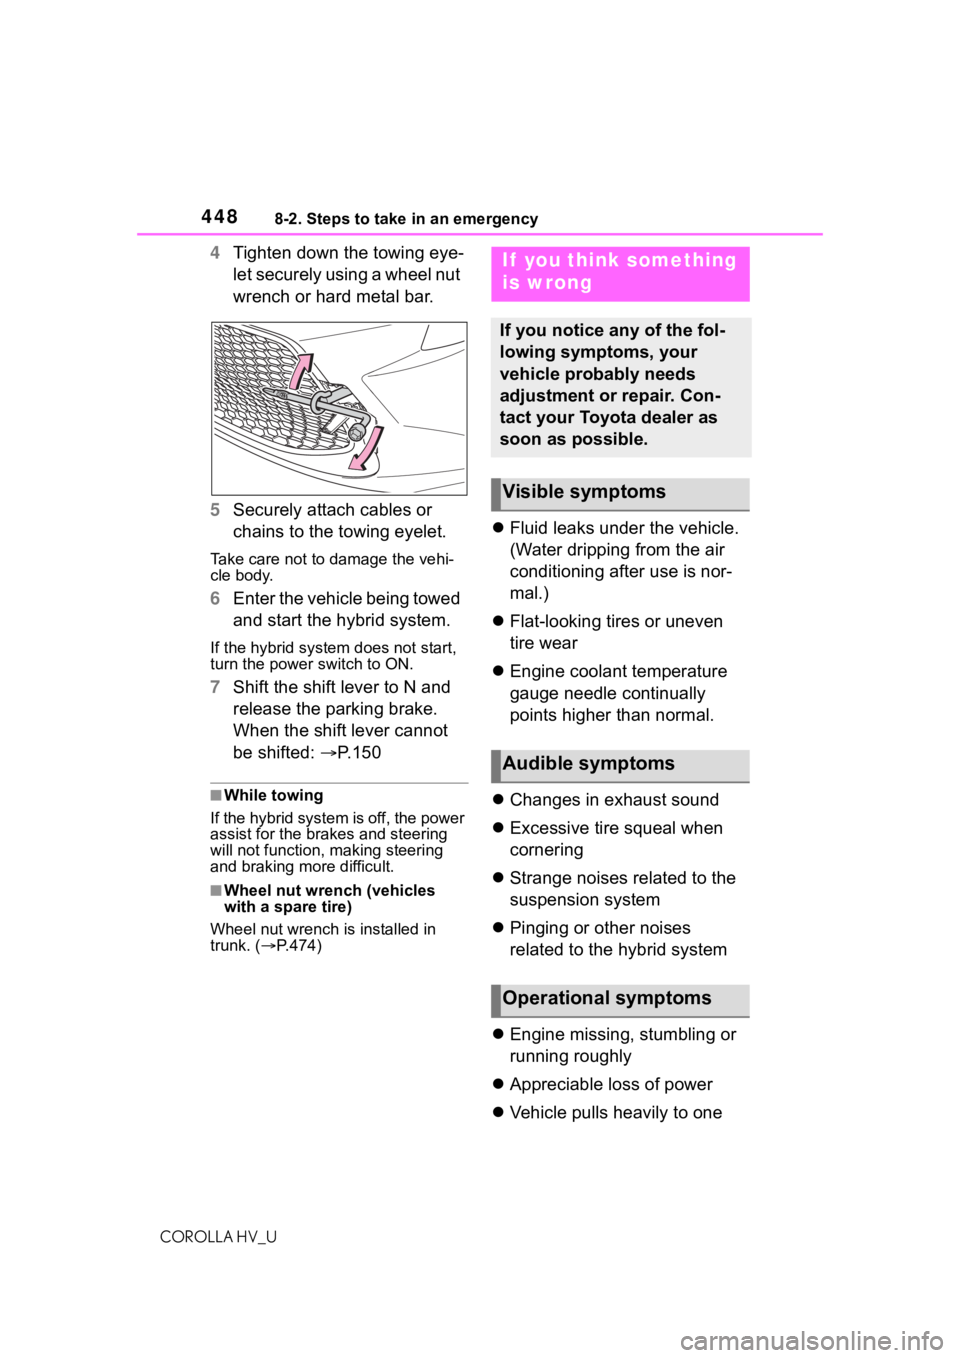
4Tighten down the towing eye-
let securely using a wheel nut
wrench or hard metal bar.
5 Securely attach cables or
chains to the towing eyelet.
Take care not to damage the vehi-
cle body.
6Enter the vehicle being towed
and start the hybrid system.
If the hybrid system does not start,
turn the power switch to ON.
7Shift the shift lever to N and
release the parking brake.
When the shift lever cannot
be shifted: P. 1 5 0
■While towing
If the hybrid system is off, the power
assist for the brakes and steering
will not function, making steering
and braking more difficult.
■Wheel nut wrench (vehicles
with a spare tire)
Wheel nut wrench is installed in
trunk. ( P.474)
Fluid leaks under the vehicle.
(Water dripping from the air
conditioning after use is nor-
mal.)
Flat-looking tires or uneven
tire wear
Engine coolant temperature
gauge needle continually
points higher than normal.
Changes in exhaust sound
Excessive tire squeal when
cornering
Strange noises related to the
suspension system
Pinging or other noises
related to the hybrid system
Engine missing, stumbling or
running roughly
Appreciable loss of power
Vehicle pulls heavily to one
If you think something
is wrong
If you notice any of the fol-
lowing symptoms, your
vehicle probably needs
adjustment or repair. Con-
tact your Toyota dealer as
soon as possible.
Visible symptoms
Audible symptoms
Operational symptoms
Page 469 of 556
4698-2. Steps to take in an emergency
COROLLA HV_U
8
When trouble arises
to be repaired. Turn the compres-
sor switch off and contact your Toy-
ota dealer.
If the tire inflation pressure exceeds
the specified air pressure, let out
some air to adjust t he tire inflation
pressure. ( P.470, 501)
15 With the compressor switch
off, disconnect the hose from
the valve on the tire and then
pull out the power plug from
the power outlet socket.
Some sealant may leak when the
hose is removed.
16 Install the valve cap onto the
valve of the emergency
repaired tire.
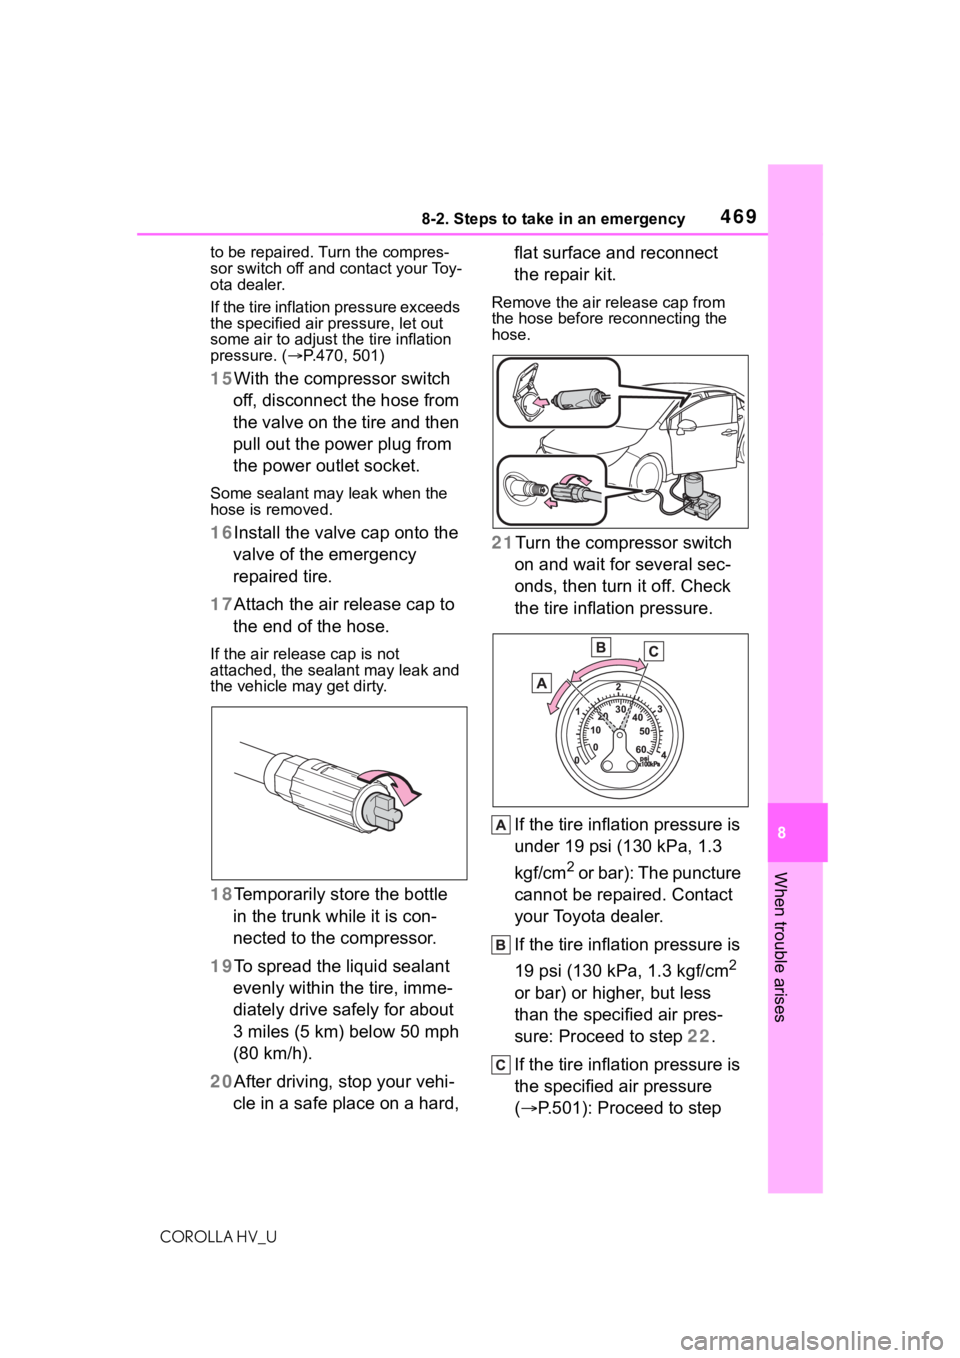
17 Attach the air release cap to
the end of the hose.
If the air release cap is not
attached, the sealant may leak and
the vehicle ma y get dirty.
18Temporarily store the bottle
in the trunk while it is con-
nected to the compressor.
19 To spread the liquid sealant
evenly within the tire, imme-
diately drive safely for about
3 miles (5 km) below 50 mph
(80 km/h).
20 After driving, stop your vehi-
cle in a safe place on a hard, flat surface and reconnect
the repair kit.
Remove the air release cap from
the hose before
reconnecting the
hose.
21Turn the compressor switch
on and wait for several sec-
onds, then turn it off. Check
the tire inflation pressure.
If the tire inflation pressure is
under 19 psi (130 kPa, 1.3
kgf/cm
2 or bar): The puncture
cannot be repaired. Contact
your Toyota dealer.
If the tire inflation pressure is
19 psi (130 kPa, 1.3 kgf/cm
2
or bar) or higher, but less
than the specified air pres-
sure: Proceed to step 22.
If the tire inflation pressure is
the specified air pressure
( P.501): Proceed to step
Page 470 of 556
4708-2. Steps to take in an emergency
COROLLA HV_U
23.
22 Turn the compressor switch
on to inflate the tire until the
specified air pressure is
reached. Drive for about 3
miles (5 km) and then per-
form step 20.
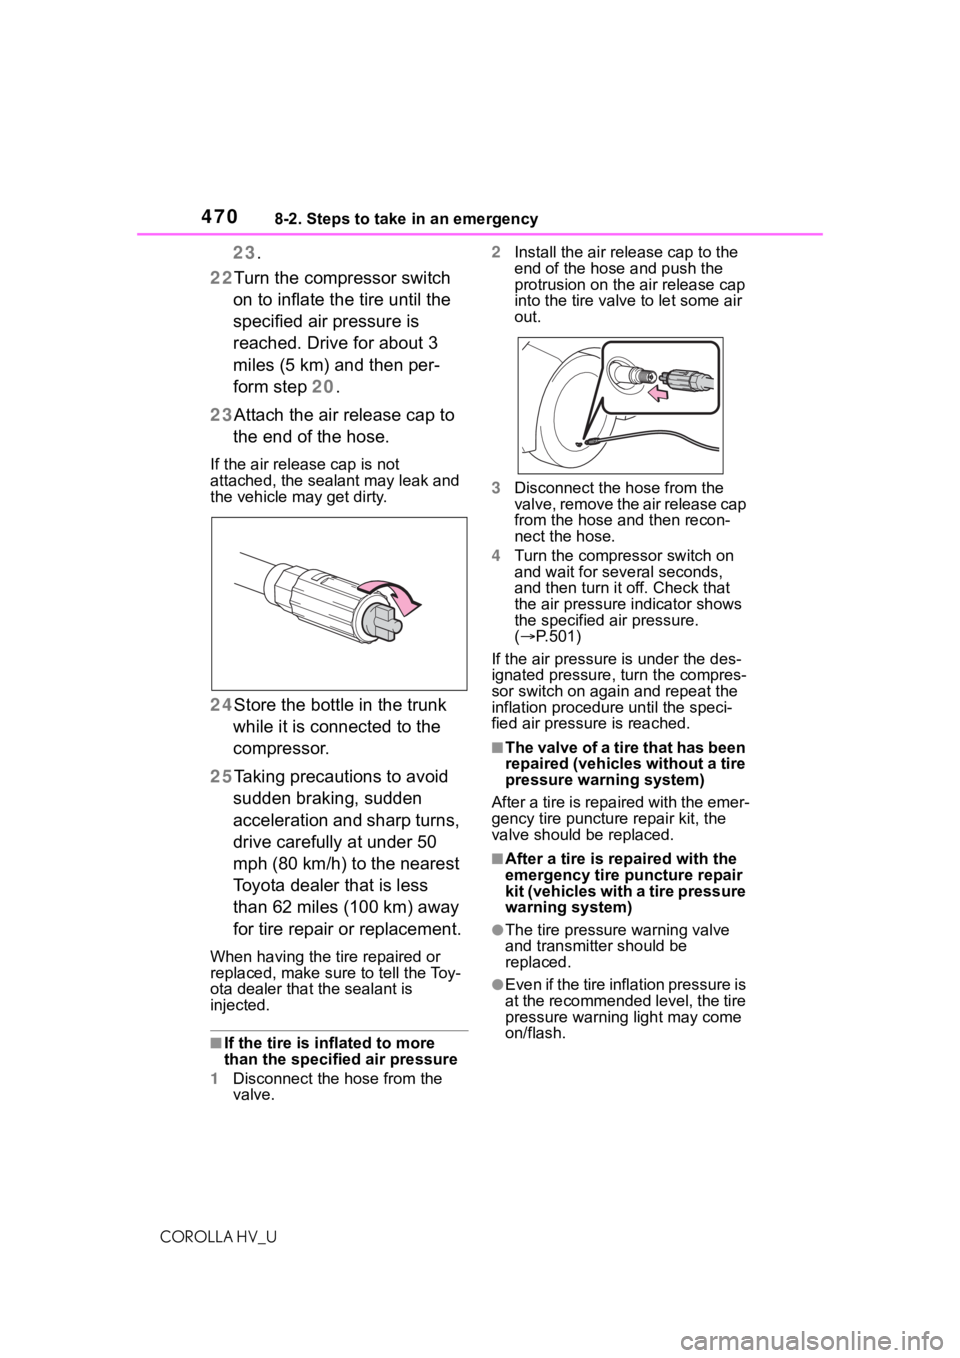
23 Attach the air release cap to
the end of the hose.
If the air release cap is not
attached, the sealant may leak and
the vehicle ma y get dirty.
24Store the bottle in the trunk
while it is connected to the
compressor.
25 Taking precautions to avoid
sudden braking, sudden
acceleration and sharp turns,
drive carefully at under 50
mph (80 km/h) to the nearest
Toyota dealer that is less
than 62 miles (100 km) away
for tire repair or replacement.
When having the tire repaired or
replaced, make sure to tell the Toy-
ota dealer that the sealant is
injected.
■If the tire is i nflated to more
than the specified air pressure
1 Disconnect the hose from the
valve. 2
Install the air release cap to the
end of the hose and push the
protrusion on the air release cap
into the tire valve to let some air
out.
3 Disconnect the hose from the
valve, remove the air release cap
from the hose an d then recon-
nect the hose.
4 Turn the compressor switch on
and wait for seve ral seconds,
and then turn it off. Check that
the air pressure indicator shows
the specified air pressure.
( P.501)
If the air pressure is under the des-
ignated pressure, turn the compres-
sor switch on again and repeat the
inflation procedure until the speci-
fied air pressure is reached.
■The valve of a tire that has been
repaired (vehicles without a tire
pressure warning system)
After a tire is repaired with the emer-
gency tire puncture repair kit, the
valve should be replaced.
■After a tire is re paired with the
emergency tire puncture repair
kit (vehicles with a tire pressure
warning system)
●The tire pressure warning valve
and transmitter should be
replaced.
●Even if the tire inflation pressure is
at the recommended level, the tire
pressure warning light may come
on/flash.
Page 472 of 556
4728-2. Steps to take in an emergency
COROLLA HV_U
WA R N I N G
• Tire inflation pressure. If the tire
inflation pressure is 19 psi (130
kPa, 1.3 kgf/cm
2 or bar) or less,
the tire may be severely dam-
aged.
NOTICE
■When performing an emer-
gency repair
●A tire should only be repaired
with the emergency tire punc-
ture repair kit if the damage is
caused by a shar p object such
as nail or screw passing through
the tire tread.
Do not remove the sharp object
from the tire. Removing the
object may widen the opening
and disenable emergency repair
with the repair kit.
●The repair kit is not waterproof.
Make sure that the repair kit is
not exposed to water, such as
when it is being used in the rain.
●Do not put the repair kit directly
onto dusty ground such as sand
at the side of the road. If the
repair kit vacuums up dust etc.,
a malfunction may occur.
■Precautions for the emer-
gency tire puncture repair kit
●The repair kit power source
should be 12 V DC suitable for
vehicle use. Do not connect the
repair kit to any other source.
●If fuel splatters on the repair kit,
the repair kit may deteriorate.
Take care not to allow fuel to
contact it.
●Place the repair kit in a storage
to prevent it from being exposed
to dirt or water.
●Store the repair kit in the trunk
out of reach of children.
●Do not disassemble or modify
the repair kit. Do not subject
parts such as the air pressure
indicator to impacts. This may
cause a malfunction.
■To avoid damage to the tire
pressure warning valves and
transmitters (vehicles with a
tire pressure warning system)
When a tire is repa ired with liquid
sealants, the tire pressure warn-
ing valve and transmitter may not
operate properly. If a liquid seal-
ant is used, contact your Toyota
dealer or other qualified service
shop as soon as possible. After
use of liquid sealant, make sure to
replace the tire p ressure warning
valve and transmitter when repair-
ing or replaci ng the tire. (P.418)