ESP TOYOTA DYNA 100/150 2014 Owners Manual (in English)
[x] Cancel search | Manufacturer: TOYOTA, Model Year: 2014, Model line: DYNA 100/150, Model: TOYOTA DYNA 100/150 2014Pages: 232, PDF Size: 14.97 MB
Page 21 of 232
KEYS AND DOORS15
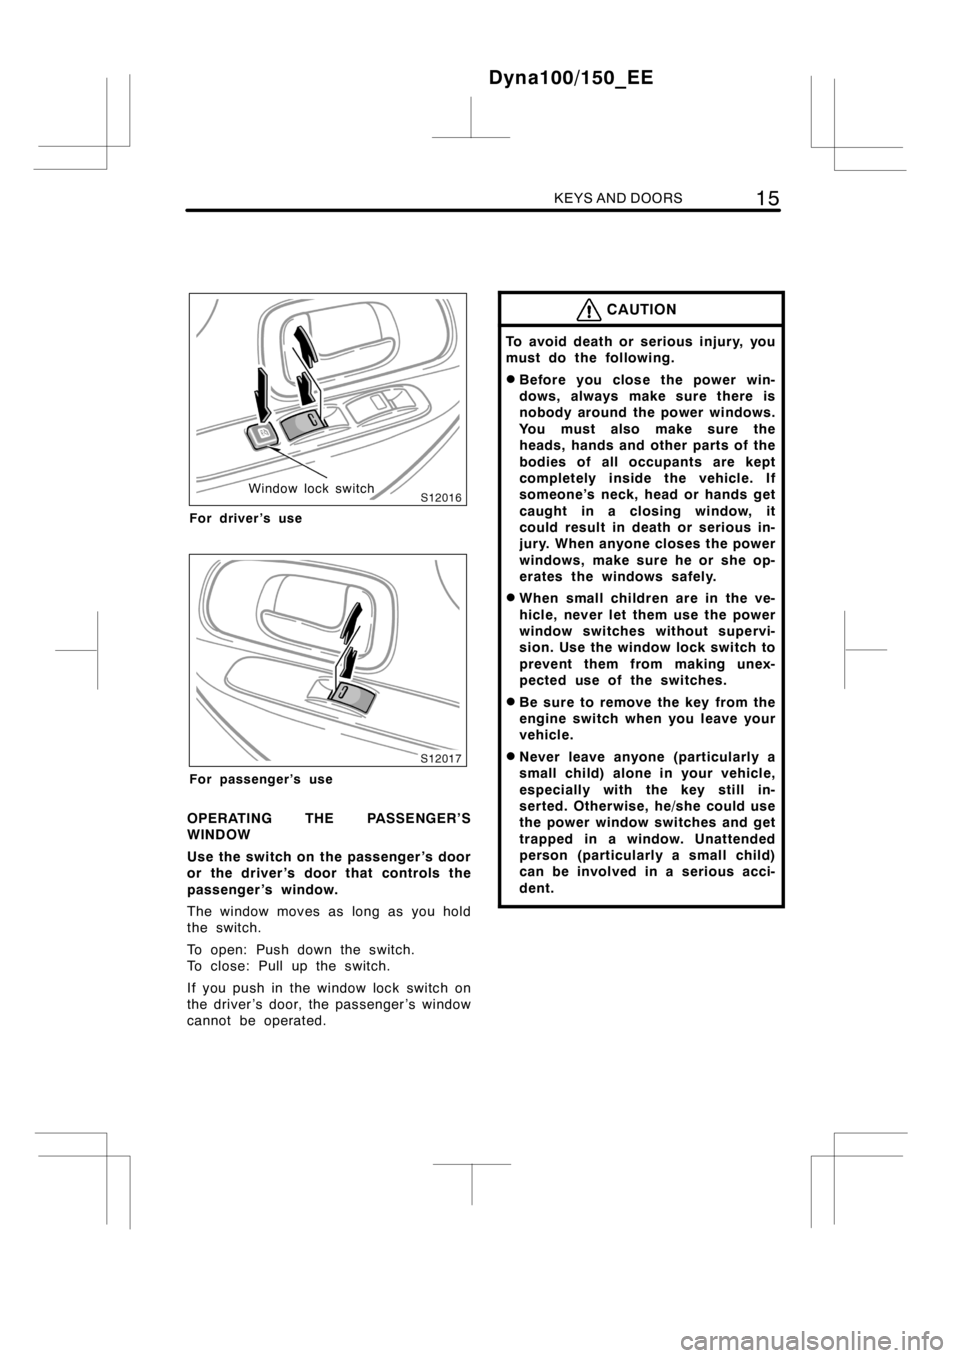
Window lock switch
For driver’s use
For passenger’s use
OPERATING THE PASSENGER’S
WINDOW
Use the switch on the passenger ’s door
or the driver ’s door that controls the
passenger ’s window.
The window moves as long as you hold
the switch.
To open: Push down the switch.
To close: Pull up the switch.
If you push in the window lock switch on
the driver ’s door, the passenger ’s window
cannot be operated.
CAUTION
To avoid death or serious injury, you
must do the following.
DBefore you close the power win-
dows, always make sure there is
nobody around the power windows.
You must also make sure the
heads, hands and other parts of the
bodies of all occupants are kept
completely inside the vehicle. If
someone’s neck, head or hands get
caught in a closing window, it
could result in death or serious in-
jury. When anyone closes the power
windows, make sure he or she op-
erates the windows safely.
DWhen small children are in the ve-
hicle, never let them use the power
window switches without supervi-
sion. Use the window lock switch to
prevent them from making unex-
pected use of the switches.
DBe sure to remove the key from the
engine switch when you leave your
vehicle.
DNever leave anyone (particularly a
small child) alone in your vehicle,
especially with the key still in-
serted. Otherwise, he/she could use
the power window switches and get
trapped in a window. Unattended
person (particularly a small child)
can be involved in a serious acci-
dent.
Dyna100/150_EE
Page 33 of 232
SEATS, SEAT BELTS, STEERING WHEEL AND MIRRORS27
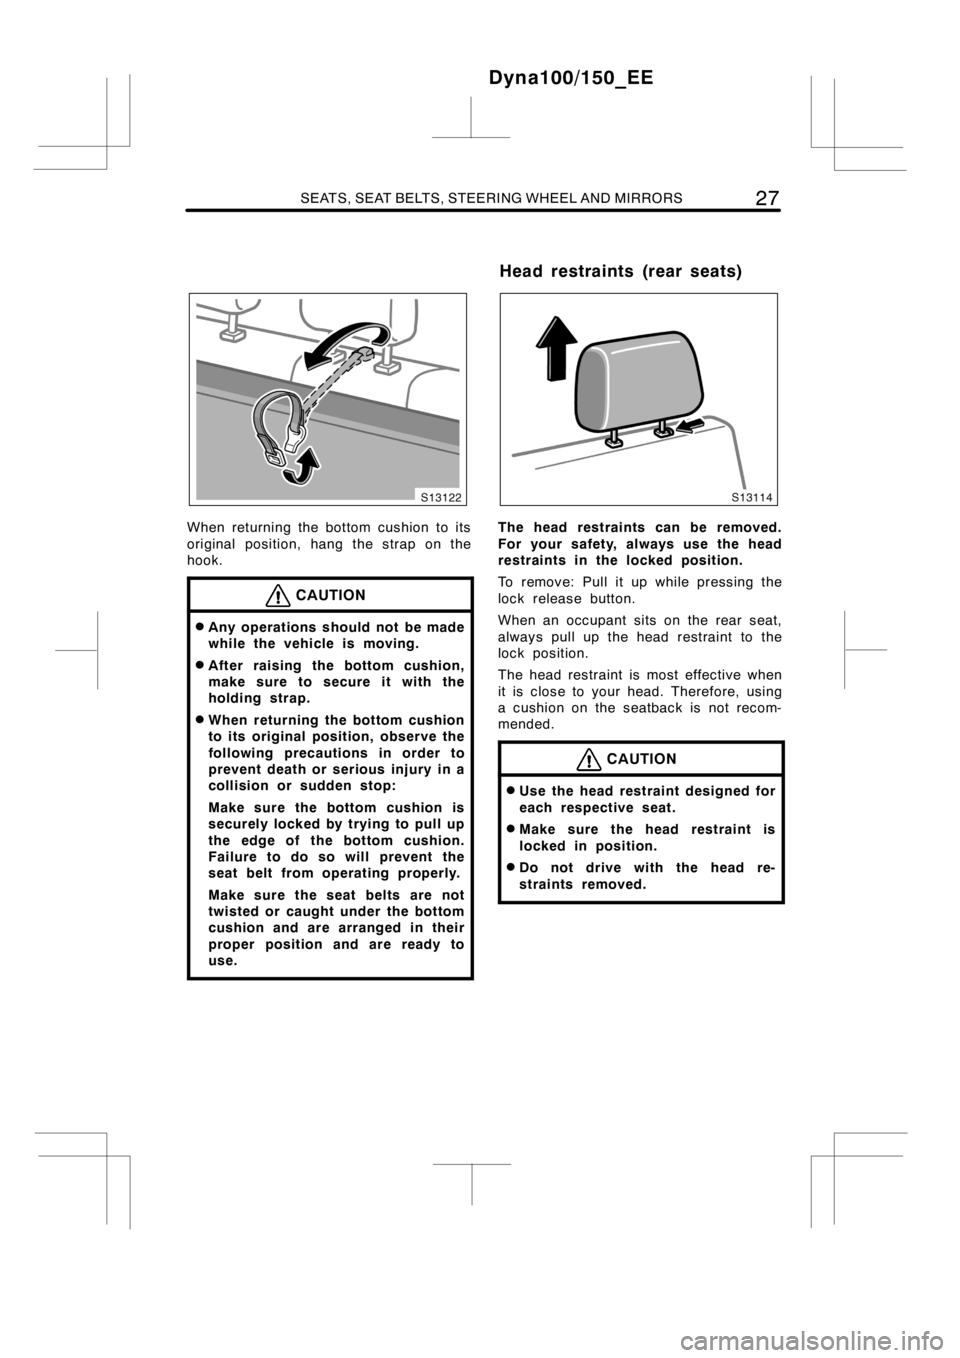
When returning the bottom cushion to its
original position, hang the strap on the
hook.
CAUTION
DAny operations should not be made
while the vehicle is moving.
DAfter raising the bottom cushion,
make sure to secure it with the
holding strap.
DWhen returning the bottom cushion
to its original position, observe the
following precautions in order to
prevent death or serious injury in a
collision or sudden stop:
Make sure the bottom cushion is
securely locked by trying to pull up
the edge of the bottom cushion.
Failure to do so will prevent the
seat belt from operating properly.
Make sure the seat belts are not
twisted or caught under the bottom
cushion and are arranged in their
proper position and are ready to
use.
The head restraints can be removed.
For your safety, always use the head
restraints in the locked position.
To remove: Pull it up while pressing the
lock release button.
When an occupant sits on the rear seat,
always pull up the head restraint to the
lock position.
The head restraint is most effective when
it is close to your head. Therefore, using
a cushion on the seatback is not recom-
mended.
CAUTION
DUse the head restraint designed for
each respective seat.
DMake sure the head restraint is
locked in position.
DDo not drive with the head re-
straints removed.
Dyna100/150_EE
Head restraints (rear seats)
Page 41 of 232
SEATS, SEAT BELTS, STEERING WHEEL AND MIRRORS35
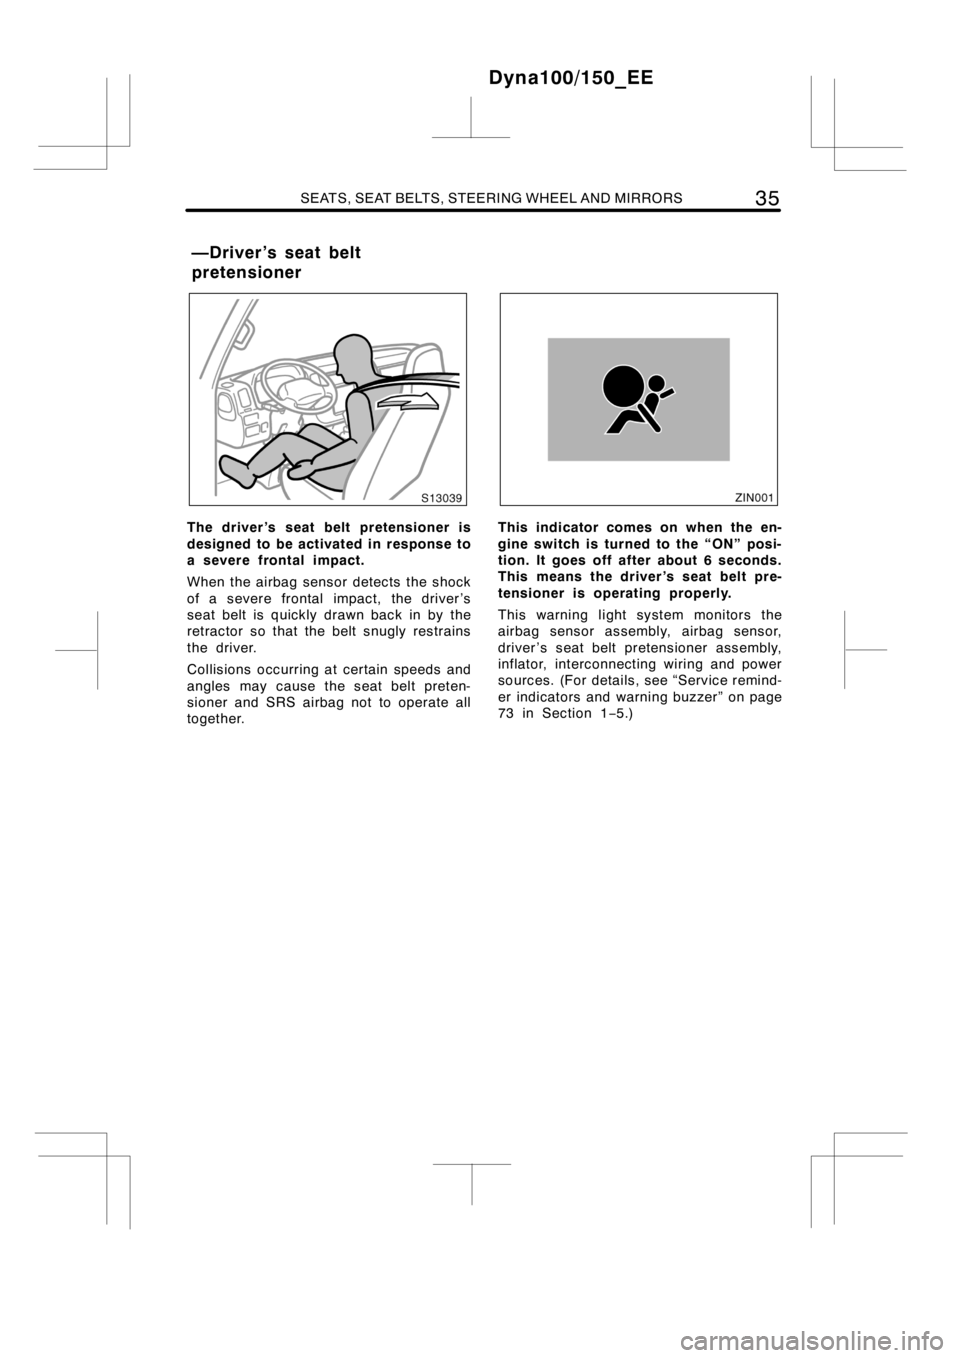
The driver ’s seat belt pretensioner is
designed to be activated in response to
a severe frontal impact.
When the airbag sensor detects the shock
of a severe frontal impact, the driver ’s
seat belt is quickly drawn back in by the
retractor so that the belt snugly restrains
the driver.
Collisionsoccurring at certain speeds and
angles may cause the seat belt preten-
sioner and SRS airbag not to operate all
together.This indicator comes on when the en-
gine switch is turned to the “ON” posi-
tion. It goes off after about 6 seconds.
This means the driver ’s seat belt pre-
tensioner is operating properly.
This warning light system monitors the
airbag sensor assembly, airbag sensor,
driver ’s seat belt pretensioner assembly,
inflator, interconnecting wiring and power
sources. (For details, see “Service remind-
er indicators and warning buzzer” on page
73 in Section 1−5.)
Dyna100/150_EE
—Driver’s seat belt
pretensioner
Page 44 of 232
38SEATS, SEAT BELTS, STEERING WHEEL AND MIRRORS
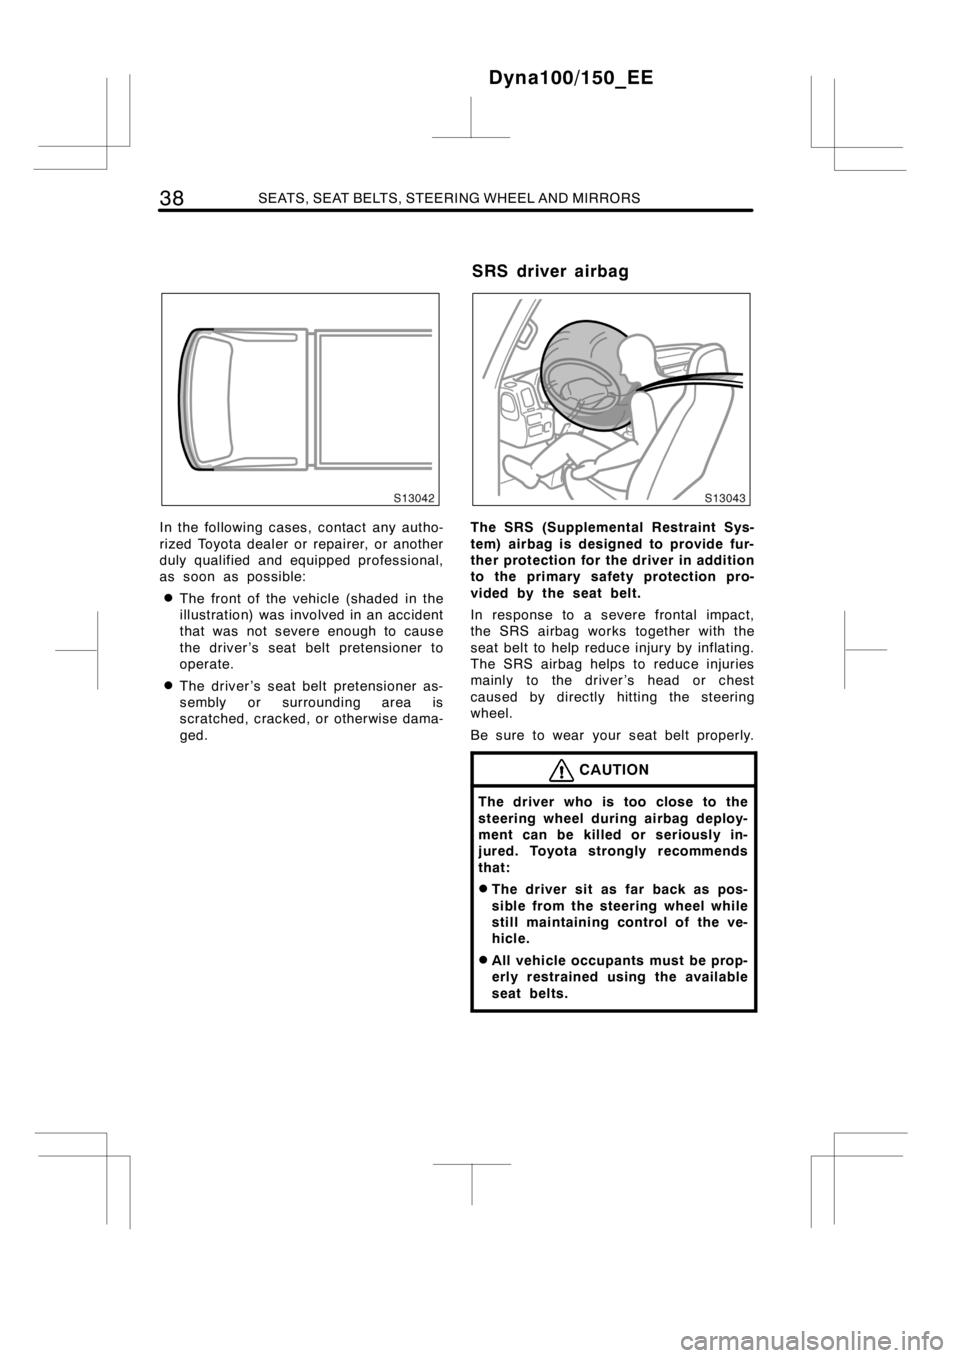
In the following cases, contact any autho-
rized Toyota dealer or repairer, or another
duly qualified and equipped professional,
as soon as possible:
DThe front of the vehicle (shaded in the
illustration) was involved in an accident
that was not severe enough to cause
the driver ’s seat belt pretensioner to
operate.
DThe driver ’s seat belt pretensioner as-
sembly or surrounding area is
scratched, cracked, or otherwise dama-
ged.
The SRS (Supplemental Restraint Sys-
tem) airbag is designed to provide fur-
ther protection for the driver in addition
to the primary safety protection pro-
vided by the seat belt.
In response to a severe frontal impact,
the SRS airbag works together with the
seat belt to help reduce injury by inflating.
The SRS airbag helps to reduce injuries
mainly to the driver ’s head or chest
caused by directly hitting the steering
wheel.
Be sure to wear your seat belt properly.
CAUTION
The driver who is too close to the
steering wheel during airbag deploy-
ment can be killed or seriously in-
jured. Toyota strongly recommends
that:
DThe driver sit as far back as pos-
sible from the steering wheel while
still maintaining control of the ve-
hicle.
DAll vehicle occupants must be prop-
erly restrained using the available
seat belts.
Dyna100/150_EE
SRS driver airbag
Page 45 of 232
SEATS, SEAT BELTS, STEERING WHEEL AND MIRRORS39
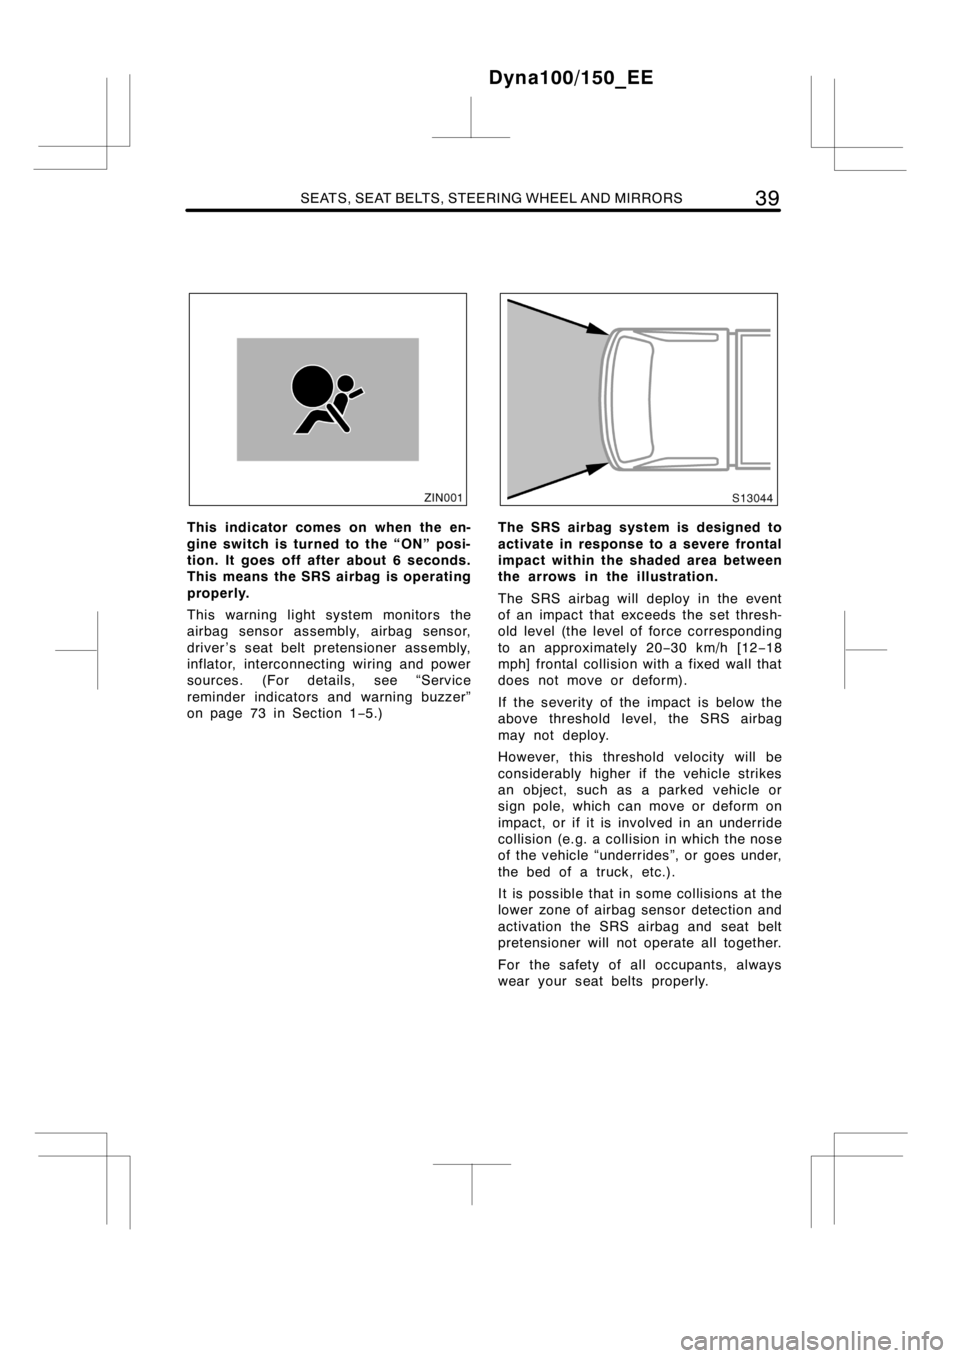
This indicator comes on when the en-
gine switch is turned to the “ON” posi-
tion. It goes off after about 6 seconds.
This means the SRS airbag is operating
properly.
This warning light system monitors the
airbag sensor assembly, airbag sensor,
driver ’s seat belt pretensioner assembly,
inflator, interconnecting wiring and power
sources. (For details, see “Service
reminder indicators and warning buzzer”
on page 73 in Section 1−5.)The SRS airbag system is designed to
activate in response to a severe frontal
impact within the shaded area between
the arrows in the illustration.
The SRS airbag will deploy in the event
of an impact that exceeds the set thresh-
old level (the level of force corresponding
to an approximately 20−30 km/h [12−18
mph] frontal collision with a fixed wall that
does not move or deform).
If the severity of the impact is below the
above threshold level, the SRS airbag
may not deploy.
However, this threshold velocity will be
considerably higher if the vehicle strikes
an object, such as a parked vehicle or
sign pole, which can move or deform on
impact, or if it is involved in an underride
collision (e.g. a collision in which the nose
of the vehicle “underrides”, or goes under,
the bed of a truck, etc.).
It is possible that in some collisions at the
lower zone of airbag sensor detection and
activation the SRS airbag and seat belt
pretensioner will not operate all together.
For the safety of all occupants, always
wear your seat belts properly.
Dyna100/150_EE
Page 123 of 232

INFORMATION BEFORE DRIVING YOUR TOYOTA11 7
When the anti−lock brake system is ac-
tivated, the following conditions may
occur. They do not indicate a malfunc-
tion of the system:
DYou may hear the anti−lock brake sys-
tem operating and feel the brake pedal
pulsating and the vibrations of the ve-
hicle body and steering wheel. You
may also hear the motor sound from
the area around the front axle even
after the vehicle is stopped.
DAt the end of the anti−lock brake sys-
tem activation, the brake pedal may
movealittleforward.
CAUTION
Do not overestimate the anti−lock
brake system: Although the anti−lock
brake system assists in providing ve-
hicle control, it is still important to
drive with all due care and maintain
a moderate speed and safe distance
from the vehicle in front of you, be-
cause there are limits to the vehicle
stability and effectiveness of steering
wheel operation even with the anti−
lock brake system on.
If tire grip performance exceeds its
capability, or if hydroplaning occurs
during high speed driving in the rain,
the anti−lock brake system does not
provide vehicle control.
Anti−lock brake system is not de-
signed to shorten the stopping dis-
tance: Always drive at moderate
speed and maintain a safe distance
from the vehicle in front of you.
Compared with vehicles without an
anti−lock brake system, your vehicle
may require a longer stopping dis-
tance in the following cases:
DDriving on rough, gravel or snow−
covered roads.
DDriving with tire chains installed.
DDriving over the steps such as the
joints on the road.
DDriving on roads where the road
surface is pitted or has other differ-
ences in surface height.
Install all tires of specified size at
appropriate pressure: The anti−lock
brake system detects vehicle speeds
using the speed sensors for respec-
tive wheels’ turning speeds. The use
of tires other than specified may fail
to detect the accurate turning speed
resulting in a longer stopping dis-
tance.
Dyna100/150_EE
Page 133 of 232

STARTING AND DRIVING127
Instruments and controls.Especially
make sure the service reminder indicators,
instrument lights, and defroster are work-
ing.
Brakes.Make sure the pedal has enough
clearance.
Spare fuses.Make sure you have spare
fuses. They should cover all the amperage
ratings designated on the fuse box lid.
In the engine compartment
Coolant level.Make sure the coolant lev-
el is correct. (See page 190 in Section
7−2 for instructions.)
Wiring.Look for damaged, loose, or dis-
connected wires.
Fuel lines.Check the lines for leaks or
loose connections.
AFTER STARTING THE ENGINE
Exhaust system.If you notice any
change in the sound of the exhaust or
smell exhaust fumes, have the cause lo-
cated and corrected immediately. (See
“Engine exhaust cautions” on page 114 in
Section 2.)
Engine oil level.Stop the engine and
check the dipstick with the vehicle parked
on a level spot. (See page 188 in Section
7−2 for instructions.)
WHILE DRIVING
Instruments.Make sure the speedometer
and gauges are working.
Brakes.In a safe place, check that the
brakes do not pull to one side when ap-
plied.
Anything unusual?Look for loose parts
and leaks. Listen for abnormal noises.
If everything looks O.K., set your mind at
ease and enjoy your trip!DAlways slow down in gusty crosswinds.
This will allow you much better control.
DDrive slowly onto curbs and, if pos-
sible, at a right angle. Avoid driving
onto high, sharp−edged objects and
other road hazards. Failure to do so
can lead to severe tire damage such
as a tire burst.
Drive slowly when passing over bumps
or travelling on abumpy road. Other-
wise, the impact could cause severe
damage to the tires and/or wheels.
DWhen parking on a hill, turn the front
wheels until they touch the curb so
that the vehicle will not roll. Apply the
parking brake, and place the transmis-
sion in first or reverse. If necessary,
block the wheels.
DWashing your vehicle or driving through
deep water may get the brakes wet. To
see whether they are wet, check that
there is no traffic near you, and then
press the pedal lightly. If you do not
feel a normal braking force, the brakes
are probably wet. To dry them, drive
the vehicle cautiously while lightly
pressing the brake pedal with the park-
ing brake applied. If they still do not
work safely, pull to the side of the road
and call any authorized Toyota dealer
or repairer, or another duly qualified
and equipped professional, for assis-
tance.
CAUTION
DBefore driving off, make sure the
parking brake is fully released and
the parking brake reminder light is
off.
DDo not leave your vehicle unat-
tended while the engine is running.
DDo not rest your foot on the brake
pedal while driving. It can cause
dangerous overheating, needless
wear, and poor fuel economy.
Dyna100/150_EE
Tips for driving in various
conditions
Page 134 of 232

128STARTING AND DRIVING
DTo drive down a long or steep hill,
reduce your speed and downshift.
Remember, if you ride the brakes
excessively, they may overheat and
not work properly.
DBe careful when accelerating, up-
shifting, downshifting or braking on
a slippery surface. Sudden accelera-
tion or engine braking could cause
the vehicle to skid or spin.
DDo not continue normal driving
when the brakes are wet. If they are
wet, your vehicle will require a
longer stopping distance, and it
may pull to one side when the
brakes are applied. Also, the park-
ing brake will not hold the vehicle
securely.
NOTICE
zDo not depress the accelerator and
brake pedals at the same time dur-
ing driving, as this may restrain
driving torque.
zDo not use the accelerator pedal or
depress the accelerator and brake
pedals at the same time to hold the
vehicle on a hill.
Driving on a slippery road surface
Drive carefully when it is raining, because
visibility will be reduced, the windows may
become fogged−up, and the road will be
slippery.
DDrive carefully when it starts to rain,
because the road surface will be espe-
cially slippery.
DRefrain from high speeds when driving
on an expressway in the rain, because
there may be a layer of water between
the tires and the road surface,
preventing the steering and brakes
from operating properly.
CAUTION
DSudden braking, acceleration and
steering when driving on a slippery
road surface may cause tire slip-
page and reduce your ability to
control the vehicle, resulting in an
accident.
DSudden changes in engine speed,
such as sudden engine braking,
may cause the vehicle to skid, re-
sulting in an accident.
DAfter driving through a puddle,
lightly depress the brake pedal to
make sure that the brakes are func-
tioning properly. Wet brake pads
may prevent the brakes from func-
tioning properly. If the brakes on
only one side are wet and not func-
tioning properly, steering control
may be affected, resulting in an ac-
cident.
Dyna100/150_EE
Driving in the rain
Page 142 of 232

136STARTING AND DRIVING
TIRES
DEnsure that your vehicle’s tires are
properly inflated. See page 193 in Sec-
tion 7−2 and page 218 in Section 8 for
instructions.
DThe trailer tires should be inflated to
the pressure recommended by the trail-
er manufacturer in respect to the total
trailer weight.
TRAILER LIGHTS
DCheck for correct operation of the turn
signals and stop lights each time you
hitch up. Direct splicing may damage
your vehicle’s electrical system and
cause a malfunction of your lights.
BREAK−IN SCHEDULE
DToyota recommends that you do not
tow a trailer with a new vehicle or a
vehicle with any new power train com-
ponent (engine, transmission, differen-
tial, wheel bearing, etc.) for the first
800 km (500 miles) of driving.
MAINTENANCE
DIf you tow a trailer, your vehicle will
require more frequent maintenance due
to the additional load.
DRetighten all fixing bolts of the towing
ball and bracket after approximately
1000 km (600 miles) of trailer driving.
PRE−TOWING SAFETY CHECK
DBe sure not to exceed designated max-
imum load for the ball coupling of the
towing bracket. Please remember that
the ball coupling load will increase the
load on the vehicle. Maximum permissi-
ble rear axle capacity must not be ex-
ceeded.
DMake sure the trailer cargo is securely
loaded so that it cannot shift.
DIf the traffic behind the trailer cannot
be seen properly with the standard rear
view mirrors, additional outside mirrors
will be necessary. Both outside mirrors
must be fitted on folding arms and ad-
justed to give a good rear view at all
times.
TRAILER TOWING TIPS
Your vehicle will handle differently
when towing a trailer. In order to avoid
accident, death or serious injury, keep
the following in mind when towing:
DBefore starting out, check operation of
the lights and all vehicle−trailer connec-
tions. After driving a short distance,
stop and recheck the lights and con-
nections. Before actually towing a trail-
er, practice turning, stopping and back-
ing with a trailer in an area away from
traffic until you learn the feel.
DBecause stopping distance may be in-
creased, vehicle−to−vehicle distance
should be increased when towing a
trailer. For each 10 km/h (6 mph) of
speed, allow at least one vehicle and
trailer length between you and the ve-
hicle ahead. Avoid sudden braking as
you may skid, resulting in jackknifing
and loss of control. This is especially
true on wet or slippery surfaces.
DAvoid jerky starts or sudden accelera-
tion. Prevent excessive clutch slippage
by keeping engine rpm low and not
racing the engine. Always start out in
first gear.
DAvoid jerky steering and sharp turns.
The trailer could hit your vehicle in a
tight turn. Slow down before making a
turn to avoid the necessity of sudden
braking.
Dyna100/150_EE
Page 151 of 232
IN CASE OF AN EMERGENCY145
Jumper cable
Discharged
batteriesPositive
terminal
(“+” mark)
Booster batteryPositive
terminal
(“+” mark)
Discharged
batteries
Jumper
cable
Negative terminal
(“−”mark)Booster
battery
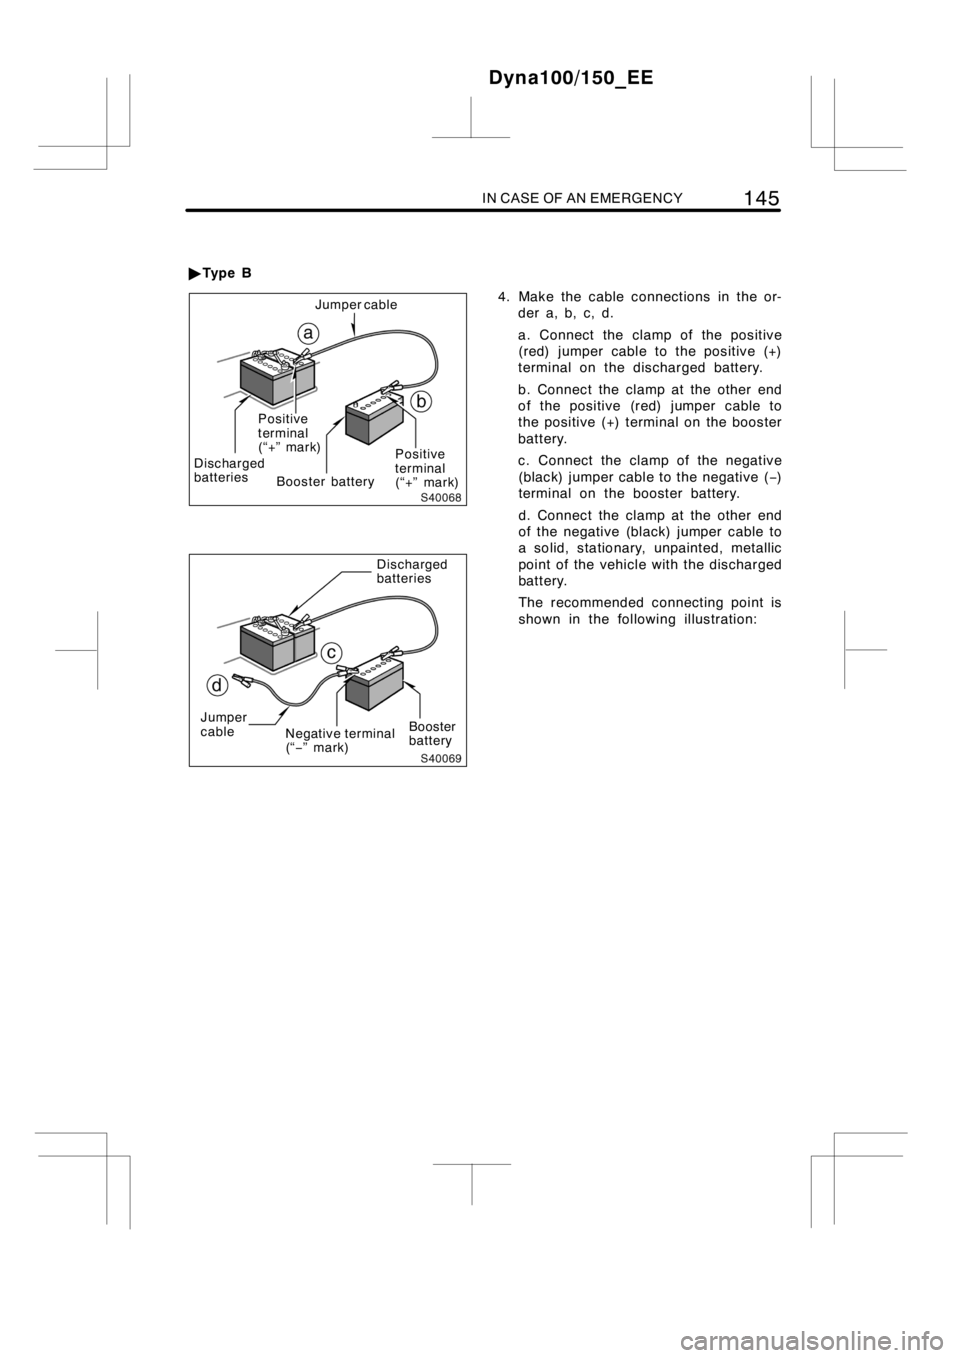
4. Make the cable connections in the or-
der a, b, c, d.
a. Connect the clamp of the positive
(red) jumper cable to the positive (+)
terminal on the discharged battery.
b. Connect the clamp at the other end
of the positive (red) jumper cable to
the positive (+) terminal on the booster
battery.
c. Connect the clamp of the negative
(black) jumper cable to the negative (−)
terminal on the booster battery.
d. Connect the clamp at the other end
of the negative (black) jumper cable to
a solid, stationary, unpainted, metallic
point of the vehicle with the discharged
battery.
The recommended connecting point is
shown in the following illustration:
Dyna100/150_EE
"Ty p e B