wipers TOYOTA DYNA 100/150 2014 Owners Manual (in English)
[x] Cancel search | Manufacturer: TOYOTA, Model Year: 2014, Model line: DYNA 100/150, Model: TOYOTA DYNA 100/150 2014Pages: 232, PDF Size: 14.97 MB
Page 5 of 232

v
Table of contents
1 OPERATION OF INSTRUMENTS AND CONTROLSPage
1 Overview of instruments and controls
1 .......................
2 Keys and Doors11 ......................................
3 Seats, Seat belts, Steering wheel and Mirrors23 ...............
4 Lights and Wipers61 .....................................
5 Gauges, Meters and Service reminder indicators67 .............
6 Engine (ignition) switch, Transmission and Parking brake79 ......
7 Air conditioning system83 .................................
8 Other equipment99 ......................................
2 INFORMATION BEFORE DRIVING YOUR TOYOTA 107........
3 STARTING AND DRIVING 123...............................
4 IN CASE OF AN EMERGENCY 141..........................
5 CORROSION PREVENTION AND APPEARANCE CARE 169...
6 MAINTENANCE REQUIREMENTS 175.......................
7DO−IT−YOURSELF MAINTENANCE
1 Introduction179 .........................................
2 Engine and Chassis187 ..................................
3 Electrical components199 .................................
8 SPECIFICATIONS 211......................................
9 INDEX 221................................................
Dyna100/150_EE
Page 67 of 232

LIGHTS AND WIPERS61
Section 1−4
OPERATION OF INSTRUMENTS AND
CONTROLS
Lights and Wipers
DHeadlights and turn signals 62..........................
DHeadlight beam level control 63.........................
DEmergency flashers 64.................................
DRear fog light 64.......................................
DInterior light 65........................................
DWindshield wipers and washer 65.......................
Dyna100/150_EE
Page 68 of 232
62LIGHTS AND WIPERS
HEADLIGHTS
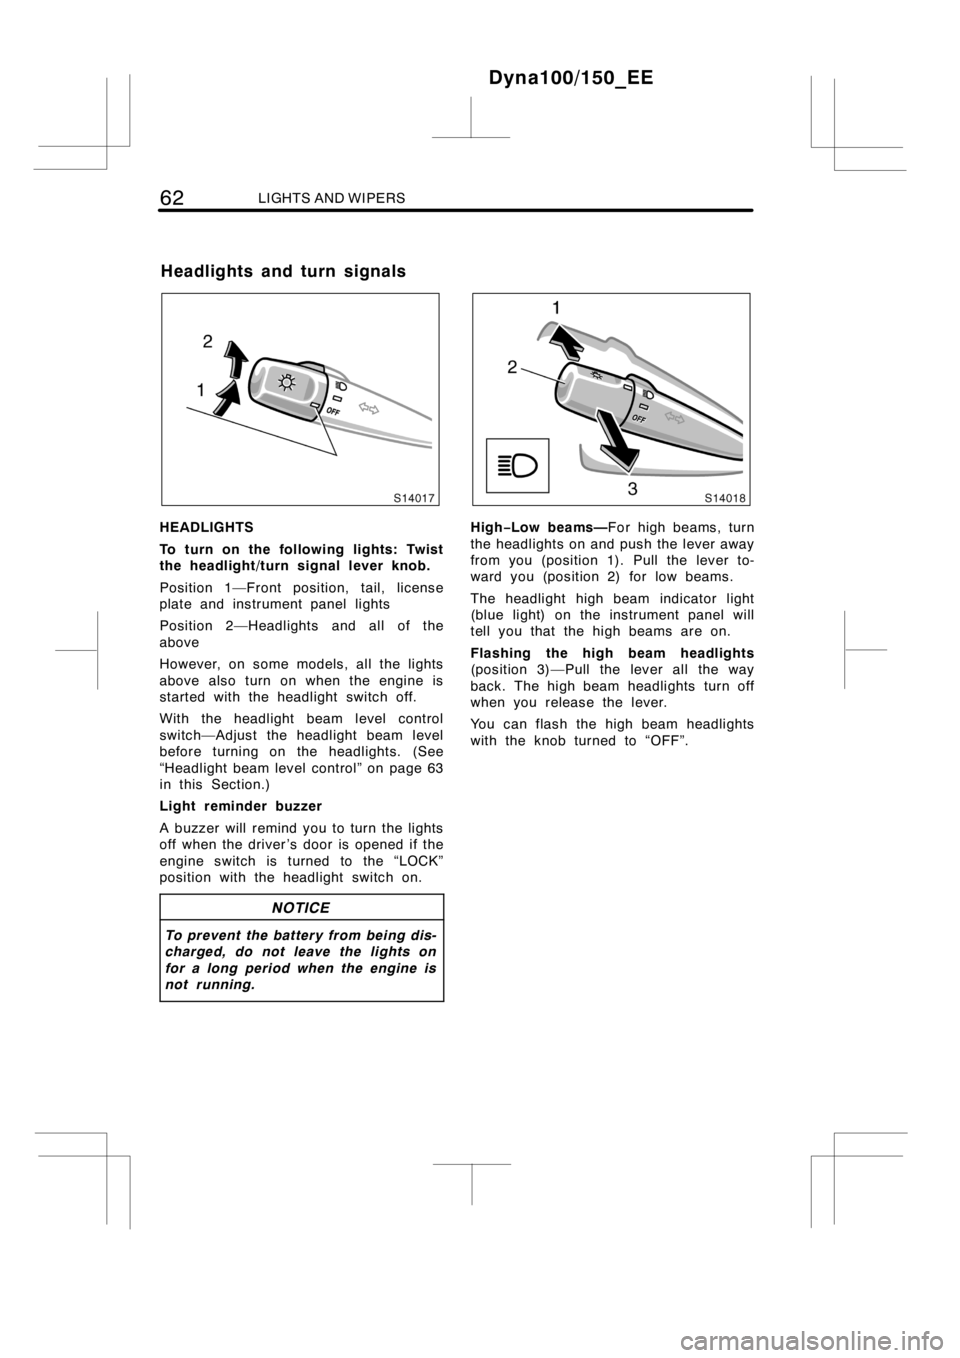
To turn on the following lights: Twist
the headlight/turn signal lever knob.
Position 1—Front position, tail, license
plate and instrument panel lights
Position 2—Headlights and all of the
above
However, on some models, all the lights
above also turn on when the engine is
started with the headlight switch off.
With the headlight beam level control
switch—Adjust the headlight beam level
before turning on the headlights. (See
“Headlight beam level control” on page 63
in this Section.)
Light reminder buzzer
A buzzer will remind you to turn the lights
off when the driver ’s door is opened if the
engine switch is turned to the “LOCK”
position with the headlight switch on.
NOTICE
To prevent the battery from being dis-
charged, do not leave the lights on
for a long period when the engine is
not running.
High−Low beams—For high beams, turn
the headlights on and push the lever away
from you (position 1). Pull the lever to-
ward you (position 2) for low beams.
The headlight high beam indicator light
(blue light) on the instrument panel will
tell you that the high beams are on.
Flashing the high beam headlights
(position 3)—Pull the lever all the way
back. The high beam headlights turn off
when you release the lever.
You can flash the high beam headlights
with the knob turned to “OFF”.
Dyna100/150_EE
Headlights and turn signals
Page 69 of 232
LIGHTS AND WIPERS63
TURN SIGNALS
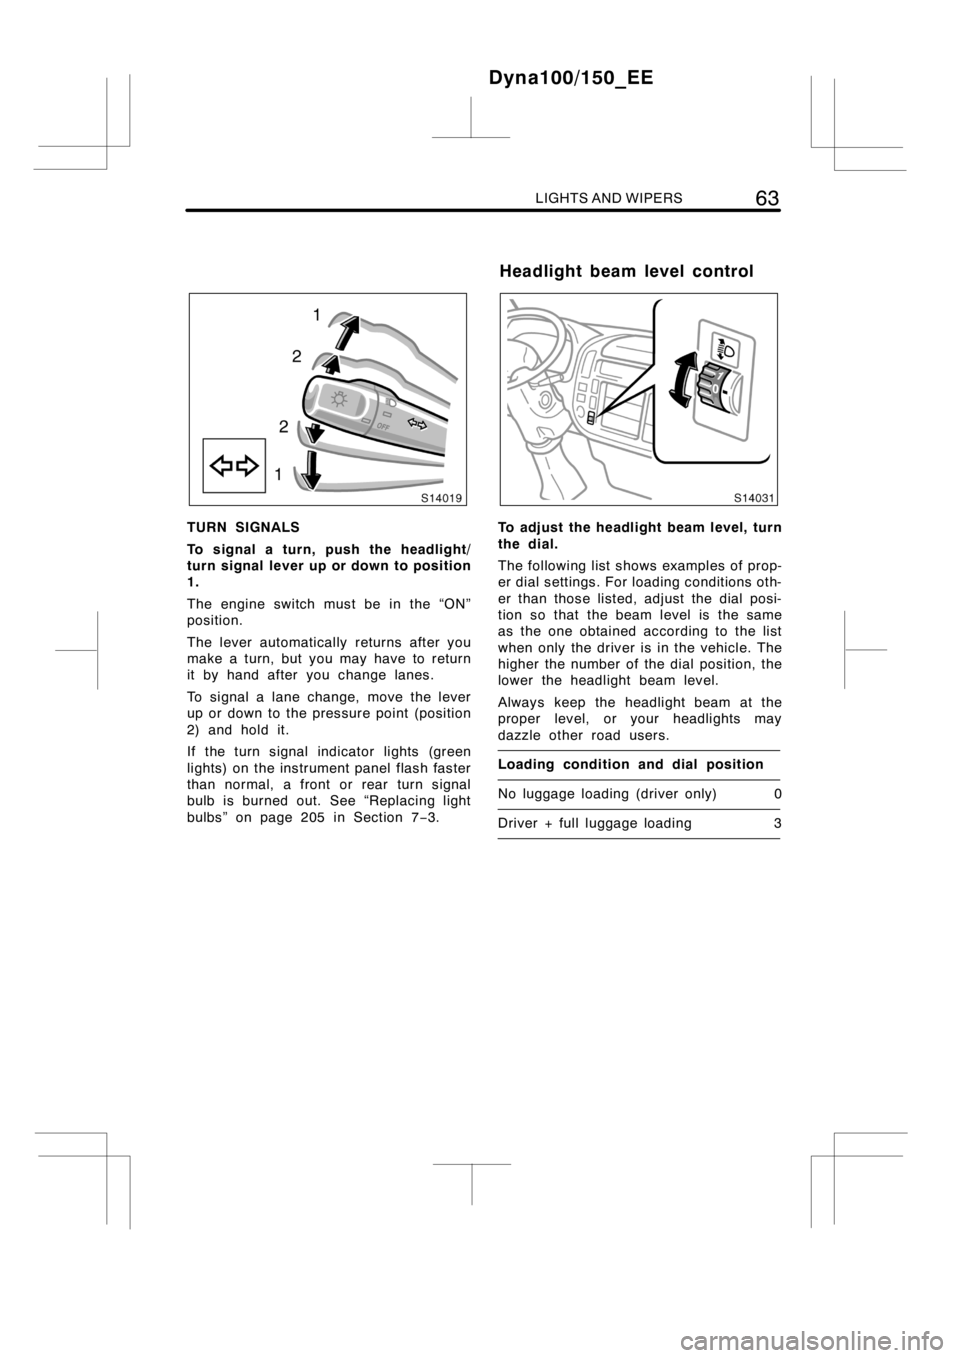
To signal a turn, push the headlight/
turn signal lever up or down to position
1.
The engine switch must be in the “ON”
position.
The lever automatically returns after you
make a turn, but you may have to return
it by hand after you change lanes.
To signal a lane change, move the lever
up or down to the pressure point (position
2) and hold it.
If the turn signal indicator lights (green
lights) on the instrument panel flash faster
than normal, a front or rear turn signal
bulb is burned out. See “Replacing light
bulbs” on page 205 in Section 7−3.To adjust the headlight beam level, turn
the dial.
The following list shows examples of prop-
er dial settings. For loading conditions oth-
er than those listed, adjust the dial posi-
tion so that the beam level is the same
as the one obtained according to the list
when only the driver is in the vehicle. The
higher the number of the dial position, the
lower the headlight beam level.
Always keep the headlight beam at the
proper level, or your headlights may
dazzle other road users.
Loading condition and dial position
No luggage loading (driver only) 0
Driver + full luggage loading 3
Dyna100/150_EE
Headlight beam level control
Page 70 of 232
64LIGHTS AND WIPERS
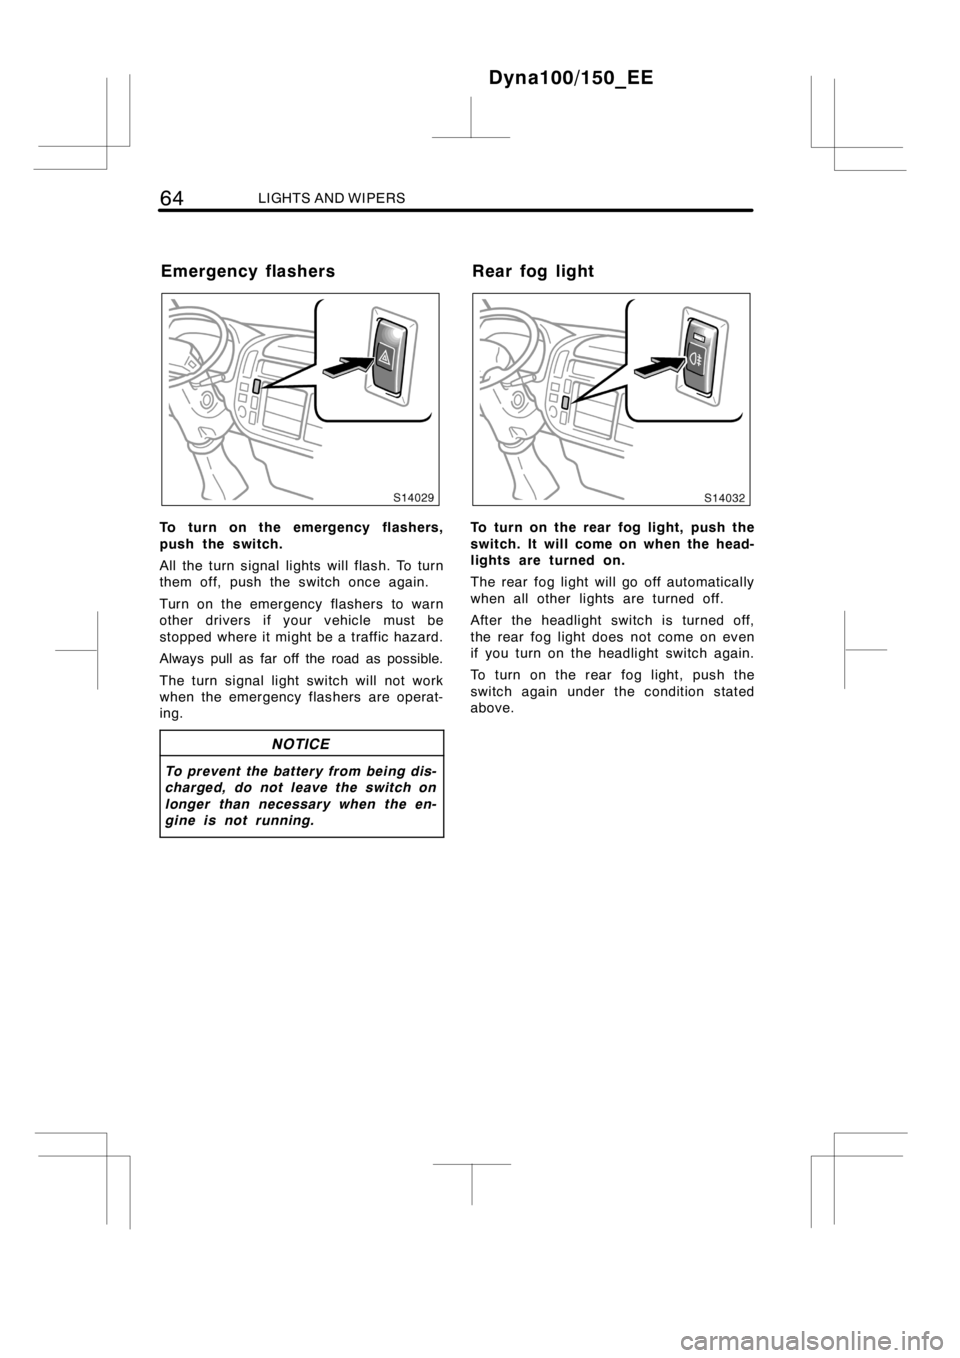
To turn on the emergency flashers,
push the switch.
All the turn signal lights will flash. To turn
them off, push the switch once again.
Turn on the emergency flashers to warn
other drivers if your vehicle must be
stopped where it might be a traffic hazard.
Always pull as far off the road as possible.
The turn signal light switch will not work
when the emergency flashers are operat-
ing.
NOTICE
To prevent the battery from being dis-
charged, do not leave the switch on
longer than necessary when the en-
gine is not running.
To turn on the rear fog light, push the
switch. It will come on when the head-
lights are turned on.
The rear fog light will go off automatically
when all other lights are turned off.
After the headlight switch is turned off,
the rear fog light does not come on even
if you turn on the headlight switch again.
To turn on the rear fog light, push the
switch again under the condition stated
above.
Dyna100/150_EE
Emergency flashers Rear fog light
Page 71 of 232
LIGHTS AND WIPERS65
Off Door
On
Front
Off
Door On
Rear (double cab models)
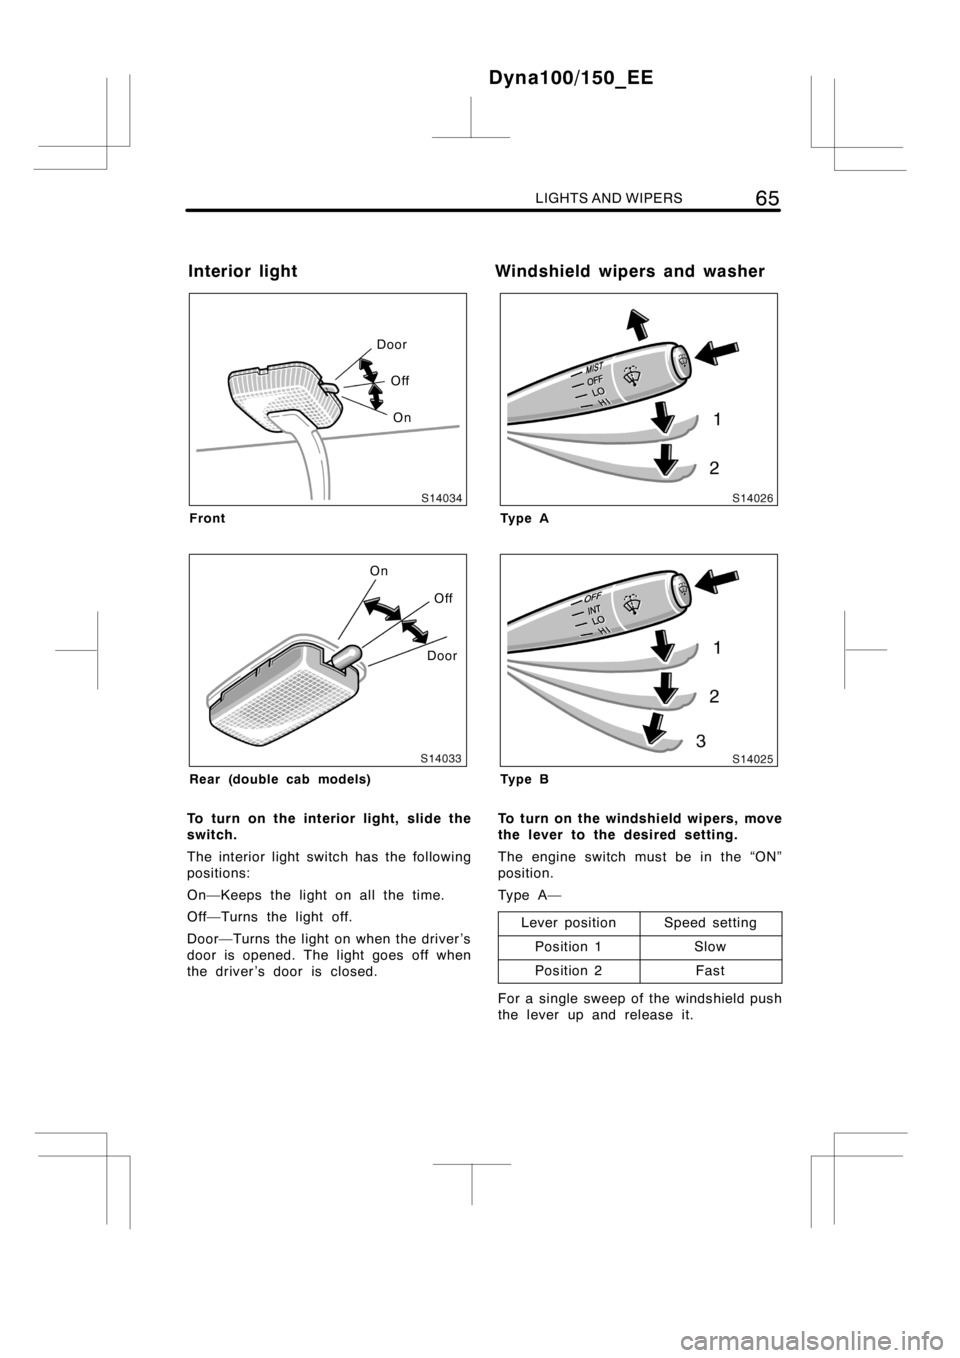
To turn on the interior light, slide the
switch.
The interior light switch has the following
positions:
On—Keeps the light on all the time.
Off—Turns the light off.
Door—Turns the light on when the driver ’s
door is opened. The light goes off when
the driver ’s door is closed.
Ty p e A
Ty p e B
To turn on the windshield wipers, move
the lever to the desired setting.
The engine switch must be in the “ON”
position.
Ty p e A —
Lever position
Speed setting
Position 1Slow
Position 2Fast
For a single sweep of the windshield push
the lever up and release it.
Dyna100/150_EE
Interior light Windshield wipers and washer
Page 72 of 232

66LIGHTS AND WIPERS
Ty p e B —
Lever position
Speed setting
Position 1Intermittent
Position 2Slow
Position 3Fast
To squirt washer fluid, push the button
on the end of the lever.
If the windshield wipers are off, they will
operate a couple of times after the washer
squirts.
For instructions on adding washer fluid,
see “Adding washer fluid” on page 204 in
Section 7−3.
In freezing weather, warm the windshield
with the defroster before using the washer.
This will help prevent the washer fluid
from freezing on your windshield, which
can block your vision.
NOTICE
Do not operate the wipers if the wind-
shield is dry. It may scratch the
glass.
Dyna100/150_EE
Page 225 of 232
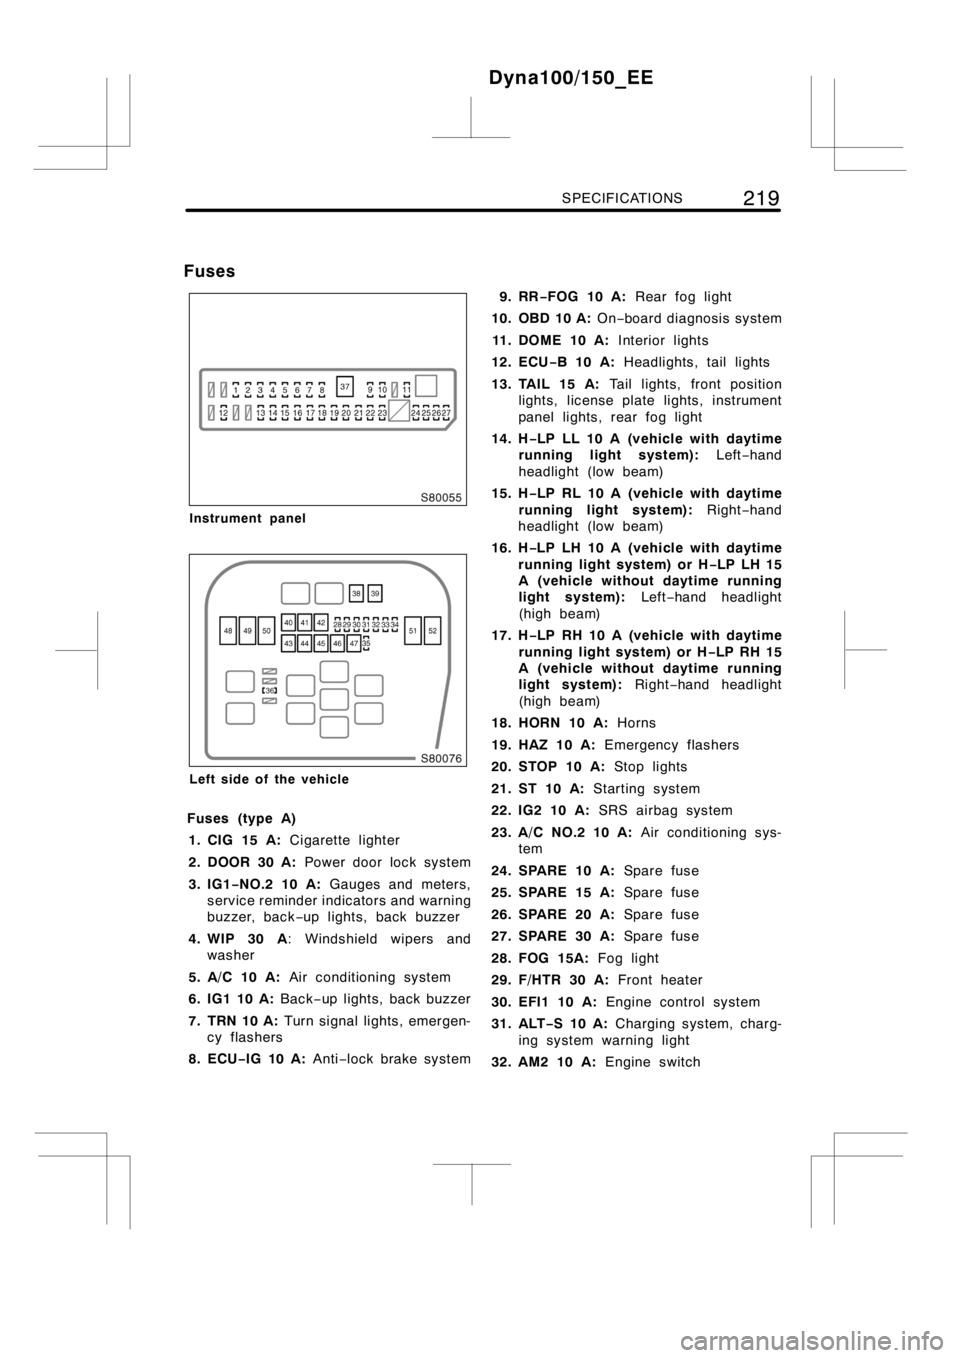
SPECIFICATIONS219
Instrument panel
Left side of the vehicle
Fuses (type A)
1. CIG 15 A:Cigarette lighter
2. DOOR 30 A:Power door locksystem
3. IG1−NO.2 10 A:Gauges and meters,
service reminder indicators and warning
buzzer, back−up lights, back buzzer
4. WIP 30 A: Windshield wipers and
washer
5. A/C 10 A:Air conditioningsystem
6.IG110A:Back−up lights, back buzzer
7. TRN 10 A:Turn signal lights, emergen-
cy flashers
8. ECU−IG 10 A:Anti−lock brake system9. RR−FOG 10 A:Rear fog light
10. OBD 10 A:On−board diagnosissystem
11 . D O M E 1 0 A :Interior lights
12. ECU−B10A:Headlights, tail lights
13. TAIL 15 A:Tail lights, front position
lights, license plate lights, instrument
panel lights, rear fog light
14. H−LP LL 10 A (vehicle with daytime
running light system):Left−hand
headlight (low beam)
15. H−LP RL 10 A (vehicle with daytime
running light system):Right−hand
headlight (low beam)
16. H−LP LH 10 A (vehicle with daytime
running light system) or H−LP LH 15
A (vehicle without daytime running
light system):Left−hand headlight
(high beam)
17. H−LP RH 10 A (vehicle with daytime
running light system) or H−LP RH 15
A (vehicle without daytime running
light system):Right−hand headlight
(high beam)
18. HORN 10 A:Horns
19. HAZ 10 A:Emergency flashers
20. STOP 10 A:Stop lights
21. ST 10 A:Starting system
22.IG210A:SRS airbag system
23.A/CNO.210A:Air conditioning sys-
tem
24. SPARE 10 A:Spare fuse
25. SPARE 15 A:Spare fuse
26. SPARE 20 A:Spare fuse
27. SPARE 30 A:Spare fuse
28. FOG 15A:Fog light
29. F/HTR 30 A:Front heater
30. EFI1 10 A:Engine control system
31. ALT−S10A:Charging system, charg-
ing system warning light
32.AM210A:Engine switch
Dyna100/150_EE
Fuses