clock TOYOTA FJ CRUISER 2010 1.G Owners Manual
[x] Cancel search | Manufacturer: TOYOTA, Model Year: 2010, Model line: FJ CRUISER, Model: TOYOTA FJ CRUISER 2010 1.GPages: 439, PDF Size: 11.02 MB
Page 4 of 439

TABLE OF CONTENTSIndex
4
3-5. Other interior features
Sun visors .......................... 254
Vanity mirrors ..................... 255
Clock .................................. 256
Outside temperature
display .............................. 257
Power outlet (12V DC) ....... 258
Power outlet (115V AC) ..... 259
Armrest............................... 265
Floor mat ............................ 266
Luggage storage box
(vehicles without sub
woofer) ............................. 267
Luggage compartment
features ............................ 268
Compass ............................ 271
4-1. Maintenance and care
Cleaning and protecting
the vehicle exterior ........... 278
Cleaning and protecting
the vehicle interior ............ 280
4-2. Maintenance
Maintenance
requirements .................... 283
General maintenance ......... 285
Emission inspection and
maintenance (I/M)
programs .......................... 2884-3. Do-it-yourself maintenance
Do-it-yourself service
precautions ....................... 289
Hood ................................... 293
Engine compartment .......... 294
Tires.................................... 308
Tire inflation pressure ......... 313
Wheels................................ 317
Air conditioning filter ........... 319
Key battery ......................... 322
Checking and replacing
fuses ................................. 324
Light bulbs .......................... 335
5-1. Essential information
Emergency flashers ............ 344
If your vehicle needs to be
towed ................................ 345
If you think something is
wrong ................................ 350
Fuel pump shut off
system .............................. 351
Event data recorder ............ 352
4Maintenance and care
5When trouble arises
Page 15 of 439
15
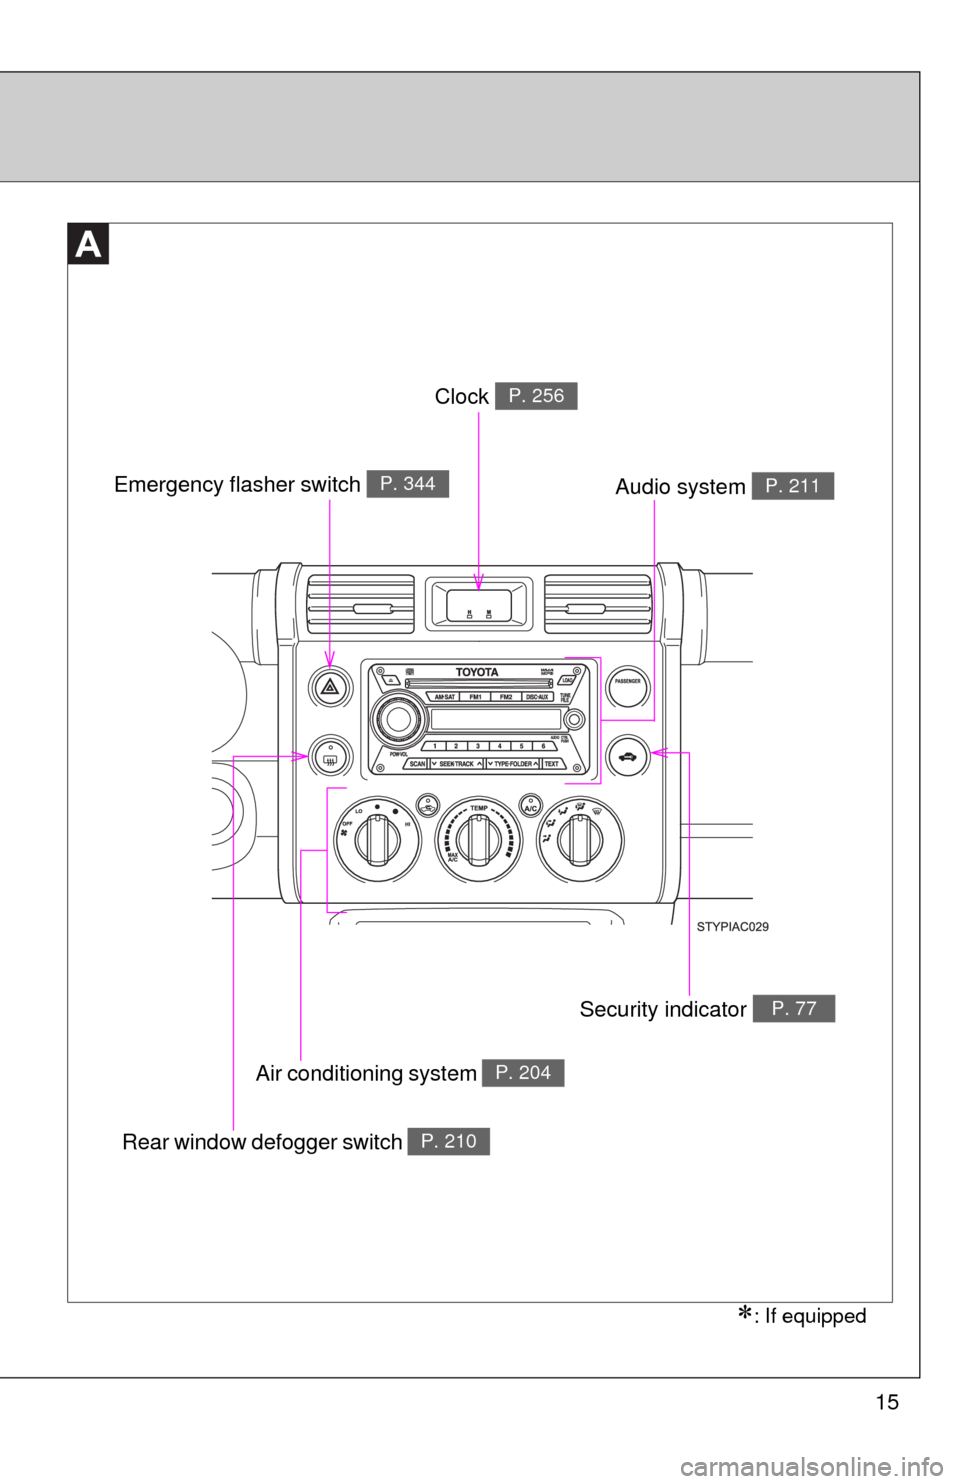
: If equipped
Clock P. 256
Emergency flasher switch P. 344Audio system P. 211
Security indicator P. 77
Air conditioning system P. 204
Rear window defogger switch P. 210
Page 38 of 439
38
1-2. Opening, closing and locking the doors
Back door
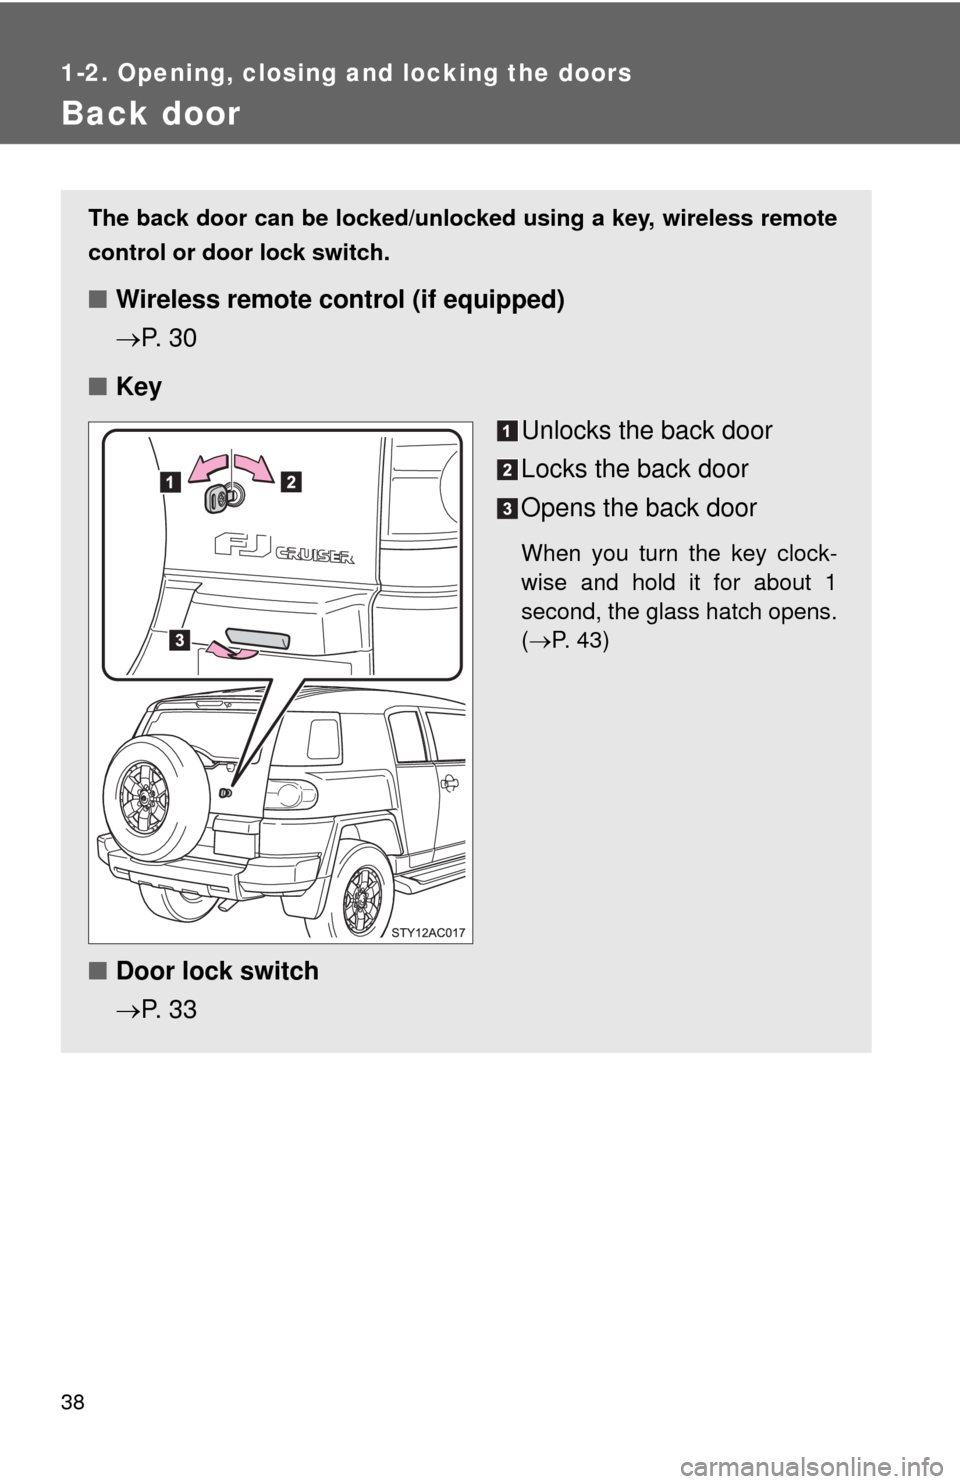
The back door can be locked/unlocked using a key, wireless remote
control or door lock switch.
■Wireless remote control (if equipped)
P. 3 0
■Key
Unlocks the back door
Locks the back door
Opens the back door
When you turn the key clock-
wise and hold it for about 1
second, the glass hatch opens.
(P. 43)
■Door lock switch
P. 3 3
Page 43 of 439
43
1
1-2. Opening, closing and locking the doors
Before driving
Glass hatch
■Opening the glass hatch
●The glass hatch opens slightly, after the back door is locked.
●When the rear window wiper is working, the wiper returns to the original
position and stops working.
The wiper restarts its working about 3 seconds after the glass hatch is
closed.
■Closing the glass hatch
●Make sure that the glass hatch is securely closed after closing it.
If the glass hatch is not securely closed, the rear window wiper and
washer will not work.
●Be careful not to lock your keys in the vehicle.
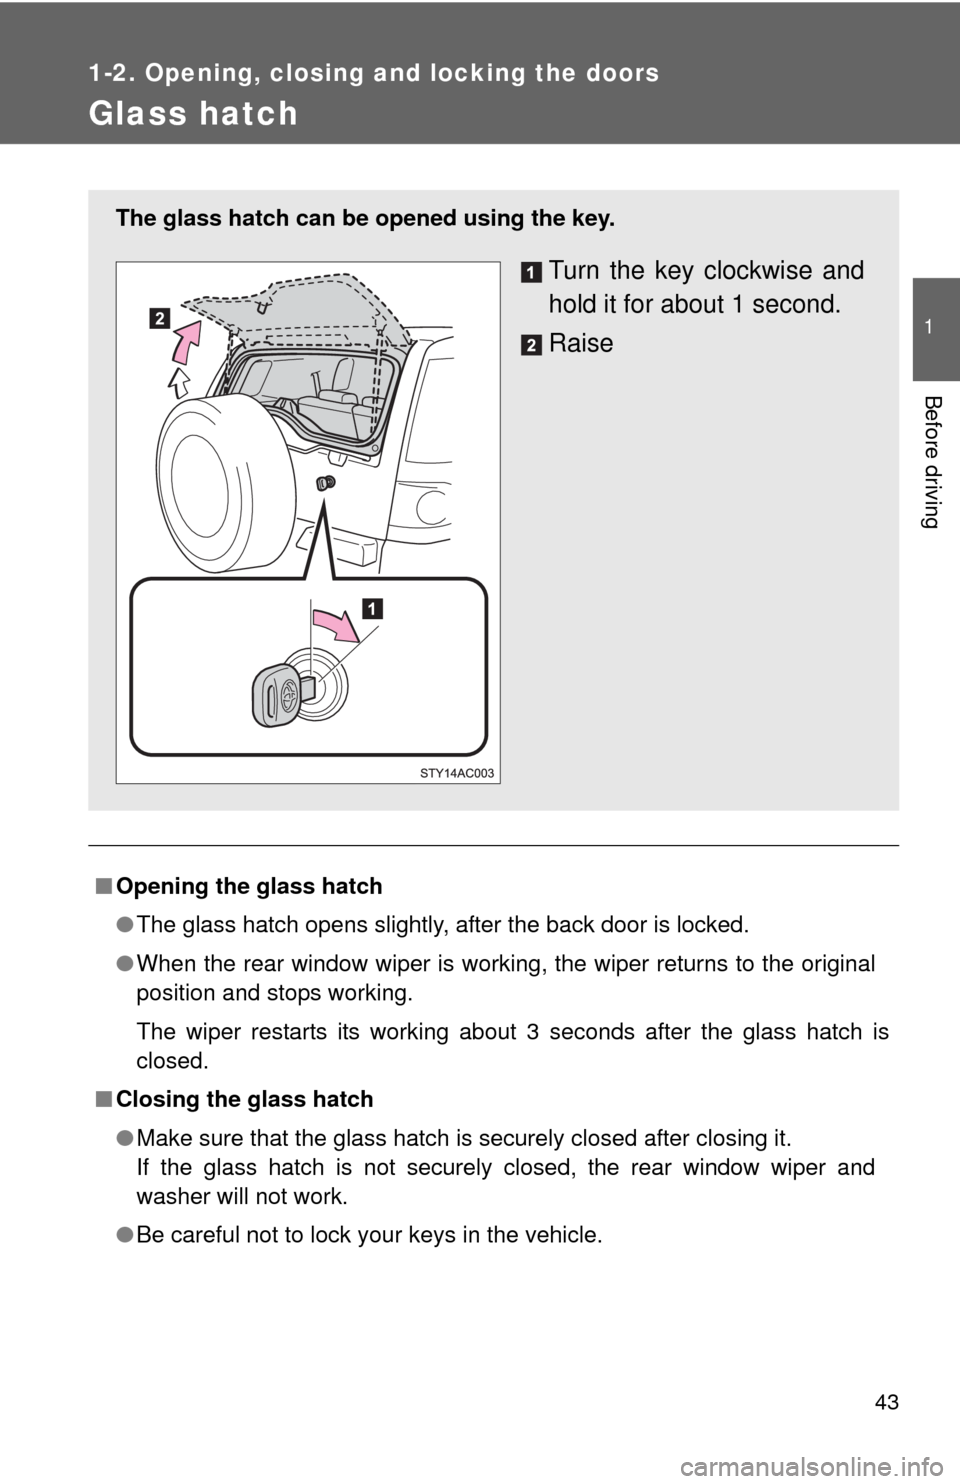
The glass hatch can be opened using the key.
Turn the key clockwise and
hold it for about 1 second.
Raise
Page 203 of 439
Interior features3
203
3-1. Using the air conditioning
system and defogger
Air conditioning system .... 204
Rear window defogger ..... 210
3-2. Using the audio system
Audio system types .......... 211
Using the radio ................. 214
Using the CD player ......... 220
Playing back MP3 and
WMA discs ..................... 227
Optimal use of the audio
system ........................... 235
Operating the sub
woofer ............................ 238
Changing display color
(type B only)................... 239
Using the AUX adapter .... 240
Using the steering wheel
audio switches ............... 242
3-3. Using the interior lights
Interior lights list ............... 244
• Interior lights .................. 245
• Personal lights ............... 2463-4. Using the storage features
List of storage features .... 247
• Glove box....................... 247
• Cup holders (front) ......... 248
• Cup holders (rear) .......... 251
• Bottle holders ................. 252
• Auxiliary box .................. 253
3-5. Other interior features
Sun visors ........................ 254
Vanity mirrors ................... 255
Clock ................................ 256
Outside temperature
display............................ 257
Power outlet (12V DC) ..... 258
Power outlet (115V AC) ... 259
Armrest ............................ 265
Floor mat .......................... 266
Luggage storage box
(vehicles without sub
woofer) ........................... 267
Luggage compartment
features .......................... 268
Compass .......................... 271
Page 204 of 439
204
3-1. Using the air conditioning system and defogger
Air conditioning system
Adjusting the settings
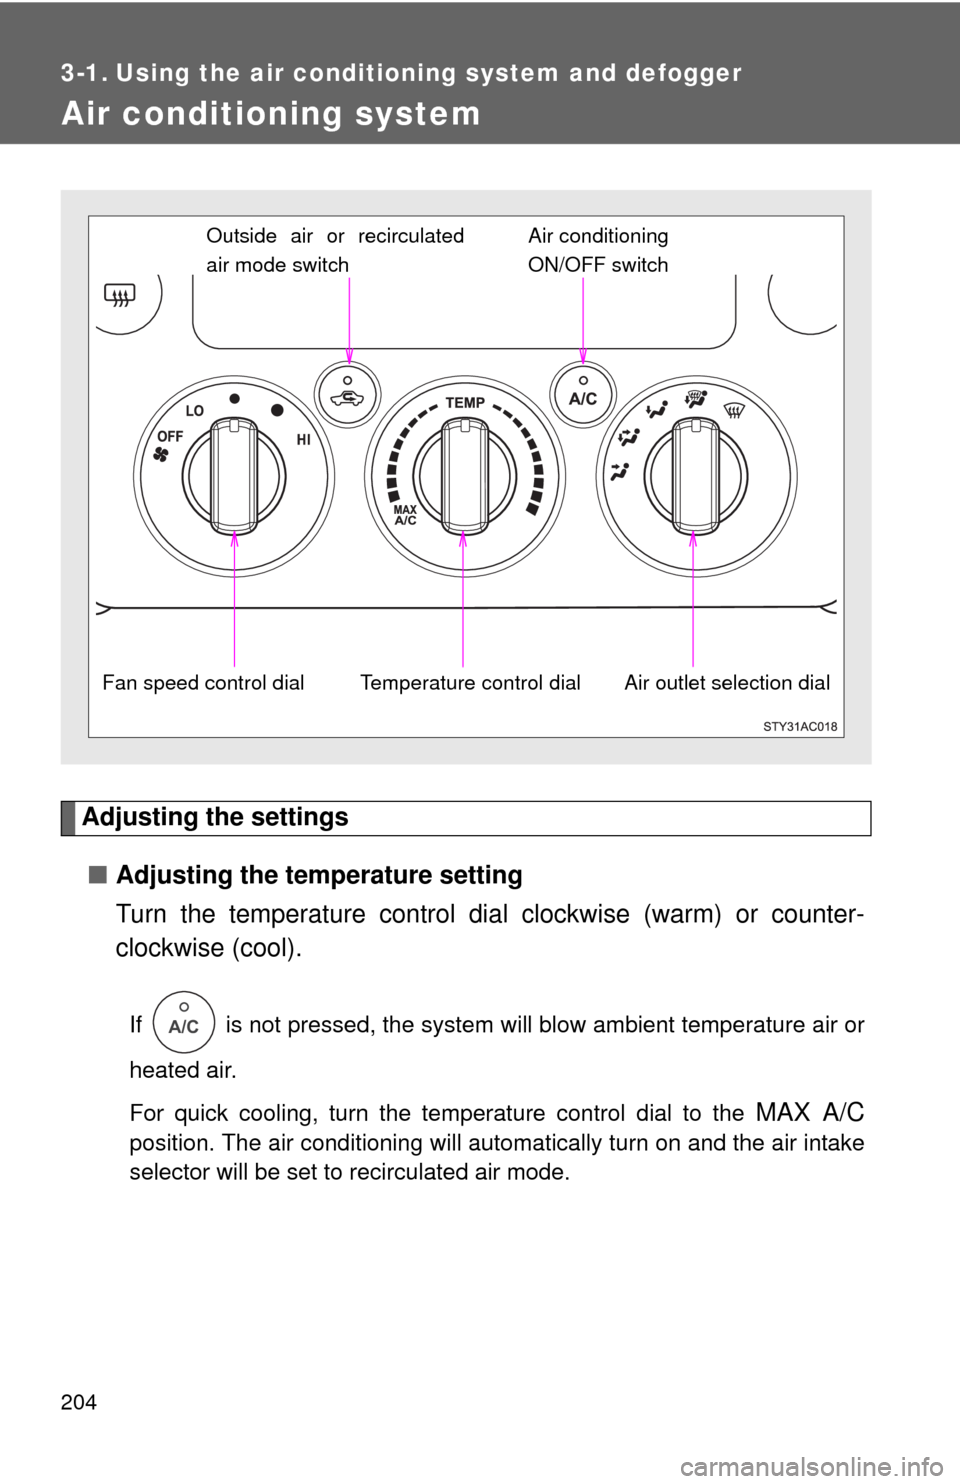
■Adjusting the temperature setting
Turn the temperature control dial clockwise (warm) or counter-
clockwise (cool).
If is not pressed, the system will blow ambient temperature air or
heated air.
For quick cooling, turn the temperature control dial to the
MAX A/C
position. The air conditioning will automatically turn on and the air intake
selector will be set to recirculated air mode.
Outside air or recirculated
air mode switch
Air outlet selection dialAir conditioning
ON/OFF switch
Temperature control dial Fan speed control dial
A/C
Page 205 of 439
205 3-1. Using the air conditioning system and defogger
3
Interior features
■Adjusting the fan speed
Turn the fan speed control dial clockwise (increase) or counter-
clockwise (decrease).
Set the dial to OFF to turn the fan off.
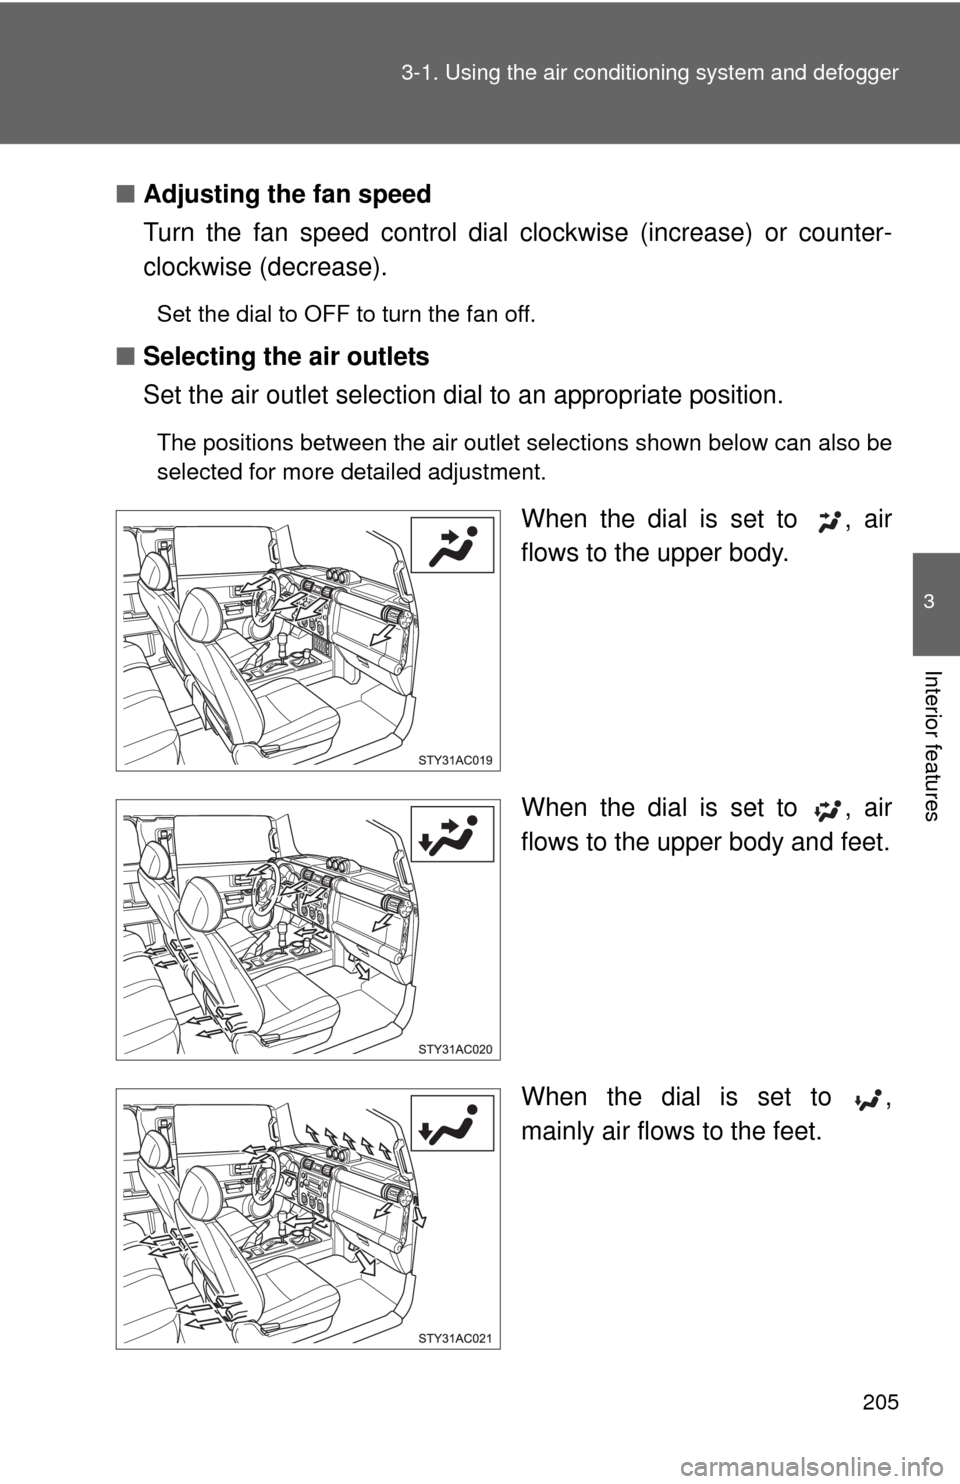
■Selecting the air outlets
Set the air outlet selection dial to an appropriate position.
The positions between the air outlet selections shown below can also be
selected for more detailed adjustment.
When the dial is set to , air
flows to the upper body.
When the dial is set to , air
flows to the upper body and feet.
When the dial is set to ,
mainly air flows to the feet.
Page 256 of 439
256
3-5. Other interior features
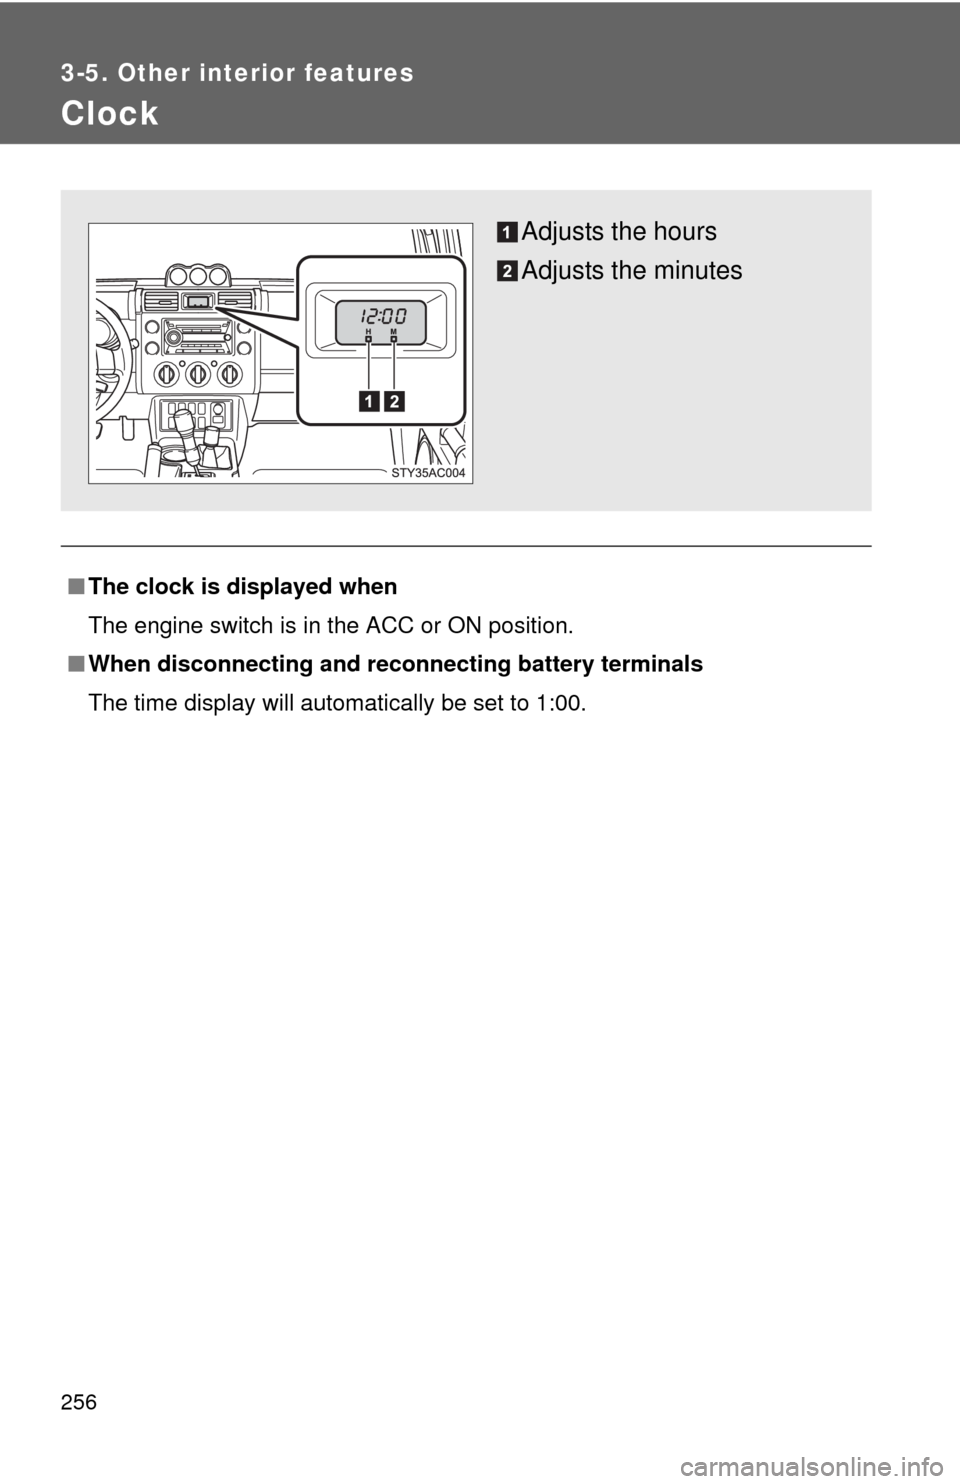
Clock
■The clock is displayed when
The engine switch is in the ACC or ON position.
■When disconnecting and reconnecting battery terminals
The time display will automatically be set to 1:00.
Adjusts the hours
Adjusts the minutes
Page 297 of 439
296 4-3. Do-it-yourself maintenance
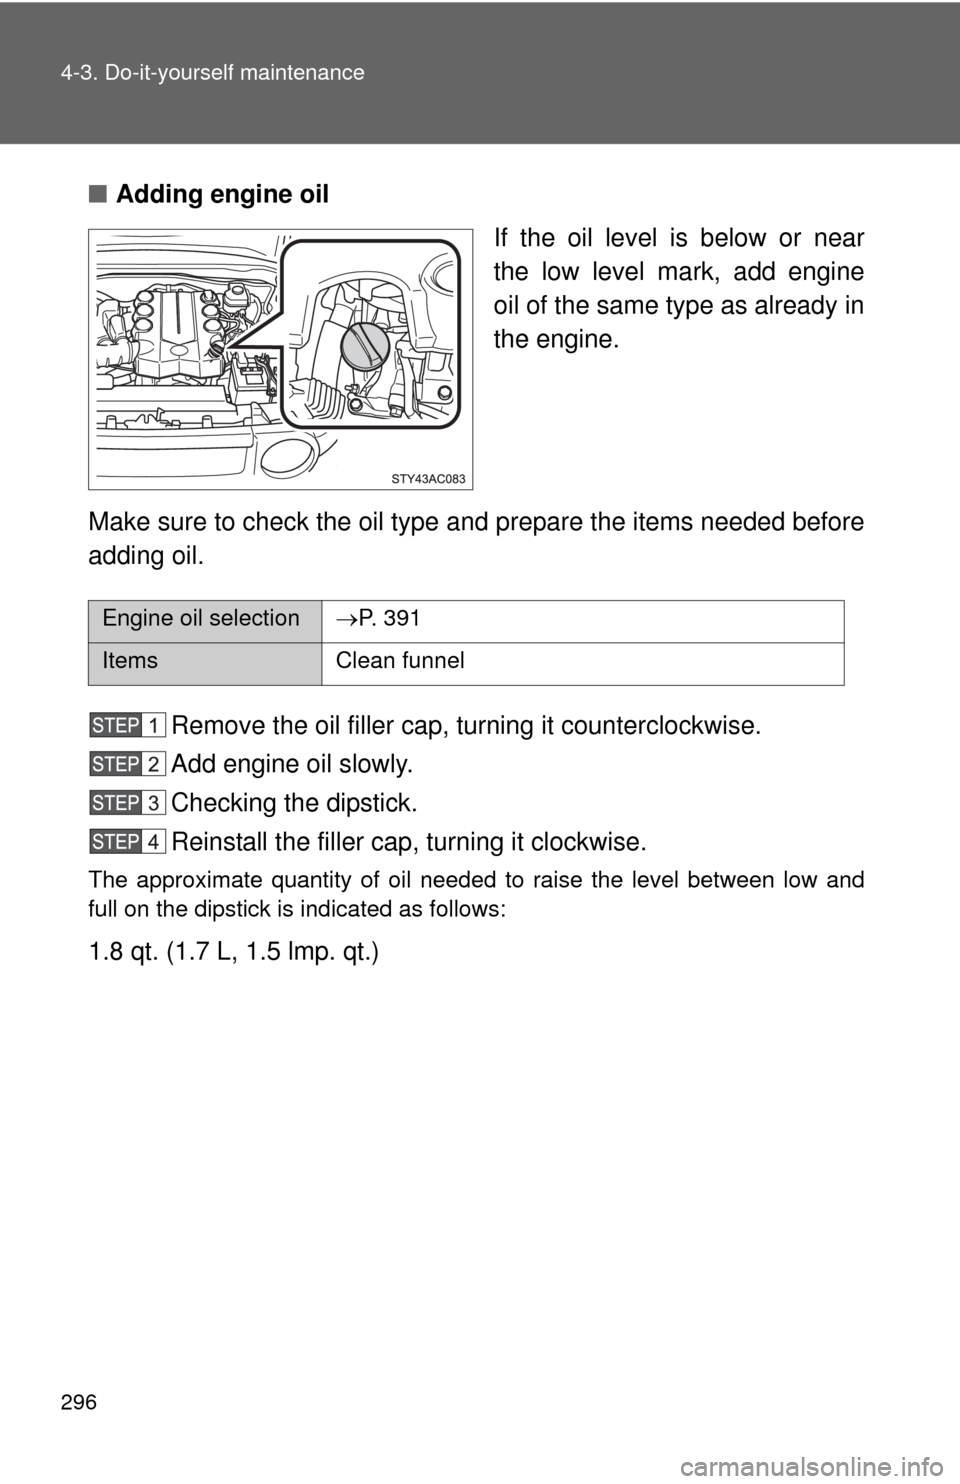
■Adding engine oil
If the oil level is below or near
the low level mark, add engine
oil of the same type as already in
the engine.
Make sure to check the oil type and prepare the items needed before
adding oil.
Remove the oil filler cap, turning it counterclockwise.
Add engine oil slowly.
Checking the dipstick.
Reinstall the filler cap, turning it clockwise.
The approximate quantity of oil needed to raise the level between low and
full on the dipstick is indicated as follows:
1.8 qt. (1.7 L, 1.5 lmp. qt.)
Engine oil selectionP. 391
Items Clean funnel
Page 303 of 439
302 4-3. Do-it-yourself maintenance
Power steering fluid
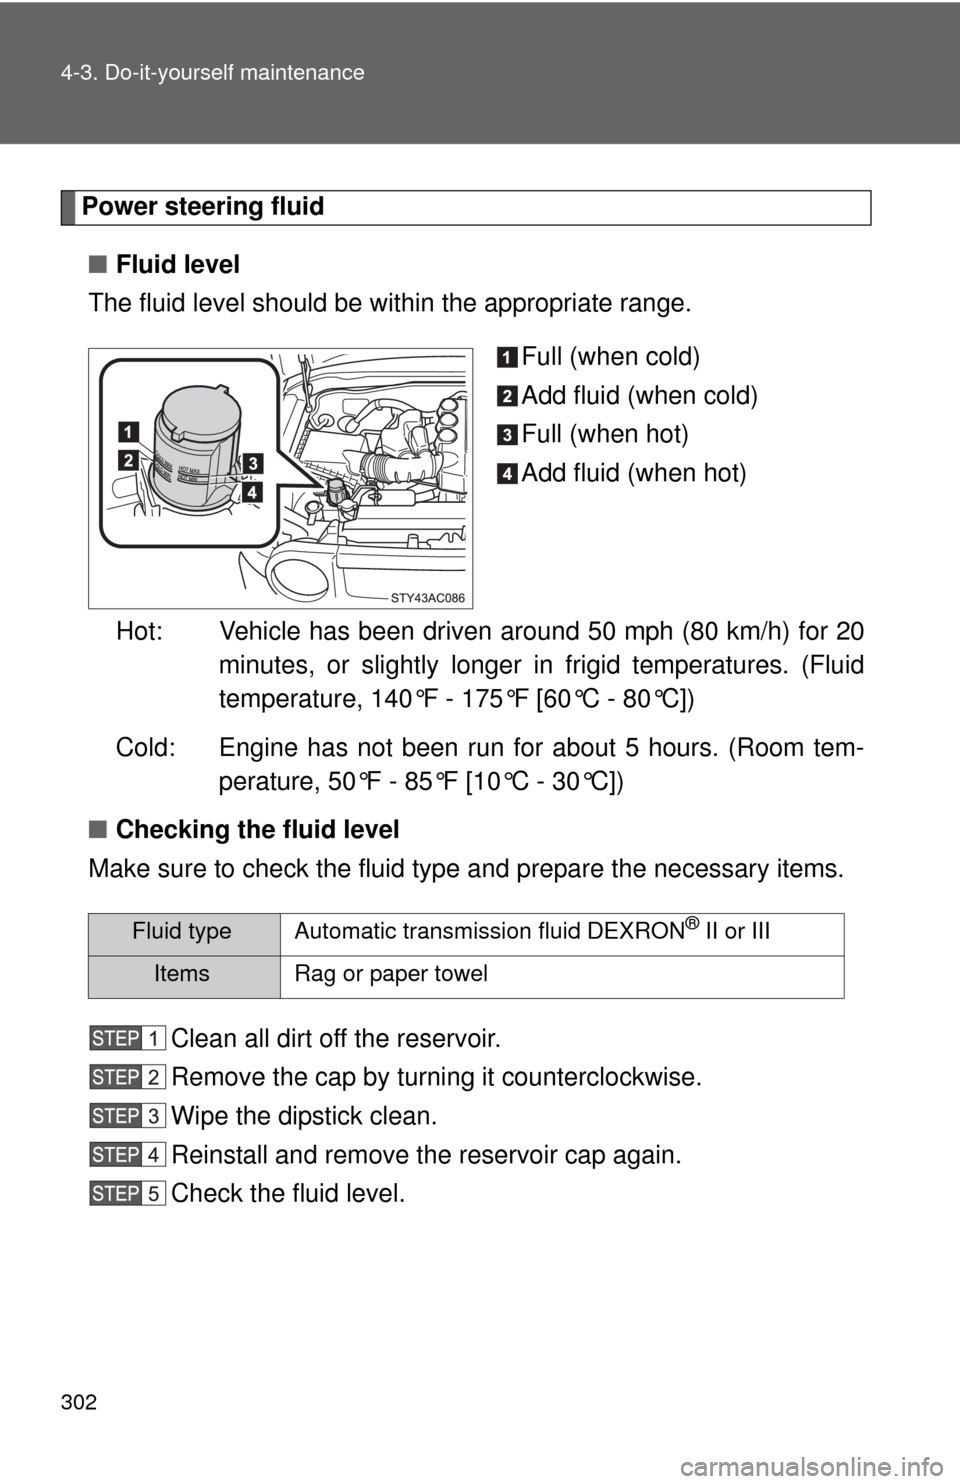
■Fluid level
The fluid level should be within the appropriate range.
Full (when cold)
Add fluid (when cold)
Full (when hot)
Add fluid (when hot)
Hot: Vehicle has been driven around 50 mph (80 km/h) for 20
minutes, or slightly longer in frigid temperatures. (Fluid
temperature, 140°F - 175°F [60°C - 80°C])
Cold: Engine has not been run for about 5 hours. (Room tem-
perature, 50°F - 85°F [10°C - 30°C])
■Checking the fluid level
Make sure to check the fluid type and prepare the necessary items.
Clean all dirt off the reservoir.
Remove the cap by turning it counterclockwise.
Wipe the dipstick clean.
Reinstall and remove the reservoir cap again.
Check the fluid level.
Fluid type Automatic transmission fluid DEXRON® II or III
Items Rag or paper towel