lock TOYOTA FJ CRUISER 2011 1.G Manual PDF
[x] Cancel search | Manufacturer: TOYOTA, Model Year: 2011, Model line: FJ CRUISER, Model: TOYOTA FJ CRUISER 2011 1.GPages: 528, PDF Size: 10.93 MB
Page 184 of 528

184 2-5. Driving information
NOTICE
■To prevent the water damage
●Take all necessary safety measures to ensure that water damage to the
engine or other components does not occur.
● Water entering the engine air intake will cause severe engine damage.
● Water entering the automatic transmission will cause deterioration in shift
quality, locking up of your transmission accompanied by vibration, and ulti-
mately damage.
● Water can wash the grease from wheel bearings, causing rusting and pre-
mature failure, and may also enter the differentials, transmission and
transfer case, reducing the gear oil’s lubricating qualities.
■ When you drive through water
If driving through water, such as when crossing shallow streams, first check
the depth of the water and the bottom of the river bed for firmness. Drive
slowly and avoid deep water.
■ Inspection after off-road driving
●Sand and mud that has accumulate d in brake drums and around brake
discs may affect braking efficiency and may damage brake system compo-
nents.
● Always perform a maintenance inspection after each day of off-road driv-
ing that has taken you through rough terrain, sand, mud, or water. For
scheduled maintenance information, refer to the “Scheduled Maintenance
Guide” or “Owner’s Manual Supplement”.
Page 187 of 528

187
2-5. Driving information
2
When driving
CAUTION
■Things that must not be carried in the luggage compartment
The following things may cause a fire if loaded in the luggage compart-
ment.
●Receptacles containing gasoline
●Aerosol cans
■Storage precautions
Observe the following precautions.
Failing to do so may result in death or serious injury.
●Do not place cargo or luggage in or on the following locations as the
item may get under the clutch, brake or accelerator pedal and prevent
the pedals from being depressed properly, block the driver’s vision, or
hit the driver or passengers, causing an accident.
• Driver’s feet
• Front passenger or rear seats (when stacking items)
• Instrument panel
• Dashboard
• Auxiliary box or tray that has no lid
●Do not stack anything in the luggage compartment higher than the
seatbacks.
Such items may be thrown about and possibly injure people in the
vehicle during sudden braking or in an accident.
●Secure all items in the occupant compartment, as they may shift and
injure someone during sudden braking, sudden swerving or an acci-
dent.
●Never allow anyone to ride in the luggage compartment. It is not
designed for passengers. They should ride in their seats with their seat
belts properly fastened. Otherwise,
they are much more likely to suffer
death or serious injury, in the event of sudden braking, sudden swerv-
ing or an accident.
Page 191 of 528
191
2-5. Driving information
2
When driving
Regulations on the use of snow chains
● Regulations regarding the use of tire chains vary according to loca-
tion and type of road. Always check local regu lations before install-
ing chains.
● Install the chains on the rear tires.
● Retighten the chains after drivi ng 1/4 - 1/2 mile (0.5 - 1.0 km).
■Snow chain installation
Observe the following precautions when installing and removing chains.
●Install and remove tire chains in a safe location.
● Install tire chains on the rear tires only. Do not install tire chains on the
front tires.
● Install tire chains following the instructions provided in the accompanying
instructions.
■ When driving the vehicle
Accelerate the vehicle slowly and drive at a reduced speed suit-
able to road conditions.
■ When parking the vehicle
Park the vehicle and move the shift lever to P (automatic trans-
mission) or to 1 or R (manual transmission) without setting the
parking brake. The parking brak e may freeze up, preventing it
from being released. If necessary , block the wheels to prevent
inadvertent sliding or creeping.
Page 195 of 528
195
2-5. Driving information
2
When driving
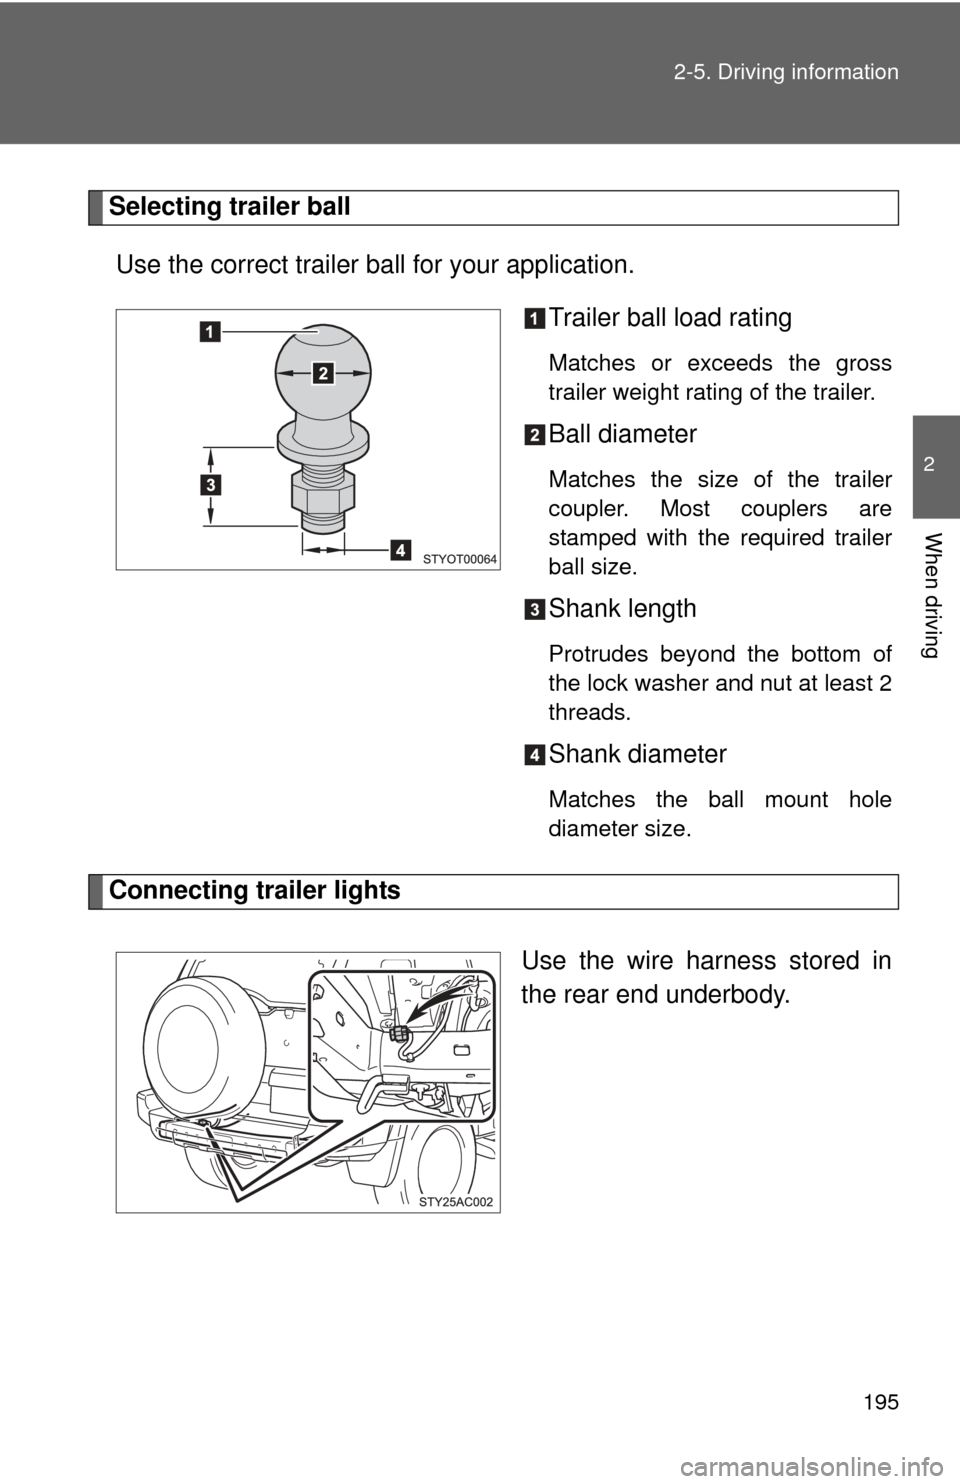
Selecting trailer ball
Use the correct trailer ball for your application. Trailer ball load rating
Matches or exceeds the gross
trailer weight rating of the trailer.
Ball diameter
Matches the size of the trailer
coupler. Most couplers are
stamped with the required trailer
ball size.
Shank length
Protrudes beyond the bottom of
the lock washer and nut at least 2
threads.
Shank diameter
Matches the ball mount hole
diameter size.
Connecting trailer lights
Use the wire harness stored in
the rear end underbody.
Page 201 of 528
201
2-5. Driving information
2
When driving
●
Always place wheel blocks under both the vehicle and the trailer
wheels when parking. Apply the parking brake firmly, and put the
transmission in P (automatic transmission) or in 1 or R (manual
transmission). Avoid parking on a slope, but if unavoidable, do so
only after performing the following:
Apply the brakes and keep them applied.
Have someone place wheel blocks under both the vehicle and
trailer wheels.
When the wheel blocks are in pl ace, release the brakes slowly
until the blocks absorb the load.
Apply the parking brake firmly.
Shift into 1 or R (manual transmission) or P (automatic trans-
mission) and turn off the engine.
● When restarting after parking on a slope:
With the transmission in P (automatic transmission) or the
clutch pedal (manual transmission) depressed, start the
engine. On vehicles with an au tomatic transmission, be sure
to keep the brake pedal pressed.
Shift into a forward gear. If reversing, shift into R.
Release the parking brake (also brake pedal on vehicles with
an automatic transmission), and slowly pull or back away from
the wheel blocks. Stop and apply the brakes.
Have someone retrieve the blocks.
Page 205 of 528
Interior features3
205
3-3. Using the Bluetooth® audio
system
Bluetooth
® audio
system ........................... 262
Using the Bluetooth
®
audio system.................. 265
Operating a Bluetooth
®
enabled portable
player ............................. 270
Setting up a Bluetooth
®
enabled portable
player ............................. 272
Bluetooth
® audio system
setup .............................. 277
3-4. Using the hands-free phone system (for cellular phone)
Hands-free phone system features .......................... 278
Using the hands-free phone system ................ 282
Making a phone call ......... 291
Setting a cellular phone ... 296
Security and system setup .............................. 302
Using the phone book ...... 307 3-5. Using the interior lights
Interior lights list ............... 315
• Interior lights .................. 316
• Personal lights ............... 317
3-6. Using the storage features List of storage features .... 318
• Glove box....................... 319
• Cup holders (front) ......... 319
• Cup holders (rear) .......... 322
• Bottle holders ................. 323
• Auxiliary box .................. 324
3-7. Other interior features Sun visors ........................ 325
Vanity mirrors ................... 326
Clock ................................ 327
Outside temperature display............................ 328
Power outlet (12V DC) ..... 329
Power outlet (115V AC) ... 330
Armrest ............................ 336
Floor mat .......................... 337
Luggage storage box (vehicles without sub
woofer) ........................... 339
Luggage compartment features .......................... 340
Compass .......................... 343
Page 206 of 528
206
3-1. Using the air conditioning system and defogger
Air conditioning system
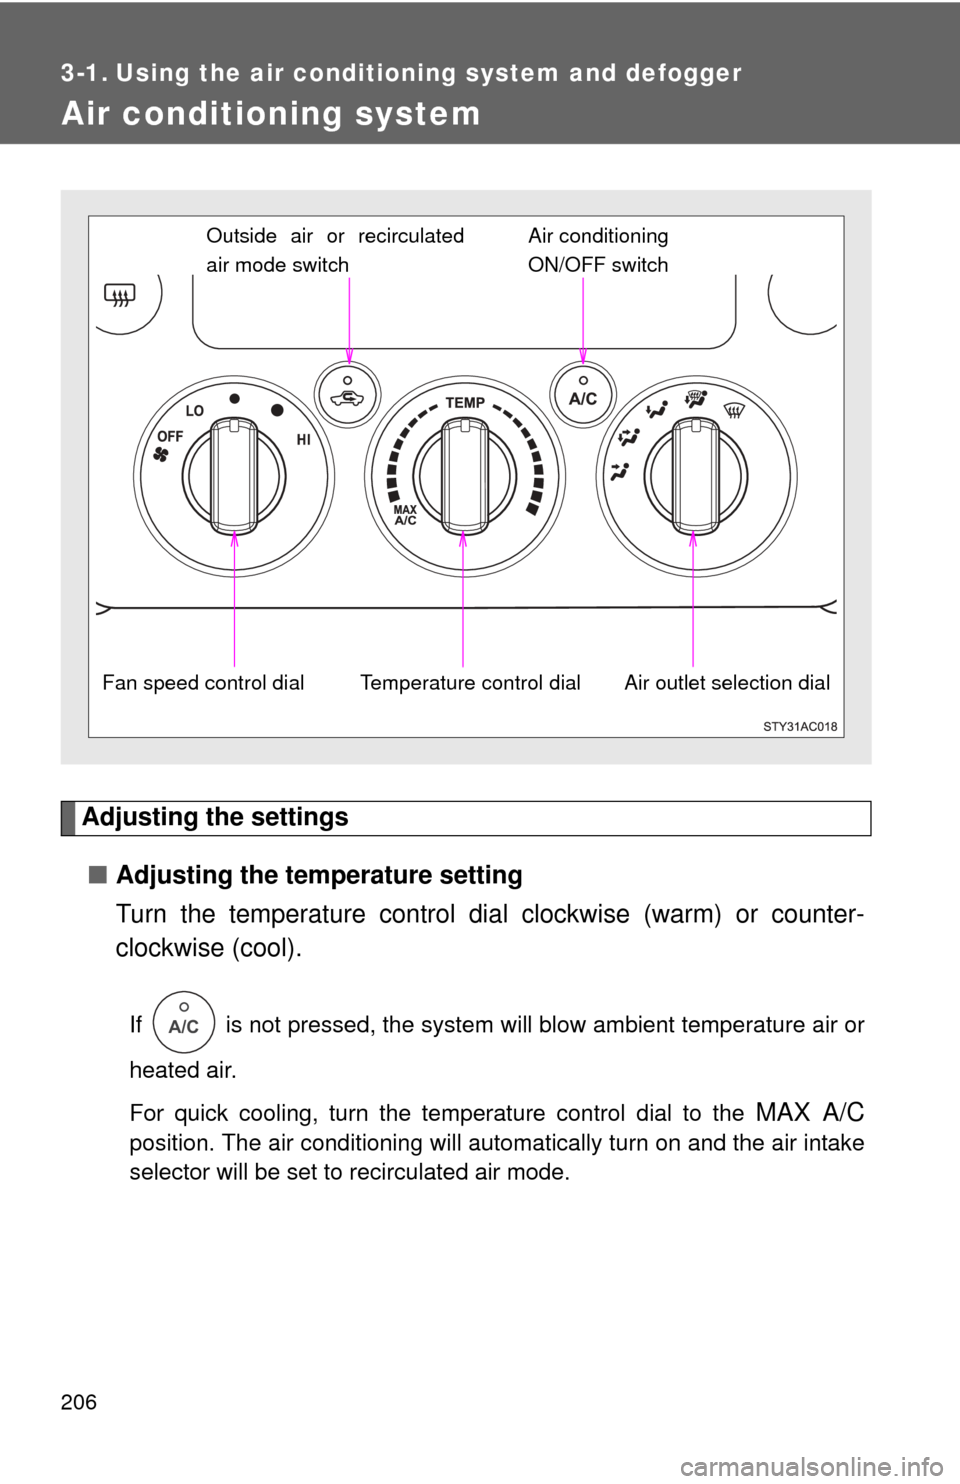
Adjusting the settings■ Adjusting the temperature setting
Turn the temperature control dial clockwise (warm) or counter-
clockwise (cool).
If is not pressed, the system will blow ambient temperature air or
heated air.
For quick cooling, turn the temperature control dial to the
MAX A/C
position. The air conditioning will automatically turn on and the air intake
selector will be set to recirculated air mode.
Outside air or recirculated
air mode switch
Air outlet selection dialAir conditioning
ON/OFF switch
Temperature control dial
Fan speed control dial
A/C
Page 207 of 528
207
3-1. Using the air conditioning system
and defogger
3
Interior features
■Adjusting the fan speed
Turn the fan speed control dial clockwise (increase) or counter-
clockwise (decrease).
Set the dial to OFF to turn the fan off.
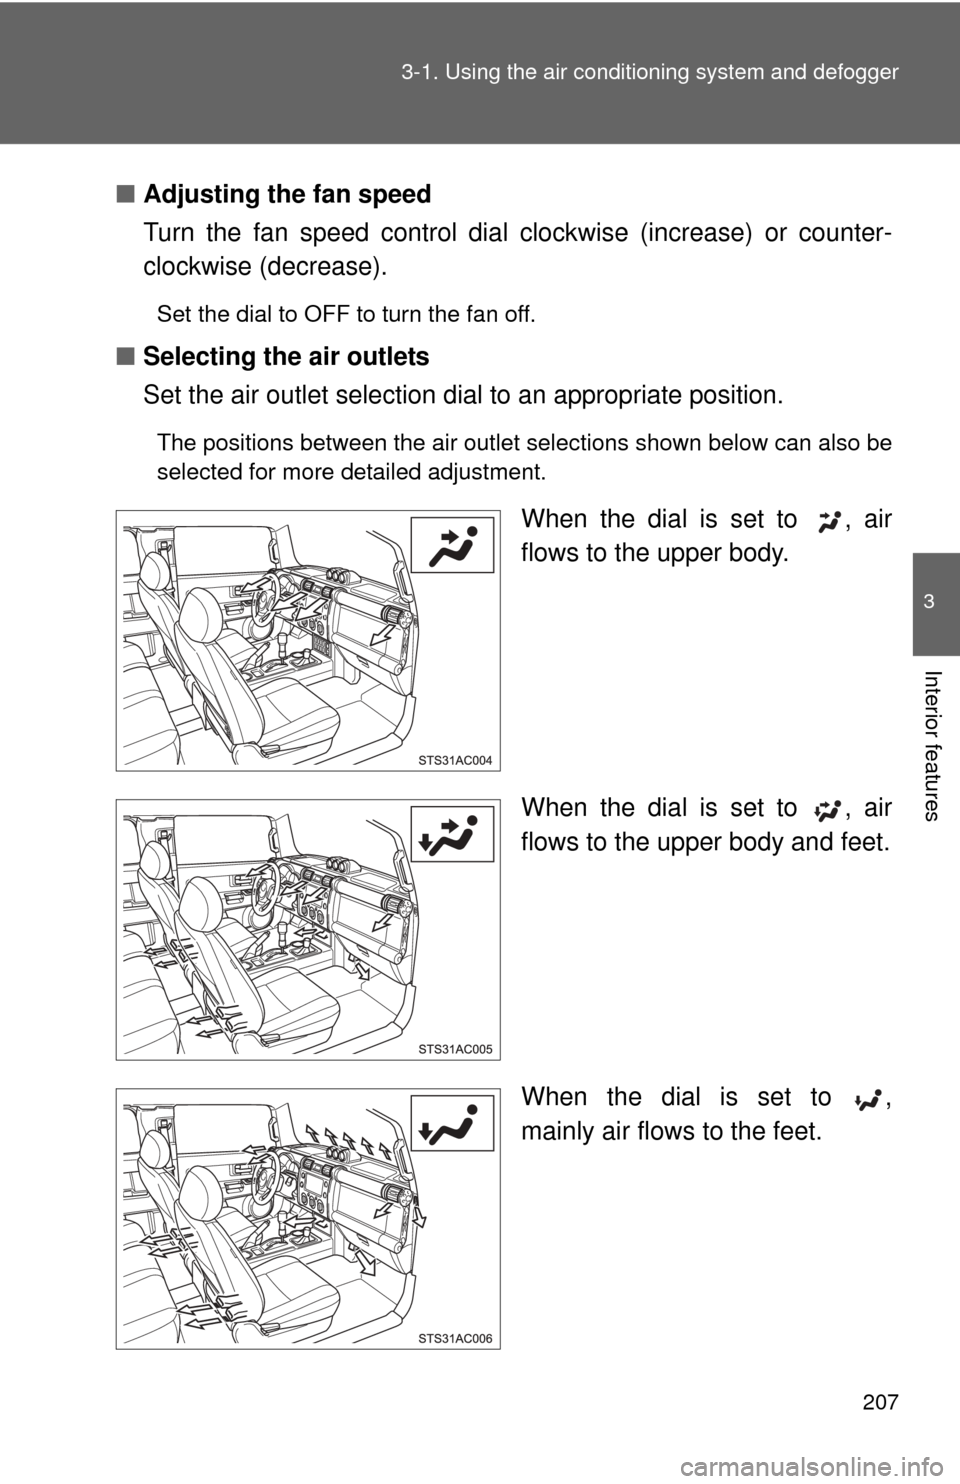
■ Selecting the air outlets
Set the air outlet selection di al to an appropriate position.
The positions between the air outlet selections shown below can also be
selected for more detailed adjustment.
When the dial is set to , air
flows to the upper body.
When the dial is set to , air
flows to the upper body and feet.
When the dial is set to ,
mainly air flows to the feet.
Page 209 of 528
209
3-1. Using the air conditioning system
and defogger
3
Interior features
■If the ambient temperature drops while using the recirculated
air mode
The air intake mode automatically changes from recirculated air
mode to outside air mode after a few minutes.
To cancel this function:
Press and hold for longer than 2 seconds.
To reactivate this function:
Turn the engine switch to the LOCK or ACC position.
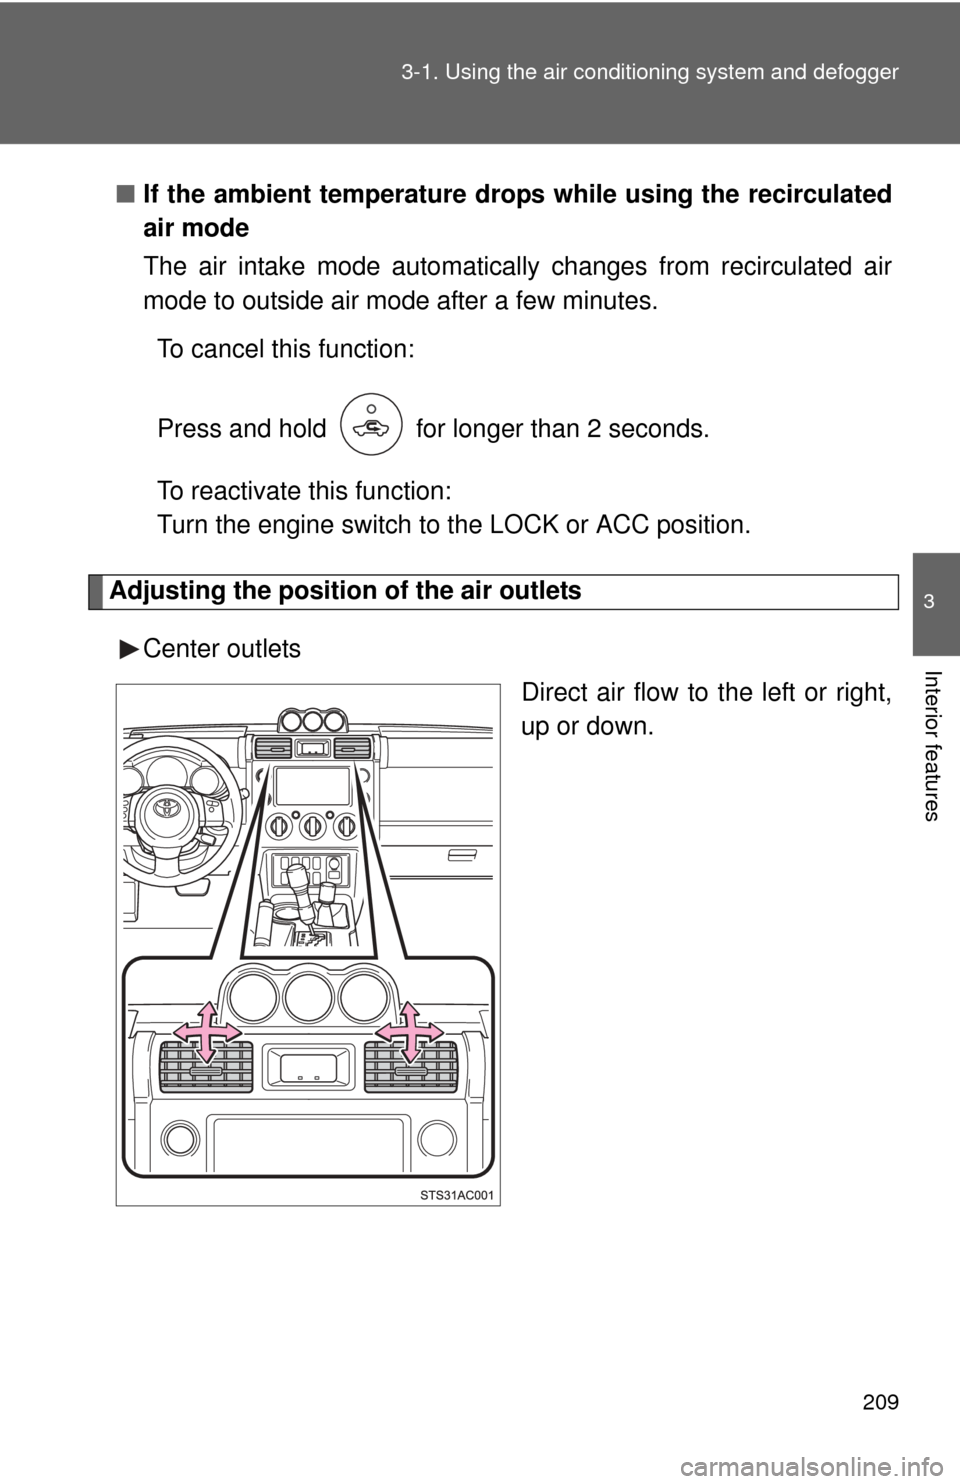
Adjusting the position of the air outlets
Center outlets Direct air flow to the left or right,
up or down.
Page 211 of 528
211
3-1. Using the air conditioning system
and defogger
3
Interior features
■Using the system in recirculated air mode
The windows will fog up more easily if the recirculated air mode is used for
an extended period.
■ When outside air temperature approaches 32°F (0°C)
The air conditioning system may not operate even when
is pressed.
■ When
is selected for the air outlets used
For your driving comfort, air flowing to the feet may be warmer than air flow-
ing to the upper body depending on the position of the temperature adjust-
ment dial.
■ When the indicator on flashes
Press and turn off the air conditioning system before turning it on
once more. There may be a problem in the air conditioning system if the indi-
cator continues to flash. Turn the air conditioning system off and have it
inspected by your Toyota dealer.
■ Air conditioning odors
●During use, various odors from inside and outside the vehicle may enter
into and accumulate in the air conditioning system. This may then cause
odor to be emitted from the vents.
● To reduce potential odors from occurring:
It is recommended that the air conditioning system be set to outside air
mode prior to turning the vehicle off.
CAUTION
■To prevent the windshield from fogging up
Do not set the air outlet selection dial to during cool air operation in
extremely humid weather. The difference between the temperature of the
outside air and that of the windshield can cause the outer surface of the
windshield to fog up, blocking your vision.
A/C
A/C
A/C