display TOYOTA FR-S 2013 Owners Manual (in English)
[x] Cancel search | Manufacturer: TOYOTA, Model Year: 2013, Model line: FR-S, Model: TOYOTA FR-S 2013Pages: 448, PDF Size: 5.59 MB
Page 2 of 448

TABLE OF CONTENTSIndex
2
1-1. Key informationKeys ..................................... 20
1-2. Opening, closing and locking the doors and
trunk
Smart key system................. 23
Wireless remote control ....... 37
Doors.................................... 40
Trunk .................................... 42
1-3. Adjustable components (seats, mirrors,
steering wheel)
Front seats ........................... 47
Rear seats ............................ 50
Head restraints ..................... 52
Seat belts ............................. 54
Steering wheel ..................... 61
Anti-glare inside rear view mirror.......................... 62
Outside rear view mirrors ..... 63
1-4. Opening and closing the windows
Power windows .................... 66
1-5. Refueling Opening the fuel tank cap .... 69 1-6. Theft deterrent system
Engine immobilizer system ................................ 73
Alarm .................................... 75
Theft prevention labels (U.S.A.)............................... 79
1-7. Safety information Correct driving posture ......... 80
SRS airbag (Supplemental Restraint System
airbag) ................................ 82
Front passenger occupant classification system ......... 117
Child restraint systems ....... 125
Installing child restraints ..... 129
2-1. Driving procedures Driving the vehicle .............. 140
Engine (ignition) switch....... 153
Automatic transmission ...... 162
Manual Transmission ......... 169
Turn signal lever ................. 172
Parking brake ..................... 173
Horn .................................... 174
2-2. Instrument cluster Gauges and meters ............ 175
Indicators and warning lights ................................. 179
Multi-information display ..... 183
1Before driving
2When driving
Page 3 of 448

1
2
3
4
5
6
7
3
2-3. Operating the lights and windshield wipers
Headlight switch .................. 188
Windshield wipers and washer .............................. 193
2-4. Using other driving systems
Cruise control ...................... 196
Driving assist systems ........ 201
2-5. Driving information Cargo and luggage ............. 206
Vehicle load limits ............... 210
Winter driving tips ............... 211
Trailer towing ...................... 214
Dinghy towing ..................... 215
3-1. Using the air conditioning system and defogger
Automatic air conditioning system .......... 218
Rear window and outside rear view mirror
defoggers .......................... 226
3-2. Using the audio system Using the AUX/USB port ..... 228 3-3. Using the interior lights
Interior lights list ................. 229
• Interior light ...................... 230
3-4. Using the storage features List of storage features ....... 231
• Glove box ......................... 232
• Bottle holders ................... 233
• Cup holders/console tray ...................... 234
3-5. Other interior features Sun visors........................... 236
Vanity mirrors ..................... 237
Clock .................................. 238
Outside temperature display .............................. 239
Power outlets...................... 240
Floor mat ............................ 242
4-1. Maintenance and care Cleaning and protecting the vehicle exterior ........... 246
Cleaning and protecting the vehicle interior ............ 250
4-2. Maintenance Maintenance requirements .................... 254
General maintenance ......... 256
Emission inspection and maintenance (I/M)
programs .......................... 259
3Interior features
4Maintenance and care
Page 11 of 448
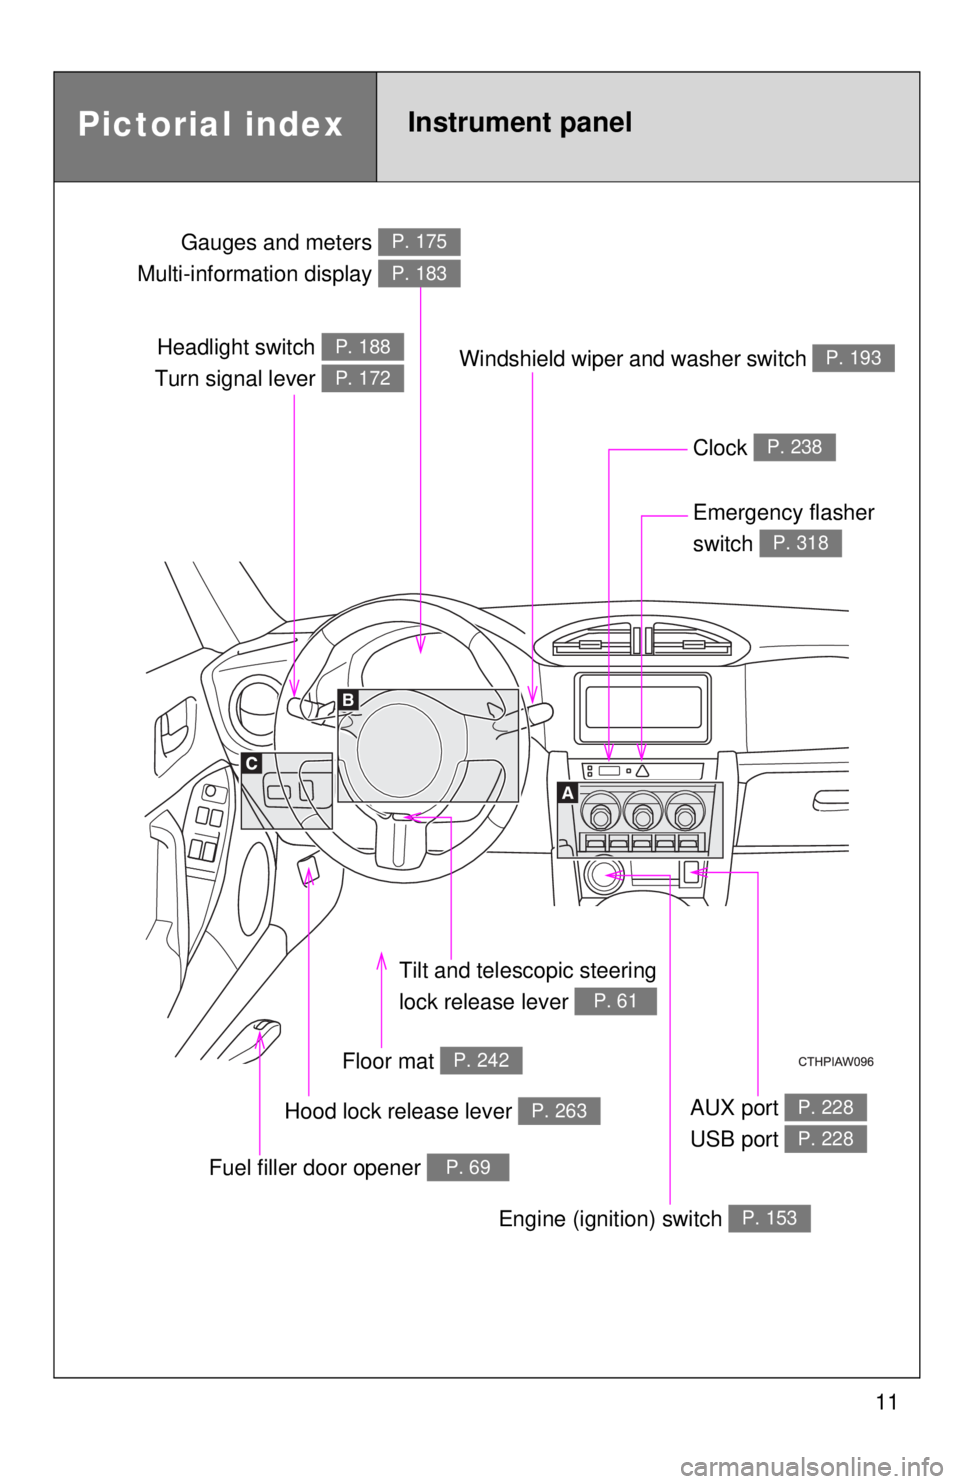
11
Headlight switch
Turn signal lever P. 188
P. 172
Gauges and meters
Multi-information display P. 175
P. 183
Clock P. 238
Windshield wiper and washer switch P. 193
Emergency flasher
switch
P. 318
Tilt and tele scopic steering
lock release lever
P. 61
Floor mat P. 242
Hood lock release lever P. 263
Fuel filler door opener P. 69
AUX port
USB port P. 228
P. 228
Pictorial indexInstrument panel
Engine (ignition) switch P. 153
Page 129 of 448
129
1
1-7. Safety information
Before driving
Installing child restraints
Follow the child restraint system manufacturer's instructions. Firmly
secure child restraints to the r ear seats using the LATCH anchors or
a seat belt. Attach the top teth er strap when installing a child
restraint.
The lap/shoulder belt can be used if your child restraint system is
not compatible with the LATCH (Low er Anchors and Tethers for Chil-
dren) system.
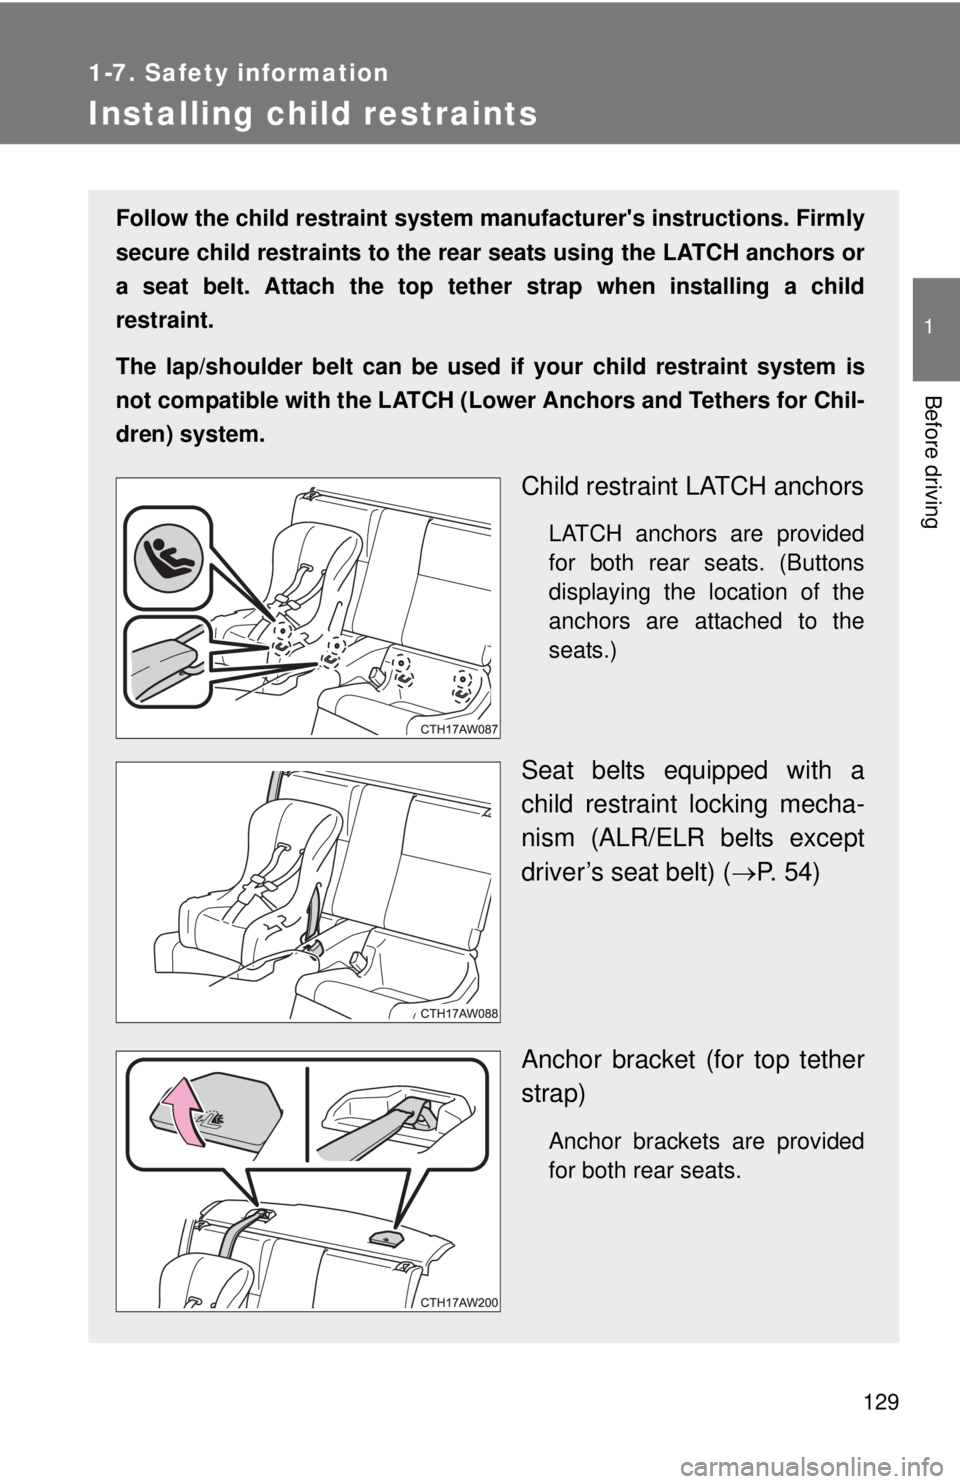
Child restraint LATCH anchors
LATCH anchors are provided
for both rear seats. (Buttons
displaying the location of the
anchors are attached to the
seats.)
Seat belts equipped with a
child restraint locking mecha-
nism (ALR/ELR belts except
driver’s seat belt) ( P. 54)
Anchor bracket (for top tether
strap)
Anchor brackets are provided
for both rear seats.
Page 139 of 448
When driving2
139
2-1. Driving proceduresDriving the vehicle............ 140
Engine (ignition) switch ............................. 153
Automatic transmission................... 162
Manual Transmission ....... 169
Turn signal lever .............. 172
Parking brake ................... 173
Horn ................................. 174
2-2. Instrument cluster Gauges and meters ......... 175
Indicators and warning lights .............................. 179
Multi-information display............................ 183 2-3. Operating the lights and
windshield wipers
Headlight switch ............... 188
Windshield wipers and washer ........................... 193
2-4. Using other driving systems
Cruise control ................... 196
Driving assist systems ..... 201
2-5. Driving information Cargo and luggage .......... 206
Vehicle load limits ............ 210
Winter driving tips ............ 211
Trailer towing ................... 214
Dinghy towing .................. 215
Page 163 of 448
163
2-1. Driving procedures
2
When driving
■
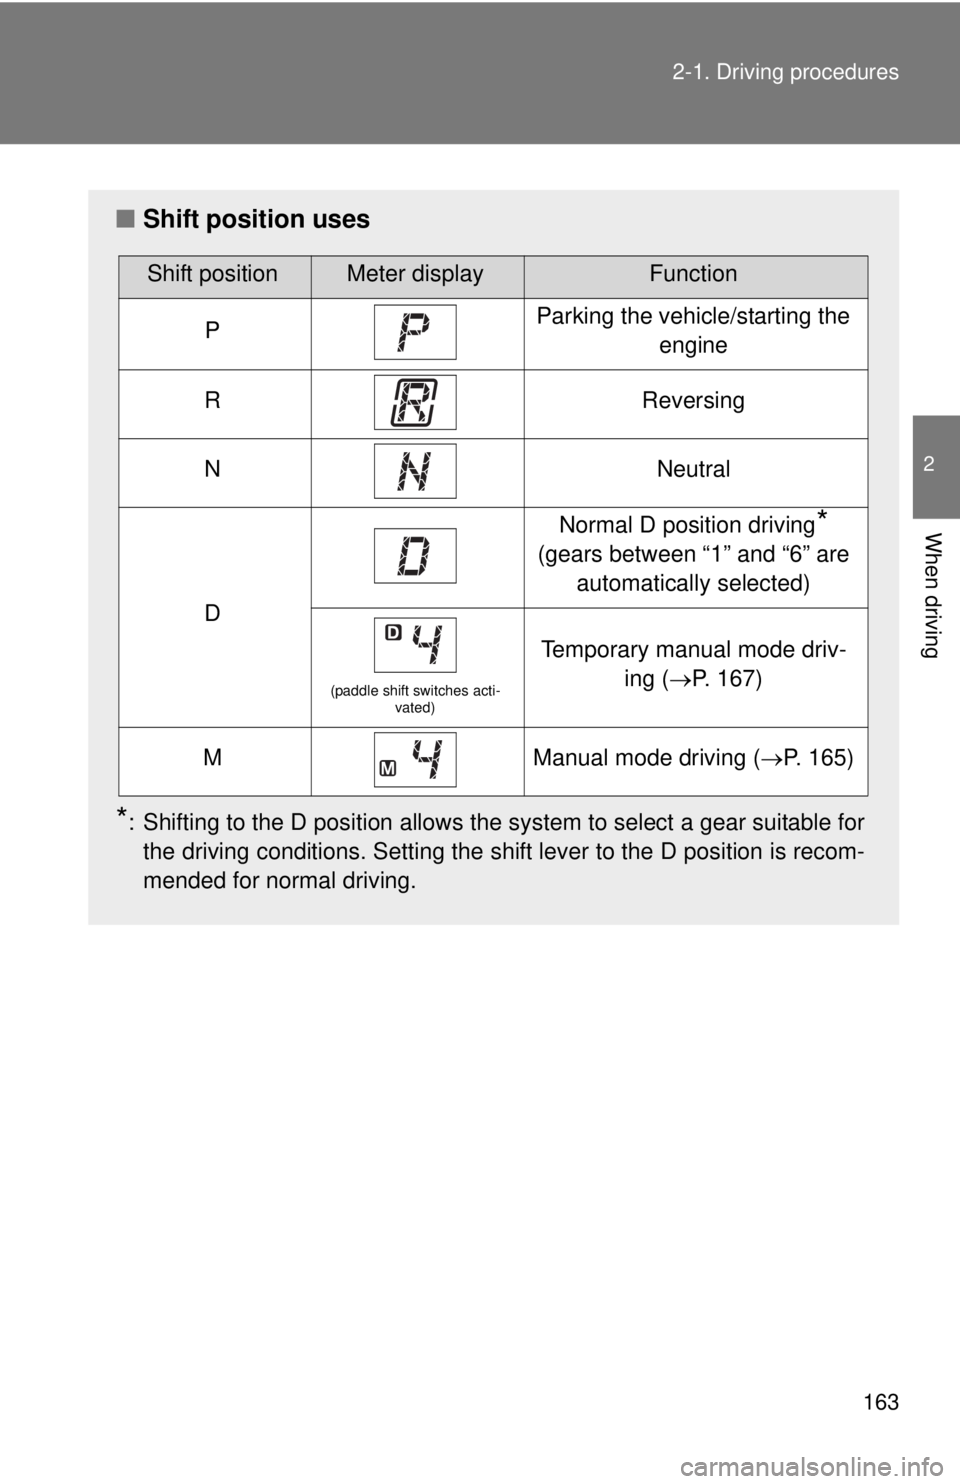
Shift position uses
*: Shifting to the D position allows the system to select a gear suitable for
the driving conditions. Setting the shift lever to the D position is recom-
mended for normal driving.
Shift positionMeter displayFunction
PParking the vehicle/starting the engine
RReversing
NNeutral
D
Normal D position driving*
(gears between “1” and “6” are automatically selected)
(paddle shift switches acti- vated)
Temporary manual mode driv-
ing (P. 167)
MManual mode driving ( P. 165)
Page 165 of 448
165
2-1. Driving procedures
2
When driving
Manual mode driving
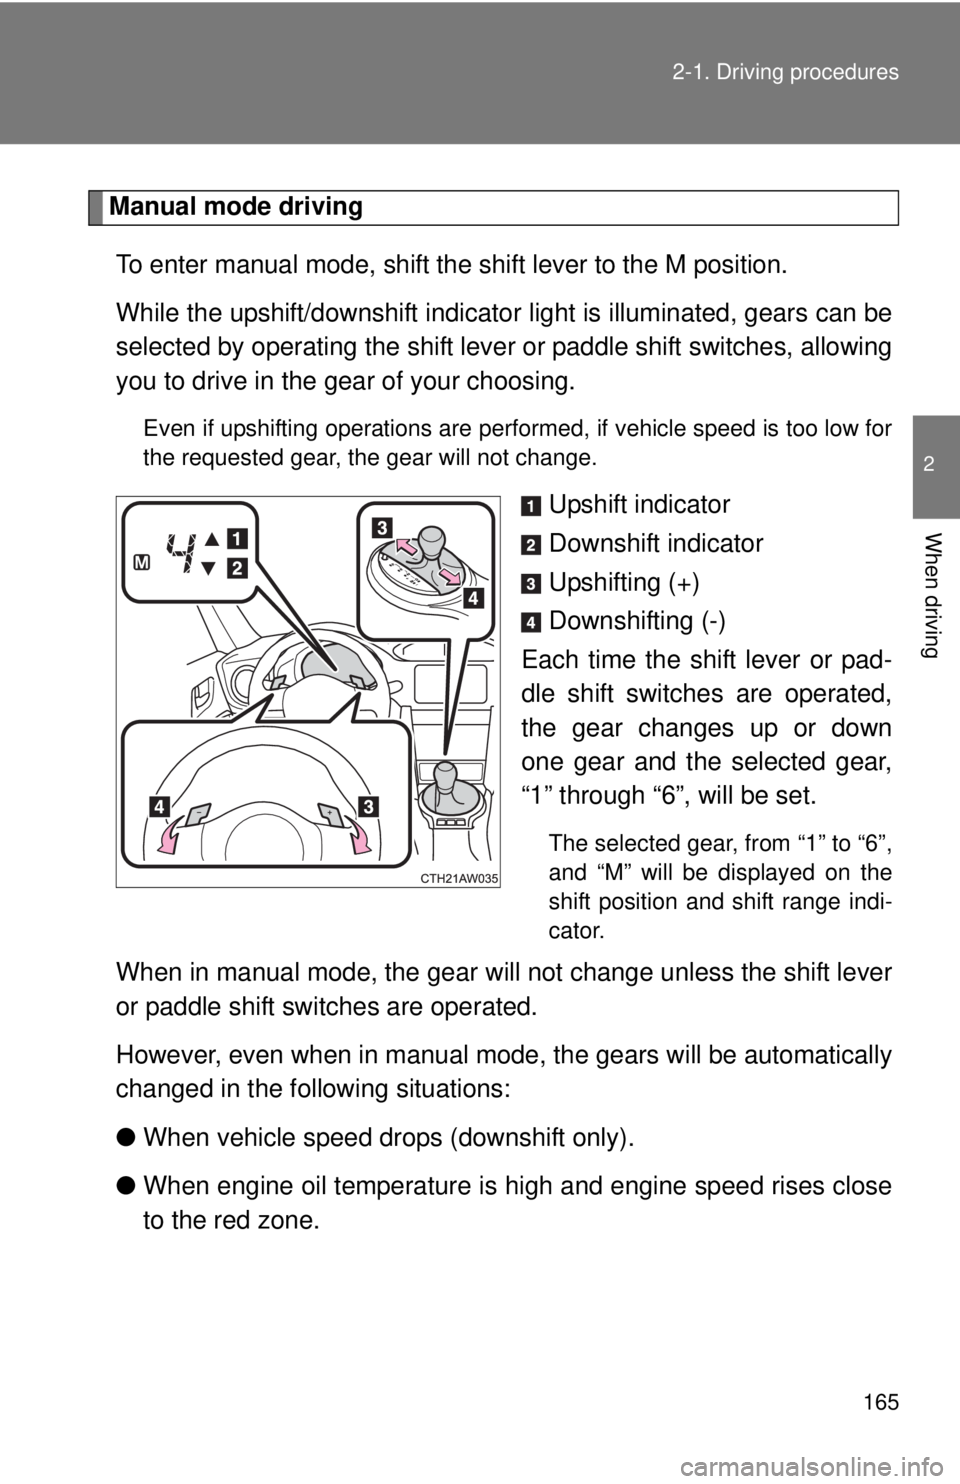
To enter manual mode, shift the shift lever to the M position.
While the upshift/downshift indicato r light is illuminated, gears can be
selected by operating the shift leve r or paddle shift switches, allowing
you to drive in the gear of your choosing.
Even if upshifting operations are performed, if vehicle speed is too low for
the requested gear, the gear will not change.
Upshift indicator
Downshift indicator
Upshifting (+)
Downshifting (-)
Each time the shift lever or pad-
dle shift switches are operated,
the gear changes up or down
one gear and the selected gear,
“1” through “6”, will be set.
The selected gear, from “1” to “6”,
and “M” will be displayed on the
shift position and shift range indi-
cator.
When in manual mode, the gear will not change unless the shift lever
or paddle shift switches are operated.
However, even when in manual mode, the gears will be automatically
changed in the following situations:
● When vehicle speed drops (downshift only).
● When engine oil temperature is high and engine speed rises close
to the red zone.
Page 167 of 448
167
2-1. Driving procedures
2
When driving
■
Automatic gear selection when the vehicle is stopped
When the vehicle is idling at high rpm in order to warm up, and the vehicle is
on a slippery road, the transmission may automatically shift to 2
nd gear for
stopping and starting off.
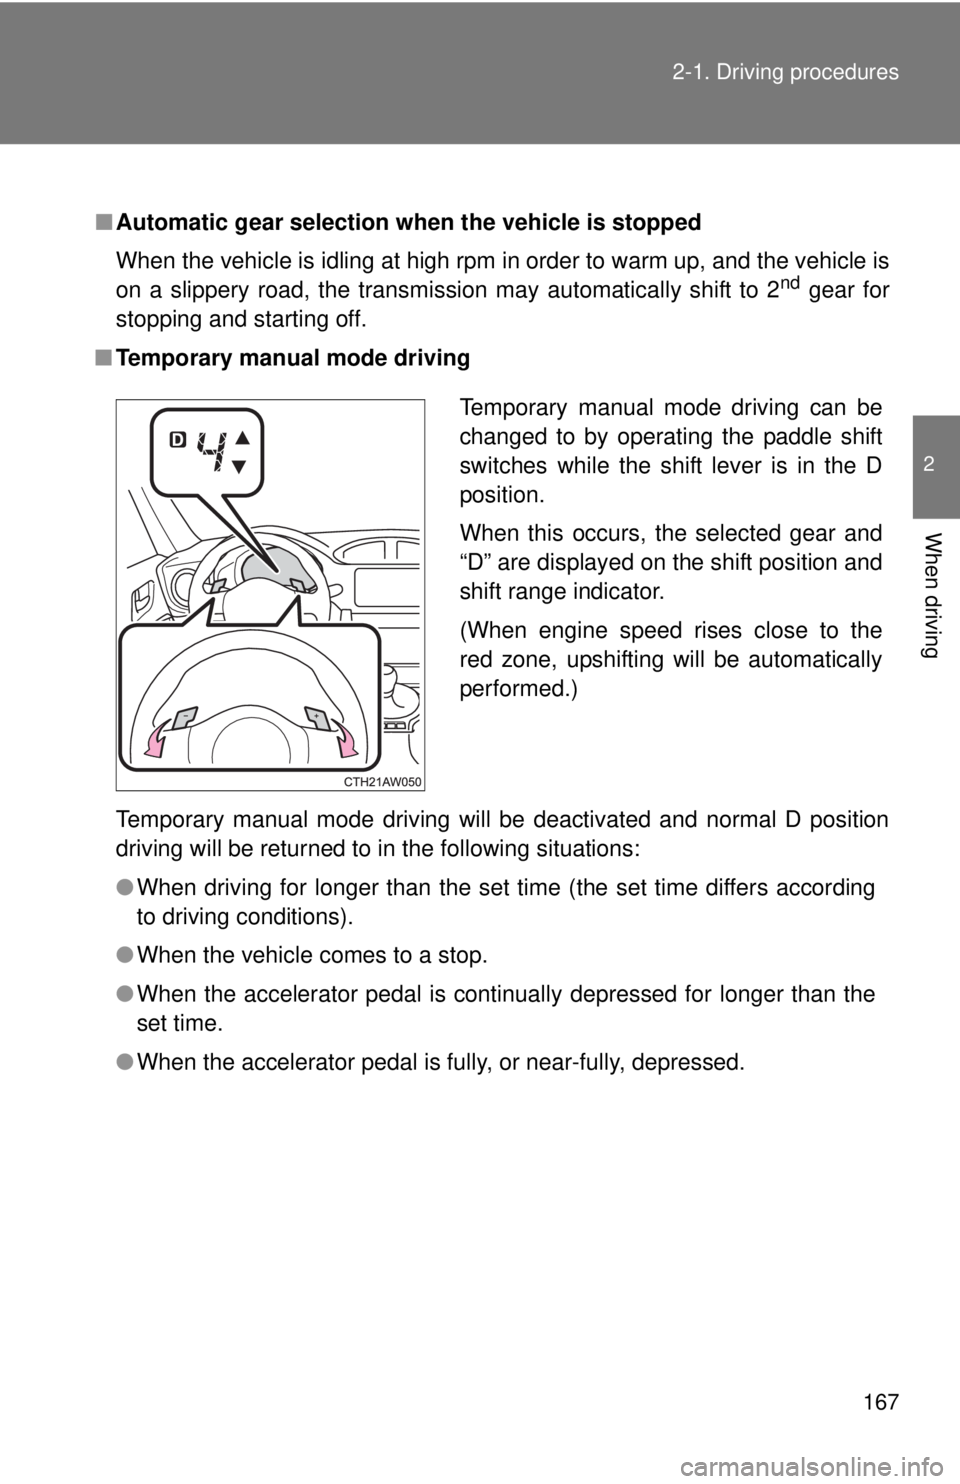
■ Temporary manual mode driving
Temporary manual mode driving will be deactivated and normal D position
driving will be returned to in the following situations:
●When driving for longer than the set time (the set time differs according
to driving conditions).
● When the vehicle comes to a stop.
● When the accelerator pedal is continually depressed for longer than the
set time.
● When the accelerator pedal is fully, or near-fully, depressed.
Temporary manual mode driving can be
changed to by operating the paddle shift
switches while the shift lever is in the D
position.
When this occurs, the selected gear and
“D” are displayed on the shift position and
shift range indicator.
(When engine speed rises close to the
red zone, upshifting will be automatically
performed.)
Page 175 of 448
175
2
When driving
2-2. Instrument cluster
Gauges and meters
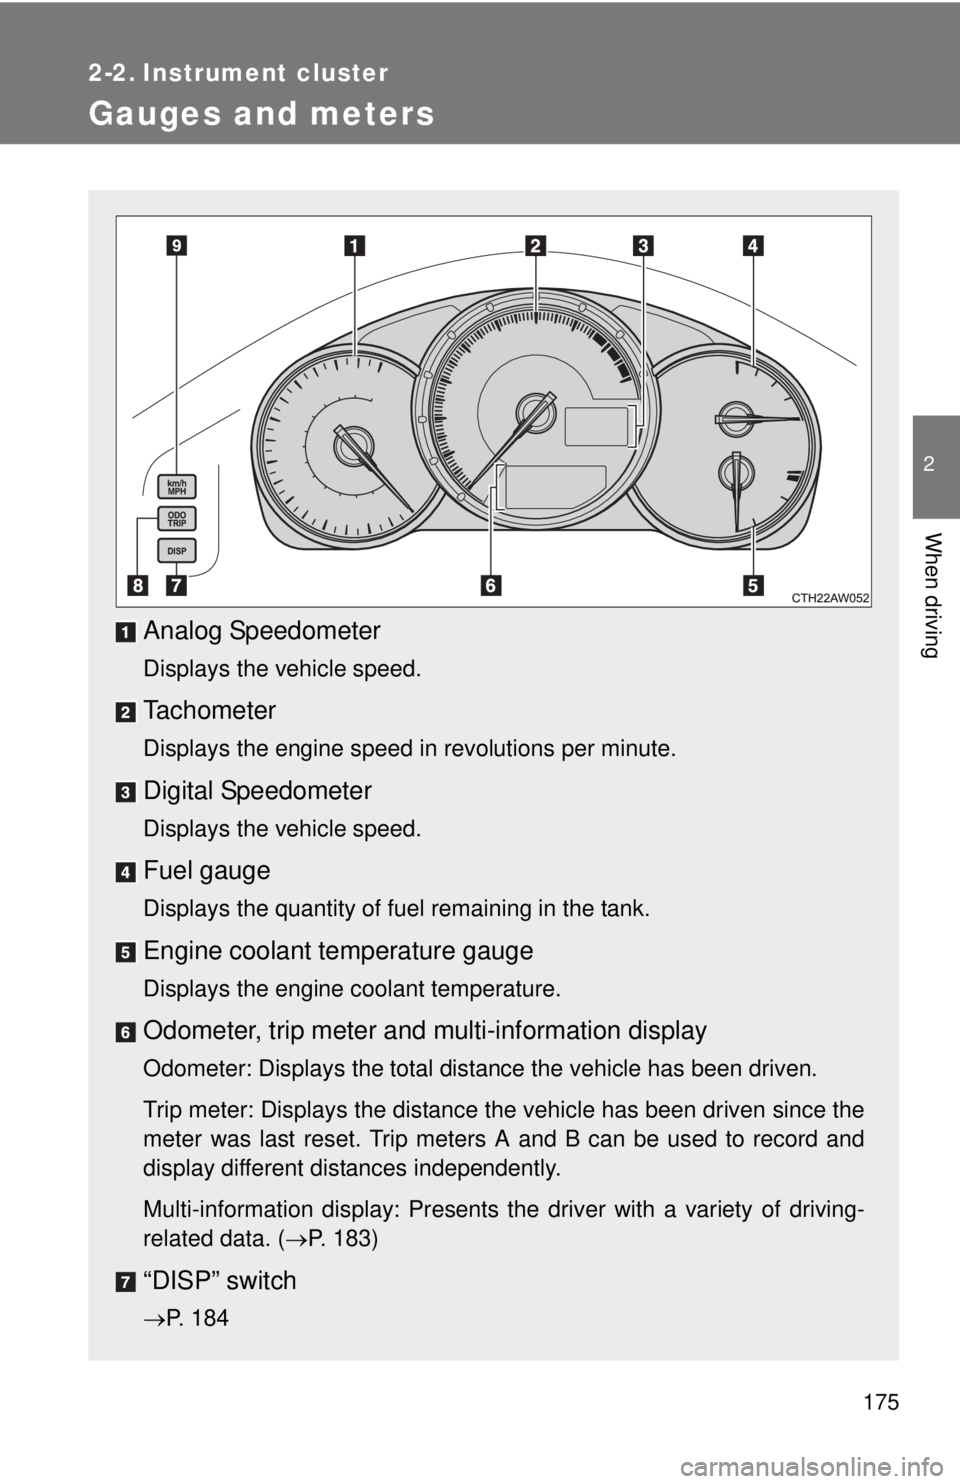
Analog Speedometer
Displays the vehicle speed.
Tachometer
Displays the engine speed in revolutions per minute.
Digital Speedometer
Displays the vehicle speed.
Fuel gauge
Displays the quantity of fuel remaining in the tank.
Engine coolant temperature gauge
Displays the engine coolant temperature.
Odometer, trip meter and multi-information display
Odometer: Displays the total distance the vehicle has been driven.
Trip meter: Displays the distance the vehicle has been driven since the
meter was last reset. Trip meters A and B can be used to record and
display different distances independently.
Multi-information display: Presents the driver with a variety of driving-
related data. (P. 183)
“DISP” switch
P. 184
Page 176 of 448
176 2-2. Instrument cluster
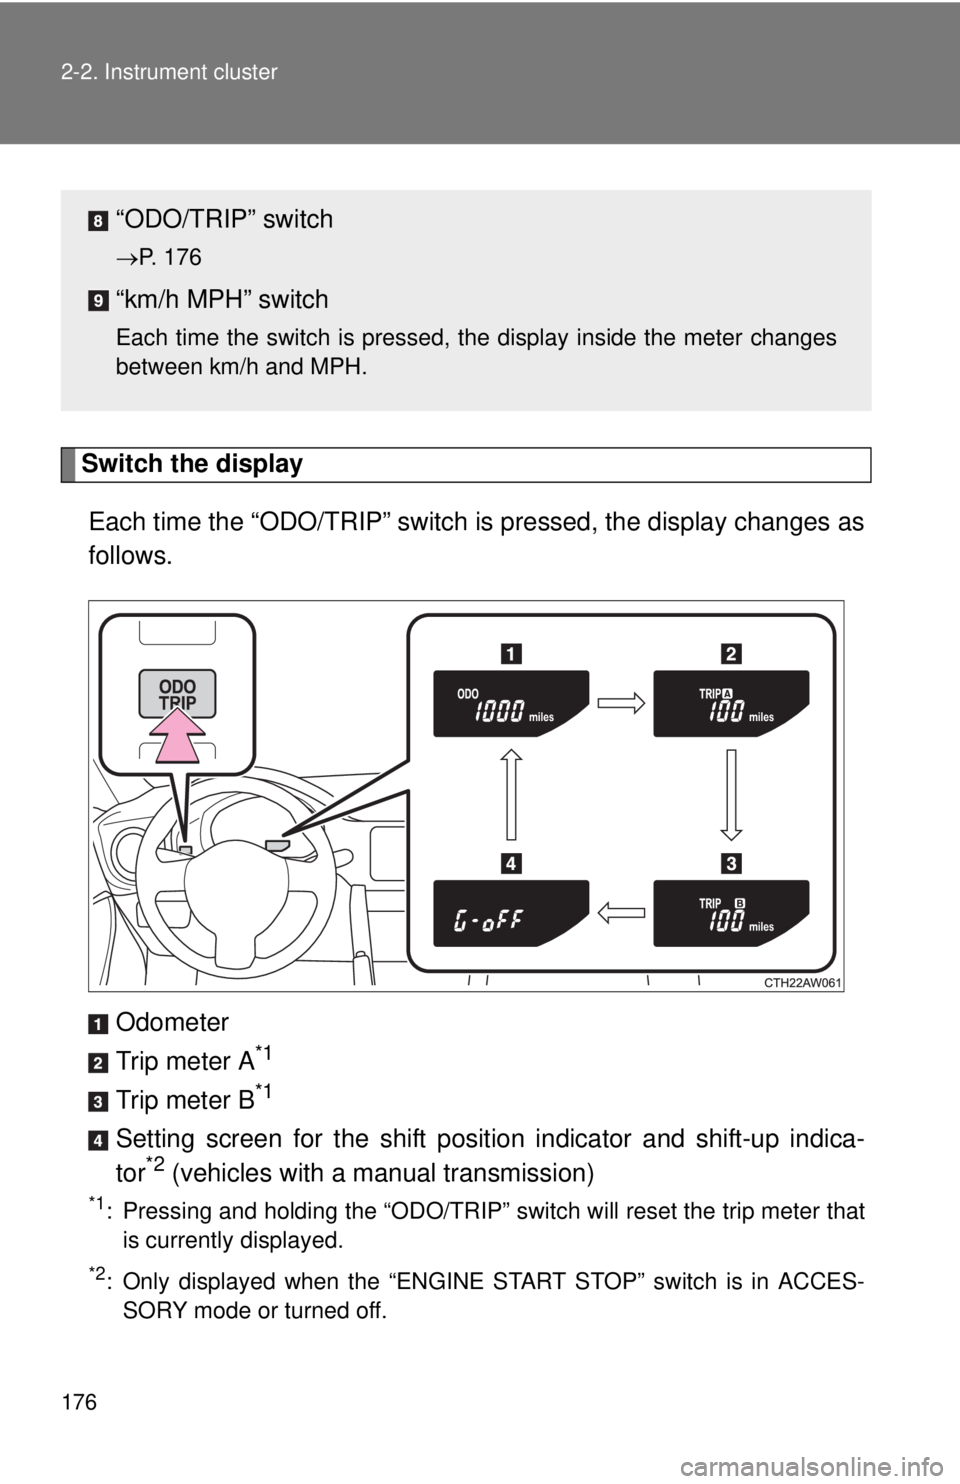
Switch the displayEach time the “ODO/TRIP” switch is pressed, the display changes as
follows.
Odometer
Trip meter A
*1
Trip meter B*1
Setting screen for the shift positio n indicator and shift-up indica-
tor*2 (vehicles with a manual transmission)
*1: Pressing and holding the “ODO/TRIP” switch will reset the trip meter that is currently displayed.
*2: Only displayed when the “ENGINE START STOP” switch is in ACCES-SORY mode or turned off.
“ODO/TRIP” switch
P. 176
“km/h MPH” switch
Each time the switch is pressed, the display inside the meter changes
between km/h and MPH.