TOYOTA FR-S 2014 Owners Manual (in English)
Manufacturer: TOYOTA, Model Year: 2014,
Model line: FR-S,
Model: TOYOTA FR-S 2014
Pages: 412, PDF Size: 9.19 MB
TOYOTA FR-S 2014 Owners Manual (in English)
FR-S 2014
TOYOTA
TOYOTA
https://www.carmanualsonline.info/img/14/43182/w960_43182-0.png
TOYOTA FR-S 2014 Owners Manual (in English)
Trending: coolant level, instrument panel, interior lights, trunk release, lock, fuse, wheel torque
Page 281 of 412
281
4-3. Do-it-yourself maintenance
4
Maintenance and care
Light bulbs
You may replace the following bulbs by yourself. The difficulty level
of replacement varies depending on the bulb. If necessary bulb
replacement seems difficult to perform, contact your Scion dealer.
■Preparing a replacement light bulb
Check the wattage of the light bulb being replaced. (P. 351)
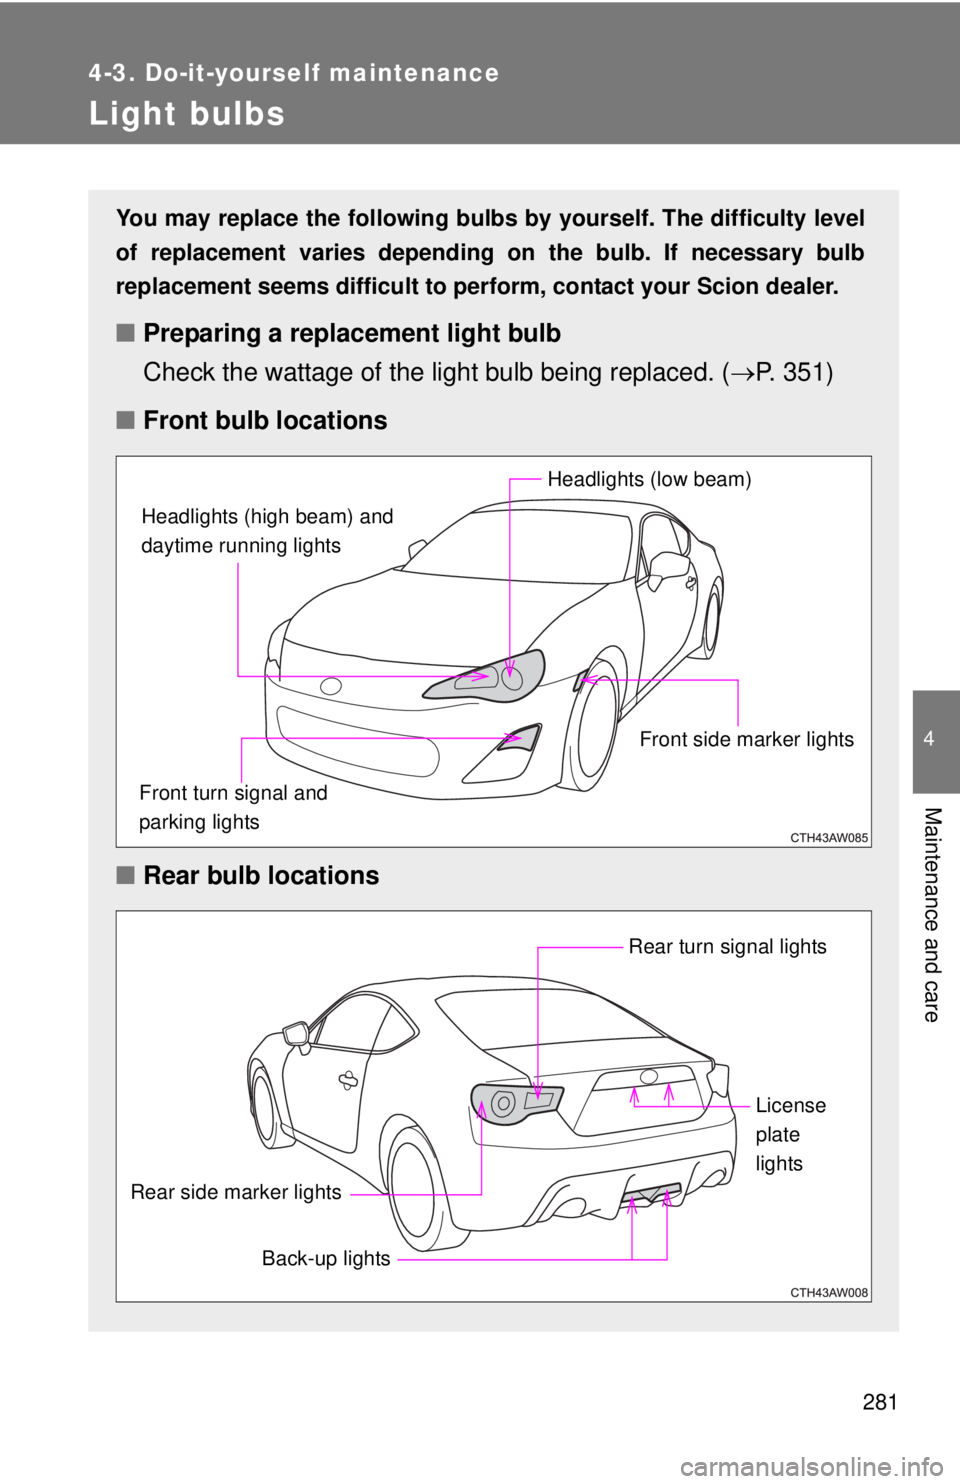
■Front bulb locations
■Rear bulb locations
Headlights (high beam) and
daytime running lights
Headlights (low beam)
Front side marker lights
Front turn signal and
parking lights
Rear turn signal lights
Rear side marker lights
Back-up lightsLicense
plate
lights
Page 282 of 412
282 4-3. Do-it-yourself maintenance
Replacing light bulbs
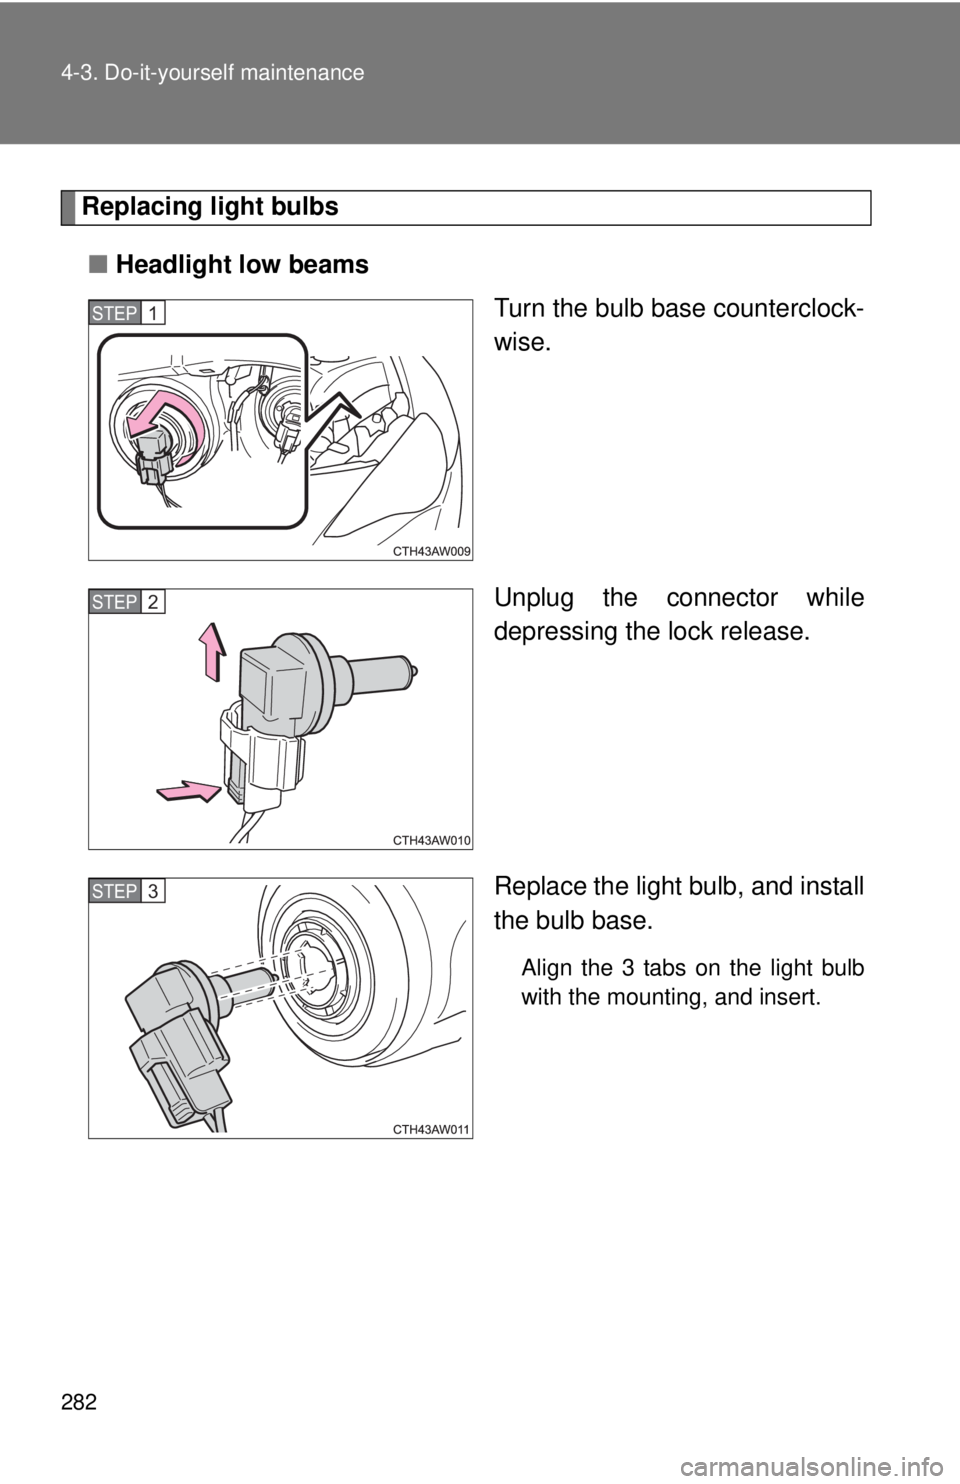
■Headlight low beams
Turn the bulb base counterclock-
wise.
Unplug the connector while
depressing the lock release.
Replace the light bulb, and install
the bulb base.
Align the 3 tabs on the light bulb
with the mounting, and insert.
STEP 1
STEP 2
STEP 3
Page 283 of 412
283 4-3. Do-it-yourself maintenance
4
Maintenance and care
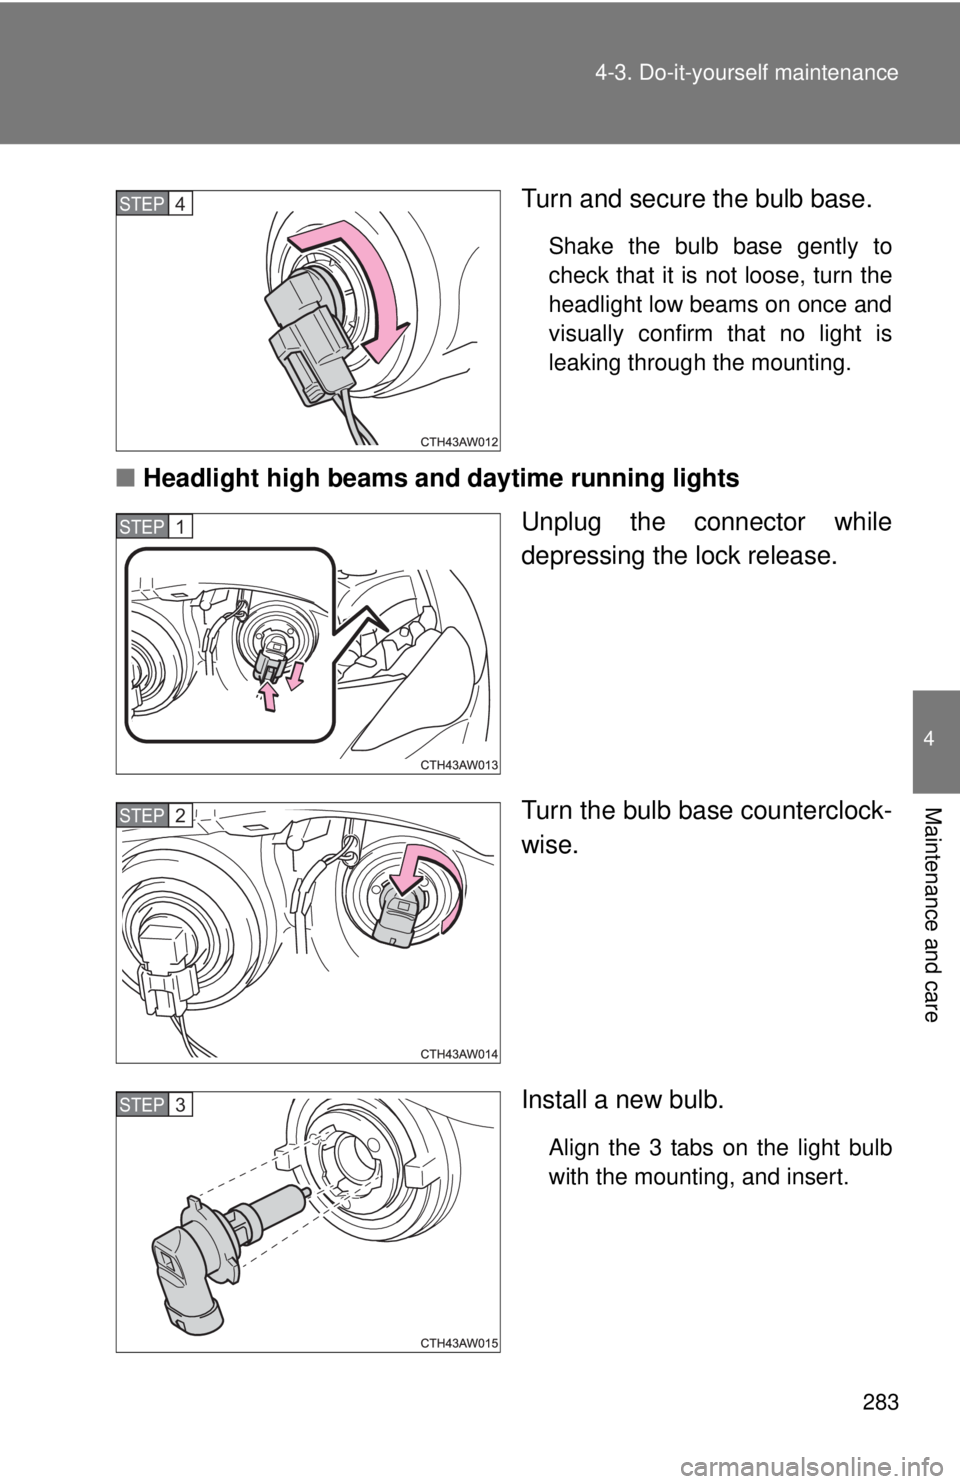
Turn and secure the bulb base.
Shake the bulb base gently to
check that it is not loose, turn the
headlight low beams on once and
visually confirm that no light is
leaking through the mounting.
■Headlight high beams and daytime running lights
Unplug the connector while
depressing the lock release.
Turn the bulb base counterclock-
wise.
Install a new bulb.
Align the 3 tabs on the light bulb
with the mounting, and insert.
STEP 4
STEP 1
STEP 2
STEP 3
Page 284 of 412
284 4-3. Do-it-yourself maintenance
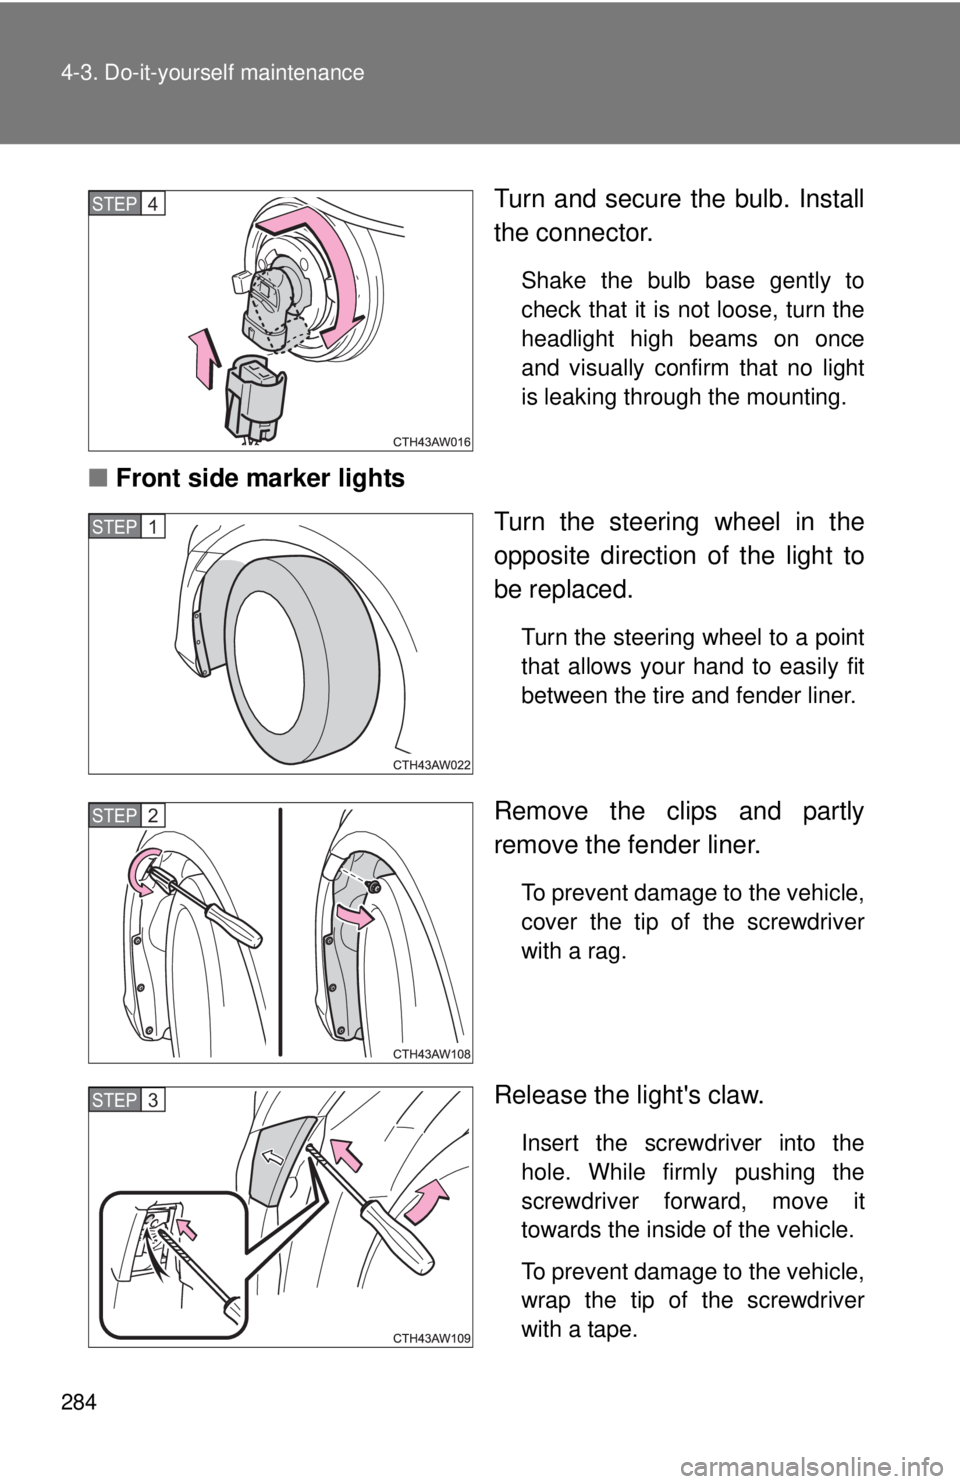
Turn and secure the bulb. Install
the connector.
Shake the bulb base gently to
check that it is not loose, turn the
headlight high beams on once
and visually confirm that no light
is leaking through the mounting.
■Front side marker lights
Turn the steering wheel in the
opposite direction of the light to
be replaced.
Turn the steering wheel to a point
that allows your hand to easily fit
between the tire and fender liner.
Remove the clips and partly
remove the fender liner.
To prevent damage to the vehicle,
cover the tip of the screwdriver
with a rag.
Release the light's claw.
Insert the screwdriver into the
hole. While firmly pushing the
screwdriver forward, move it
towards the inside of the vehicle.
To prevent damage to the vehicle,
wrap the tip of the screwdriver
with a tape.
STEP 4
STEP 1
STEP 2
STEP 3
Page 285 of 412
285 4-3. Do-it-yourself maintenance
4
Maintenance and care
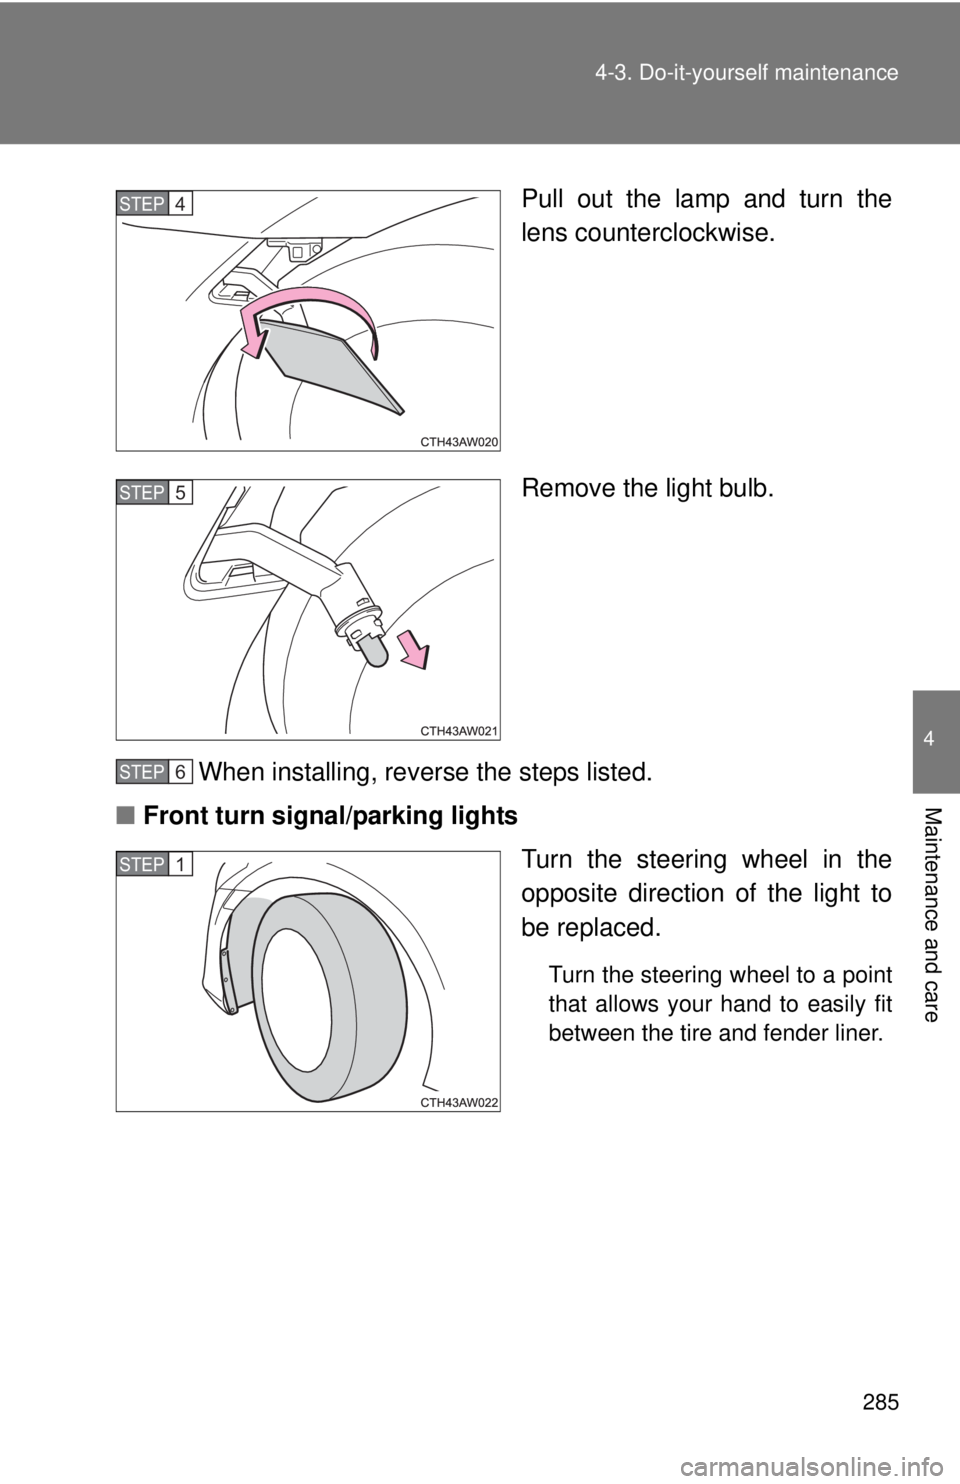
Pull out the lamp and turn the
lens counterclockwise.
Remove the light bulb.
When installing, reverse the steps listed.
■Front turn signal/parking lights
Turn the steering wheel in the
opposite direction of the light to
be replaced.
Turn the steering wheel to a point
that allows your hand to easily fit
between the tire and fender liner.
STEP 4
STEP 5
STEP 6
STEP 1
Page 286 of 412
286 4-3. Do-it-yourself maintenance
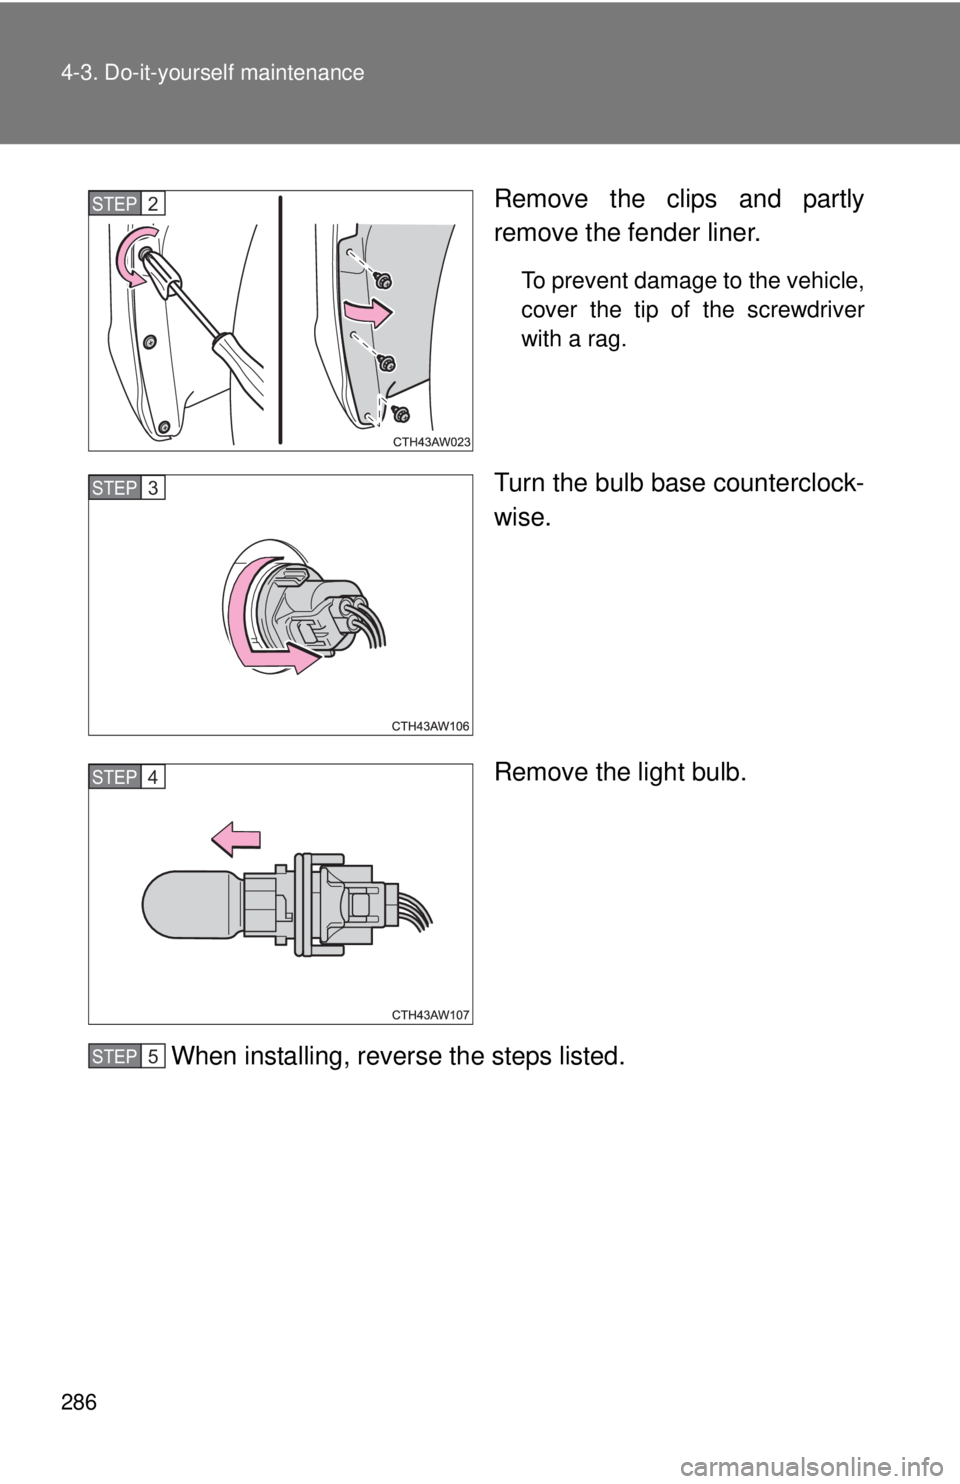
Remove the clips and partly
remove the fender liner.
To prevent damage to the vehicle,
cover the tip of the screwdriver
with a rag.
Turn the bulb base counterclock-
wise.
Remove the light bulb.
When installing, reverse the steps listed.
STEP 2
STEP 3
STEP 4
STEP 5
Page 287 of 412
287 4-3. Do-it-yourself maintenance
4
Maintenance and care
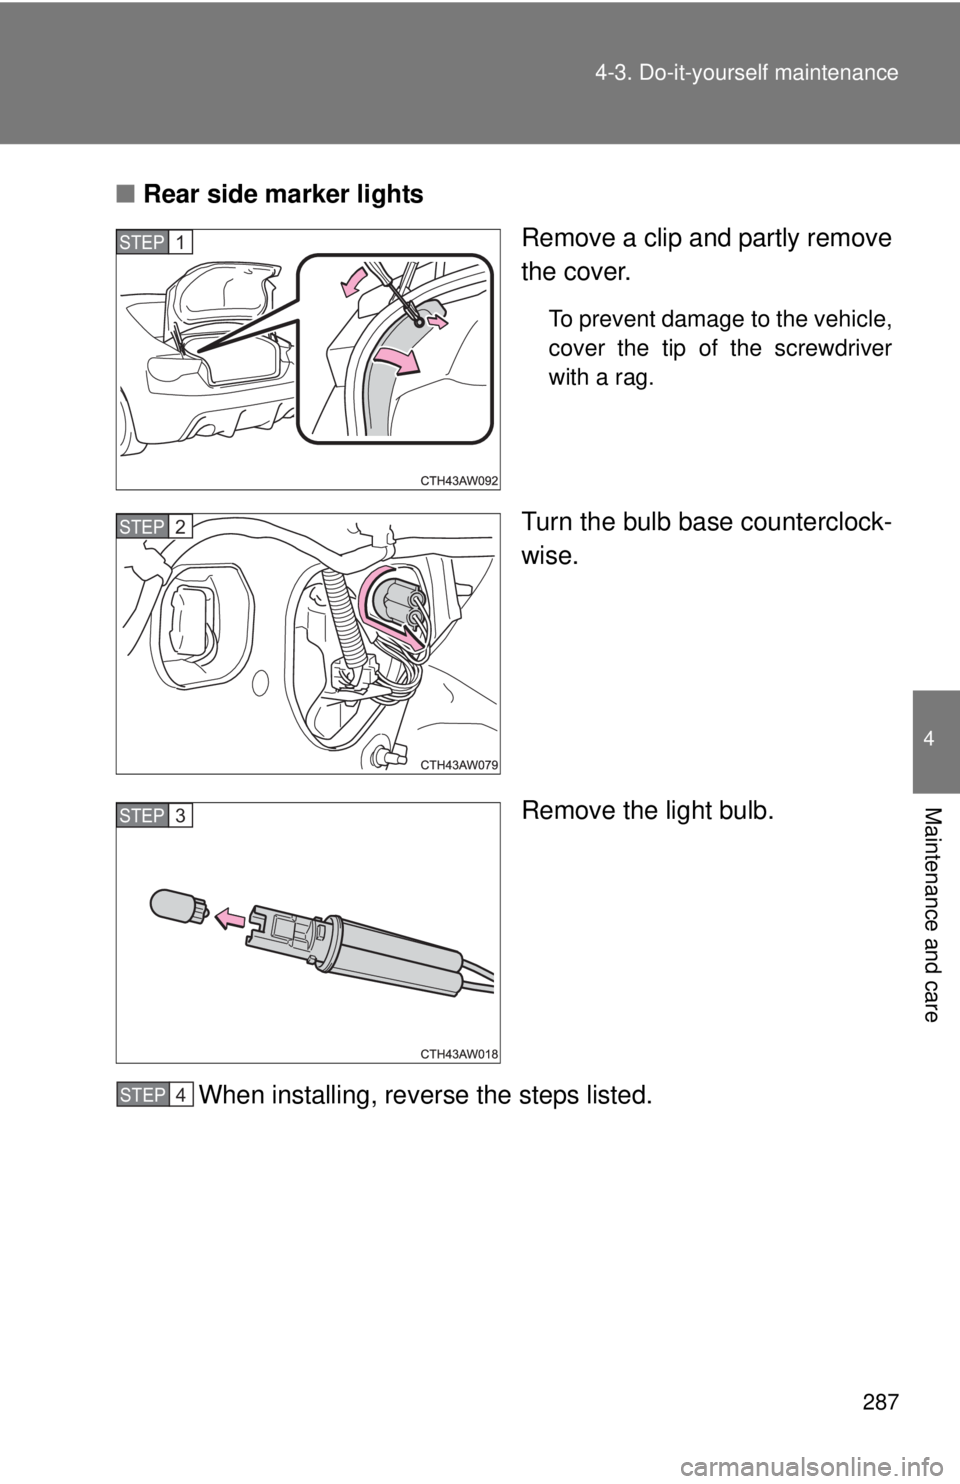
■Rear side marker lights
Remove a clip and partly remove
the cover.
To prevent damage to the vehicle,
cover the tip of the screwdriver
with a rag.
Turn the bulb base counterclock-
wise.
Remove the light bulb.
When installing, reverse the steps listed.
STEP 1
STEP 2
STEP 3
STEP 4
Page 288 of 412
288 4-3. Do-it-yourself maintenance
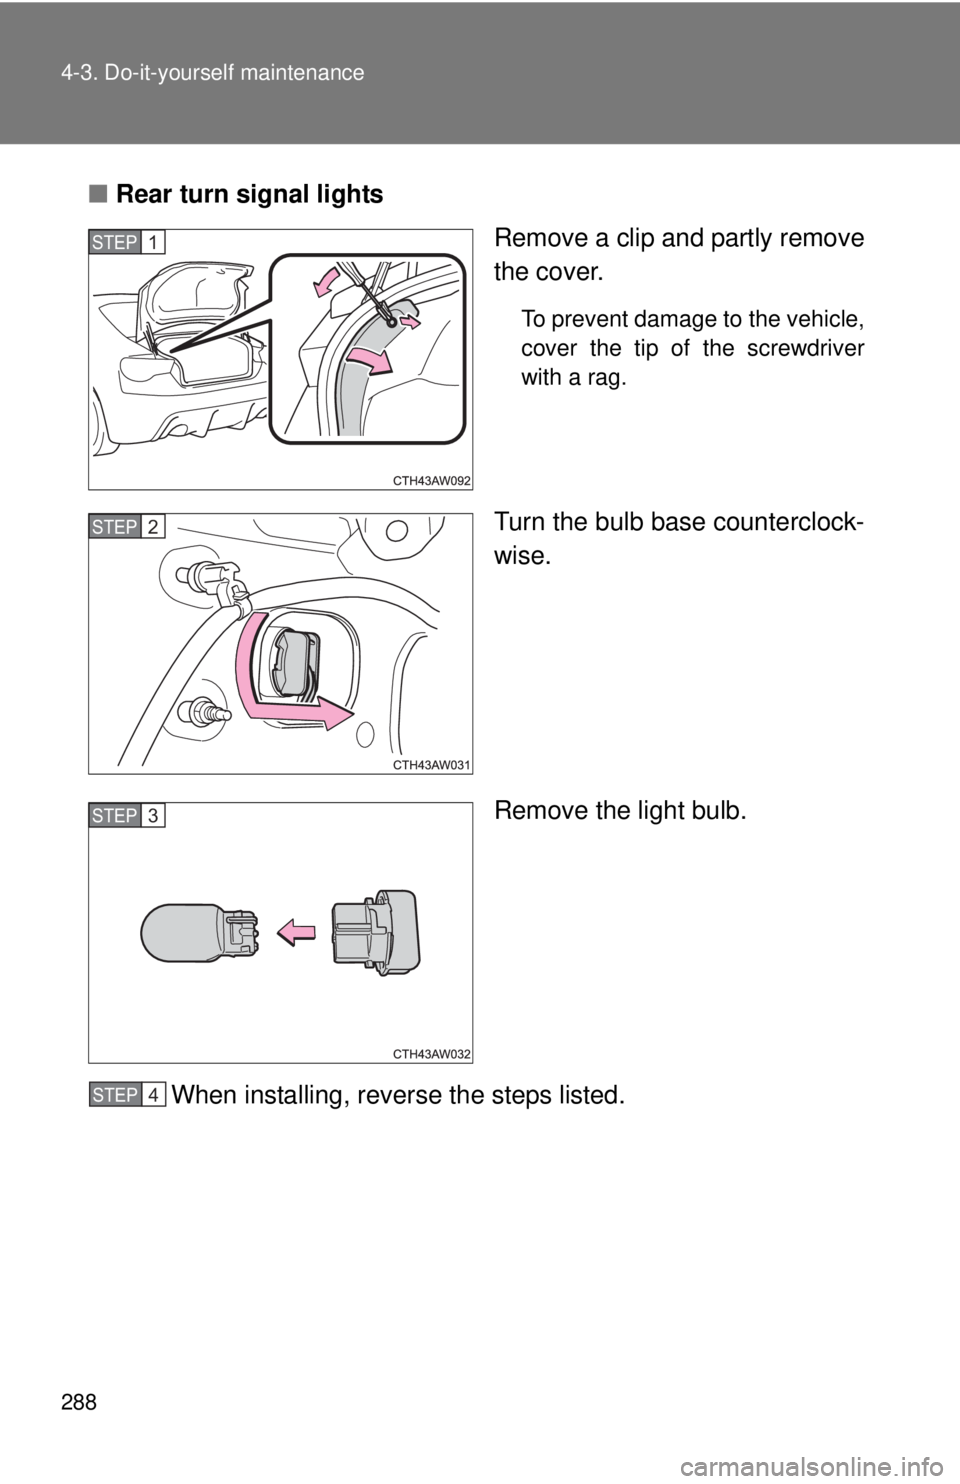
■Rear turn signal lights
Remove a clip and partly remove
the cover.
To prevent damage to the vehicle,
cover the tip of the screwdriver
with a rag.
Turn the bulb base counterclock-
wise.
Remove the light bulb.
When installing, reverse the steps listed.
STEP 1
STEP 2
STEP 3
STEP 4
Page 289 of 412
289 4-3. Do-it-yourself maintenance
4
Maintenance and care
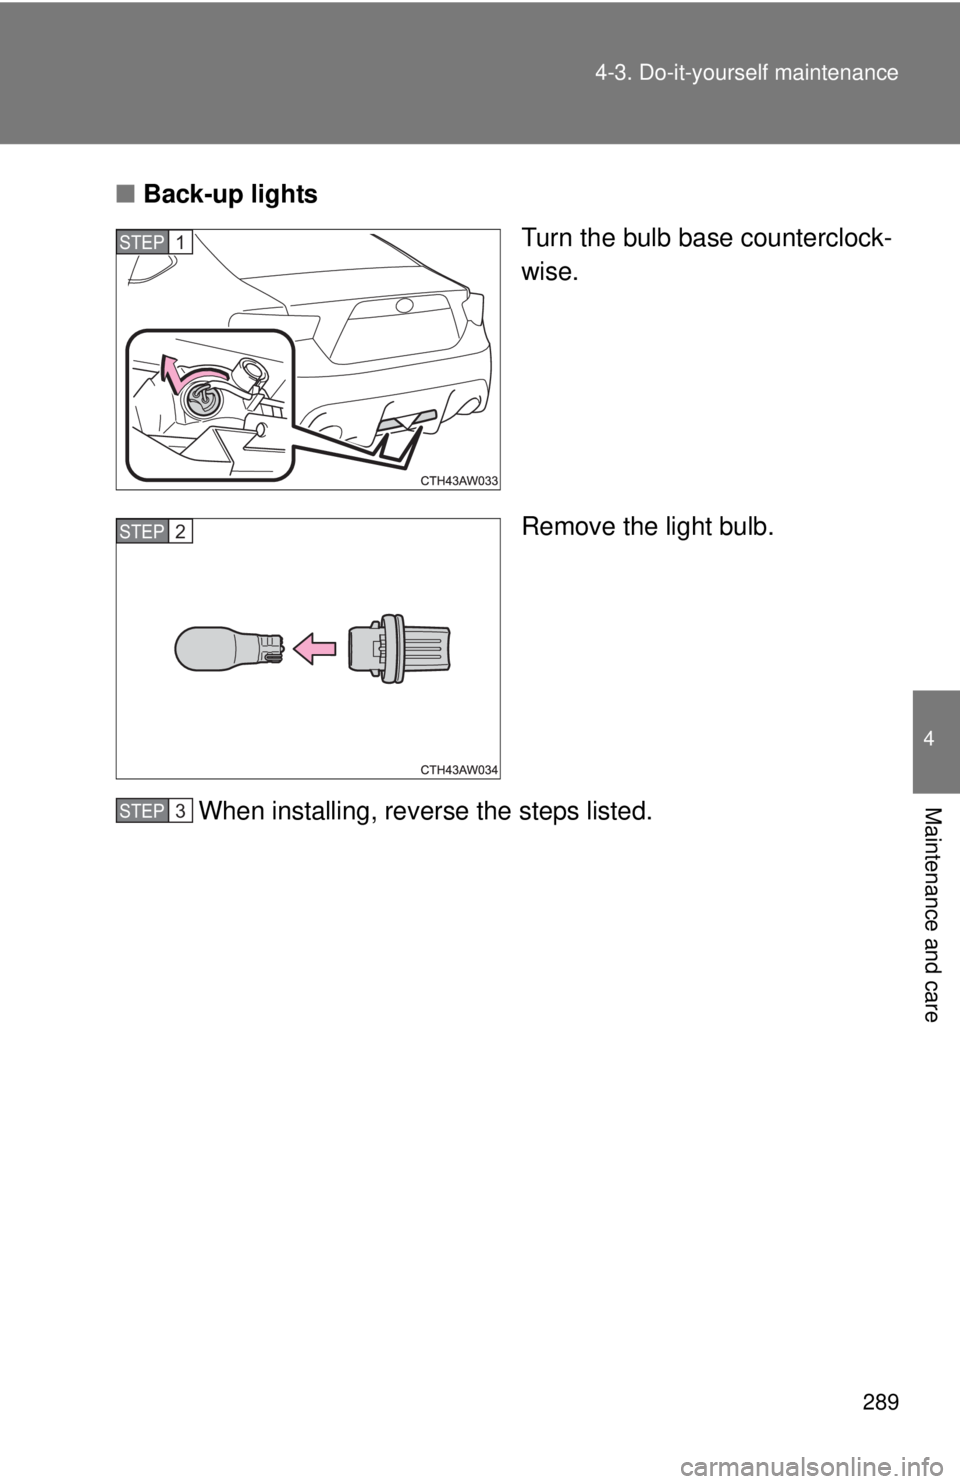
■Back-up lights
Turn the bulb base counterclock-
wise.
Remove the light bulb.
When installing, reverse the steps listed.
STEP 1
STEP 3 STEP 2
STEP 3
Page 290 of 412
290 4-3. Do-it-yourself maintenance
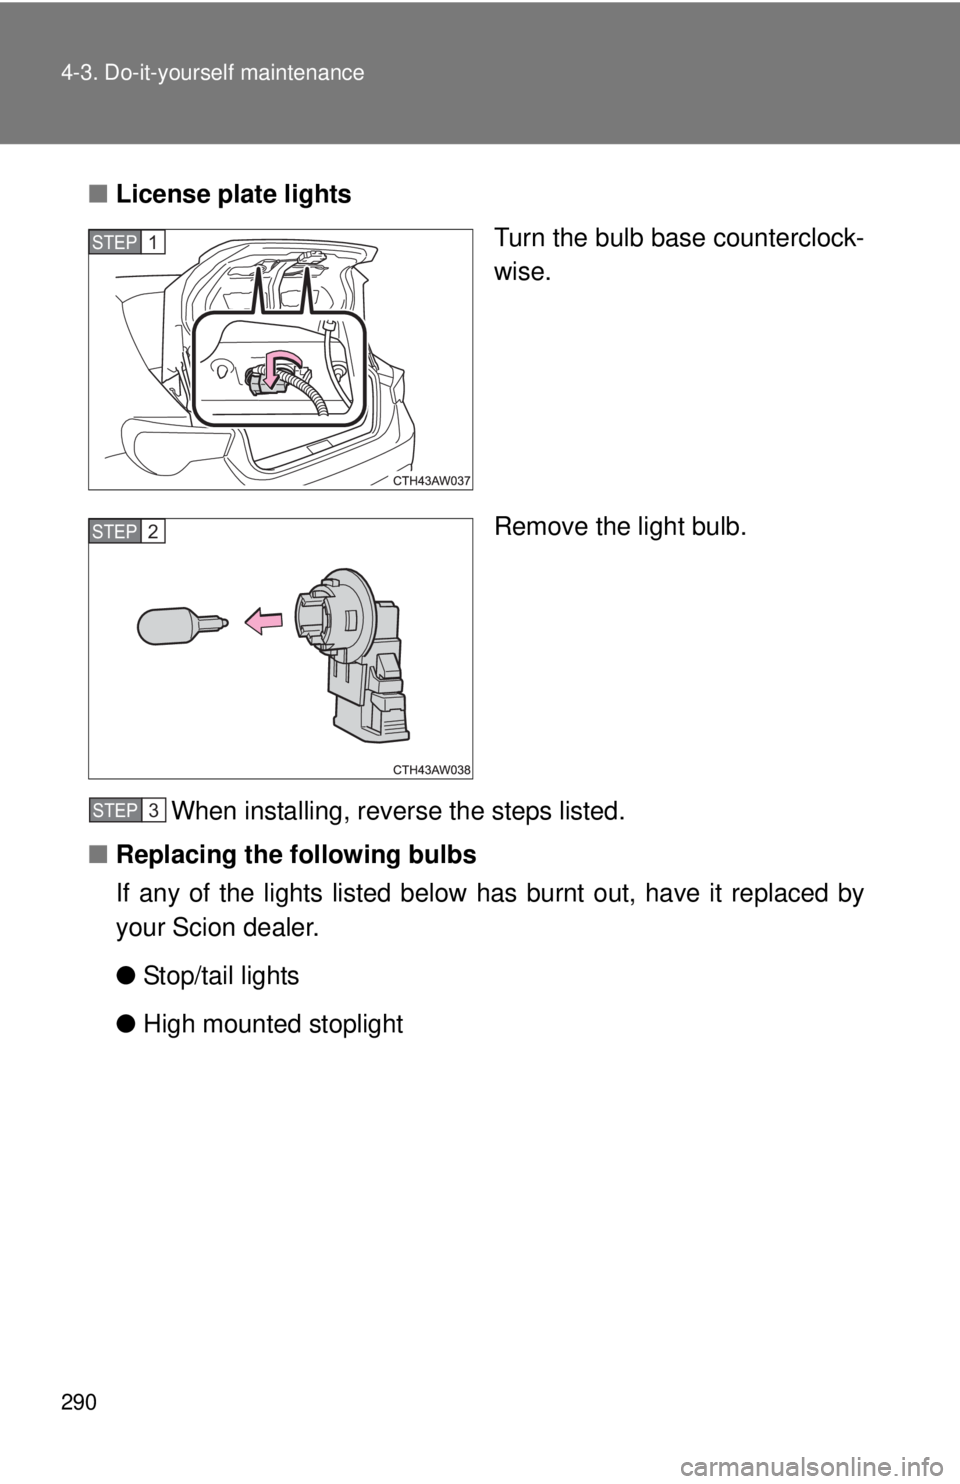
■License plate lights
Turn the bulb base counterclock-
wise.
Remove the light bulb.
When installing, reverse the steps listed.
■Replacing the following bulbs
If any of the lights listed below has burnt out, have it replaced by
your Scion dealer.
●Stop/tail lights
●High mounted stoplight
STEP 1
STEP 2
STEP 3
Trending: fuel reserve, mirror, ignition, fuel tank capacity, oil capacity, USB, sport mode
