engine TOYOTA GR YARIS 2022 Owners Manual
[x] Cancel search | Manufacturer: TOYOTA, Model Year: 2022, Model line: GR YARIS, Model: TOYOTA GR YARIS 2022Pages: 470, PDF Size: 113.17 MB
Page 238 of 470
236
Owner's Manual_Europe_M52P63_en
5-2. Using the interior lights
2Turns the door position on
3 Turns the light on
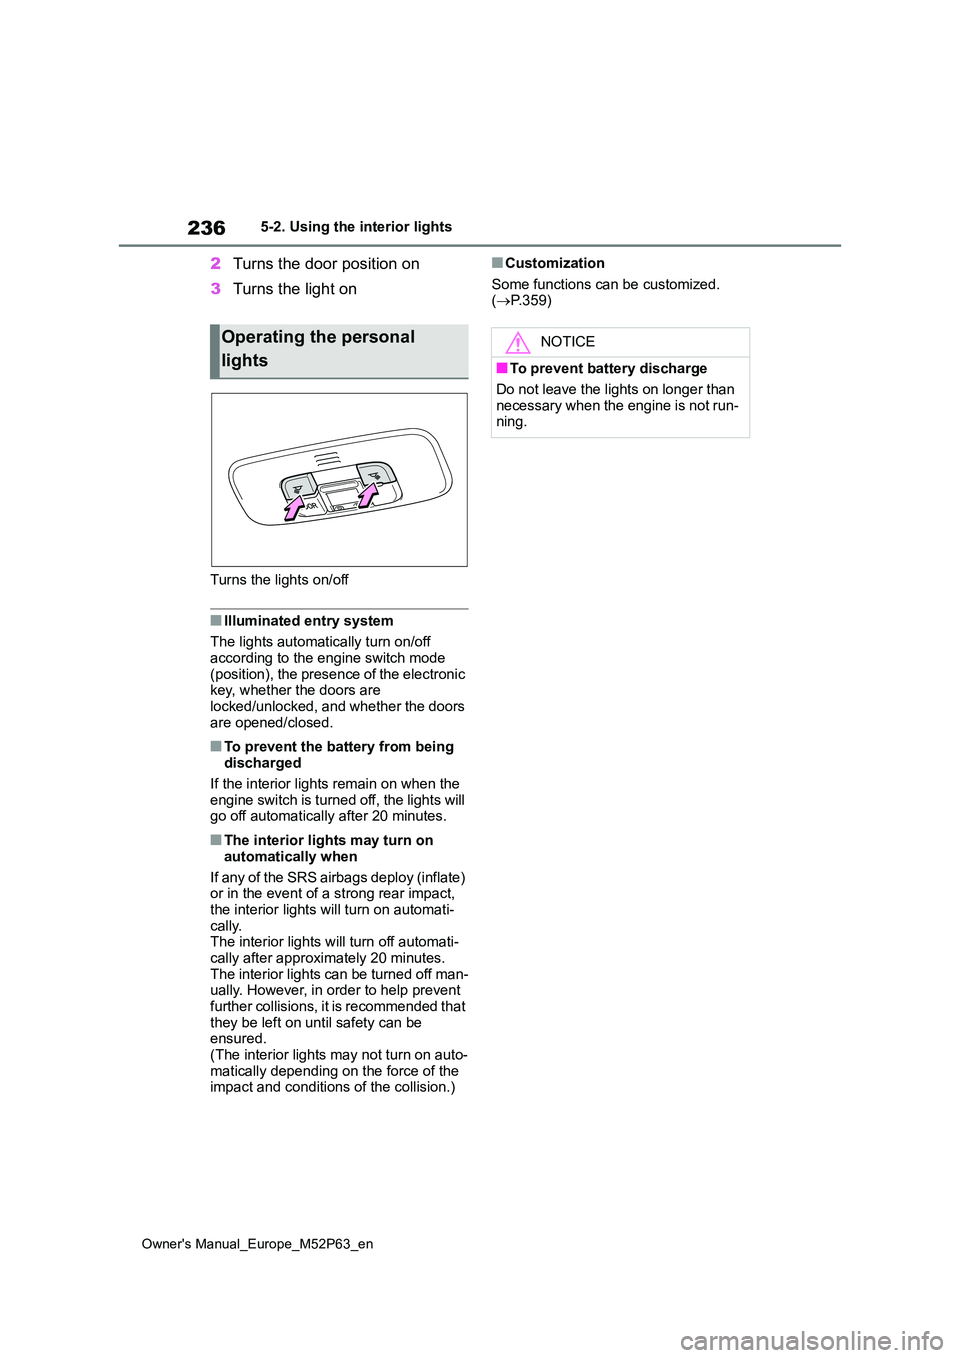
Turns the lights on/off
■Illuminated entry system
The lights automatically turn on/off
according to the engine switch mode (position), the presence of the electronic key, whether the doors are
locked/unlocked, and whether the doors are opened/closed.
■To prevent the battery from being discharged
If the interior lights remain on when the engine switch is turned off, the lights will go off automatically after 20 minutes.
■The interior lights may turn on
automatically when
If any of the SRS airbags deploy (inflate) or in the event of a strong rear impact,
the interior lights will turn on automati- cally.The interior lights will turn off automati-
cally after approximately 20 minutes. The interior lights can be turned off man-ually. However, in order to help prevent
further collisions, it is recommended that they be left on until safety can be ensured.
(The interior lights may not turn on auto- matically depending on the force of the impact and conditions of the collision.)
■Customization
Some functions can be customized. ( P.359)
Operating the personal
lights
NOTICE
■To prevent battery discharge
Do not leave the lights on longer than necessary when the engine is not run-ning.
Page 244 of 470
242
Owner's Manual_Europe_M52P63_en
5-4. Other interior features
5-4.Other interior features
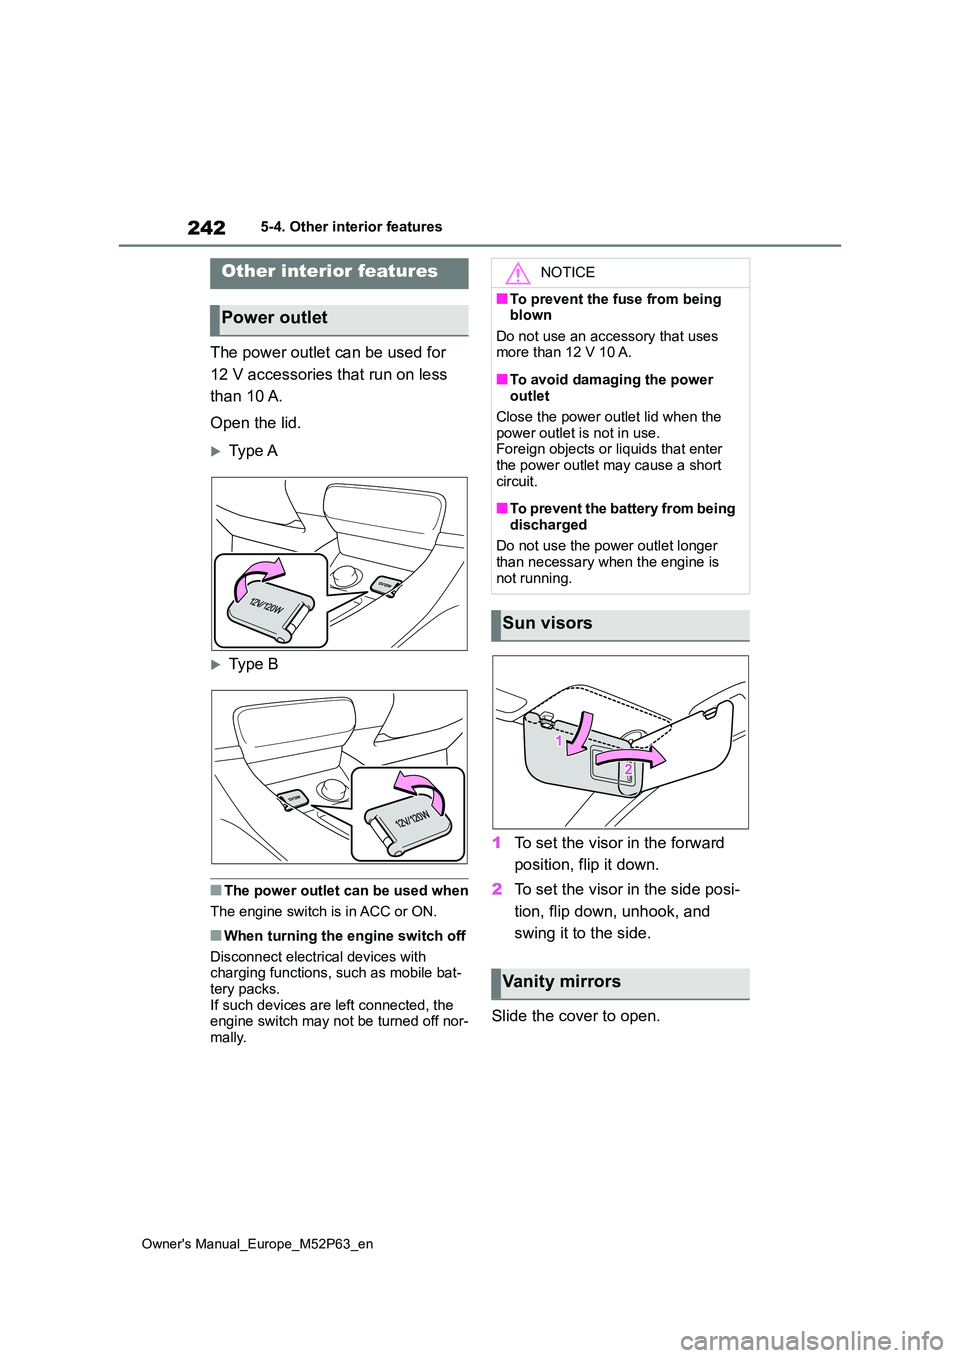
The power outlet can be used for
12 V accessories that run on less
than 10 A.
Open the lid.
Type A
Type B
■The power outlet can be used when
The engine switch is in ACC or ON.
■When turning the engine switch off
Disconnect electrical devices with charging functions, such as mobile bat-
tery packs. If such devices are left connected, the engine switch may not be turned off nor-
mally.
1 To set the visor in the forward
position, flip it down.
2 To set the visor in the side posi-
tion, flip down, unhook, and
swing it to the side.
Slide the cover to open.
Other interior features
Power outlet
NOTICE
■To prevent the fuse from being blown
Do not use an accessory that uses more than 12 V 10 A.
■To avoid damaging the power outlet
Close the power outlet lid when the
power outlet is not in use. Foreign objects or liquids that enter the power outlet may cause a short
circuit.
■To prevent the battery from being
discharged
Do not use the power outlet longer than necessary when the engine is
not running.
Sun visors
Va n it y m i r ro r s
Page 247 of 470
6
245
Owner's Manual_Europe_M52P63_en
6
Maintenance and care
Maintenance and care
6-1. Maintenance and care
Cleaning and protecting the
vehicle exterior ............... 246
Cleaning and protecting the
vehicle interior ................ 249
6-2. Matte paint care guide (if
equipped)
Basic knowledge about matte
clear coat ........................ 252
Washing your vehicle........ 256
Frequently Asked Questions
....................................... 259
6-3. Maintenance
Maintenance requirements 263
6-4. Do-it-yourself maintenance
Do-it-yourself service precau-
tions ................................ 265
Hood ................................. 266
Positioning a floor jack...... 268
Engine compartment ........ 269
Battery .............................. 273
Tires .................................. 275
Replacing the tire.............. 285
Tire inflation pressure ....... 288
Wheels.............................. 290
Air conditioning filter ......... 291
Wireless remote control/elec-
tronic key battery ............ 293
Checking and replacing fuses
....................................... 295
Light bulbs ........................ 299
Page 249 of 470
247
6
Owner's Manual_Europe_M52P63_en
6-1. Maintenance and care
Maintenance and care
late on the windows for a long period.
Clean the windows with a soft, damp cloth as soon as possible.• Do not use wax or glass cleaners that
contain abrasives when cleaning the windows.• Do not use any metallic objects to
remove condensation build up.
●When the water-repellent perfor-
mance has become insufficient, the coating can be repaired. Consult any authorized Toyota retailer or Toyota
authorized repairer, or any reliable repairer.
■Plated portions
If dirt cannot be removed, clean the
parts as follows:
●Use a soft cloth dampened with an
approximately 5% solution of neutral detergent and water to clean the dirt off.
●Wipe the surface with a dry, soft cloth to remove any remaining moisture.
●To remove oily deposits, use alcohol wet wipes or a similar product.
■Carbon film (if equipped)
●Do not attach a roof carrier on the car-bon-film. It may damage the film sur-
face.
●On l y u se lo w t em pe r a tu r e wat e r ; 50 ° C
(122°F) or less, for an automatic car wash and high pressure washer.
Do not use the high pressure washer to
the film edge to avoid coming off.
●Do not take heated water more than 90°C (194°F) directly. It may cause the film to come off easily.
●Only use a neutral detergent which is approved for car wash use and water.
●Do not wax or apply a coating to the film to keep film textured appearance.
●Dirt like bird droppings and oil should be cleaned off with a neutral detergent
immediately.
■Brake
●Painted brake calipers
• When using detergent, use neutral
detergent. Do not use hard brushes or abrasive cleaners, as they will dam-age the paint.
• Do not use detergent on the brake cal- ipers when they are hot.• Wash detergent off immediately after
use.
●Rust may form if the vehicle is parked
with wet brake pads or disc rotors, causing them to stick. Before parking the vehicle after it is washed, drive
slowly and apply the brakes several times to dry the parts.
WARNING
■When washing the vehicle
Do not apply water to the inside of the engine compartment. Doing so may cause the electrical components, etc.
to catch fire.
■When cleaning the windshield
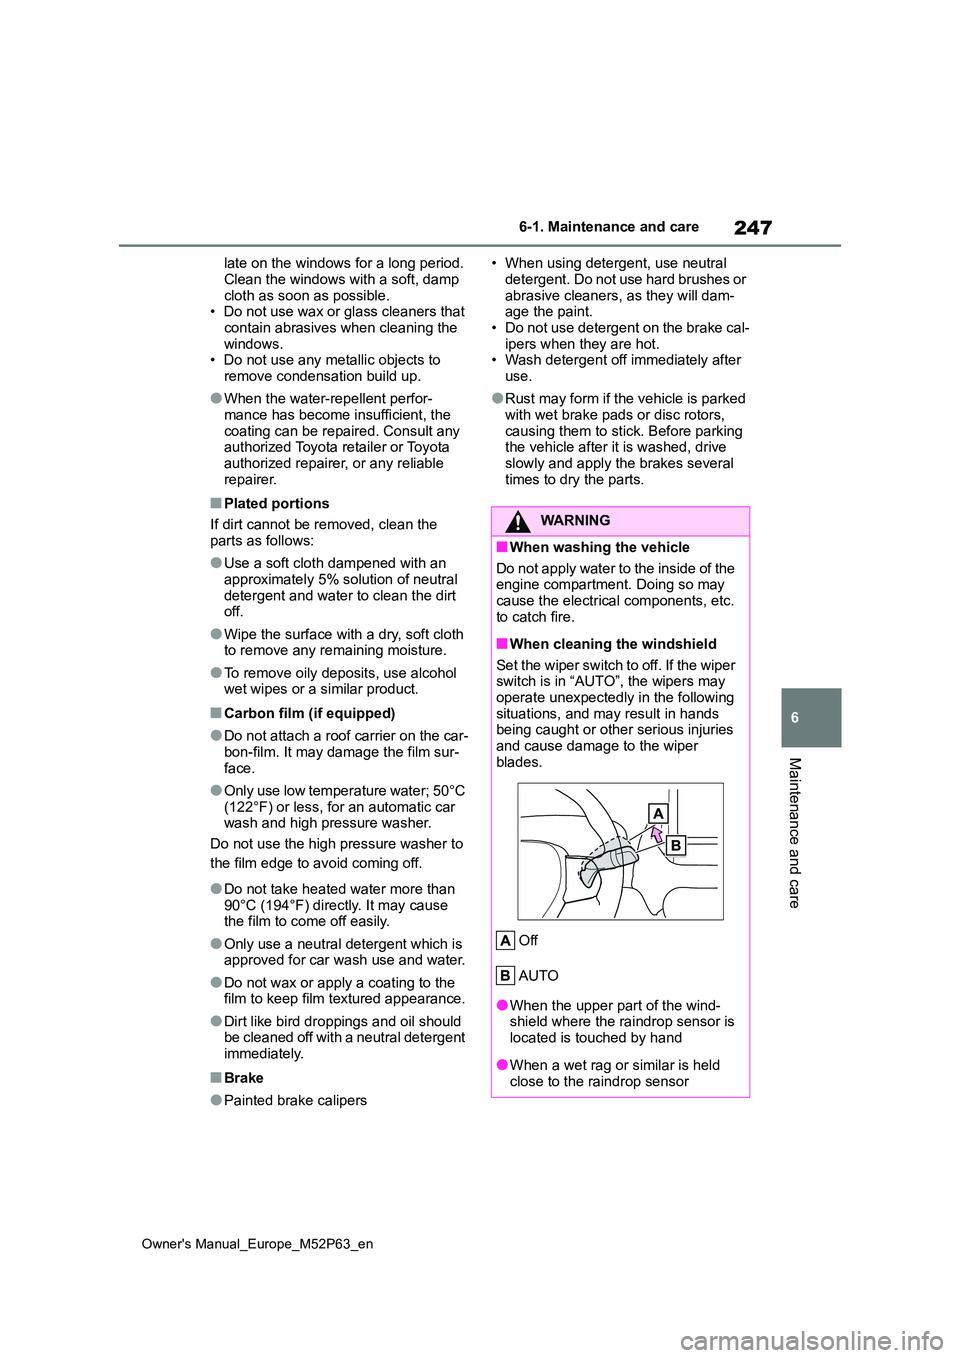
Set the wiper switch to off. If the wiper switch is in “AUTO”, the wipers may operate unexpectedly in the following
situations, and may result in hands being caught or other serious injuries and cause damage to the wiper
blades.
Off
AUTO
●When the upper part of the wind- shield where the raindrop sensor is
located is touched by hand
●When a wet rag or similar is held
close to the raindrop sensor
Page 256 of 470
254
Owner's Manual_Europe_M52P63_en
6-2. Matte paint care guide (if equipped)
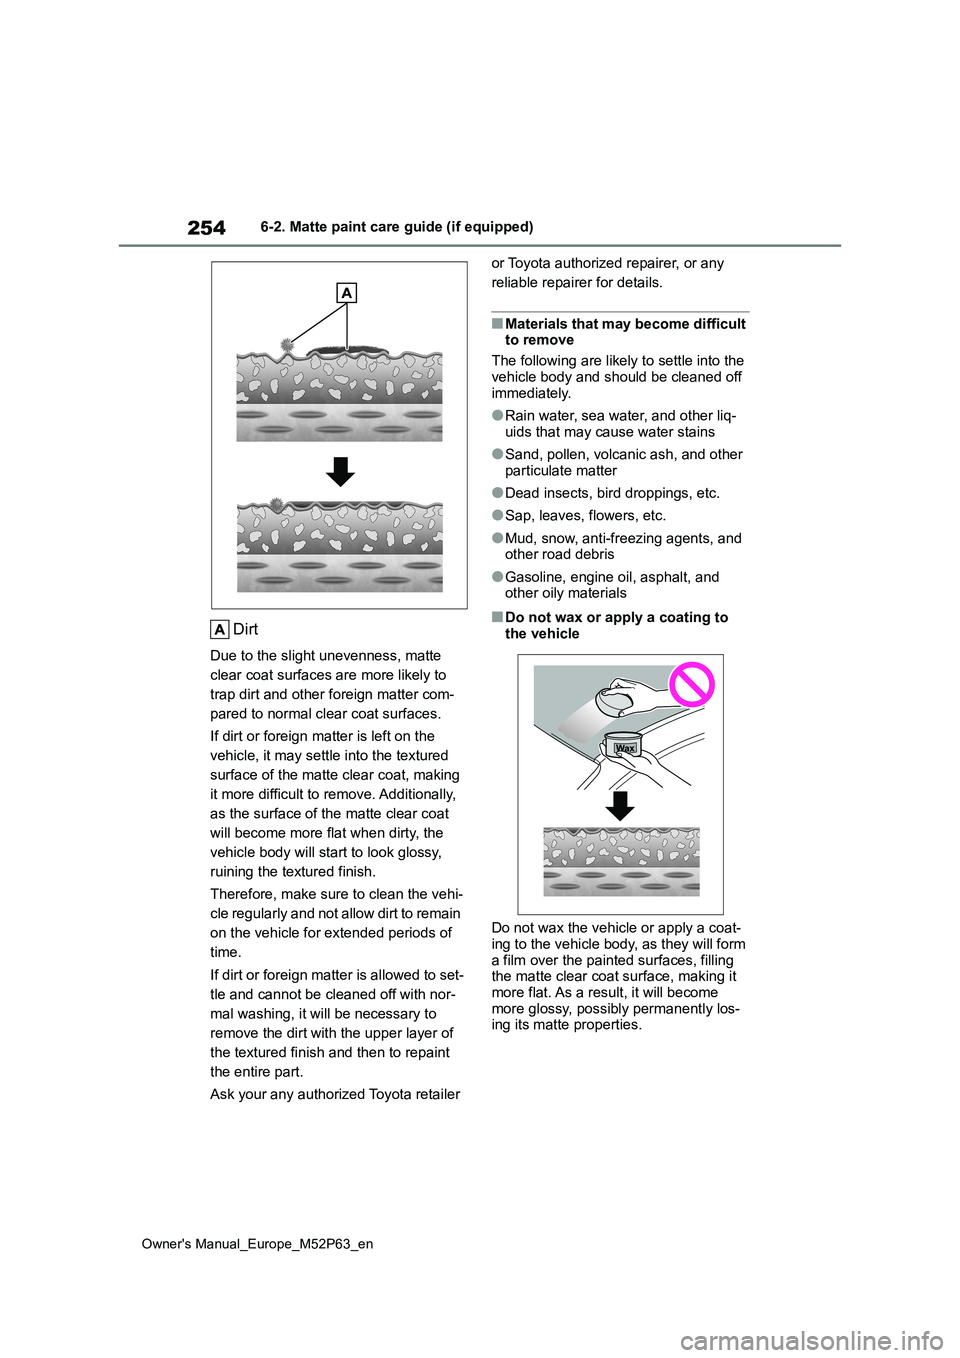
Dirt
Due to the slight unevenness, matte
clear coat surfaces are more likely to
trap dirt and other foreign matter com-
pared to normal clear coat surfaces.
If dirt or foreign matter is left on the
vehicle, it may settle into the textured
surface of the matte clear coat, making
it more difficult to remove. Additionally,
as the surface of the matte clear coat
will become more flat when dirty, the
vehicle body will start to look glossy,
ruining the textured finish.
Therefore, make sure to clean the vehi-
cle regularly and not allow dirt to remain
on the vehicle for extended periods of
time.
If dirt or foreign matter is allowed to set-
tle and cannot be cleaned off with nor-
mal washing, it will be necessary to
remove the dirt with the upper layer of
the textured finish and then to repaint
the entire part.
Ask your any authorized Toyota retailer
or Toyota authorized repairer, or any
reliable repairer for details.
■Materials that may become difficult to remove
The following are likely to settle into the
vehicle body and should be cleaned off immediately.
●Rain water, sea water, and other liq-uids that may cause water stains
●Sand, pollen, volcanic ash, and other particulate matter
●Dead insects, bird droppings, etc.
●Sap, leaves, flowers, etc.
●Mud, snow, anti-freezing agents, and other road debris
●Gasoline, engine oil, asphalt, and other oily materials
■Do not wax or apply a coating to
the vehicle
Do not wax the vehicle or apply a coat-
ing to the vehicle body, as they will form a film over the painted surfaces, filling the matte clear coat surface, making it
more flat. As a result, it will become more glossy, possibly permanently los-ing its matte properties.
Page 266 of 470

264
Owner's Manual_Europe_M52P63_en
6-3. Maintenance
request that a record of maintenance
be kept.
■Does your vehicle need repairs?
Be on the alert for changes in perfor- mance and sounds, and visual tip-offs
that indicate service is needed. Some important clues are:
●Engine misses (misfire), stumbling or pinging
●Appreciable loss of power
●Strange engine noises
●A fluid leak under the vehicle (How-ever, water dripping from the air con-
ditioning system after use is normal.)
●Change in exhaust sound (This may
indicate a dangerous carbon monox- ide leak. Drive with the windows open and have the exhaust system checked
immediately.)
●Flat-looking tires, excessive tire
squeal when cornering, uneven tire wear
●Vehicle pulls to one side when driven straight on a level road
●Strange noises related to suspension movement
●Loss of brake effectiveness, spongy feeling brake pedal or clutch pedal (vehicles with a manual transmission),
pedal almost touches the floor, vehicle pulls to one side when braking
●Engine coolant temperature continu-ally higher than normal ( P.81, 84)
If you notice any of these clues, take
your vehicle to any authorized Toyota
retailer or Toyota authorized repairer, or
any reliable repairer as soon as possi-
ble. Your vehicle may need adjustment
or repair.
Page 267 of 470
265
6
Owner's Manual_Europe_M52P63_en
6-4. Do-it-yourself maintenance
Maintenance and care
6-4.Do-it-y ours elf main ten ance
Do-it-yourself ser vice
precautions
If you perform maintenance by
yourself, be sure to follow the
correct procedure as given in
these sections.
Maintenance
ItemsParts and tools
Battery con-
dition
( P.273)
•Warm water
• Baking soda
• Grease
• Conventional wrench
(for terminal clamp
bolts)
Engine cool-
ant level
( P.271)
• “Toyota Super Long
Life Coolant” or a simi-
lar high quality eth-
ylene glycol-based
non-silicate, non-
amine, non-nitrite and
non-borate coolant
with long-life hybrid
organic acid technol-
ogy.
“Toyota Super Long
Life Coolant” is pre-
mixed with 50% cool-
ant and 50% deionized
water.
• Funnel (used only for
adding coolant)
Engine oil
level
( P.269)
• “Toyota Genuine Motor
Oil” or equivalent
• Rag or paper towel
• Funnel (used only for
adding engine oil)
Fuses
( P.295)
• Fuse with same
amperage rating as
original
Light bulbs
( P.299)
• Bulb with same num-
ber and wattage rating
as original
• Flathead screwdriver
•Wrench
Radiator,
condenser
( P.272)
Tire inflation
pressure
( P.288)
• Tire pressure gauge
• Compressed air
source
Washer fluid
( P.272)
• Water or washer fluid
containing antifreeze
(for winter use)
• Funnel (used only for
adding water or
washer fluid)
WARNING
The engine compartment contains many mechanisms and fluids that
may move suddenly, become hot, or become electrically energized. To avoid death or serious injury, observe
the following precautions.
■When working on the engine
compartment
●Keep hands, clothing and tools away from the moving fan and
engine drive belt.
●Be careful not to touch the engine,
radiator, exhaust manifold, etc. right after driving as they may be hot. Oil and other fluids may also be hot.
●Do not leave anything that may burn easily, such as paper and
rags, in the engine compartment.
ItemsParts and tools
Page 268 of 470
266
Owner's Manual_Europe_M52P63_en
6-4. Do-it-yourself maintenance
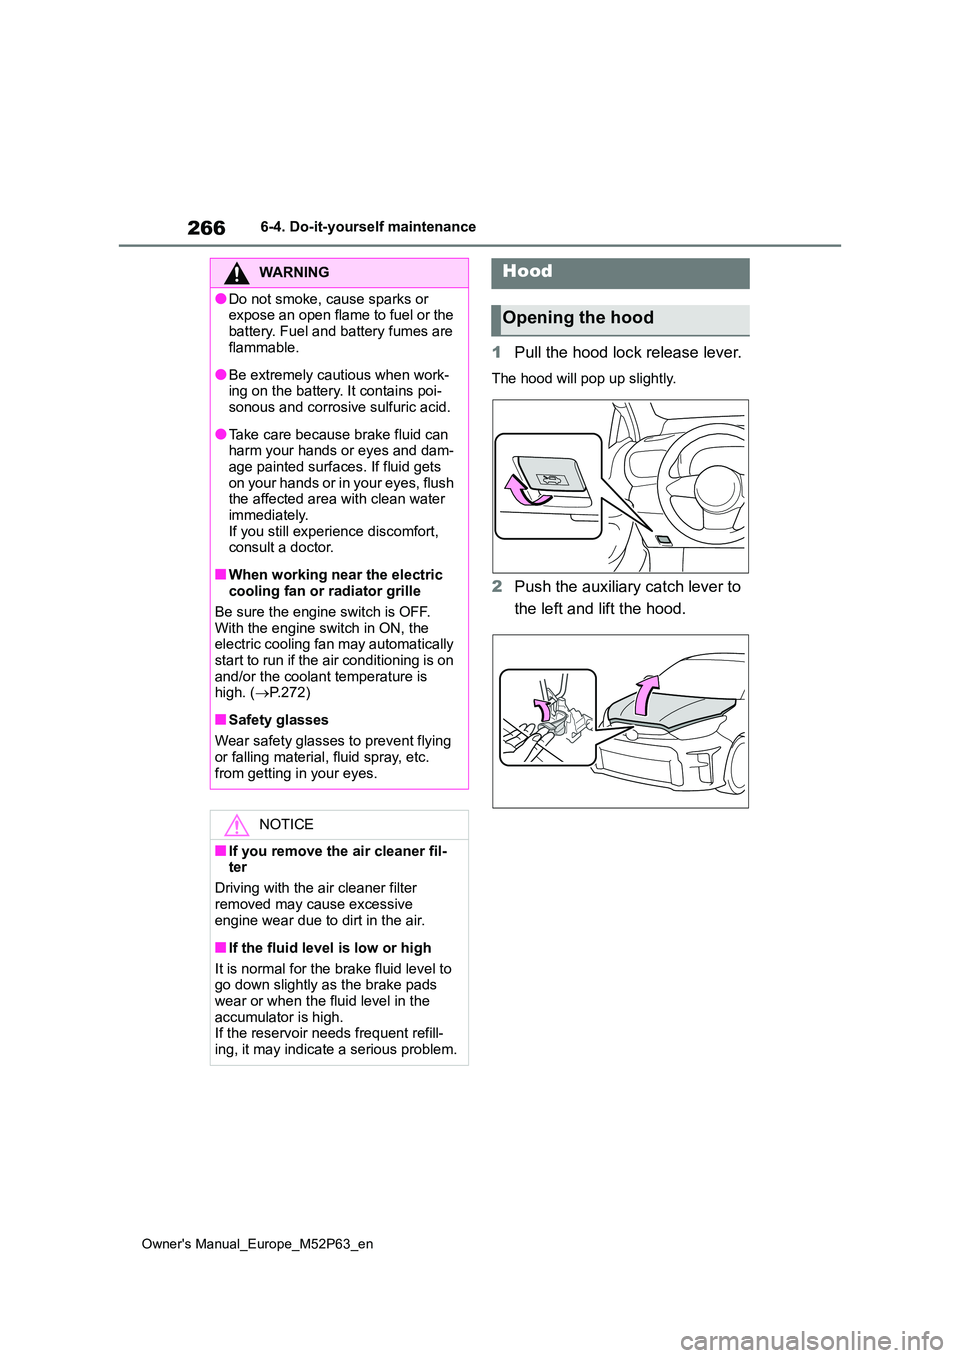
1Pull the hood lock release lever.
The hood will pop up slightly.
2Push the auxiliary catch lever to
the left and lift the hood.
WARNING
●Do not smoke, cause sparks or expose an open flame to fuel or the
battery. Fuel and battery fumes are flammable.
●Be extremely cautious when work-ing on the battery. It contains poi-sonous and corrosive sulfuric acid.
●Take care because brake fluid can harm your hands or eyes and dam-
age painted surfaces. If fluid gets on your hands or in your eyes, flush the affected area with clean water
immediately. If you still experience discomfort, consult a doctor.
■When working near the electric cooling fan or radiator grille
Be sure the engine switch is OFF. With the engine switch in ON, the electric cooling fan may automatically
start to run if the air conditioning is on and/or the coolant temperature is high. ( P.272)
■Safety glasses
Wear safety glasses to prevent flying
or falling material, fluid spray, etc. from getting in your eyes.
NOTICE
■If you remove the air cleaner fil-ter
Driving with the air cleaner filter
removed may cause excessive engine wear due to dirt in the air.
■If the fluid level is low or high
It is normal for the brake fluid level to go down slightly as the brake pads
wear or when the fluid level in the accumulator is high.If the reservoir needs frequent refill-
ing, it may indicate a serious problem.
Hood
Opening the hood
Page 271 of 470
269
6
Owner's Manual_Europe_M52P63_en
6-4. Do-it-yourself maintenance
Maintenance and care
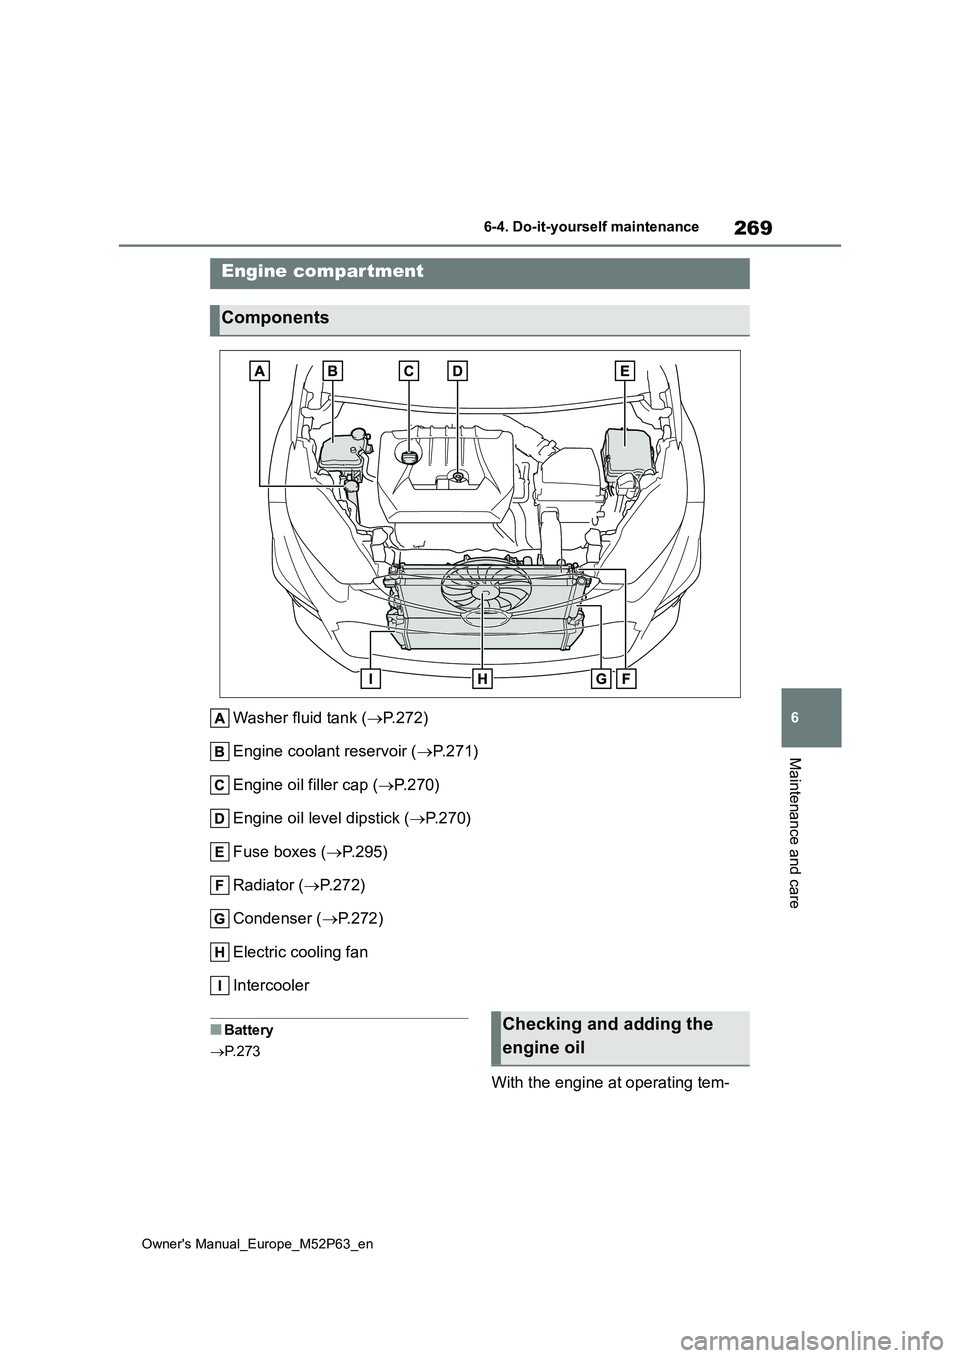
Washer fluid tank (P.272)
Engine coolant reservoir ( P. 2 7 1 )
Engine oil filler cap ( P.270)
Engine oil level dipstick ( P.270)
Fuse boxes ( P.295)
Radiator ( P.272)
Condenser ( P.272)
Electric cooling fan
Intercooler
■Battery
P. 2 7 3
With the engine at operating tem-
Engine compartment
Components
Checking and adding the
engine oil
Page 272 of 470
270
Owner's Manual_Europe_M52P63_en
6-4. Do-it-yourself maintenance
perature and turned off, check the
oil level on the dipstick.
■Checking the engine oil
1 Park the vehicle on level
ground. After warming up the
engine and turning it off, wait
more than 8 minutes for the oil
to drain back into the bottom of
the engine.
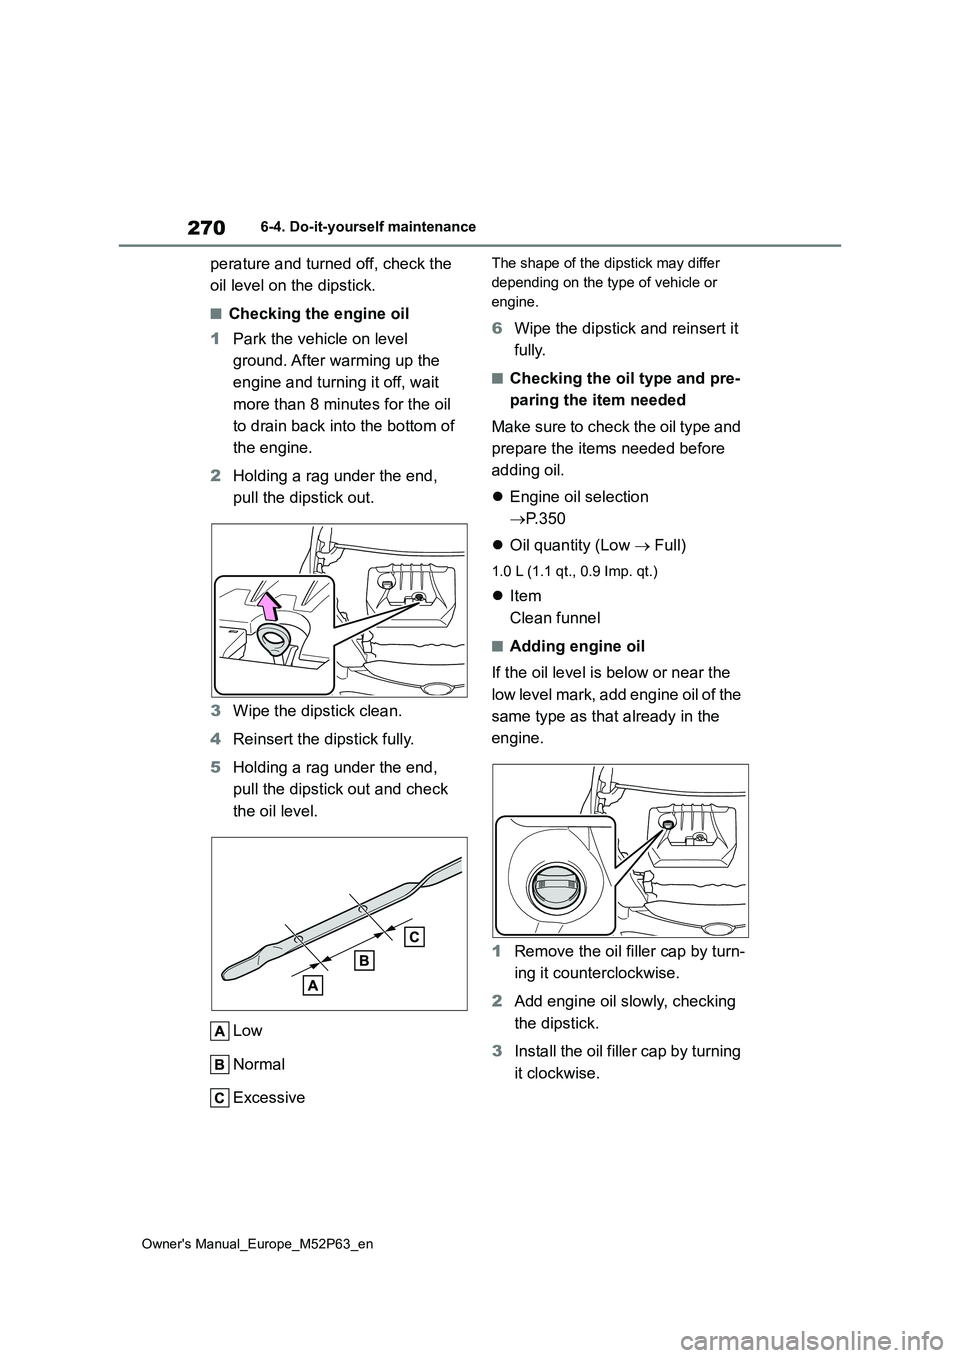
2 Holding a rag under the end,
pull the dipstick out.
3 Wipe the dipstick clean.
4 Reinsert the dipstick fully.
5 Holding a rag under the end,
pull the dipstick out and check
the oil level.
Low
Normal
Excessive
The shape of the dipstick may differ
depending on the type of vehicle or
engine.
6 Wipe the dipstick and reinsert it
fully.
■Checking the oil type and pre-
paring the item needed
Make sure to check the oil type and
prepare the items needed before
adding oil.
Engine oil selection
P.350
Oil quantity (Low Full)
1.0 L (1.1 qt., 0.9 Imp. qt.)
Item
Clean funnel
■Adding engine oil
If the oil level is below or near the
low level mark, add engine oil of the
same type as that already in the
engine.
1 Remove the oil filler cap by turn-
ing it counterclockwise.
2 Add engine oil slowly, checking
the dipstick.
3 Install the oil filler cap by turning
it clockwise.