change time TOYOTA GR86 2022 Owners Manual (in English)
[x] Cancel search | Manufacturer: TOYOTA, Model Year: 2022, Model line: GR86, Model: TOYOTA GR86 2022Pages: 582, PDF Size: 86.38 MB
Page 7 of 582
5
Please note that this manual
applies to all models and explains
all equipment, including options.
Therefore, you may find some
explanations for equipment not
installed on your vehicle.
All specifications provided in this
manual are current at the time of
printing. However, because of the
Toyota policy of continual product
improvement, we reserve the right
to make changes at any time with-
out notice.
Depending on specifications, the
vehicle shown in the illustrations
may differ from your vehicle in
terms of color and equipment.
Both genuine Toyota and a wide
variety of other spare parts and
accessories for Toyota vehicles are
currently available on the market.
Should it be determined that any of
the genuine Toyota parts or acces-
sories supplied with the vehicle
need to be replaced, Toyota recom-
mends that genuine Toyota parts or
accessories, be used to replace
them. Other parts or accessories of
matching quality can also be used.
Toyota cannot acce pt any liability or
guarantee spare parts and acces-
sories which are not genuine
Toyota products, nor for replace-
ment or installati on involving such
parts. In addition, damage or per-
formance problems resulting from
the use of non-genuine Toyota
spare parts or accessories may not
be covered under warranty.
The installation of an RF-transmit-
ter system in your vehicle could
affect electronic systems such as:
Multiport fuel injection sys-
tem/sequential multiport fuel
injection system
EyeSight system
Cruise control system
Anti-lock brake system
Vehicle dynamics integrated
management
SRS airbag system
Seat belt pretensioner system
Be sure to check with any author-
ized Toyota retailer or Toyota
authorized repairer, or any reliable
repairer for precautionary meas-
ures or special instructions regard-
ing installation of an RF-transmitter
system.
Further information regarding fre-
quency bands, power levels,
antenna positions and installation
For your infor mation
Main Owner’s Manual
Accessories, spare parts
and modification of your
To y o t a
Installation of an RF-trans-
mitter system
Page 93 of 582
91
2
2-1. Instrument cluster
Vehicle status information and indicators
■Display items
Odometer
Displays the total distance the vehicle
has been driven.
Trip meter A/Trip meter B
Displays the distance the vehicle has
been driven since the meter was last
reset. Trip meters A and B can be used
to record and display different distances
independently.
To reset, display th e desired trip meter
and press and hold the display change
button.
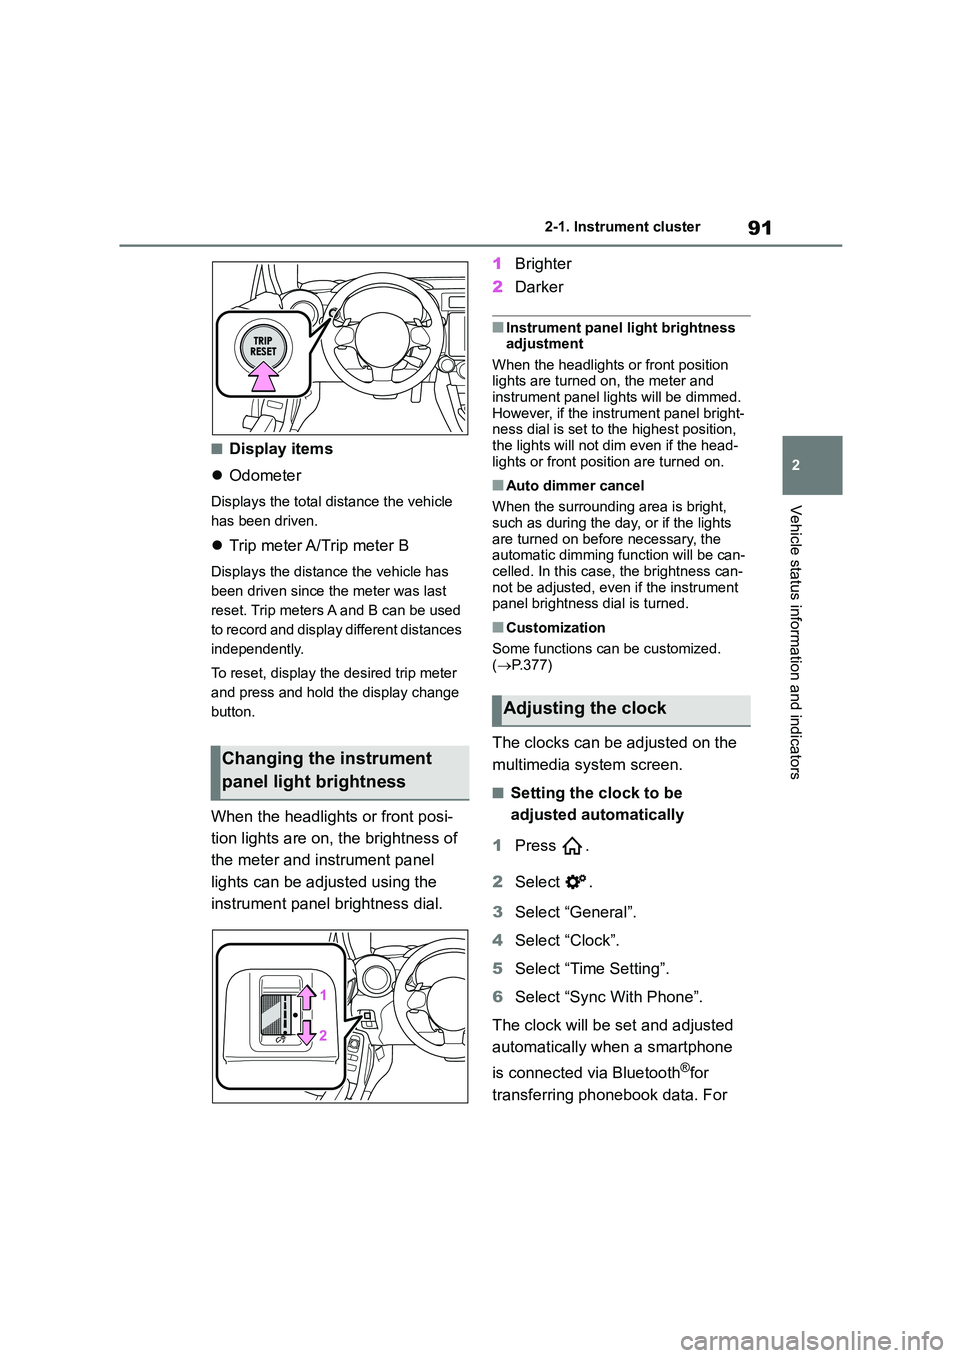
When the headlights or front posi-
tion lights are on, the brightness of
the meter and instrument panel
lights can be adjusted using the
instrument panel brightness dial.
1 Brighter
2 Darker
■Instrument panel light brightness adjustment
When the headlights or front position
lights are turned on, the meter and instrument panel lights will be dimmed.
However, if the instrument panel bright-
ness dial is set to the highest position, the lights will not dim even if the head-
lights or front position are turned on.
■Auto dimmer cancel
When the surrounding area is bright, such as during the day, or if the lights
are turned on before necessary, the
automatic dimming function will be can- celled. In this case, the brightness can-
not be adjusted, even if the instrument
panel brightness dial is turned.
■Customization
Some functions can be customized.
( P.377)
The clocks can be adjusted on the
multimedia system screen.
■Setting the clock to be
adjusted automatically
1 Press .
2 Select .
3 Select “General”.
4 Select “Clock”.
5 Select “Time Setting”.
6 Select “Sync With Phone”.
The clock will be set and adjusted
automatically when a smartphone
is connected via Bluetooth®for
transferring phonebook data. For
Changing the instrument
panel light brightness
Adjusting the clock
Page 94 of 582
922-1. Instrument cluster
details, refer to the “Multimedia
owner's manual”.
■Adjusting the clock manually
1 Press .
2 Select .
3 Select “General”.
4 Select “Clock”.
5 Select “Time Setting”.
6 Select “Manual” then adjust the
clock.
7 Select “OK”.
■Changing the clock between
12H/24H format
1 Press .
2 Select .
3 Select “General”.
4 Select “Clock”.
5 Select “12H” or “24H”.
■Clock settings screen
The clock setting screen can also be
displayed by touching the clock on the status bar.
■Display
Normal display
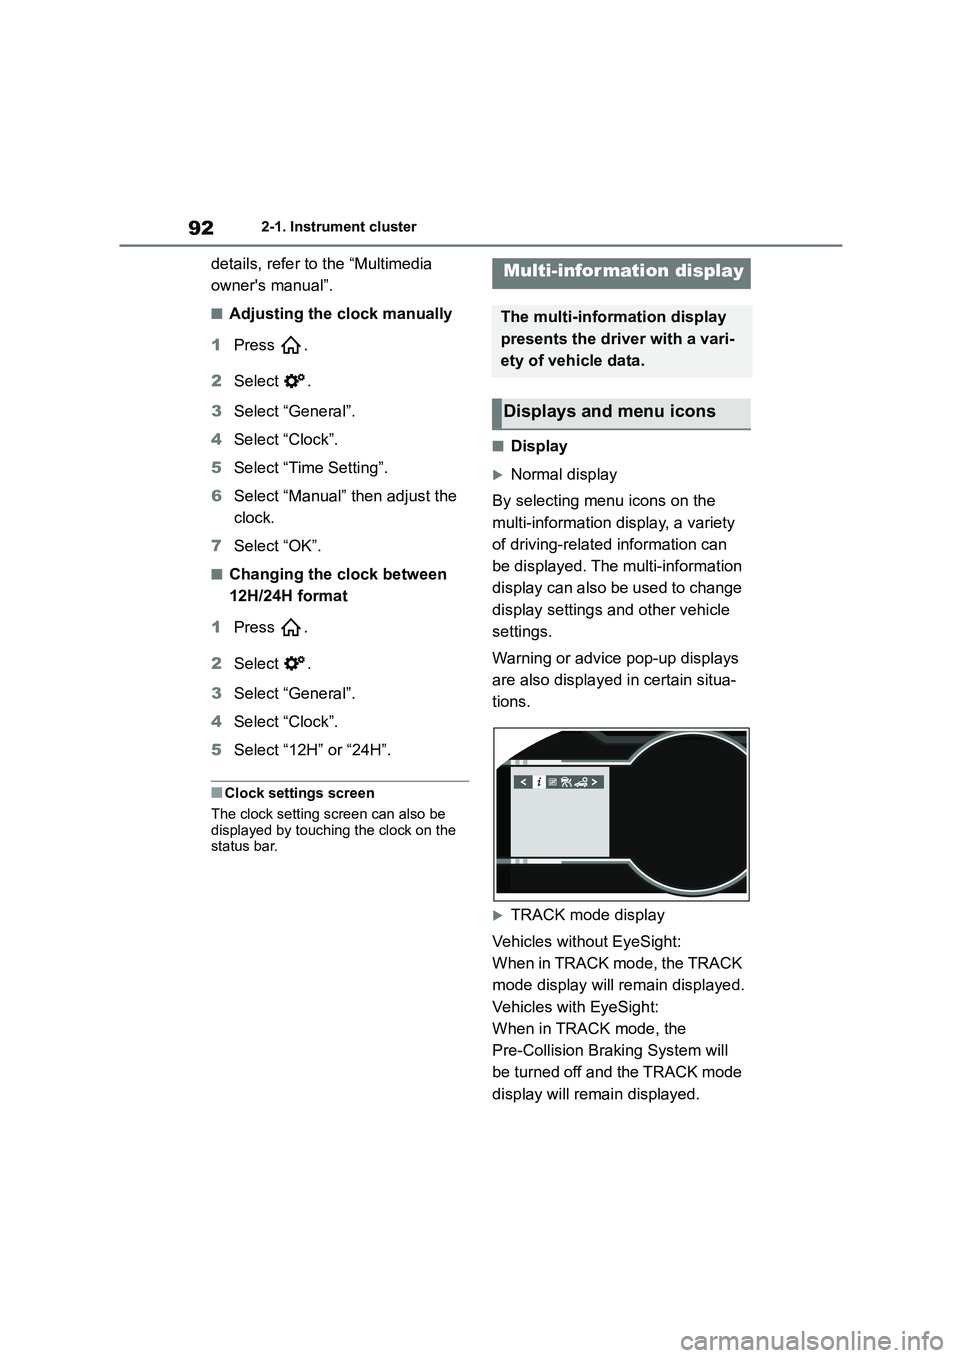
By selecting menu icons on the
multi-information display, a variety
of driving-related information can
be displayed. The multi-information
display can also be used to change
display settings and other vehicle
settings.
Warning or advice pop-up displays
are also displayed in certain situa-
tions.
TRACK mode display
Vehicles without EyeSight:
When in TRACK mode, the TRACK
mode display will remain displayed.
Vehicles with EyeSight:
When in TRACK mode, the
Pre-Collision Braking System will
be turned off and the TRACK mode
display will remain displayed.
Multi-information display
The multi-information display
presents the driver with a vari-
ety of vehicle data.
Displays and menu icons
Page 95 of 582
93
2
2-1. Instrument cluster
Vehicle status information and indicators
( P.183)
Warning or advice pop-up displays
are also displayed in certain situa-
tions.
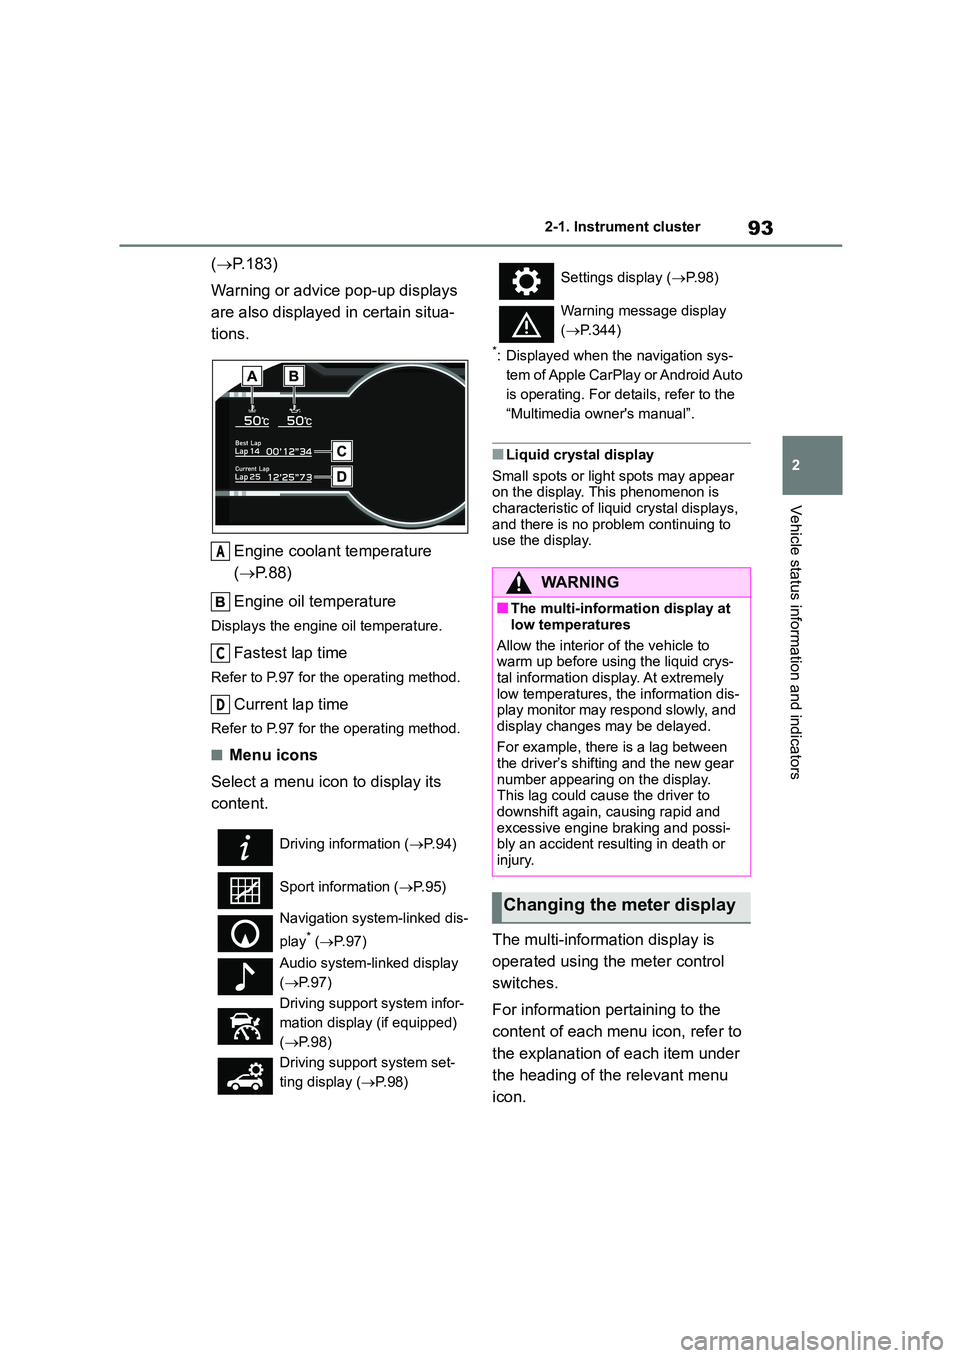
Engine coolant temperature
( P.88)
Engine oil temperature
Displays the engine oil temperature.
Fastest lap time
Refer to P.97 for the operating method.
Current lap time
Refer to P.97 for the operating method.
■Menu icons
Select a menu icon to display its
content.
*: Displayed when the navigation sys-
tem of Apple CarPlay or Android Auto
is operating. For details, refer to the
“Multimedia owner's manual”.
■Liquid crystal display
Small spots or light spots may appear on the display. This phenomenon is
characteristic of liq uid crystal displays,
and there is no problem continuing to use the display.
The multi-information display is
operated using the meter control
switches.
For information pertaining to the
content of each menu icon, refer to
the explanation of each item under
the heading of the relevant menu
icon.
Driving information ( P. 9 4 )
Sport information ( P. 9 5 )
Navigation system-linked dis-
play* ( P. 9 7 )
Audio system-linked display
( P. 9 7 )
Driving suppor t system infor-
mation display (if equipped)
( P. 9 8 )
Driving support system set-
ting display ( P. 9 8 )
A
C
D
Settings display (P. 9 8 )
Warning message display
( P.344)
WA R N I N G
■The multi-information display at
low temperatures
Allow the interior of the vehicle to warm up before using the liquid crys-
tal information display. At extremely
low temperatures, the information dis- play monitor may respond slowly, and
display changes may be delayed.
For example, there is a lag between the driver’s shifting and the new gear
number appearing on the display.
This lag could cause the driver to downshift again, causing rapid and
excessive engine braking and possi-
bly an accident resulting in death or injury.
Changing the meter display
Page 99 of 582
97
2
2-1. Instrument cluster
Vehicle status information and indicators
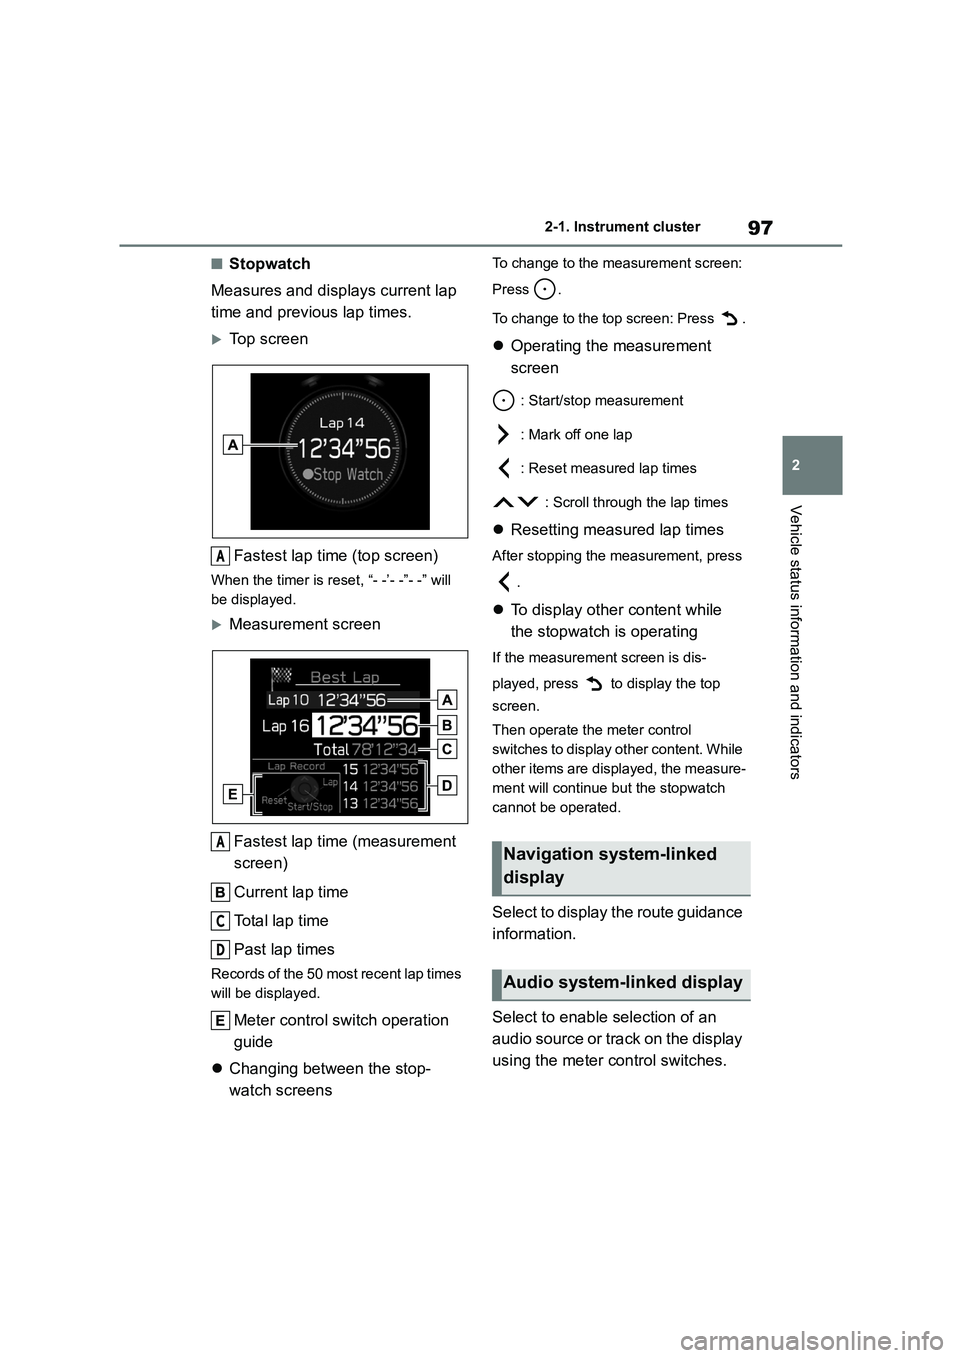
■Stopwatch
Measures and displays current lap
time and previous lap times.
Top screen
Fastest lap time (top screen)
When the timer is reset, “- -’- -”- -” will
be displayed.
Measurement screen
Fastest lap time (measurement
screen)
Current lap time
To t a l l a p t i m e
Past lap times
Records of the 50 most recent lap times
will be displayed.
Meter control switch operation
guide
Changing between the stop-
watch screens
To change to the measurement screen:
Press .
To change to the top screen: Press .
Operating the measurement
screen
: Start/stop measurement
: Mark off one lap
: Reset measured lap times
: Scroll through the lap times
Resetting measured lap times
After stopping the measurement, press
.
To display other content while
the stopwatch is operating
If the measurement screen is dis-
played, press to display the top
screen.
Then operate the meter control
switches to display other content. While
other items are displayed, the measure-
ment will continue but the stopwatch
cannot be operated.
Select to display the route guidance
information.
Select to enable selection of an
audio source or track on the display
using the meter control switches.
A
A
C
D
Navigation system-linked
display
Audio system-linked display
Page 114 of 582
1123-2. Opening, closing and locking the doors and trunk
switch modes are changed.
●Do not leave the electronic key on top
of the instrument panel or near the
door pockets when exiting the vehicle. Depending on the radio wave recep-
tion conditions, it may be detected by
the antenna outside the cabin and the doors will become lockable from the
outside, possibly trapping the elec-
tronic key inside the vehicle.
●As long as the electronic key is within
the effective range, the doors may be locked or unlocked by anyone. How-
ever, only the doors detecting the
electronic key can be used to unlock the vehicle.
●Even if the electronic key is not inside the vehicle, it may be possible to start
the engine if the electronic key is near
the window.
●The doors may unlock or lock if a
large amount of water splashes on the door handle, such as in the rain or in a
car wash, when the electronic key is
within the effective range. (The doors will automatically be locked after
approximately 30 seconds if the doors
are not opened and closed.)
●If the wireless remote control is used
to lock the doors when the electronic key is near the vehicle, there is a pos-
sibility that the door may not be
unlocked by the entry function. (Use the wireless remote control to unlock
the doors.)
●Touching the door lock or unlock sen-
sor while wearing gloves may prevent
lock or unlock operation.
●Vehicles without a double locking sys-
tem: When the lock operation is per-
formed using the lock sensor, recognition signals will be shown up to
three consecutive times. After this, no
recognition signals will be given.
●If the door handle becomes wet while
the electronic key is within the effec- tive range, the door may lock and
unlock repeatedly. In this case, follow
the following correction procedures to
wash the vehicle:
• Place the electronic key in a location 2 m (6 ft.) or more away from the vehi-
cle. (Take care to ensure that the key
is not stolen.) • Set the electronic key to battery-sav-
ing mode to disable the smart entry &
start system. ( P. 1 1 1 )
●If the electronic key is inside the vehi-
cle and a door handle becomes wet during a car wash, a message may be
shown on the multi-information dis-
play and a buzzer will sound outside the vehicle. To turn off the alarm, lock
both side doors.
●The lock sensor may not work prop-
erly if it comes into contact with ice,
snow, mud, etc. Clean the lock sensor and attempt to operate it again.
●A sudden handle operation or a han-dle operation immediately after enter-
ing the effective range may prevent
the doors from being unlocked. Touch the door unlock sensor and check that
the doors are unlocked before pulling
the door handle again.
●Unlocking the vehicle may take more
time if another electronic key is within the effective range.
■When the vehicle is not driven for
extended periods
●To prevent theft of the vehicle, do not
leave the electronic key within 2 m (6
ft.) of the vehicle.
●The smart entry & start system can be
deactivated in advance. ( P. 1 1 3 )
●Setting the electronic key to bat-
tery-saving mode helps to reduce key battery depletion. ( P. 1 1 1 )
■To operate the system properly
●Make sure to carry the electronic key
when operating th e system. Do not get the electronic key too close to the
vehicle when operating the system
from the outside of the vehicle.
Depending on the position and holding
condition of the electronic key, the key may not be detected correctly and the
Page 118 of 582
1163-2. Opening, closing and locking the doors and trunk
8Wait for the buzzer to sound 1
time and then press the switch
the same number of times as for
the next digit.
For example: If registering 32468,
press the switch 2 times.
9 Repeat step 8 for the remaining
digits.
10 Within 30 seconds after the
buzzer begins sounding inter-
mittently, perform steps 7
through 9 again to confirm the
PIN code.
Registration is complete and all of the doors and the fuel filler door will unlock.
■Unlocking method
Press the trunk opener switch using
the same procedure as steps 7
through 9.
■PIN code registration
●To prevent theft, the same digit for all
5 digits and 12345 cannot be regis- tered as the PIN code. Also, avoid
using the same number as on your
license plate or other simple codes.
●To use 0 as a digit, press the trunk
opener switch 10 times.
●If a mistake is made during registra-
tion, unlock the doors or trunk using
the wireless remote control to cancel registration. Then perform registra-
tion again, starting from step 1. How-
ever, if the mistake was made in step 10 , a buzzer will sound and step 10
can be performed again.
●To clear the PIN code, perform the
registration procedure and enter
22222.
●After registering a new PIN code,
make sure to check that the doors can be unlocked using the code.
●If the smart entry & start system has
been disabled using the wireless
remote control method, the PIN code for the PIN code smart entry cannot
be cleared. ( P.114)
●In the following cases, perform the
PIN code registration procedure
again. • If the PIN code has been forgotten.
• When you wish to change the PIN
code.
●Make sure to change the PIN code
periodically.
●If the vehicle has been loaned to
another person, make sure that the PIN code has not been changed or
cleared. If the PIN code has been
changed or cleared, perform PIN code registration again.
■Unlocking method
●If an electronic key is within a detec-tion area, operation of the smart entry
will be given priority.
●If a mistake is made while entering the
PIN code, wait 5 seconds or more
before performing the procedure again.
●If the incorrect PIN code is entered 5 times consecutively, a buzzer will
sound for approximately 2 seconds
and operation will not be possible for 5 minutes.
Page 142 of 582
1404-2. Driving procedures
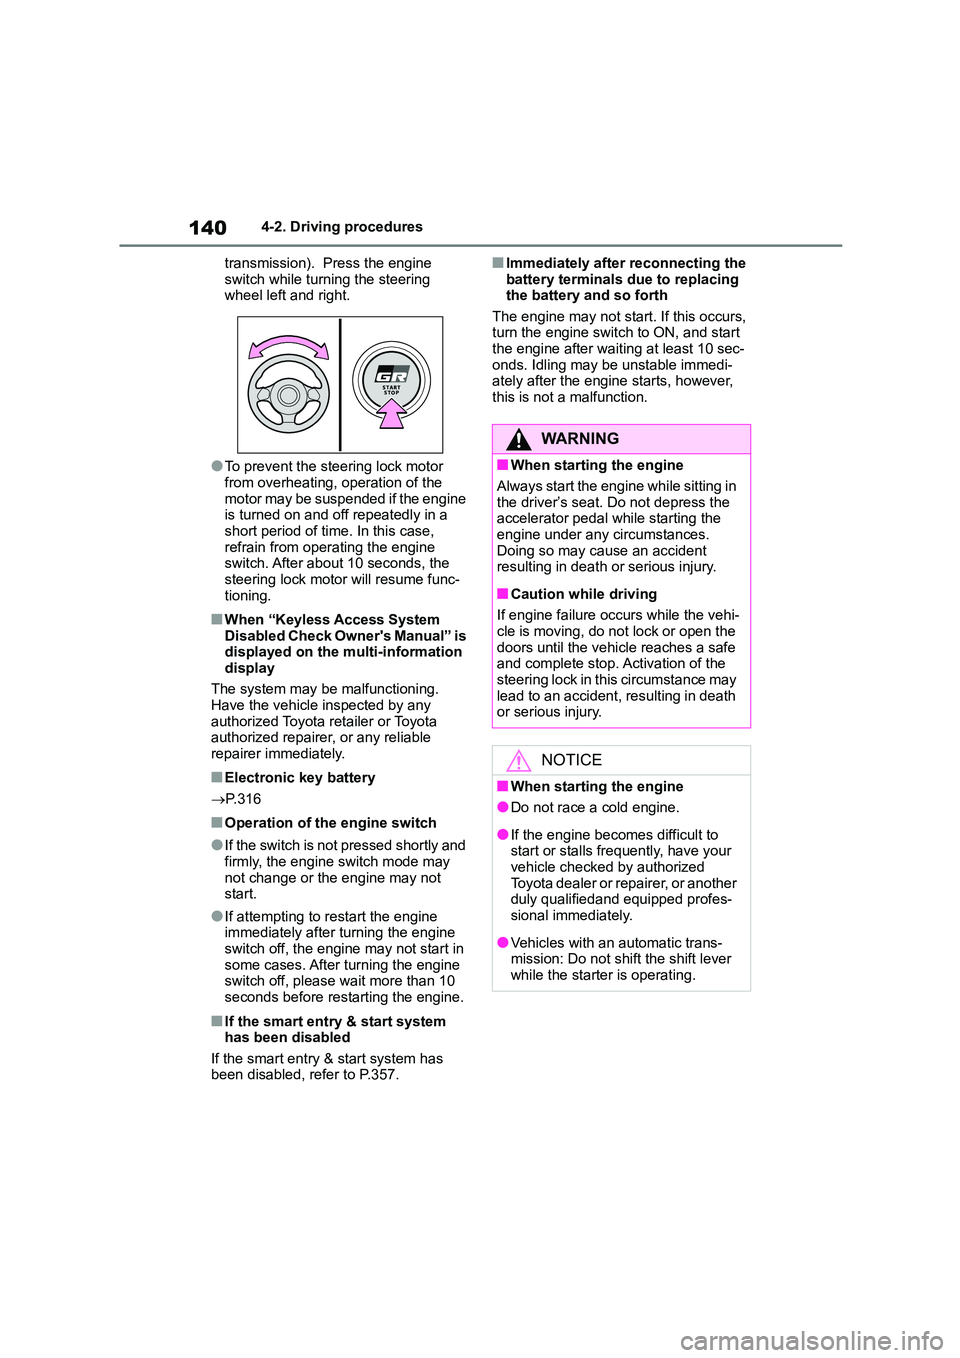
transmission). Press the engine
switch while turning the steering wheel left and right.
●To prevent the steering lock motor from overheating, operation of the
motor may be suspended if the engine
is turned on and off repeatedly in a short period of time. In this case,
refrain from operating the engine
switch. After about 10 seconds, the steering lock motor will resume func-
tioning.
■When “Keyless Access System
Disabled Check Owner's Manual” is displayed on the multi-information
display
The system may be malfunctioning. Have the vehicle inspected by any
authorized Toyota retailer or Toyota
authorized repairer, or any reliable repairer immediately.
■Electronic key battery
P.316
■Operation of the engine switch
●If the switch is not pressed shortly and
firmly, the engine switch mode may
not change or the engine may not start.
●If attempting to restart the engine immediately after turning the engine
switch off, the engine may not start in
some cases. After turning the engine switch off, please wait more than 10
seconds before restarting the engine.
■If the smart entry & start system
has been disabled
If the smart entry & start system has been disabled, refer to P.357.
■Immediately after reconnecting the
battery terminals due to replacing the battery and so forth
The engine may not start. If this occurs,
turn the engine switch to ON, and start the engine after waiting at least 10 sec-
onds. Idling may be unstable immedi-
ately after the engine starts, however, this is not a malfunction.
WA R N I N G
■When starting the engine
Always start the engine while sitting in
the driver’s seat. Do not depress the accelerator pedal while starting the
engine under any circumstances.
Doing so may cause an accident resulting in death or serious injury.
■Caution while driving
If engine failure occurs while the vehi-
cle is moving, do not lock or open the
doors until the vehicle reaches a safe and complete stop. Activation of the
steering lock in this circumstance may
lead to an accident, resulting in death or serious injury.
NOTICE
■When starting the engine
●Do not race a cold engine.
●If the engine becomes difficult to
start or stalls frequently, have your vehicle checked by authorized
Toyota dealer or repairer, or another
duly qualifiedand equipped profes- sional immediately.
●Vehicles with an automatic trans-mission: Do not shi ft the shift lever
while the starter is operating.
Page 143 of 582
141
4
4-2. Driving procedures
Driving
Automatic transmission
1 Stop the vehicle completely.
2 Set the parking brake (P.151),
and shift the shift lever to P.
Check the parking brake indicator is
illuminated.
3 Press the engine switch.
The engine will stop, and the meter dis-
play will be extinguished.
4 Release the brake pedal and
check that “ACCESSORY” or
“IGNITION ON” is not shown on
the meters.
Manual transmission
1 Stop the vehicle completely.
2 Set the parking brake. (P.151)
Check the parking brake indicator is illuminated.
3 Shift the shift lever to N.
( P.147)
4 Press the engine switch.
The engine will stop, and the meter dis-
play will be extinguished.
5 Release the brake pedal and
check that “ACCESSORY” or
“IGNITION ON” is not shown on
the meters.
Modes can be changed by pressing
the engine switch with brake pedal
(automatic transmission) or clutch
pedal (manual transmission)
released. (The mode changes each
NOTICE
■Symptoms indicating a malfunc-
tion with the engine switch
If the engine switch seems to be oper- ating somewhat differently than usual,
such as the switch sticking slightly,
there may be a malfunction. Contact any authorized Toyota retailer or
Toyota authorized repairer, or any reli-
able repairer immediately.
Stopping the engine
WA R N I N G
■Stopping the engine in an emer-
gency
If you want to stop the engine in an
emergency while driving the vehicle,
press and hold the engine switch for
more than 2 seconds, or press it briefly 3 times or more in succession.
( P.326)
However, do not touch the engine switch while driving except in an
emergency. Turning the engine off
while driving will not cause loss of steering or braking control, but the
power assist to these systems will be
lost. This will make it more difficult to steer and brake, so you should pull
over and stop the vehicle as soon as
it is safe to do so.
●If the engine switch is operated
while the vehicle is running, a warn- ing message will be shown on the
multi-information display and a
buzzer sounds.
●Vehicles with an automatic trans-
mission: To restart the engine after performing an emergency shut-
down, shift the shift lever to N and
then press the engine switch.
●Vehicles with a manual transmis-
sion: To restart the engine after per- forming an emergency shutdown,
depress the clutch pedal and then
press the engine switch.
Changing engine switch
modes
Page 147 of 582
145
4
4-2. Driving procedures
Driving
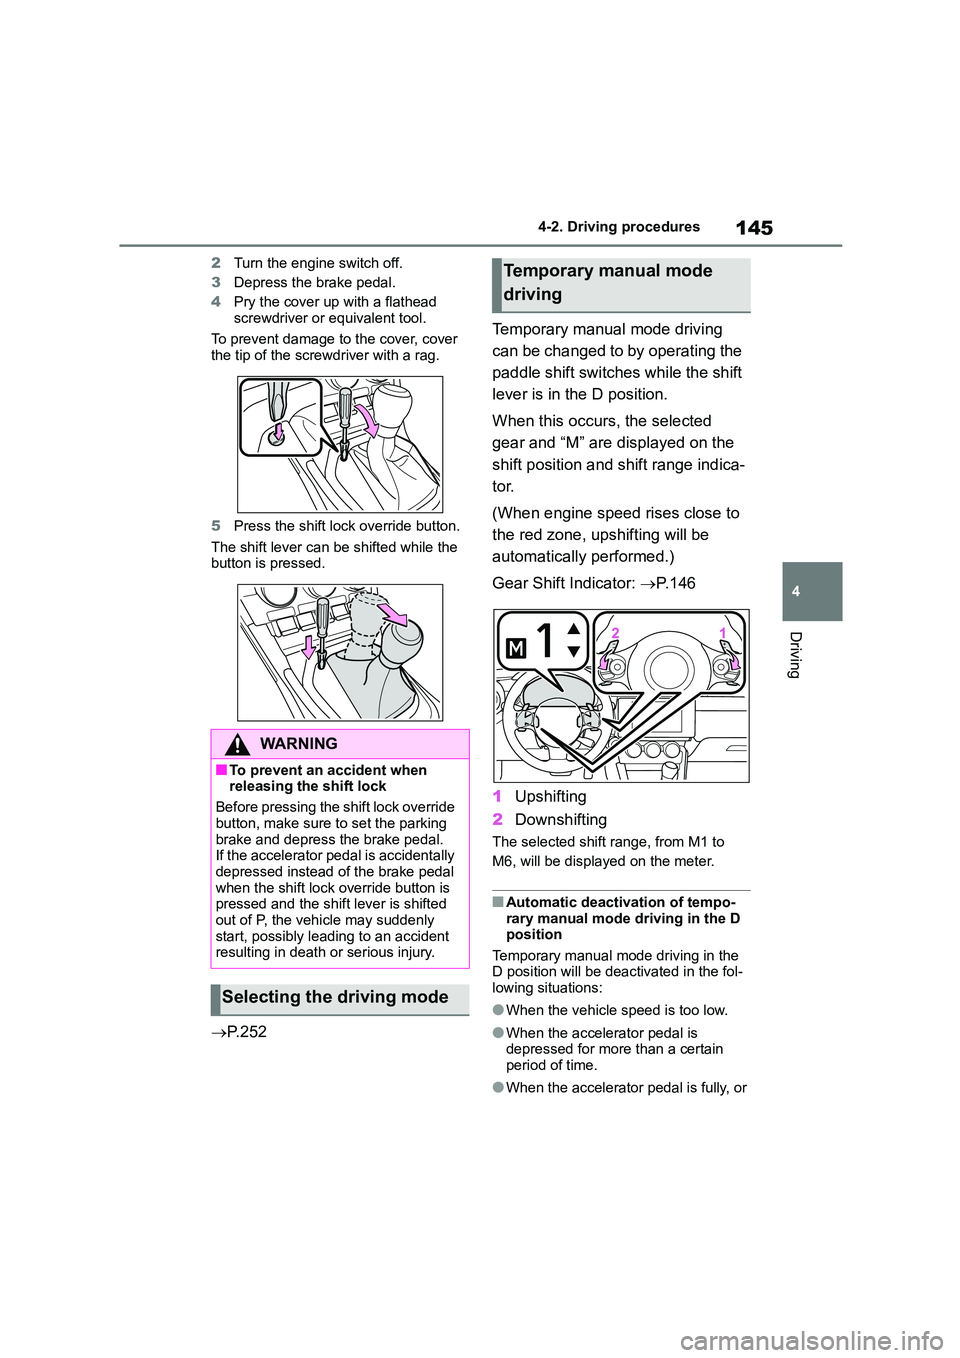
2 Turn the engine switch off.
3 Depress the brake pedal.
4 Pry the cover up with a flathead
screwdriver or equivalent tool.
To prevent damage to the cover, cover
the tip of the screwdriver with a rag.
5 Press the shift lock override button.
The shift lever can be shifted while the
button is pressed.
P. 2 5 2
Temporary manual mode driving
can be changed to by operating the
paddle shift switches while the shift
lever is in the D position.
When this occurs, the selected
gear and “M” are displayed on the
shift position and shift range indica-
tor.
(When engine speed rises close to
the red zone, upshifting will be
automatically performed.)
Gear Shift Indicator: P. 1 4 6
1 Upshifting
2 Downshifting
The selected shift range, from M1 to
M6, will be displayed on the meter.
■Automatic deactivation of tempo- rary manual mode driving in the D
position
Temporary manual mode driving in the
D position will be deactivated in the fol- lowing situations:
●When the vehicle speed is too low.
●When the accelerator pedal is
depressed for more than a certain period of time.
●When the accelerator pedal is fully, or
WA R N I N G
■To prevent an accident when releasing the shift lock
Before pressing the shift lock override
button, make sure to set the parking brake and depress the brake pedal.
If the accelerator pedal is accidentally
depressed instead of the brake pedal when the shift lock override button is
pressed and the shift lever is shifted
out of P, the vehicle may suddenly start, possibly leading to an accident
resulting in death or serious injury.
Selecting the driving mode
Temporary manual mode
driving