windshield wipers TOYOTA GR86 2022 Owners Manual (in English)
[x] Cancel search | Manufacturer: TOYOTA, Model Year: 2022, Model line: GR86, Model: TOYOTA GR86 2022Pages: 582, PDF Size: 86.38 MB
Page 5 of 582
3TABLE OF CONTENTS
1
6
5
4
3
2
8
7
Windshield wipers and washer
.......................................... 160
4-4. Refueling
Opening the fuel tank cap ... 162
4-5. EyeSight
EyeSight ............................. 165
Pre-Collision Braking System
.......................................... 175
Adaptive Cruise Control ...... 185
Conventional Cruise Control
.......................................... 201
Pre-Collision Throttle Manage-
ment.................................. 209
Lane Departure Warning..... 214
Lane Sway Warning ............ 216
Lead Vehicle Start Alert ...... 218
List of alert/notification sounds
.......................................... 220
EyeSight malfunction and tem-
porary stop........................ 222
4-6. Using other driving systems
BSD/RCTA .......................... 226
Reverse Automatic Braking
(RAB) system ................... 234
Rear view camera ............... 244
Conventional Cruise Control
.......................................... 248
Driving mode select switch
.......................................... 252
Hill-start assist control......... 253
Exhaust Gas Filter system .. 255
Driving assist systems ........ 256
4-7. Driving tips
Winter driving tips ............... 260
5-1. Using the air conditioning
system
Automatic air conditioning sys-
tem.................................... 264
Seat heaters ....................... 269
5-2. Using the interior lights
Interior lights list .................. 271
5-3. Using the storage features
List of storage features ....... 273
Trunk features..................... 276
5-4. Using the other interior fea-
tures
Other interior features ......... 277
6-1. Maintenance and care
Cleaning and protecting the
vehicle exterior ................. 282
Cleaning and protecting the
vehicle interior .................. 285
Cleaning and protecting the
Ultrasuede®area ............... 287
6-2. Maintenance
Maintenance requirements
.......................................... 289
6-3. Do-it-yourself maintenance
Do-it-yourself service precau-
tions .................................. 291
Hood ................................... 293
Positioning a floor jack ........ 294
Engine compartment........... 295
Tires .................................... 301
Replacing the tire ................ 308
5Interior features
6Maintenance and care
Page 13 of 582
11Pictorial index
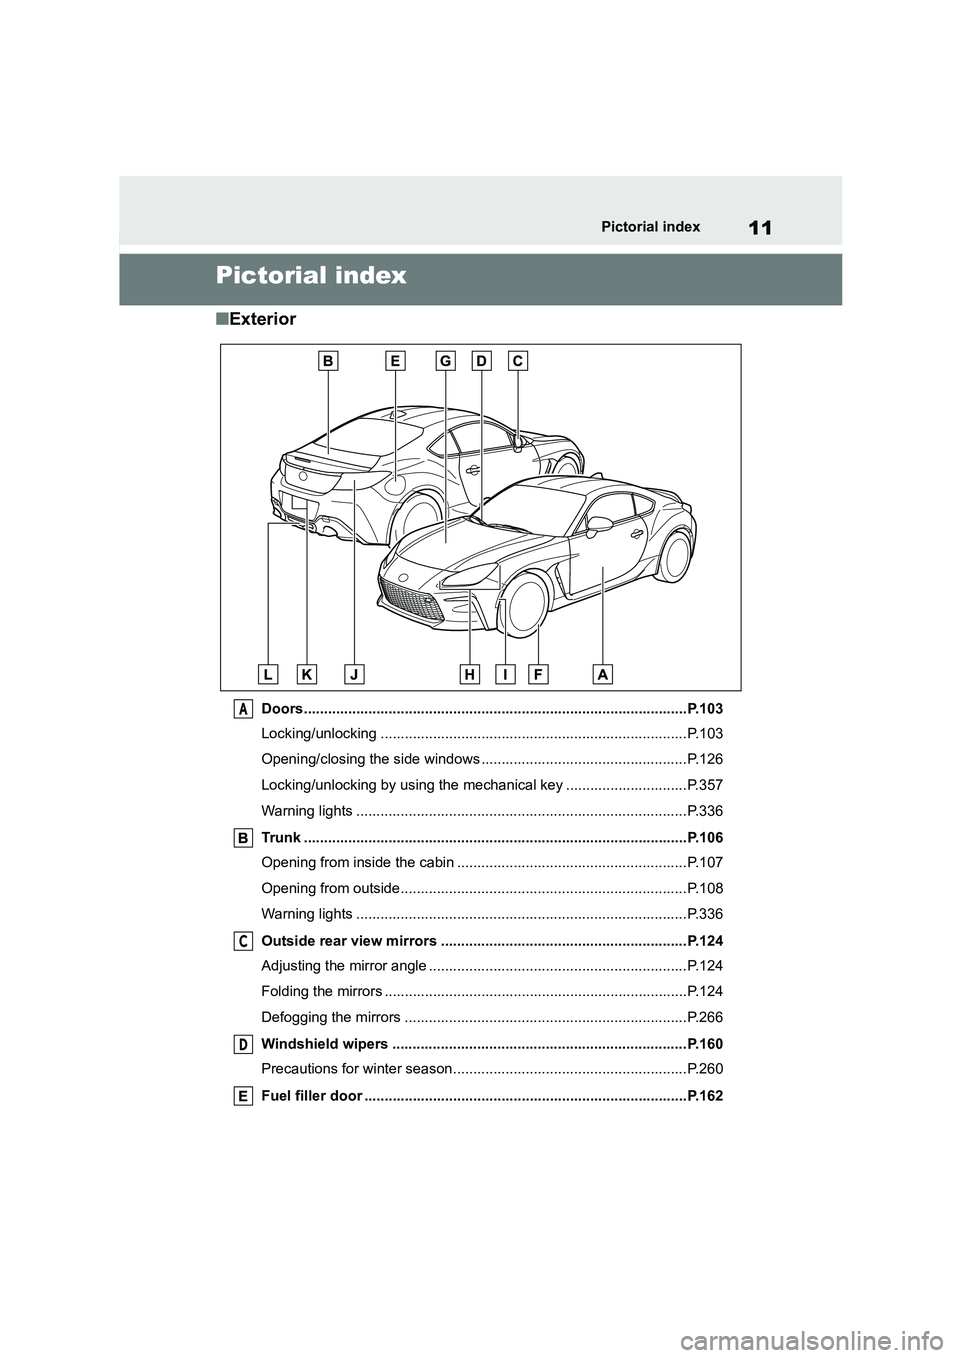
Pictorial index
■Exterior
Doors...............................................................................................P.103
Locking/unlocking ............................................................................P.103
Opening/closing the side windows ...................................................P.126
Locking/unlocking by using the mechanical key ..............................P.357
Warning lights ..................................................................................P.336
Trunk ...............................................................................................P.106
Opening from inside the cabin .........................................................P.107
Opening from outside.......................................................................P.108
Warning lights ..................................................................................P.336
Outside rear view mirrors .............................................................P.124
Adjusting the mirror angle ................................................................P.124
Folding the mirrors ...........................................................................P.124
Defogging the mirrors ......................................................................P.266
Windshield wipers .........................................................................P.160
Precautions for winter season..........................................................P.260
Fuel filler door ................................................................................P.162
A
C
D
Page 131 of 582
4
129
4
Driving
Driving
.4-1. Before driving
Driving the vehicle ............ 130
Cargo and luggage ........... 137
Trailer towing .................... 138
4-2. Driving procedures
Engine (ignition) switch ..... 139
Automatic transmission .... 143
Manual transmission ......... 147
Turn signal lever ............... 150
Parking brake ................... 151
ASC (Active Sound Control)
....................................... 152
4-3. Operating the lights and wip-
ers
Headlight switch ............... 153
High Beam Assist ............. 156
Rear fog lights .................. 159
Windshield wipers and washer
....................................... 160
4-4. Refueling
Opening the fuel tank cap
....................................... 162
4-5. EyeSight
EyeSight ........................... 165
Pre-Collision Braking System
....................................... 175
Adaptive Cruise Control.... 185
Conventional Cruise Control
....................................... 201
Pre-Collision Throttle Manage-
ment ............................... 209
Lane Departure Warning .. 214
Lane Sway Warning.......... 216
Lead Vehicle Start Alert .... 218
List of alert/notification sounds
........................................ 220
EyeSight malfunction and tem-
porary stop...................... 222
4-6. Using other driving systems
BSD/RCTA ........................ 226
Reverse Automatic Braking
(RAB) system ................. 234
Rear view camera ............. 244
Conventional Cruise Control
........................................ 248
Driving mode select switch
........................................ 252
Hill-start assist control....... 253
Exhaust Gas Filter system
........................................ 255
Driving assist systems ...... 256
4-7. Driving tips
Winter driving tips ............. 260
Page 155 of 582
153
4
4-3. Operating the lights and wipers
Driving
4-3.Operating the lights and wipers
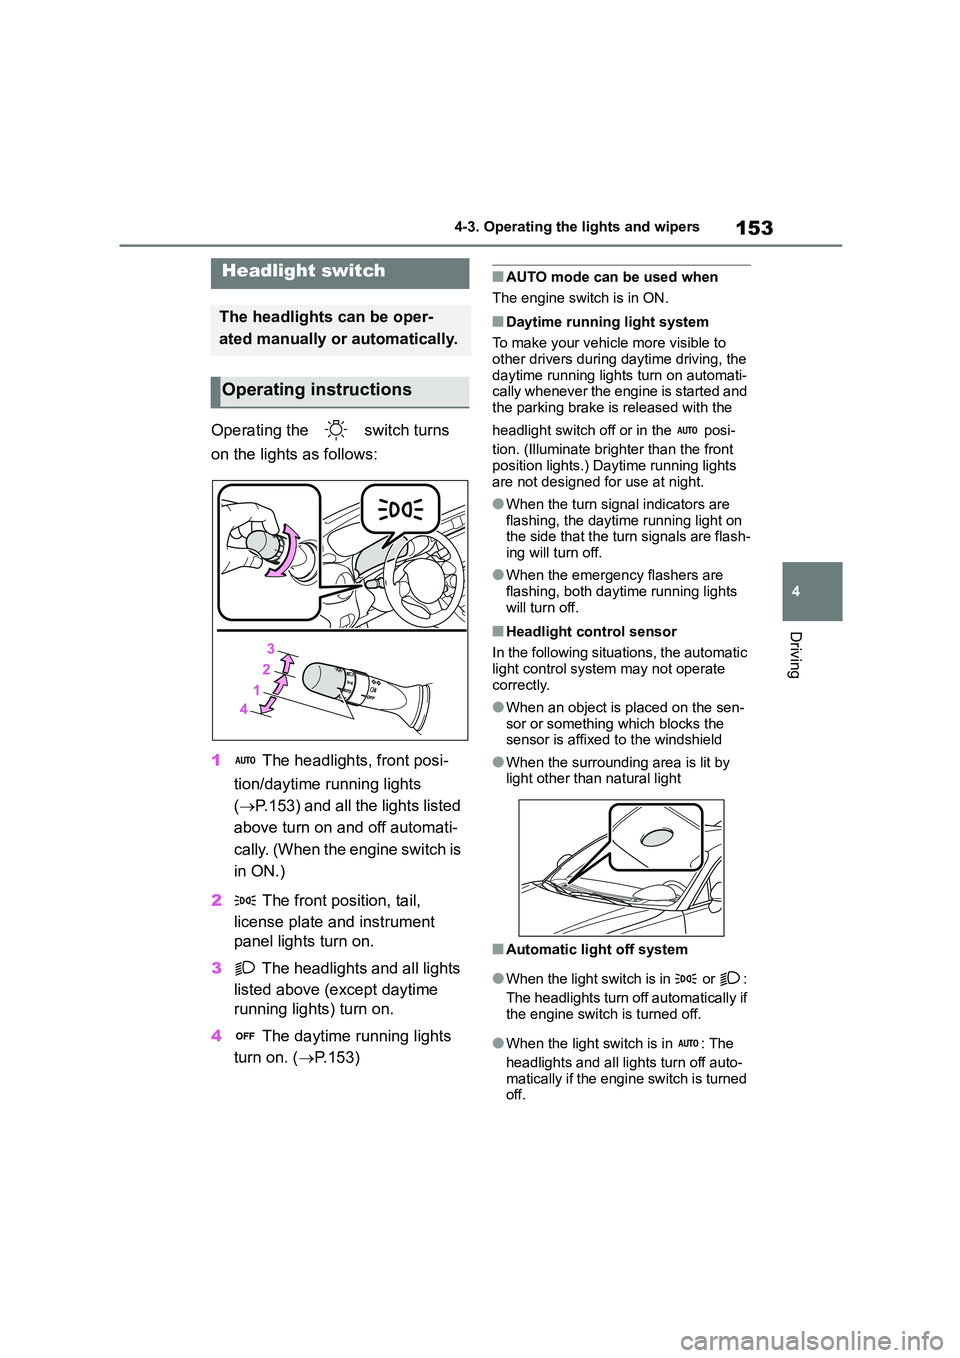
Operating the switch turns
on the lights as follows:
1 The headlights, front posi-
tion/daytime running lights
( P.153) and all the lights listed
above turn on and off automati-
cally. (When the engine switch is
in ON.)
2 The front position, tail,
license plate and instrument
panel lights turn on.
3 The headlights and all lights
listed above (except daytime
running lights) turn on.
4 The daytime running lights
turn on. ( P.153)
■AUTO mode can be used when
The engine switch is in ON.
■Daytime running light system
To make your vehicle more visible to
other drivers during daytime driving, the daytime running lights turn on automati-
cally whenever the engine is started and
the parking brake is released with the
headlight switch off or in the posi-
tion. (Illuminate brighter than the front
position lights.) Daytime running lights are not designed for use at night.
●When the turn signal indicators are flashing, the daytime running light on
the side that the turn signals are flash-
ing will turn off.
●When the emergency flashers are
flashing, both daytime running lights will turn off.
■Headlight control sensor
In the following situations, the automatic
light control system may not operate correctly.
●When an object is placed on the sen-sor or something which blocks the
sensor is affixed to the windshield
●When the surrounding area is lit by light other than natural light
■Automatic light off system
●When the light switch is in or :
The headlights turn off automatically if the engine switch is turned off.
●When the light switch is in : The
headlights and all lights turn off auto-
matically if the engine switch is turned
off.
Headlight switch
The headlights can be oper-
ated manually or automatically.
Operating instructions
Page 156 of 582
1544-3. Operating the lights and wipers
To turn the lights on again, turn the
engine switch to ON, or turn the light
switch off once and then back to or
.
■Light reminder buzzer
A buzzer sounds when the engine switch is turned off and the driver’s door
is opened while the lights are turned on.
■Automatic headlight leveling sys-
tem
The level of the headlights is automati-
cally adjusted according to the number
of passengers and the loading condition of the vehicle to ensure that the head-
lights do not interfere with other road
users.
■Windshield wiper linked headlight illumination
When driving during daytime with the
headlight switch turned to , if the
windshield wipers are used, the head-
lights will turn on automatically after sev-
eral seconds to help enhance the visibility of your vehicle.
■Battery-saving function
In order to prevent the battery of the
vehicle from discharging, if the light
switch is in the or position when
the engine switch is turned off the bat-
tery saving function will operate and
automatically turn off all the lights after approximately 20 minutes.
When any of the following are per-
formed, the battery-saving function will be disabled.
●When the engine switch is turned to ACC or ON
●When the headlight switch is in the
position
●When a door is opened or closed
■Welcome light illumination control
The headlights and tail lights automati- cally turn on at night when the doors are
unlocked using the wireless remote con-
trol if the light switch is in the posi-
tion. The headlights and tail lights will turn off automatically after approxi-
mately 30 seconds.
■Customization
Some functions can be customized. ( P.377)
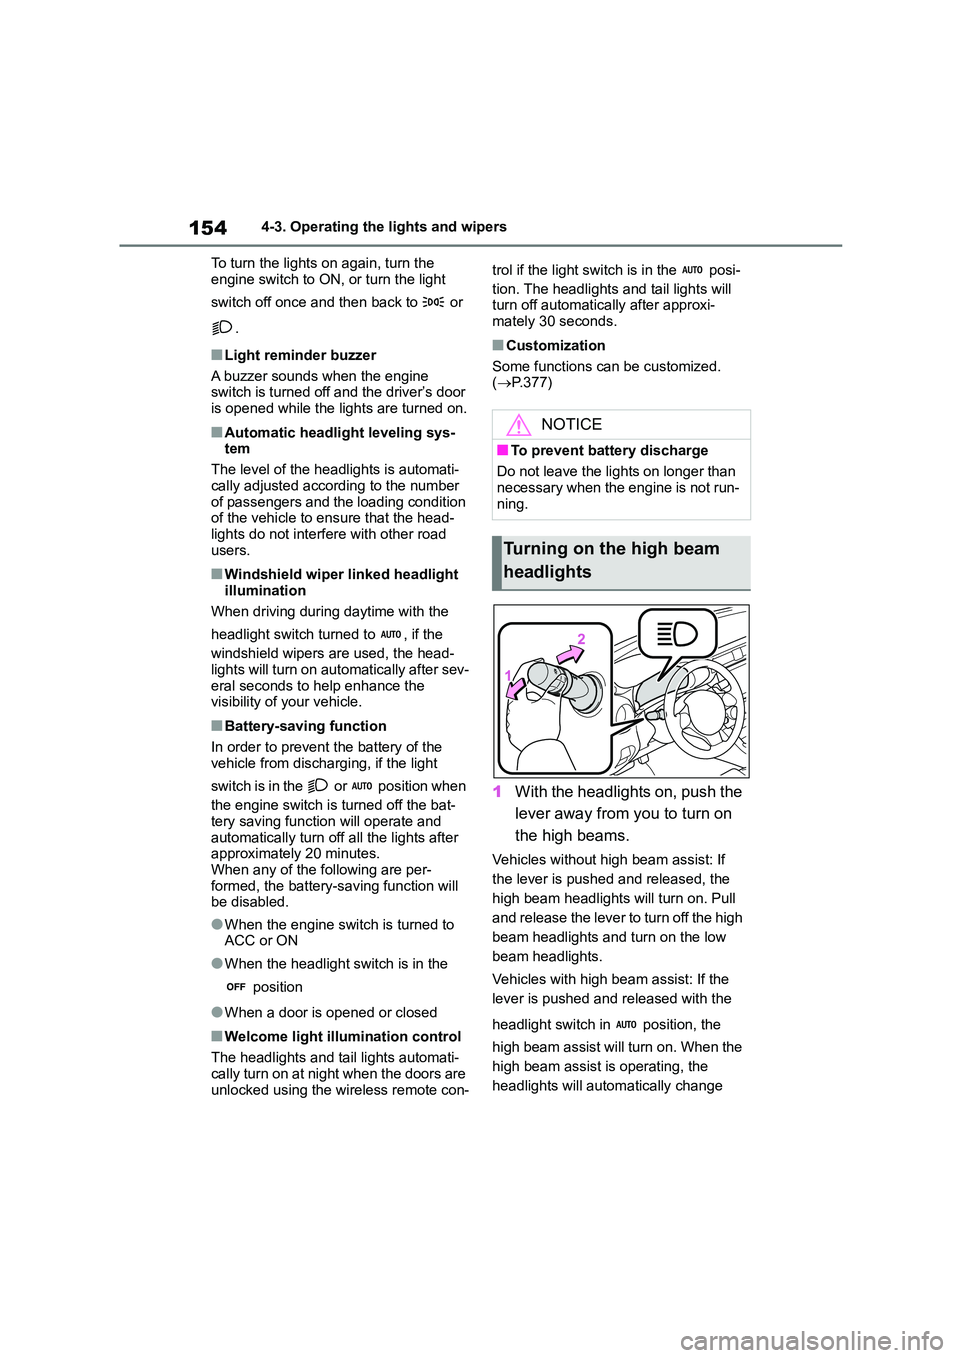
1With the headlights on, push the
lever away from you to turn on
the high beams.
Vehicles without high beam assist: If
the lever is pushed and released, the
high beam headlights will turn on. Pull
and release the lever to turn off the high
beam headlights and turn on the low
beam headlights.
Vehicles with high beam assist: If the
lever is pushed and released with the
headlight switch in position, the
high beam assist will turn on. When the
high beam assist is operating, the
headlights will automatically change
NOTICE
■To prevent battery discharge
Do not leave the lights on longer than
necessary when the engine is not run- ning.
Turning on the high beam
headlights
Page 160 of 582
1584-3. Operating the lights and wipers
etc.)
• When the windshield is obscured by fog, mist, ice, dirt, etc.
• When the windshield is cracked or
damaged • When the stereo camera is deformed
or dirty
• When the temperature of the stereo camera is extremely high
• When the surrounding brightness
level is equal to that of headlights, tail lights or fog lights
• When headlights or tail lights of vehi-
cles ahead are turned off, dirty, chang- ing color, or not aimed properly
• When the vehicle is hit by water,
snow, dust, etc. from a preceding vehicle
• When driving through an area of inter-
mittently changing brightness and darkness
• When frequently and repeatedly driv-
ing ascending/descending roads, or roads with rough, bumpy or uneven
surfaces (such as stone-paved roads,
gravel roads, etc.) • When frequently and repeatedly tak-
ing curves or driving on a winding
road • When there is a highly reflective
object ahead of the vehicle, such as a
sign or mirror • When the back of a preceding vehicle
is highly reflective, such as a con-
tainer on a truck • When the vehicle’s headlights are
damaged or dirty, or are not aimed
properly • When the vehicle is listing or titling
due to a flat tire, a trailer being towed,
etc. • Immediately after the engine is started
• When the headlights are changed
between the high beams and low
beams repeatedly in an abnormal manner
• When the driver believes that the high
beams may be flashing or dazzling pedestrians or other drivers
• When the vehicle is used in an area in
which vehicles travel on the opposite side of the road of the country for
which the vehicle was designed, for
example using a vehicle designed for
right-hand traffic in a left-hand traffic area, or vice versa
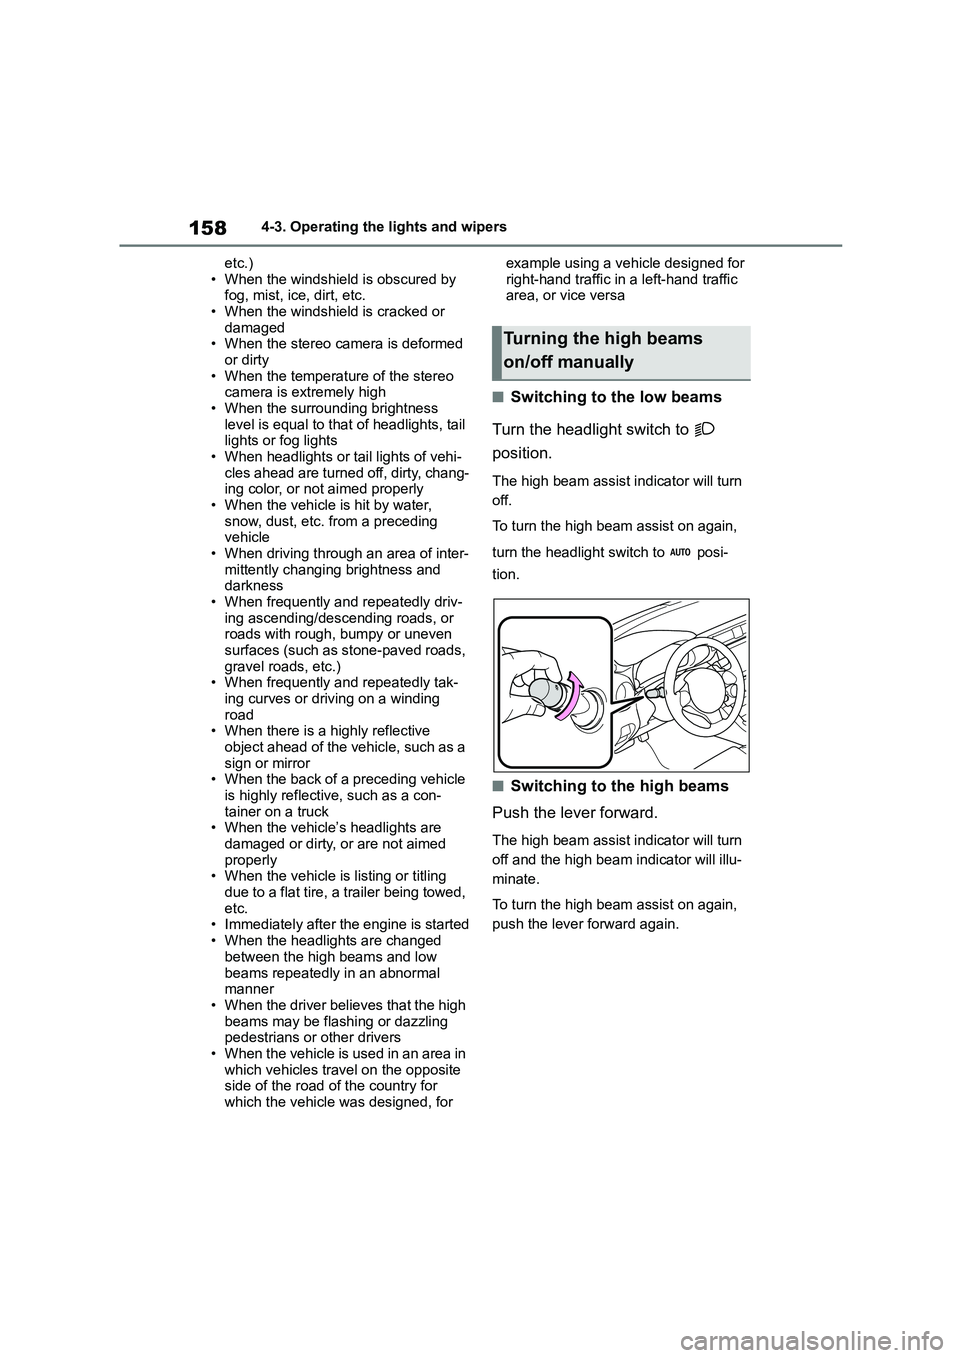
■Switching to the low beams
Turn the headlight switch to
position.
The high beam assist indicator will turn
off.
To turn the high beam assist on again,
turn the headlight switch to posi-
tion.
■Switching to the high beams
Push the lever forward.
The high beam assist indicator will turn
off and the high beam indicator will illu-
minate.
To turn the high beam assist on again,
push the lever forward again.
Turning the high beams
on/off manually
Page 162 of 582
1604-3. Operating the lights and wipers
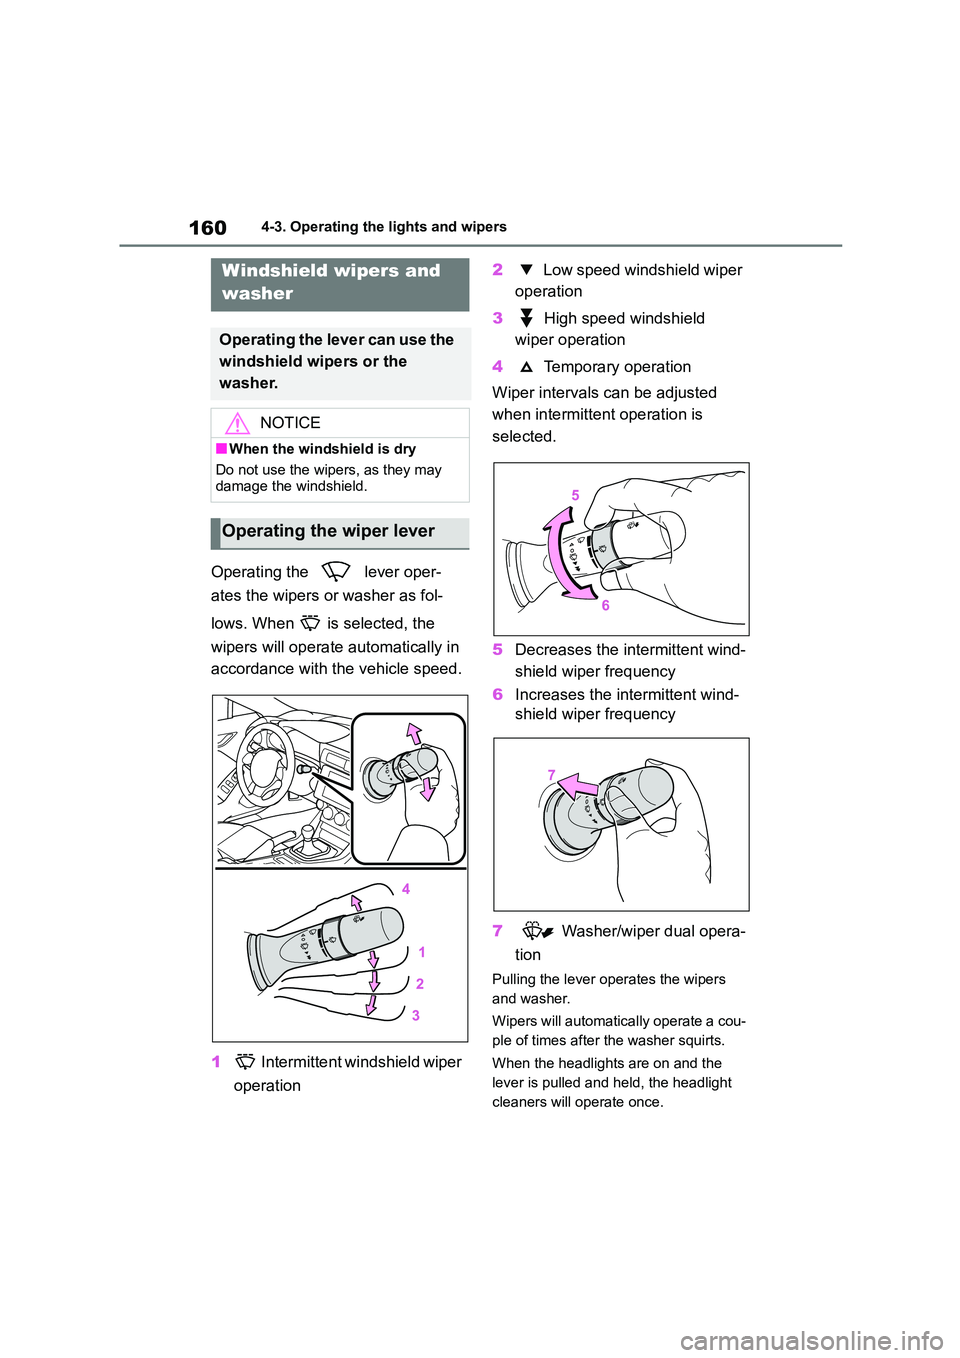
Operating the lever oper-
ates the wipers or washer as fol-
lows. When is selected, the
wipers will op erate automatically in
accordance with the vehicle speed.
1 Intermittent windshield wiper
operation
2 Low speed windshield wiper
operation
3 High speed windshield
wiper operation
4 Temporary operation
Wiper intervals can be adjusted
when intermittent operation is
selected.
5 Decreases the intermittent wind-
shield wiper frequency
6 Increases the intermittent wind-
shield wiper frequency
7 Washer/wiper dual opera-
tion
Pulling the lever operates the wipers
and washer.
Wipers will automatical ly operate a cou-
ple of times after the washer squirts.
When the headlights are on and the
lever is pulled and held, the headlight
cleaners will operate once.
Windshield wipers and
washer
Operating the lever can use the
windshield wipers or the
washer.
NOTICE
■When the windshield is dry
Do not use the wipers, as they may
damage the windshield.
Operating the wiper lever
Page 163 of 582
161
4
4-3. Operating the lights and wipers
Driving
■The windshield wiper and washer can be operated when
The engine switch is in ON.
■If no windshield washer fluid
sprays
Check that the washer nozzles are not
blocked if there is washer fluid in the
windshield washer fluid reservoir.
WA R N I N G
■Caution regarding the use of washer fluid
When it is cold, do not use the washer
fluid until the windshield becomes warm. The fluid may freeze on the
windshield and cause low visibility.
This may lead to an accident, result- ing in death or serious injury.
NOTICE
■When the washer fluid tank is
empty
Do not operate the switch continually
as the washer fluid pump may over-
heat.
■When a nozzle becomes blocked
In this case, contact any authorized Toyota retailer or Toyota authorized
repairer, or any reliable repairer.
Do not try to clear it with a pin or other object. The nozzle will be damaged.
Page 170 of 582
1684-5. EyeSight
NOTICE
●Under the conditions listed below, it
will become more difficult for the
system to detect the vehicle in front, motorcycles, bicycles, pedestrians
and obstacles on the road, and lane
markers. Also, EyeSight may tem- porarily stop operating. However,
the temporary stop will be canceled
once these conditions have
improved and the vehicle is driven for a short period of time.
• Bad weather (for example heavy
rain, a blizzard or thick fog). In par- ticular, the system is more likely to
temporarily stop operating when
there is an oil film adhering to the windshield, a glass coating has
been applied, or poorly performing
wipers are used.
• Strong light is coming from the front
(sunlight or headlight beams of oncoming traffic, etc.).
• The windshield washer is in use.
• Raindrops, water drops, or dirt on
the windshield are not wiped off suf- ficiently.
• The windshield has become fogged, scratched or smeared, or
snow, dirt ,dust or frost has adhered
to it, or it is otherwise affected. These will reduce the stereo cam-
era’s field of view. Also, light is
reflecting off the dirt, etc.
• The vehicle is tilted at an extreme
angle due to loaded cargo or other factors.
• Visibility is poor due to sand, smoke or water vapor blowing in the wind,
or the front vision is obscured due
to water splashes, snow, dirt or dust stir up generated by the vehicle in
front or oncoming traffic.
• The stereo camera’s field of view is
obstructed.
• Through the entrance or exit of a tunnel
• The rear aspect of the vehicle in front is low, small or irregular (for
example a low bed trailer, etc.).
• The obstacle is a fence, a wall or a
shutter, etc. with a uniform pattern
(a striped pattern, brick, etc.) or with no pattern in front.
• The obstacle is a wall or door made of glass or a mirror in front.
• Driving at night or in a tunnel when there is a vehicle in front that does
not have its taillights on
• Driving through a banner or flag,
low branches on a tree or thick/tall
vegetation
• On steep uphill or downhill grades
• The stereo camera is obstructed by
a hand, etc. (If even one of the
lenses is obstructed, the system does not operate properly.)
• It is completely dark and no objects are detected.
• The area around the vehicle has a uniform color (such as when com-
pletely covered in snow, etc.).
• Accurate detection is not possible
due to reflections in the windshield.
●Under the conditions listed below,
EyeSight may temporarily stop
operating. If this occurs, EyeSight will resume operating when the
conditions improve.
• The temperature inside the vehicle
is high, such as after the vehicle was left in bright sunshine, or the
temperature inside the vehicle is
low, such as after the vehicle was left in an extremely cold environ-
ment.
• Immediately after the engine starts
Page 286 of 582
2846-1. Maintenance and care
NOTICE
■Protective film for side sill plates
(if equipped)
Make sure to remove the protective film. Failure to do so may cause rust,
depending on conditions.
■Cleaning the exterior lights
●Wash carefully. Do not use organic
substances or scrub with a hard
brush. This may damage the sur- faces of the lights.
●Do not apply wax to the surfaces of the lights.
Wax may cause damage to the
lenses.
■To prevent damage to the wind-
shield wiper arms
When lifting the wiper arms away
from the windshield, pull the driver
side wiper arm upward first, and repeat for the passenger side. When
returning the wipers to their original
position, do so from the passenger side first.
■When using a high pressure car wash
●When washing the vehicle, do not
spray the camera or its surrounding area directly with a high pressure
washer. Shock applied from high
pressure water may cause the device to not operate normally.
●Do not bring the nozzle tip close to boots (rubber or resin manufac-
tured cover), connectors or the fol-
lowing parts. The parts may be damaged if they come into contact
with high-pressure water.
• Traction related parts
• Suspension parts
• Steering parts
• Brake parts
●Keep the cleaning nozzle at least 30 cm (11.9 in.) away from the vehi-
cle body. Otherwise resin section,
such as moldings and bumpers, may be deformed and damaged.
Also, do not continuously hold the
nozzle in the same place.
●Do not spray the lower part of the
windshield continuously.
If water enters the air conditioning
system intake located near the lower
part of the windshield, the air condi- tioning system may not operate cor-
rectly.
●Do not wash the underside of the
vehicle using a high pressure car
washer.