TOYOTA GT86 2016 Owners Manual (in English)
Manufacturer: TOYOTA, Model Year: 2016, Model line: GT86, Model: TOYOTA GT86 2016Pages: 464, PDF Size: 17.53 MB
Page 391 of 464
5
391 5-2. Steps to take in an emergency
When trouble arises
FT86_EE
вЦ†Certification for the jack
86_OM_EE_OM18058E.book 391 гГЪгГЉгВЄ пЉТпЉРпЉСпЉХеєіпЉУжЬИпЉСпЉЧжЧ•гААзБЂжЫЬжЧ•гААеНИеЙНпЉСпЉСжЩВпЉУпЉСеИЖ
Page 392 of 464
392 5-2. Steps to take in an emergency
FT86_EE
CAUTION
вЦ†Using the tire jack
Improper use of the tire jack may lead to death or serious injuries due to the
vehicle suddenly falling off the jack.
вЧПDo not use the tire jack for any purpose other than replacing tires or install-
ing and removing tire chains.
вЧПOnly use the tire jack that comes with this vehicle for replacing a flat tire.
Do not use it on other vehicles, and do not use other tire jacks for replac-
ing tires on this vehicle.
вЧПAlways check that the tire jack is securely set to the jack point.
вЧПDo not put any part of your body under the vehicle supported by a jack.
вЧПDo not start or run the engine while your vehicle is supported by the jack.
вЧПDo not raise the vehicle while someone is in it.
вЧПWhen raising the vehicle, do not put an object on or under the jack.
вЧПDo not raise the vehicle to a height greater than that required to replace
the tire.
вЧПUse a jack stand if it is necessary to get under the vehicle.
Take particular care when lowering the vehicle to ensure that no one working
on or near the vehicle may be injured.
86_OM_EE_OM18058E.book 392 гГЪгГЉгВЄ пЉТпЉРпЉСпЉХеєіпЉУжЬИпЉСпЉЧжЧ•гААзБЂжЫЬжЧ•гААеНИеЙНпЉСпЉСжЩВпЉУпЉСеИЖ
Page 393 of 464
5
393 5-2. Steps to take in an emergency
When trouble arises
FT86_EE
CAUTION
вЦ†Replacing a flat tire
вЧПDo not touch the disc wheels or the area around the brakes immediately
after the vehicle has been driven.
After the vehicle has been driven the disc wheels and the area around the
brakes will be extremely hot. Touching these areas with hands, feet or
other body parts while changing a tire, etc. may result in burns.
вЧПDo not attach a heavily damaged wheel ornament, as it may fly off the
wheel while the vehicle is moving.
вЧПFailure to follow these precautions could cause the wheel nuts to loosen
and the tire to fall off, resulting in death or serious injury.
вАҐ Have the wheel nuts tightened with a torque wrench to 120 N
вАҐm (12.2
kgf
вАҐm, 89 ftвАҐlbf) as soon as possible after changing wheels.
вАҐ When installing a tire, only use wheel nuts that have been specifically
designed for that wheel.
вАҐ If there are any cracks or deformations in the bolt screws, nut threads
or bolt holes of the wheel, have the vehicle inspected by any autho-
rized Toyota dealer or repairer, or another duly qualified and equipped
professional.
вАҐ When installing the wheel nuts, be sure to install them with the tapered
ends facing inward. (вЖТP. 327)
86_OM_EE_OM18058E.book 393 гГЪгГЉгВЄ пЉТпЉРпЉСпЉХеєіпЉУжЬИпЉСпЉЧжЧ•гААзБЂжЫЬжЧ•гААеНИеЙНпЉСпЉСжЩВпЉУпЉСеИЖ
Page 394 of 464
394 5-2. Steps to take in an emergency
FT86_EE
NOTICE
вЦ†Do not drive the vehicle with a flat tire.
Do not continue driving with a flat tire.
Driving even a short distance with a flat tire can damage the tire and the
wheel beyond repair.
вЦ†Stowing the jack
When stowing the jack in the jack holder, make sure that the part that the
jack handle attaches to is pointing towards the inside of the trunk. Failure to
do so may damage the vehicle body.
вЦ†When replacing the tires
When removing or fitting the wheels, tires or the tire pressure warning valve
and transmitter, contact any authorized Toyota dealer or repairer, or another
duly qualified and equipped professional as the tire pressure warning valve
and transmitter may be damaged if not handled correctly.
вЦ†To avoid damage to the tire pressure warning valves and transmitters
When a tire is repaired with liquid sealants, the tire pressure warning valve
and transmitter may not operate properly. If a liquid sealant is used, contact
any authorized Toyota dealer or repairer, or another duly qualified and
equipped professional or other qualified service shop as soon as possible.
Make sure to replace the tire pressure warning valve and transmitter when
replacing the tire. (вЖТP. 316)
86_OM_EE_OM18058E.book 394 гГЪгГЉгВЄ пЉТпЉРпЉСпЉХеєіпЉУжЬИпЉСпЉЧжЧ•гААзБЂжЫЬжЧ•гААеНИеЙНпЉСпЉСжЩВпЉУпЉСеИЖ
Page 395 of 464
5
395
5-2. Steps to take in an emergency
When trouble arises
FT86_EE
If you have a flat tire (vehicles with an emergency tire puncture repair kit)
Your vehicle is not equipped with a spare tire, but instead is
equipped with an emergency tire puncture repair kit.
A puncture caused by a nail or screw passing through the tire tread
can be repaired temporarily using the emergency tire puncture repair
kit. (The kit contains a bottle of sealant. The sealant can be used only
once to temporarily repair one tire without removing the nail or
screw from the tire.) Depending on the damage, this kit cannot be
used to repair the tire. (вЖТP. 398)
After temporarily repairing the tire with the kit, have the tire repaired
or replaced by any authorized Toyota dealer or repairer, or another
duly qualified and equipped professional. Repairs conducted using
the emergency tire puncture repair kit are only a temporary measure.
Have the tire repaired and replaced as soon as possible.
вЦ†Before repairing the tire
вЧПStop the vehicle in a safe place on a hard, flat surface.
вЧПSet the parking brake.
вЧПShift the shift lever to P (vehicles with an automatic transmis-
sion) or N (vehicles with a manual transmission).
вЧПStop the engine.
вЧПTurn on the emergency flashers.
86_OM_EE_OM18058E.book 395 гГЪгГЉгВЄ пЉТпЉРпЉСпЉХеєіпЉУжЬИпЉСпЉЧжЧ•гААзБЂжЫЬжЧ•гААеНИеЙНпЉСпЉСжЩВпЉУпЉСеИЖ
Page 396 of 464
396 5-2. Steps to take in an emergency
FT86_EE
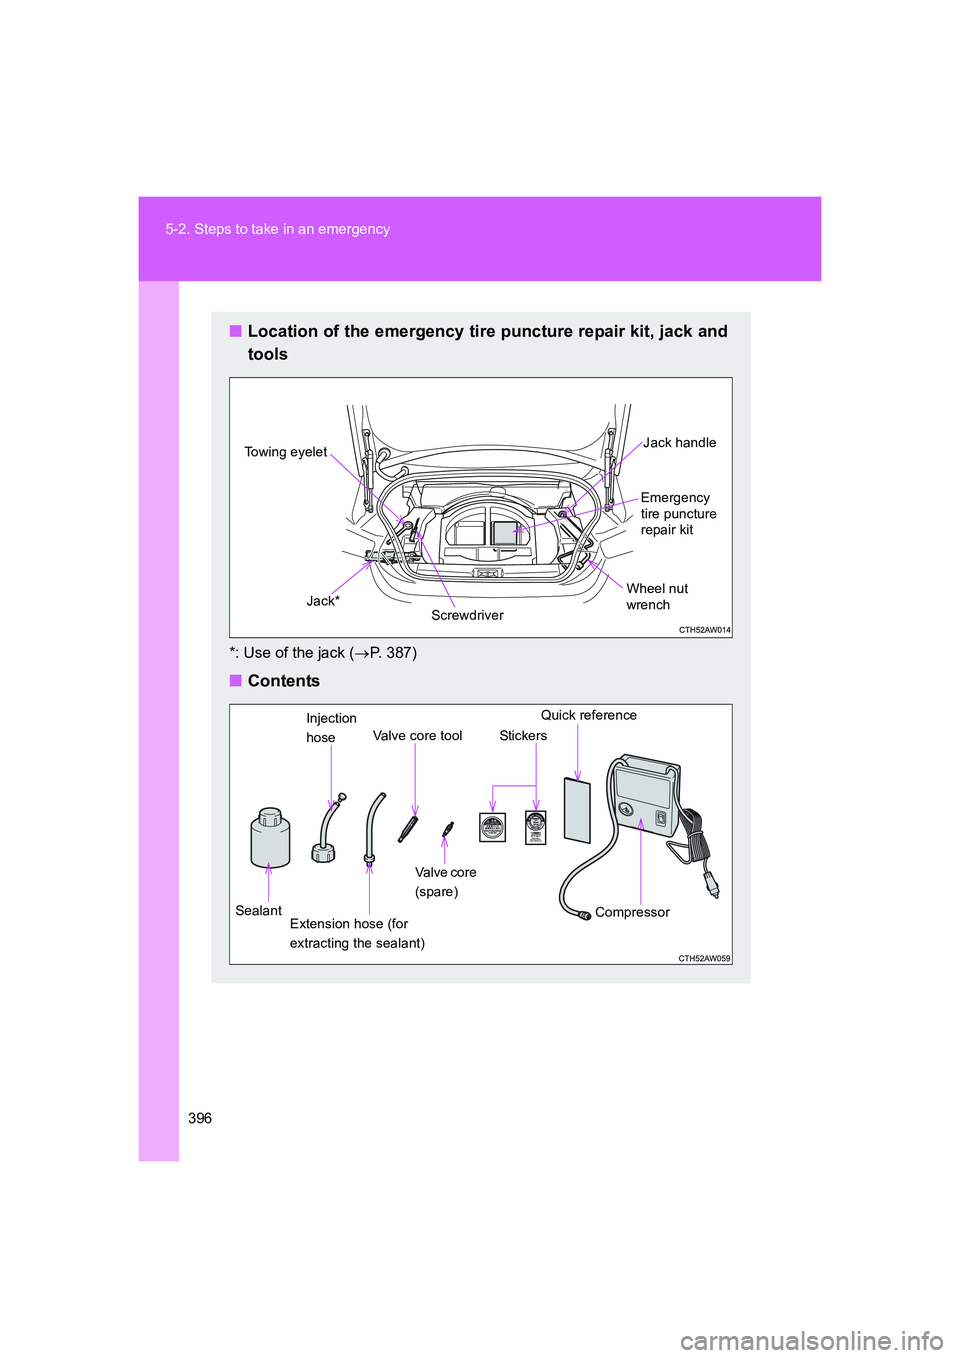
вЦ†Location of the emergency tire puncture repair kit, jack and
tools
*: Use of the jack (вЖТP. 387)
вЦ†Contents
ScrewdriverEmergency
tire puncture
repair kitJack handle
Towing eyelet
Jack*Wheel nut
wrench
SealantInjection
hoseVa l v e c o r e t o o l
Valve core
(spare)
Compressor Stic kers
Extension hose (for
extracting the sealant)
Quick reference
86_OM_EE_OM18058E.book 396 гГЪгГЉгВЄ пЉТпЉРпЉСпЉХеєіпЉУжЬИпЉСпЉЧжЧ•гААзБЂжЫЬжЧ•гААеНИеЙНпЉСпЉСжЩВпЉУпЉСеИЖ
Page 397 of 464
5
397 5-2. Steps to take in an emergency
When trouble arises
FT86_EE
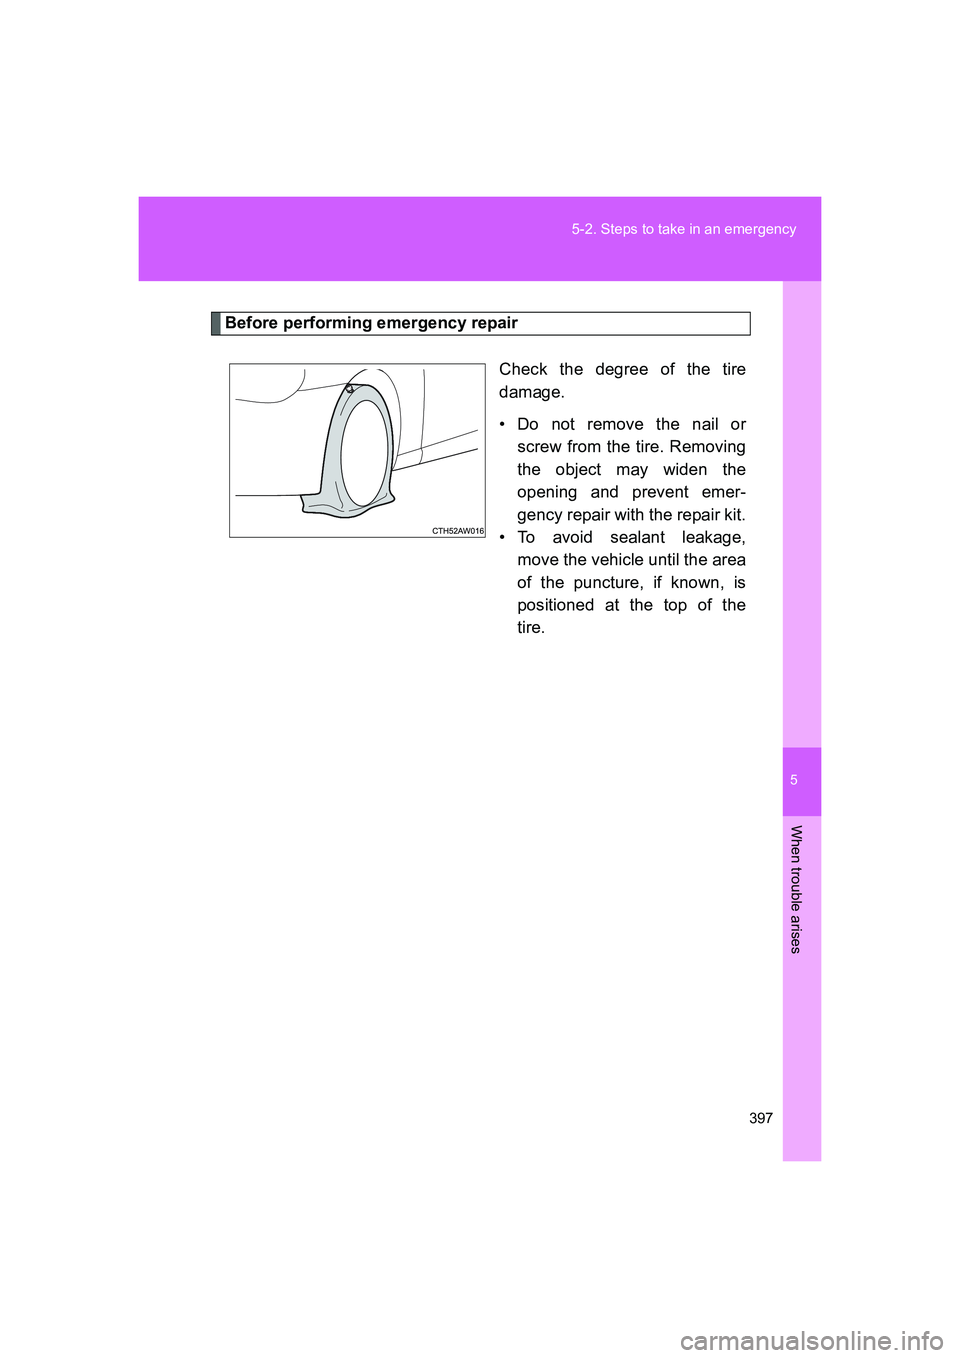
Before performing emergency repair
Check the degree of the tire
damage.
вАҐ Do not remove the nail or
screw from the tire. Removing
the object may widen the
opening and prevent emer-
gency repair with the repair kit.
вАҐ To avoid sealant leakage,
move the vehicle until the area
of the puncture, if known, is
positioned at the top of the
tire.
86_OM_EE_OM18058E.book 397 гГЪгГЉгВЄ пЉТпЉРпЉСпЉХеєіпЉУжЬИпЉСпЉЧжЧ•гААзБЂжЫЬжЧ•гААеНИеЙНпЉСпЉСжЩВпЉУпЉСеИЖ
Page 398 of 464
398 5-2. Steps to take in an emergency
FT86_EE
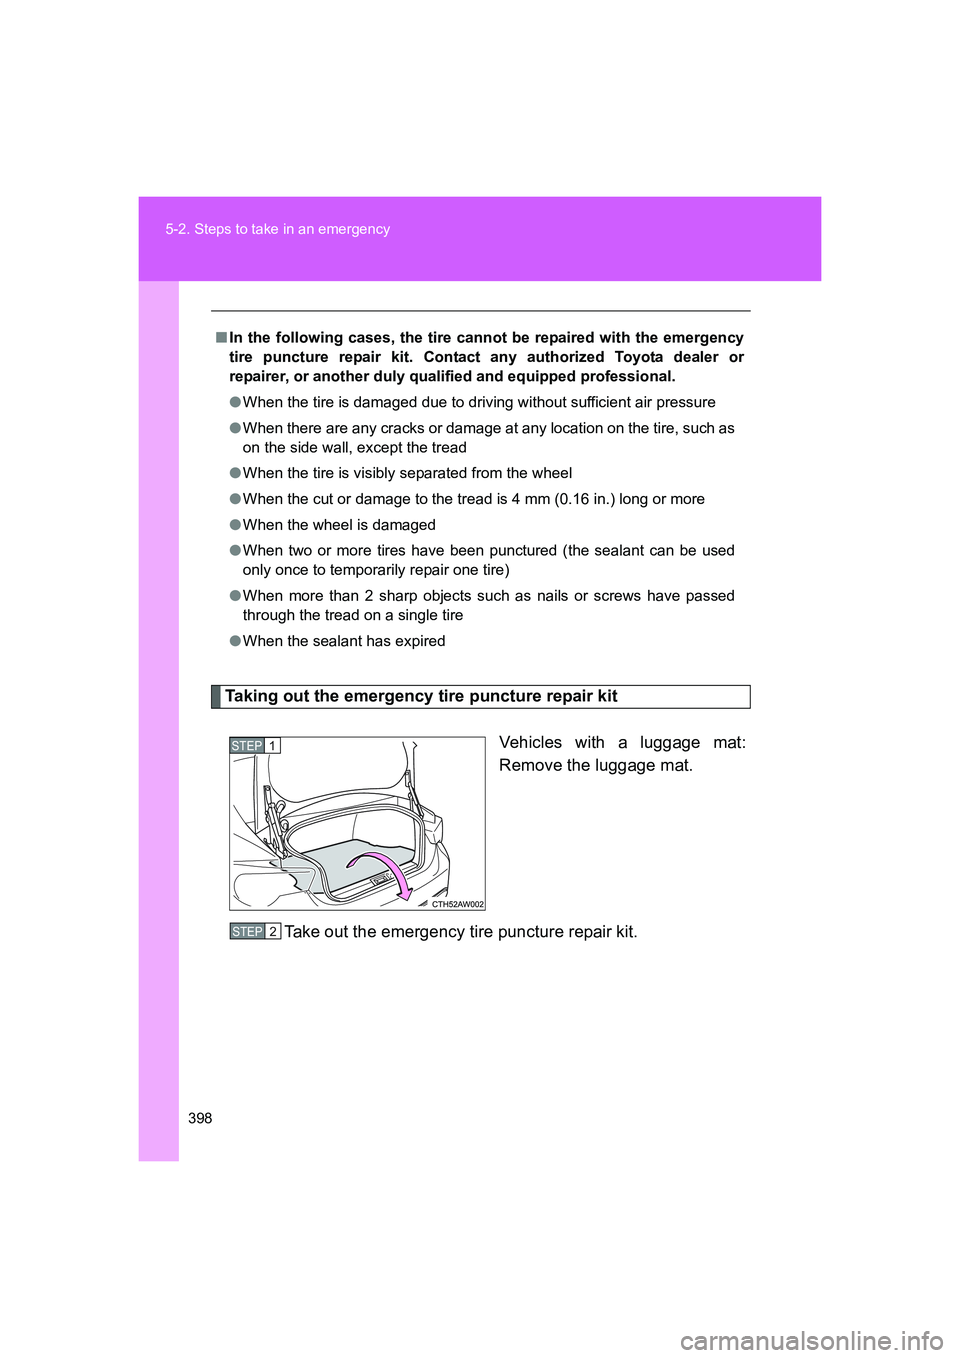
Taking out the emergency tire puncture repair kit
Vehicles with a luggage mat:
Remove the luggage mat.
Take out the emergency tire puncture repair kit.
вЦ†In the following cases, the tire cannot be repaired with the emergency
tire puncture repair kit. Contact any authorized Toyota dealer or
repairer, or another duly qualified and equipped professional.
вЧПWhen the tire is damaged due to driving without sufficient air pressure
вЧПWhen there are any cracks or damage at any location on the tire, such as
on the side wall, except the tread
вЧПWhen the tire is visibly separated from the wheel
вЧПWhen the cut or damage to the tread is 4 mm (0.16 in.) long or more
вЧПWhen the wheel is damaged
вЧПWhen two or more tires have been punctured (the sealant can be used
only once to temporarily repair one tire)
вЧПWhen more than 2 sharp objects such as nails or screws have passed
through the tread on a single tire
вЧПWhen the sealant has expired
STEP 1
STEP 2
86_OM_EE_OM18058E.book 398 гГЪгГЉгВЄ пЉТпЉРпЉСпЉХеєіпЉУжЬИпЉСпЉЧжЧ•гААзБЂжЫЬжЧ•гААеНИеЙНпЉСпЉСжЩВпЉУпЉСеИЖ
Page 399 of 464
5
399 5-2. Steps to take in an emergency
When trouble arises
FT86_EE
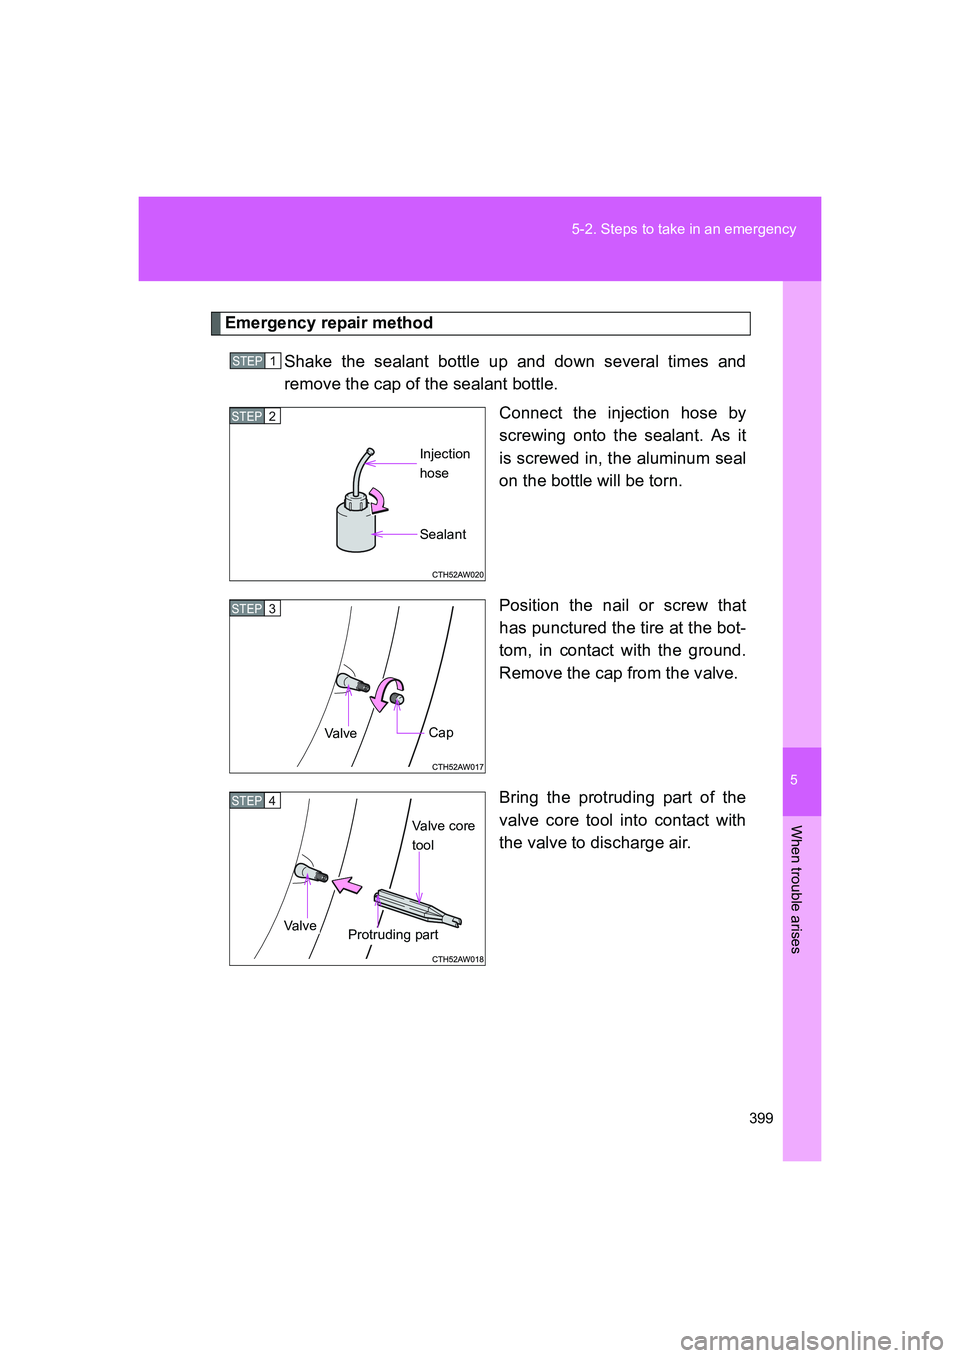
Emergency repair method
Shake the sealant bottle up and down several times and
remove the cap of the sealant bottle.
Connect the injection hose by
screwing onto the sealant. As it
is screwed in, the aluminum seal
on the bottle will be torn.
Position the nail or screw that
has punctured the tire at the bot-
tom, in contact with the ground.
Remove the cap from the valve.
Bring the protruding part of the
valve core tool into contact with
the valve to discharge air.
STEP 1
STEP 2
Injection
hose
Sealant
STEP 3
Va l v eCap
STEP 4
Va l v eProtruding partValve core
tool
86_OM_EE_OM18058E.book 399 гГЪгГЉгВЄ пЉТпЉРпЉСпЉХеєіпЉУжЬИпЉСпЉЧжЧ•гААзБЂжЫЬжЧ•гААеНИеЙНпЉСпЉСжЩВпЉУпЉСеИЖ
Page 400 of 464
400 5-2. Steps to take in an emergency
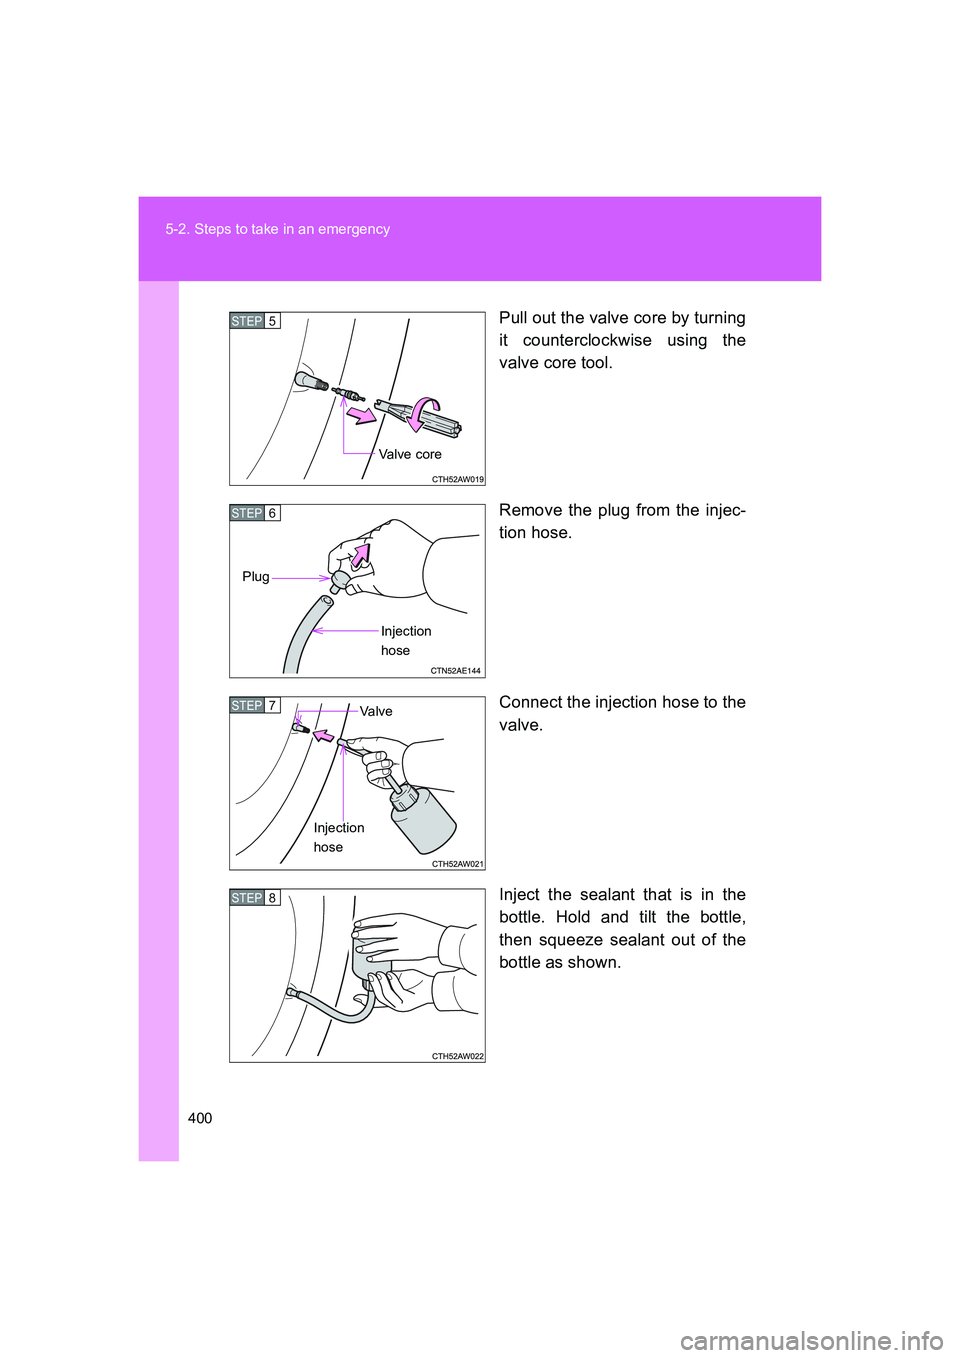
FT86_EEPull out the valve core by turning
it counterclockwise using the
valve core tool.
Remove the plug from the injec-
tion hose.
Connect the injection hose to the
valve.
Inject the sealant that is in the
bottle. Hold and tilt the bottle,
then squeeze sealant out of the
bottle as shown.
STEP 5
Va l v e c o r e
STEP 6
Plug
Injection
hose
STEP 7 Va l v e
Injection
hose
STEP 8
86_OM_EE_OM18058E.book 400 гГЪгГЉгВЄ пЉТпЉРпЉСпЉХеєіпЉУжЬИпЉСпЉЧжЧ•гААзБЂжЫЬжЧ•гААеНИеЙНпЉСпЉСжЩВпЉУпЉСеИЖ