Key TOYOTA GT86 2017 1.G User Guide
[x] Cancel search | Manufacturer: TOYOTA, Model Year: 2017, Model line: GT86, Model: TOYOTA GT86 2017 1.GPages: 428, PDF Size: 7.83 MB
Page 30 of 428
30
1-2. Opening, closing and locking the doors and trunk
Trunk
The trunk can be opened using the key, trunk opener or wireless
remote control.
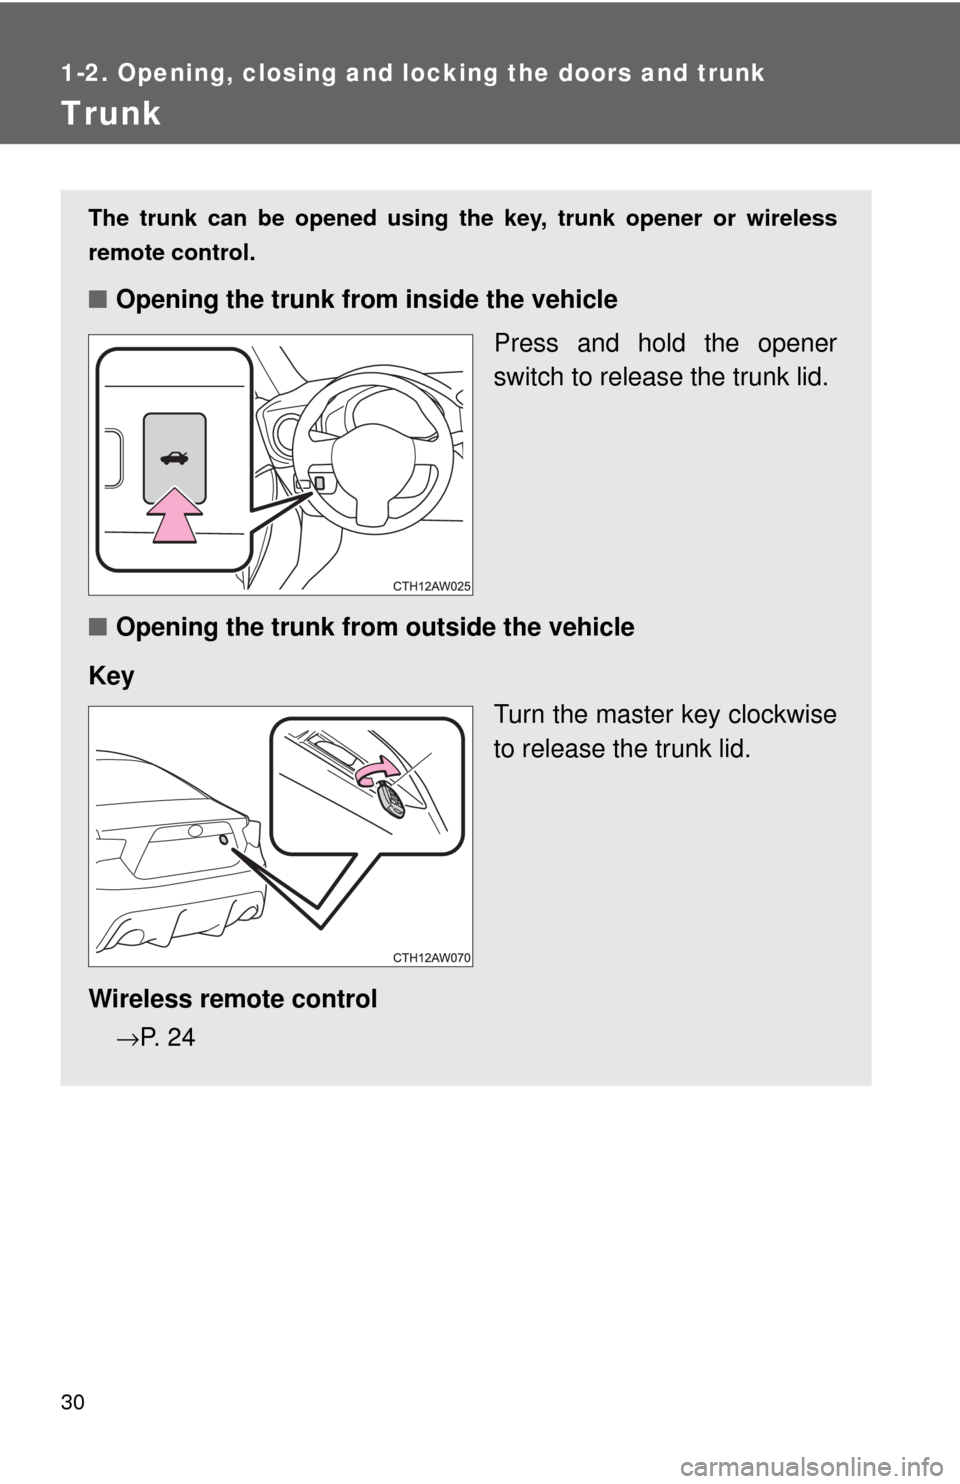
■ Opening the trunk from inside the vehicle
Press and hold the opener
switch to release the trunk lid.
■ Opening the trunk from outside the vehicle
Key Turn the master key clockwise
to release the trunk lid.
Wireless remote control
→P. 2 4
Page 31 of 428
31
1-2. Opening, closing and locking the doors and trunk
1
Before driving
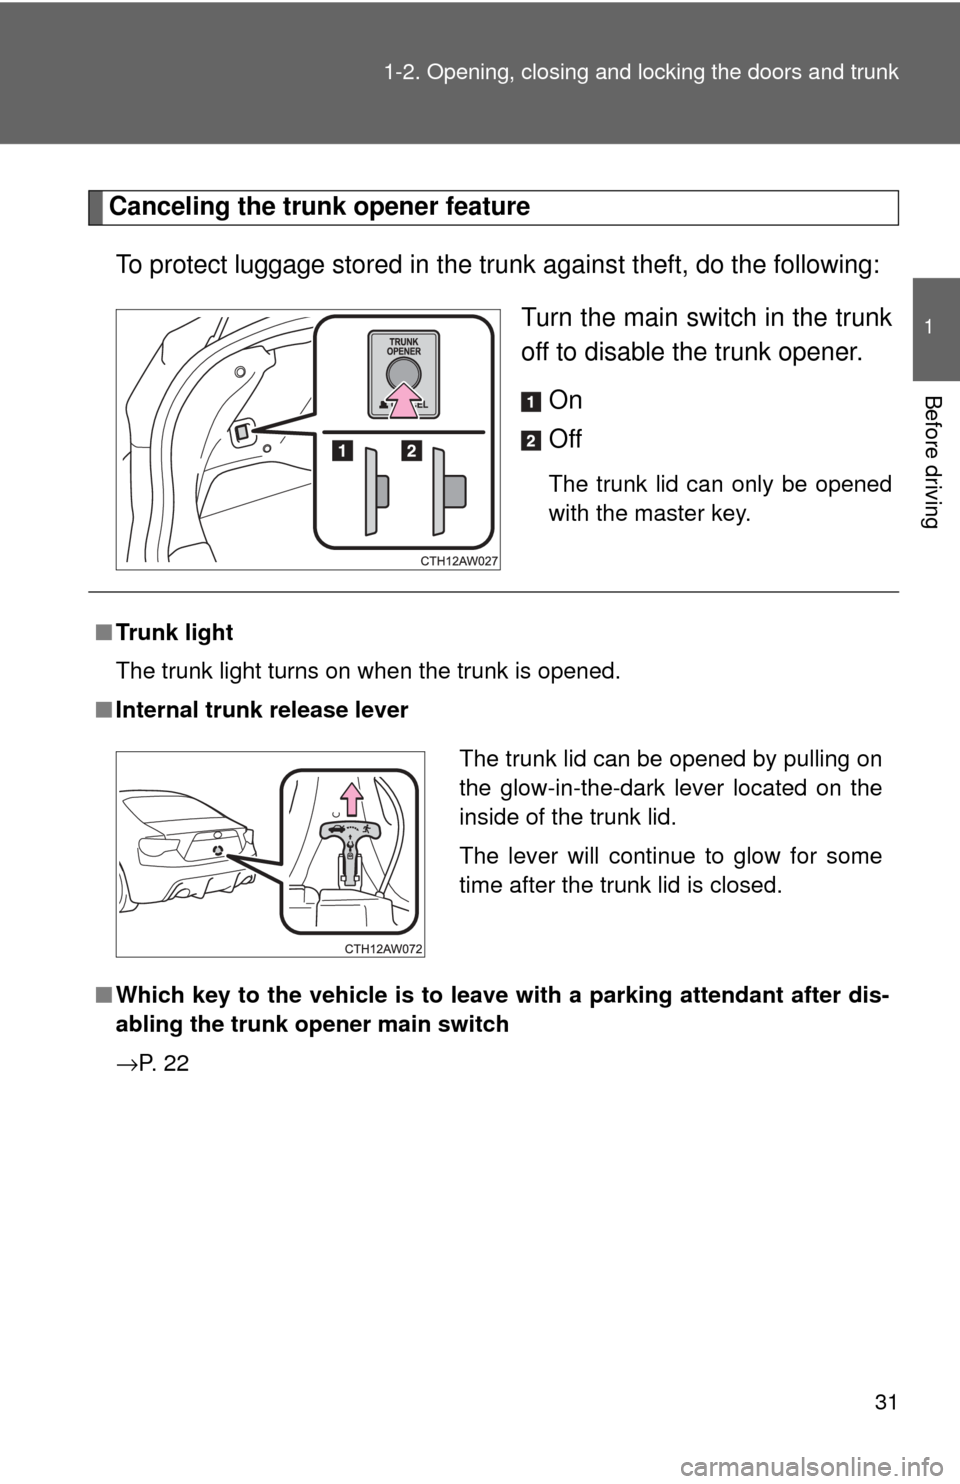
Canceling the trunk opener feature
To protect luggage stored in the trunk against theft, do the following:
Turn the main switch in the trunk
off to disable the trunk opener. On
Off
The trunk lid can only be opened
with the master key.
■Trunk light
The trunk light turns on when the trunk is opened.
■ Internal trunk release lever
■ Which key to the vehicle is to leave with a parking attendant after dis-
abling the trunk opener main switch
→P. 2 2
The trunk lid can be opened by pulling on
the glow-in-the-dark lever located on the
inside of the trunk lid.
The lever will continue to glow for some
time after the trunk lid is closed.
Page 56 of 428

56 1-4. Opening and closing the windows
WARNING
■Closing the windows
Observe the following precautions.
Failure to do so may result in death or serious injury.
●The driver is responsible for all the power window operations, including the
operation for the passengers. In order to prevent accidental operation,
especially by a child, do not let a child operate the power windows. It is
possible for children and other passengers to have body parts caught in
the power window. Also, when riding with a child, it is recommended to use
the window lock switch. ( →P. 54)
● Check to make sure that all passengers do not have any part of their body
in a position where it could be caught when a window is being operated.
● When exiting the vehicle, turn the engine switch off, carry the key and exit
the vehicle along with the child. There may be accidental operation, due to
mischief, etc., that may possibly lead to an accident.
■ Jam protection function
●Never use any part of your body to intentionally activate the jam protection
function.
● The jam protection function may not work if something gets caught just
before the window fully closes.
Page 61 of 428
61
1
Before driving
1-6. Theft deterrent system
Engine immobilizer system
■When the vehicle cannot be started with the registered key
Remove the key and try again.
■ System maintenance
The vehicle has a maintenance-free type engine immobilizer system.
■ Conditions that may cause the system to malfunction
● If the key is in contact with a metallic object
● If the key is in close proximity to or touching a key to the security system
(key with a built-in transponder chip) of another vehicle
The vehicle's keys have built-in tran sponder chips that prevent the
engine from starting if the key has not been previously registered in
the vehicle's on-board computer.
Never leave the keys inside the vehicle when you leave the vehicle.
This system is designed to help prevent vehicle theft but does not
guarantee absolute security against all vehicle thefts.
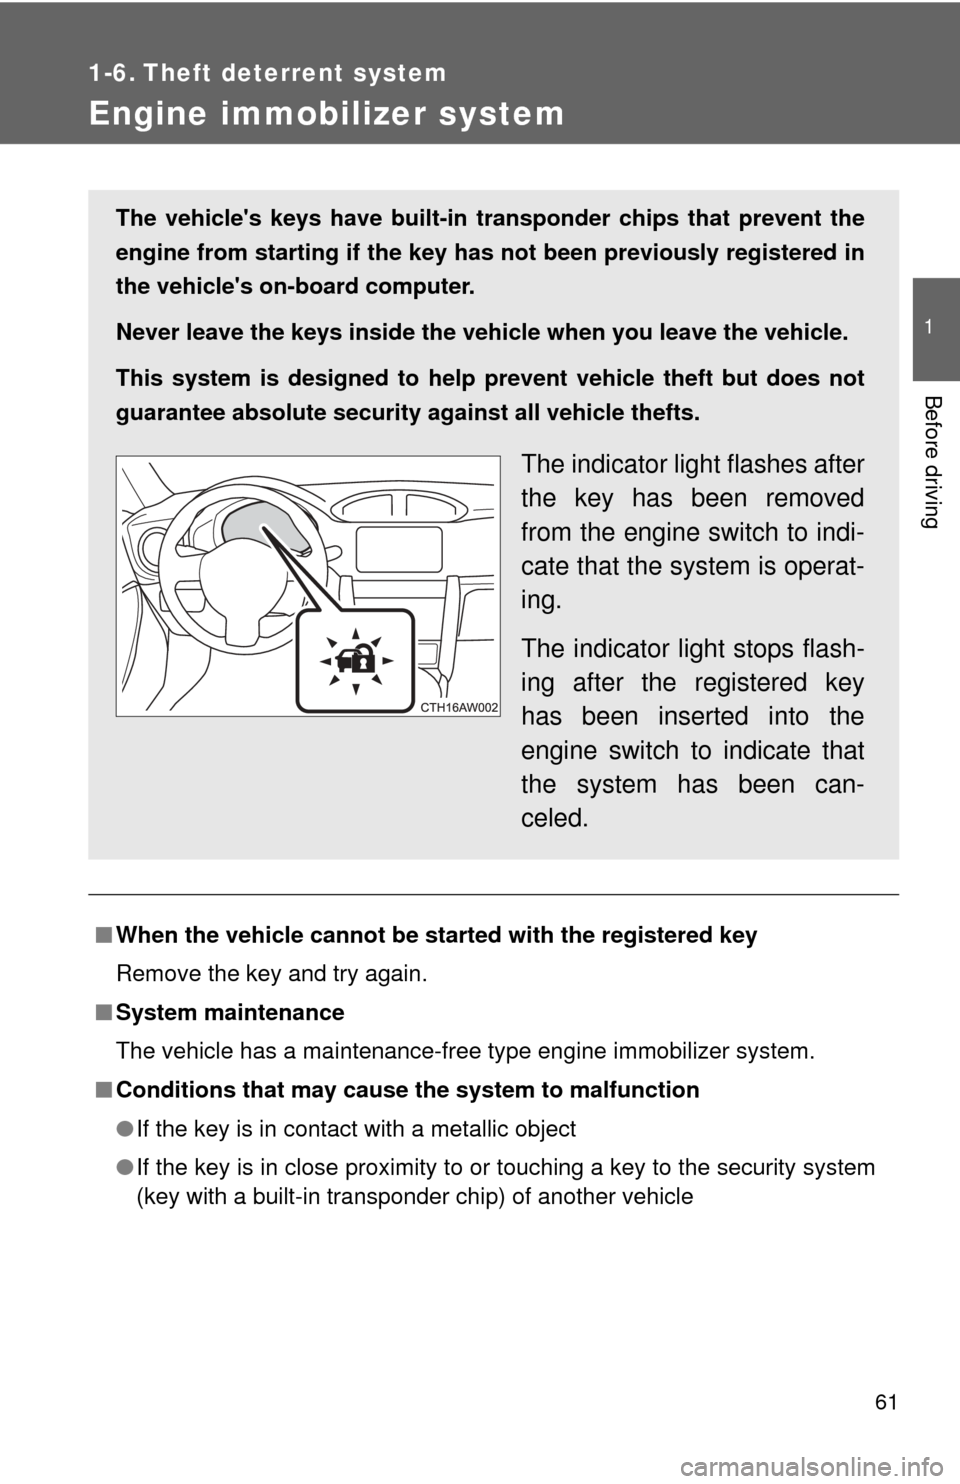
The indicator light flashes after
the key has been removed
from the engine switch to indi-
cate that the system is operat-
ing.
The indicator light stops flash-
ing after the registered key
has been inserted into the
engine switch to indicate that
the system has been can-
celed.
Page 129 of 428
129
2-1. Driving procedures
2
When driving
■
Parking the vehicle
Vehicles with an au tomatic transmission
With the shift lever in D, depress the brake pedal.
Shift the shift lever to P. ( →P. 145)
Set the parking brake. ( →P. 156)
Turn the engine switch to the “LOCK” position to stop the
engine.
Lock the door, making sure that you have the key on your
person.
If parking on a hill, block the wheels as needed.
Vehicles with a manual transmission While depressing the clutch pedal, depress the brake
pedal.
Shift the shift lever to N. ( →P. 152)
Set the parking brake. ( →P. 156)
Turn the engine switch to the “LOCK” position to stop the
engine.
Lock the door, making sure that you have the key on your
person.
If parking on a hill, shift the shift lever to 1 or R and block the
wheels as needed.
STEP 1
STEP 2
STEP 3
STEP 4
STEP 5
STEP 1
STEP 2
STEP 3
STEP 4
STEP 5
Page 142 of 428
142
2-1. Driving procedures
Engine (ignition) switch
■Starting the engine
Vehicles with an au tomatic transmission
Check that the parking brake is set.
Check that the shift lever is set in P.
Firmly depress the brake pedal.
Turn the engine switch to the “START” position to start the
engine.
Vehicles with a manual transmission Check that the parking brake is set.
Check that the shift lever is set in N.
Firmly depress the clutch pedal.
Turn the engine switch to the “START” position to start the
engine.
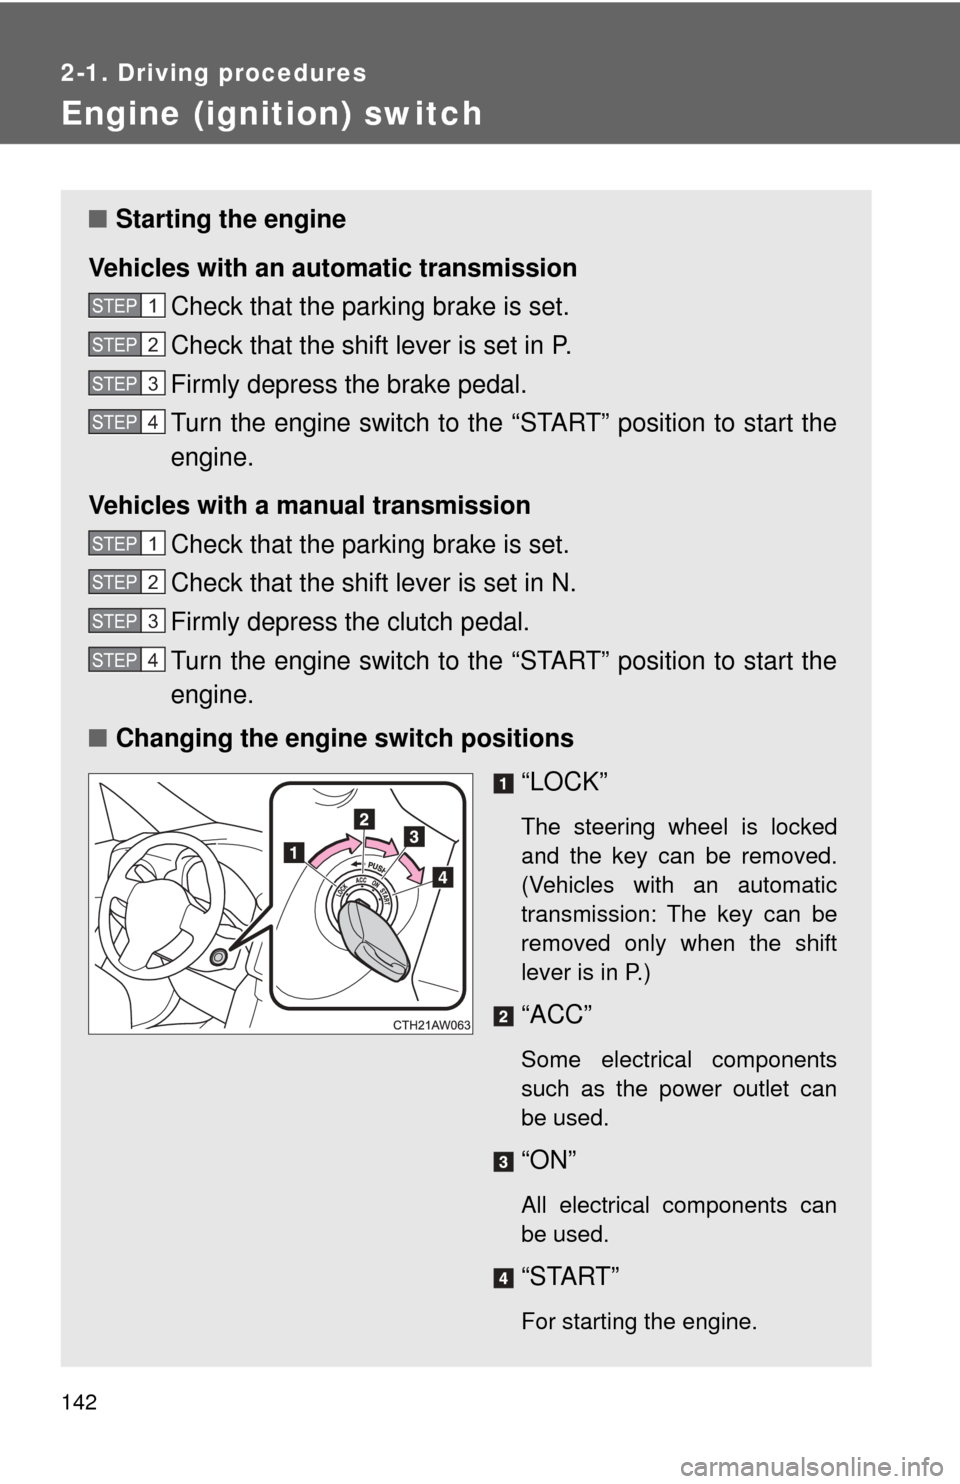
■ Changing the engine switch positions
“LOCK”
The steering wheel is locked
and the key can be removed.
(Vehicles with an automatic
transmission: The key can be
removed only when the shift
lever is in P.)
“ACC”
Some electrical components
such as the power outlet can
be used.
“ON”
All electrical components can
be used.
“START”
For starting the engine.
STEP 1
STEP 2
STEP 3
STEP 4
STEP 1
STEP 2
STEP 3
STEP 4
Page 143 of 428
143
2-1. Driving procedures
2
When driving
■
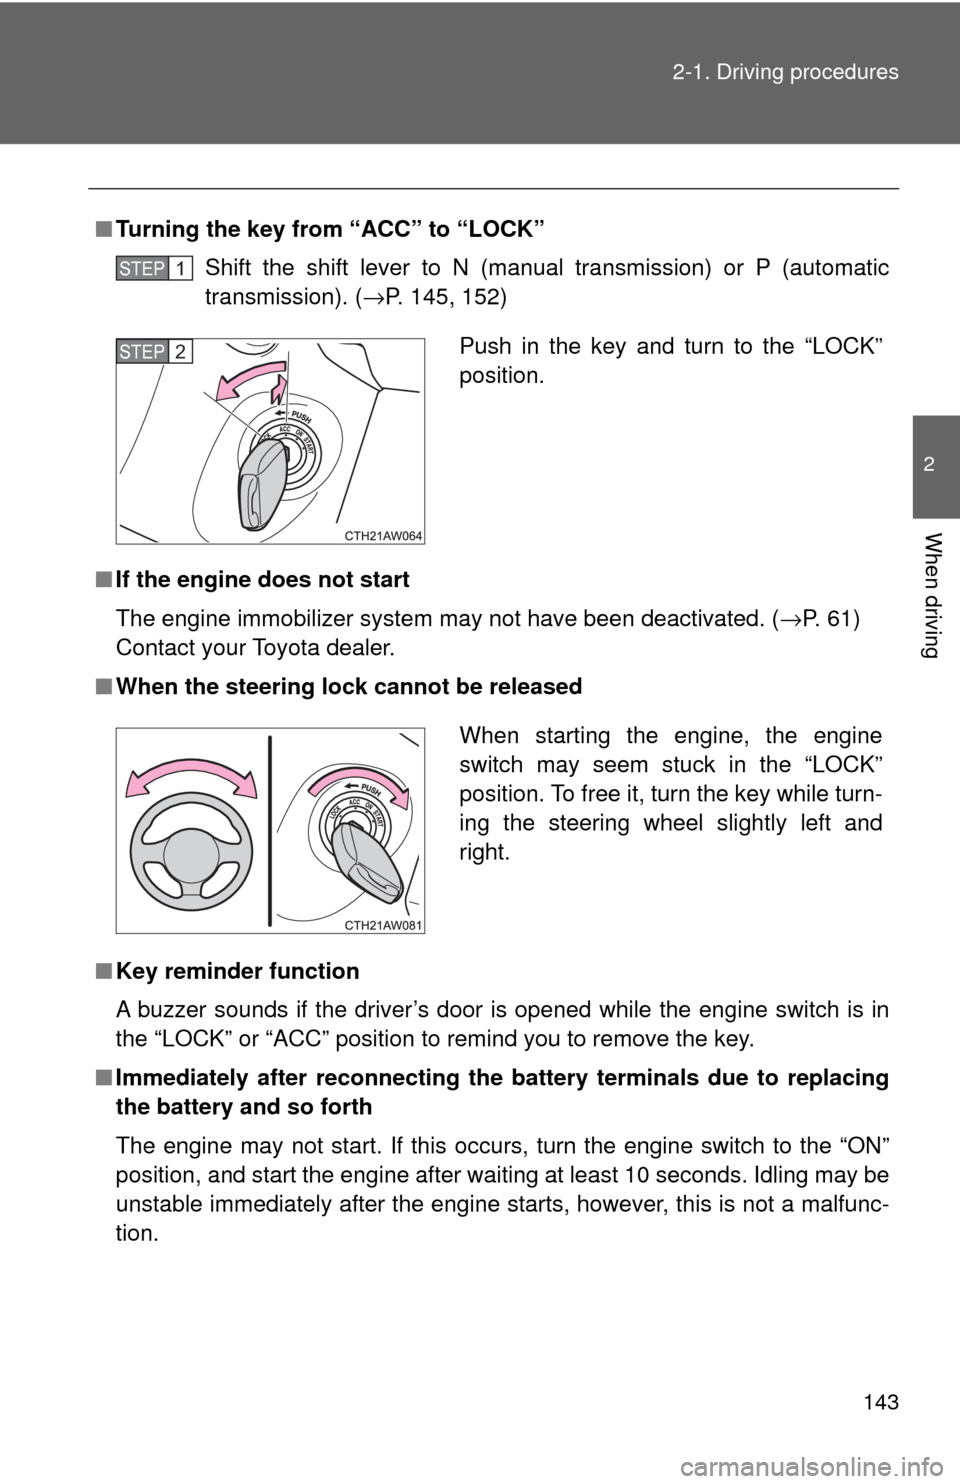
Turning the key from “ACC” to “LOCK”
Shift the shift lever to N (manual transmission) or P (automatic
transmission). ( →P. 145, 152)
■ If the engine does not start
The engine immobilizer system may not have been deactivated. ( →P. 61)
Contact your Toyota dealer.
■ When the steering lock cannot be released
■ Key reminder function
A buzzer sounds if the driver’s door is opened while the engine switch is in
the “LOCK” or “ACC” position to remind you to remove the key\
.
■ Immediately after reconnecting the battery terminals due to replacing
the battery and so forth
The engine may not start. If this occurs, turn the engine switch to the “O\
N”
position, and start the engine after waiting at least 10 seconds. Idling may be
unstable immediately after the engine starts, however, this is not a malfunc-
tion.
STEP 1
Push in the key and turn to the “LOCK”
position.STEP 2
When starting the engine, the engine
switch may seem stuck in the “LOCK”
position. To free it, turn the key while turn-
ing the steering wheel slightly left and
right.
Page 174 of 428
174 2-3. Operating the lights and windshield wipers
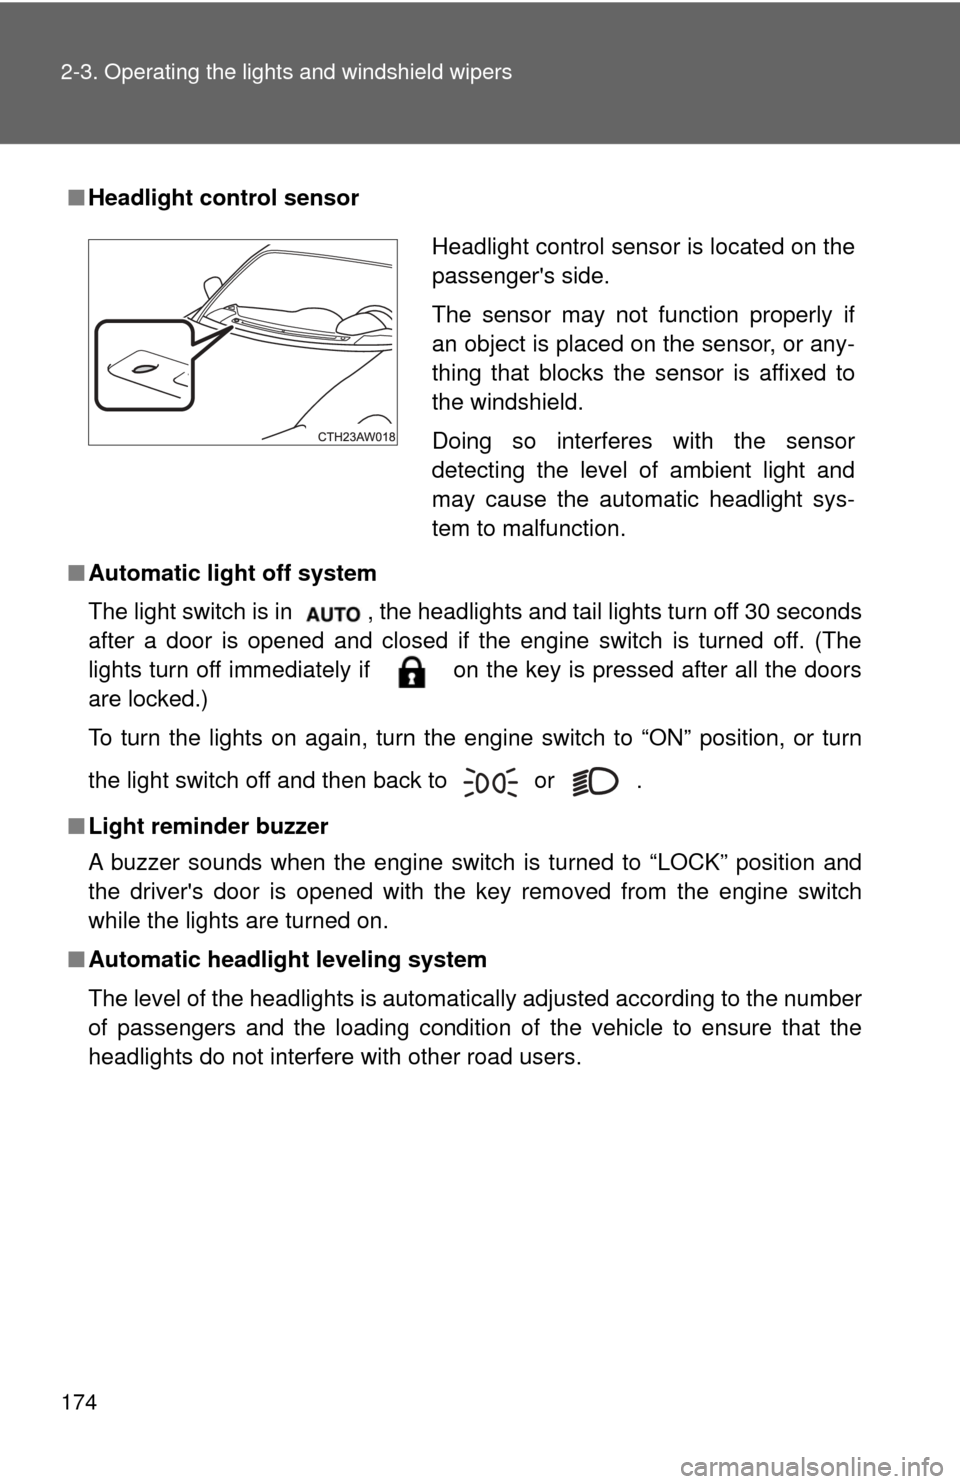
■Headlight control sensor
■ Automatic light off system
The light switch is in , the headlights and tail lights turn off 30 seconds
after a door is opened and closed if the engine switch is turned off. (The
lights turn off immediately if on the key is pressed after all the doors
are locked.)
To turn the lights on again, turn the engine switch to “ON” positio\
n, or turn
the light switch off and then back to
or .
■ Light reminder buzzer
A buzzer sounds when the engine switch is turned to “LOCK” position\
and
the driver's door is opened with the key removed from the engine switch
while the lights are turned on.
■ Automatic headlight leveling system
The level of the headlights is automatically adjusted according to the number
of passengers and the loading condition of the vehicle to ensure that the
headlights do not interfere with other road users.
Headlight control sensor is located on the
passenger's side.
The sensor may not function properly if
an object is placed on the sensor, or any-
thing that blocks the sensor is affixed to
the windshield.
Doing so interferes with the sensor
detecting the level of ambient light and
may cause the automatic headlight sys-
tem to malfunction.
Page 235 of 428
Maintenance and care4
235
4-1. Maintenance and careCleaning and protecting the vehicle exterior......... 236
Cleaning and protecting the vehicle interior.......... 240
4-2. Maintenance Maintenance requirements .................. 244
General maintenance....... 246
Emission inspection and maintenance (I/M)
programs........................ 249 4-3. Do-it-yourself
maintenance
Do-it-yourself service precautions .................... 250
Hood ................................ 253
Positioning a floor jack ................................ 255
Engine compartment ........ 257
Tires ................................. 270
Tire inflation pressure ...... 277
Wheels ............................. 281
Air conditioning filter......... 284
Wireless remote control key battery ..................... 287
Checking and replacing fuses .............................. 290
Light bulbs........................ 298
Page 287 of 428
287
4-3. Do-it-yourself maintenance
4
Maintenance and care
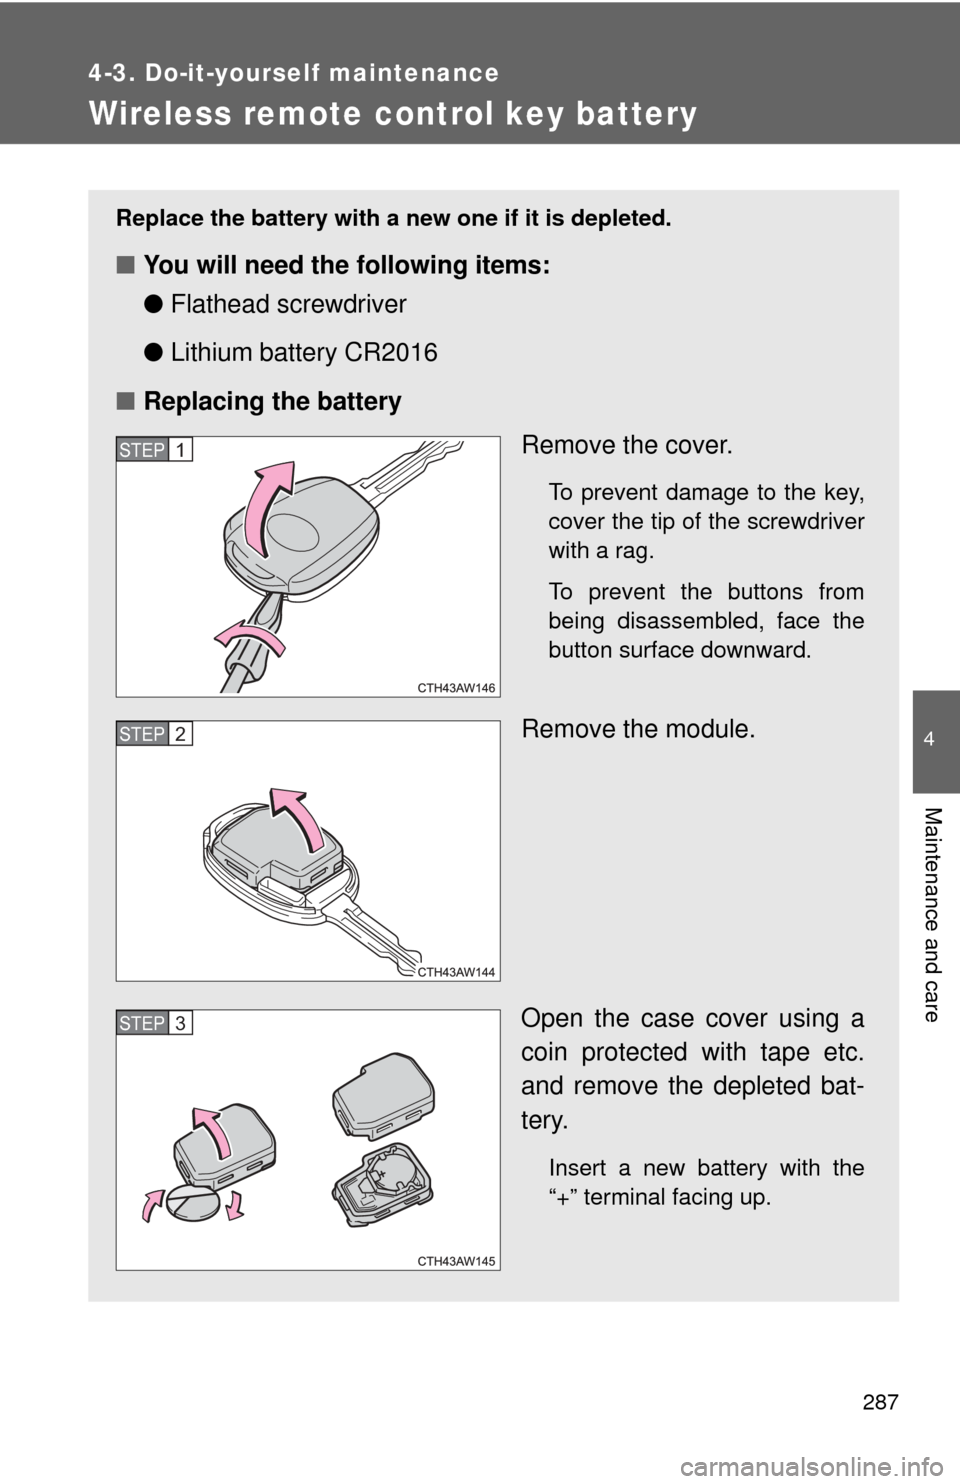
Wireless remote control key battery
Replace the battery with a new one if it is depleted.
■You will need the following items:
●Flathead screwdriver
● Lithium battery CR2016
■ Replacing the battery
Remove the cover.
To prevent damage to the key,
cover the tip of the screwdriver
with a rag.
To prevent the buttons from
being disassembled, face the
button surface downward.
Remove the module.
Open the case cover using a
coin protected with tape etc.
and remove the depleted bat-
tery.
Insert a new battery with the
“+” terminal facing up.
STEP 1
STEP 2
STEP 3