brake TOYOTA GT86 2018 Owners Manual (in English)
[x] Cancel search | Manufacturer: TOYOTA, Model Year: 2018, Model line: GT86, Model: TOYOTA GT86 2018Pages: 28, PDF Size: 1.62 MB
Page 3 of 28

1
INDEX
Engine maintenance 8
Fuel tank door release
& cap 7
Hood release
8
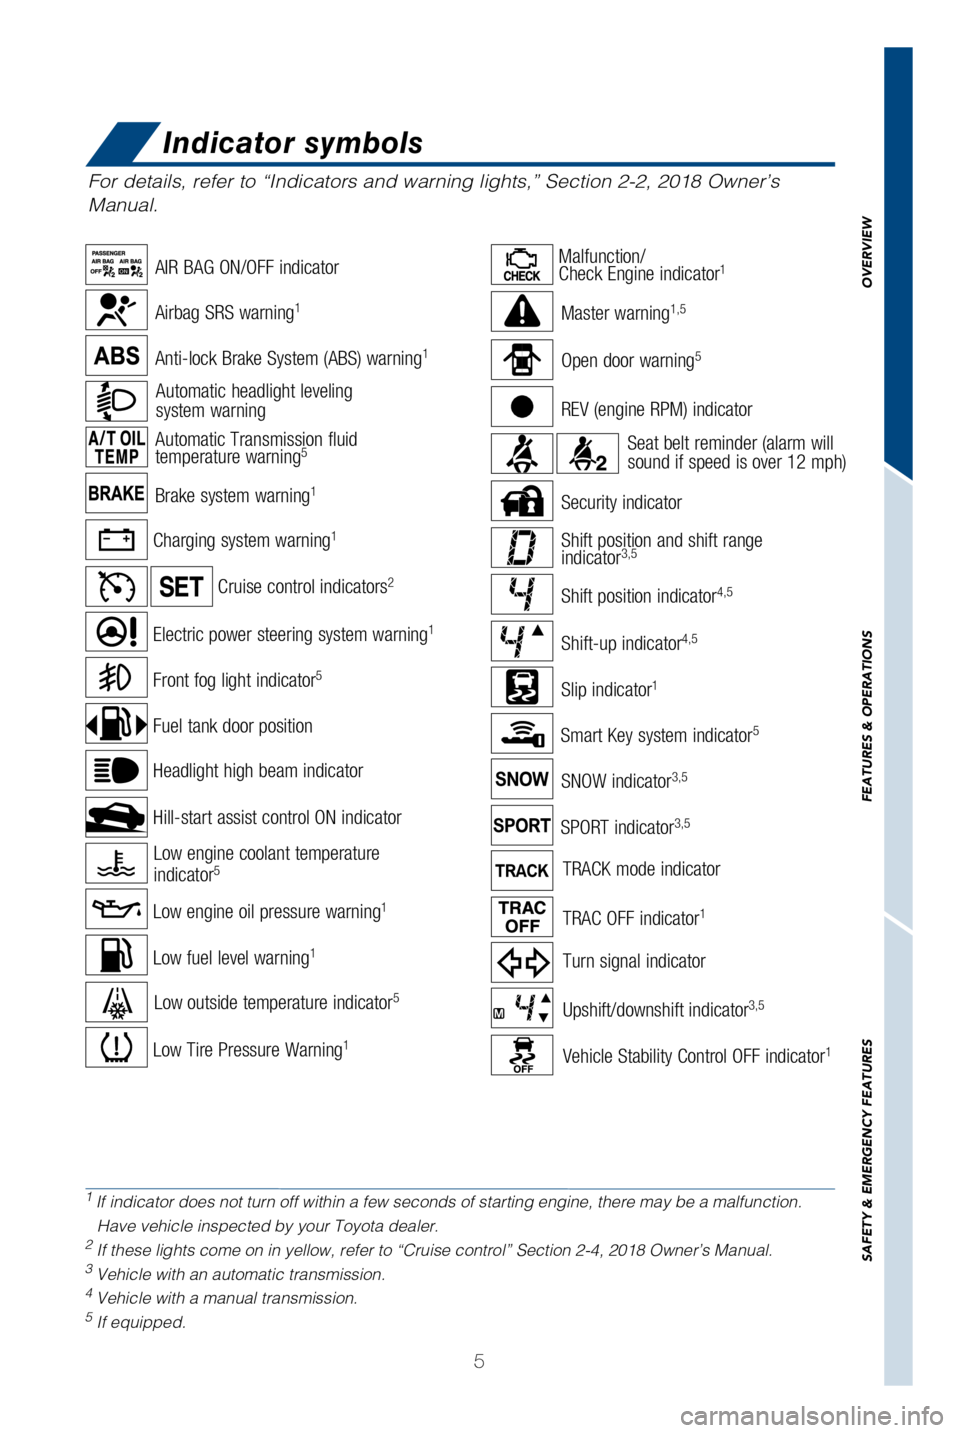
Indicator symbols
5
Instrument cluster
4
Instrument panel
2-3
Instrument panel light control
8
Keyless (and remote) entry
6
Smart Key system
7
OVERVIEW
FEATURES & OPERATIONS SAFETY & EMERGENCY FEATURES
Air conditioning/heating 18
Automatic transmission
9
AUX/USB port
17
Clock
16
Cruise control
10
Cup/bottle holders
15
Door locks
16
Driving modes
10-11
Hill-start Assist Control (HAC)
11
Lights & turn signals
12
Manual transmission
9
Multi-Information Display (MID)
14
Parking brake
9
Power outlets
17
Rear view monitor system
19
Seat adjustments-Front
13
Seats-Fold down rear seats
13
Seats-Head restraints
12
Steering lock release
19
Steering wheel switches
15
Tilt & telescopic steering wheel
16
Trunk release
16
Windows
13
Windshield wipers & washers
12 Floor mat installation
23
Seat belts
20
Spare tire & tools
21
Star Safety System™ 22-23
Tire Pressure Monitoring
(warning) System (TPMS)
20
PAIRING BLUETOOTH® PHONE FOR
THE FIRST TIME 24-25
OVERVIEW
FEATURES & OPERATIONS
SAFETY & EMERGENCY FEATURES
Page 7 of 28
5
Brake system warning1
Charging system warning1
Automatic headlight leveling
system warning
For details, refer to “Indicators and warning lights,” Section 2-2\
, 2018 Owner’s
Manual.
Anti-lock Brake System (ABS) warning1
Airbag SRS warning1
Low fuel level warning1
Cruise control indicators2
Low Tire Pressure Warning1
1
If indicator does not turn off within a few seconds of starting engine, \
there may be a malfunction. Have vehicle inspected by your Toyota dealer.
2 If these lights come on in yellow, refer to “Cruise control” Sect\
ion 2-4, 2018 Owner’s Manual.3 Vehicle with an automatic transmission.4 Vehicle with a manual transmission.5 If equipped.
Slip indicator1
Smart Key system indicator5
Automatic Transmission fluid
temperature warning5
Vehicle Stability Control OFF indicator1
TRAC OFF indicator1
SNOW indicator3,5
REV (engine RPM) indicator
Upshift/downshift indicator3,5
Shift position indicator4,5
Shift-up indicator4,5
Shift position and shift range
indicator3,5
Security indicator
SPORT indicator3,5
Turn signal indicator
TRACK mode indicator
Open door warning5
Master warning1,5
AIR BAG ON/OFF indicator
Seat belt reminder (alarm will
sound if speed is over 12 mph)
Malfunction/
Check Engine indicator1
Low engine oil pressure warning1
Low engine coolant temperature
indicator5
Electric power steering system warning1
Fuel tank door position
Front fog light indicator5
Hill-start assist control ON indicator Headlight high beam indicator
Low outside temperature indicator5
Indicator symbols
OVERVIEW
FEATURES & OPERATIONS
SAFETY & EMERGENCY FEATURES
Page 9 of 28
7
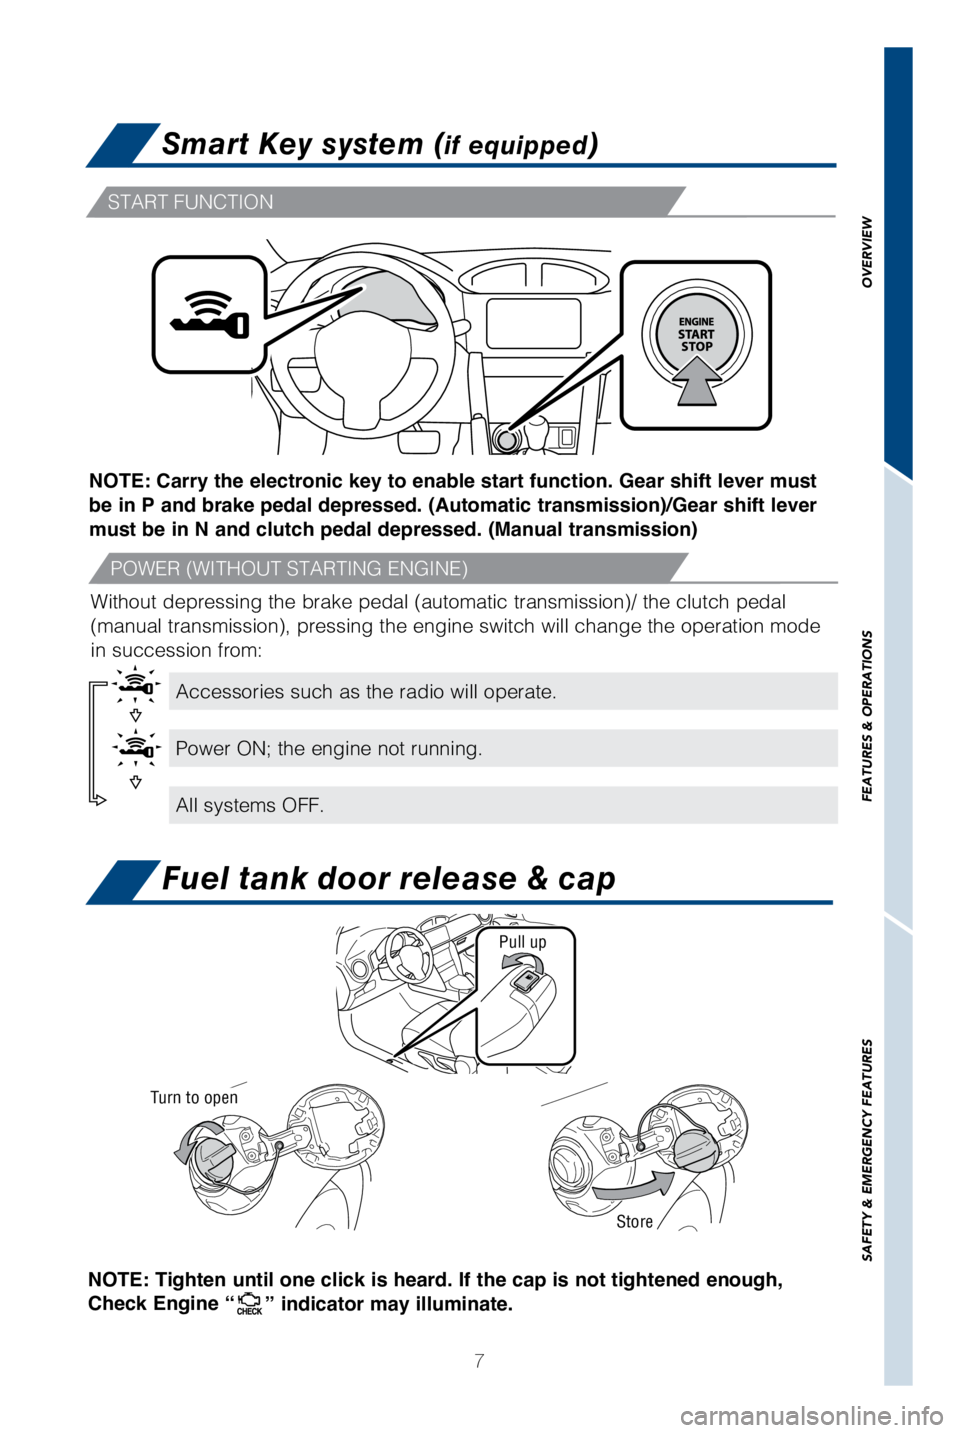
Smart Key system (if equipped)
START FUNCTION
POWER (WITHOUT STARTING ENGINE)
Accessories such as the radio will operate.
Power ON; the engine not running.
All systems OFF.
NOTE: Carry the electronic key to enable start function. Gear shift lever must
be in P and brake pedal depressed. (Automatic transmission)/Gear shift lever
must be in N and clutch pedal depressed. (Manual transmission)
Without depressing the brake pedal (automatic transmission)/ the clutc\
h pedal
(manual transmission), pressing the engine switch will change the oper\
ation mode
in succession from:
Fuel tank door release & cap
NOTE: Tighten until one click is heard. If the cap is not tightened enough,
Check Engine “
” indicator may illuminate.
Pull up
Store
Turn to open
OVERVIEW
FEATURES & OPERATIONS
SAFETY & EMERGENCY FEATURES
Page 11 of 28
9
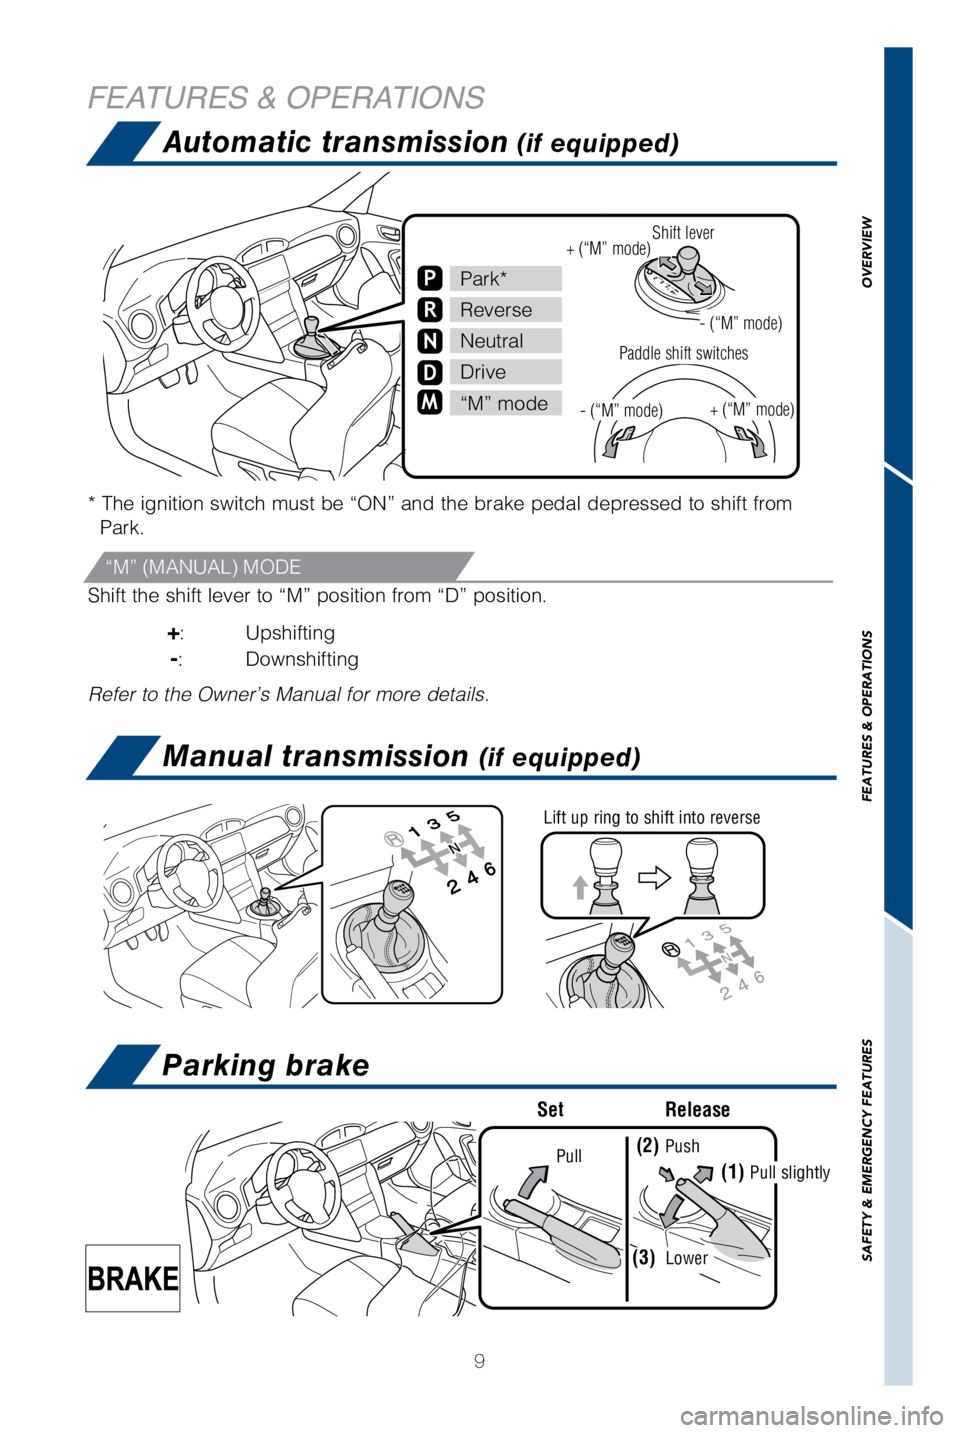
P
R
N
D
M
Park*
Reverse
Neutral
Drive
“M” mode
+ (“M” mode)
- (“M” mode)
+ (“M” mode)- (“M” mode)
Paddle shift switchesShift lever
* The ignition switch must be “ON” and the brake pedal depressed t\
o shift from
Park.
Shift the shift lever to “M” position from “D” position.
+: Upshifting
-: Downshifting
Refer to the Owner’s Manual for more details.
Pull(2) Push
(1) Pull slightly
(3) Lower
Set Release
“M” (MANUAL) MODE
Automatic transmission (if equipped)
FEATURES & OPERATIONS
Lift up ring to shift into reverse
Manual transmission (if equipped)
Parking brake
OVERVIEW
FEATURES & OPERATIONS
SAFETY & EMERGENCY FEATURES
Page 12 of 28
10
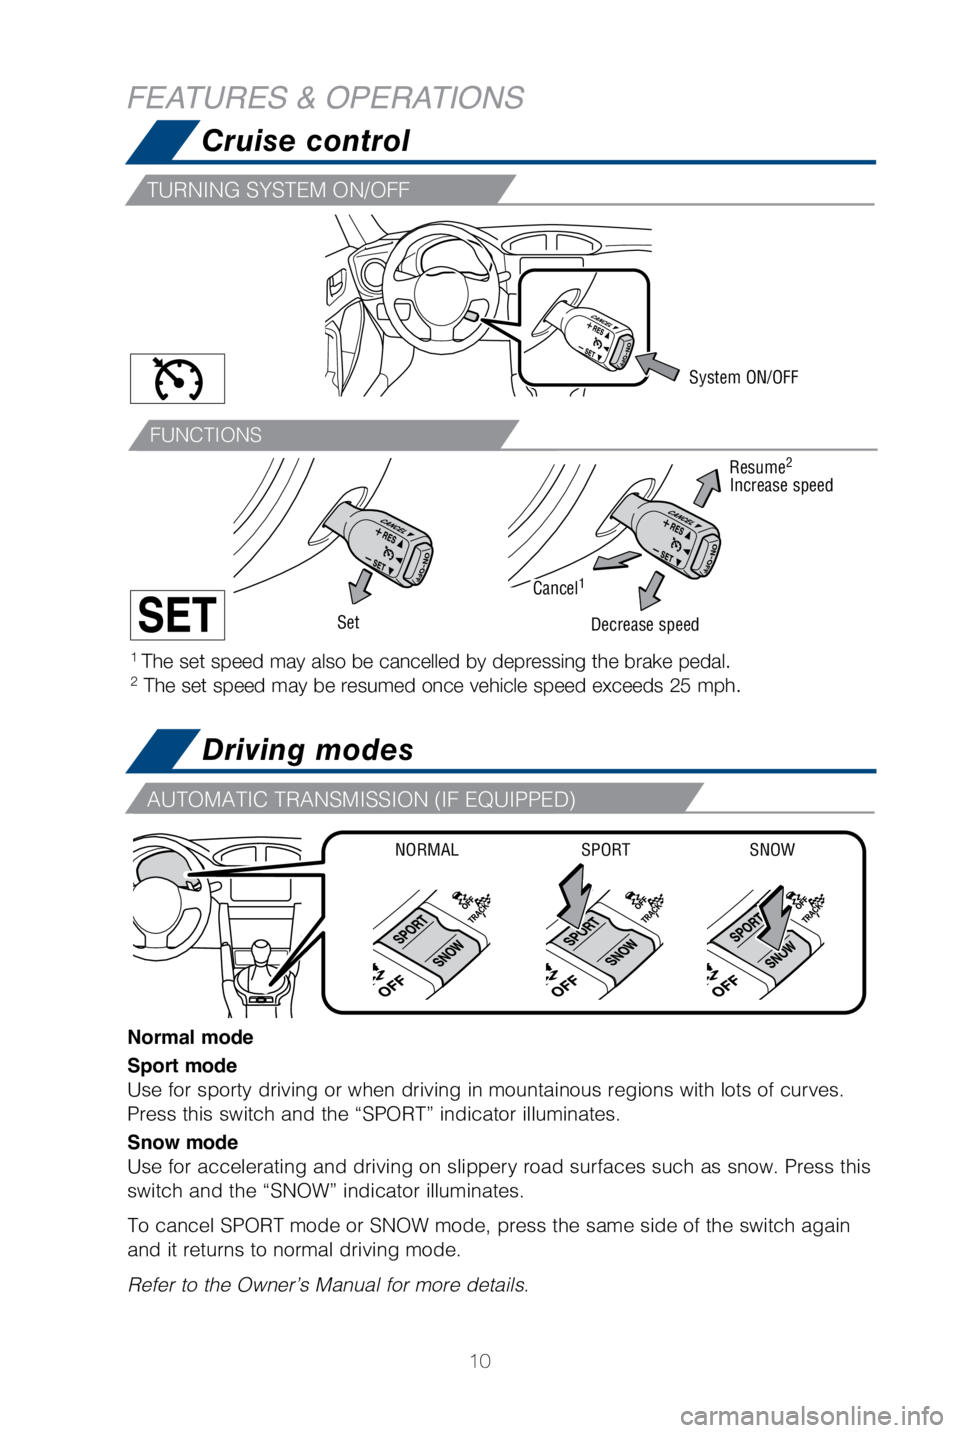
Normal mode
Sport mode
Use for sporty driving or when driving in mountainous regions with lots \
of curves.
Press this switch and the “SPORT” indicator illuminates.
Snow mode
Use for accelerating and driving on slippery road surfaces such as snow.\
Press this
switch and the “SNOW” indicator illuminates.
To cancel SPORT mode or SNOW mode, press the same side of the switch aga\
in
and it returns to normal driving mode.Refer to the Owner’s Manual for more details.
Driving modes
Cruise control
1 The set speed may also be cancelled by depressing the brake pedal.2 The set speed may be resumed once vehicle speed exceeds 25 mph.
System ON/OFF
Increase speed
Decrease speed
Cancel1
Resume2
Set
FEATURES & OPERATIONS
NORMAL SPORTSNOW
TURNING SYSTEM ON/OFF
AUTOMATIC TRANSMISSION (IF EQUIPPED)
FUNCTIONS
Page 24 of 28
22
Star Safety System™
Your vehicle comes standard with the Star Safety SystemTM, which combines Anti-
lock Braking System (ABS), Brake Assist (BA), Electronic Brake-force\
Distribution
(EBD), Smart Stop Technology (SST), Traction Control (TRAC) and Ve\
hicle Stability
Control (VSC).
Refer to the Owner’s Manual for more details and important informatio\
n on
limitations to these systems.
SAFETY & EMERGENCY FEATURES
Smart Stop Technology automatically reduces engine power when the accele\
rator
and brake pedals are pressed simultaneously under certain conditions.
SST engages when the accelerator is depressed first and the brakes are a\
pplied
firmly for longer than one-half second at speeds greater than five miles\
per hour.
SST doesn’t engage if the brake pedal is depressed before the acceler\
ator pedal,
allowing vehicles to start on a steep hill and safely accelerate without\
rolling
backward.
SMART STOP TECHNOLOGY (SST)
VSC helps prevent loss of traction during cornering by reducing engine p\
ower and
applying brake force to selected wheels.
Toyota’s VSC monitors steering angle and the direction your vehicle i\
s traveling.
When it senses that the front or rear wheels begin to lose traction, VSC\
reduces
engine power and applies braking to selected wheels. This helps restore \
traction
and vehicle control.
VEHICLE STABILITY CONTROL (VSC)
Toyota’s ABS sensors detect which wheels are locking up and limits wh\
eel lockup
by “pulsing” each wheel’s brakes independently. Pulsing release\
s brake pressure
repeatedly for fractions of a second. This helps the tires attain the tr\
action that
current road conditions will allow, helping you to stay in directional c\
ontrol.
ANTI-LOCK BRAKE SYSTEM (ABS)
Brake Assist is designed to detect sudden or “panic” braking, and \
then add braking
pressure to help decrease the vehicle’s stopping distance. When there\
’s only a split
second to react, Brake Assist can add additional brake pressure more qui\
ckly than
just the driver alone can.
BRAKE ASSIST (BA)
Toyota’s ABS technology has Electronic Brake-force Distribution (EBD\
) to help
maintain control and balance when braking. Abrupt stops can cause a vehi\
cle to tilt
forward, reducing the braking power of the rear wheels. EBD responds to \
sudden
stops by redistributing brake force to enhance the braking effectiveness\
of all four
wheels.
ELECTRONIC BRAKE FORCE DISTRIBUTION (EBD)
Page 25 of 28
23
VSC helps prevent loss of traction during cornering by reducing engine p\
ower, and
Traction Control helps maintain traction on loose gravel and wet, icy, o\
r uneven
surfaces by applying brake force to the spinning wheel(s).
Toyota’s TRAC sensors are activated when one of the drive wheels star\
ts to slip.
TRAC limits engine output and applies the brakes to the spinning wheel. \
This
transfers power to the wheels that still have traction to help keep you \
on track.
Floor mat installation
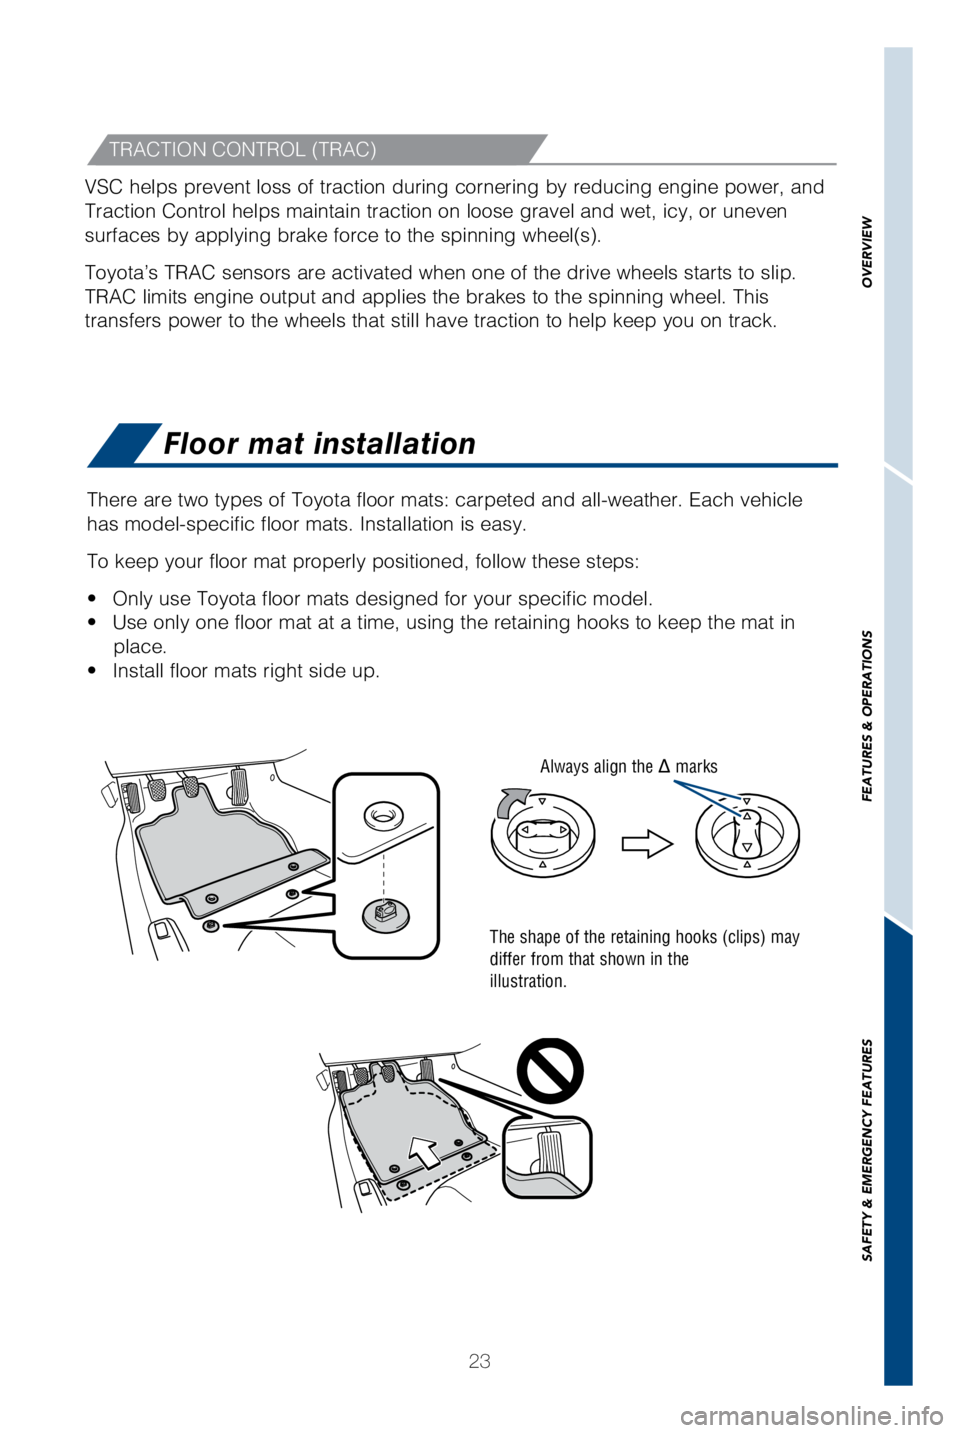
There are two types of Toyota floor mats: carpeted and all-weather. Each\
vehicle
has model-specific floor mats. Installation is easy.
To keep your floor mat properly positioned, follow these steps:
•
Only use Toyota floor mats designed for your specific model.
•
Use only one floor mat at a time, using the retaining hooks to keep the \
mat in place.
•
Install floor mats right side up.
The shape of the retaining hooks (clips) may
differ from that shown in the
illustration.
Always align the marks
TRACTION CONTROL (TRAC)
OVERVIEW
FEATURES & OPERATIONS
SAFETY & EMERGENCY FEATURES