TOYOTA GT86 2019 Owners Manual (in English)
Manufacturer: TOYOTA, Model Year: 2019,
Model line: GT86,
Model: TOYOTA GT86 2019
Pages: 532, PDF Size: 7.98 MB
TOYOTA GT86 2019 Owners Manual (in English)
GT86 2019
TOYOTA
TOYOTA
https://www.carmanualsonline.info/img/14/42354/w960_42354-0.png
TOYOTA GT86 2019 Owners Manual (in English)
Trending: fuel fill door release, low beam, interior lights, light, ABS, overheating, stop start
Page 361 of 532
361
4-3. Do-it-yourself maintenance
4
Maintenance and care
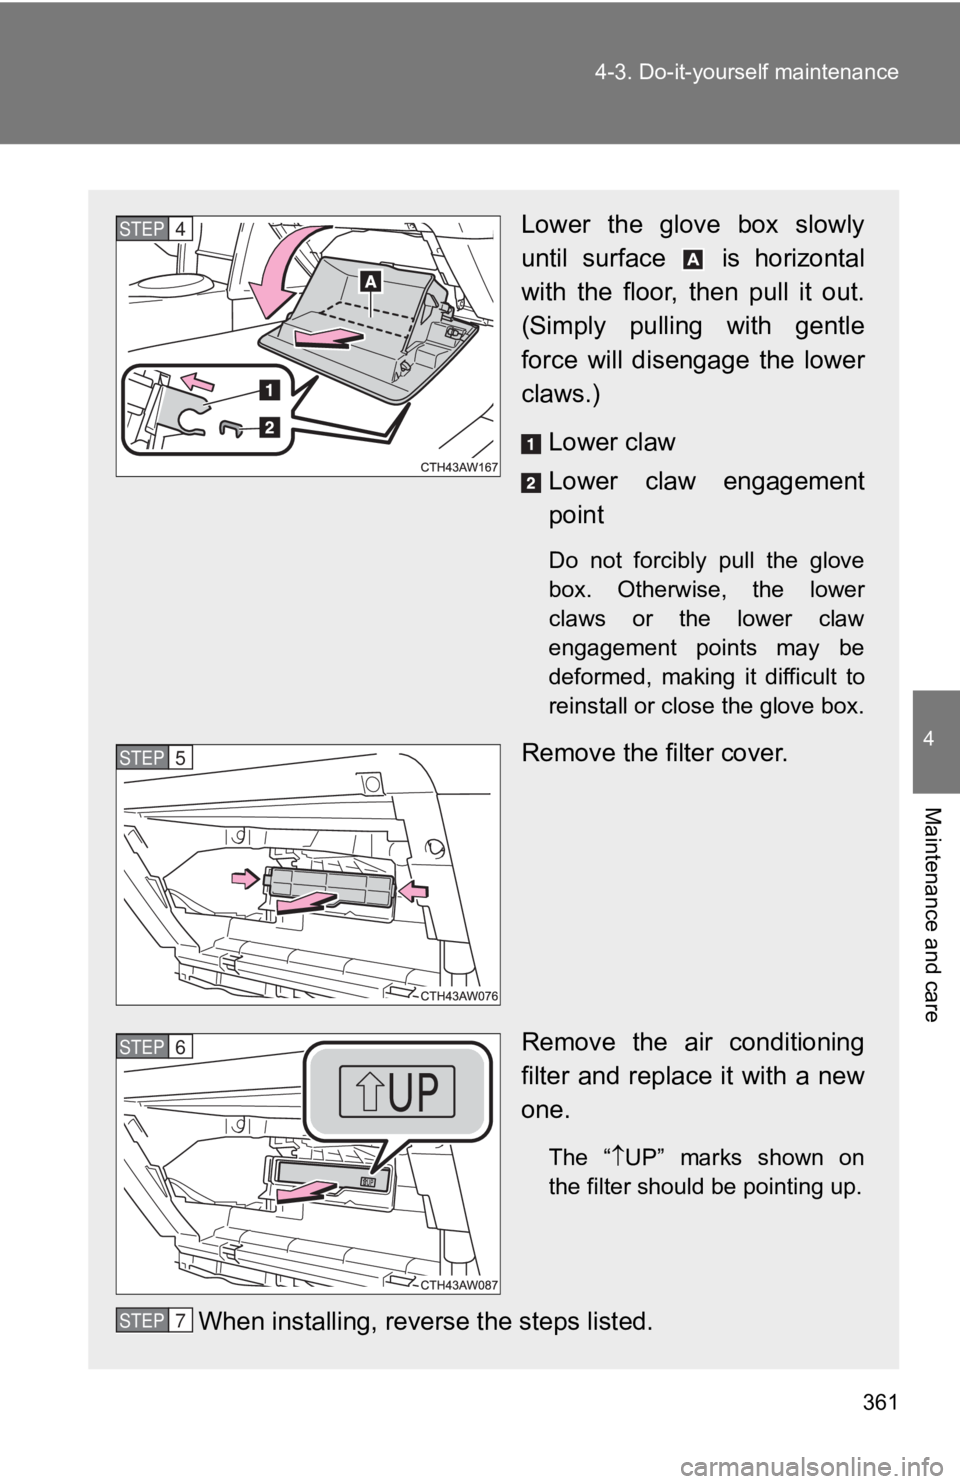
Lower the glove box slowly
until surface is horizontal
with the floor, then pull it out.
(Simply pulling with gentle
force will dis
engage the lower
claws.)
Lower claw
Lower claw engagement
point
Do not forcibly pull the glove
box. Otherwise, the lower
claws or the lower claw
engagement points may be
deformed, making it difficult to
reinstall or close the glove box.
Remove the filter cover.
Remove the air conditioning
filter and replace it with a new
one.
The “ UP” marks shown on
the filter should be pointing up.
When installing, reverse the steps listed.
STEP 4
STEP 5
STEP 6
STEP 7
Page 362 of 532
362 4-3. Do-it-yourself maintenance
■Checking interval
Inspect and replace the air conditioning filter according to th e maintenance
schedule. In dusty areas or areas with heavy traffic flow, early replacement
may be required. (For scheduled maintenance information, please refer to
the “Scheduled Maintenance Gui de” or “Owner’s Manual Supplement ”.)
■ If air flow from the ven ts decreases dramatically
The filter may be clogged. Check the filter and replace if nece ssary.
NOTICE
■When removing the glove box
Do not forcibly pull the glove box. Otherwise, the lower claws or the lower
claw engagement points may be deformed, making it difficult to reinstall or
close the glove box.
■ When using the air conditioning system
Make sure that a filter is always installed.
Using the air conditioning system without a filter may cause da mage to the
system.
Page 363 of 532
363
4-3. Do-it-yourself maintenance
4
Maintenance and care
Wireless remote control/electronic key batter y
Replace the battery with a new one if it is depleted.
■You will need the following items:
●Flathead screwdriver
● Lithium battery CR2016 (vehicles without a smart key sys-
tem), or CR2032 (vehicles with a smart key system)
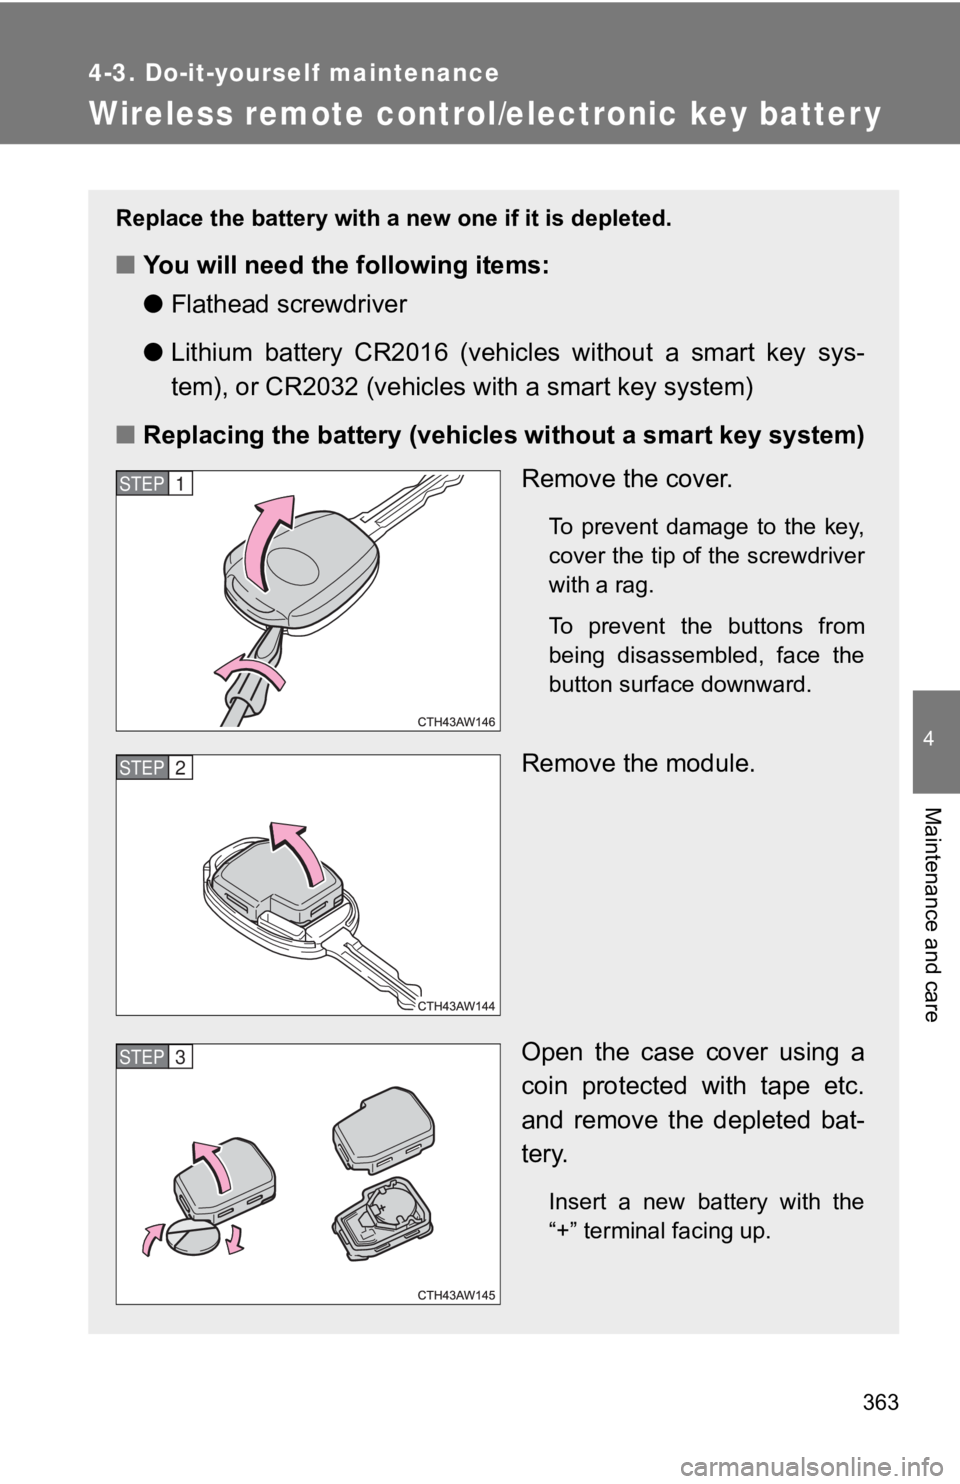
■ Replacing the battery (vehicles without a smart key system)
Remove the cover.
To prevent damage to the key,
cover the tip of the screwdriver
with a rag.
To prevent the buttons from
being disassembled, face the
button surface downward.
Remove the module.
Open the case cover using a
coin protected with tape etc.
and remove the depleted bat-
tery.
Insert a new battery with the
“+” terminal facing up.
STEP 1
STEP 2
STEP 3
Page 364 of 532
364 4-3. Do-it-yourself maintenance
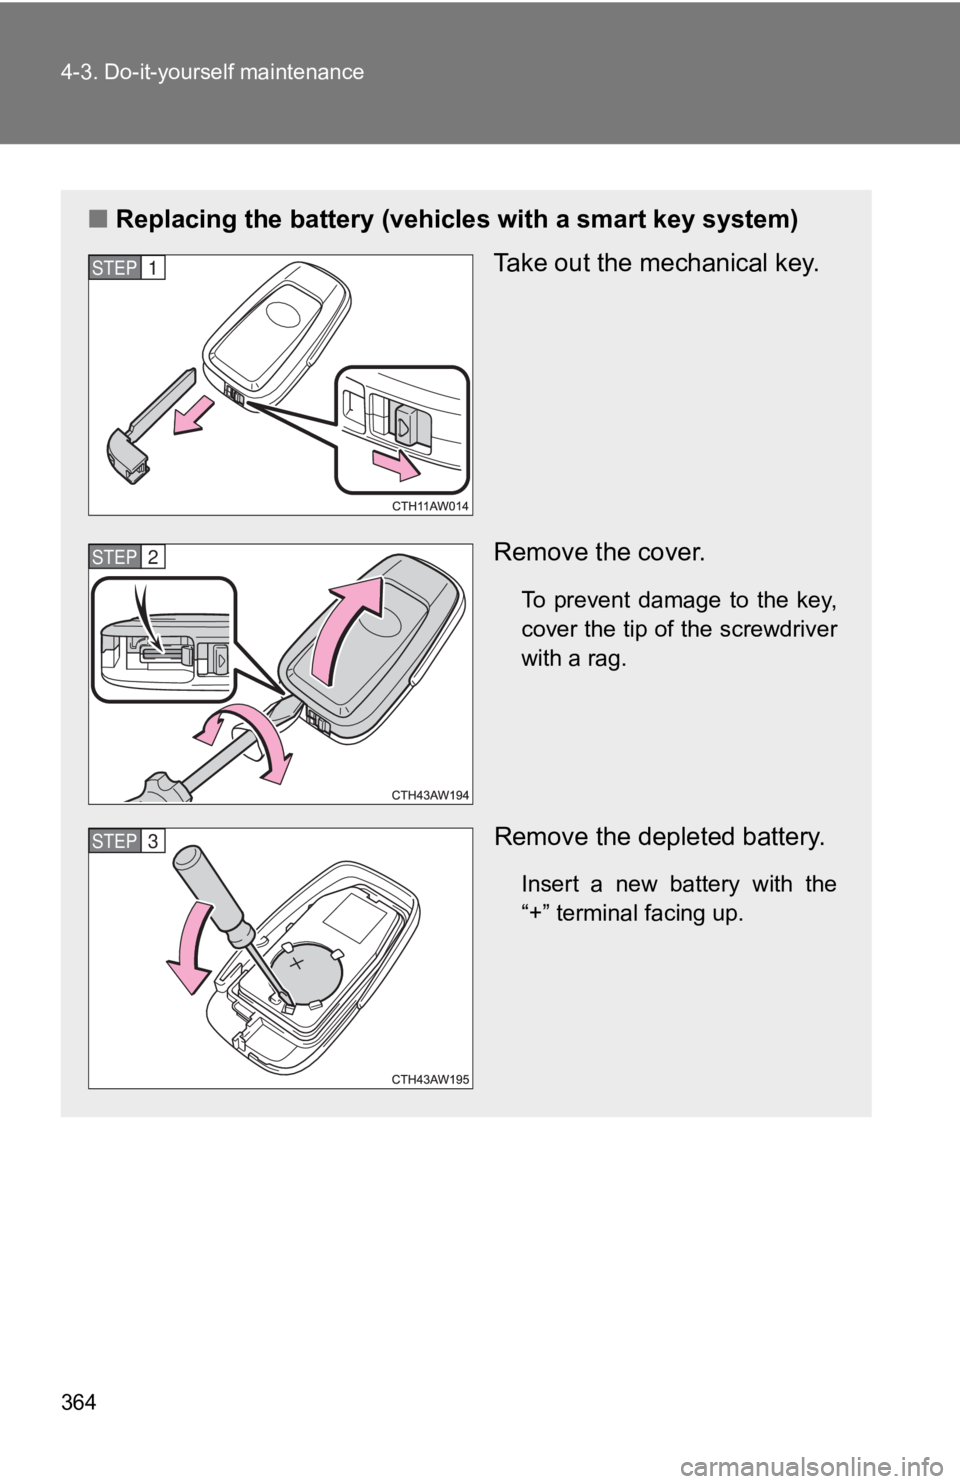
■Replacing the battery (vehicl es with a smart key system)
Take out the mechanical key.
Remove the cover.
To prevent damage to the key,
cover the tip of the screwdriver
with a rag.
Remove the depleted battery.
Insert a new battery with the
“+” terminal facing up.
STEP 1
STEP 2
STEP 3
Page 365 of 532
365
4-3. Do-it-yourself maintenance
4
Maintenance and care
■
Use a CR2016 (vehicles without a smart key system) or CR2032 (v ehi-
cles with a smart key system) lithium battery
● Batteries can be purchased at your Toyota dealer, local electri cal appli-
ance shops or camera stores.
● Replace only with the same or equivalent type recommended by th e
manufacturer.
● Dispose of used batteries according to local laws.
■ If the key battery is depleted
The following symptoms may occur:
●The smart key system (if equipped) and wireless remote control will not
function properly.
● The operational range will be reduced.
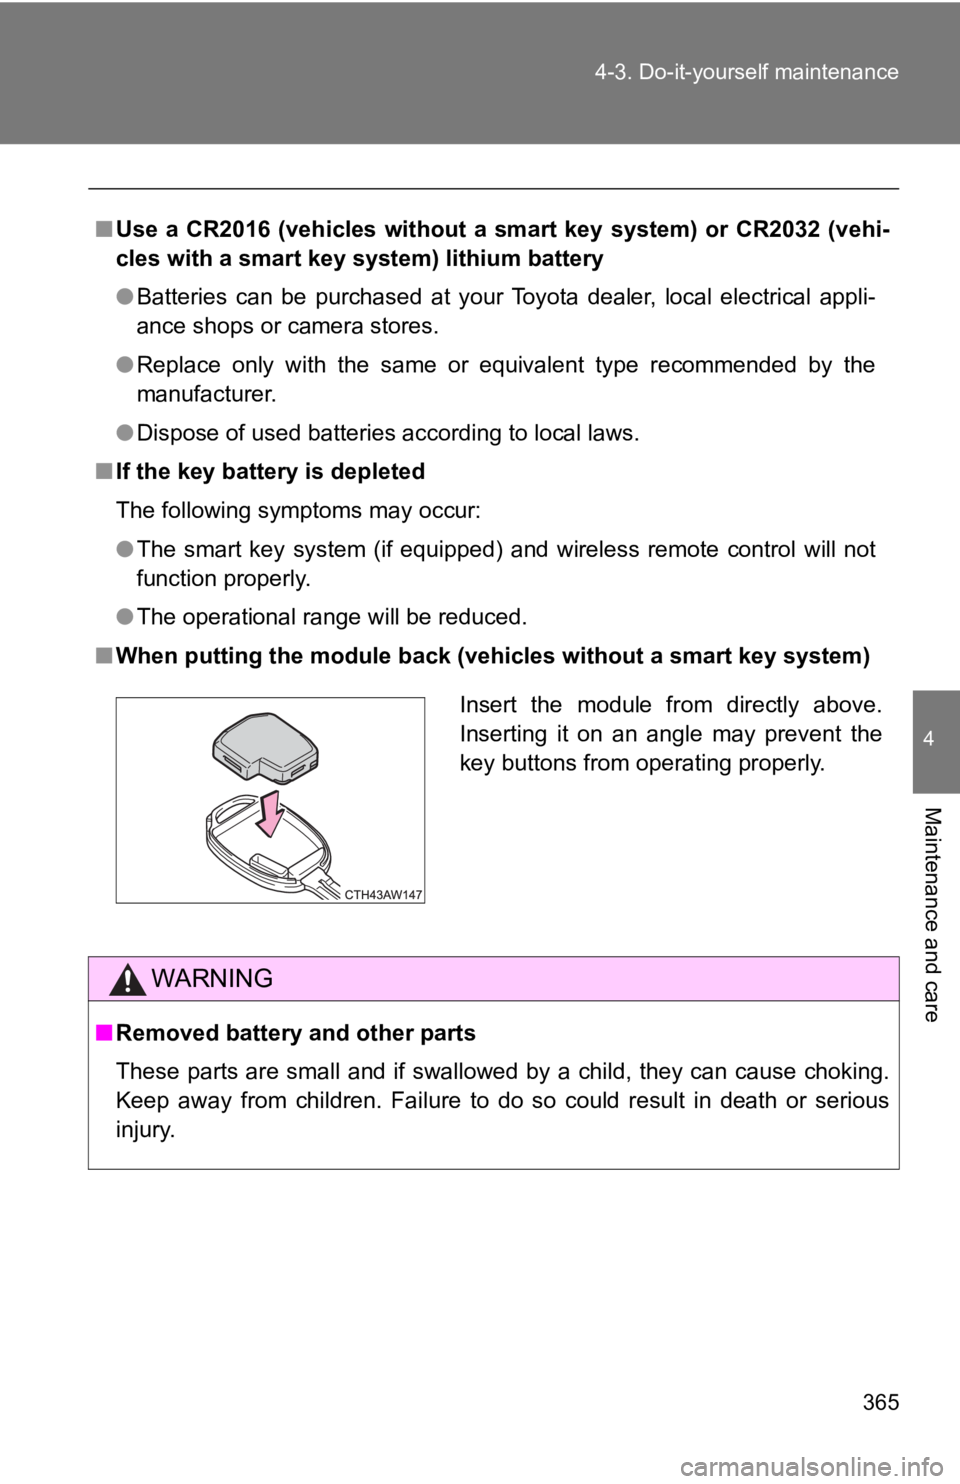
■ When putting the module back ( vehicles without a smart key syst em)
WARNING
■Removed battery and other parts
These parts are small and if swallowed by a child, they can cau se choking.
Keep away from children. Failure to do so could result in death or serious
injury.
Insert the module from directly above.
Inserting it on an angle may prevent the
key buttons from operating properly.
Page 366 of 532
366 4-3. Do-it-yourself maintenance
NOTICE
■For normal operation after replacing the battery
Observe the following precautions to prevent accidents:
●Always work with dry hands.
Moisture may cause the battery to rust.
● Do not touch or move any other component inside the remote cont rol.
● Do not bend either of the battery terminals.
Page 367 of 532
367
4-3. Do-it-yourself maintenance
4
Maintenance and care
Checking and replacing fuses
If any of the electrical components do not operate, a fuse may have
blown. If this happens, check and replace the fuses as necessar y.
Vehicles without a smart key system
Turn the engine switch off.
Vehicles with a smart key system
Turn the “ENGINE START STOP” switch off.
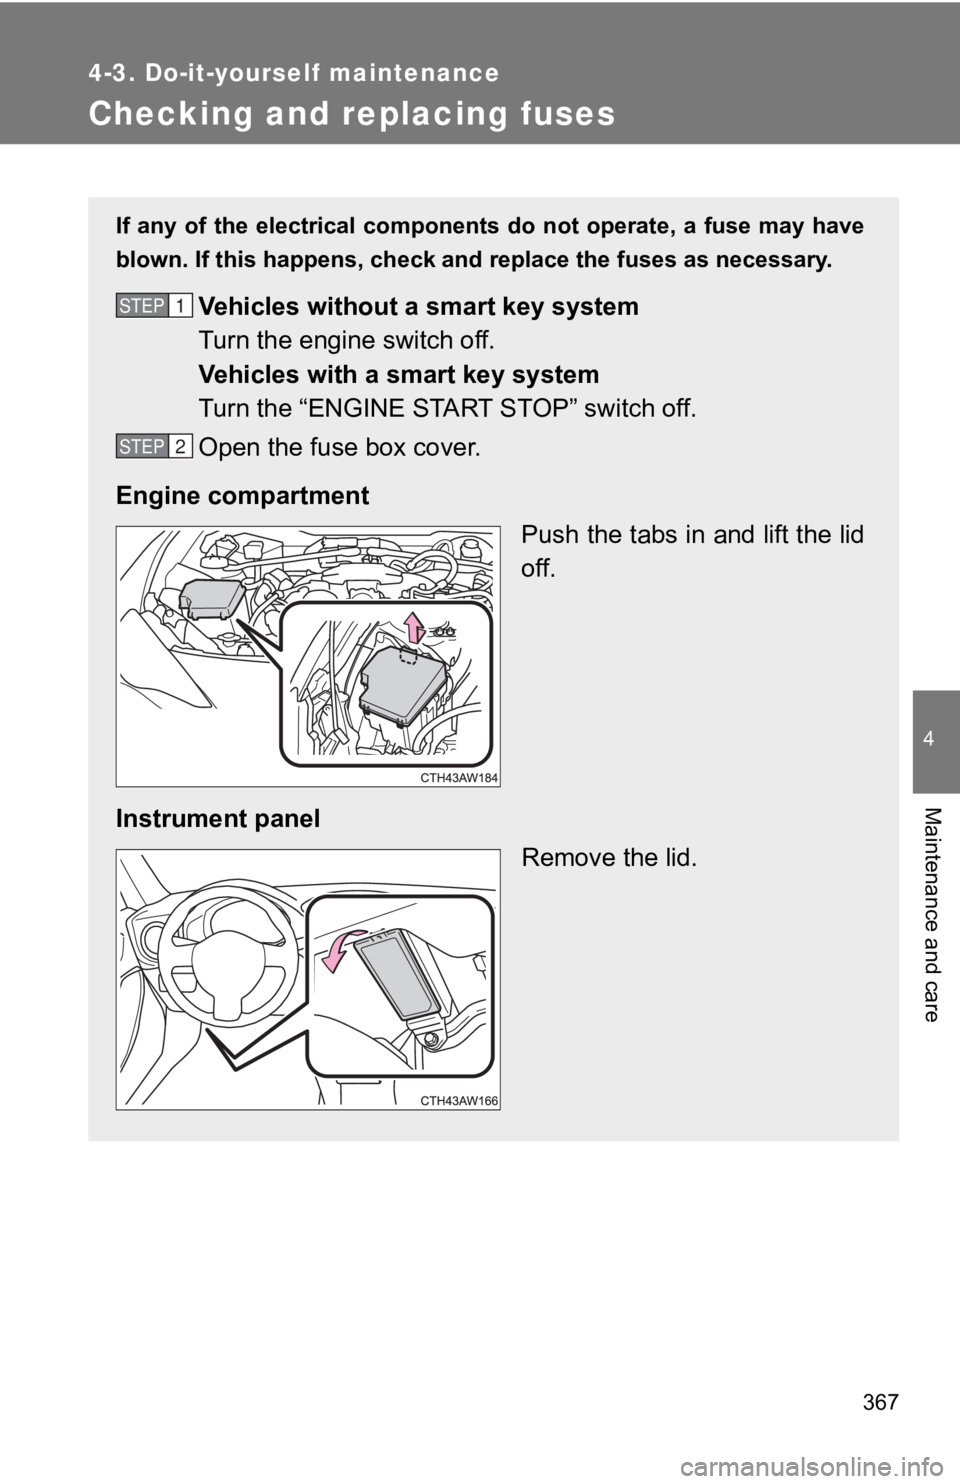
Open the fuse box cover.
Engine compartment Push the tabs in and lift the lid
off.
Instrument panel Remove the lid.STEP 1
STEP 2
Page 368 of 532
368 4-3. Do-it-yourself maintenance
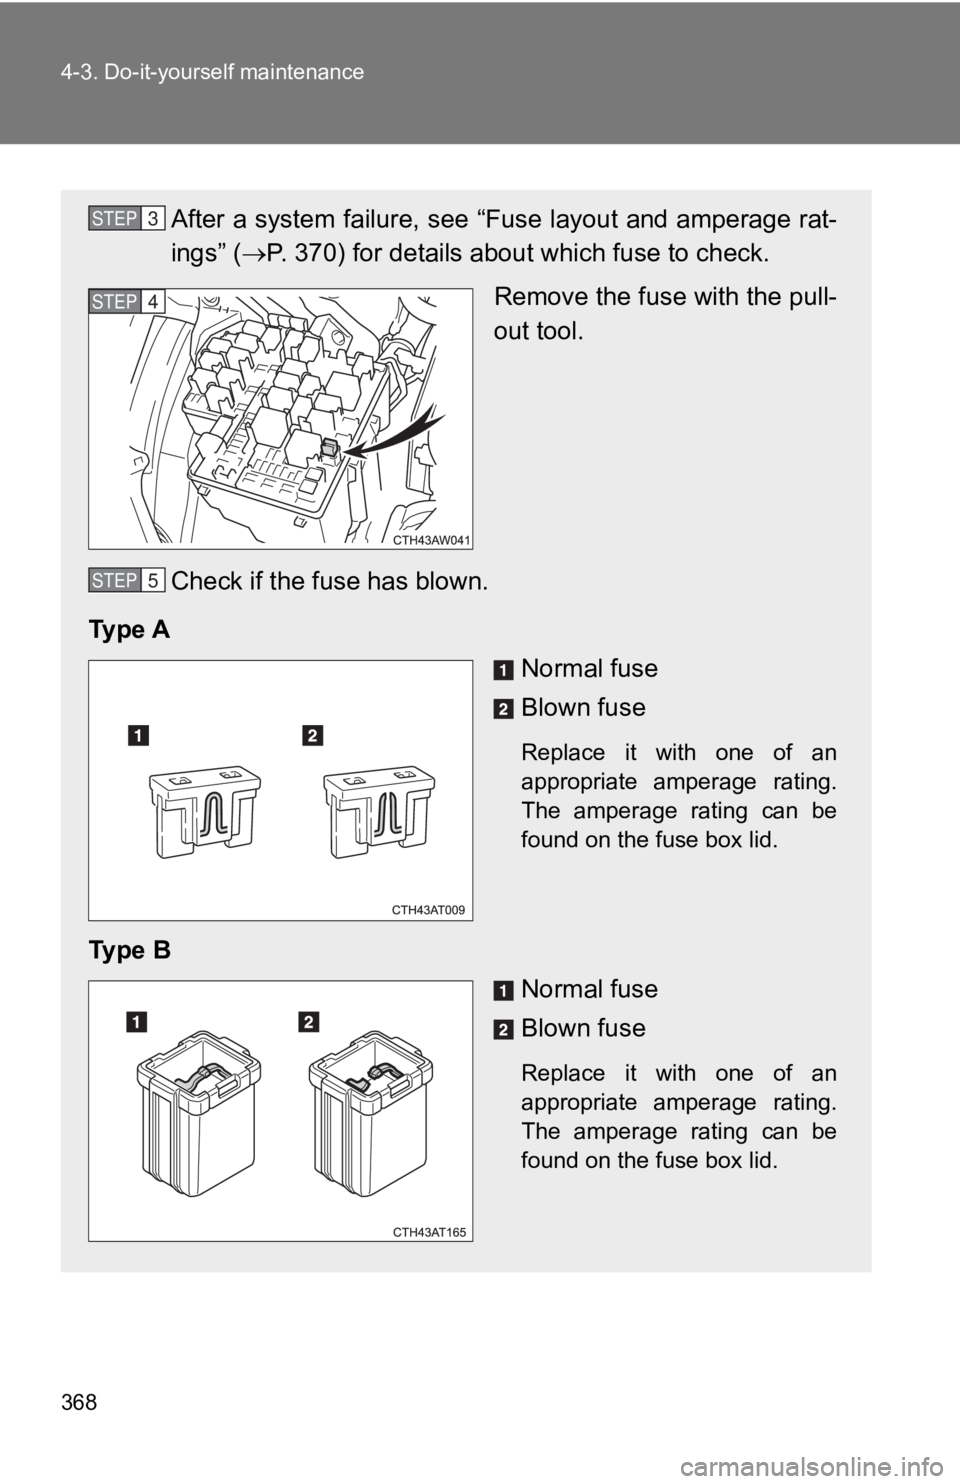
After a system failure, see “Fuse layout and amperage rat-
ings” (P. 370) for details abo ut which fuse to check.
Remove the fuse with the pull-
out tool.
Check if the f use has blown.
Ty p e A Normal fuse
Blown fuse
Replace it with one of an
appropriate amperage rating.
The amperage rating can be
found on the fuse box lid.
Ty p e BNormal fuse
Blown fuse
Replace it with one of an
appropriate amperage rating.
The amperage rating can be
found on the fuse box lid.
STEP 3
STEP 4
STEP 5
Page 369 of 532
369
4-3. Do-it-yourself maintenance
4
Maintenance and care
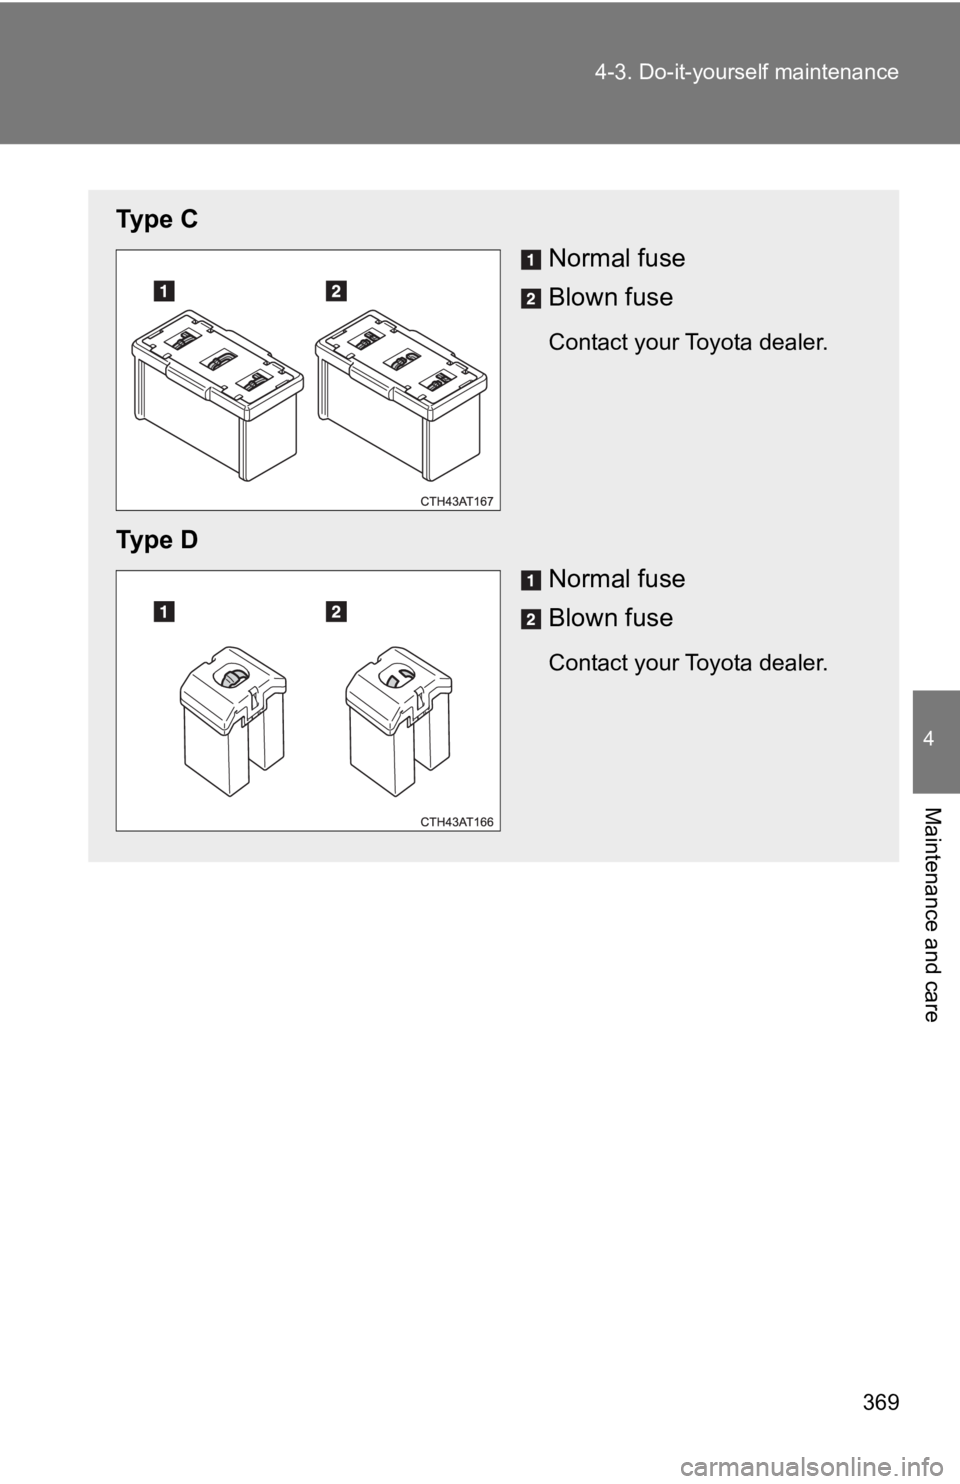
Ty p e C
Normal fuse
Blown fuse
Contact your Toyota dealer.
Ty p e DNormal fuse
Blown fuse
Contact your Toyota dealer.
Page 370 of 532
370 4-3. Do-it-yourself maintenance
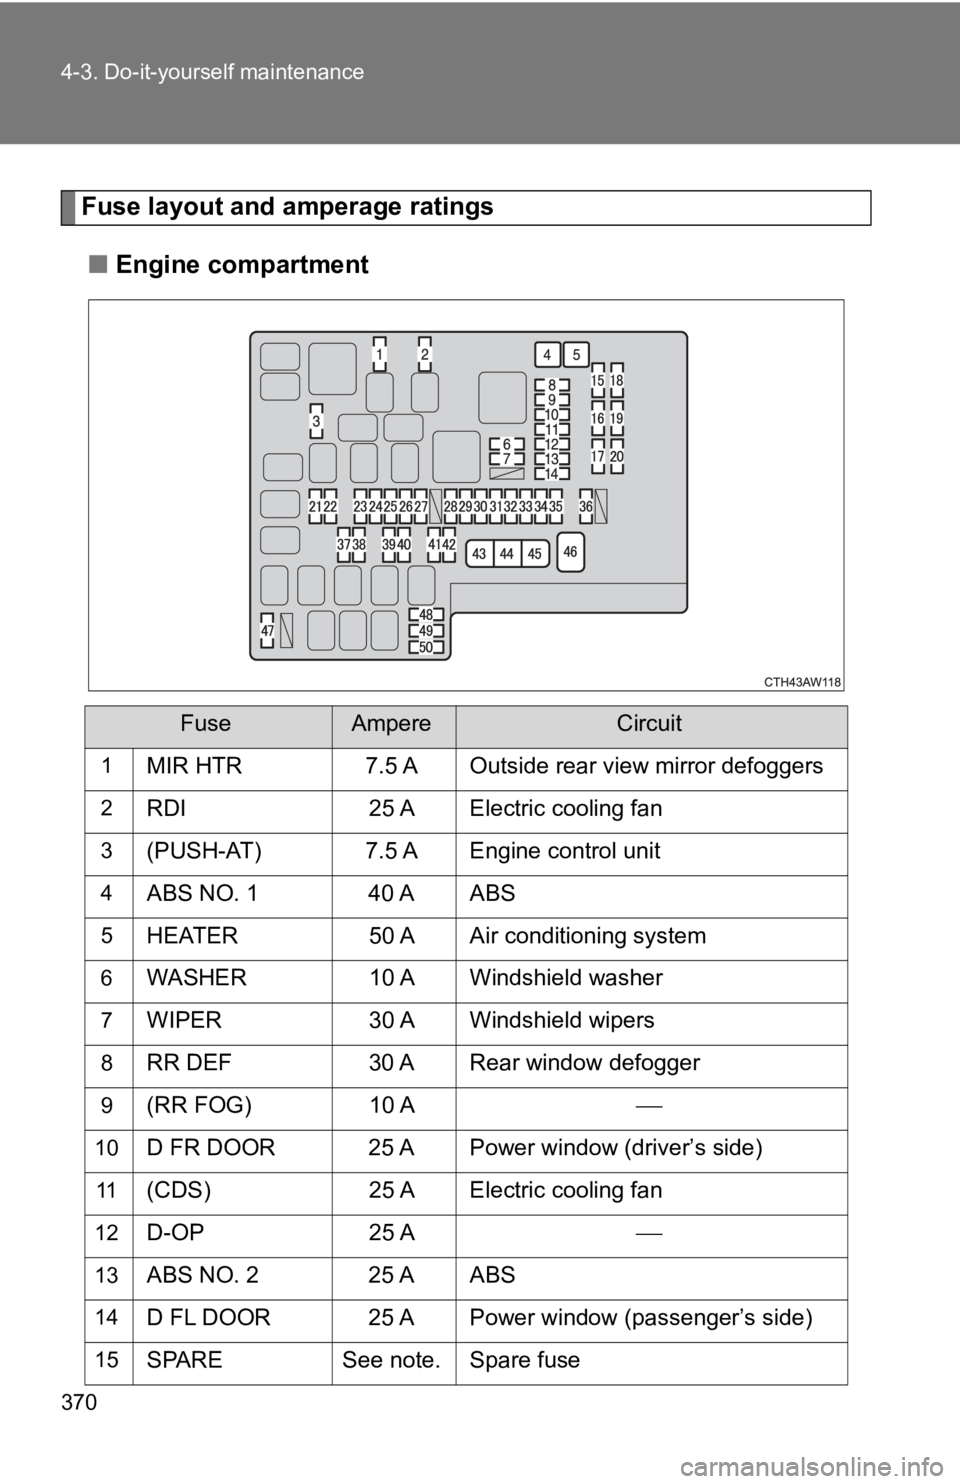
Fuse layout and amperage ratings■ Engine compartment
FuseAmpereCircuit
1MIR HTR 7.5 A Outside rear view mirror defoggers
2RDI 25 A Electric cooling fan
3(PUSH-AT) 7.5 A Engine control unit
4ABS NO. 1 40 A ABS
5HEATER 50 A Air conditioning system
6WASHER10 A Windshield washer
7WIPER30 A Windshield wipers
8RR DEF30 A Rear window defogger
9(RR FOG) 10 A
10D FR DOOR 25 A Power window (driver’s side)
11(CDS)25 A Electric cooling fan
12D-OP 25 A
13ABS NO. 2 25 A ABS
14D FL DOOR 25 A Power window (passenger’s side)
15SPARESee note. Spare fuse
Trending: deactivate airbag, turn signal bulb, power steering fluid, warning, immobilizer, heating, fog light
