TOYOTA HIGHLANDER 2013 XU50 / 3.G Quick Reference Guide
Manufacturer: TOYOTA, Model Year: 2013, Model line: HIGHLANDER, Model: TOYOTA HIGHLANDER 2013 XU50 / 3.GPages: 36, PDF Size: 8.75 MB
Page 11 of 36
OVERVIEW
FEATURES/OPERATIONS
SAFETY AND EMERGENCY FEATURES
9
NOTE: Tighten until one click is heard.
If the cap is not tightened enough, Check
Engine “
” indicator may illuminate.
Turn to open
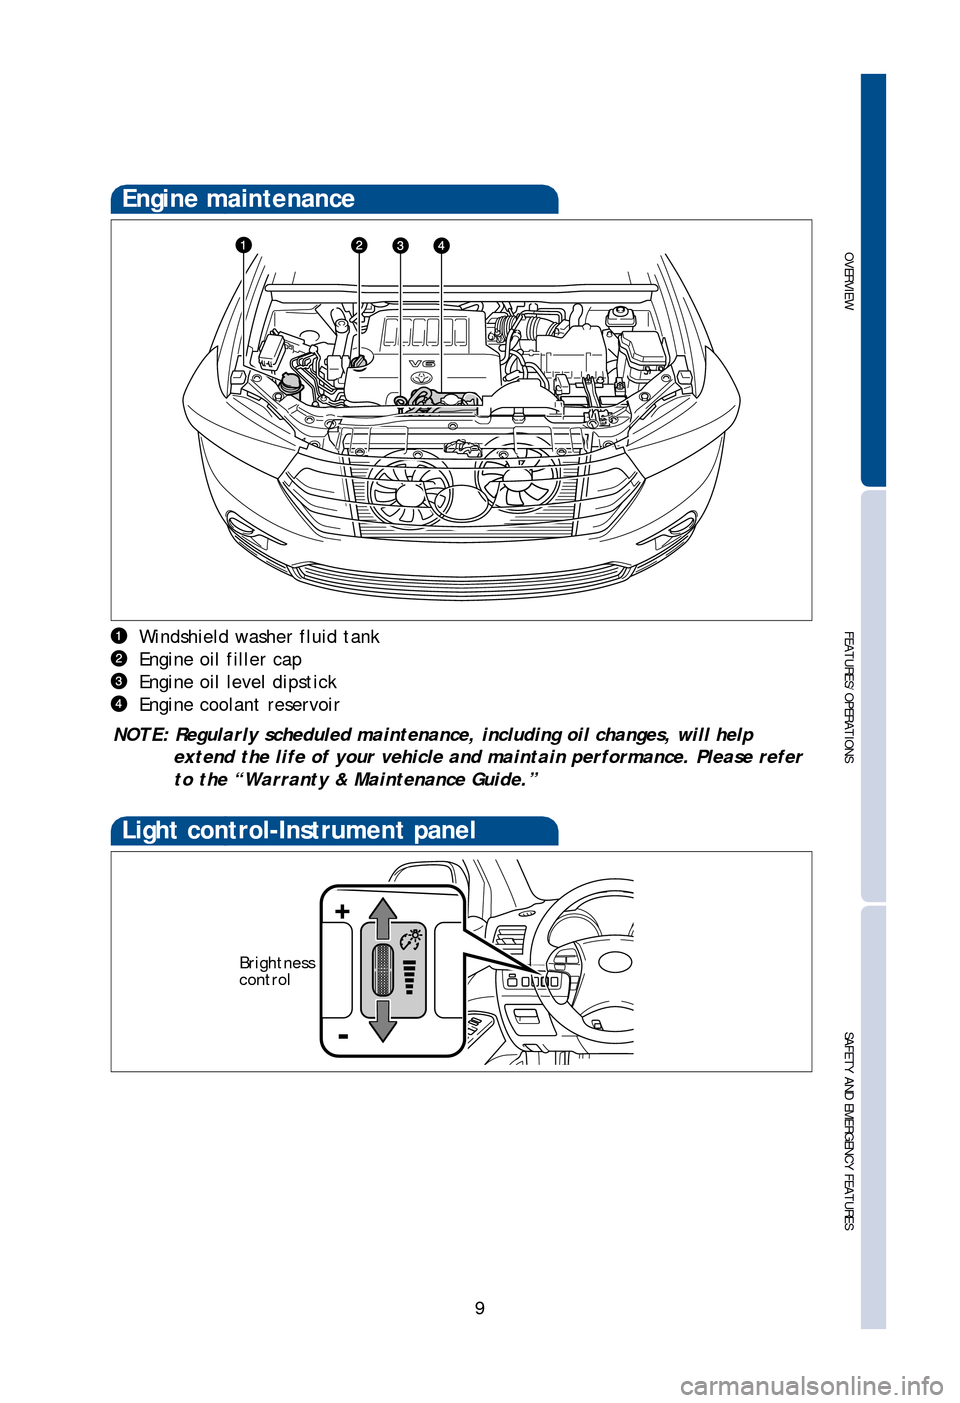
Windshield washer fluid tank
Engine oil filler cap
Engine oil level dipstick
Engine coolant reservoir
NOTE: Regularly scheduled maintenance, including oil changes, will help extend the life of your vehicle and maintain performance. Please refer
to the “Warranty & Maintenance Guide.”
Engine maintenance
Light control-Instrument panel
Brightness
control
-
+
126893_TEXT.indd 98/13/12 10:48 PM
Page 12 of 36
10
FEATURES/OPERATIONS
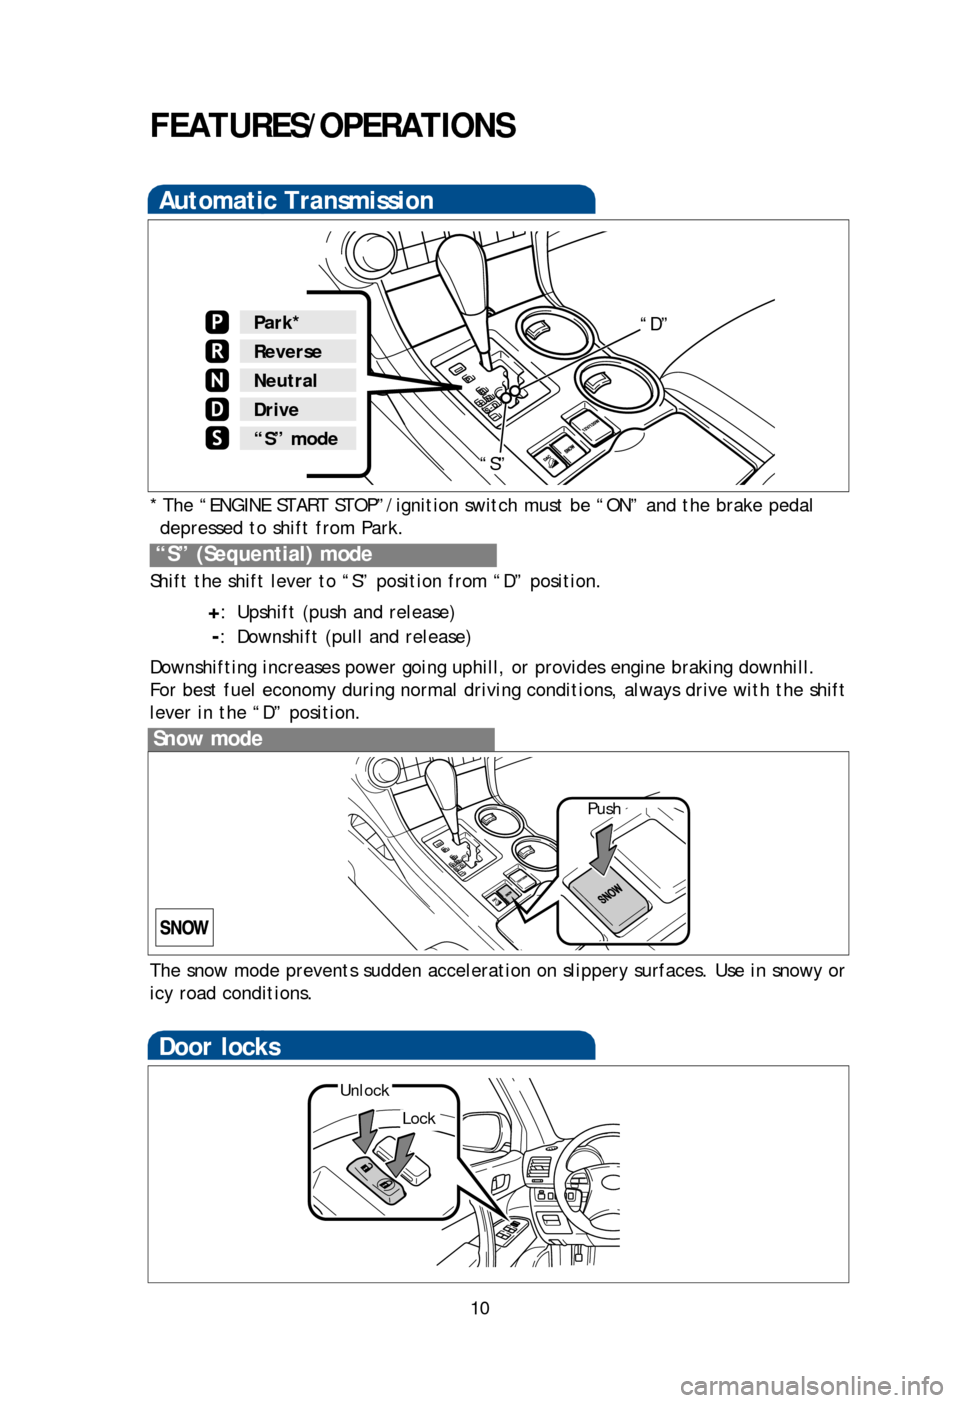
Automatic Transmission
* The “ENGINE START STOP”/ignition switch must be “ON” and the brake pedal depressed to shift from Park.
Shift the shift lever to “S” position from “D” position.
+: Upshift (push and release)
-: Downshift (pull and release)
Downshifting increases power going uphill, or provides engine braking downhill.
For best fuel economy during normal driving conditions, always drive with the shift
lever in the “D” position.
“S” (Sequential) mode
Park*
Reverse
Neutral
Drive
N
“S” mode “D”
Snow mode
Push
Steering lock release
Door locks
With Smart Key system
Auto lock/unlock
Automatic door locks can be programmed to operate in two different modes, or
turned OFF.
-Doors lock when shifting from Park.
-Doors lock when the vehicle speed goes above approximately 12 mph.
-Doors unlock when shifting into Park.
Vehicles without Smart Key system
-Doors unlock when the ignition switch is set from “ON” to “ACC” or “LOCK” and
driver’s door is opened.
Vehicles with Smart Key system
-Doors unlock when the “ENGINE START STOP” switch is set to OFF and driver’s
door is opened.
Refer to the Owner’s Manual for more details.
Parking brake
The snow mode prevents sudden acceleration on slippery surfaces. Use in snowy or
icy road conditions.
“S”
Lock
Unlock
126893_TEXT.indd 108/13/12 10:48 PM
Page 13 of 36
OVERVIEW
FEATURES/OPERATIONS
SAFETY AND EMERGENCY FEATURES
11
FEATURES/OPERATIONS
* The “ENGINE START STOP”/ignition switch must be “ON” and the brake pedal depressed to shift from Park.
Shift the shift lever to “S” position from “D” position.
+: Upshift (push and release)
-: Downshift (pull and release)
Downshifting increases power going uphill, or provides engine braking downhill.
For best fuel economy during normal driving conditions, always drive with the shift
lever in the “D” position.
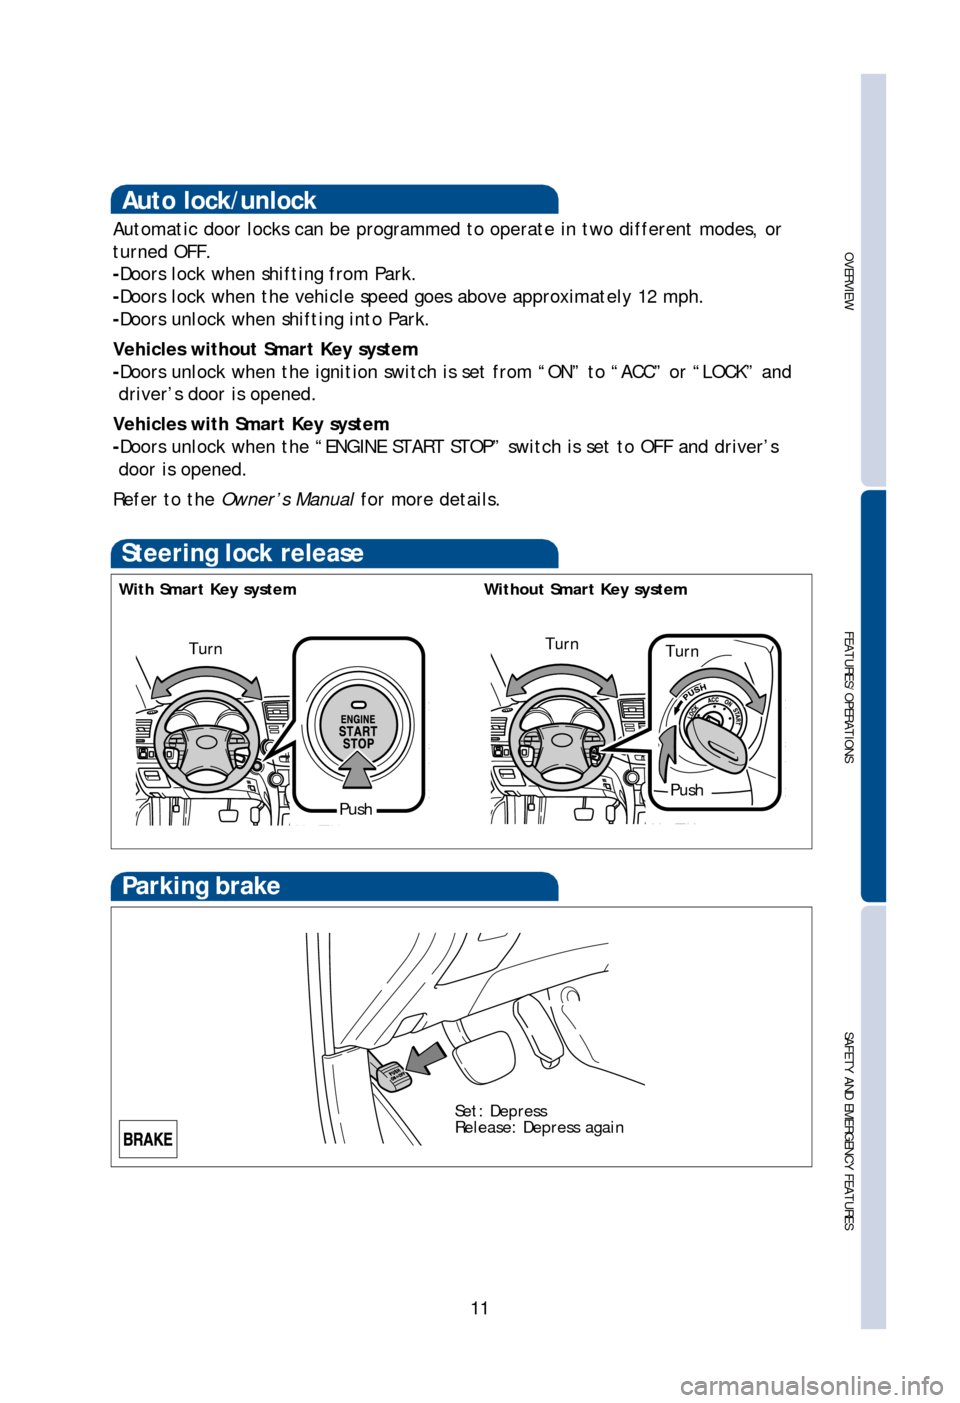
Steering lock release
Turn
Turn
With Smart Key system Without Smart Key system
PushPush
Turn
Auto lock/unlock
Automatic door locks can be programmed to operate in two different modes, or
turned OFF.
-Doors lock when shifting from Park.
-Doors lock when the vehicle speed goes above approximately 12 mph.
-Doors unlock when shifting into Park.
Vehicles without Smart Key system
-Doors unlock when the ignition switch is set from “ON” to “ACC” or “LOCK” and
driver’s door is opened.
Vehicles with Smart Key system
-Doors unlock when the “ENGINE START STOP” switch is set to OFF and driver’s door is opened.
Refer to the Owner’s Manual for more details.
Parking brake
The snow mode prevents sudden acceleration on slippery surfaces. Use in snowy or
icy road conditions.
Set: Depress
Release: Depress again
126893_TEXT.indd 118/13/12 10:48 PM
Page 14 of 36
12
FEATURES/OPERATIONS
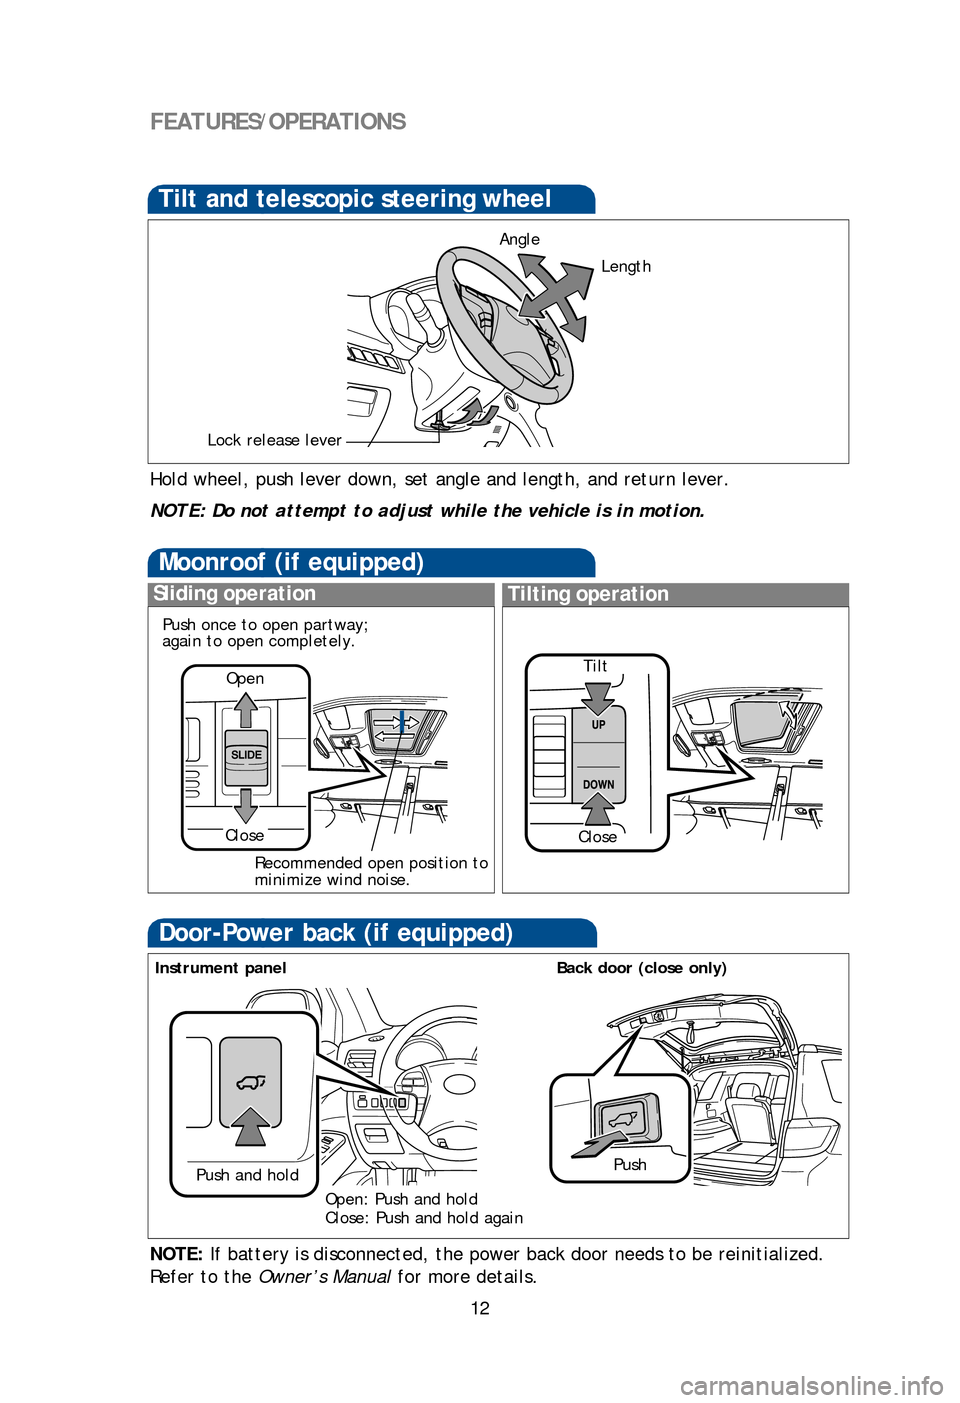
Hold wheel, push lever down, set angle and length, and return lever.
AngleLength
Lock release lever
NOTE: Do not attempt to adjust while the vehicle is in motion.
Tilt and telescopic steering wheel
Moonroof (if equipped)
Sliding operationTilting operation
Open Tilt
Close
Close
Door-Power back (if equipped)
PushPush and hold
Instrument panel Back door (close only)
Open: Push and hold
Close: Push and hold again
NOTE: If battery is disconnected, the power back door needs to be reinitialized.
Refer to the Owner’s Manual for more details.
Recommended open position to
minimize wind noise.
Seat adjustments-Rear
Second row seat
Seat position (forward/backward)
Seatback angle
Third seat access lever
Seatback release
Refer to the Owner’s Manual for more details.
Seat adjustments-Front
Seat position (forward/backward)
Seat cushion angle
Height crank (driver side only)
Seatback angle
Seat position, cushion angle (driver side only) and height (driver side only)
Driver seat leg support (if equipped)
Lumbar support (driver side only)
Manual seat
Push once to open partway;
again to open completely.
126893_TEXT.indd 128/13/12 10:48 PM
Page 15 of 36
OVERVIEW
FEATURES/OPERATIONS
SAFETY AND EMERGENCY FEATURES
13
Hold wheel, push lever down, set angle and length, and return lever.
NOTE: Do not attempt to adjust while the vehicle is in motion.
NOTE: If battery is disconnected, the power back door needs to be reinitialized.
Refer to the Owner’s Manual for more details.
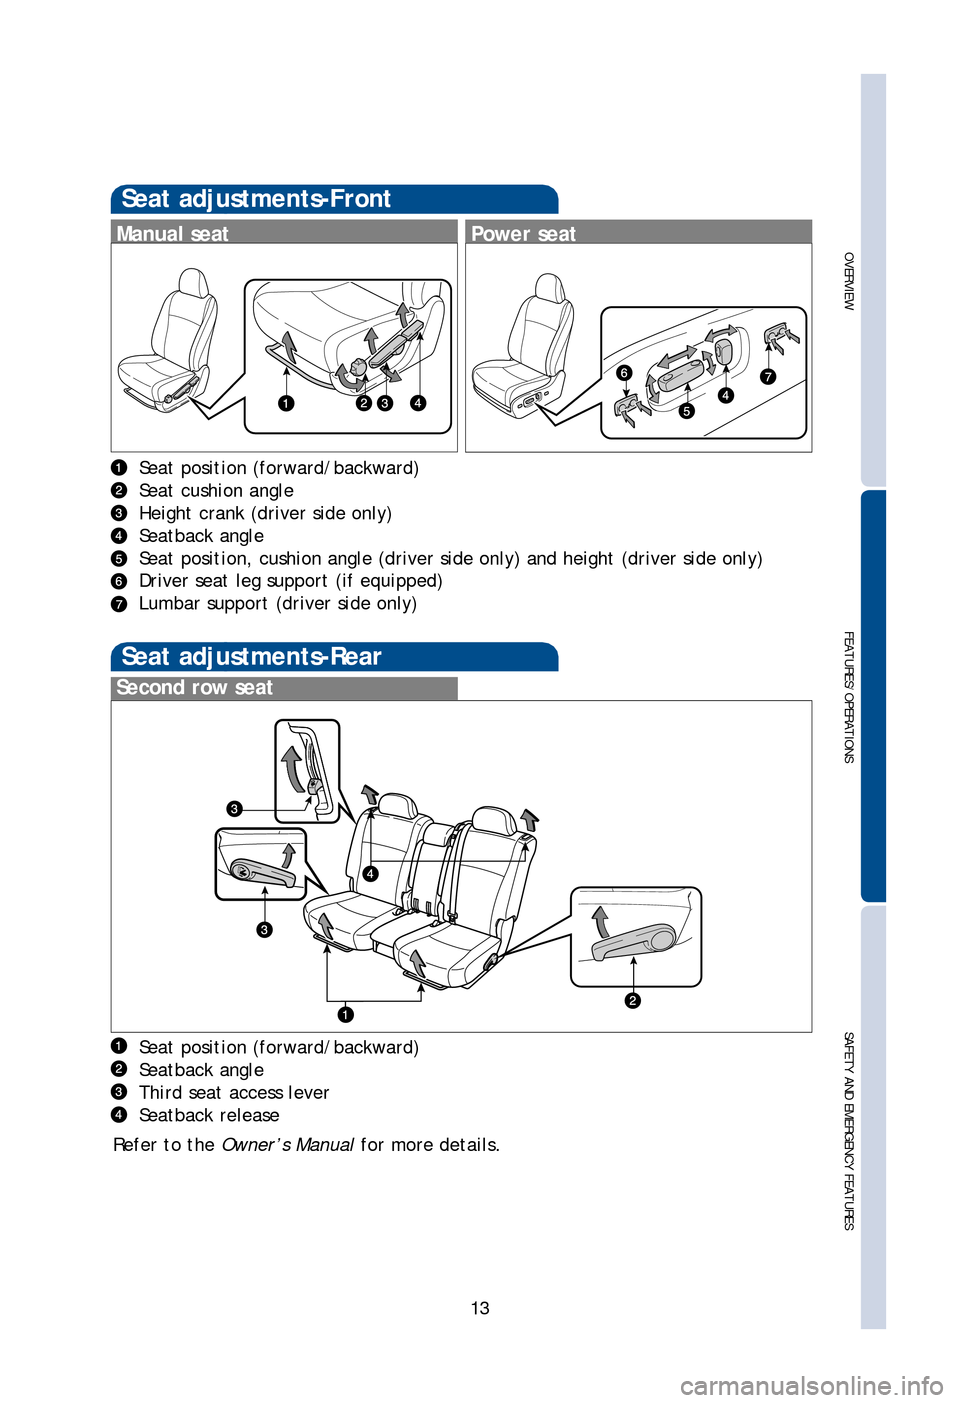
Seat adjustments-Rear
Second row seat
Seat position (forward/backward)
Seatback angle
Third seat access lever
Seatback release
Refer to the Owner’s Manual for more details.
Seat adjustments-Front
Seat position (forward/backward)
Seat cushion angle
Height crank (driver side only)
Seatback angle
Seat position, cushion angle (driver side only) and height (driver side only)
Driver seat leg support (if equipped)
Lumbar support (driver side only)
Manual seatPower seat
126893_TEXT.indd 138/13/12 10:48 PM
Page 16 of 36
14
FEATURES/OPERATIONS
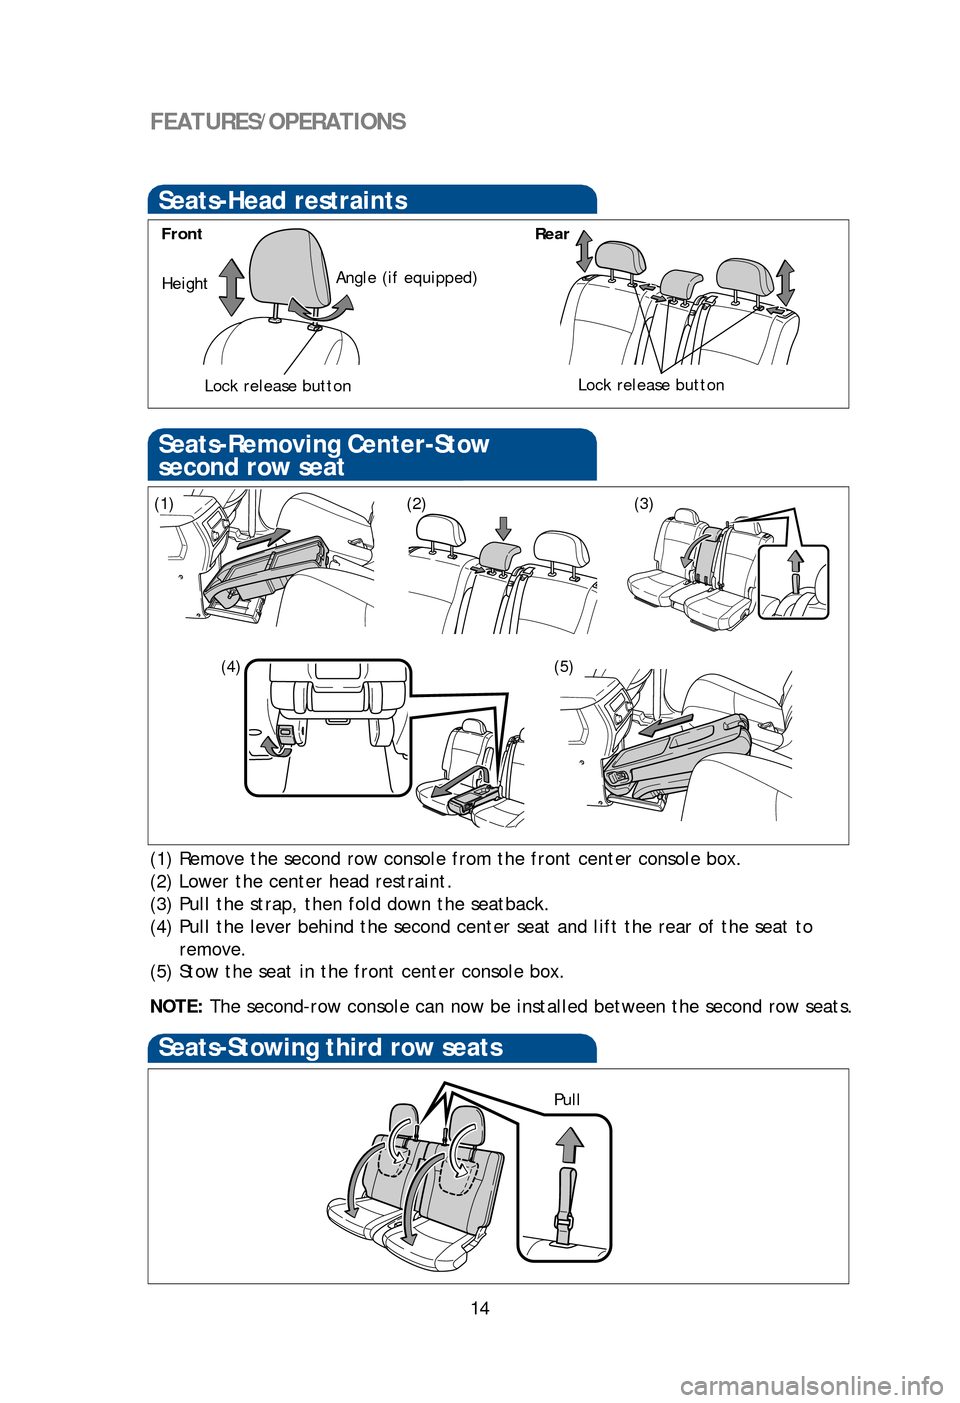
Seats-Head restraints
FrontRear
Lock release buttonLock release button
(1) Remove the second row console from the front center console box.
(2) Lower the center head restraint.
(3) Pull the strap, then fold down the seatback.
(4) Pull the lever behind the second center seat and lift the rear of the seat to
remove.
(5) Stow the seat in the front center console box.
Pull
Windshield wipers & washers
Front
Rear
(1)
(5)
(4)
(3)(2)
NOTE: The second-row console can now be installed between the second row seats.
Seats-Removing Center-Stow
second row seatSeats-Folding down second row seats
(if equipped)
Height Angle (if equipped)
* Intermittent windshield wiper frequency adjustment Rotate to increase/decrease wipe frequency.Seats
-Stowing third row seats
From outside
Refer to the Owner’s Manual for more details.
Seats -Returning third row seats
(1) Pull
126893_TEXT.indd 148/13/12 10:48 PM
Page 17 of 36
OVERVIEW
FEATURES/OPERATIONS
SAFETY AND EMERGENCY FEATURES
15
(1) Remove the second row console from the front center console box.
(2) Lower the center head restraint.
(3) Pull the strap, then fold down the seatback.
(4) Pull the lever behind the second center seat and lift the rear of the seat to remove.
(5) Stow the seat in the front center console box.
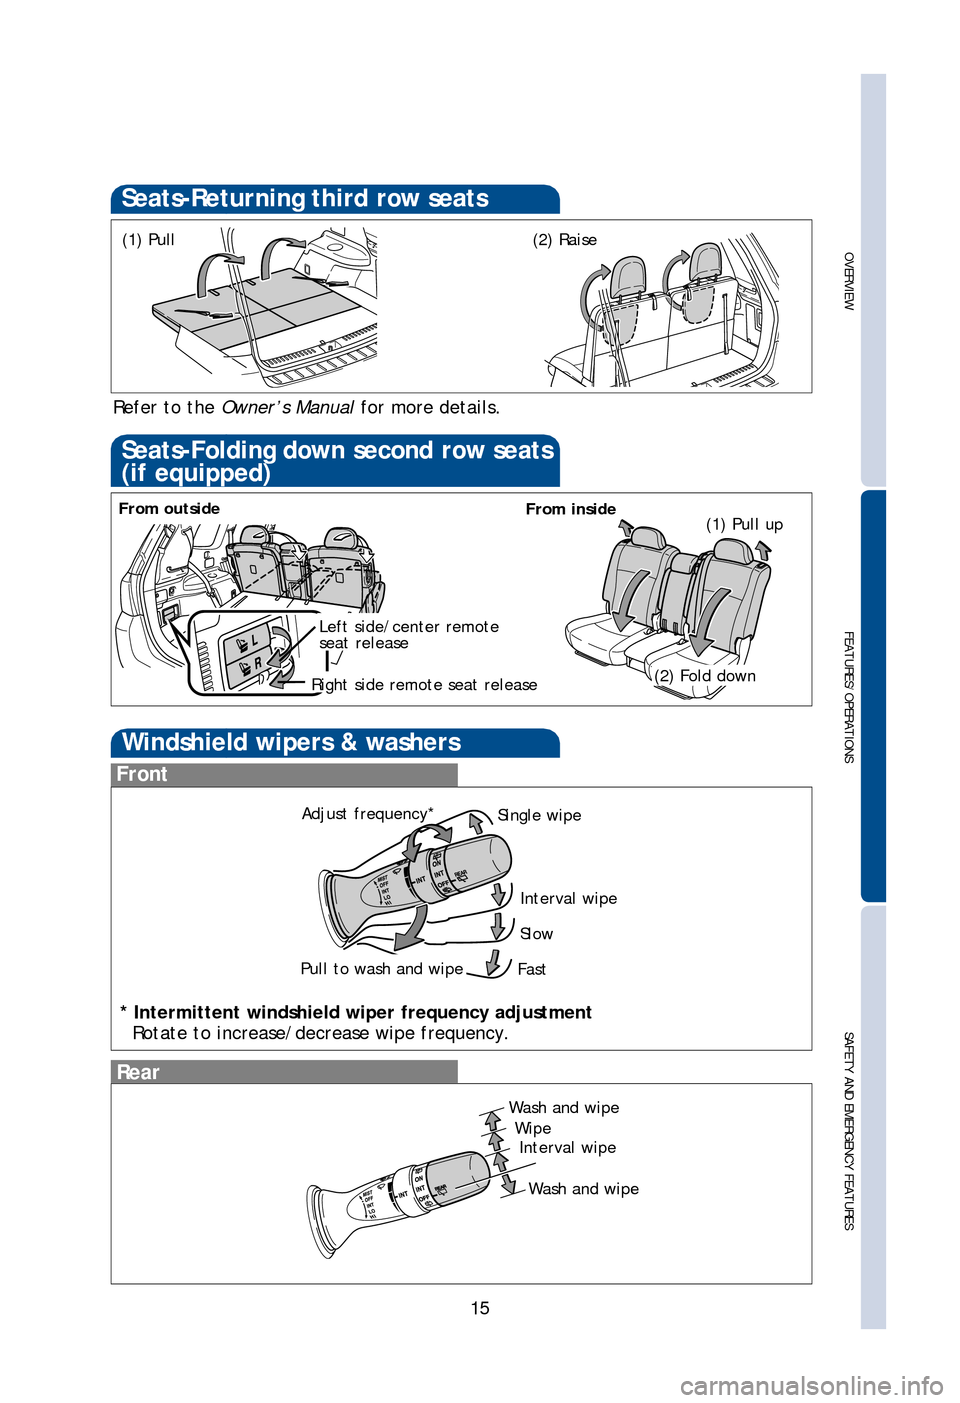
(2) Fold down
Windshield wipers & washers
Front
Rear
(1) Pull up
NOTE: The second-row console can now be installed between the second row seats.
Seats-Folding down second row seats
(if equipped)
* Intermittent windshield wiper frequency adjustment
Rotate to increase/decrease wipe frequency.
Left side/center remote
seat release
Right side remote seat release
From outside
Refer to the Owner’s Manual for more details.
Seats -Returning third row seats
(1) Pull(2) Raise
Interval wipe
Single wipe
Slow
FastPull to wash and wipe Adjust frequency*
Wash and wipe
WipeInterval wipe
Wash and wipe
From inside
126893_TEXT.indd 158/13/12 10:49 PM
Page 18 of 36
16
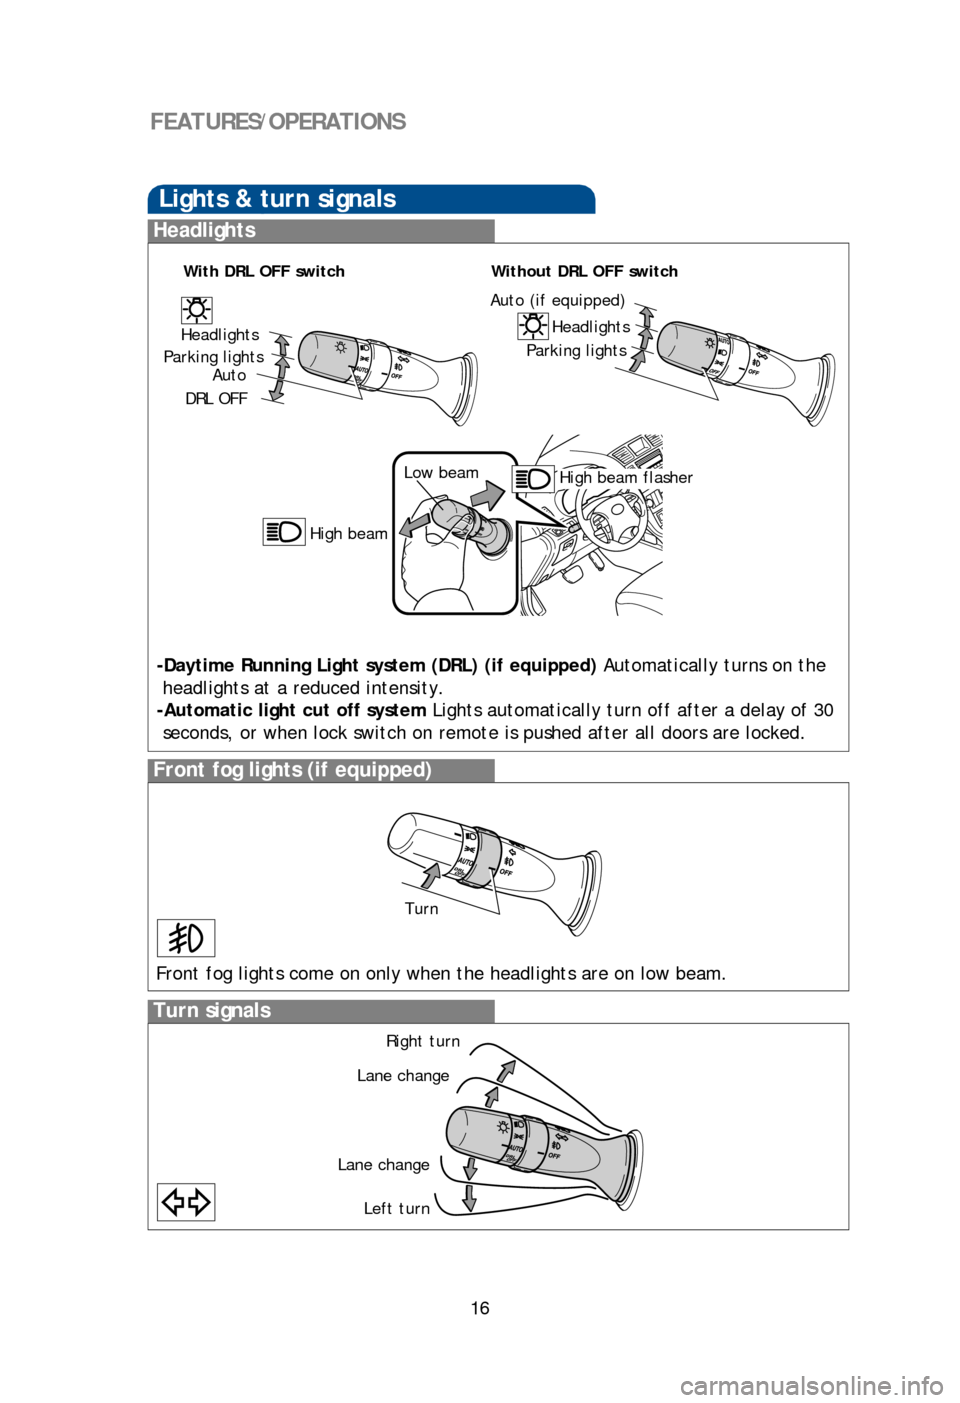
Lights & turn signals
Turn signals
Headlights
Front fog lights (if equipped)
-Daytime Running Light system (DRL) (if equipped) Automatically turns on the
headlights at a reduced intensity.
-Automatic light cut off system Lights automatically turn off after a delay of 30 seconds, or when lock switch on remote is pushed after all doors are locked.
Front fog lights come on only when the headlights are on low beam.
Power outlets-12V DC
Instrument panel (with seat heater)
The “ENGINE START STOP”/ignition switch must be in the “ACC” or “ON” position
to be used.
Power outlet-120V AC (if equipped)
Beside second row seat
Center console
The “ENGINE START STOP”/ignition switch must be in the “ON” position to be used.
FEATURES/OPERATIONS
High beam flasher
Low beam
High beam
Headlights
Parking lights
Auto (if equipped)
Headlights
Parking lights
Auto
DRL OFF
With DRL OFF switchWithout DRL OFF switch
Turn
Right turn
Lane change
Lane change Left turn
126893_TEXT.indd 168/13/12 10:49 PM
Page 19 of 36
OVERVIEW
FEATURES/OPERATIONS
SAFETY AND EMERGENCY FEATURES
17
-Daytime Running Light system (DRL) (if equipped) Automatically turns on the
headlights at a reduced intensity.
-Automatic light cut off system Lights automatically turn off after a delay of 30 seconds, or when lock switch on remote is pushed after all doors are locked.
Front fog lights come on only when the headlights are on low beam.
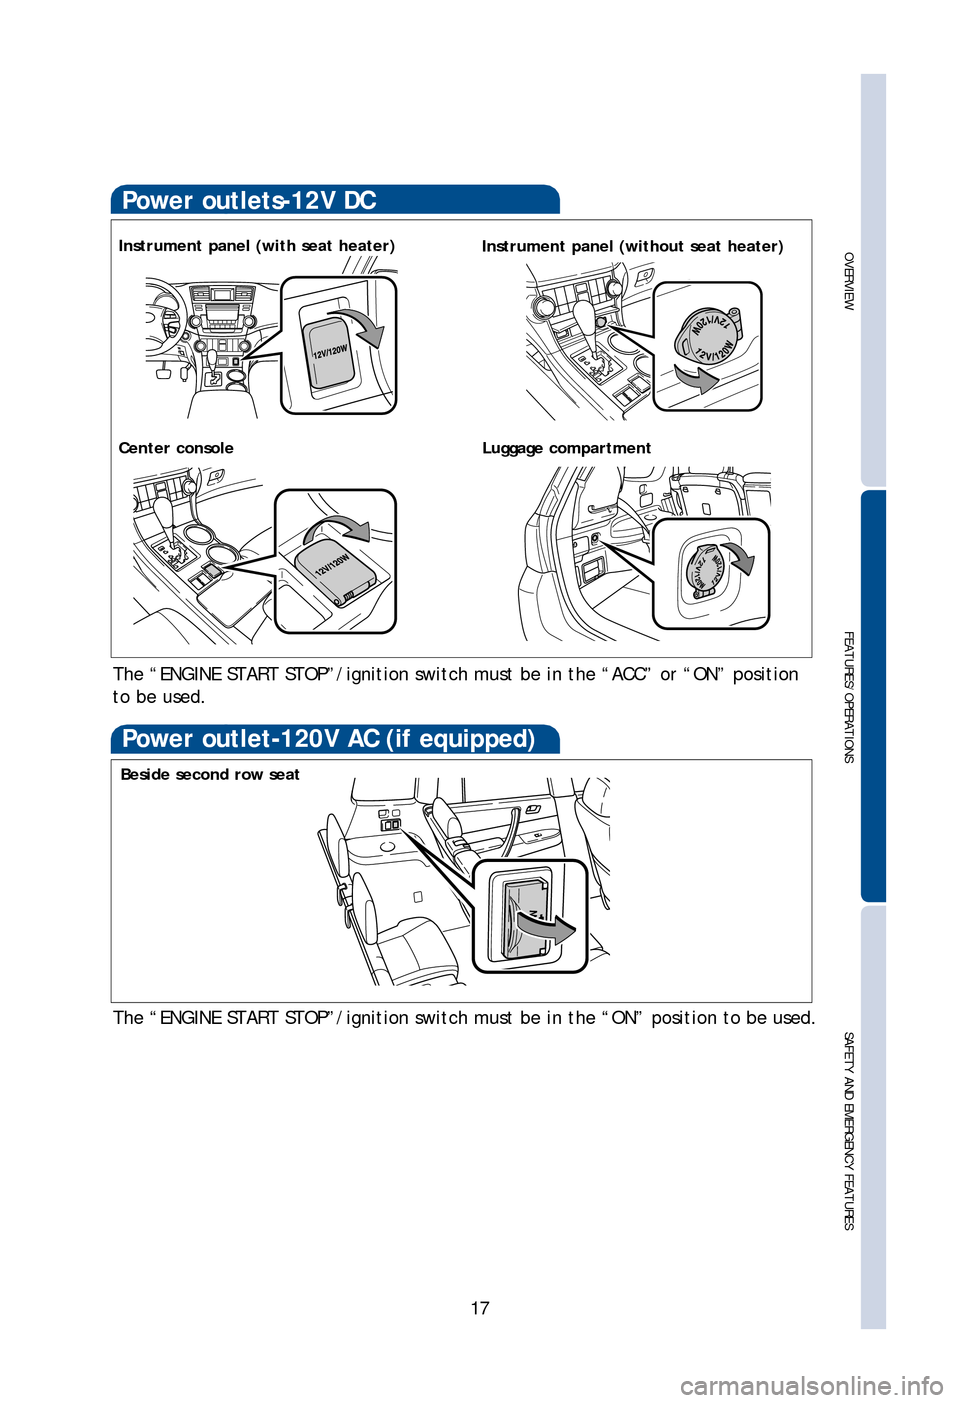
Power outlets-12V DC
Luggage compartment
Instrument panel (with seat heater) Instrument panel (without seat heater)
The “ENGINE START STOP”/ignition switch must be in the “ACC” or “ON” position
to be used.
Power outlet-120V AC (if equipped)
Beside second row seat
Center console
The “ENGINE START STOP”/ignition switch must be in the “ON” position to be used.
126893_TEXT.indd 178/13/12 10:49 PM
Page 20 of 36
18
FEATURES/OPERATIONS
Multi-Information DisplayTelephone controls (Bluetooth®)
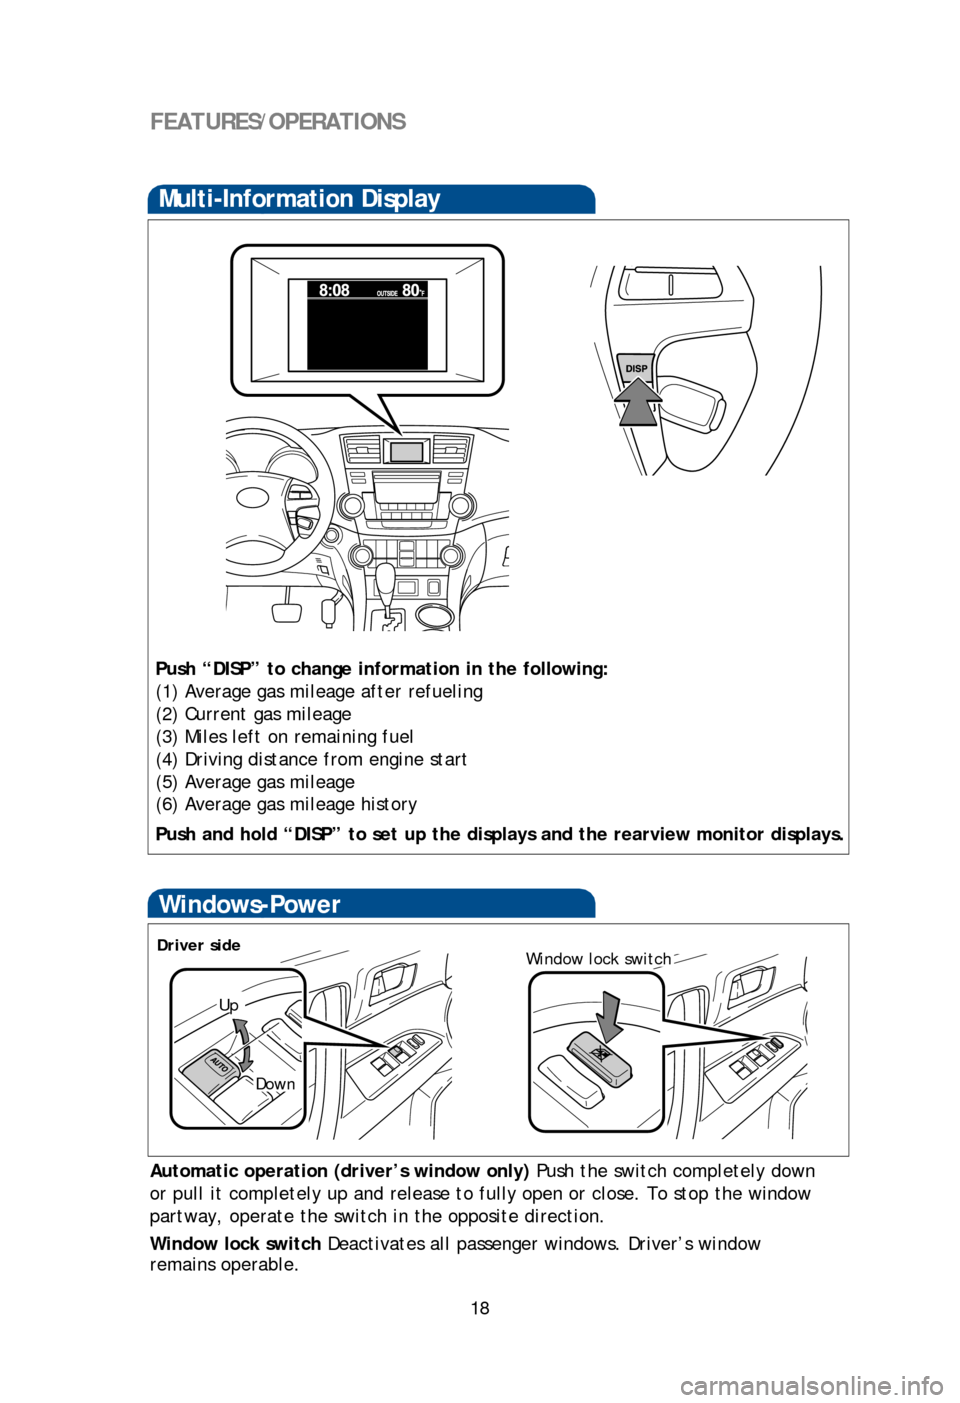
Push “DISP” to change information in the following:
(1) Average gas mileage after refueling
(2) Current gas mileage
(3) Miles left on remaining fuel
(4) Driving distance from engine start
(5) Average gas mileage
(6) Average gas mileage history
Push and hold “DISP” to set up the displays and the rearview monitor displays.
Windows-Power
Up
Down
Driver sideWindow lock switch
Automatic operation (driver’s window only) Push the switch completely down
or pull it completely up and release to fully open or close. To stop the window
partway, operate the switch in the opposite direction.
Window lock switch Deactivates all passenger windows. Driver’s window
remains operable.
Bluetooth® technology allows dialing or receipt of calls without taking hands from
the steering wheel or using a cable to connect the telephone and the system.
Refer to “Display Audio System Owner’s Manual” for more information about
phone connections and compatibility.
Audio unit
Volume
Steering wheel controls
Audio control
“ ”
Use to search within the selected audio medium (radio, CD, iPod®, etc.).
“MODE”
Push to turn audio ON and select an audio mode. Push and hold to turn the
audio system OFF.
Volume control
126893_TEXT.indd 188/13/12 10:49 PM