page 57 TOYOTA HIGHLANDER 2015 XU50 / 3.G Navigation Manual
[x] Cancel search | Manufacturer: TOYOTA, Model Year: 2015, Model line: HIGHLANDER, Model: TOYOTA HIGHLANDER 2015 XU50 / 3.GPages: 356, PDF Size: 5.14 MB
Page 41 of 356
41
1. BASIC INFORMATION BEFORE OPERATION
2
BASIC FUNCTION
7. SCREEN ADJUSTMENT
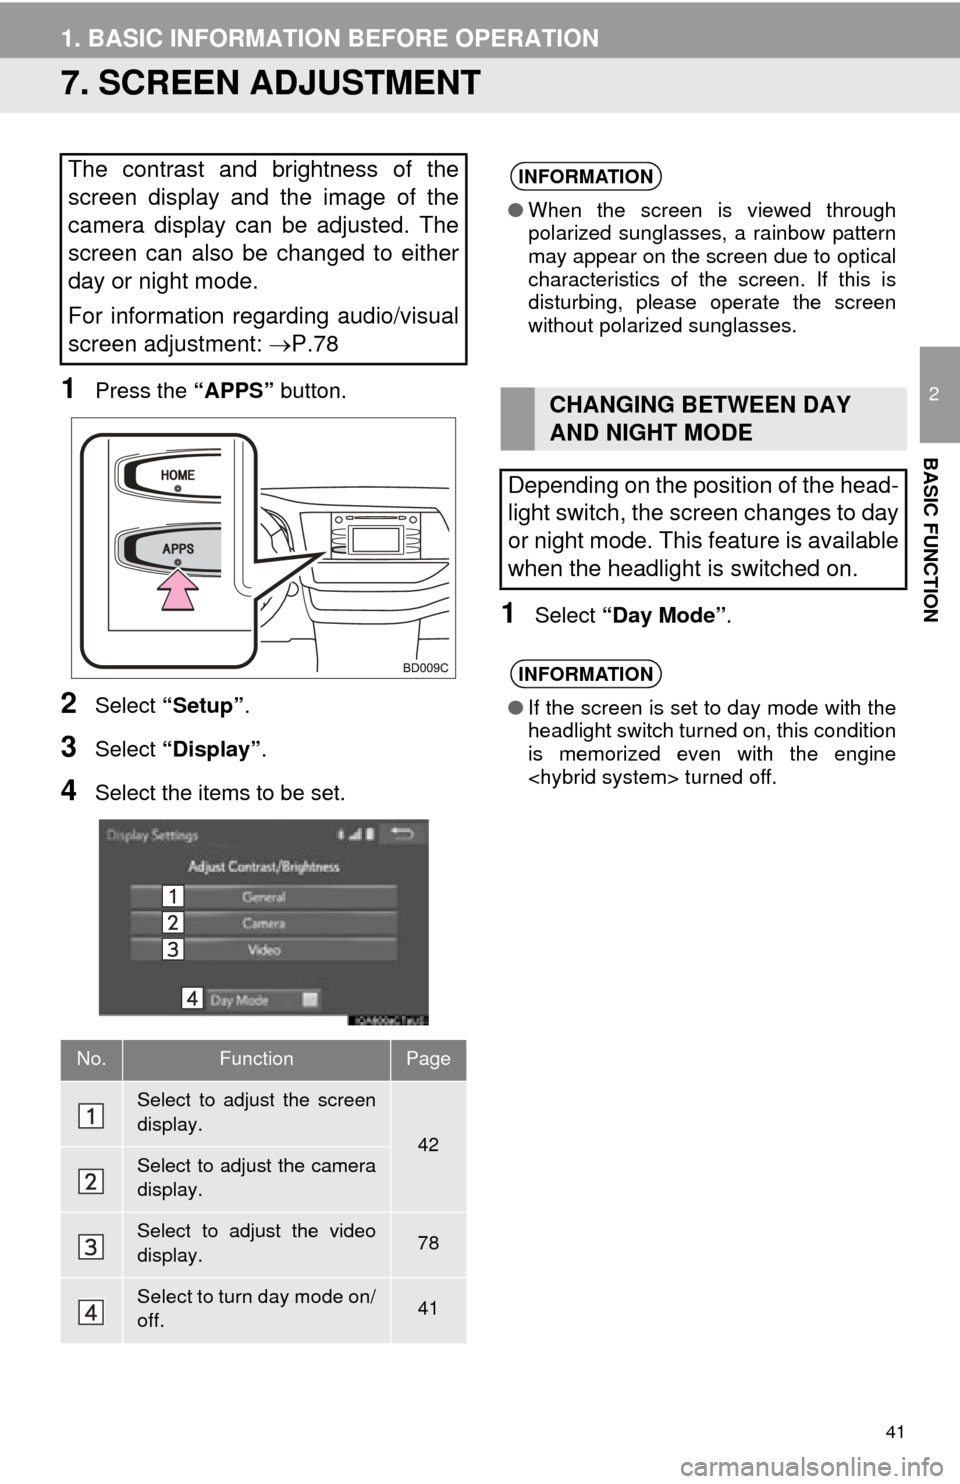
1Press the “APPS” button.
2Select “Setup” .
3Select “Display” .
4Select the items to be set.
1Select “Day Mode” .
The contrast and brightness of the
screen display and the image of the
camera display can be adjusted. The
screen can also be changed to either
day or night mode.
For information regarding audio/visual
screen adjustment: P.78
No.FunctionPage
Select to adjust the screen
display.
42Select to adjust the camera
display.
Select to adjust the video
display.78
Select to turn day mode on/
off.41
INFORMATION
●When the screen is viewed through
polarized sunglasses, a rainbow pattern
may appear on the screen due to optical
characteristics of the screen. If this is
disturbing, please operate the screen
without polarized sunglasses.
CHANGING BETWEEN DAY
AND NIGHT MODE
Depending on the position of the head-
light switch, the screen changes to day
or night mode. This feature is available
when the headlight is switched on.
INFORMATION
● If the screen is set to day mode with the
headlight switch turned on, this condition
is memorized even with the engine
Page 49 of 356
49
2. Bluetooth® SETTINGS
2
BASIC FUNCTION
2. SETTING Bluetooth® DETAILS
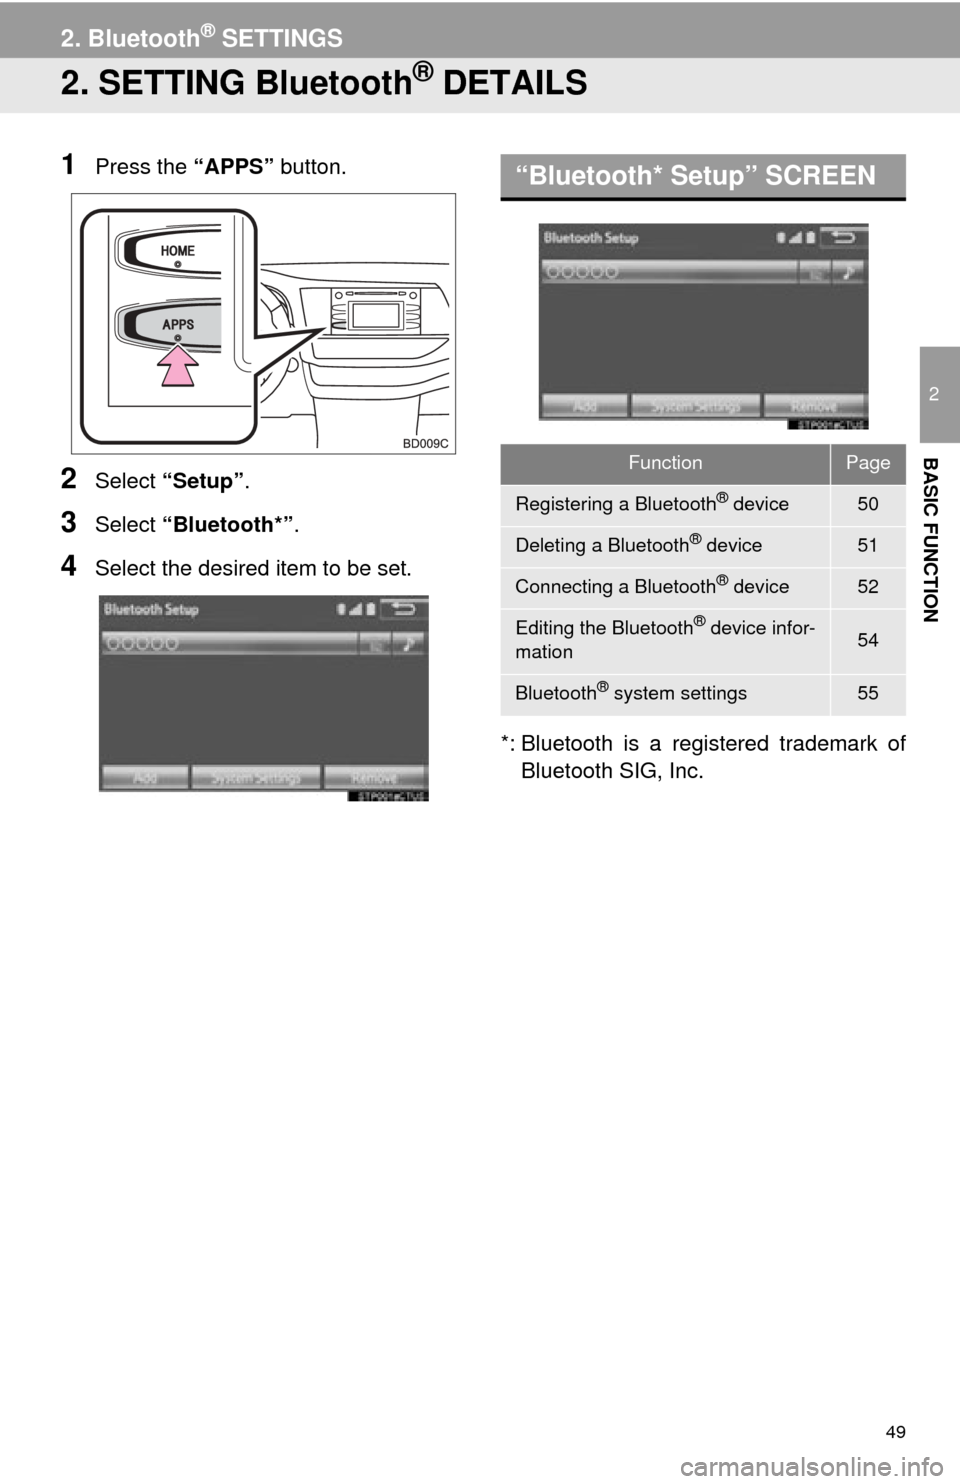
1Press the “APPS” button.
2Select “Setup” .
3Select “Bluetooth*” .
4Select the desired item to be set.
*: Bluetooth is a registered trademark of
Bluetooth SIG, Inc.
“Bluetooth* Setup” SCREEN
FunctionPage
Registering a Bluetooth® device50
Deleting a Bluetooth® device51
Connecting a Bluetooth® device52
Editing the Bluetooth® device infor-
mation54
Bluetooth® system settings55
Page 56 of 356
56
2. Bluetooth® SETTINGS
1Select “Bluetooth* Power” .
When “Bluetooth* Power” is on :
Vehicles without a smart key system
The Bluetooth
® device is automatically
connected when the engine switch is
turned to the “ACC” or “ON” position.
Vehicles with a smart key system
The Bluetooth
® device is automatically
connected when the engine
switch is turned to ACCESSORY or IG-
NITION ON
When “Bluetooth* Power” is off :
The Bluetooth
® device is disconnected,
and the system will not connect to it next
time.
1Select “Bluetooth* Name” .
2Enter a name and select “OK”.
1Select “Bluetooth* PIN” .
2Enter a PIN-code and select “OK”.
*: Bluetooth is a registered trademark of Bluetooth SIG, Inc.
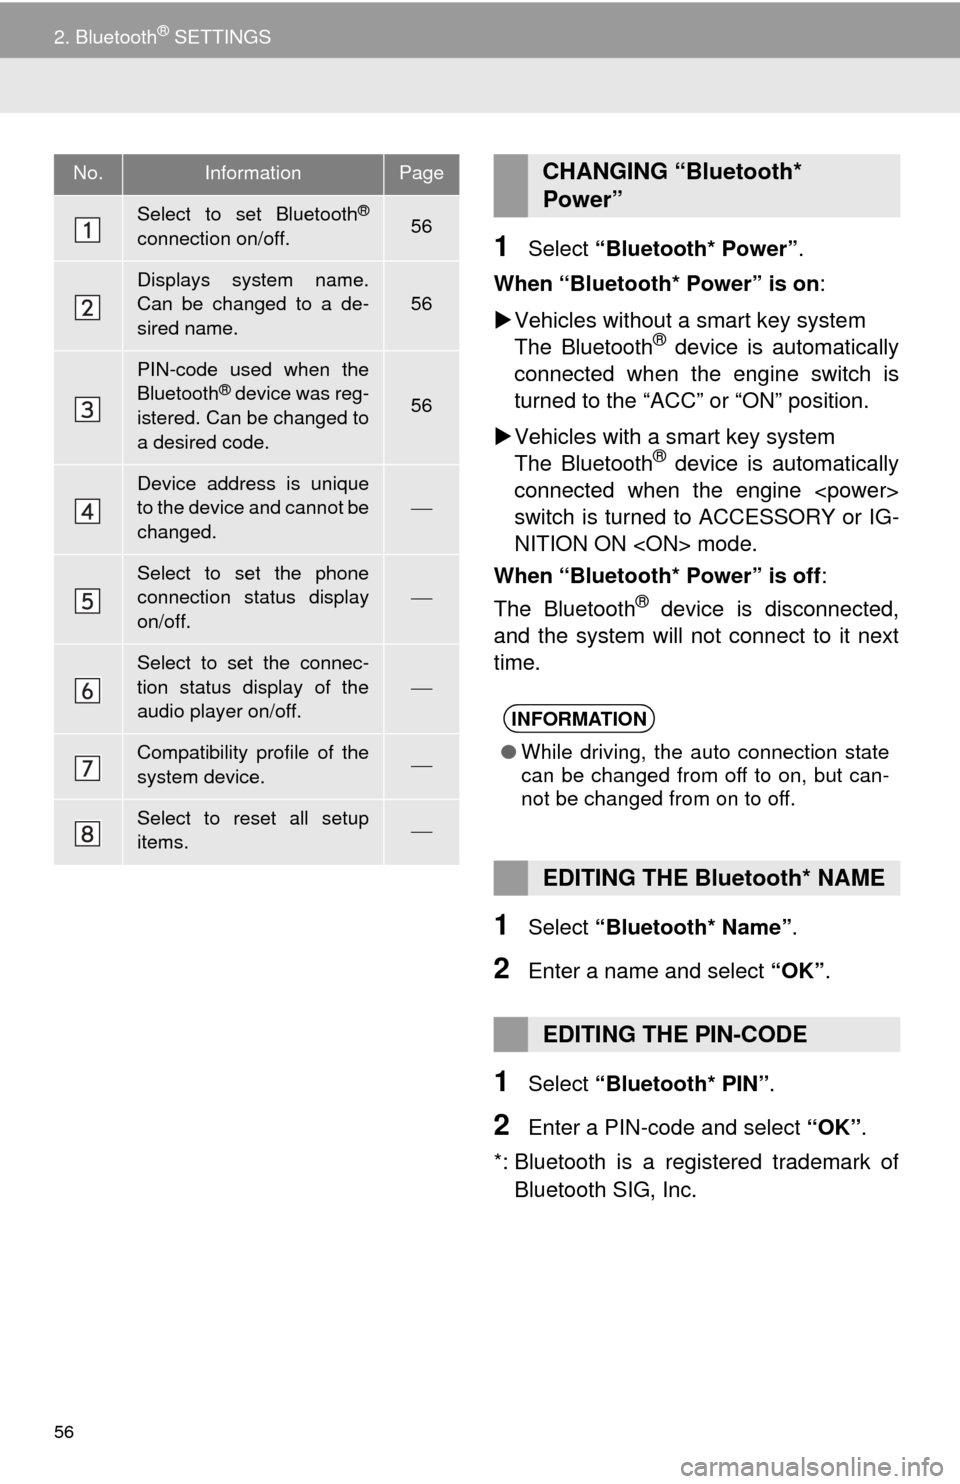
No.InformationPage
Select to set Bluetooth®
connection on/off.56
Displays system name.
Can be changed to a de-
sired name.
56
PIN-code used when the
Bluetooth® device was reg-
istered. Can be changed to
a desired code.56
Device address is unique
to the device and cannot be
changed.
Select to set the phone
connection status display
on/off.
Select to set the connec-
tion status display of the
audio player on/off.
Compatibility profile of the
system device.
Select to reset all setup
items.
CHANGING “Bluetooth*
Power”
INFORMATION
● While driving, the auto connection state
can be changed from off to on, but can-
not be changed from on to off.
EDITING THE Bluetooth* NAME
EDITING THE PIN-CODE
Page 67 of 356
67
3. OTHER SETTINGS
2
BASIC FUNCTION
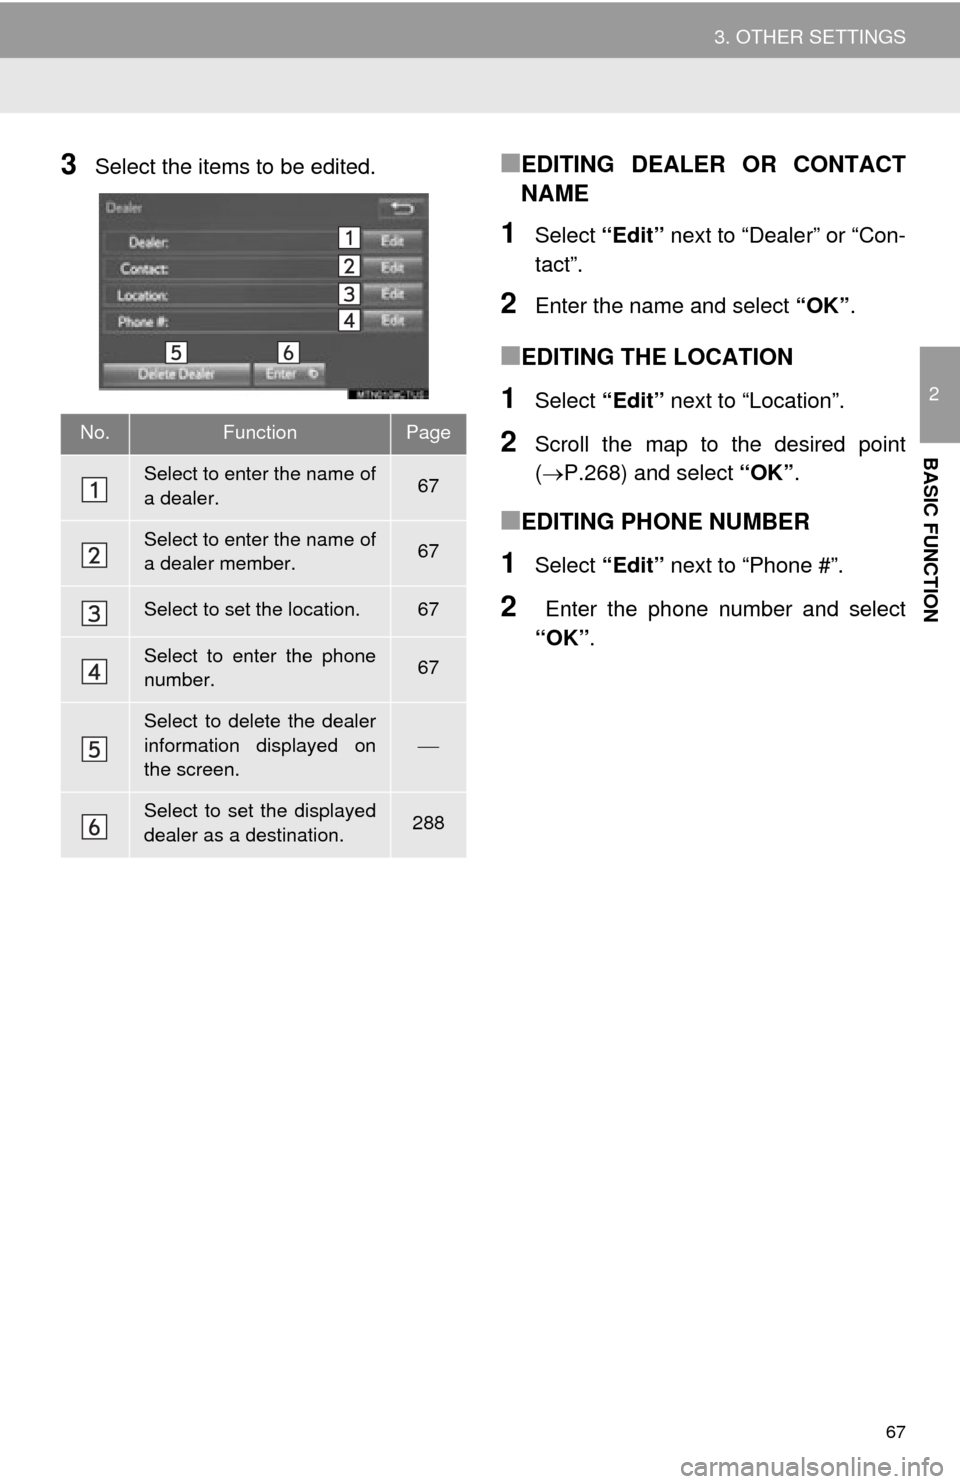
3Select the items to be edited.■EDITING DEALER OR CONTACT
NAME
1Select “Edit” next to “Dealer” or “Con-
tact”.
2Enter the name and select “OK”.
■EDITING THE LOCATION
1Select “Edit” next to “Location”.
2Scroll the map to the desired point
(P.268) and select “OK”.
■EDITING PHONE NUMBER
1Select “Edit” next to “Phone #”.
2 Enter the phone number and select
“OK”.
No.FunctionPage
Select to enter the name of
a dealer.67
Select to enter the name of
a dealer member.67
Select to set the location.67
Select to enter the phone
number.67
Select to delete the dealer
information displayed on
the screen.
Select to set the displayed
dealer as a destination.288
Page 73 of 356
73
1. BASIC OPERATION
3
AUDIO/VISUAL SYSTEM
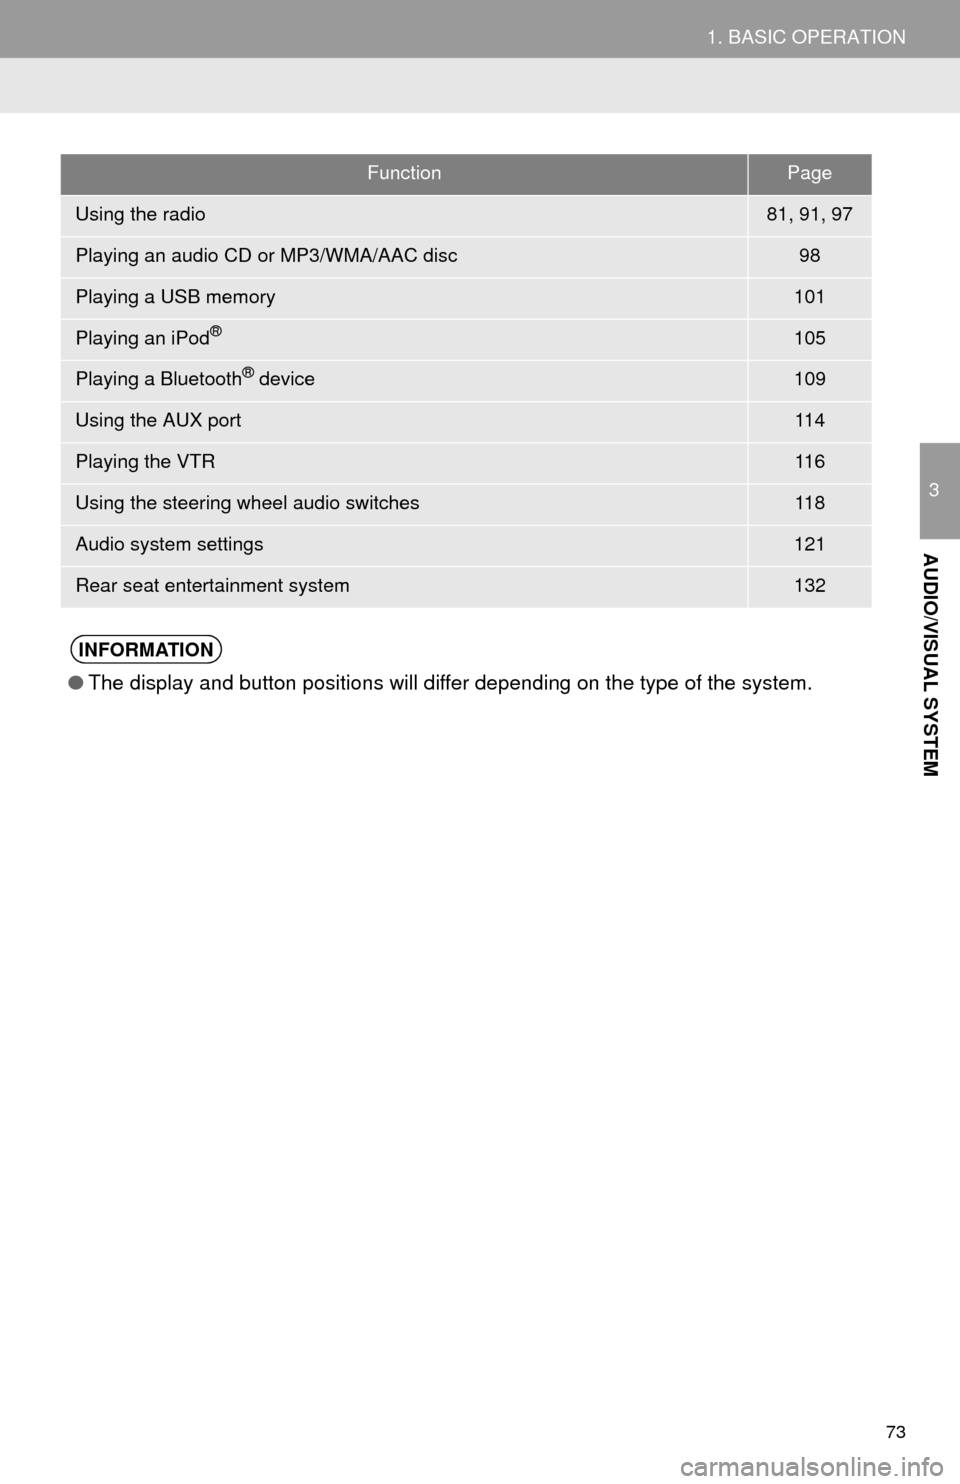
FunctionPage
Using the radio81, 91, 97
Playing an audio CD or MP3/WMA/AAC disc98
Playing a USB memory101
Playing an iPod®105
Playing a Bluetooth® device109
Using the AUX port11 4
Playing the VTR11 6
Using the steering wheel audio switches11 8
Audio system settings121
Rear seat entertainment system132
INFORMATION
●The display and button positions will differ depending on the type of the system.
Page 75 of 356

75
1. BASIC OPERATION
3
AUDIO/VISUAL SYSTEM
1Press the “AUDIO” button.
2Select “Source” on the audio screen
or press “AUDIO” button again.
3Select the desired source.
1Display the “Select Audio Source”
screen. (P.75)
2Select “Reorder” .
3Select the desired audio source then
or to reorder.
4Select “OK”.
SELECTING AN AUDIO
SOURCE
INFORMATION
●Dimmed screen buttons cannot be oper-
ated.
● When there are two pages, select
or to change the page.
REORDERING THE AUDIO
SOURCE
Page 83 of 356
83
2. RADIO OPERATION
3
AUDIO/VISUAL SYSTEM
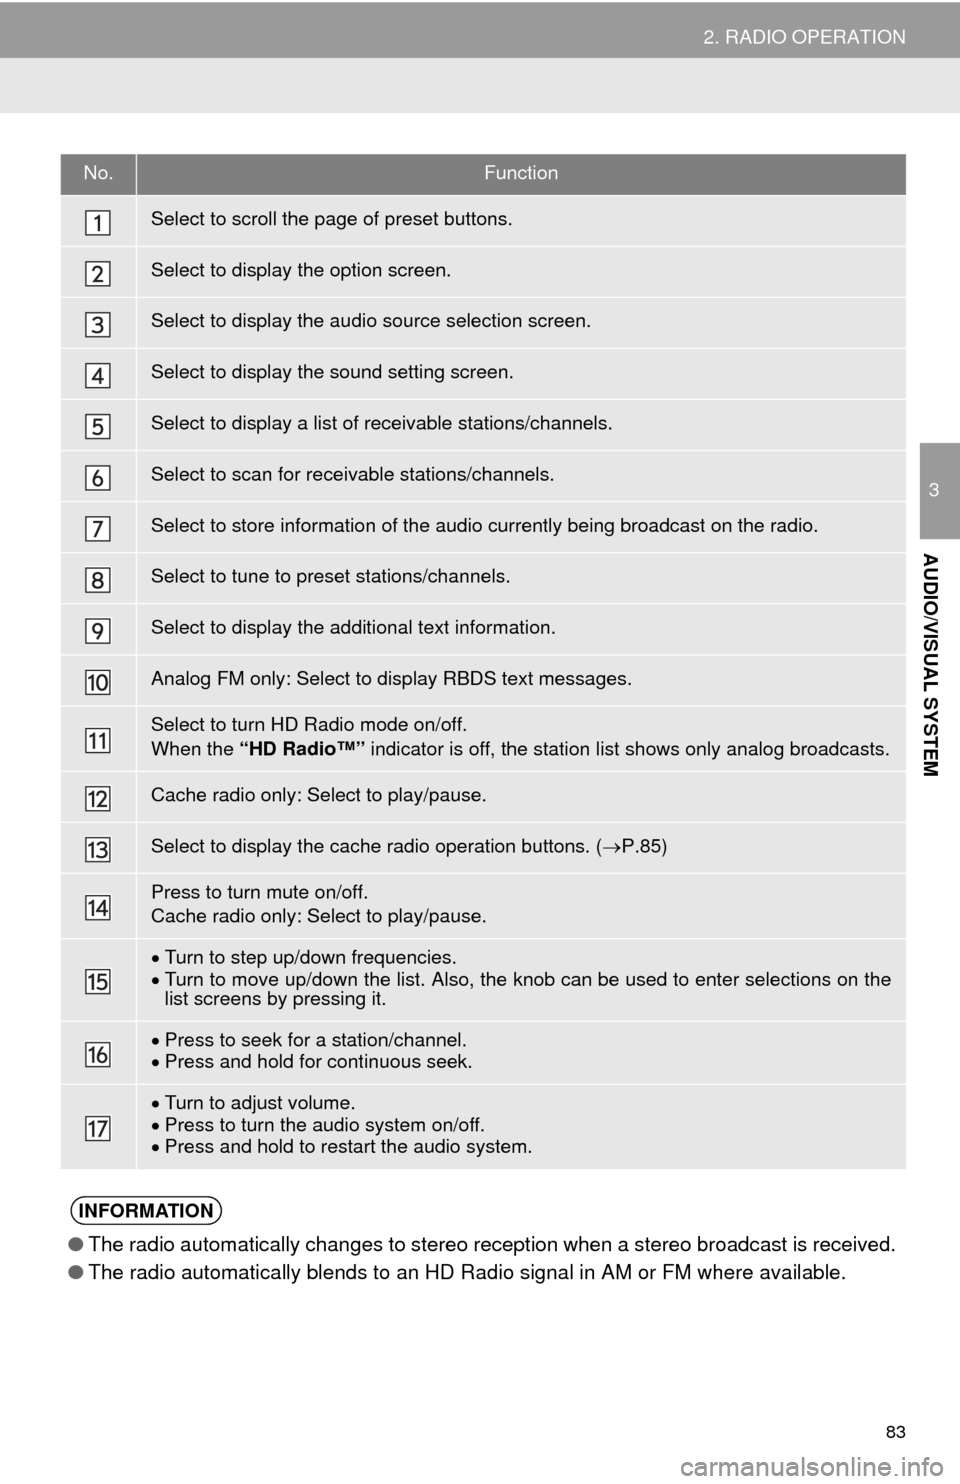
No.Function
Select to scroll the page of preset buttons.
Select to display the option screen.
Select to display the audio source selection screen.
Select to display the sound setting screen.
Select to display a list of receivable stations/channels.
Select to scan for receivable stations/channels.
Select to store information of the audio currently being broadcast on the radio.
Select to tune to preset stations/channels.
Select to display the additional text information.
Analog FM only: Select to display RBDS text messages.
Select to turn HD Radio mode on/off.
When the “HD Radio™” indicator is off, the station list shows only analog broadcasts.
Cache radio only: Select to play/pause.
Select to display the cache radio operation buttons. ( P.85)
Press to turn mute on/off.
Cache radio only: Select to play/pause.
Turn to step up/down frequencies.
Turn to move up/down the list. Also, the knob can be used to enter selections on the
list screens by pressing it.
Press to seek for a station/channel.
Press and hold for continuous seek.
Turn to adjust volume.
Press to turn the audio system on/off.
Press and hold to restart the audio system.
INFORMATION
● The radio automatically changes to stereo reception when a stereo broadcast is received.
● The radio automatically blends to an HD Radio signal in AM or FM where available.
Page 84 of 356
84
2. RADIO OPERATION
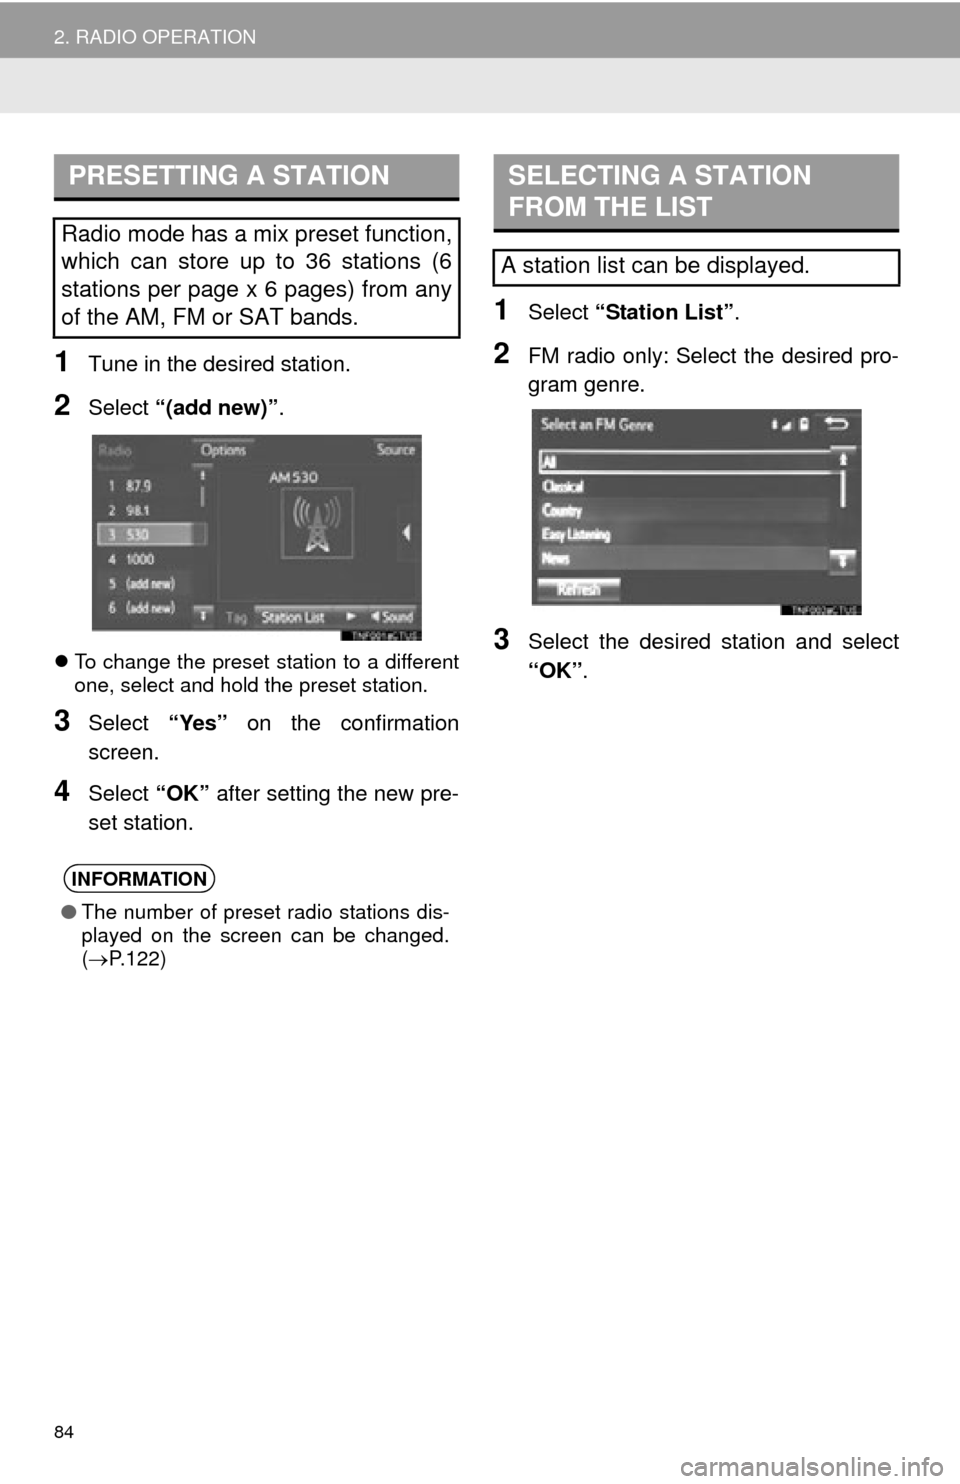
1Tune in the desired station.
2Select “(add new)” .
To change the preset station to a different
one, select and hold the preset station.
3Select “Yes” on the confirmation
screen.
4Select “OK” after setting the new pre-
set station.
1Select “Station List” .
2FM radio only: Select the desired pro-
gram genre.
3Select the desired station and select
“OK”.
PRESETTING A STATION
Radio mode has a mix preset function,
which can store up to 36 stations (6
stations per page x 6 pages) from any
of the AM, FM or SAT bands.
INFORMATION
●The number of preset radio stations dis-
played on the screen can be changed.
( P.122)
SELECTING A STATION
FROM THE LIST
A station list can be displayed.
Page 92 of 356
92
2. RADIO OPERATION
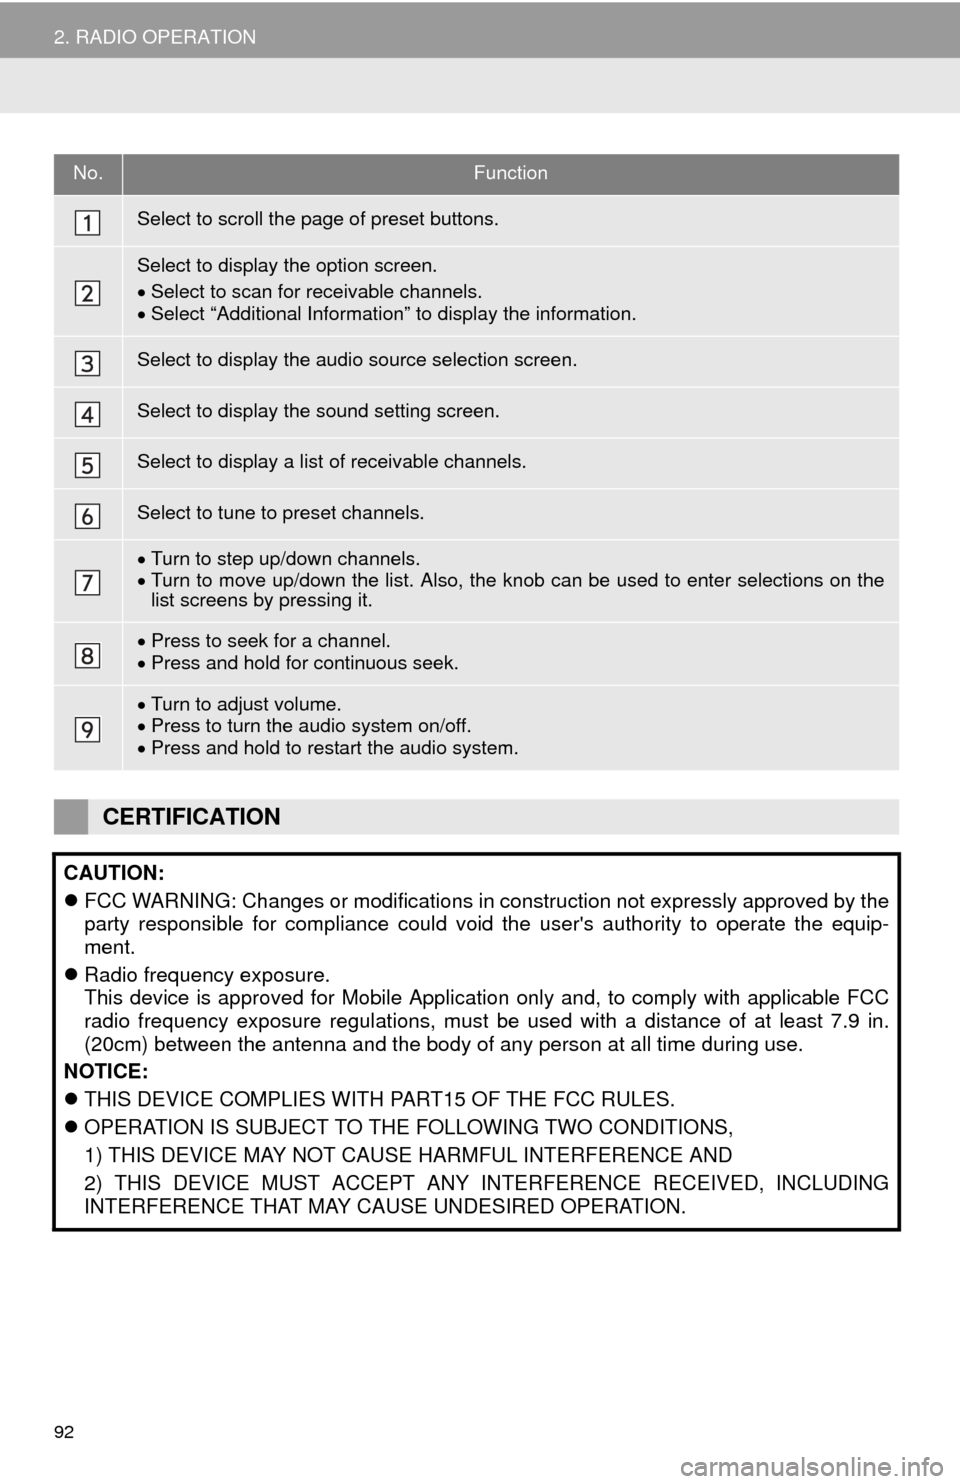
No.Function
Select to scroll the page of preset buttons.
Select to display the option screen.
Select to scan for receivable channels.
Select “Additional Information” to display the information.
Select to display the audio source selection screen.
Select to display the sound setting screen.
Select to display a list of receivable channels.
Select to tune to preset channels.
Turn to step up/down channels.
Turn to move up/down the list. Also, the knob can be used to enter selections on the
list screens by pressing it.
Press to seek for a channel.
Press and hold for continuous seek.
Turn to adjust volume.
Press to turn the audio system on/off.
Press and hold to restart the audio system.
CERTIFICATION
CAUTION:
FCC WARNING: Changes or modifications in construction not expressly approved by the
party responsible for compliance could void the user's authority to operate the equip-
ment.
Radio frequency exposure.
This device is approved for Mobile Application only and, to comply with applicable FCC
radio frequency exposure regulations, must be used with a distance of at least 7.9 in.
(20cm) between the antenna and the body of any person at all time during use.
NOTICE:
THIS DEVICE COMPLIES WITH PART15 OF THE FCC RULES.
OPERATION IS SUBJECT TO THE FOLLOWING TWO CONDITIONS,
1) THIS DEVICE MAY NOT CAUSE HARMFUL INTERFERENCE AND
2) THIS DEVICE MUST ACCEPT ANY INTERFERENCE RECEIVED, INCLUDING
INTERFERENCE THAT MAY CAUSE UNDESIRED OPERATION.
Page 122 of 356
122
5. SETUP
1Display the “Audio Settings” screen.
(P.121)
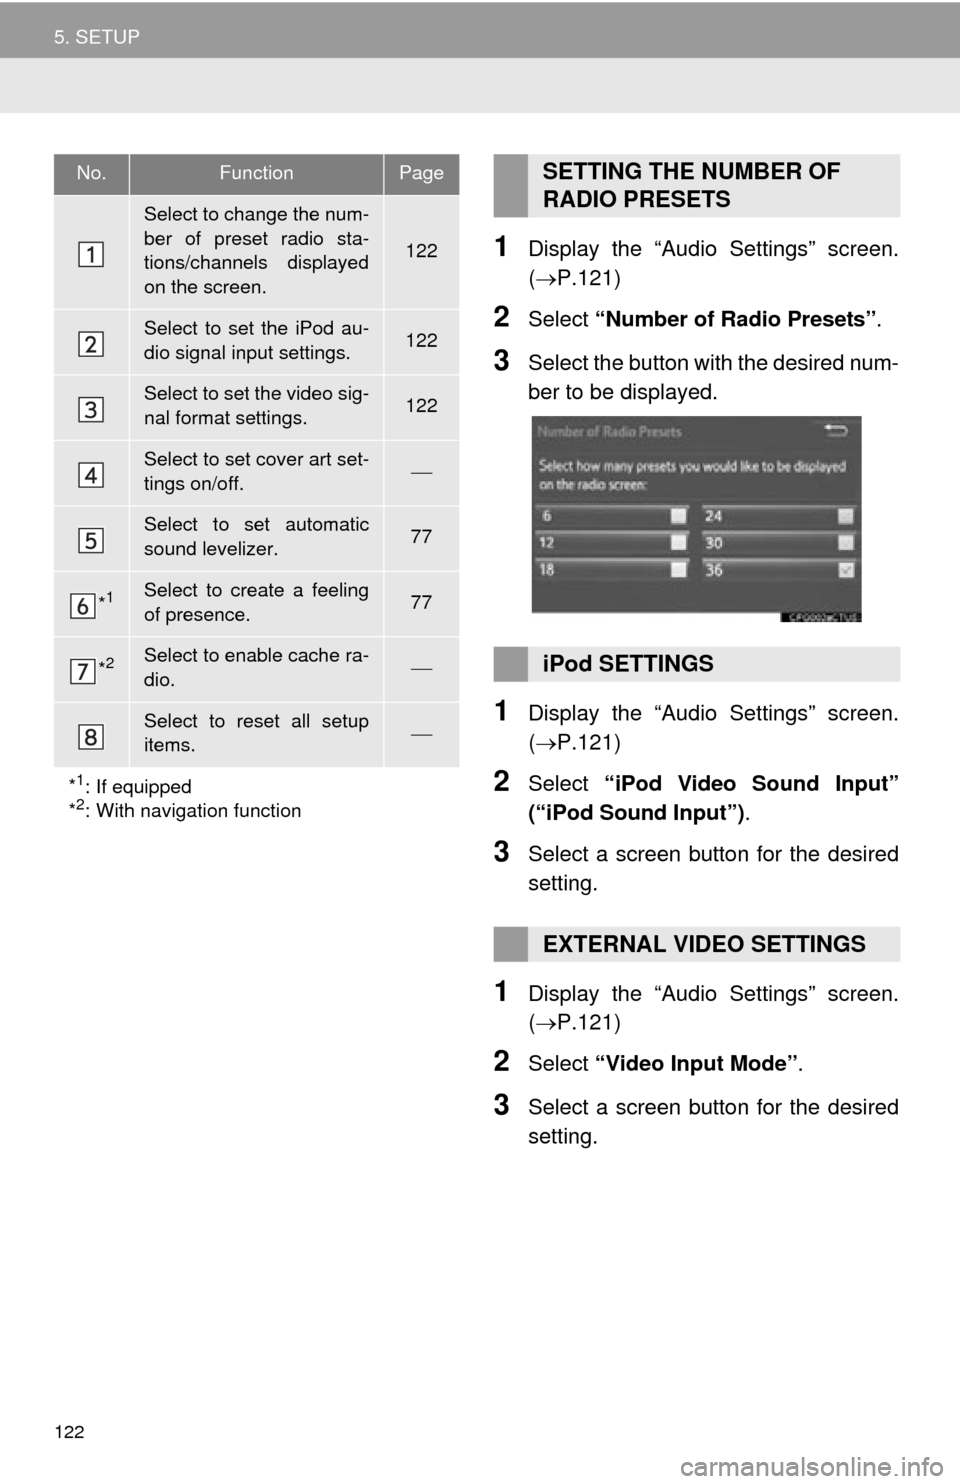
2Select “Number of Radio Presets” .
3Select the button with the desired num-
ber to be displayed.
1Display the “Audio Settings” screen.
(P.121)
2Select “iPod Video Sound Input”
(“iPod Sound Input”) .
3Select a screen button for the desired
setting.
1Display the “Audio Settings” screen.
(P.121)
2Select “Video Input Mode” .
3Select a screen button for the desired
setting.
No.FunctionPage
Select to change the num-
ber of preset radio sta-
tions/channels displayed
on the screen.
122
Select to set the iPod au-
dio signal input settings.122
Select to set the video sig-
nal format settings.122
Select to set cover art set-
tings on/off.
Select to set automatic
sound levelizer.77
*1Select to create a feeling
of presence.77
*2Select to enable cache ra-
dio.
Select to reset all setup
items.
*
1: If equipped
*2: With navigation function
SETTING THE NUMBER OF
RADIO PRESETS
iPod SETTINGS
EXTERNAL VIDEO SETTINGS