TOYOTA HIGHLANDER 2015 XU50 / 3.G Owners Manual
HIGHLANDER 2015 XU50 / 3.G
TOYOTA
TOYOTA
https://www.carmanualsonline.info/img/14/6421/w960_6421-0.png
TOYOTA HIGHLANDER 2015 XU50 / 3.G Owners Manual
Trending: fuel additives, ground clearance, battery capacity, oil type, deactivate passenger airbag, dashboard, overheating
Page 541 of 712
5417-3. Do-it-yourself maintenance
7
Maintenance and care
HIGHLANDER_U (OM48E98U)■
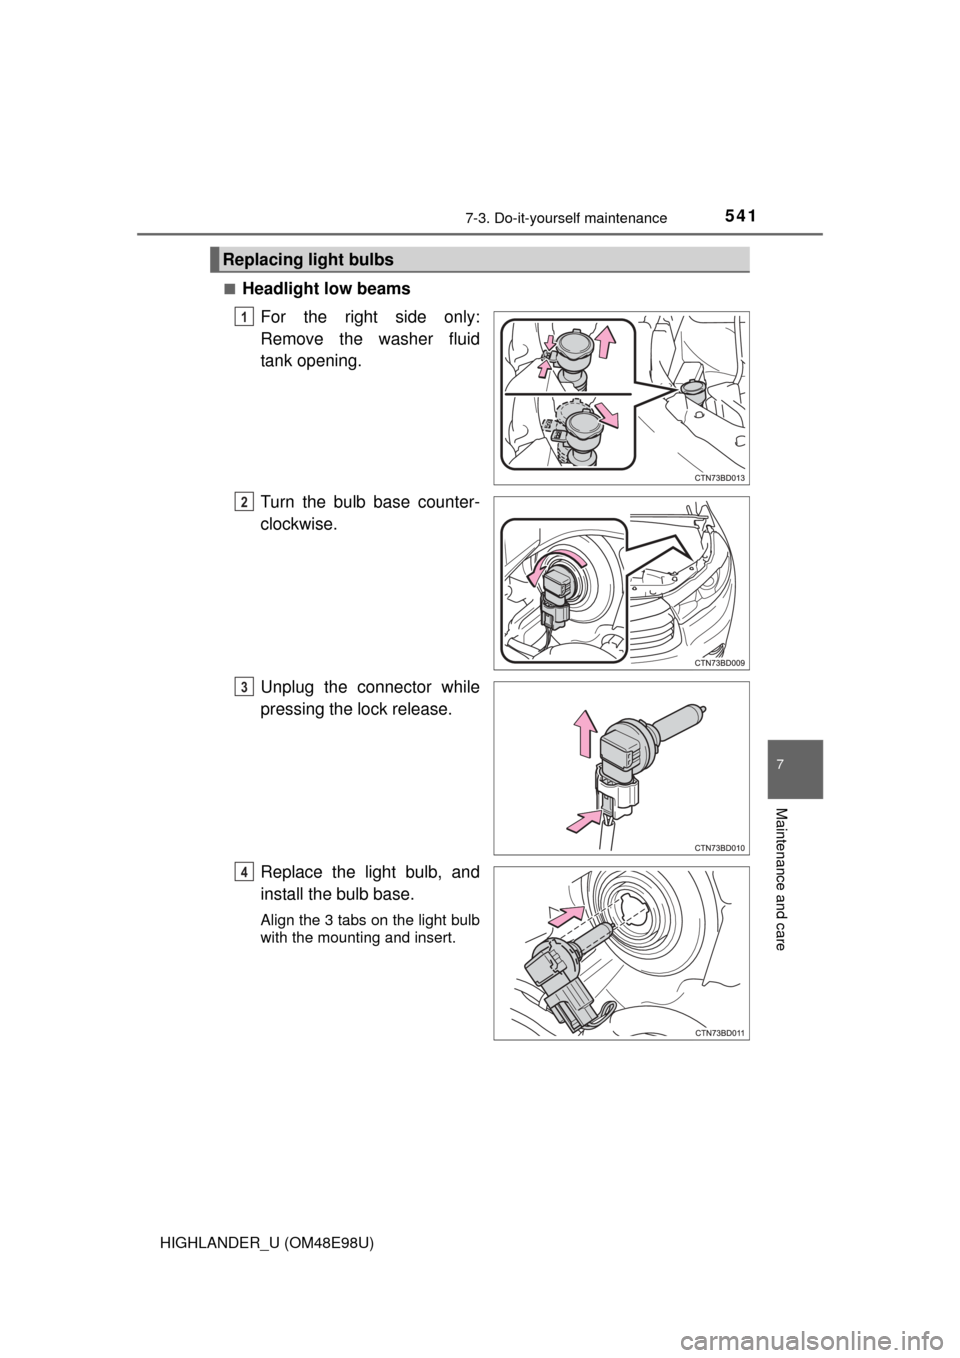
Headlight low beams
For the right side only:
Remove the washer fluid
tank opening.
Turn the bulb base counter-
clockwise.
Unplug the connector while
pressing the lock release.
Replace the light bulb, and
install the bulb base.
Align the 3 tabs on the light bulb
with the mounting and insert.
Replacing light bulbs
1
2
3
4
Page 542 of 712
5427-3. Do-it-yourself maintenance
HIGHLANDER_U (OM48E98U)
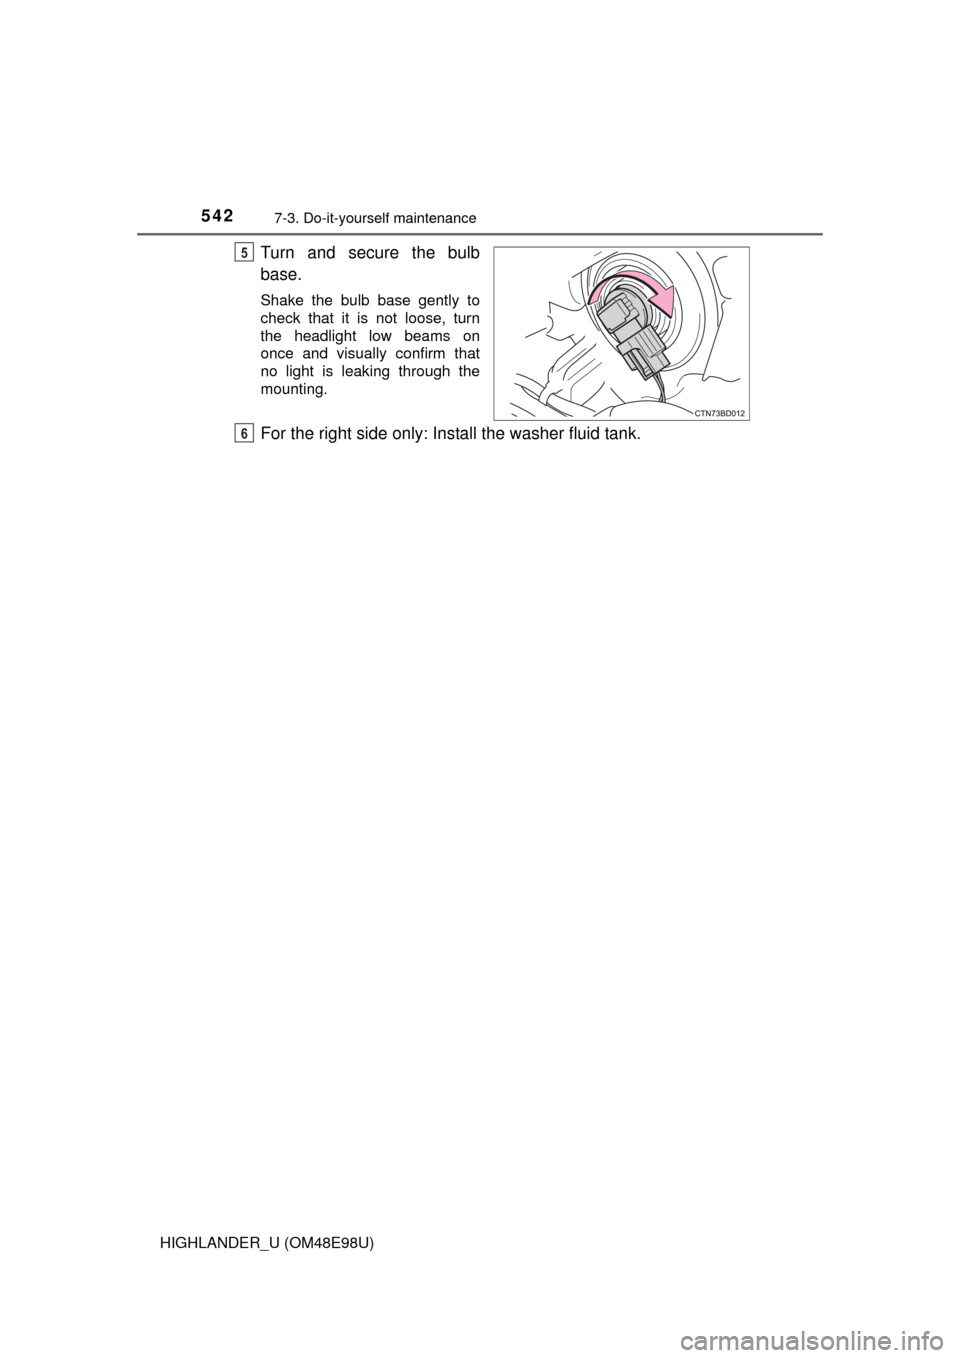
Turn and secure the bulb
base.
Shake the bulb base gently to
check that it is not loose, turn
the headlight low beams on
once and visually confirm that
no light is leaking through the
mounting.
For the right side only: Install the washer fluid tank.
5
6
Page 543 of 712
5437-3. Do-it-yourself maintenance
7
Maintenance and care
HIGHLANDER_U (OM48E98U)■
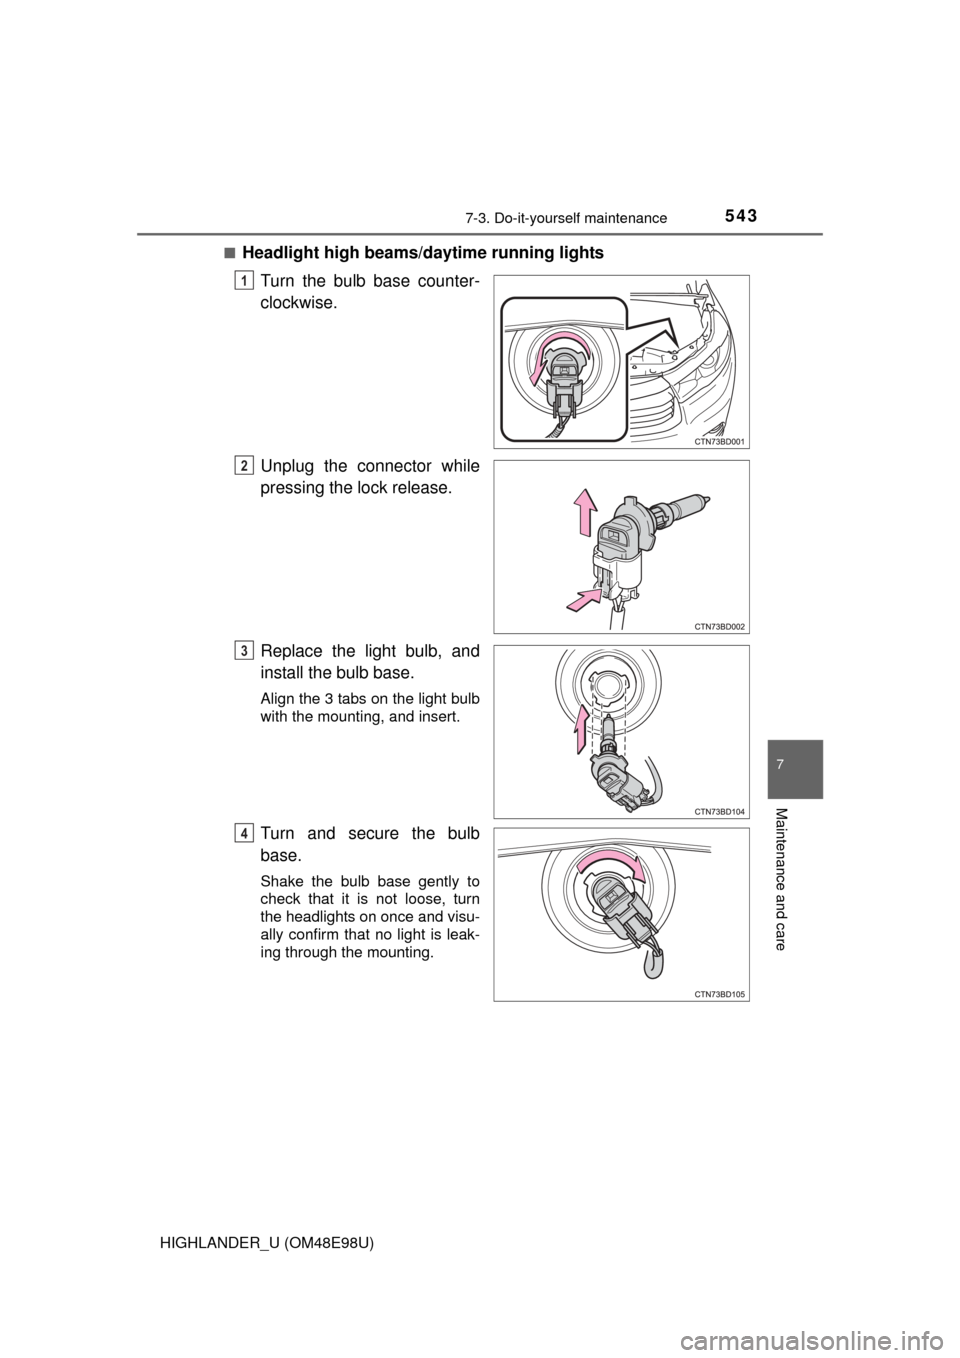
Headlight high beams/
daytime running lights
Turn the bulb base counter-
clockwise.
Unplug the connector while
pressing the lock release.
Replace the light bulb, and
install the bulb base.
Align the 3 tabs on the light bulb
with the mounting, and insert.
Turn and secure the bulb
base.
Shake the bulb base gently to
check that it is not loose, turn
the headlights on once and visu-
ally confirm that no light is leak-
ing through the mounting.
1
2
3
4
Page 544 of 712
5447-3. Do-it-yourself maintenance
HIGHLANDER_U (OM48E98U)■
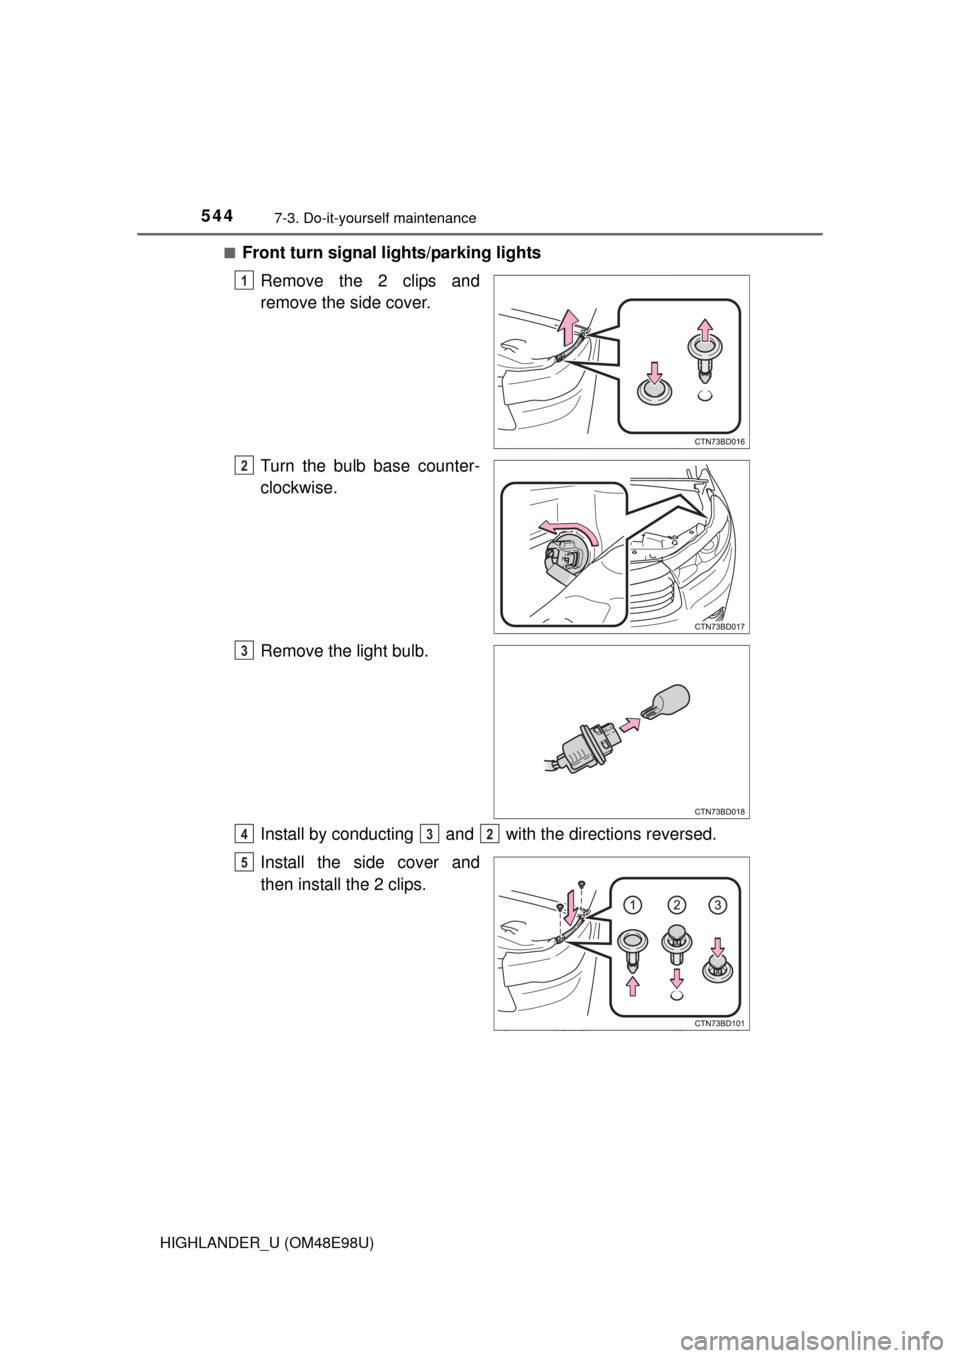
Front turn signal
lights/parking lights
Remove the 2 clips and
remove the side cover.
Turn the bulb base counter-
clockwise.
Remove the light bulb.
Install by conducting and with the directions reversed.
Install the side cover and
then install the 2 clips.
1
2
3
432
5
Page 545 of 712
5457-3. Do-it-yourself maintenance
7
Maintenance and care
HIGHLANDER_U (OM48E98U)■
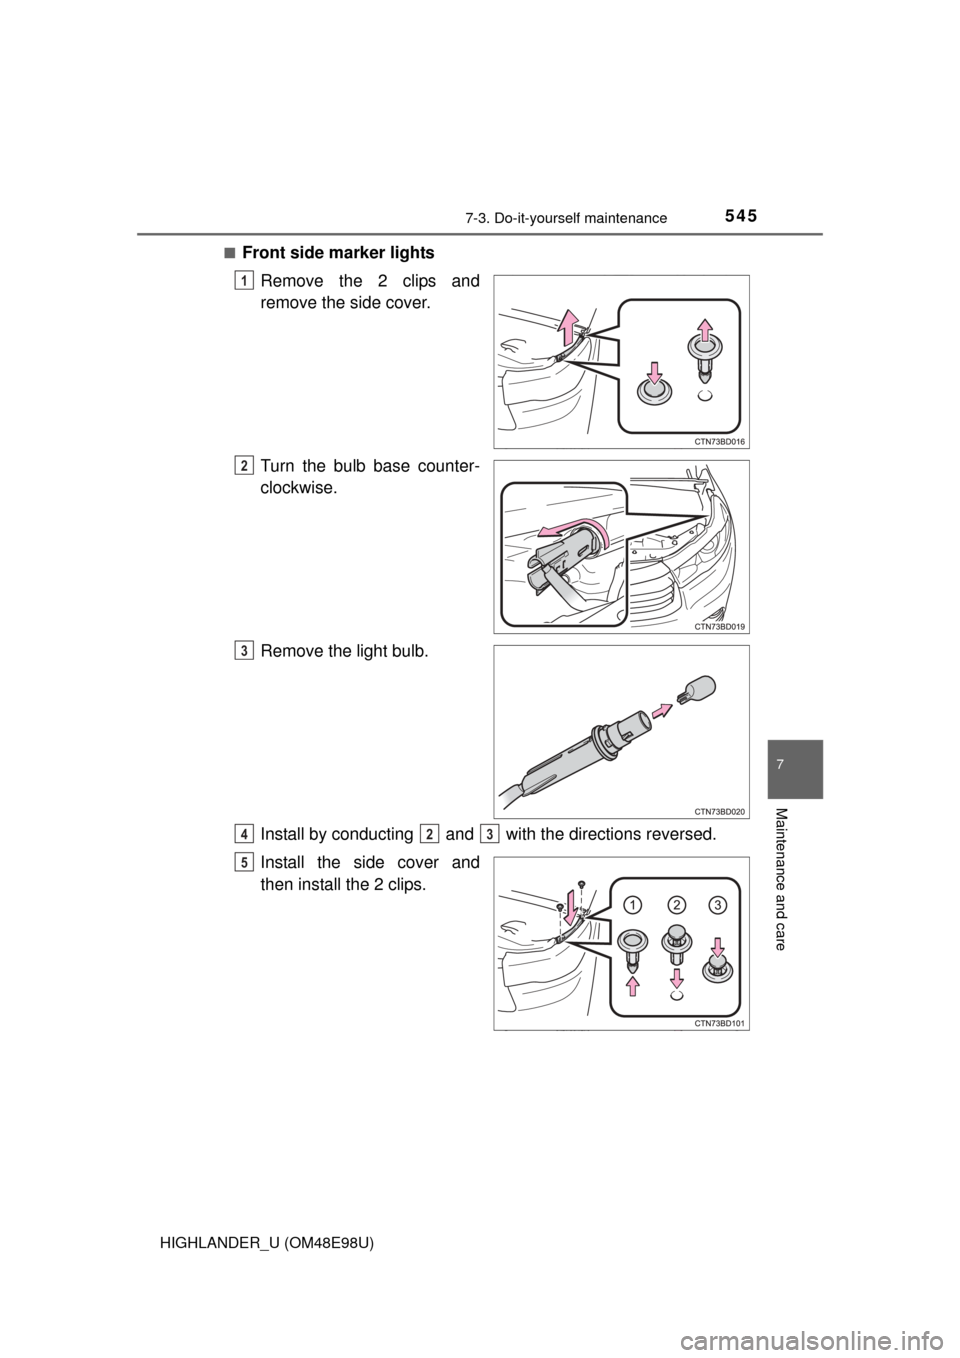
Front side marker lights
Remove the 2 clips and
remove the side cover.
Turn the bulb base counter-
clockwise.
Remove the light bulb.
Install by conducting and with the directions reversed.
Install the side cover and
then install the 2 clips.
1
2
3
423
5
Page 546 of 712
5467-3. Do-it-yourself maintenance
HIGHLANDER_U (OM48E98U)■
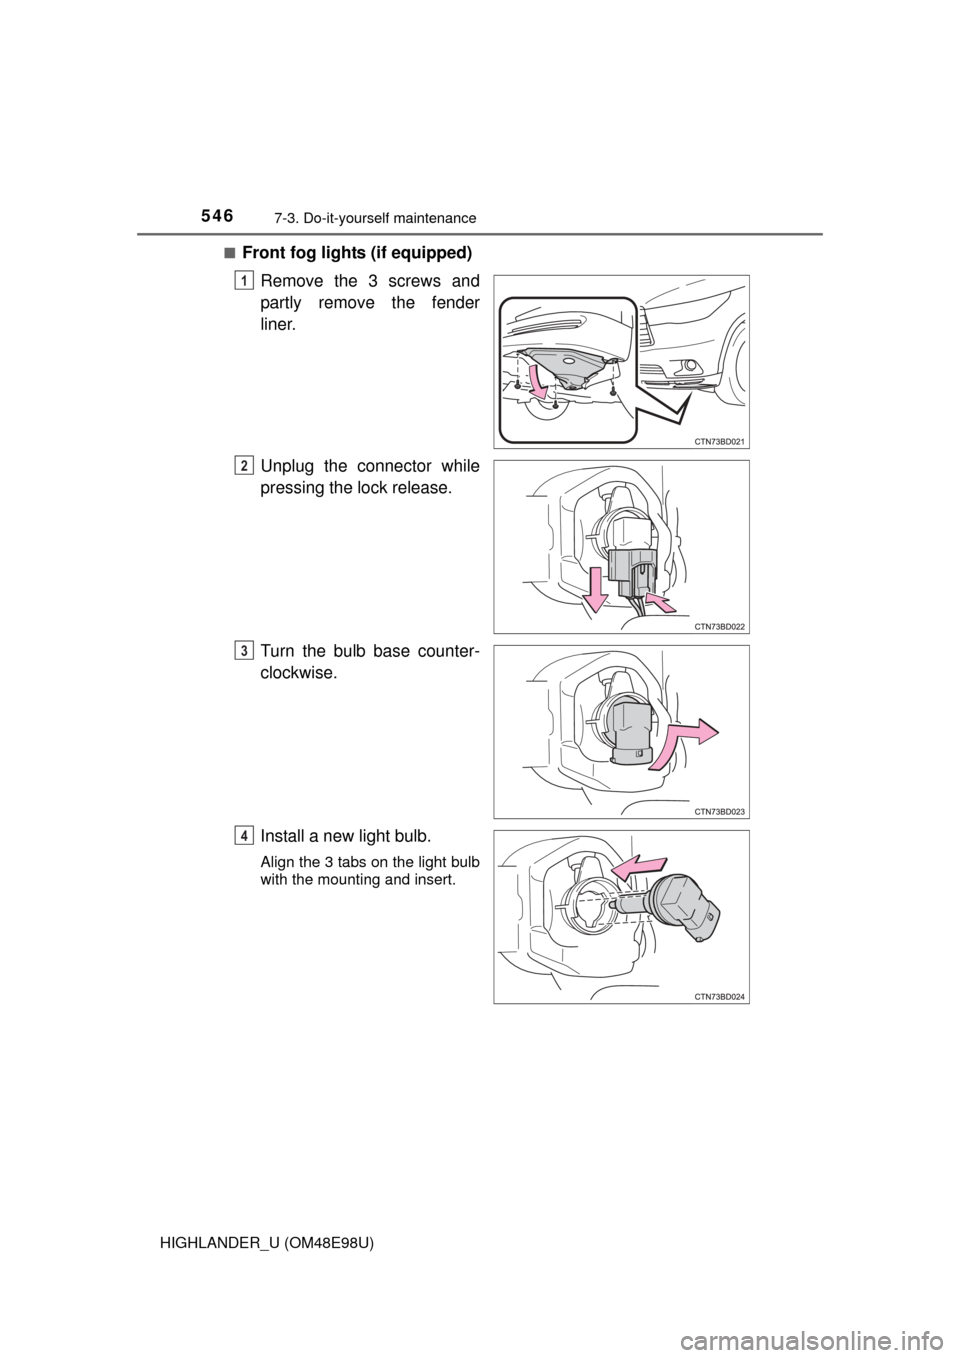
Front fog lights (if equipped)
Remove the 3 screws and
partly remove the fender
liner.
Unplug the connector while
pressing the lock release.
Turn the bulb base counter-
clockwise.
Install a new light bulb.
Align the 3 tabs on the light bulb
with the mounting and insert.
1
2
3
4
Page 547 of 712
5477-3. Do-it-yourself maintenance
7
Maintenance and care
HIGHLANDER_U (OM48E98U)
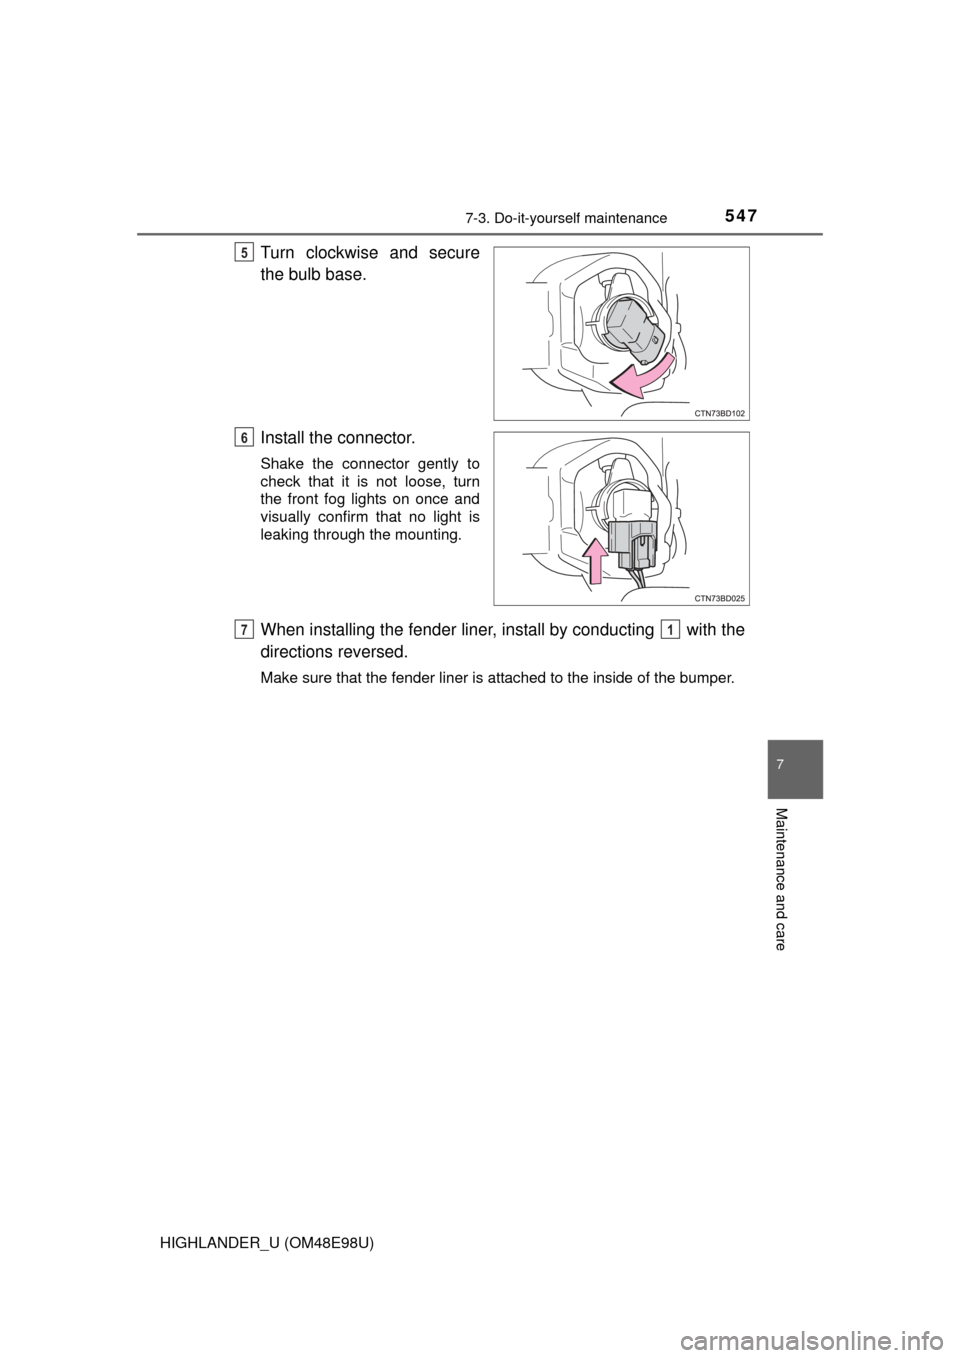
Turn clockwise and secure
the bulb base.
Install the connector.
Shake the connector gently to
check that it is not loose, turn
the front fog lights on once and
visually confirm that no light is
leaking through the mounting.
When installing the fender liner, install by conducting with the
directions reversed.
Make sure that the fender liner is attached to the inside of the bumper.
5
6
71
Page 548 of 712
5487-3. Do-it-yourself maintenance
HIGHLANDER_U (OM48E98U)■
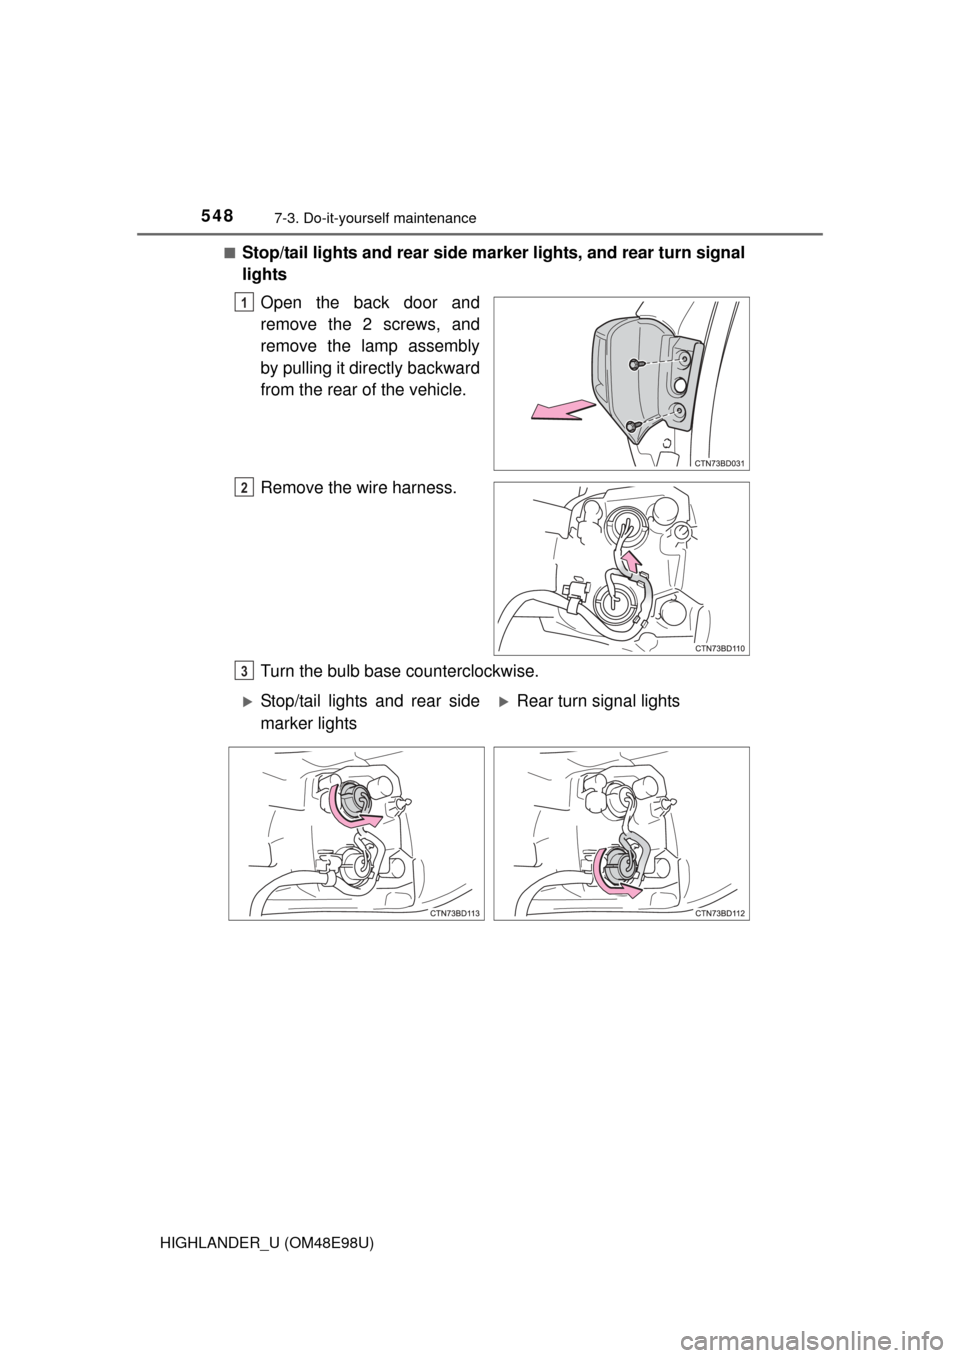
Stop/tail lights and rear side mar
ker lights, and rear turn signal
lights
Open the back door and
remove the 2 screws, and
remove the lamp assembly
by pulling it directly backward
from the rear of the vehicle.
Remove the wire harness.
Turn the bulb base counterclockwise.
1
2
3
Stop/tail lights and rear side
marker lightsRear turn signal lights
Page 549 of 712
5497-3. Do-it-yourself maintenance
7
Maintenance and care
HIGHLANDER_U (OM48E98U)
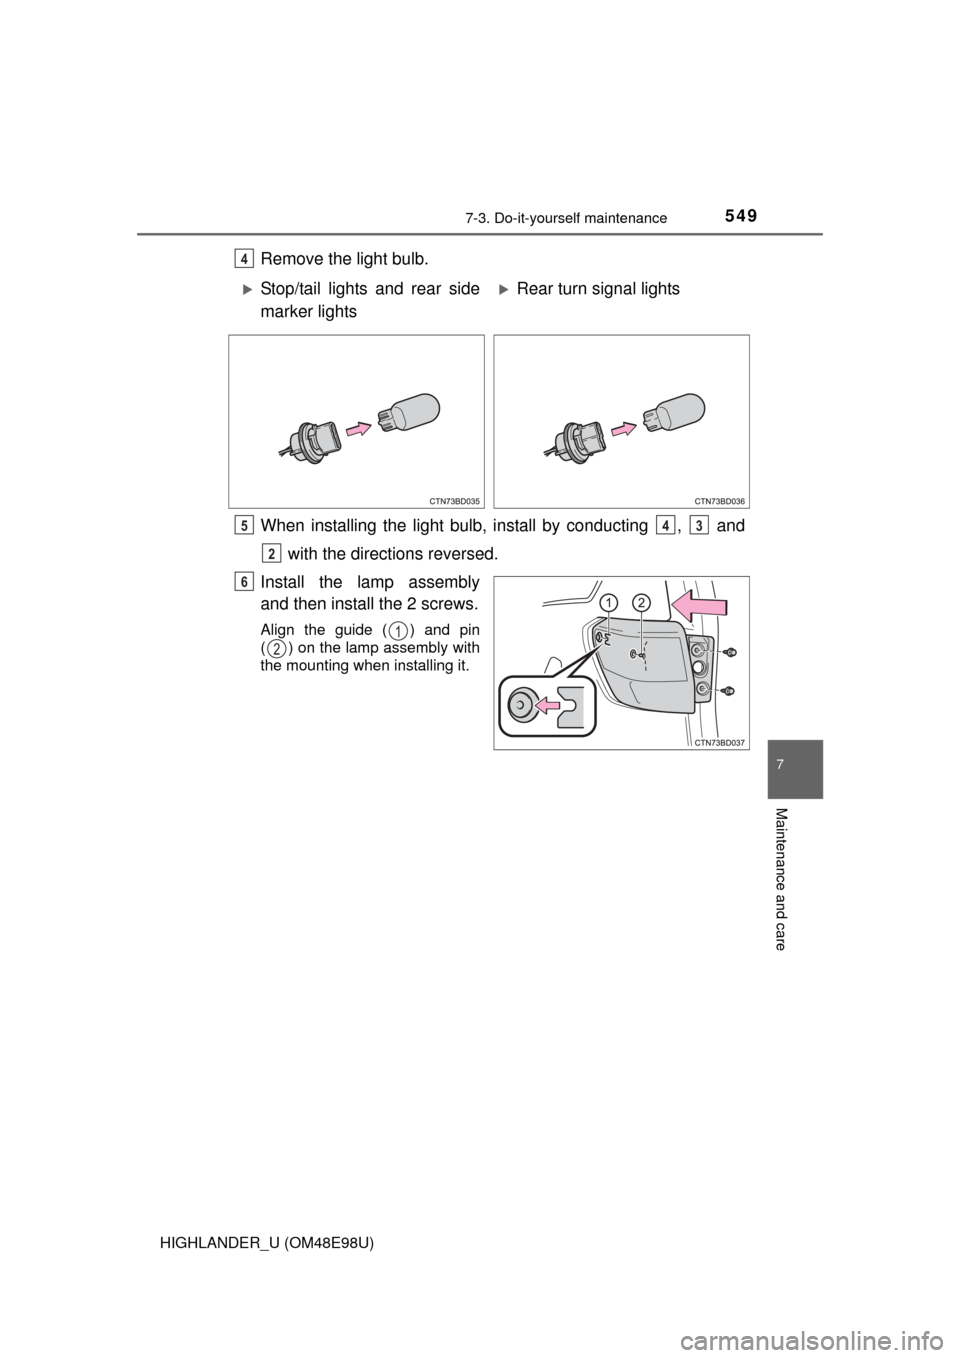
Remove the light bulb.
When installing the light bulb, install by conducting , and with the directions reversed.
Install the lamp assembly
and then install the 2 screws.
Align the guide ( ) and pin
( ) on the lamp assembly with
the mounting when installing it.
4
Stop/tail lights and rear side
marker lightsRear turn signal lights
543
2
6
1
2
Page 550 of 712
5507-3. Do-it-yourself maintenance
HIGHLANDER_U (OM48E98U)■
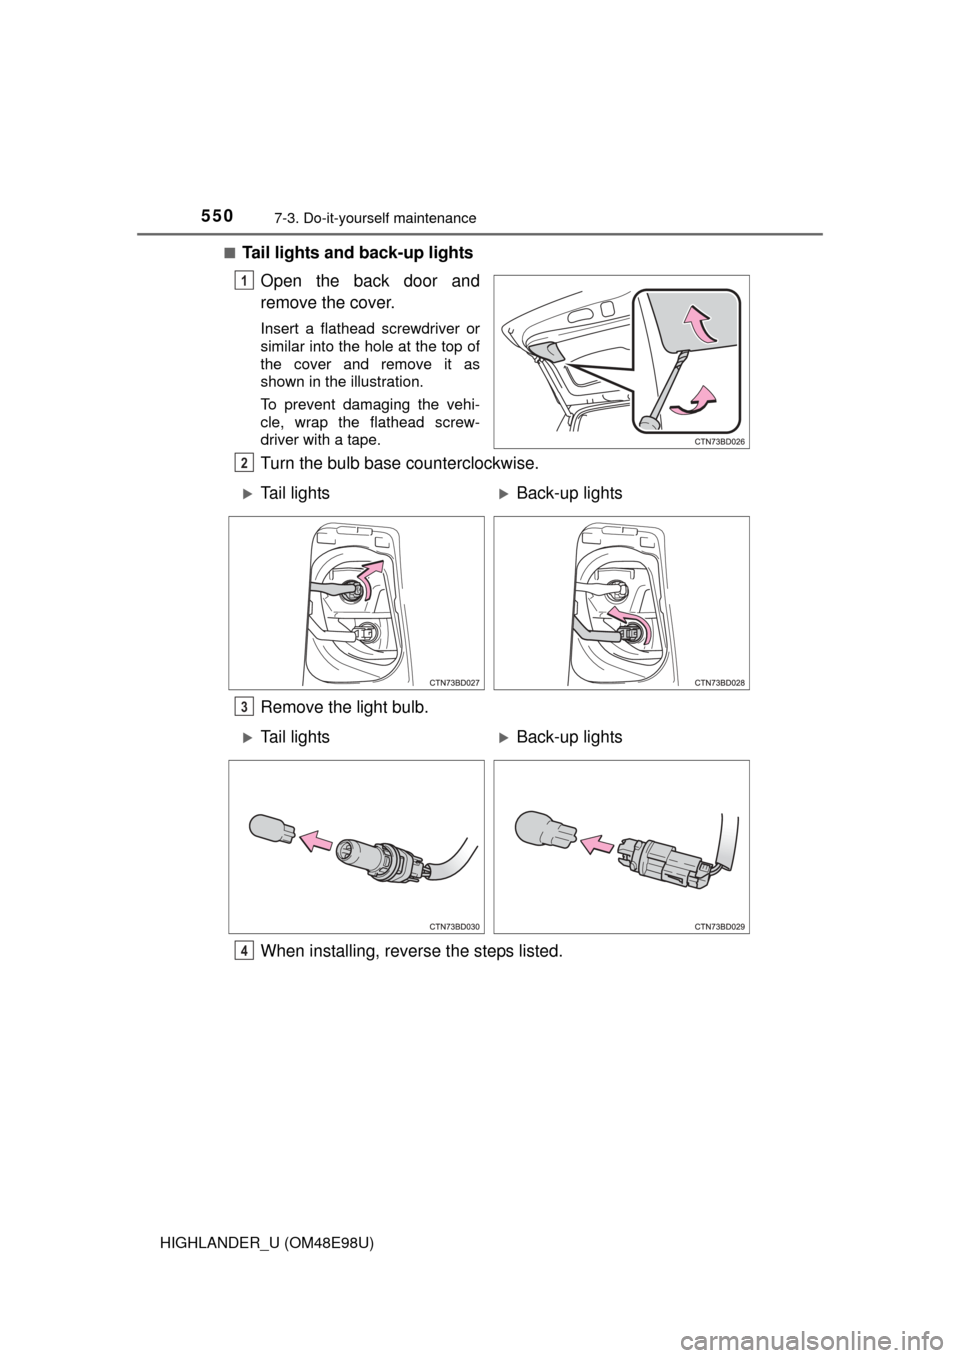
Tail lights and back-up lights
Open the back door and
remove the cover.
Insert a flathead screwdriver or
similar into the hole at the top of
the cover and remove it as
shown in the illustration.
To prevent damaging the vehi-
cle, wrap the flathead screw-
driver with a tape.
Turn the bulb base counterclockwise.
Remove the light bulb.
When installing, reverse the steps listed.
1
2
Tail lightsBack-up lights
3
Tail lightsBack-up lights
4
Trending: wheel alignment, glove box, radiator cap, climate control, check oil, Interior fuse, brake rotor
