height TOYOTA HIGHLANDER 2018 Owners Manual (in English)
[x] Cancel search | Manufacturer: TOYOTA, Model Year: 2018, Model line: HIGHLANDER, Model: TOYOTA HIGHLANDER 2018Pages: 732, PDF Size: 14.5 MB
Page 33 of 732
331-1. For safe use
1
For safety and security
HIGHLANDER_U (OM0E031U)
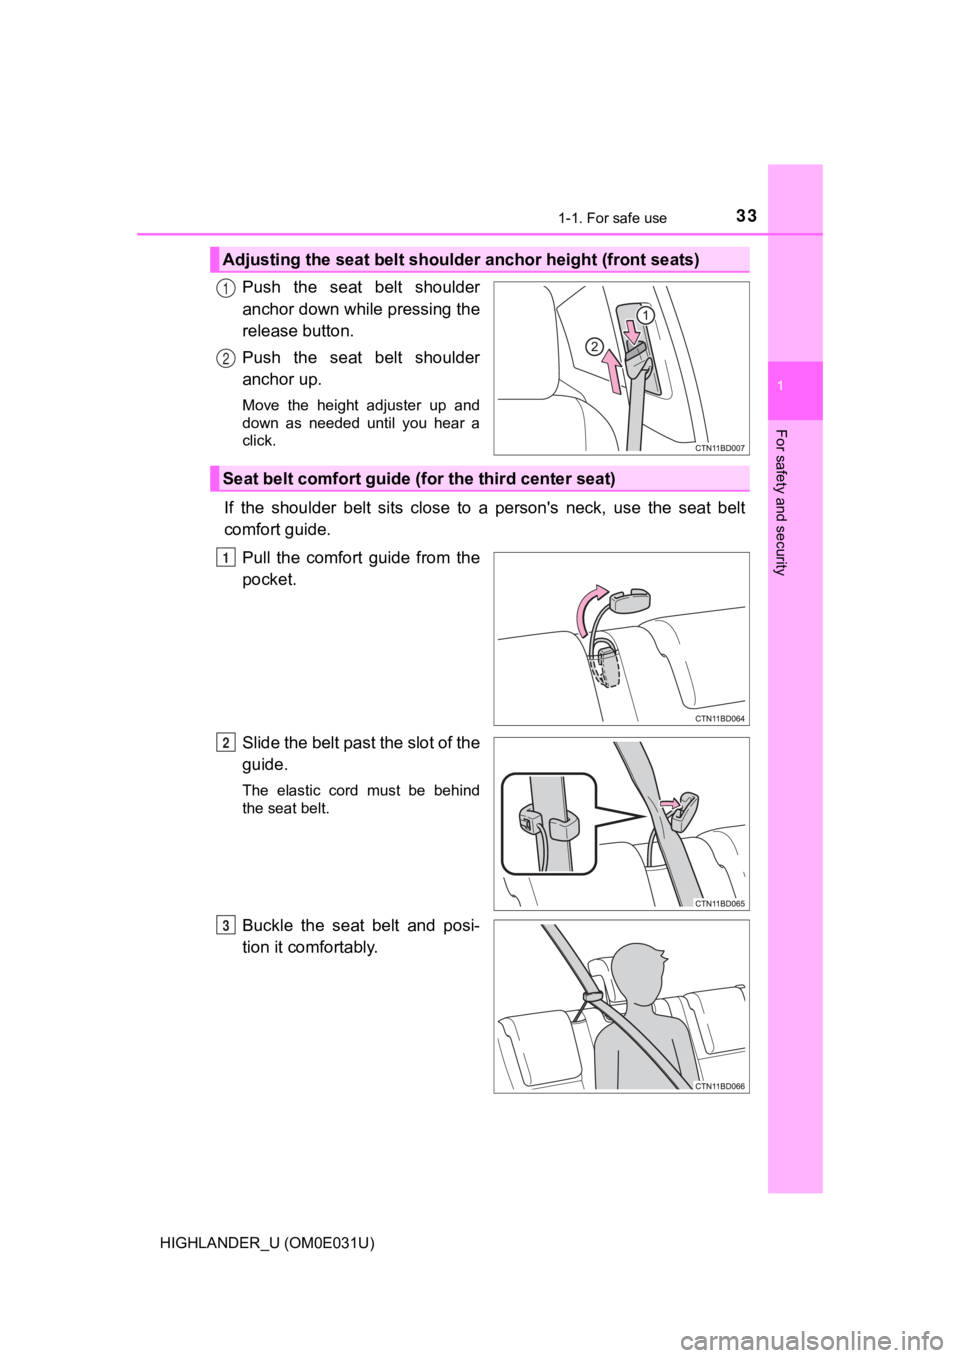
Push the seat belt shoulder
anchor down while pressing the
release button.
Push the seat belt shoulder
anchor up.
Move the height adjuster up and
down as needed until you hear a
click.
If the shoulder belt sits close to a person's neck, use the seat belt
comfort guide.
Pull the comfort guide from the
pocket.
Slide the belt past the slot of the
guide.
The elastic cord must be behind
the seat belt.
Buckle the seat belt and posi-
tion it comfortably.
Adjusting the seat be lt shoulder anchor height (front seats)
1
2
Seat belt comfort guide (fo r the third center seat)
1
2
3
Page 149 of 732
149
3
Operation of each component
HIGHLANDER_U (OM0E031U)
3-3. Adjusting the seats
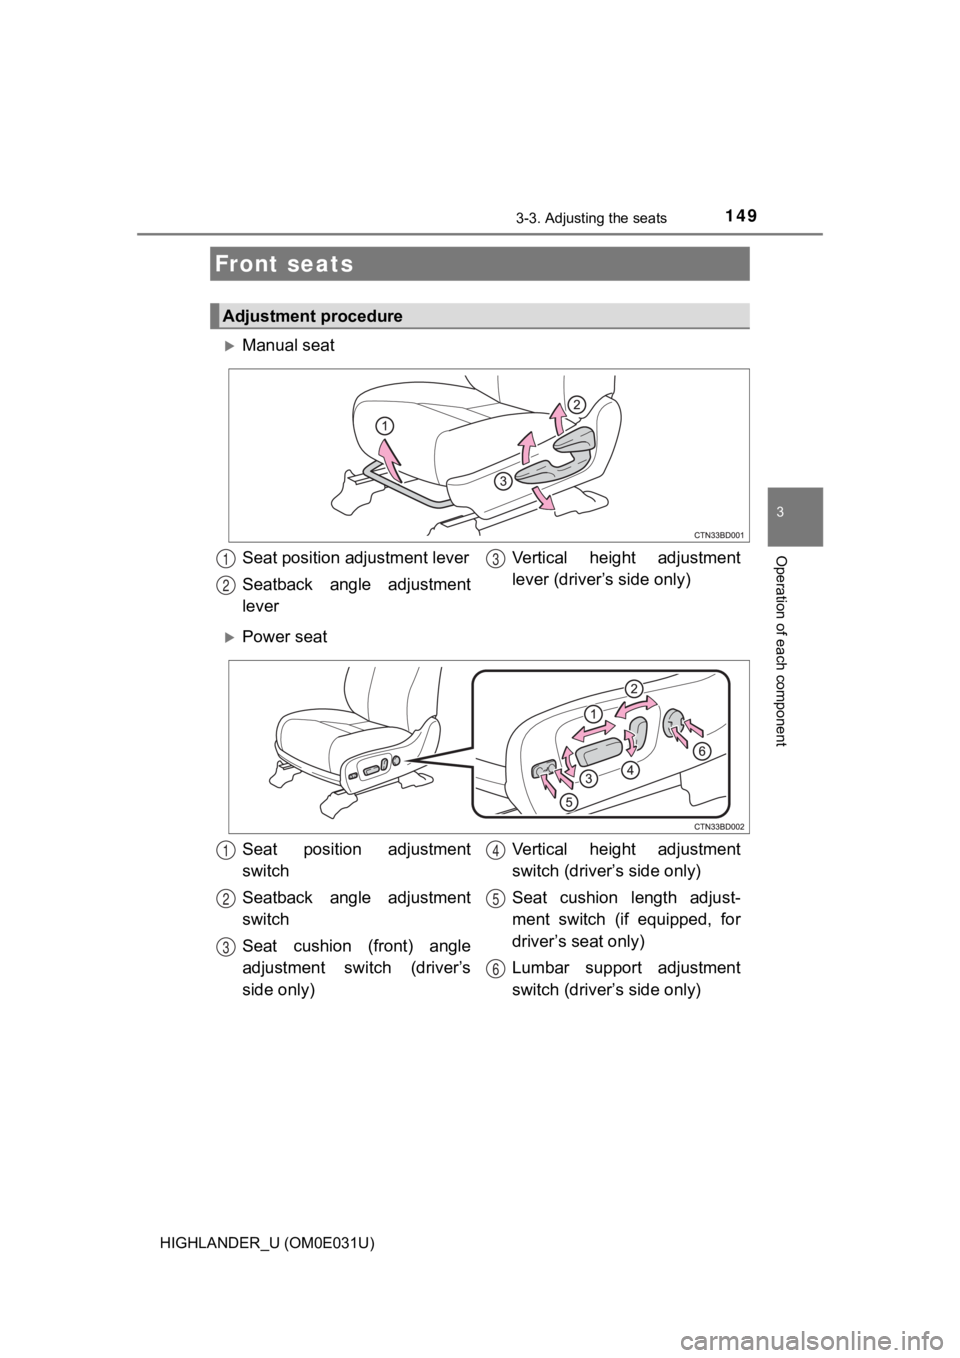
Manual seat
Power seat
Front seats
Adjustment procedure
Seat position adjustment lever
Seatback angle adjustment
leverVertical height adjustment
lever (driver’s side only)1
2
3
Seat position adjustment
switch
Seatback angle adjustment
switch
Seat cushion (front) angle
adjustment switch (driver’s
side only)Vertical height adjustment
switch (driver’s side only)
Seat cushion length adjust-
ment switch (if equipped, for
driver’s seat only)
Lumbar support adjustment
switch (driver’s side only)1
2
3
4
5
6
Page 165 of 732
1653-3. Adjusting the seats
3
Operation of each component
HIGHLANDER_U (OM0E031U)■
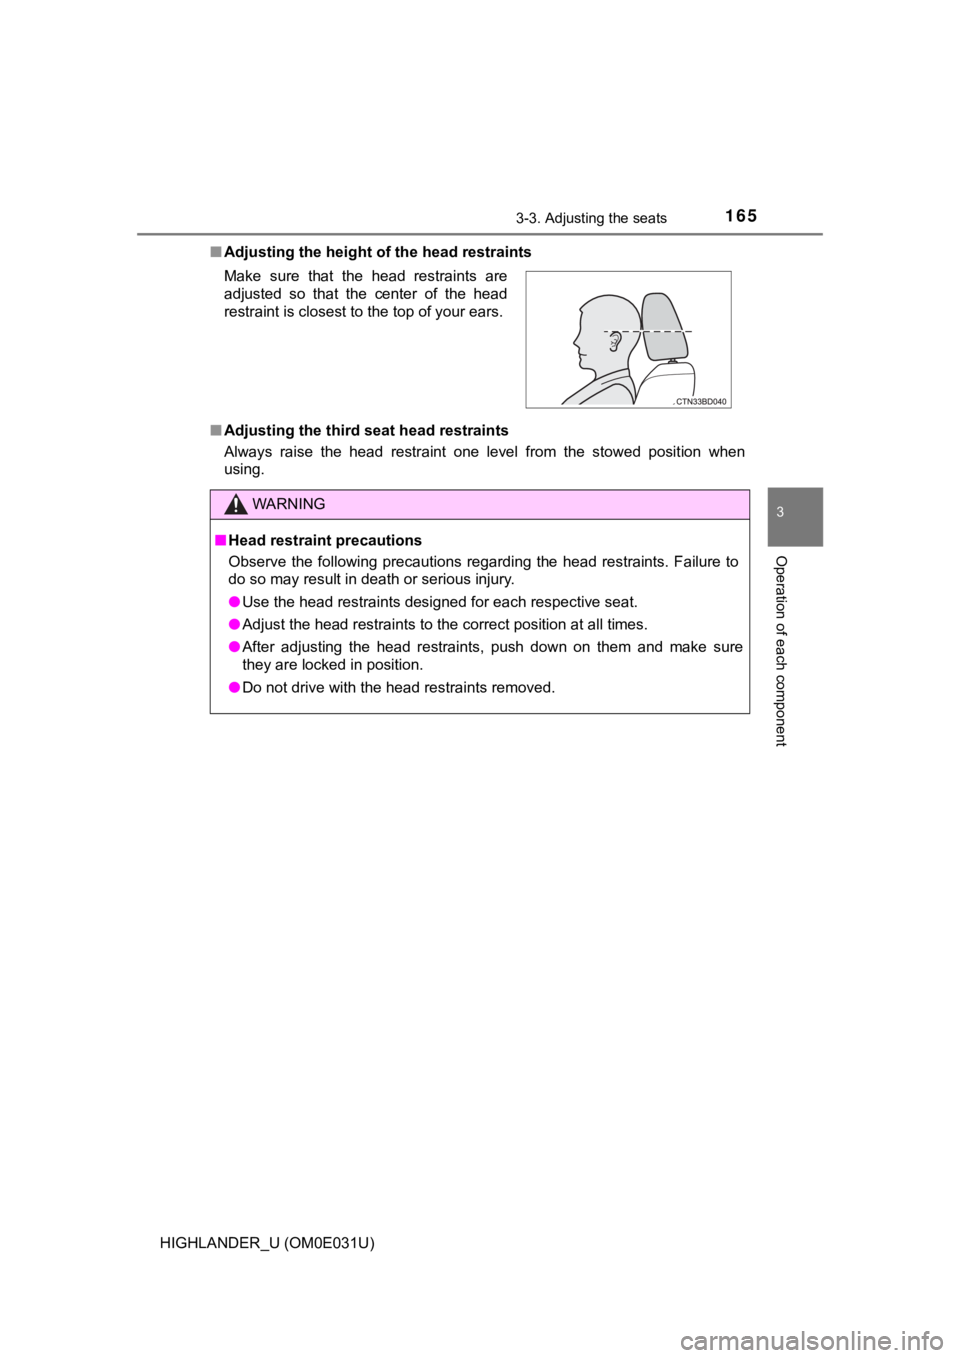
Adjusting the height o f the head restraints
■ Adjusting the third seat head restraints
Always raise the head restraint one level from the stowed posit ion when
using. Make sure that the head restraints are
adjusted so that the center of the head
restraint is closest to the top of your ears.
WARNING
■ Head restraint precautions
Observe the following precautions regarding the head restraints. Failure to
do so may result in death or serious injury.
● Use the head restraints designed for each respective seat.
● Adjust the head restraints to the correct position at all times.
● After adjusting the head restraints, push down on them and make sure
they are locked in position.
● Do not drive with the head restraints removed.
Page 168 of 732
1683-4. Adjusting the steering wheel and mirrors
HIGHLANDER_U (OM0E031U)
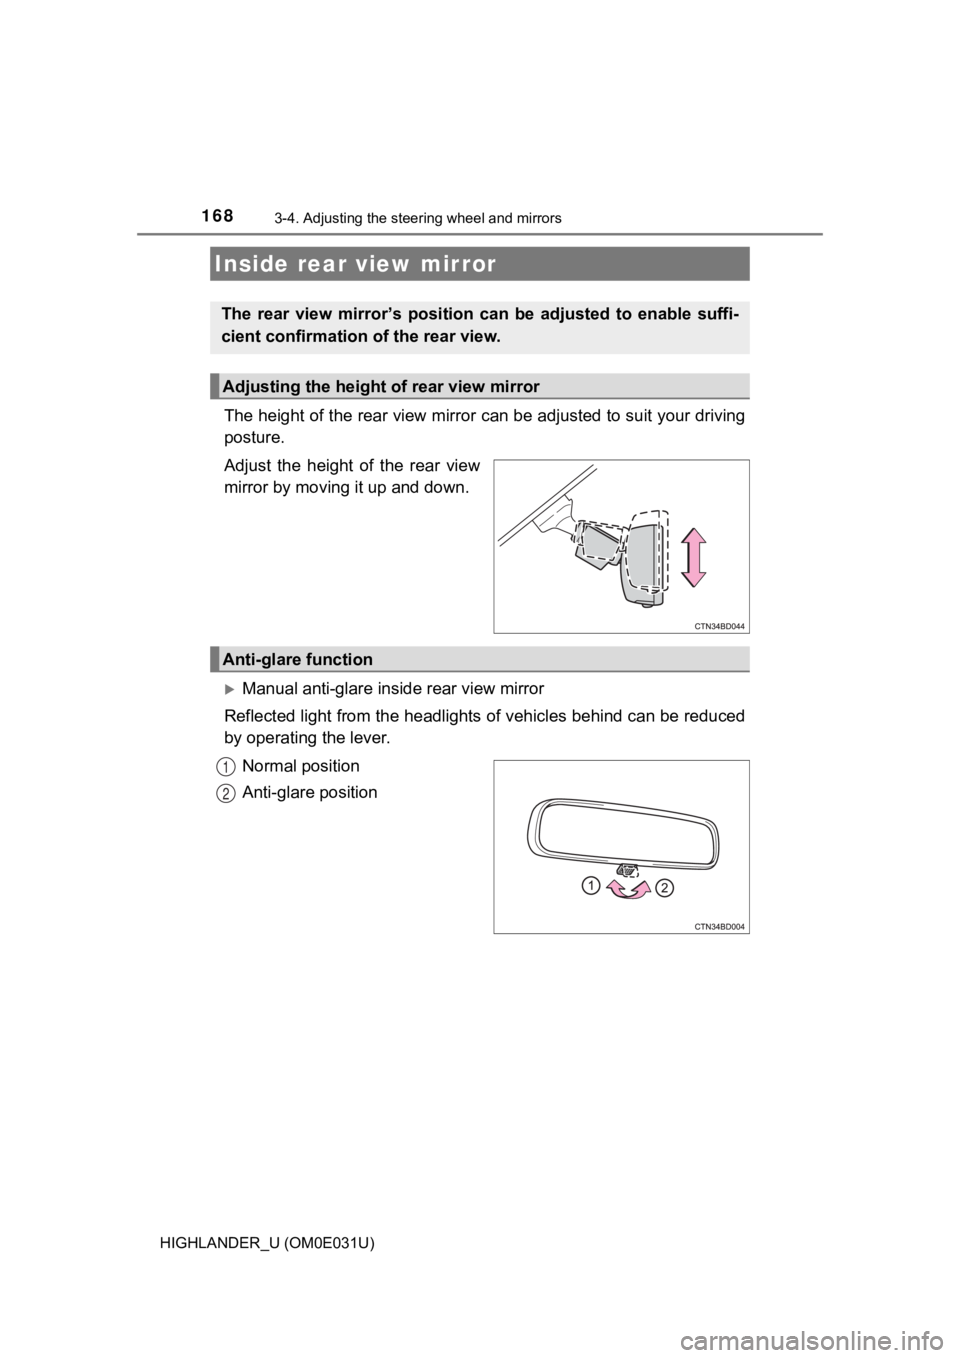
The height of the rear view mirror can be adjusted to suit your driving
posture.
Adjust the height of the rear view
mirror by moving it up and down.
Manual anti-glare inside rear view mirror
Reflected light from the headlights of vehicles behind can be r educed
by operating the lever.
Normal position
Anti-glare position
Inside rear view mirror
The rear view mirror’s position ca n be adjusted to enable suffi-
cient confirmation of the rear view.
Adjusting the height of rear view mirror
Anti-glare function
1
2
Page 207 of 732
2074-1. Before driving
4
Driving
HIGHLANDER_U (OM0E031U)
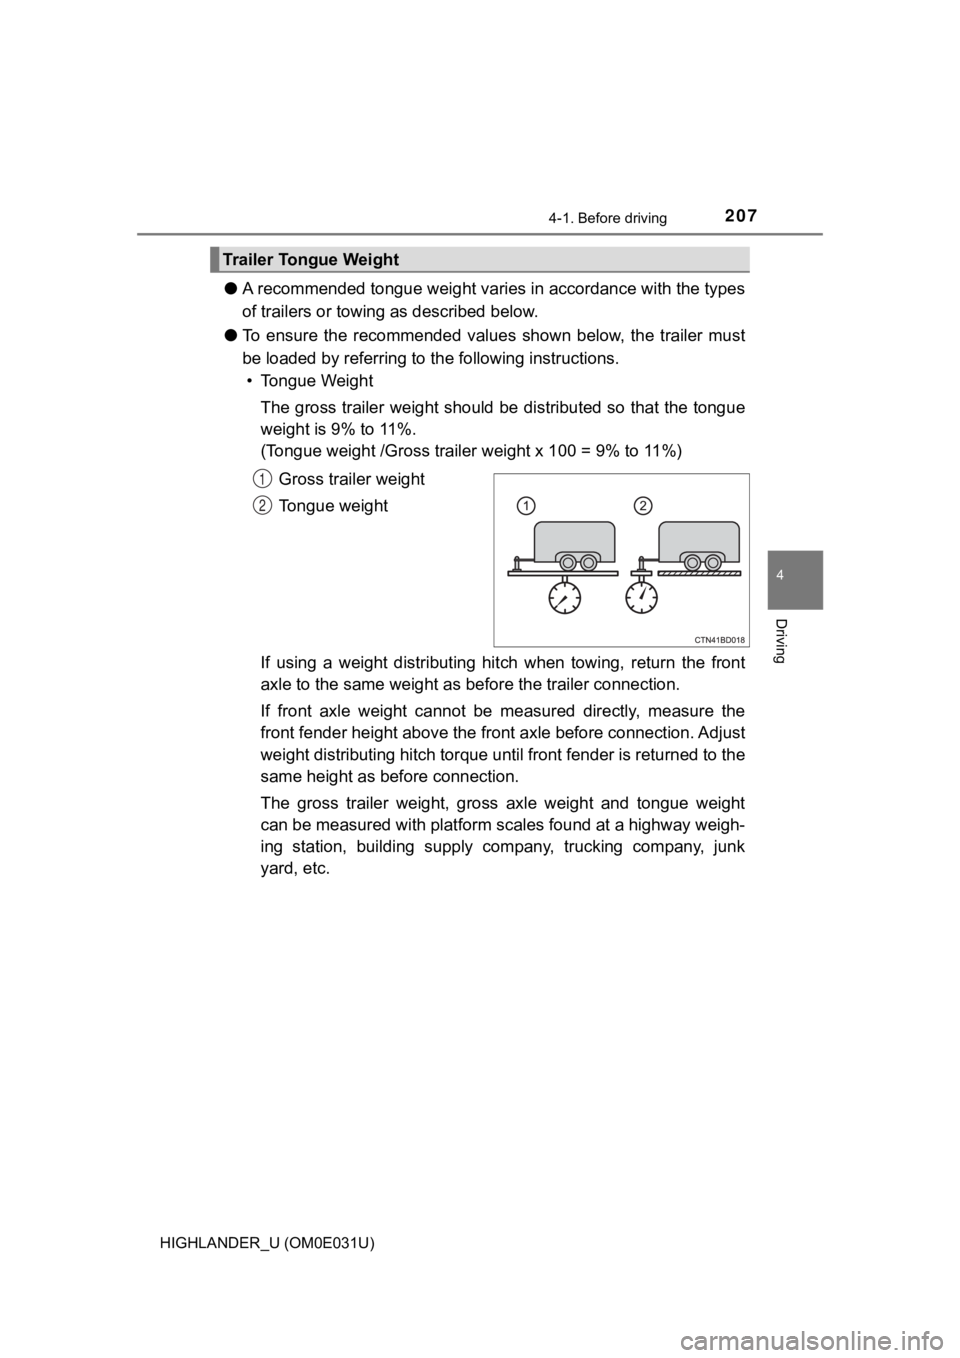
●A recommended tongue weight varies in accordance with the types
of trailers or towing as described below.
● To ensure the recommended values shown below, the trailer must
be loaded by referring to t he following instructions.
• Tongue Weight
The gross trailer weight should be distributed so that the tong ue
weight is 9% to 11%.
(Tongue weight /Gross trailer weight x 100 = 9% to 11%)
Gross trailer weight
Tongue weight
If using a weight distributing hi tch when towing, return the front
axle to the same weight as b efore the trailer connection.
If front axle weight cannot be measured directly, measure the
front fender height above the front axle before connection. Adjust
weight distributing hitch torque until front fender is returned to the
same height as b efore connection.
The gross trailer weight, gross axle weight and tongue weight
can be measured with platform sca les found at a highway weigh-
ing station, building supply company, trucking company, junk
yard, etc.
Trailer Tongue Weight
1
2
Page 213 of 732
2134-1. Before driving
4
Driving
HIGHLANDER_U (OM0E031U)
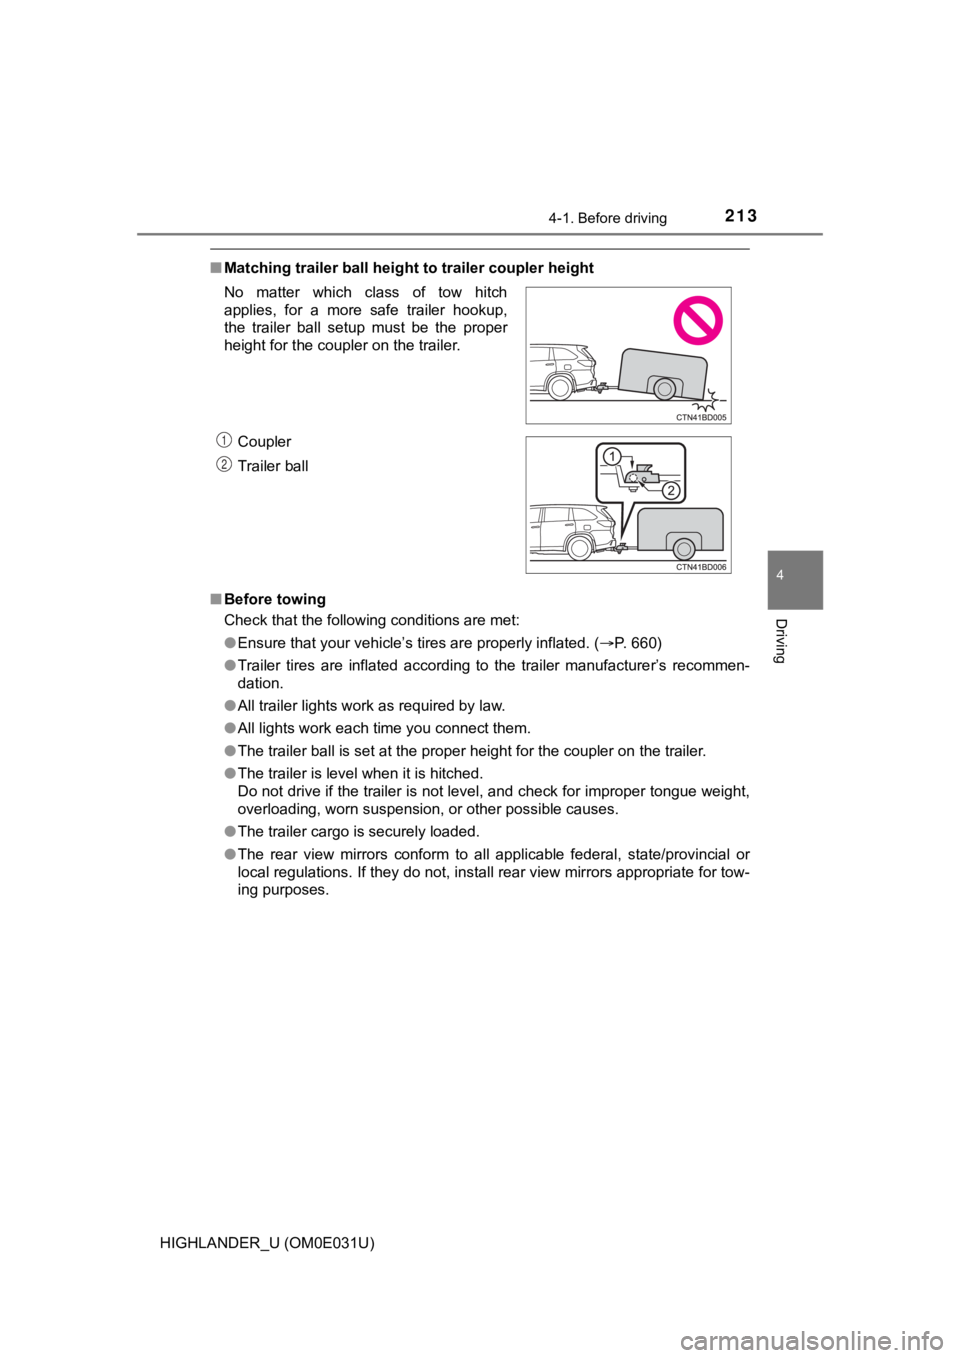
■Matching trailer ball height to trailer coupler height
■ Before towing
Check that the following conditions are met:
●Ensure that your vehicle’s tires are properly inflated. ( P. 660)
● Trailer tires are inflated according to the trailer manufacture r’s recommen-
dation.
● All trailer lights work as required by law.
● All lights work each time you connect them.
● The trailer ball is set at the proper height for the coupler on the trailer.
● The trailer is level when it is hitched.
Do not drive if the trailer is not level, and check for imprope r tongue weight,
overloading, worn suspension, or other possible causes.
● The trailer cargo is securely loaded.
● The rear view mirrors conform to all applicable federal, state/provincial or
local regulations. If they do not, install rear view mirrors ap propriate for tow-
ing purposes.
No matter which class of tow hitch
applies, for a more safe trailer hookup,
the trailer ball setup must be the proper
height for the coupler on the trailer.
Coupler
Trailer ball
1
2
Page 323 of 732

3234-5. Using the driving support systems
4
Driving
HIGHLANDER_U (OM0E031U)• When vehicle lanes are wide, or when driving on the edge of a
lane, and
the vehicle in an adjacent lane is far away from your vehicle
• When towing a trailer
• When items such as a bicycle carrier are installed on the rear of the vehi-
cle
• When there is a significant difference in height between your vehicle and
the vehicle that enters the detection area
• Immediately after the BSM function is turned on
● Instances of the BSM function unnecessarily detecting a vehicle and/or
object may increase in the following situations:
• When the sensor is misaligned due to a strong impact to the se nsor or its
surrounding area
• When the distance between your vehicle and a guardrail, wall, etc. that
enters the detection area is short
• When driving up and down consecutive steep inclines, such as h ills, dips
on the road, etc.
• When vehicle lanes are narrow, or when driving on the edge of a lane,
and a vehicle traveling in a lane other than the adjacent lanes enters the
detection area
• When driving on roads with sharp bends, consecutive curves, or uneven
surfaces
• When the tires are slipping or spinning
• When the distance between your vehicle and a following vehicle is short
• When a bicycle carrier or other accessory is installed to the rear of the vehicle
• When towing a trailer
Page 343 of 732
3434-6. Driving tips
4
Driving
HIGHLANDER_U (OM0E031U)
●Specific design charac teristics give it a higher center of grav ity than
ordinary passenger cars. This vehi cle design feature causes this
type of vehicle to be more likel y to rollover. And, utility vehicles
have a significantly higher rollover rate than other types of v ehicles.
● An advantage of the higher ground clearance is a better view of the
road allowing you to anticipate problems.
● It is not designed for cornering at the same speeds as ordinary pas-
senger cars any more than low-s lung sports cars are designed to
perform satisfactorily under o ff-road conditions. Therefore, sh arp
turns at excessive speeds may c ause the vehicle to rollover.
Utility vehicle precautions
This vehicle belongs to the utility vehicle class, which has
higher ground clearance and narrower tread in relation to the
height of its center of gravity.
Utility vehicle feature
WARNING
■Utility vehicle precautions
Always observe the following precautions to minimize the risk o f death, seri-
ous injury or damage to your vehicle:
● In a rollover crash, an unbelted person is significantly more l ikely to die
than a person wearing a seat belt. Therefore, the driver and al l passengers
should always fasten their seat belts.
● Avoid sharp turns or abrupt maneuvers, if at all possible.
Failure to operate this vehicle correctly may result in loss of control or
vehicle rollover causing death or serious injury.
● Loading cargo on the roof luggage carrier (if equipped) will make the cen-
ter of the vehicle gravity higher. Avoid high speeds, sudden starts, sharp
turns, sudden braking or abrupt maneuvers, otherwise it may res ult in loss
of control or vehicle rollover due to failure to operate this vehicle correctly.
● Always slow down in gusty crosswinds. Because of its profile and higher
center of gravity, your vehicle is more sensitive to side winds than an ordi-
nary passenger car. Slowing down will allow you to have better control.
● Do not drive horizontally across steep slopes. Driving straight up or
straight down is preferred. Your vehicle (or any similar off-ro ad vehicle)
can tip over sideways much more easily than forward or backward .
Page 610 of 732
6108-2. Steps to take in an emergency
HIGHLANDER_U (OM0E031U)
WARNING
■Using the tire jack
Observe the following precautions.
Improper use of the tire jack may cause the vehicle to suddenly fall off
the jack, leading to death or serious injury.
●Do not use the tire jack for any purpose other than replacing t ires or
installing and removing tire chains.
●Only use the tire jack that comes with this vehicle for replacing a flat
tire.
Do not use it on other vehicles, and do not use other tire jack s for
replacing tires on this vehicle.
●Put the jack properl y in its jack point.
●Do not put any part of your body under the vehicle while it is supported
by the jack.
●Do not start the engine or drive the vehicle while the vehicle is sup-
ported by the jack.
●Do not raise the vehicle w hile someone is inside.
●When raising the vehicle, do not put an object on or under the jack.
●Do not raise the vehicle to a height greater than that required to
replace the tire.
●Use a jack stand if it is nece ssary to get under the vehicle.
●When lowering the vehicle, make sure that there is no-one near the
vehicle. If there are people nearb y, warn them vocally before lowering.
Page 650 of 732
650
HIGHLANDER_U (OM0E031U)
9-1. Specifications
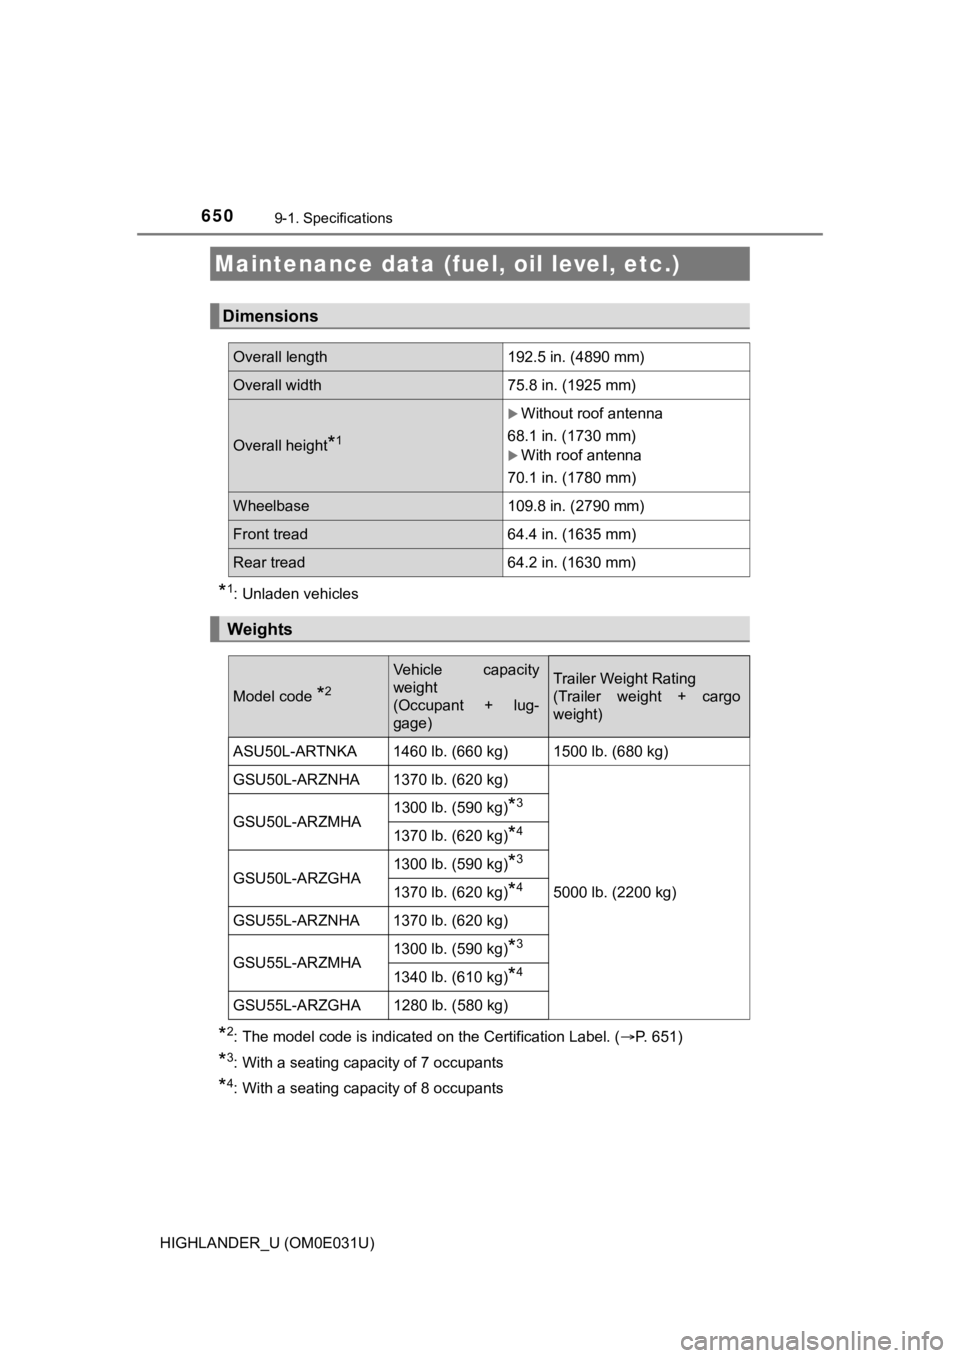
*1: Unladen vehicles
*2: The model code is indicated on the Certification Label. (P. 651)
*3: With a seating capacity of 7 occupants
*4: With a seating capacity of 8 occupants
Maintenance data (fuel, oil level, etc.)
Dimensions
Overall length192.5 in. (4890 mm)
Overall width 75.8 in. (1925 mm)
Overall height*1
Without roof antenna
68.1 in. (1730 mm)
With roof antenna
70.1 in. (1780 mm)
Wheelbase 109.8 in. (2790 mm)
Front tread64.4 in. (1635 mm)
Rear tread 64.2 in. (1630 mm)
Weights
Model code *2
Vehicle capacity
weight
(Occupant + lug-
gage)Trailer Weight Rating
(Trailer weight + cargo
weight)
ASU50L-ARTNKA 1460 lb. (660 kg) 1500 lb. (680 kg)
GSU50L-ARZNHA 1370 lb. (620 kg)
5000 lb. (2200 kg)
GSU50L-ARZMHA
1300 lb. (590 kg)
*3
1370 lb. (620 kg)*4
GSU50L-ARZGHA
1300 lb. (590 kg)*3
1370 lb. (620 kg)*4
GSU55L-ARZNHA 1370 lb. (620 kg)
GSU55L-ARZMHA1300 lb. (590 kg)
*3
1340 lb. (610 kg)*4
GSU55L-ARZGHA 1280 lb. (580 kg)