engine TOYOTA HIGHLANDER 2020 (in English) Workshop Manual
[x] Cancel search | Manufacturer: TOYOTA, Model Year: 2020, Model line: HIGHLANDER, Model: TOYOTA HIGHLANDER 2020Pages: 560, PDF Size: 14.42 MB
Page 146 of 560
1463-3. Adjusting the seats
HIGHLANDER_UIf 2 or more keys are in the vehicle,
the driving position cannot be
recorded properly.
1
Check that the shift lever is in
P.
2 Turn the engine switch to
ON.
3 Recall the driving position
that you want to record.
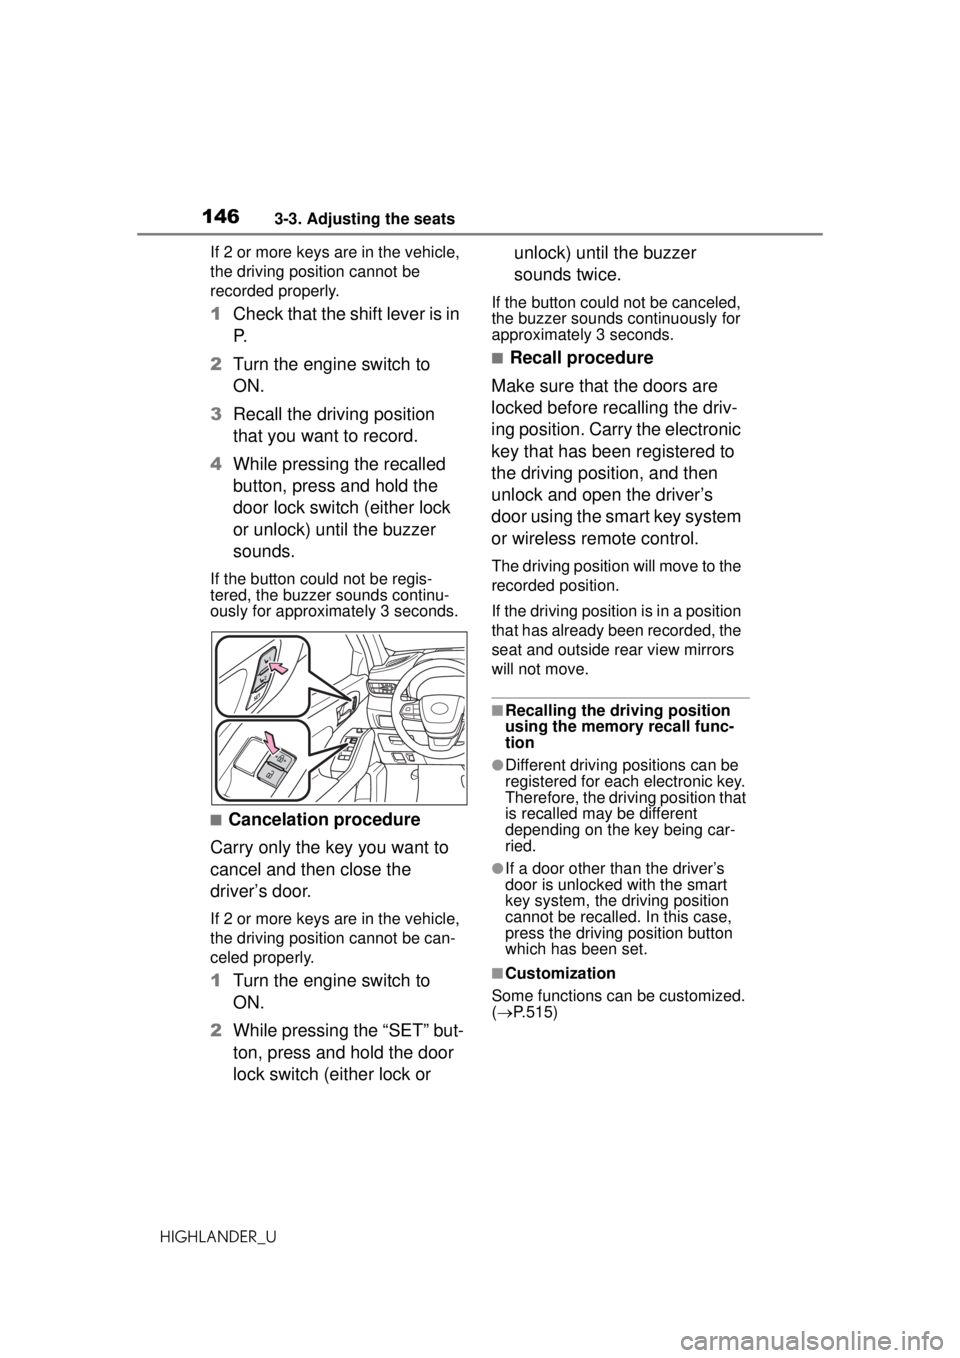
4 While pressing the recalled
button, press and hold the
door lock switch (either lock
or unlock) until the buzzer
sounds.
If the button could not be regis-
tered, the buzzer sounds continu-
ously for approximately 3 seconds.
■Cancelation procedure
Carry only the key you want to
cancel and then close the
driver’s door.
If 2 or more keys are in the vehicle,
the driving position cannot be can-
celed properly.
1 Turn the engine switch to
ON.
2 While pressing the “SET” but-
ton, press and hold the door
lock switch (either lock or unlock) until the buzzer
sounds twice.
If the button could not be canceled,
the buzzer sounds continuously for
approximately 3 seconds.
■Recall procedure
Make sure that the doors are
locked before recalling the driv-
ing position. Carry the electronic
key that has been registered to
the driving position, and then
unlock and open the driver’s
door using the smart key system
or wireless remote control.
The driving position will move to the
recorded position.
If the driving position is in a position
that has already been recorded, the
seat and outside rear view mirrors
will not move.
■Recalling the driving position
using the memory recall func-
tion
●Different driving positions can be
registered for each electronic key.
Therefore, the driving position that
is recalled may be different
depending on the key being car-
ried.
●If a door other than the driver’s
door is unlocked with the smart
key system, the driving position
cannot be recalled. In this case,
press the driving position button
which has been set.
■Customization
Some functions can be customized.
( P.515)
Page 151 of 560
1513-4. Adjusting the steering wheel and mirrors
HIGHLANDER_U
3
Before driving
*: If equipped
The height of the rear view mir-
ror can be adjusted to suit your
driving posture.
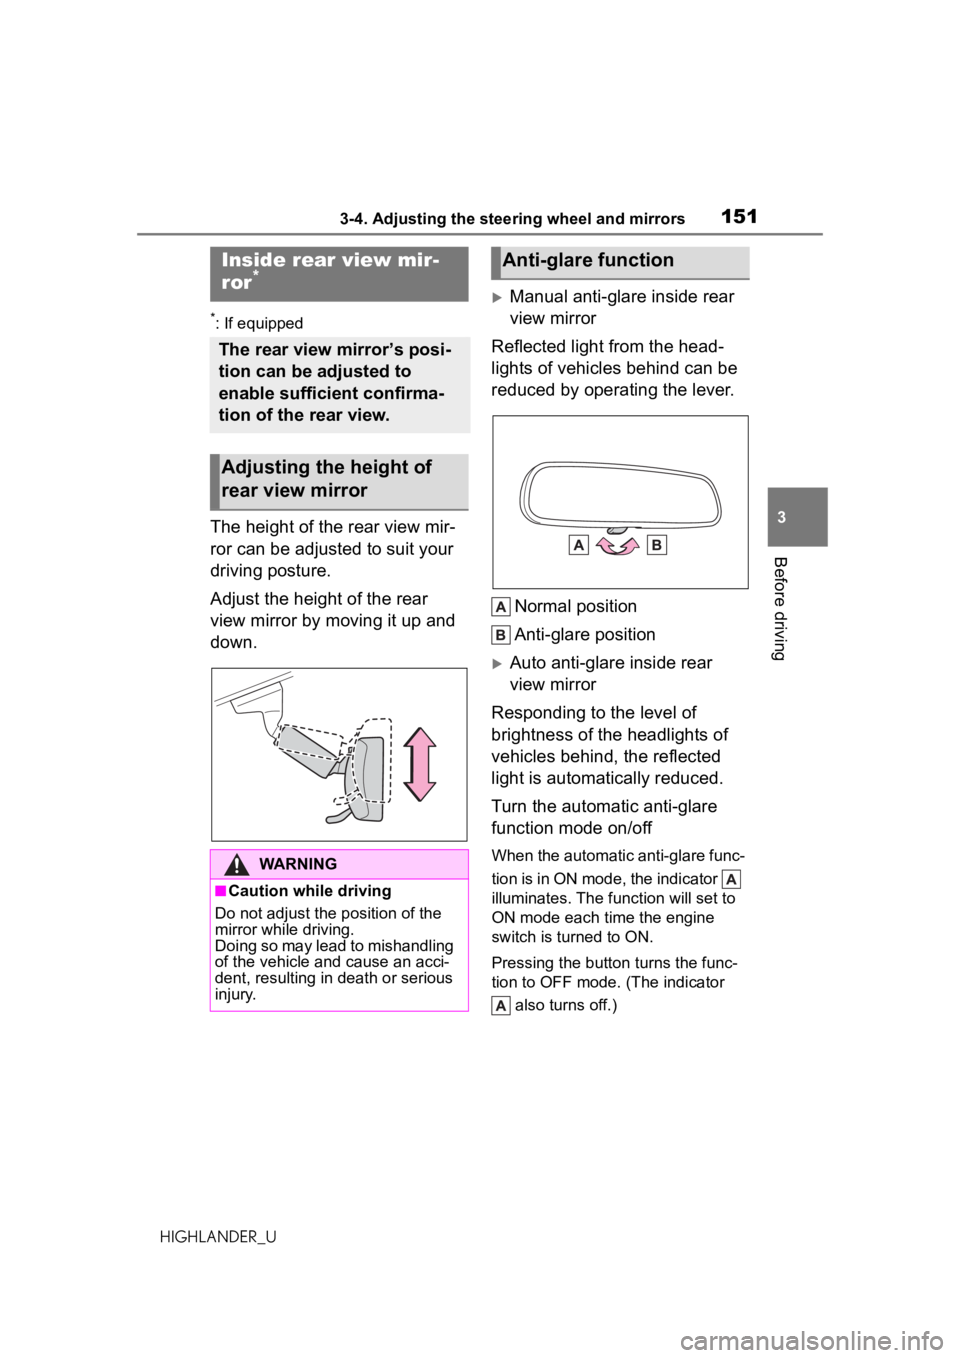
Adjust the height of the rear
view mirror by moving it up and
down.
Manual anti-glare inside rear
view mirror
Reflected light from the head-
lights of vehicles behind can be
reduced by operating the lever.
Normal position
Anti-glare position
Auto anti-glare inside rear
view mirror
Responding to the level of
brightness of the headlights of
vehicles behind, the reflected
light is automatically reduced.
Turn the automatic anti-glare
function mode on/off
When the automatic anti-glare func-
tion is in ON mode, the indicator
illuminates. The function will set to
ON mode each time the engine
switch is turned to ON.
Pressing the button turns the func-
tion to OFF mode. (The indicator also turns off.)
Inside rear view mir-
ror*
The rear view mirror’s posi-
tion can be adjusted to
enable sufficient confirma-
tion of the rear view.
Adjusting the height of
rear view mirror
WARNING
■Caution while driving
Do not adjust the position of the
mirror while driving.
Doing so may lead to mishandling
of the vehicle and cause an acci-
dent, resulting in death or serious
injury.
Anti-glare function
Page 153 of 560
1533-4. Adjusting the steering wheel and mirrors
HIGHLANDER_U
3
Before driving
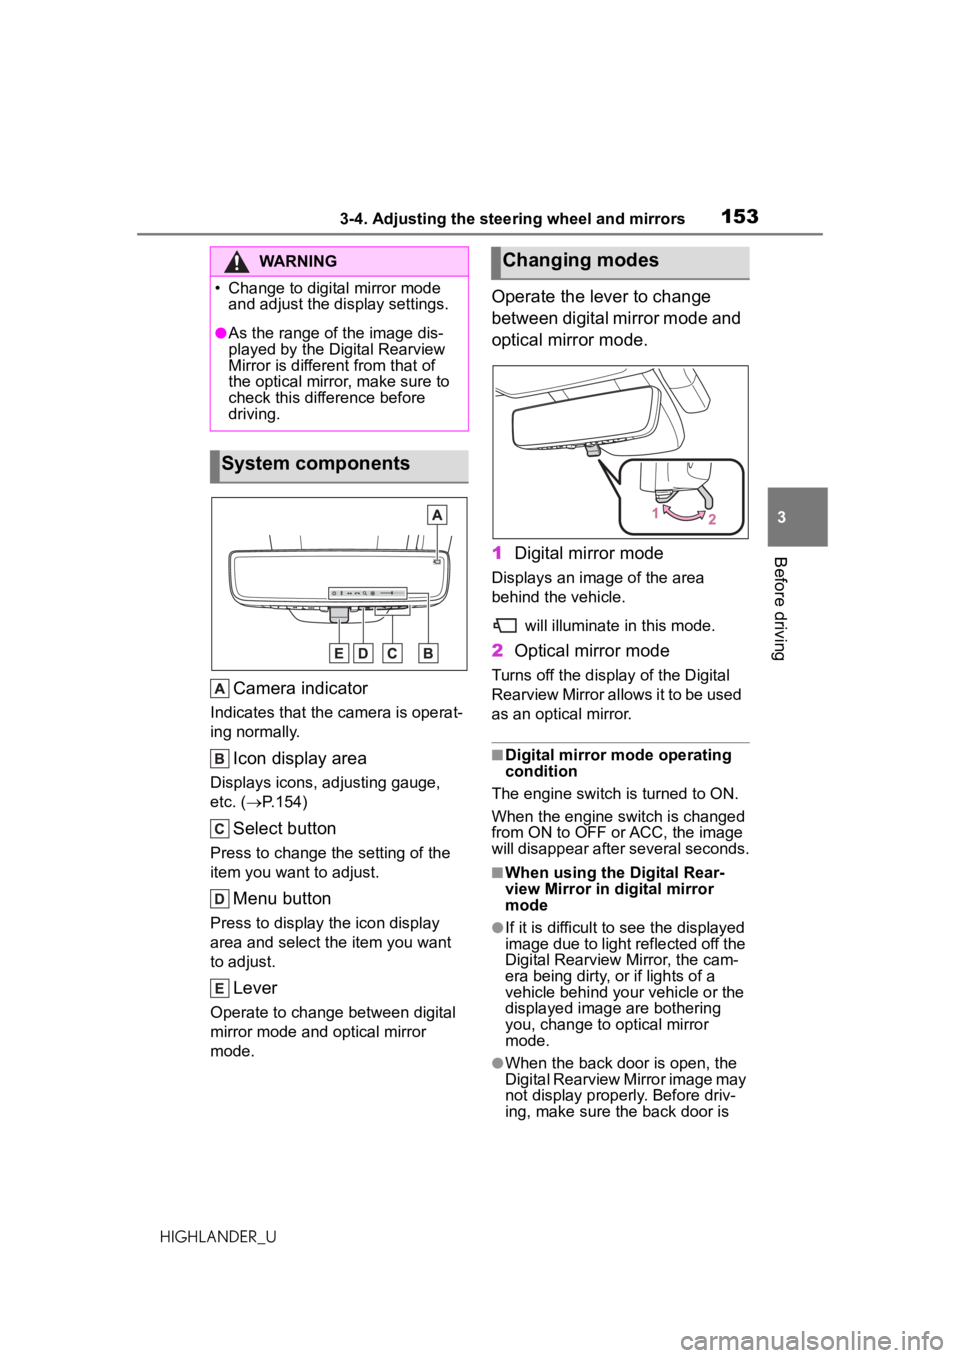
Camera indicator
Indicates that the camera is operat-
ing normally.
Icon display area
Displays icons, adjusting gauge,
etc. ( P.154)
Select button
Press to change the setting of the
item you want to adjust.
Menu button
Press to display the icon display
area and select the item you want
to adjust.
Lever
Operate to change between digital
mirror mode and optical mirror
mode.
Operate the lever to change
between digital mirror mode and
optical mirror mode.
1 Digital mirror mode
Displays an image of the area
behind the vehicle.
will illuminate in this mode.
2Optical mirror mode
Turns off the display of the Digital
Rearview Mirror allows it to be used
as an optical mirror.
■Digital mirror mode operating
condition
The engine switch is turned to ON.
When the engine switch is changed
from ON to OFF or ACC, the image
will disappear after several seconds.
■When using the Digital Rear-
view Mirror in digital mirror
mode
●If it is difficult to see the displayed
image due to light reflected off the
Digital Rearview Mirror, the cam-
era being dirty, or if lights of a
vehicle behind your vehicle or the
displayed image are bothering
you, change to optical mirror
mode.
●When the back door is open, the
Digital Rearview Mirror image may
not display properly. Before driv-
ing, make sure the back door is
WARNING
• Change to digital mirror mode and adjust the display settings.
●As the range of the image dis-
played by the Digital Rearview
Mirror is different from that of
the optical mirror, make sure to
check this difference before
driving.
System components
Changing modes
Page 155 of 560
1553-4. Adjusting the steering wheel and mirrors
HIGHLANDER_U
3
Before driving
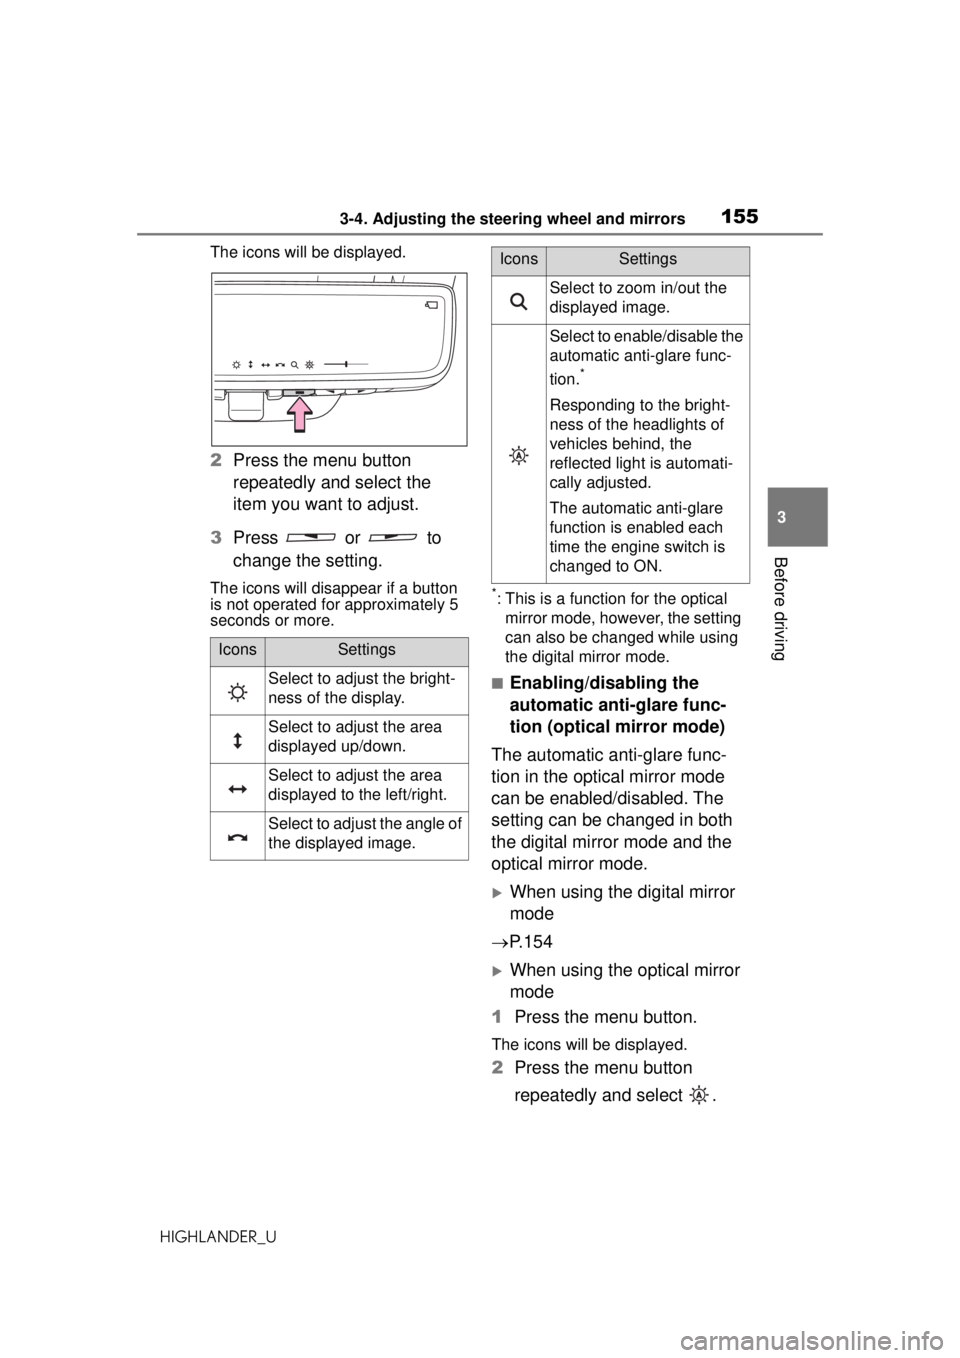
The icons will be displayed.
2 Press the menu button
repeatedly and select the
item you want to adjust.
3 Press or to
change the setting.
The icons will disappear if a button
is not operated for approximately 5
seconds or more.*: This is a function for the optical
mirror mode, however, the setting
can also be changed while using
the digital mirror mode.
■Enabling/disabling the
automatic anti-glare func-
tion (optical mirror mode)
The automatic anti-glare func-
tion in the optical mirror mode
can be enabled/disabled. The
setting can be changed in both
the digital mirror mode and the
optical mirror mode.
When using the digital mirror
mode
P.154
When using the optical mirror
mode
1 Press the menu button.
The icons will be displayed.
2Press the menu button
repeatedly and select .
IconsSettings
Select to adjust the bright-
ness of the display.
Select to adjust the area
displayed up/down.
Select to adjust the area
displayed to the left/right.
Select to adjust the angle of
the displayed image.
Select to zoom in/out the
displayed image.
Select to enable/disable the
automatic anti-glare func-
tion.
*
Responding to the bright-
ness of the headlights of
vehicles behind, the
reflected light is automati-
cally adjusted.
The automatic anti-glare
function is enabled each
time the engine switch is
changed to ON.
IconsSettings
Page 162 of 560
1623-4. Adjusting the steering wheel and mirrors
HIGHLANDER_U
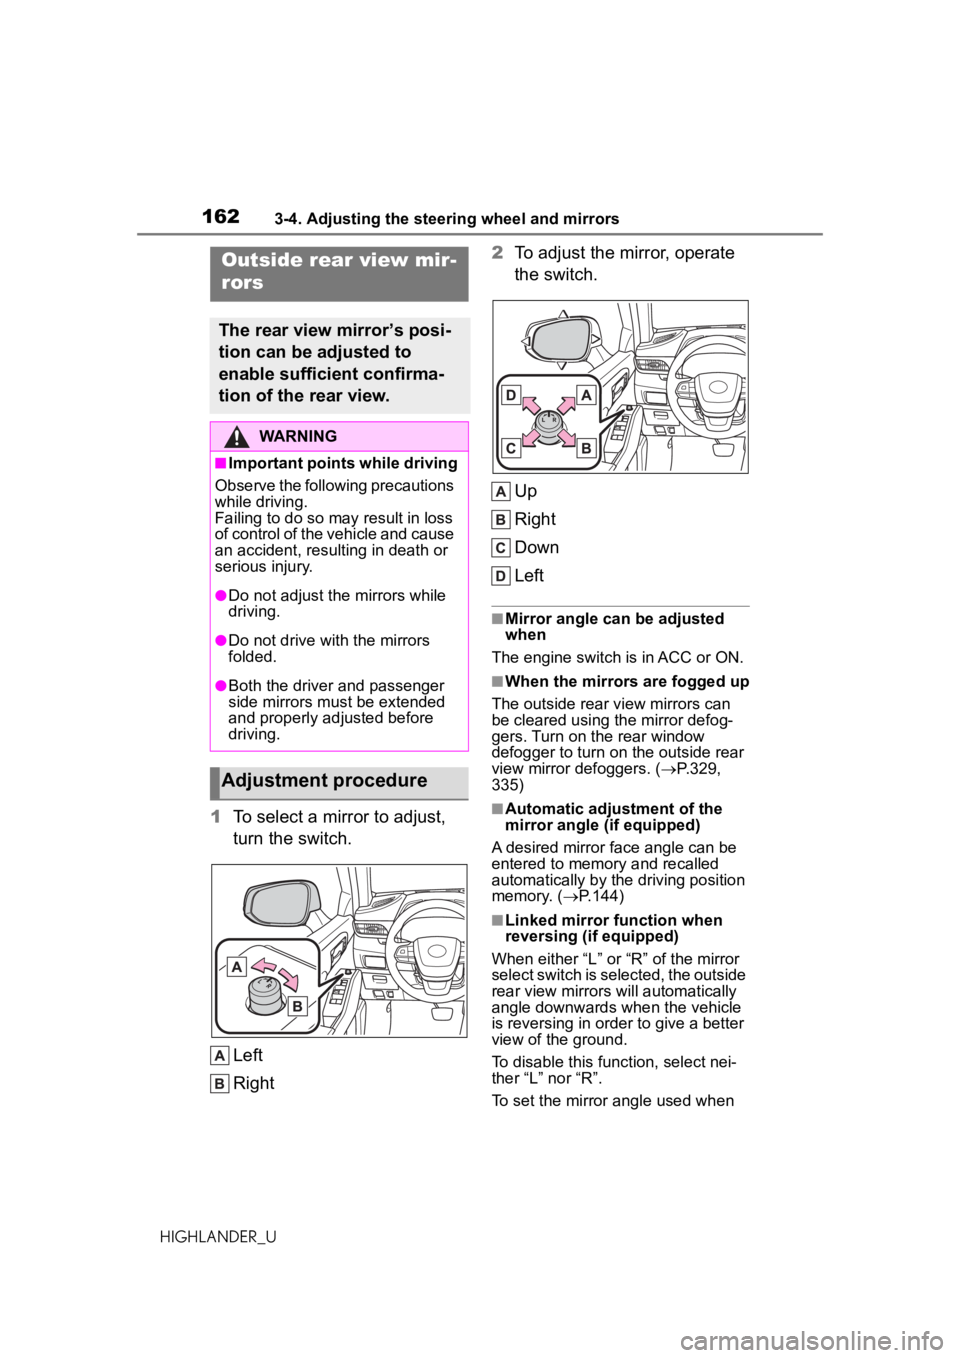
1To select a mirror to adjust,
turn the switch.
Left
Right 2
To adjust the mirror, operate
the switch.
Up
Right
Down
Left
■Mirror angle can be adjusted
when
The engine switch is in ACC or ON.
■When the mirrors are fogged up
The outside rear view mirrors can
be cleared using the mirror defog-
gers. Turn on the rear window
defogger to turn on the outside rear
view mirror defoggers. ( P.329,
335)
■Automatic adjustment of the
mirror angle (if equipped)
A desired mirror face angle can be
entered to memory and recalled
automatically by the driving position
memory. ( P.144)
■Linked mirror function when
reversing (if equipped)
When either “L” or “R” of the mirror
select switch is selected, the outside
rear view mirrors will automatically
angle downwards when the vehicle
is reversing in order to give a better
view of the ground.
To disable this function, select nei-
ther “L” nor “R”.
To set the mirror angle used when
Outside rear view mir-
rors
The rear view mirror’s posi-
tion can be adjusted to
enable sufficient confirma-
tion of the rear view.
WARNING
■Important points while driving
Observe the following precautions
while driving.
Failing to do so may result in loss
of control of the vehicle and cause
an accident, resulting in death or
serious injury.
●Do not adjust the mirrors while
driving.
●Do not drive with the mirrors
folded.
●Both the driver and passenger
side mirrors must be extended
and properly adjusted before
driving.
Adjustment procedure
Page 164 of 560
1643-5. Opening, closing the windows and moon roof
HIGHLANDER_U
3-5.Opening, closing the windows and moon roof
The power windows can be
opened and closed using the
switches.
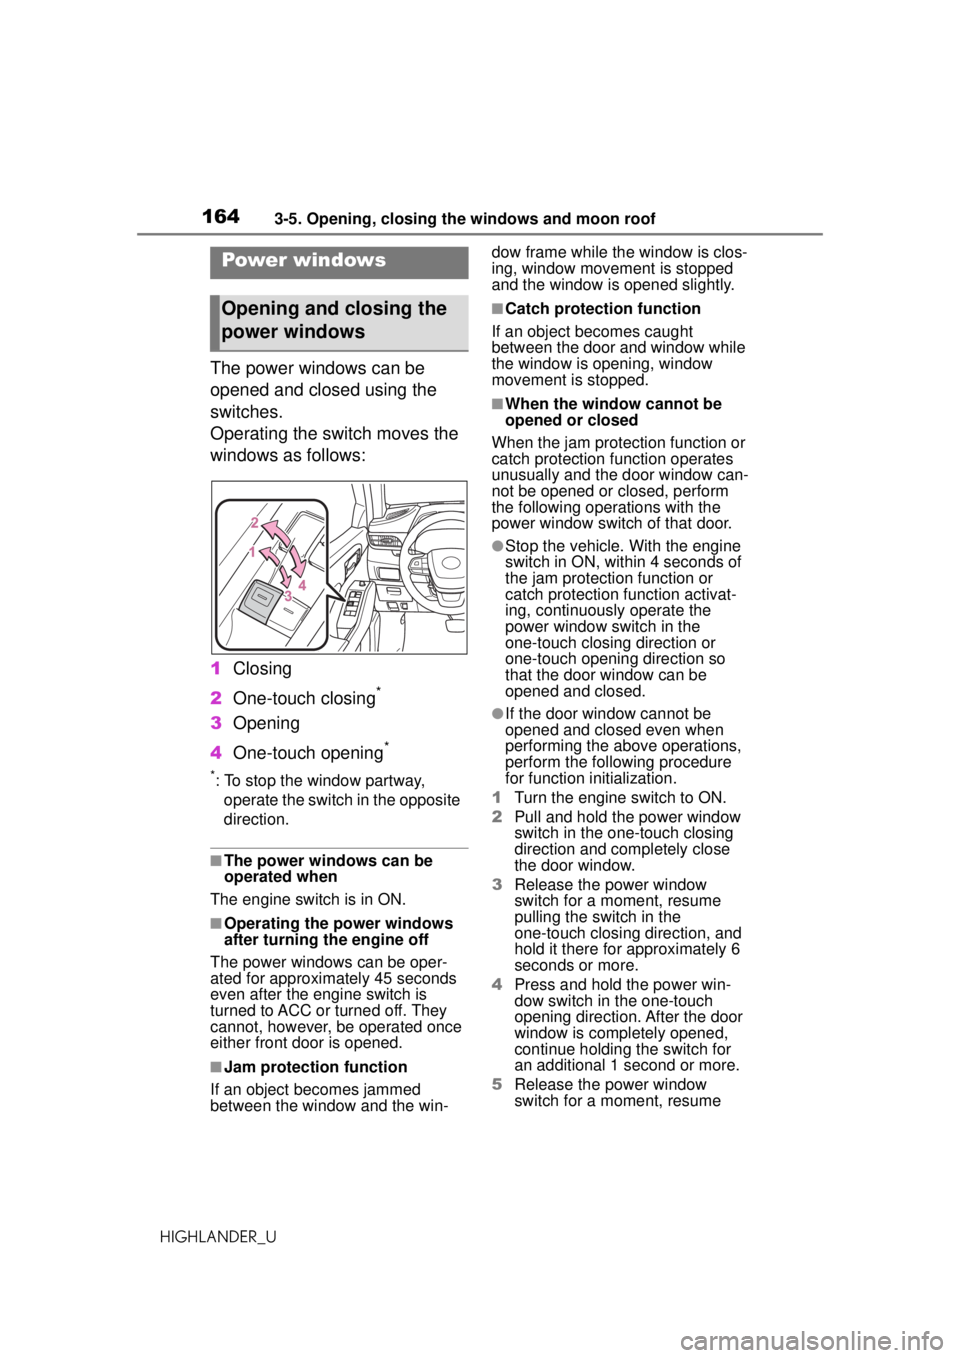
Operating the switch moves the
windows as follows:
1Closing
2 One-touch closing
*
3Opening
4 One-touch opening
*
*: To stop the window partway,
operate the switch in the opposite
direction.
■The power windows can be
operated when
The engine switch is in ON.
■Operating the power windows
af
ter turning the engine off
The power windows can be oper-
ated for approximately 45 seconds
even after the engine switch is
turned to ACC or turned off. They
cannot, however, be operated once
either front door is opened.
■Jam protection function
If an object becomes jammed
between the window and the win- dow frame while the window is clos-
ing, window movement is stopped
and the window is opened slightly.
■Catch protection function
If an object becomes caught
between the door and window while
the window is opening, window
movement is stopped.
■When the window cannot beop ened or closed
When the jam protection function or
catch protection function operates
unusually and the door window can-
not be opened or closed, perform
the following operations with the
power window switch of that door.
●Stop the vehicle. With the engine
switch in ON, within 4 seconds
of
the
jam protection function or
catch protection function activat-
ing, continuously oper
ate the
power
window switch
in theo
ne-touch closing direction
or
o
ne-touch opening direction
so
tha
t the door window can be
opened and closed.
●If the door window cannot beo pened and closed even when
performing the above oper
ations,
p
erform the following procedure
for function initialization.
1 Turn the engine switch to ON.
2 Pull and hold the power window
switch in the one-touch closing
direction and completely close
the door window.
3 Release the power window
switch for a moment, resume
pulling the switch in the
one-touch closing direction, and
hold it there for approximately 6
seconds or more.
4 Press and hold the power win-
dow switch in the one-touch
opening direction. After the door
window is completely opened,
continue holding the switch for
an additional 1 second or more.
5 Release the power window
switch for a moment, resume
Power windows
Opening and closing the
power windows
Page 165 of 560
1653-5. Opening, closing the windows and moon roof
HIGHLANDER_U
3
Before driving
pushing the switch in the
one-touch opening direction, and
hold it there for approximately 4
seconds or more.
6 Pull and hold the power window
switch in the one-touch closing
direction again. After the door
window is completely closed,
continue holding the switch for a
further 1 second or more.
If you release the switch while the
window is moving, start again from
the beginning.
If the window reverses and cannot
be fully closed or opened, have the
vehicle inspected by your Toyota
dealer.
■Door lock linked window opera-
tion
●The power windows can be
opened and closed using the
mechanical key.
* ( P.481)
●The power windows can be
opened using the wireless remote
control.
* ( P. 1 1 5 )*: These settings must be custom-
ized at your Toyota dealer.
■Power windows open warning
buzzer
A buzzer sounds and a message is
shown on the multi-information dis-
play when the engine switch is
turned off and the driver’s door is
opened with the power windows
open.
■Customization
Some functions can be customized.
( P.515)
WARNING
Observe the following precau-
tions.
Failing to do so may result in
death or serious injury.
■Closing the windows
●The driver is responsible for all
the power window operations,
including the operation for the
passengers. In order to prevent
accidental operation, especially
by a child, do not let a child
operate the power windows. It is
possible for children and other
passengers to have body parts
caught in the power window.
Also, when riding with a child, it
is recommended to use the win-
dow lock switch. (
P.166)
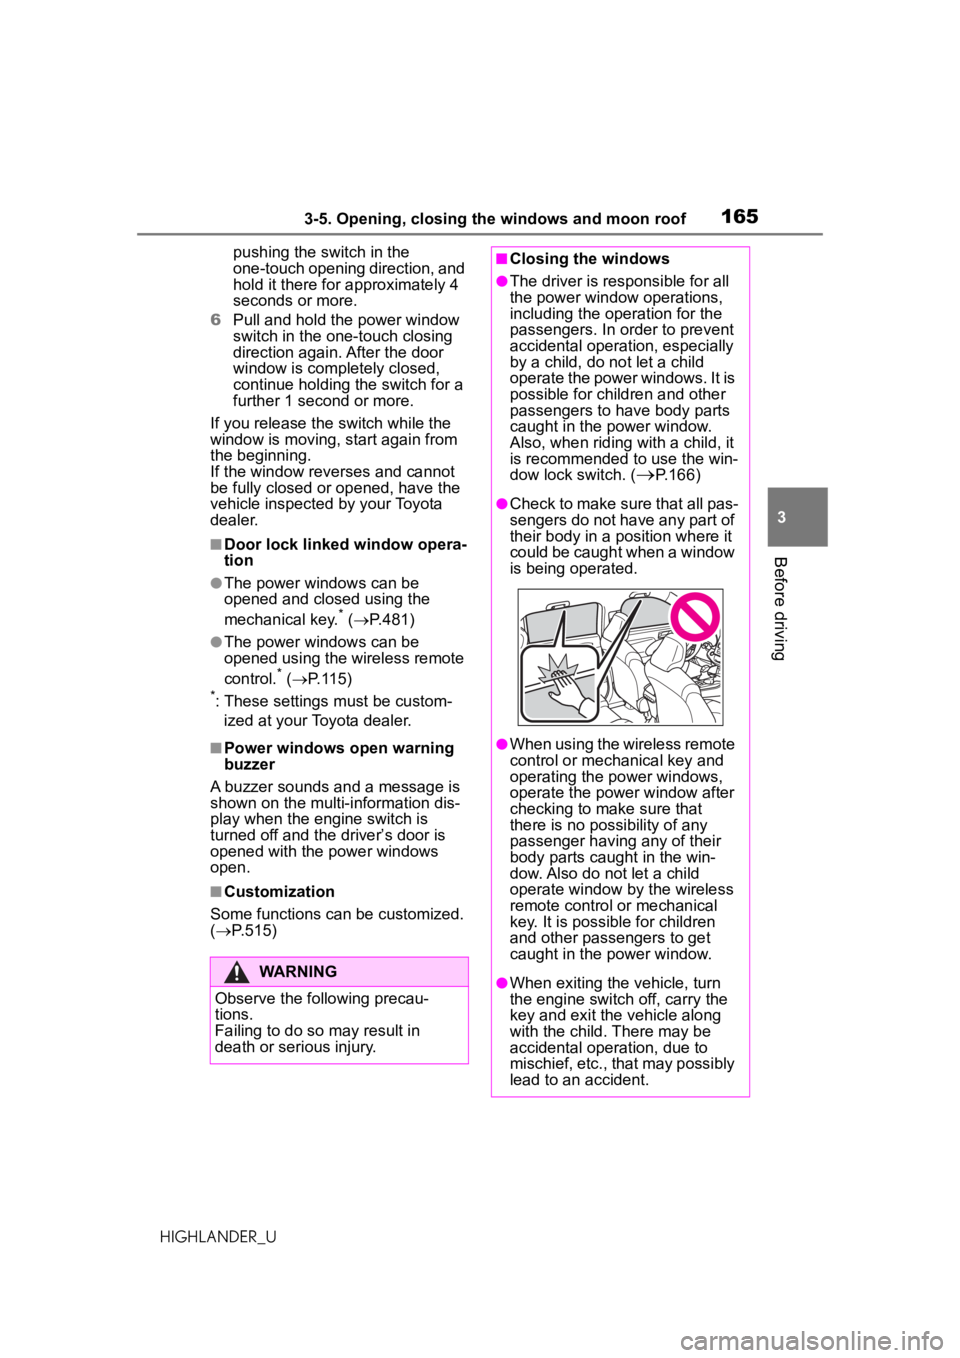
●Check to make sure that all pas-
sengers do not have any part of
their body in a position where it
could be caught when a window
is being operated.
●When using the wireless remote
control or mechanical key and
operating the power windows,
operate the power window after
checking to make sure that
there is no possibility of any
passenger having any of their
body parts caught in the win-
dow. Also do not let a child
operate window by the wireless
remote control or mechanical
key. It is possible for children
and other passengers to get
caught in the power window.
●When exiting the vehicle, turn
the engine switch off, carry the
key and exit the vehicle along
with the child. There may be
accidental operation, due to
mischief, etc., that may possibly
lead to an accident.
Page 166 of 560
1663-5. Opening, closing the windows and moon roof
HIGHLANDER_U
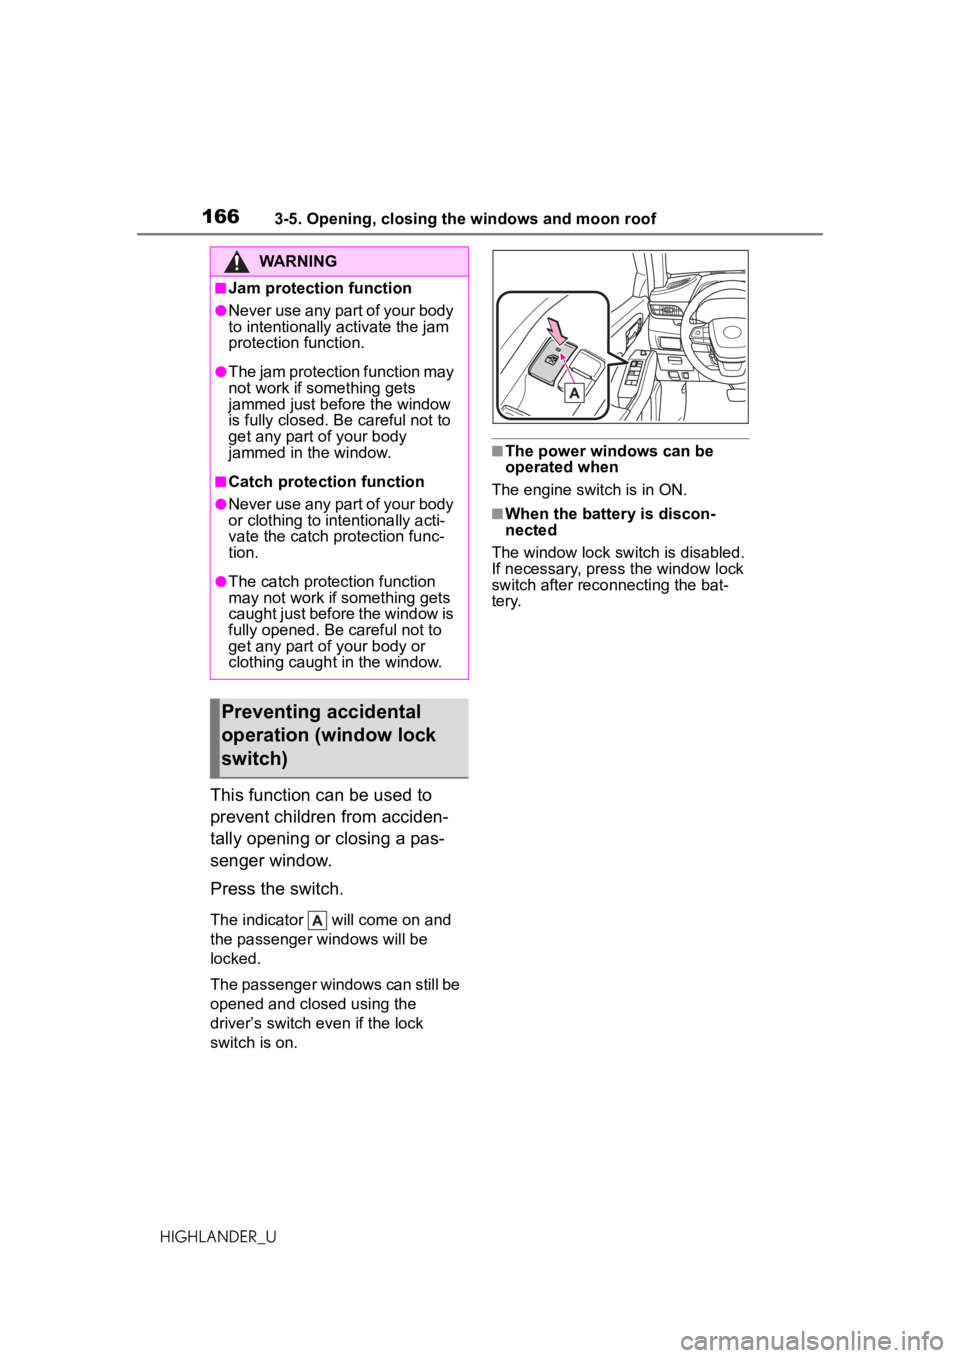
This function can be used to
prevent children from acciden-
tally opening or closing a pas-
senger window.
Press the switch.
The indicator will come on and
the passenger windows will be
locked.
The passenger windows can still be
opened and closed using the
driver’s switch even if the lock
switch is on.
■The power windows can be
operated when
The engine switch is in ON.
■When the battery is discon-
nected
The window lock switch is disabled.
If necessary, press the window lock
switch after reco nnecting the bat-
tery.
WARNING
■Jam protection function
●Never use any part of your body
to intentionally activate the jam
protection function.
●The jam protection function may
not work if something gets
jammed just before the window
is fully closed. Be careful not to
get any part of your body
jammed in the window.
■Catch protection function
●Never use any part of your body
or clothing to intentionally acti-
vate the catch protection func-
tion.
●The catch protection function
may not work if something gets
caught just before the window is
fully opened. Be careful not to
get any part of your body or
clothing caught in the window.
Preventing accidental
operation (window lock
switch)
Page 167 of 560
1673-5. Opening, closing the windows and moon roof
HIGHLANDER_U
3
Before driving
*: If equipped
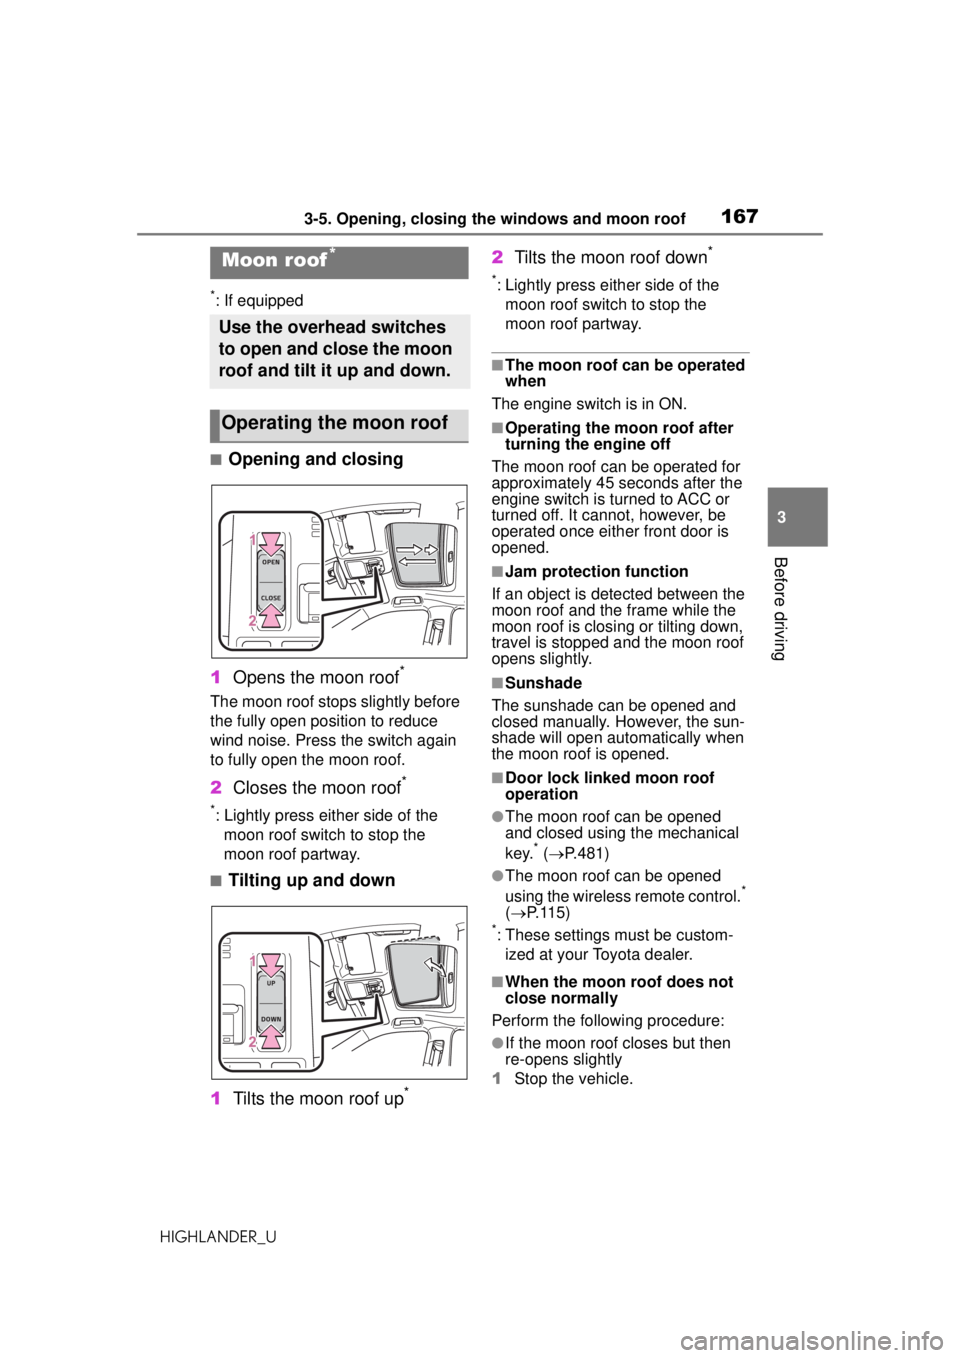
■Opening and closing
1 Opens the moon roof
*
The moon roof stops slightly before
the fully open position to reduce
wind noise. Press the switch again
to fully open the moon roof.
2Closes the moon roof*
*: Lightly press either side of the
moon roof switch to stop the
moon roof partway.
■Tilting up and down
1 Tilts the moon roof up
*
2Tilts the moon roof down*
*: Lightly press either side of the
moon roof switch to stop the
moon roof partway.
■The moon roof can be operated
when
The engine switch is in ON.
■Operating the moon roof after
turning the engine off
The moon roof can be operated for
approximately 45 seconds after the
engine switch is turned to ACC or
turned off. It cannot, however, be
operated once either front door is
opened.
■Jam protection function
If an object is detected between the
moon roof and the frame while the
moon roof is closing or tilting down,
travel is stopped and the moon roof
opens slightly.
■Sunshade
The sunshade can be opened and
closed manually. However, the sun-
shade will open autom atically when
the moon roof is opened.
■Door lock linked moon roof
operation
●The moon roof can be opened
and closed using the mechanical
key.
* ( P.481)
●The moon roof can be opened
using the wireless remote control.*
( P. 1 1 5 )
*: These settings must be custom-
ized at your Toyota dealer.
■When the moon roof does not
close normally
Perform the following procedure:
●If the moon roof closes but then
re-opens slightly
1 Stop the vehicle.
Moon roof*
Use the overhead switches
to open and close the moon
roof and tilt it up and down.
Operating the moon roof
Page 168 of 560
1683-5. Opening, closing the windows and moon roof
HIGHLANDER_U2
Press and hold the “CLOSE”
switch.
*1
The moon roof will close, reopen
and pause for approximately 10 sec-
onds.
*2 Then it will close again, tilt
up and pause for approximately 1
second. Finally, it will tilt down, open
and close.
3 Check to make sure that the
moon roof is completely closed
and then release the switch.
●If the moon roof tilts down but then
tilts back up
1 Stop the vehicle.
2 Press and hold the “UP” switch
*1
until the moon roof moves into
the tilt up position and stops.
3 Release the “UP” switch once
and then press and hold the “UP”
switch again.
*1
The moon roof will pause for
approximately 10 seconds in the tilt
up position.
*2 Then it will adjust
slightly and pause for approximately
1 second. Finally, it will tilt down,
open and close.
4 Check to make sure that the
moon roof is completely closed
and then release the switch.
*1: If the switch is released at the
incorrect time, the procedure will
have to be performed again from
the beginning.
*2: If the switch is released after the above mentioned 10 second
pause, automatic operation will
be disabled. In that case, press
and hold the “CLOSE” or “UP”
switch, and the moon roof will tilt
up and pause for approximately 1
second. Then it will tilt down,
open and close. Check to make
sure that the moon roof is com-
pletely closed and then release
the switch.
If the moon roof does not fully close even after performing the above
procedure correctly, have the vehi-
cle inspected by your Toyota dealer.
■Moon roof open warning buzzer
A buzzer sounds and a message is
shown on the multi-information dis-
play when the engine switch is
turned off and the driver’s door is
opened with the moon roof open.
■Customization
Some functions can be customized.
( P.515)
WARNING
Observe the following precau-
tions.
Failing to do so may cause death
or serious injury.
■Opening the moon roof
●Do not allow any passengers to
put their hands or heads outside
the vehicle while it is moving.
●Do not sit on top of the moon
roof.
■Opening and closing the
moon roof
●The driver is responsible for
moon roof opening and closing
operations.
In order to prevent accidental
operation, especially by a child,
do not let a child operate the
moon roof. It is possible for chil-
dren and other passengers to
have body parts caught in the
moon roof.