USB TOYOTA HIGHLANDER 2021 Accessories, Audio & Navigation (in English)
[x] Cancel search | Manufacturer: TOYOTA, Model Year: 2021, Model line: HIGHLANDER, Model: TOYOTA HIGHLANDER 2021Pages: 412, PDF Size: 18.57 MB
Page 254 of 412
2545-1. Voice command system operation
HIGHLANDER_HIGHLANDER HV_NAVI_(U)
*: The audio device must be con-nected via a USB cable to use the
functionality in this section
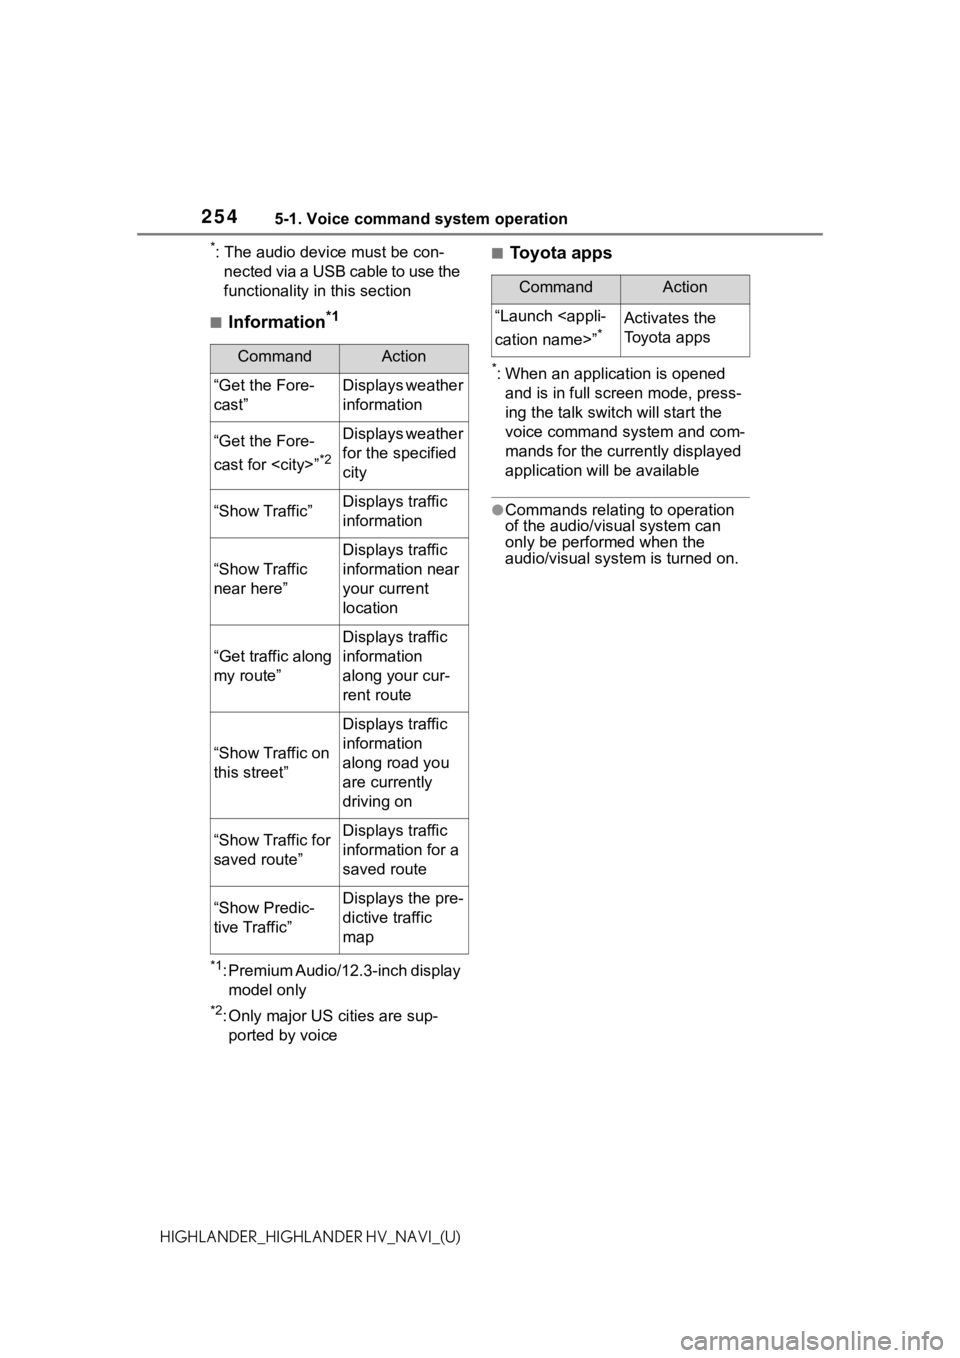
■Information*1
*1: Premium Audio/12.3-inch display model only
*2: Only major US cities are sup-ported by voice
■Toyota apps
*: When an application is opened and is in full screen mode, press-
ing the talk swit ch will start the
voice command system and com-
mands for the currently displayed
application will be available
●Commands relating to operation
of the audio/visual system can
only be performed when the
audio/visual system is turned on.
CommandAction
“Get the Fore-
cast”Displays weather
information
“Get the Fore-
cast for
*2
Displays weather
for the specified
city
“Show Traffic”Displays traffic
information
“Show Traffic
near here”
Displays traffic
information near
your current
location
“Get traffic along
my route”
Displays traffic
information
along your cur-
rent route
“Show Traffic on
this street”
Displays traffic
information
along road you
are currently
driving on
“Show Traffic for
saved route”Displays traffic
information for a
saved route
“Show Predic-
tive Traffic”Displays the pre-
dictive traffic
map
CommandAction
“Launch
*Activates the
Toyota apps
Page 341 of 412

3418-1. Phone operation (Hands-free system for cellular phones)
8
Phone
HIGHLANDER_HIGHLANDER HV_NAVI_(U)
■For PBAP compatible Blue-
tooth
® phones when “Auto-
matic Transfer” is set to on
( P.354)
Contacts are transferred auto-
matically.
■For PBAP compatible Blue-
tooth
® phones when “Auto-
matic Transfer” is set to off
( P.354)
1 Select the desired item.
Select to always transfer all
the contacts from a con-
nected cellular phone auto-
matically.
Select to transfer all the con-
tacts from a connected cellu-
lar phone only once.
Select to cancel transferring.
2 Check that a confirmation
screen is displayed when the
operation is complete.
■For PBAP incompatible but
OPP compatible Blue-
tooth
® phones
1 Select the desired item. Select to transfer the con-
tacts from the connected cel-
lular phone.
Transfer the contact data to
the system using a Blue-
tooth
® phone.
Select to add a new contact
manually.
Follow the steps in “Register-
ing a new contact to the con-
tacts list” from step 2.
( P.357)
Select to cancel transferring.
●If your cellular phone is neither
PBAP nor OPP compatible, the
contacts cannot be transferred
using Bluetooth
®. But the contacts
can be transferred from USB
device. ( P.356)
●Depending on the type of Blue-
tooth® phone:
• It may be necessary to perform
additional steps on the phone
when transferring contact data.
• The registered image in the con-
tact list may not transfer depend-
ing on the type of Bluetooth
®
phone connected.
When the contact list is
empty
A
B
C
A
B
C
Page 356 of 412
3568-2. Setup
HIGHLANDER_HIGHLANDER HV_NAVI_(U)“Replace Contacts”: Select to trans-
fer the contact fro
m the connected
cellular phone and replace the cur-
rent one.
“Add Contact”: Select to transfer
the desired contact data from the
connected cellular phone to add to
the current one.
4 Transfer the contact data to
the system using a Blue-
tooth
® phone.
This operation may be unnec-
essary depending on the type
of Bluetooth
® phone.
To cancel this function, select
“Cancel”.
5 Check that a confirmation
screen is displayed when the
operation is complete.
Backed-up contact data
(“vCard” formatted) can be
transferred from USB device or
Bluetooth
® phone to this sys-
tem.
1 Connect a USB device.
( P.137)
2 Select “Transfer Contacts
from Device”.
3 Select “From USB”.
4 Select “USB 1” or “USB 2”
when the multiple USB
devices are connected. If a
USB device is connected,
skip this procedure.
5 Select “Replace Contacts” or
“Add Contact”. If the contact is not registered, skip this
procedure.
“Replace Contacts”: Select to trans-
fer the contact fr
om the connected
USB device or Bluetooth
® phone
and replace the current one.
“Add Contact”: Select to transfer
the desired contact data from the
connected USB de vice or Blue-
tooth
® phone to add to the current
one.
6 Select a desired file from
vCard file list.
7 Check that a confirmation
screen is displayed when the
operation is complete.
●Depending on the type of Blue-
tooth® phone used and number of
files, it may take time to display
vCard file lists and download con-
tacts.
●Downloading may not complete
correctly in the following cases:
• If the engine switch
loading.
• If the USB device or Bluetooth
®
phone is removed before down-
loading is complete.
From USB device
Page 369 of 412
3699-1. Connected Services overview
9
Connected Services
HIGHLANDER_HIGHLANDER HV_NAVI_(U)
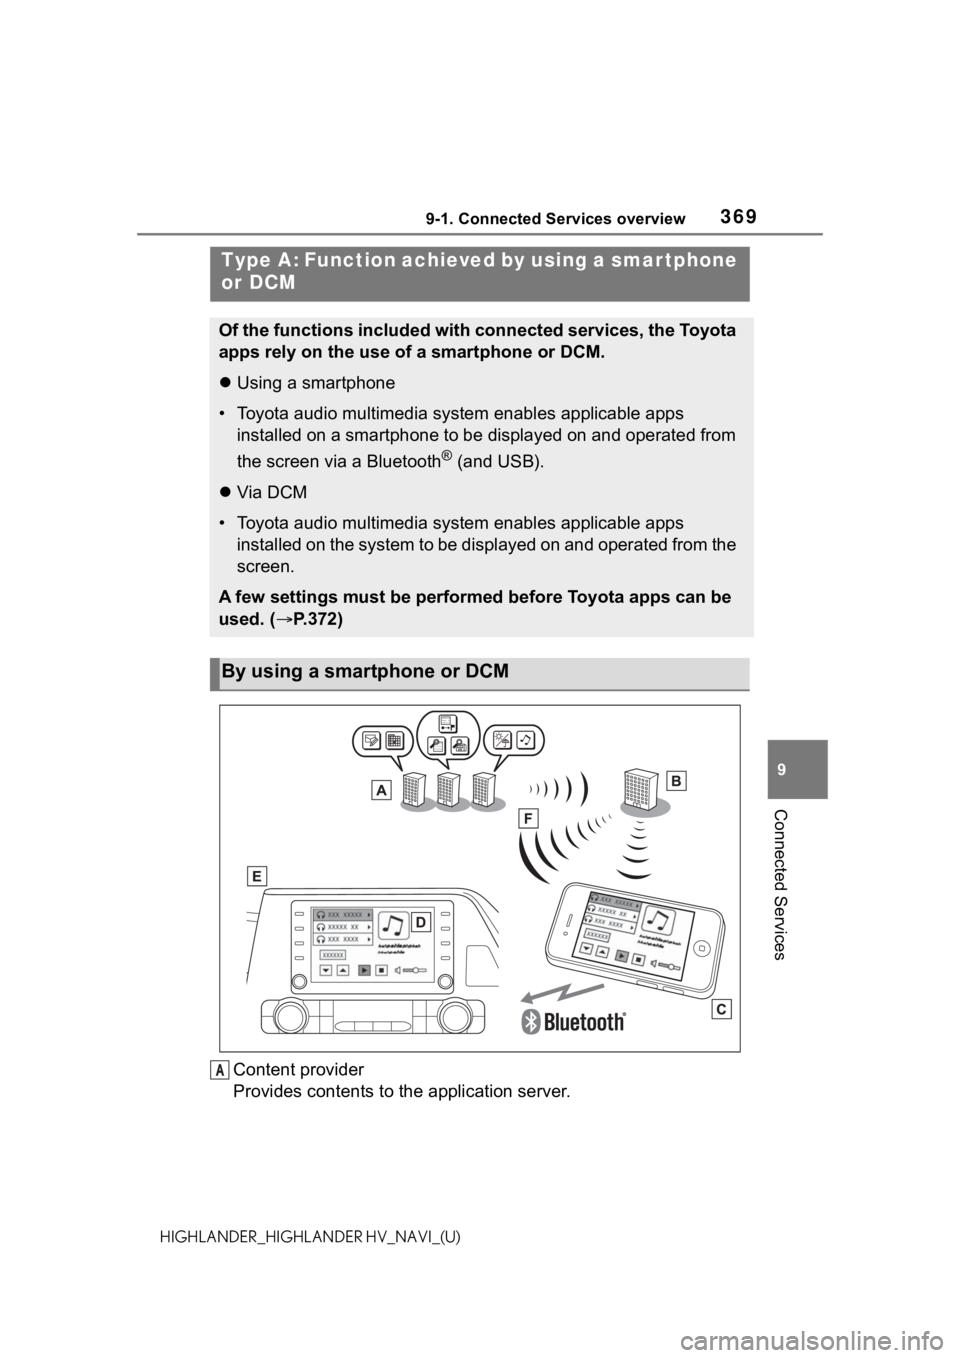
Content provider
Provides contents to the application server.
Type A: Function achieved by using a smar tphone
or DCM
Of the functions included with connected services, the Toyota
apps rely on the use of a smartphone or DCM.
Using a smartphone
• Toyota audio multimedia system enables applicable apps
installed on a smartphone to be displayed on and operated from
the screen via a Bluetooth
® (and USB).
Via DCM
• Toyota audio multimedia system enables applicable apps
installed on the system to be displayed on and operated from th e
screen.
A few settings must be performed before Toyota apps can be
used. ( P.372)
By using a smartphone or DCM
A
Page 384 of 412
3849-3. Setup
HIGHLANDER_HIGHLANDER HV_NAVI_(U)
9-3.Setup
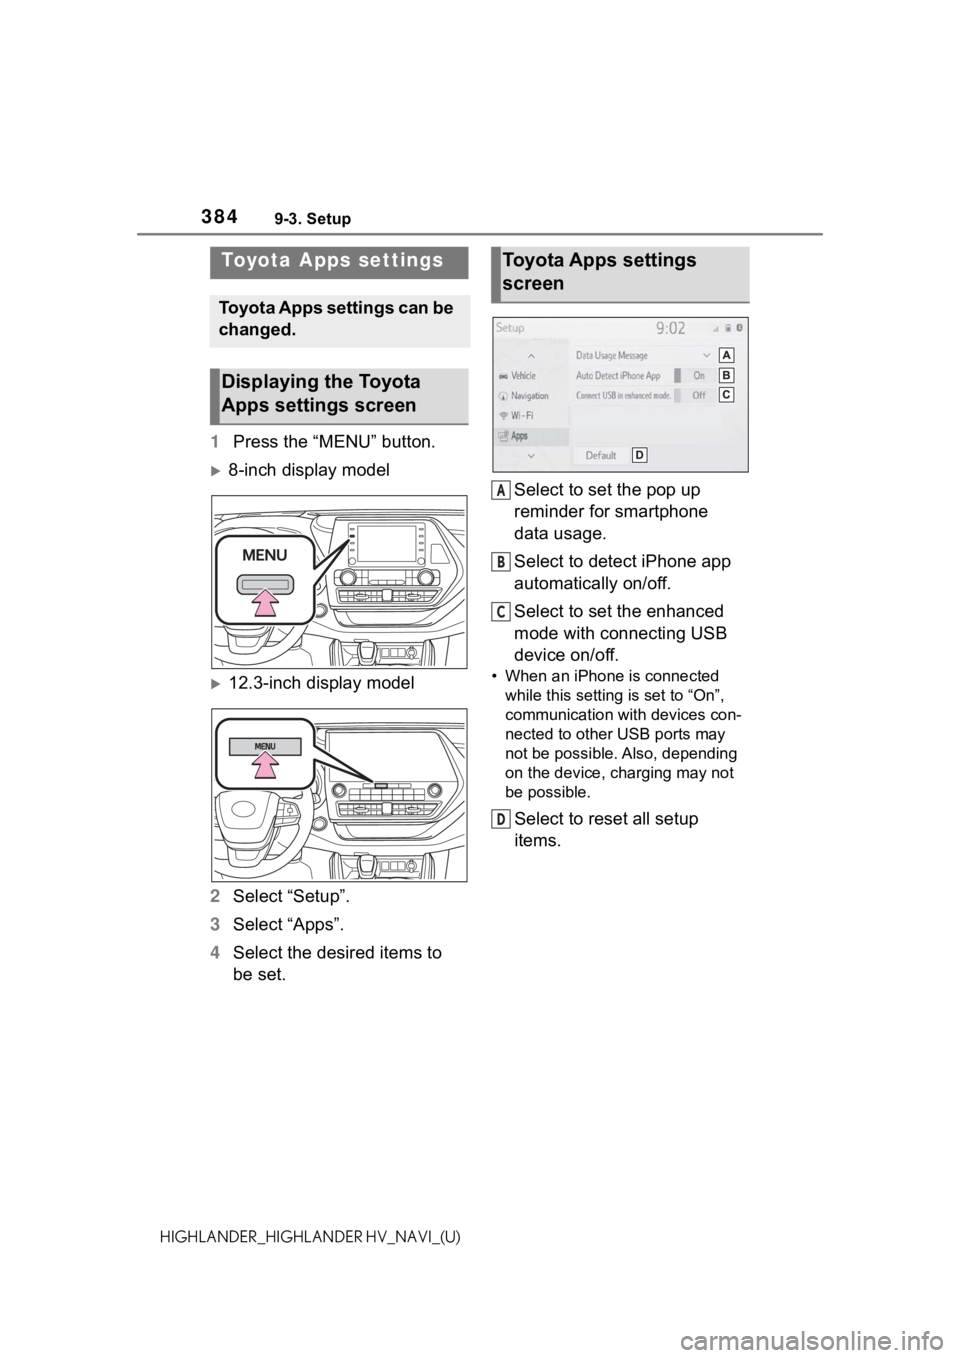
1Press the “MENU” button.
8-inch display model
12.3-inch display model
2 Select “Setup”.
3 Select “Apps”.
4 Select the desired items to
be set. Select to set the pop up
reminder for smartphone
data usage.
Select to detect iPhone app
automatically on/off.
Select to set the enhanced
mode with connecting USB
device on/off.• When an iPhone is connected
while this setting is set to “On”,
communication with devices con-
nected to other USB ports may
not be possible. Also, depending
on the device, charging may not
be possible.
Select to reset all setup
items.
Toyota Apps settings
Toyota Apps settings can be
changed.
Displaying the Toyota
Apps settings screen
Toyota Apps settings
screen
A
B
C
D
Page 386 of 412
386
HIGHLANDER_HIGHLANDER HV_NAVI_(U)
Alphabetical Index
A
A route from the Cloud .......... 104
AM ............................................ 141
Android Auto .......................... 157
Android Auto button (Menu screen) .................................... 15
Apple CarPlay button (Menu screen) .................................... 15
Apple CarPlay/Android Auto ... 59
APPS button ........... .................. 12
Apps button (Menu screen) ..... 15
Apps button (Setup screen) .... 19
Audio ....................................... 134 Audio source ........................ 136
Operating information........... 167
Reordering the audio source 137
Screen adjustment ............... 139
Some basics......................... 136
Sound settings ..................... 138
Turning the system on and off........................................... 136
USB port............................... 137
Voice command system ....... 140
Audio (rear seat entertainment) ............................................... 177Function index ...................... 177
Operating information........... 214
Some basics......................... 178
AUDIO button............................ 12
Audio button (Menu screen).... 15
Audio button (Setup screen) ... 19
Audio settings ........................ 164 Common settings ................. 164
Radio settings ...................... 165
Settings the driver easy speak function............................... 166
Audio source .......................... 136
B
Basic operation ........................ 80 Bluetooth
® audio ....................158
Registering/Connecting a Blue- tooth
® device ......................161
Bluetooth® button (Setup
screen) .....................................19
Bluetooth
® details settings .....45
Bluetooth® setup screen.........45
Connecting a Bluetooth® device
.............................................46
Deleting a Bluetooth
® device..48
Detailed settings screen .........50
Displaying the Bluetooth
® setup
screen...................................45
Editing the Bluetooth
® device
information............................49
Registering a Bluetooth
® device
.............................................48
Bluetooth
® hands-free system
...............................................334
Bluetooth
® phone message func-
tion .........................................346 Calling the message sender .349
Checking received messages ...........................................347
Displaying the message screen ...........................................346
Receiving a mess age ...........346
Replying to a message (dicta- tion reply)............................348
Replying to a message (quick reply) ..................................348
Buttons overview......................12
C
Clock settings ...........................69
Command list ..........................250
D
Data service button (Setup screen) .....................................19
Data services settings............260
Page 390 of 412
390
HIGHLANDER_HIGHLANDER HV_NAVI_(U)Toyota multi-operation touch
overview ............................... 31
Toyota parking assist monitor ............................................... 274Camera ................................ 281
Differences between the screen and the actual road ............ 283
Distance guide line display mode ........................................... 280
Driving precautions .............. 274
Estimated course line display mode .................................. 277
Parking assist gui de line display
mode .................................. 279
Precautions .......................... 280
Things you should know....... 287
Using the system.................. 276
When approaching three-dimen- sional objects ..................... 285
Traffic button (Setup screen) .. 19
Traffic incidents button (Informa- tion screen) ............................. 21
Traffic information .................... 90
Traffic settings ........................ 123
TUNE SCROLL knob ................ 12
U
USB memory ........................... 152
USB port .................................. 137
Use of information accumulated by navigation system........... 128
V
Vehicle alert history button
(Information screen) .............. 21
Vehicle button (Setup screen) ........................................... 19, 73
Vehicle settings ........................ 73 Displaying the vehicle settings screen .................................. 73
Maintenance........................... 74 Valet mode setting ..................76
Vehicle settings screen...........74
Voice button (Setup screen) ...........................................19, 72
Voice command system .........246 Using the voice command sys-tem .....................................246
Voice command system opera- tion......................................247
Voice guidance prompts ........ 110
Voice settings ...........................72 Displaying the voice settings screen...................................72
Voice settings screen .............72
W
Weather ...................................258
Weather button (Information screen) .....................................21
Wi-Fi
® button (Setup screen) ..19
Wi-Fi® Hotspot ..........................53
Connecting a device to the in-vehicle access point .........53
Operating hints .......................57