remove seats TOYOTA HIGHLANDER 2021 Owners Manual (in English)
[x] Cancel search | Manufacturer: TOYOTA, Model Year: 2021, Model line: HIGHLANDER, Model: TOYOTA HIGHLANDER 2021Pages: 568, PDF Size: 15.96 MB
Page 32 of 568
321-1. For safe use
HIGHLANDER_Useat belt.
3
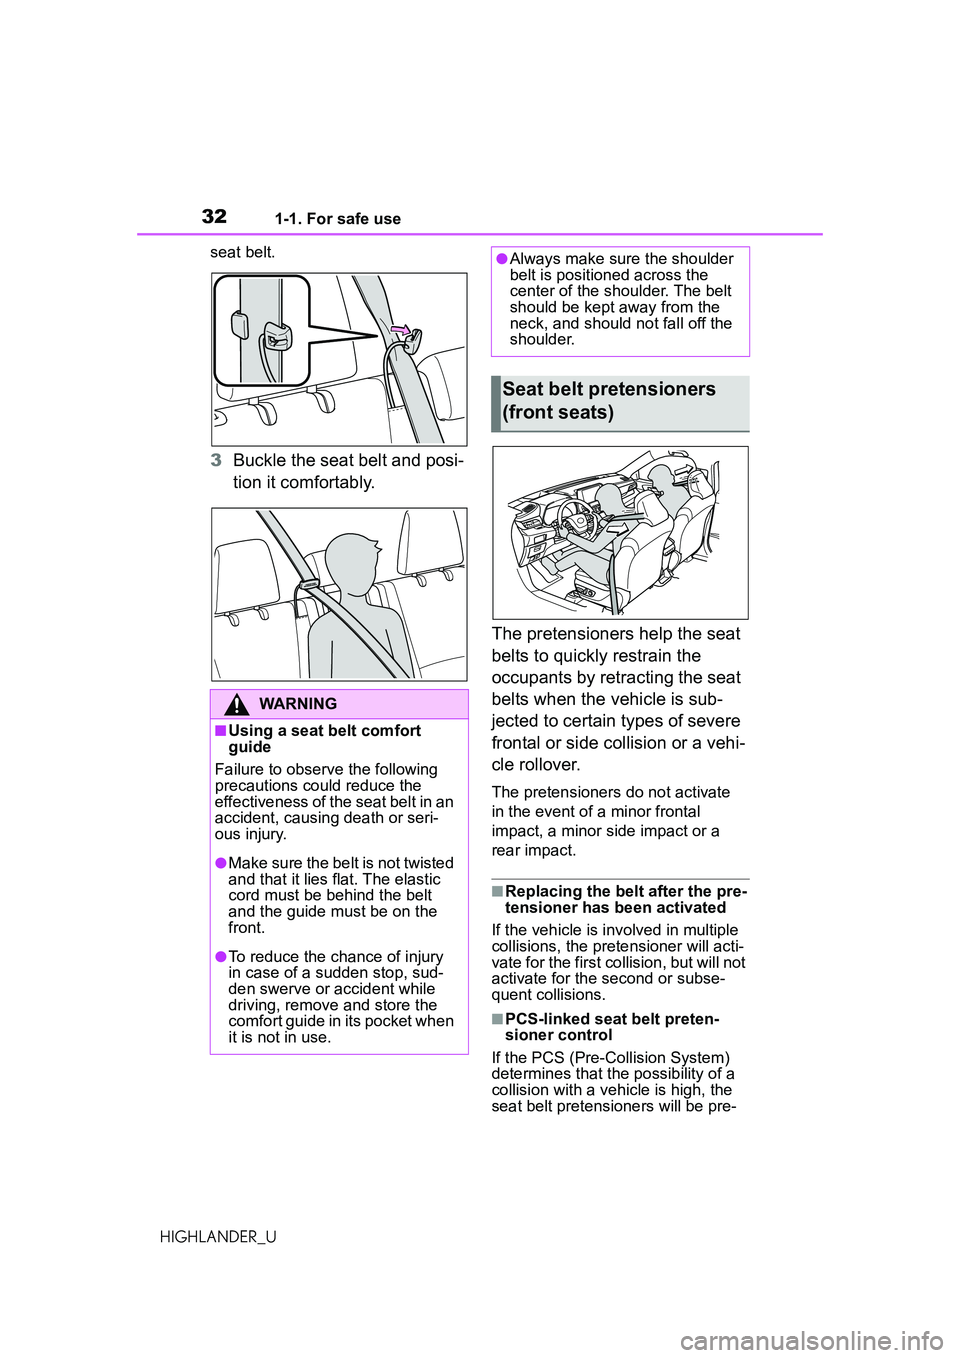
Buckle the seat belt and posi-
tion it comfortably.
The pretensioners help the seat
belts to quickly restrain the
occupants by retracting the seat
belts when the vehicle is sub-
jected to certain types of severe
frontal or side collision or a vehi-
cle rollover.
The pretensioners do not activate
in the event of a minor frontal
impact, a minor side impact or a
rear impact.
■Replacing the belt after the pre-
tensioner has been activated
If the vehicle is in volved in multiple
collisions, the pretensioner will acti-
vate for the first collision, but will not
activate for the second or subse-
quent collisions.
■PCS-linked seat belt preten-
sioner control
If the PCS (Pre-Collision System)
determines that th e possibility of a
collision with a vehicle is high, the
seat belt pretensioners will be pre-
WARNING
■Using a seat belt comfort
guide
Failure to obser ve the following
precautions could reduce the
effectiveness of the seat belt in an
accident, causing death or seri-
ous injury.
●Make sure the belt is not twisted
and that it lies flat. The elastic
cord must be behind the belt
and the guide must be on the
front.
●To reduce the chance of injury
in case of a sudden stop, sud-
den swerve or accident while
driving, remove and store the
comfort guide in its pocket when
it is not in use.
●Always make sure the shoulder
belt is positioned across the
center of the shoulder. The belt
should be kept away from the
neck, and should not fall off the
shoulder.
Seat belt pretensioners
(front seats)
Page 42 of 568
421-1. For safe use
HIGHLANDER_U
WARNING
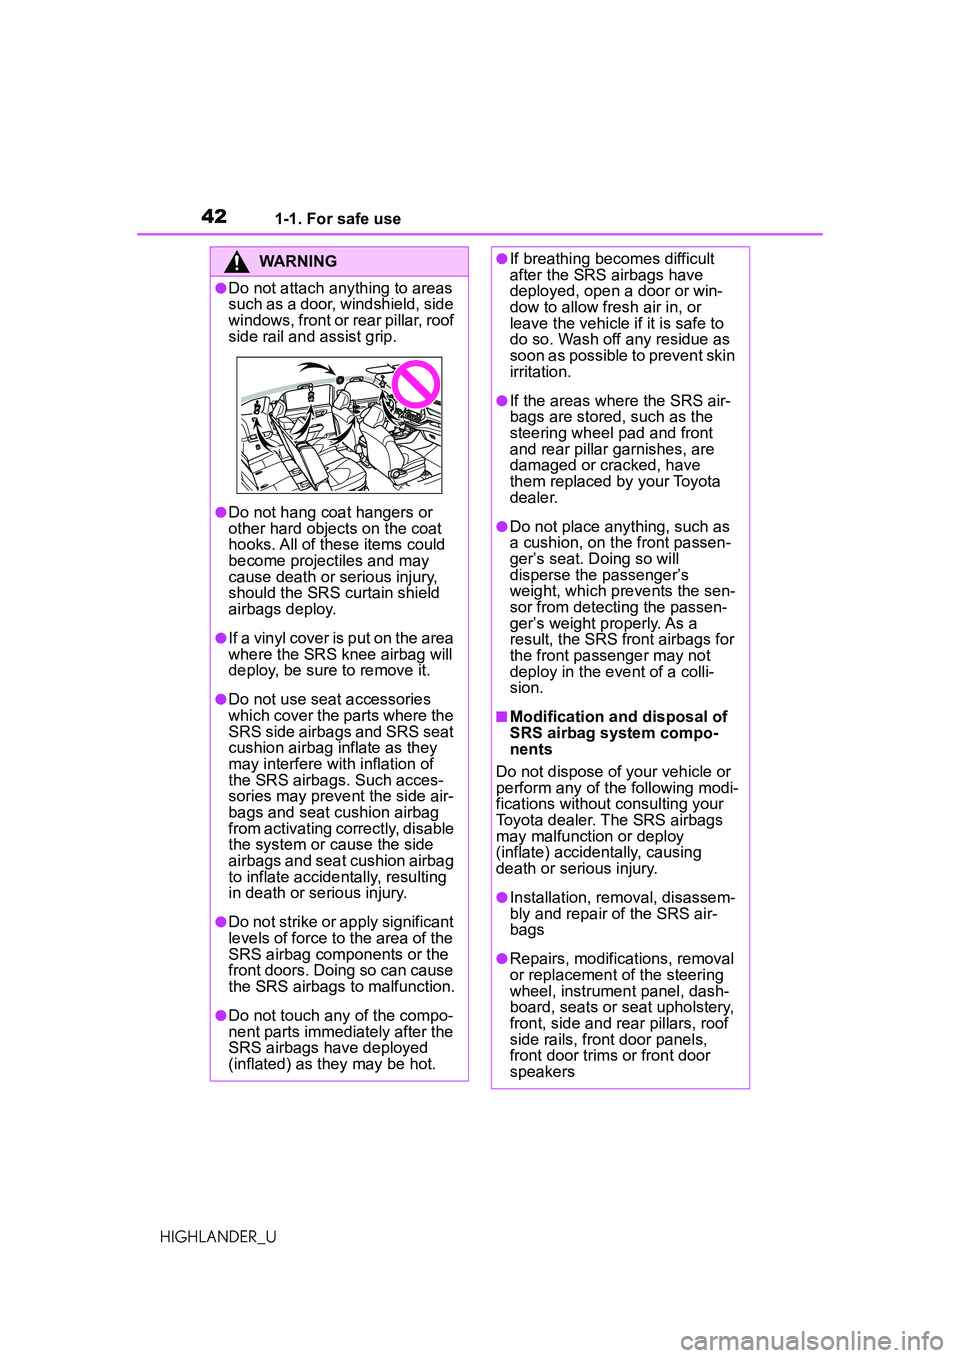
●Do not attach anything to areas
such as a door, windshield, side
windows, front or rear pillar, roof
side rail and assist grip.
●Do not hang coat hangers or
other hard objects on the coat
hooks. All of these items could
become projectiles and may
cause death or serious injury,
should the SRS curtain shield
airbags deploy.
●If a vinyl cover is put on the area
where the SRS knee airbag will
deploy, be sure to remove it.
●Do not use seat accessories
which cover the parts where the
SRS side airbags and SRS seat
cushion airbag inflate as they
may interfere with inflation of
the SRS airbags. Such acces-
sories may prevent the side air-
bags and seat cushion airbag
from activating correctly, disable
the system or cause the side
airbags and seat cushion airbag
to inflate accidentally, resulting
in death or serious injury.
●Do not strike or apply significant
levels of force to the area of the
SRS airbag components or the
front doors. Doing so can cause
the SRS airbags to malfunction.
●Do not touch any of the compo-
nent parts immediately after the
SRS airbags have deployed
(inflated) as they may be hot.
●If breathing becomes difficult
after the SRS airbags have
deployed, open a door or win-
dow to allow fresh air in, or
leave the vehicle if it is safe to
do so. Wash off any residue as
soon as possible to prevent skin
irritation.
●If the areas where the SRS air-
bags are stored, such as the
steering wheel pad and front
and rear pillar garnishes, are
damaged or cracked, have
them replaced by your Toyota
dealer.
●Do not place anything, such as
a cushion, on the front passen-
ger’s seat. Doing so will
disperse the passenger’s
weight, which prevents the sen-
sor from detecting the passen-
ger’s weight properly. As a
result, the SRS front airbags for
the front passenger may not
deploy in the event of a colli-
sion.
■Modification and disposal of
SRS airbag system compo-
nents
Do not dispose of your vehicle or
perform any of the following modi-
fications without consulting your
Toyota dealer. The SRS airbags
may malfunction or deploy
(inflate) accidentally, causing
death or serious injury.
●Installation, removal, disassem-
bly and repair of the SRS air-
bags
●Repairs, modifications, removal
or replacement of the steering
wheel, instrument panel, dash-
board, seats or seat upholstery,
front, side and rear pillars, roof
side rails, front door panels,
front door trims or front door
speakers
Page 45 of 568
451-1. For safe use
1
For safety and security
HIGHLANDER_U
WARNING
●Do not recline the front passen-
ger seatback so far that it
touches a rear seat. This may
cause the “PASS AIR BAG
OFF” indicator light to be illumi-
nated, which indicates that the
SRS airbags for the front pas-
senger will not activate in the
event of a severe accident. If
the seatback touches the rear
seat, return the seatback to a
position where it does not touch
the rear seat. Keep the front
passenger seatback as upright
as possible when the vehicle is
moving. Reclining the seatback
excessively may lessen the
effectiveness of the seat belt
system.
●If an adult sits in the front pas-
senger seat, the “PASS AIR
BAG ON” indicator light is illumi-
nated. If the “PASS AIR BAG
OFF” indicator is illuminated,
ask the passenger to sit up
straight, well back in the seat,
feet on the floor, and with the
seat belt worn correctly. If the
“PASS AIR BAG OFF” indicator
still remains illuminated, either
ask the passenger to move to
the rear seat, or if that is not
possible, move the front pas-
senger seat fully rearward.
●When it is unavoidable to install
a forward-facing child restraint
system on the front passenger
seat, install the child restraint
system on the front passenger
seat in the proper order.
(
P. 5 2 )
●Do not modify or remove the
front seats.
●Do not kick the front passenger
seat or subject it to severe
impact. Otherwise, the SRS
warning light may come on to
indicate a malfunction of the
front passenger occupant clas-
sification system. In this case,
contact your Toyota dealer
immediately.
●Child restraint systems installed
on the rear seat should not con-
tact the front seatbacks.
●Do not use a seat accessory,
such as a cushion and seat
cover, that covers the seat
cushion surface.
●Do not modify or replace the
upholstery of the front seat.
Page 60 of 568

601-2. Child safety
HIGHLANDER_U
■Child restraint LATCH
anchors
LATCH anchors are provided for
the outboard second seats.
■When installing in the rear
outboard seats
Install the child restraint system
in accordance to the operation
manual enclosed with the child
restraint system.
1 Adjust the seat
If there is a gap between the child
seat and the seatback, adjust the
seatback angle until good contact is
achieved.
2Remove the head restraint if
it interferes with your child
restraint system. ( P.150) 3
Widen the gap between the
seat cushion and seatback
slightly.
With flexible lower attach-
ments
4 Latch the hooks of the lower
attachments onto the LATCH
anchors.
For owners in Canada:
The symbol on a child
restraint system indicates
the presence of a lower con-
nector system.
Canada only
With rigid lower attachments
4 Latch the buckles onto the
LATCH anchors.
For owners in Canada:
The symbol on a child
restraint system indicates
Child restraint system
fixed with a child restraint
LATCH anchor
Page 63 of 568
631-2. Child safety
1
For safety and security
HIGHLANDER_Uanchors.
■Fixing the top tether strap
to the anchor bracket (sec-
ond seats)
Install the child restraint system
in accordance to the operation
manual enclosed with the child
restraint system.
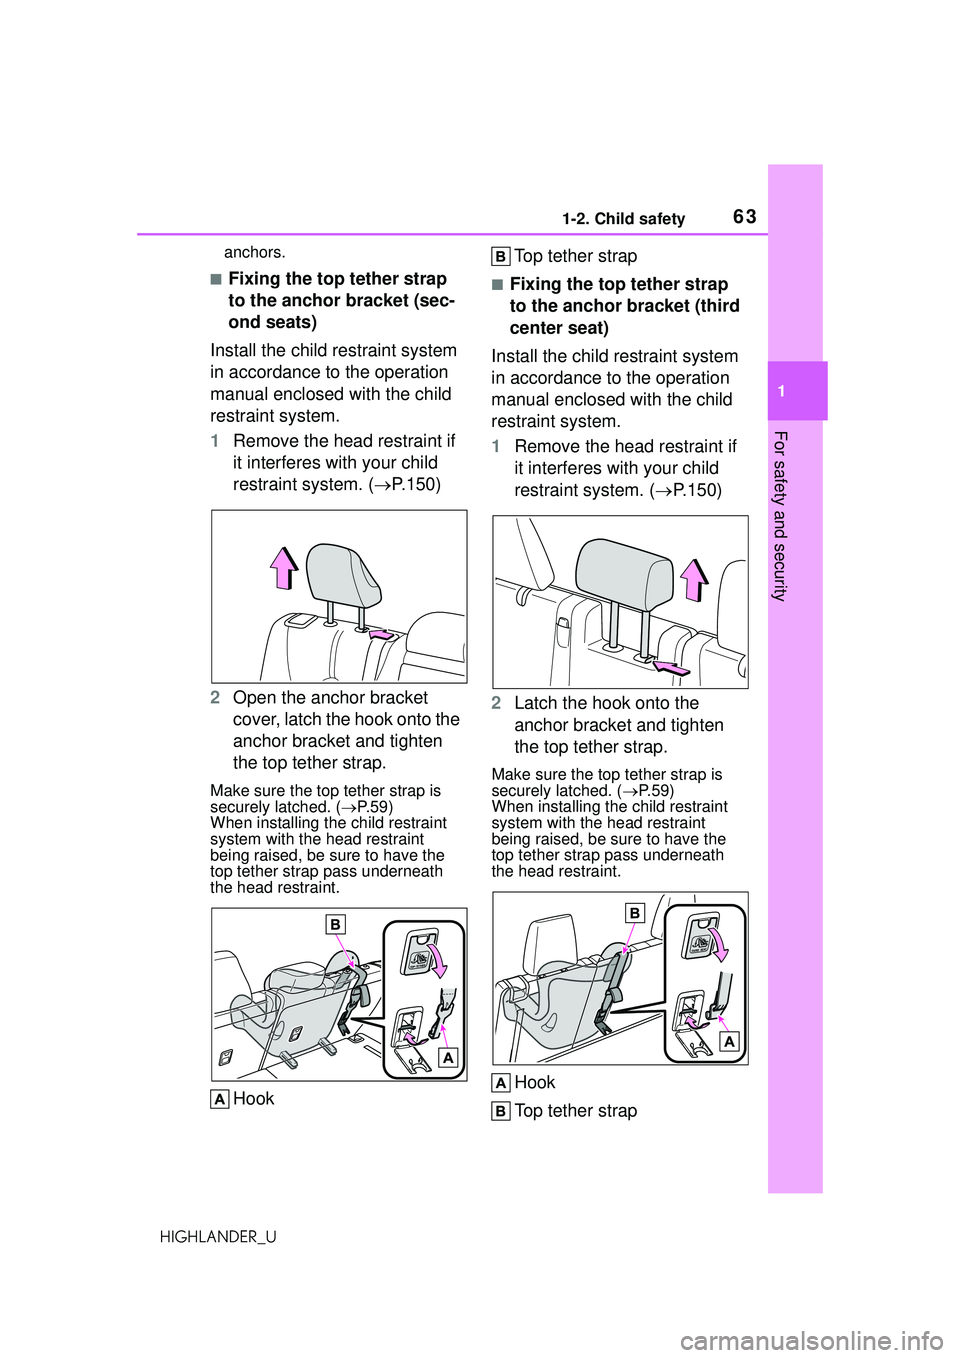
1 Remove the head restraint if
it interferes with your child
restraint system. ( P.150)
2 Open the anchor bracket
cover, latch the hook onto the
anchor bracket and tighten
the top tether strap.
Make sure the top tether strap is
securely latched. ( P.59)
When installing the child restraint
system with the head restraint
being raised, be sure to have the
top tether strap pass underneath
the head restraint.
Hook Top tether strap
■Fixing the top tether strap
to the anchor bracket (third
center seat)
Install the child restraint system
in accordance to the operation
manual enclosed with the child
restraint system.
1 Remove the head restraint if
it interferes with your child
restraint system. ( P.150)
2 Latch the hook onto the
anchor bracket and tighten
the top tether strap.
Make sure the top tether strap is
securely latched. ( P. 5 9 )
When installing the child restraint
system with the head restraint
being raised, be sure to have the
top tether strap pass underneath
the head restraint.
Hook
Top tether strap
Page 146 of 568
1463-3. Adjusting the seats
HIGHLANDER_U
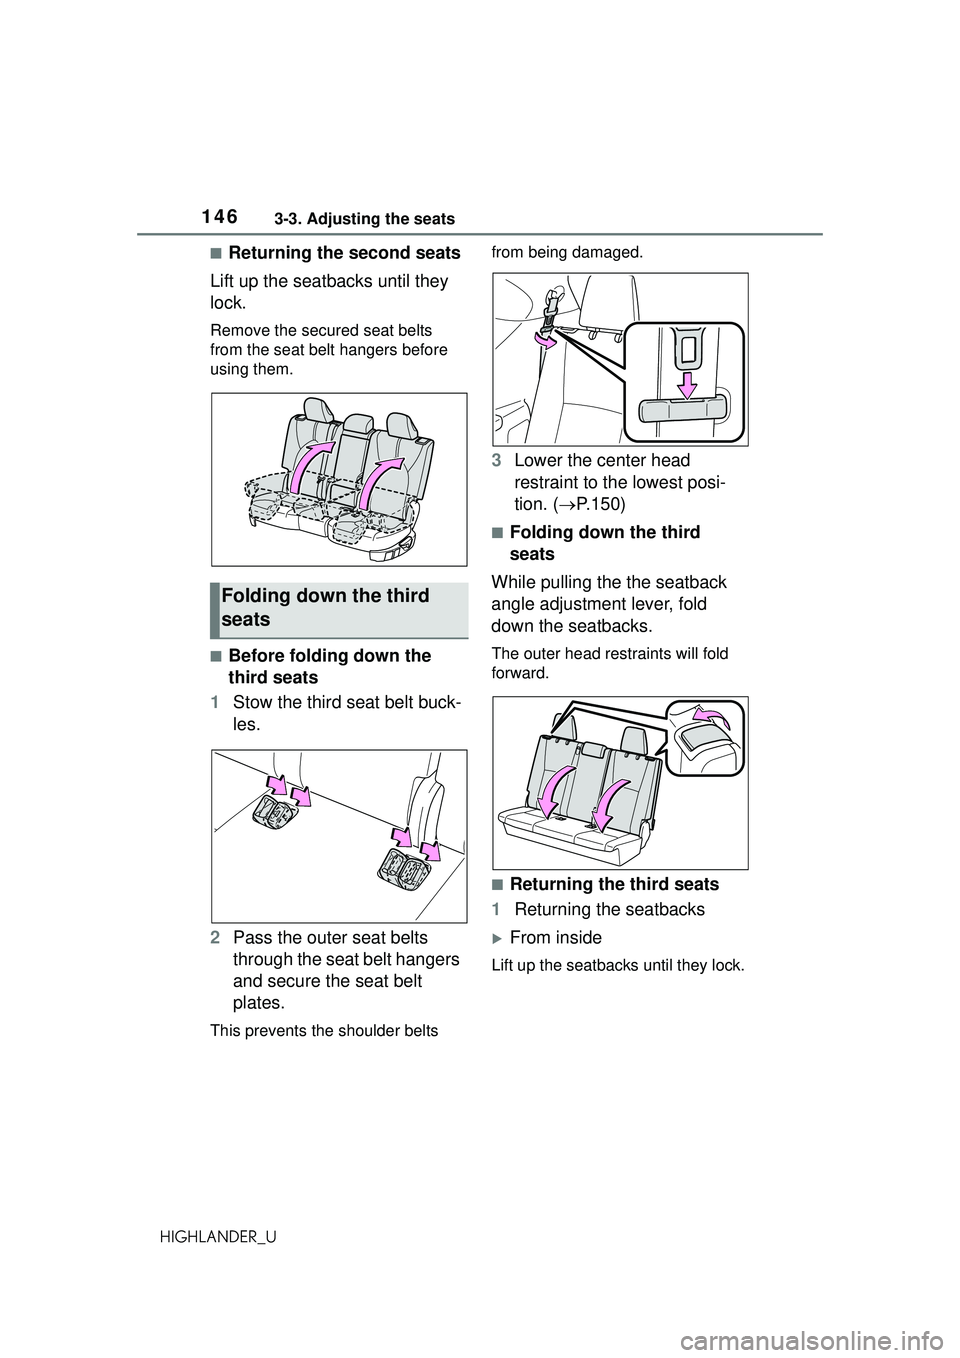
■Returning the second seats
Lift up the seatbacks until they
lock.
Remove the secu red seat belts
from the seat belt hangers before
using them.
■Before folding down the
third seats
1 Stow the third seat belt buck-
les.
2 Pass the outer seat belts
through the seat belt hangers
and secure the seat belt
plates.
This prevents the shoulder belts from being damaged.
3
Lower the center head
restraint to the lowest posi-
tion. ( P.150)
■Folding down the third
seats
While pulling the the seatback
angle adjustment lever, fold
down the seatbacks.
The outer head rest raints will fold
forward.
■Returning the third seats
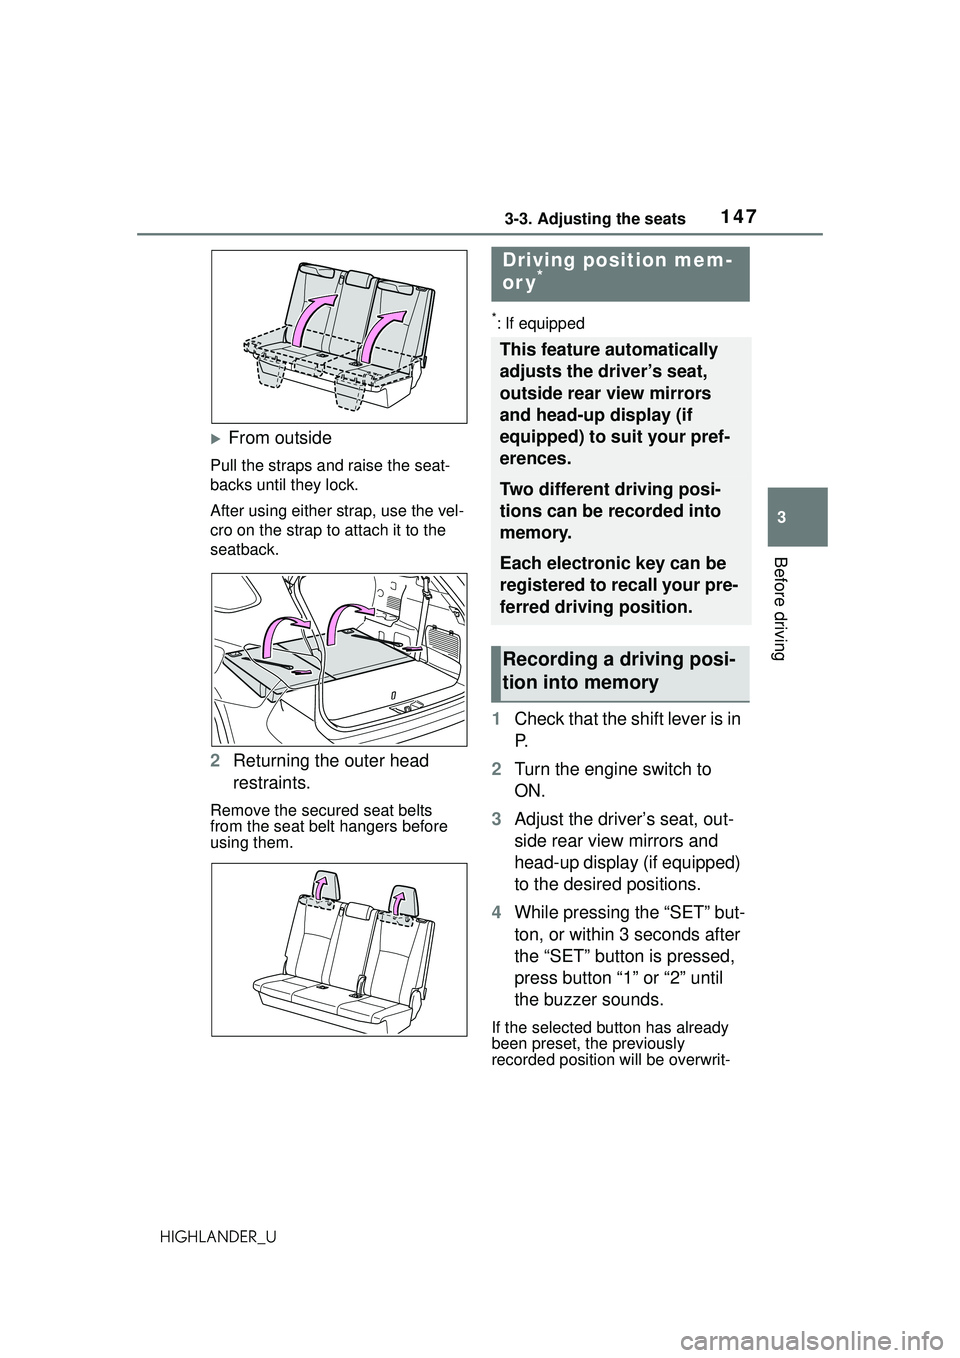
1 Returning the seatbacks
From inside
Lift up the seatbacks until they lock.
Folding down the third
seats
Page 147 of 568
1473-3. Adjusting the seats
3
Before driving
HIGHLANDER_U
From outside
Pull the straps and raise the seat-
backs until they lock.
After using either strap, use the vel-
cro on the strap to attach it to the
seatback.
2Returning the outer head
restraints.
Remove the secu red seat belts
from the seat belt hangers before
using them.
*: If equipped
1 Check that the shift lever is in
P.
2 Turn the engine switch to
ON.
3 Adjust the driver’s seat, out-
side rear view mirrors and
head-up display (if equipped)
to the desired positions.
4 While pressing the “SET” but-
ton, or within 3 seconds after
the “SET” button is pressed,
press button “1” or “2” until
the buzzer sounds.
If the selected button has already
been preset, the previously
recorded position will be overwrit-
Driving position mem-
or y*
This feature automatically
adjusts the driver’s seat,
outside rear view mirrors
and head-up display (if
equipped) to suit your pref-
erences.
Two different driving posi-
tions can be recorded into
memory.
Each electronic key can be
registered to recall your pre-
ferred driving position.
Recording a driving posi-
tion into memory
Page 150 of 568
1503-3. Adjusting the seats
HIGHLANDER_U(
P.521)
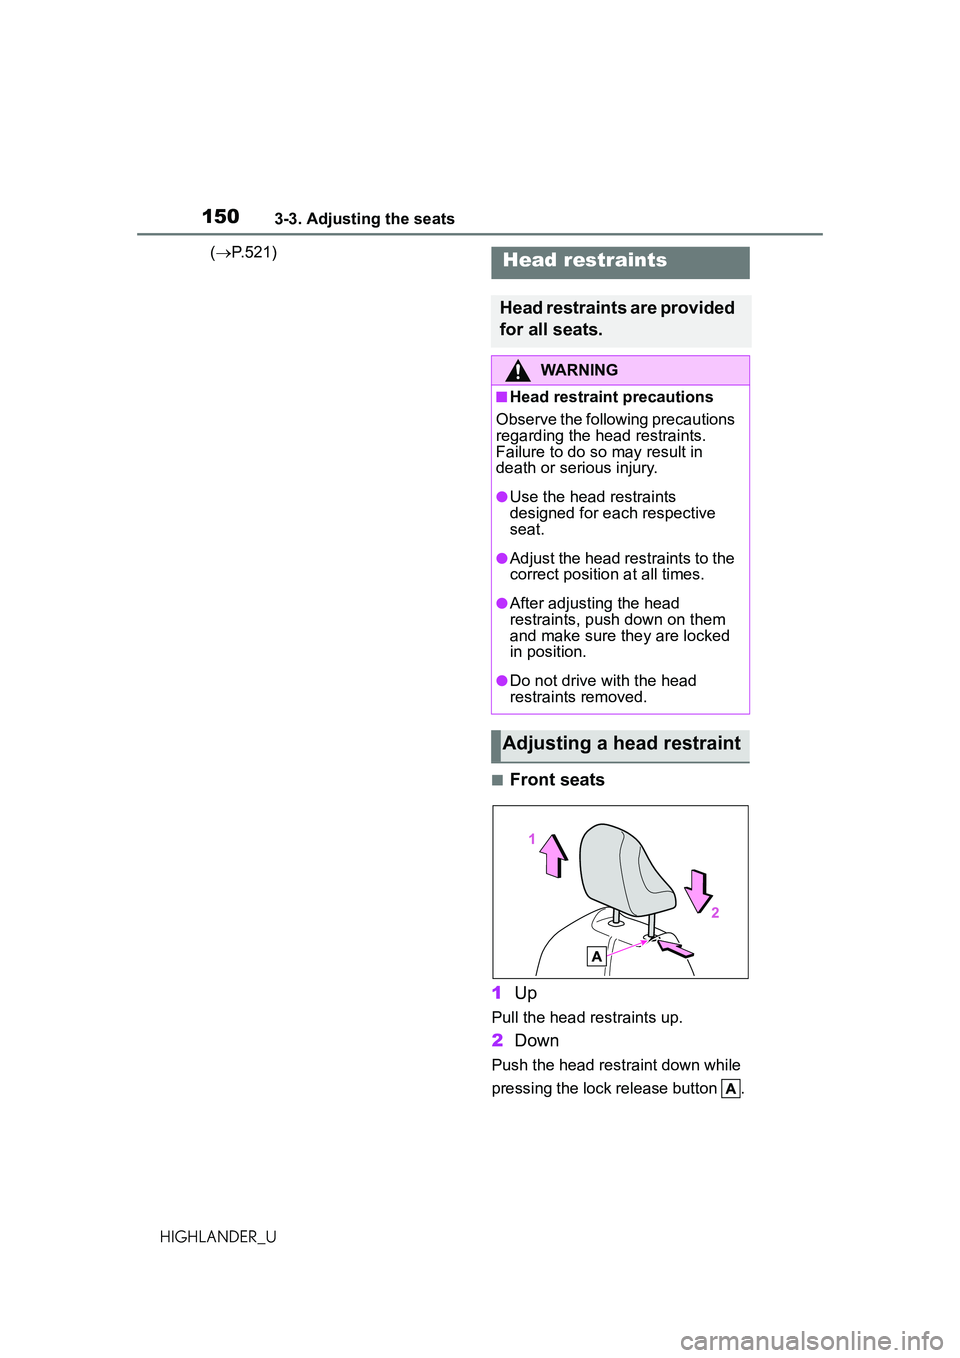
■Front seats
1 Up
Pull the head restraints up.
2Down
Push the head restraint down while
pressing the lock release button .
Head restraints
Head restraints are provided
for all seats.
WARNING
■Head restraint precautions
Observe the following precautions
regarding the head restraints.
Failure to do so may result in
death or serious injury.
●Use the head restraints
designed for each respective
seat.
●Adjust the head restraints to the
correct position at all times.
●After adjusting the head
restraints, push down on them
and make sure they are locked
in position.
●Do not drive with the head
restraints removed.
Adjusting a head restraint
Page 372 of 568
3725-4. Using the storage features
HIGHLANDER_U
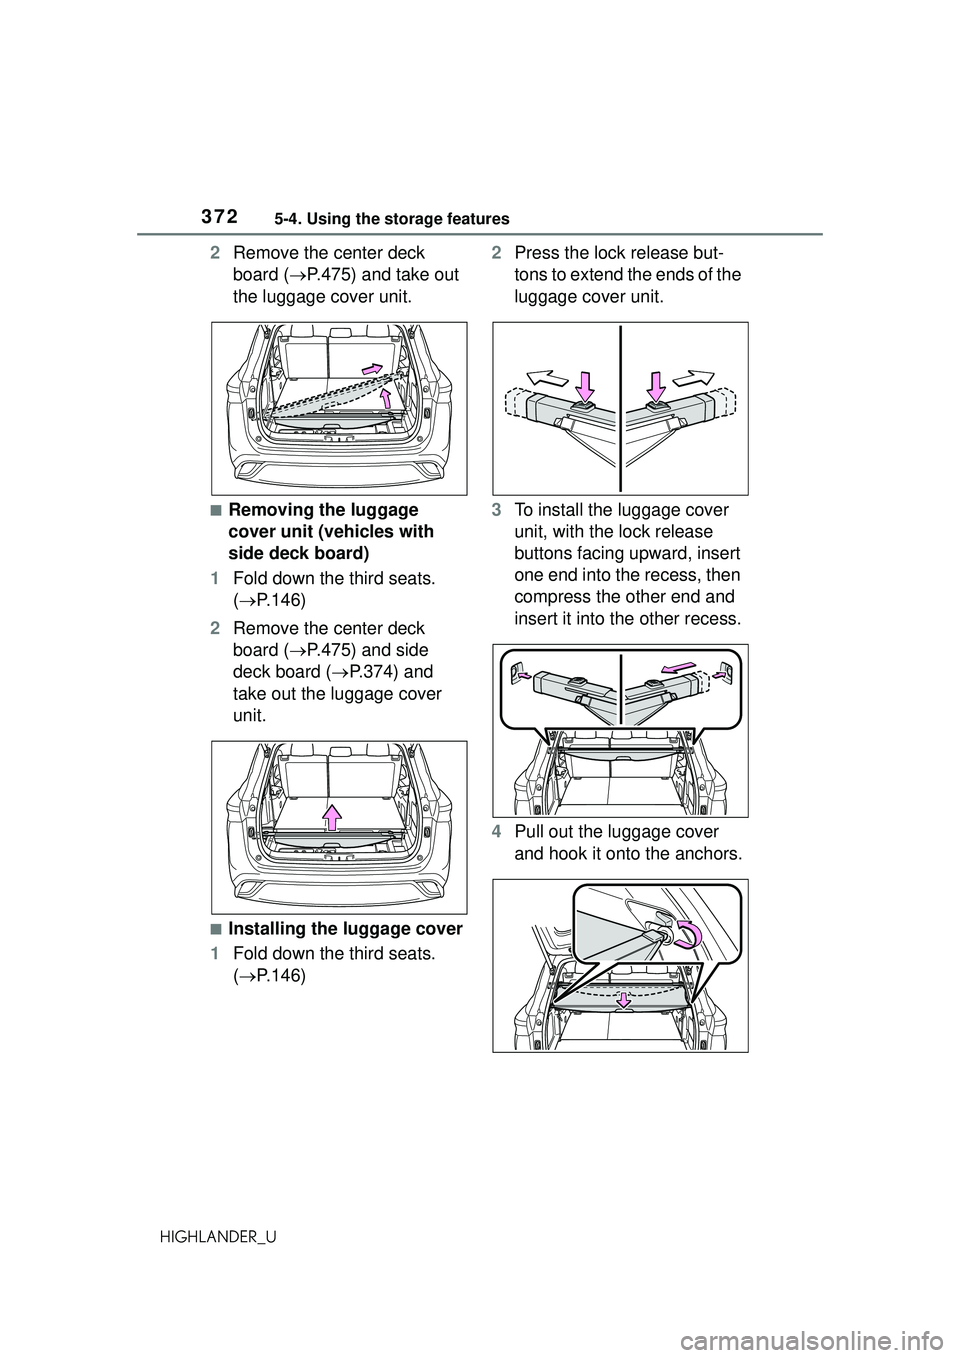
2Remove the center deck
board ( P.475) and take out
the luggage cover unit.
■Removing the luggage
cover unit (vehicles with
side deck board)
1 Fold down the third seats.
( P.146)
2 Remove the center deck
board ( P.475) and side
deck board ( P.374) and
take out the luggage cover
unit.
■Installing the luggage cover
1 Fold down the third seats.
( P.146) 2
Press the lock release but-
tons to extend the ends of the
luggage cover unit.
3 To install the luggage cover
unit, with the lock release
buttons facing upward, insert
one end into the recess, then
compress the other end and
insert it into the other recess.
4 Pull out the luggage cover
and hook it onto the anchors.
Page 399 of 568
3996-1. Maintenance and care
6
Maintenance and care
HIGHLANDER_U
Remove dirt and dust using a
vacuum cleaner. Wipe dirty
surfaces with a cloth damp-
ened with lukewarm water.
If dirt cannot be removed,
wipe it off with a soft cloth
dampened with neutral deter-
gent diluted to approximately
1%.
Wring out any excess water
from the cloth and thoroughly
wipe off remaining traces of
detergent and water.
■Shampooing the carpets
There are several commercial foam-
ing-type cleaners available. Use a
sponge or brush to apply the foam.
Rub in overlapping circles. Do not
use water. Wipe dirty surfaces and
let them dry. Excellent results are
obtained by keeping the carpet as
dry as possible.
■Handling the seat belts
Clean with mild soap and lukewarm
water using a cloth or sponge. Also
check the belts periodically for
excessive wear, fraying or cuts.
Cleaning and protect-
ing the vehicle interior
Perform cleaning in a man-
ner appropriate to each
component and its material.
Protecting the vehicle
interior
WARNING
■Water in the vehicle
●Do not splash or spill liquid in
the vehicle.
Doing so may cause electrical
components, etc. to malfunc-
tion or catch fire.
●Do not get any of the SRS com-
ponents or wiring in the vehicle
interior wet.
( P. 3 4 )
An electrical malfunction may
cause the airbags to deploy or
not function properly, resulting
in death or serious injury.
●Vehicles with wireless charger:
Do not let the wireless charger
( P.376) get wet. Failure to do
so may cause the charger to
become hot and cause burns or
could cause electric shock
resulting in death or serious
injury.
■Cleaning the interior (espe-
cially instrument panel)
Do not use polish wax or polish
cleaner. The instrument panel
may reflect off the windshield,
obstructing the driver’s view and
leading to an accident, resulting in
death or serious injury.
NOTICE
■Cleaning detergents
●Do not use the following types
of detergent, as they may dis-
color the vehicle interior or
cause streaks or damage to
painted surfaces:
• Non-seat portions: Organic sub- stances such as benzene or
gasoline, alkaline or acidic solu-
tions, dye, and bleach
• Seats: Alkaline or acidic solu- tions, such as thinner, benzene,
and alcohol