roof TOYOTA HIGHLANDER 2022 Owner's Guide
[x] Cancel search | Manufacturer: TOYOTA, Model Year: 2022, Model line: HIGHLANDER, Model: TOYOTA HIGHLANDER 2022Pages: 568, PDF Size: 13.73 MB
Page 325 of 568
3254-6. Driving tips
4
Driving
Do not try to forcibly open a
window or move a wiper that
is frozen. Pour warm water
over the frozen area to melt
the ice. Wipe away the water
immediately to prevent it from
freezing.
To ensure proper operation of
the climate control system
fan, remove any snow that
has accumulated on the air
inlet vents in front of the wind-
shield.
Check for and remove any
excess ice or snow that may
have accumulated on the
exterior lights, vehicle’s roof,
chassis, around the tires or on
the brakes.
Remove any snow or mud
from the bottom of your shoes
before getting in the vehicle.
Accelerate the vehicle slowly,
keep a safe distance between
you and the vehicle ahead, and
drive at a reduced speed suit-
able to road conditions.
Park the vehicle and move
the shift lever to P without set-
ting the parking brake. The
parking brake may freeze up,
preventing it from being
released. If the vehicle is parked without setting the
parking brake, make sure to
block the wheels. Failure to
do so may be dangerous
because it may cause the
vehicle to move unexpectedly,
possibly leading to an acci-
dent.
When the parking
brake is in auto-
matic mode, release the parking
brake after shifting the shift lever to
P. ( P.210)
If the vehicle is parked without
setting the parking brake,
confirm that the shift lever
cannot be moved out of P
*.
*: The shift lever will be locked if it is
attempted to be sh ifted from P to
any other position without
depressing the brake pedal. If the
shift lever can be shifted from P,
there may be a problem with the
shift lock system. Have the vehi-
cle inspected by your Toyota
dealer immediately.
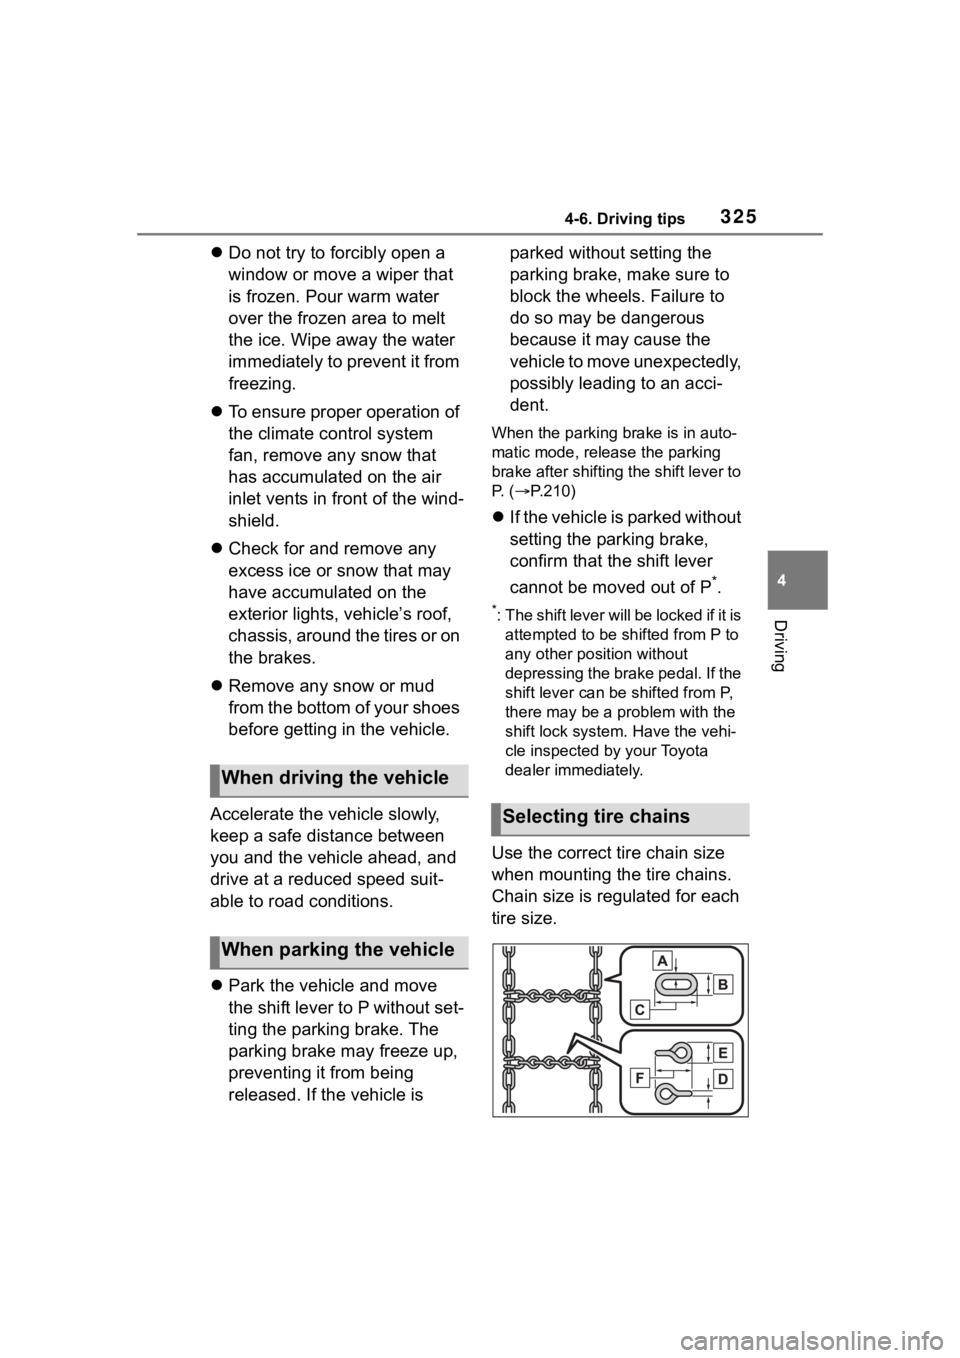
Use the correct tire chain size
when mounting the tire chains.
Chain size is regulated for each
tire size.
When driving the vehicle
When parking the vehicle
Selecting tire chains
Page 327 of 568
3274-6. Driving tips
4
Driving
Specific design characteris-
tics give it a higher center of
gravity than ordinary passen-
ger cars. This vehicle design
feature causes this type of
vehicle to be more likely to
rollover. And, utility vehicles
have a significantly higher
rollover rate than other types
of vehicles.
An advantage of the higher
ground clearance is a better
view of the road allowing you
to anticipate problems.
It is not designed for corner-
ing at the same speeds as
ordinary passenger cars any
more than low-slung sports
cars are designed to perform
satisfactorily under off-road
conditions. Therefore, sharp
turns at excessive speeds
may cause the vehicle to roll-
over.
Utility vehicle precau-
tions
This vehicle belongs to the
utility vehicle class, which
has higher ground clear-
ance and narrower tread in
relation to the height of its
center of gravity.
Utility vehicle feature
WARNING
■Utility vehicle precautions
Always observe t he following pre-
cautions to minim ize the risk of
death, serious injury or damage to
your vehicle:
●In a rollover crash, an unbelted
person is significantly more
likely to die than a person wear-
ing a seat belt. Therefore, the
driver and all passengers
should always fasten their seat
belts.
●Avoid sharp turns or abrupt
maneuvers, if at all possible.
Failure to operat e this vehicle
correctly may result in loss of
control or vehicle rollover caus-
ing death or serious injury.
●Loading cargo on the roof lug-
gage carrier (if equipped) will
make the center of the vehicle
gravity higher. Avoid high
speeds, sudden starts, sharp
turns, sudden braking or abrupt
maneuvers, otherwise it may
result in loss of control or vehi-
cle rollover du e to failure to
operate this vehicle correctly.
●Always slow down in gusty
crosswinds. Because of its pro-
file and higher ce nter of gravity,
your vehicle is more sensitive to
side winds than an ordinary
passenger car. Slowing down
will allow you to have better
control.
●Do not drive horizontally across
steep slopes. Driving straight up
or straight down is preferred.
Your vehicle (or any similar
off-road vehicle) can tip over
sideways much more easily
than forward or backward.
Page 362 of 568
3625-3. Using the interior lights
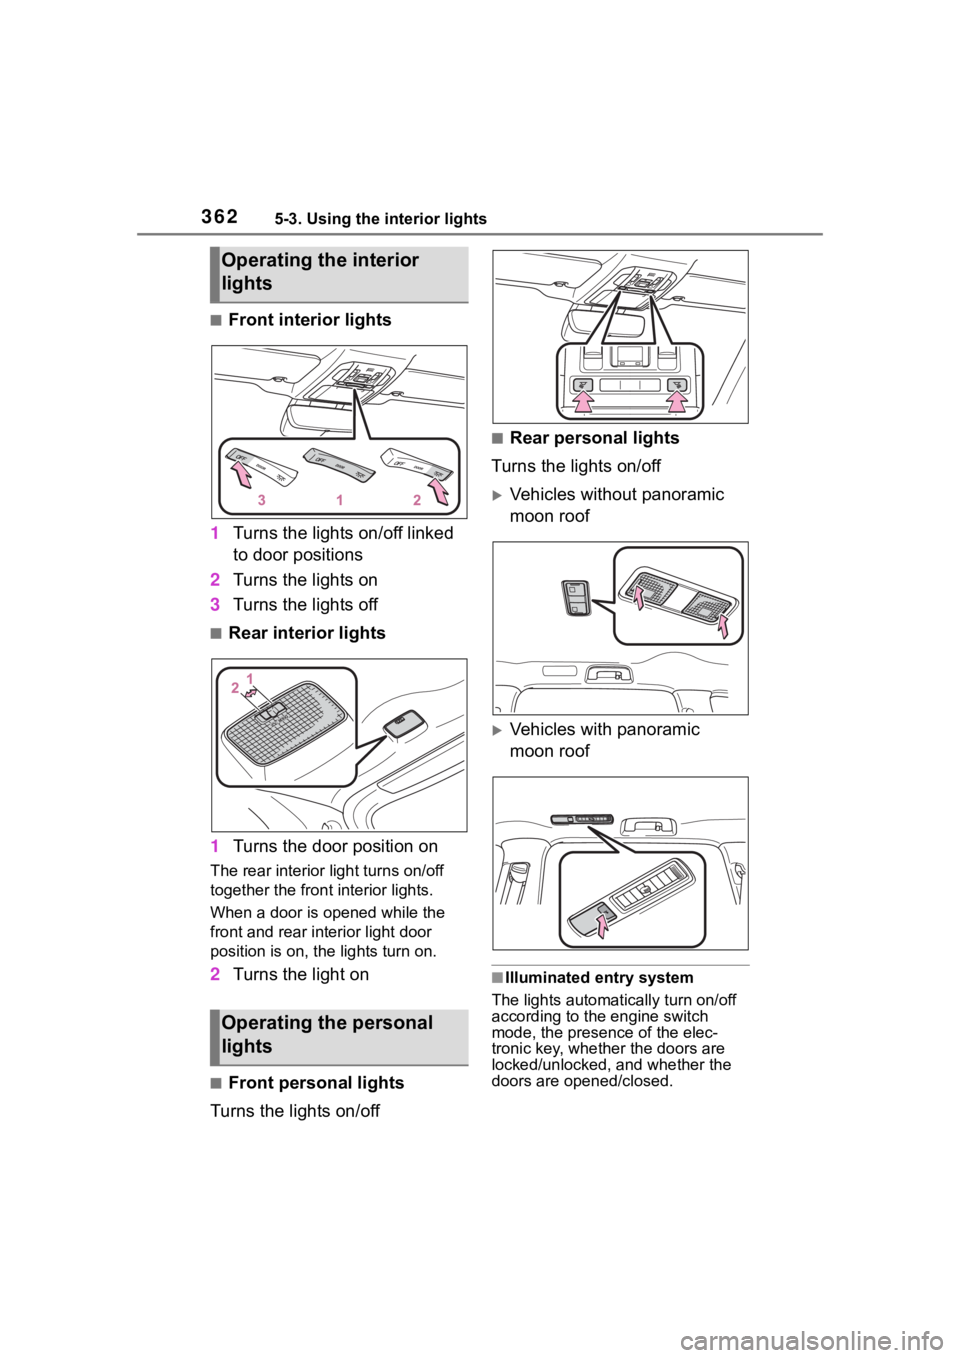
■Front interior lights
1 Turns the lights on/off linked
to door positions
2 Turns the lights on
3 Turns the lights off
■Rear interior lights
1 Turns the door position on
The rear interior light turns on/off
together the front interior lights.
When a door is opened while the
front and rear interior light door
position is on, the lights turn on.
2Turns the light on
■Front personal lights
Turns the lights on/off
■Rear personal lights
Turns the lights on/off
Vehicles without panoramic
moon roof
Vehicles with panoramic
moon roof
■Illuminated entry system
The lights automatically turn on/off
according to the engine switch
mode, the presence of the elec-
tronic key, whether the doors are
locked/unlocked, and whether the
doors are opened/closed.
Operating the interior
lights
Operating the personal
lights
Page 394 of 568
3946-1. Maintenance and care
6-1.Maintenance and care
Working from top to bottom,
liberally apply water to the
vehicle body, wheel wells and
underside of the vehicle to
remove any dirt and dust.
Wash the vehicle body using
a sponge or soft cloth, such
as a chamois.
For hard-to-remove marks,
use car wash soap and rinse
thoroughly with water.
Wipe away any water.
Wax the vehicle when the
waterproof coating deterio-
rates.
If water does not bead on a clean
surface, apply wax when the vehi-
cle body is cool.
■Automatic car washes
●Before washing the vehicle:
• Fold the mirrors
• Turn off the power back door (if equipped)
Start washing from the front of the
vehicle. Extend the mirrors before
driving.
●Brushes used in automatic car
washes may scratch the vehicle
surface, parts (wheel, etc.) and harm your vehicle’s paint.
●Rear spoiler may not be washable
in some automatic car washes.
There may also be an increased
risk of damage to vehicle.
■High pressure car washes
As water may enter the cabin, do
not bring the nozzle tip near the
gaps around the doors or perimeter
of the windows, or spray these
areas continuously.
■When using a car wash
If the door handle becomes wet
while the electronic key is within the
effective range, the door may lock
and unlock repeatedly. In that case,
follow the following correction pro-
cedures to wash the vehicle:
●Place the key in a position 6 ft. (2
m) or more separate from the
vehicle while the vehicle is being
washed. (Take care to ensure that
the key is not stolen.)
●Set the electronic key to bat-
tery-saving mode to disable the
smart key system. ( P.134)
■Wheels and wheel ornaments
●Remove any dirt immediately by
using a neutral detergent.
●Wash detergent off with water
immediately after use.
●To protect the paint from damage,
make sure to obs erve the follow-
ing precautions.
• Do not use acidic, alkaline or abrasive detergent
• Do not use hard brushes
• Do not use detergent on the
wheels when they are hot, such
as after driving or parking in hot
weather
■Brake pads and calipers
Rust may form if the vehicle is
parked with wet brake pads or disc
rotors, causing them to stick. Before
parking the vehicle after it is
washed, drive slo wly and apply the
brakes several times to dry the
Cleaning and protect-
ing the vehicle exte-
rior
Perform cleaning in a man-
ner appropriate to each
component and its material.
Cleaning instructions
Page 487 of 568
4877-2. Steps to take in an emergency
7
When trouble arises
■When the electronic key does
not work properly
●Make sure that the smart key sys-
tem has not been deactivated in
the customization setting. If it is
off, turn the function on. (Custom-
izable features: P.521)
●Check if battery-saving mode is
set. If it is set, cancel the function.
( P.135)
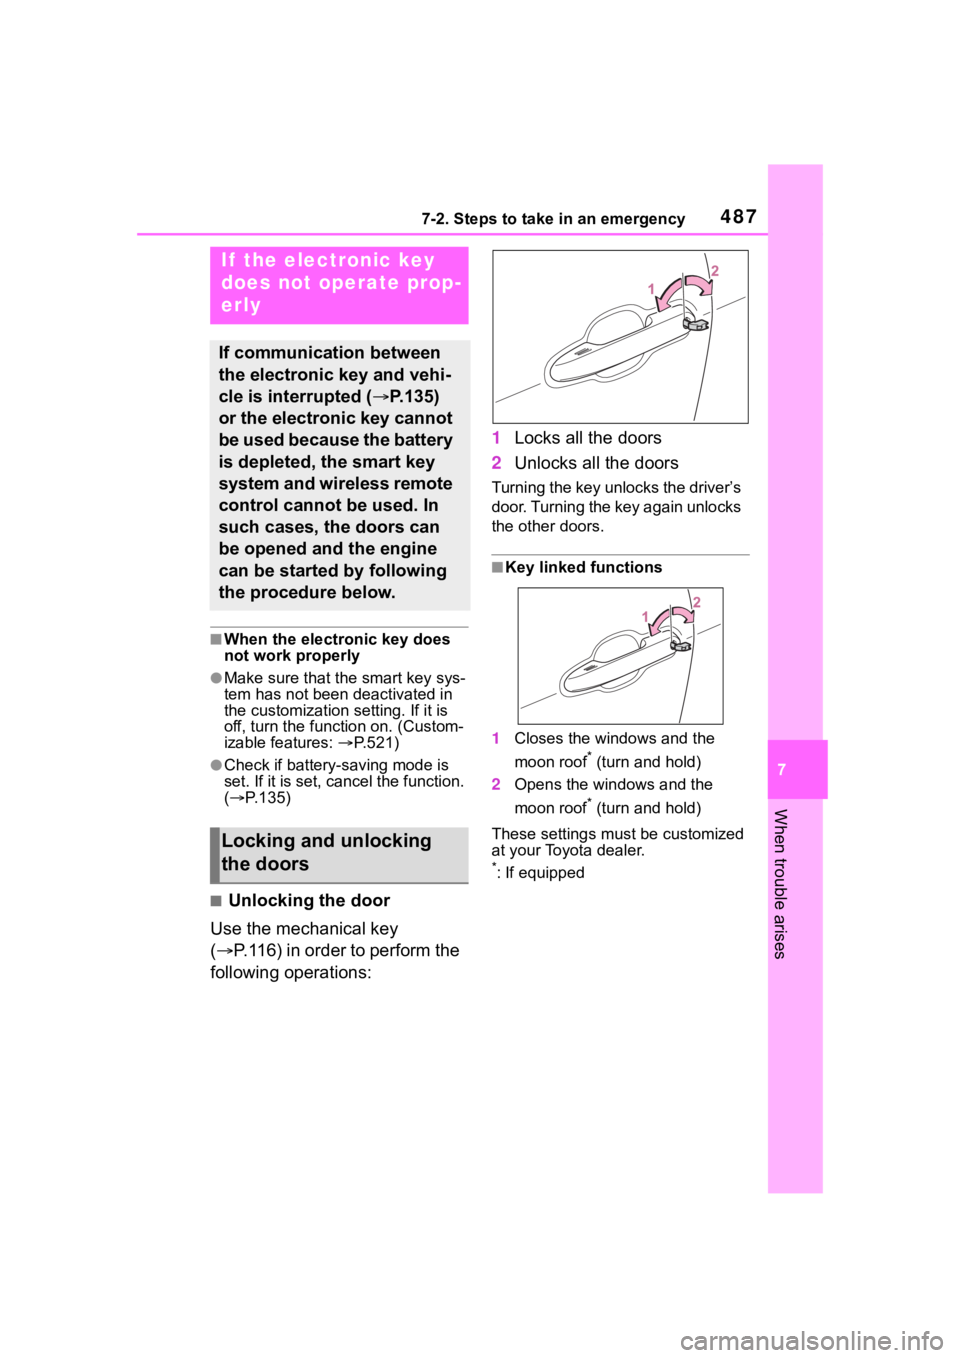
■Unlocking the door
Use the mechanical key
( P.116) in order to perform the
following operations: 1
Locks all the doors
2 Unlocks all the doors
Turning the key unlocks the driver’s
door. Turning the key again unlocks
the other doors.
■Key linked functions
1 Closes the windows and the
moon roof
* (turn and hold)
2 Opens the windows and the
moon roof
* (turn and hold)
These settings mus t be customized
at your Toyota dealer.
*: If equipped
If the electronic key
does not operate prop-
erly
If communication between
the electronic key and vehi-
cle is interrupted ( P.135)
or the electronic key cannot
be used because the battery
is depleted, the smart key
system and wireless remote
control cannot be used. In
such cases, the doors can
be opened and the engine
can be started by following
the procedure below.
Locking and unlocking
the doors
Page 488 of 568
4887-2. Steps to take in an emergency
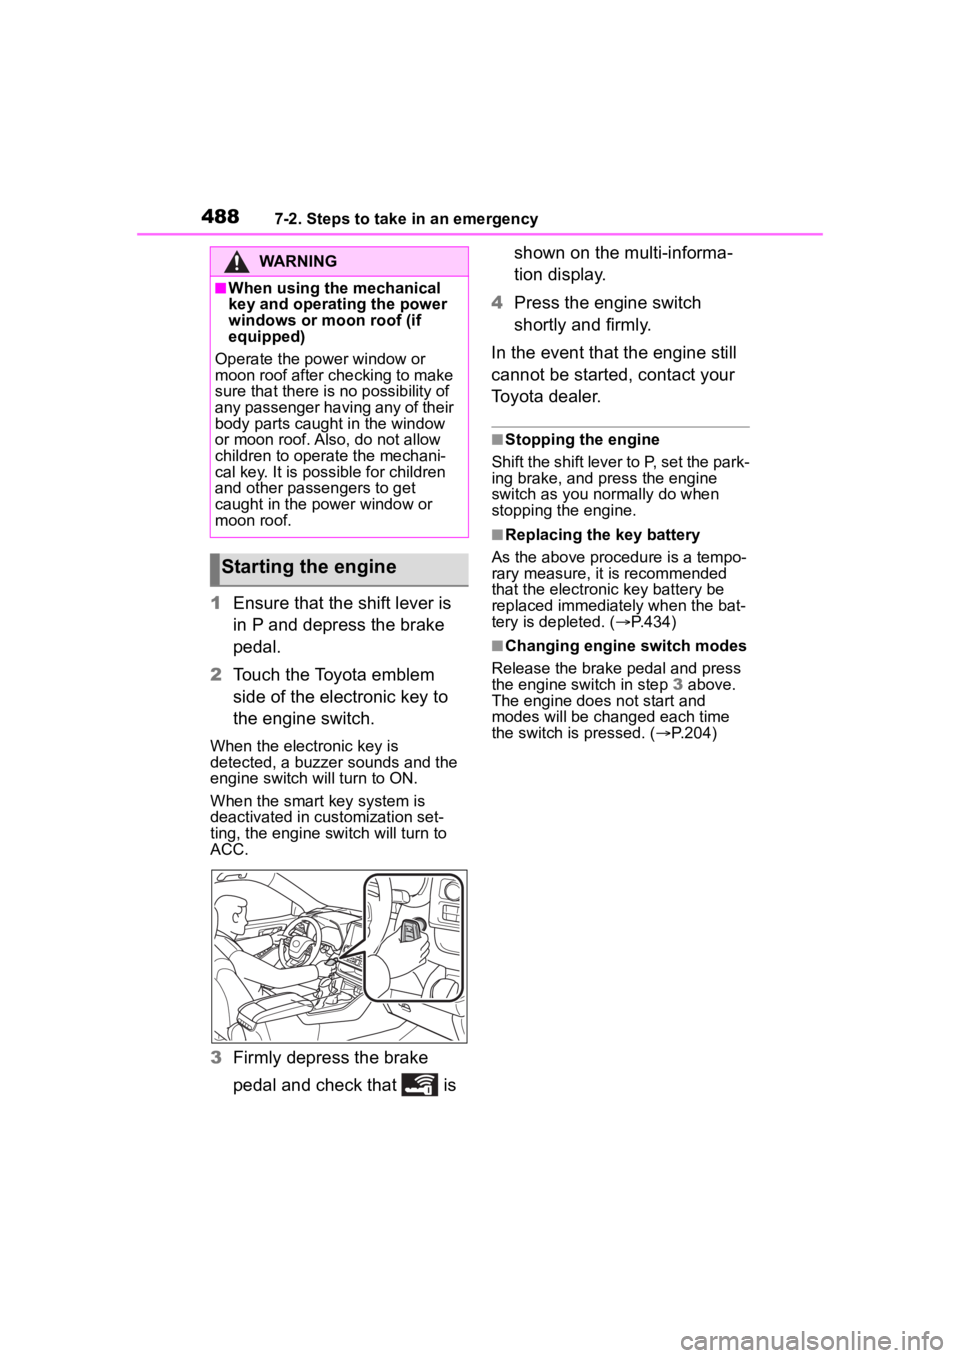
1Ensure that the shift lever is
in P and depress the brake
pedal.
2 Touch the Toyota emblem
side of the electronic key to
the engine switch.
When the electronic key is
detected, a buzzer sounds and the
engine switch will turn to ON.
When the smart key system is
deactivated in customization set-
ting, the engine switch will turn to
ACC.
3Firmly depress the brake
pedal and check that is shown on the multi-informa-
tion display.
4 Press the engine switch
shortly and firmly.
In the event that the engine still
cannot be started, contact your
Toyota dealer.
■Stopping the engine
Shift the shift lever to P, set the park-
ing brake, and press the engine
switch as you normally do when
stopping the engine.
■Replacing the key battery
As the above proce dure is a tempo-
rary measure, it is recommended
that the electronic key battery be
replaced immediately when the bat-
tery is depleted. ( P.434)
■Changing engine switch modes
Release the brake pedal and press
the engine switch in step 3 above.
The engine does not start and
modes will be changed each time
the switch is pressed. ( P.204)
WARNING
■When using the mechanical
key and operating the power
windows or moon roof (if
equipped)
Operate the power window or
moon roof after checking to make
sure that there is n o possibility of
any passenger having any of their
body parts caught in the window
or moon roof. Al so, do not allow
children to operate the mechani-
cal key. It is possible for children
and other passengers to get
caught in the power window or
moon roof.
Starting the engine
Page 516 of 568
5168-1. Specifications
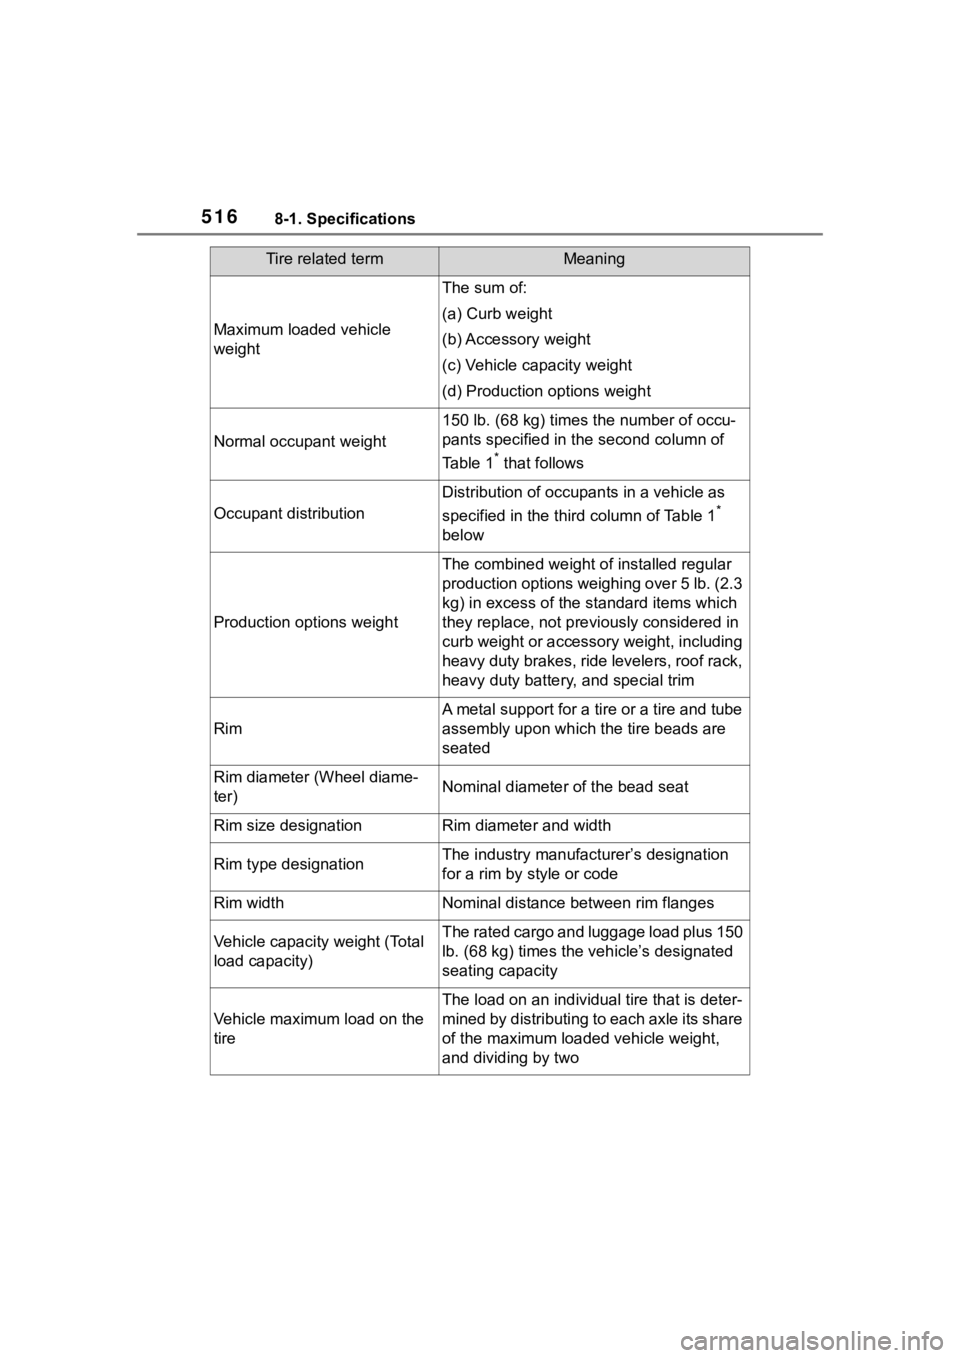
Maximum loaded vehicle
weight
The sum of:
(a) Curb weight
(b) Accessory weight
(c) Vehicle capacity weight
(d) Production options weight
Normal occupant weight
150 lb. (68 kg) times the number of occu-
pants specified in the second column of
Table 1
* that follows
Occupant distribution
Distribution of occupants in a vehicle as
specified in the thi rd column of Table 1
*
below
Production options weight
The combined weight o f installed regular
production options weighing over 5 lb. (2.3
kg) in excess of the s tandard items which
they replace, not previously considered in
curb weight or accessory weight, including
heavy duty brakes, ride levelers, roof rack,
heavy duty battery, and special trim
Rim
A metal support for a tire or a tire and tube
assembly upon which the tire beads are
seated
Rim diameter (Wheel diame-
ter)Nominal diameter of the bead seat
Rim size designationRim diameter and width
Rim type designationThe industry manufacturer’s designation
for a rim by style or code
Rim widthNominal distance be tween rim flanges
Vehicle capacity weight (Total
load capacity)The rated cargo and luggage load plus 150
lb. (68 kg) times the vehicle’s designated
seating capacity
Vehicle maximum load on the
tire
The load on an individual tire that is deter-
mined by distributing to each axle its share
of the maximum loaded vehicle weight,
and dividing by two
Tire related termMeaning
Page 527 of 568
5278-2. Customization
8
Vehicle specifications
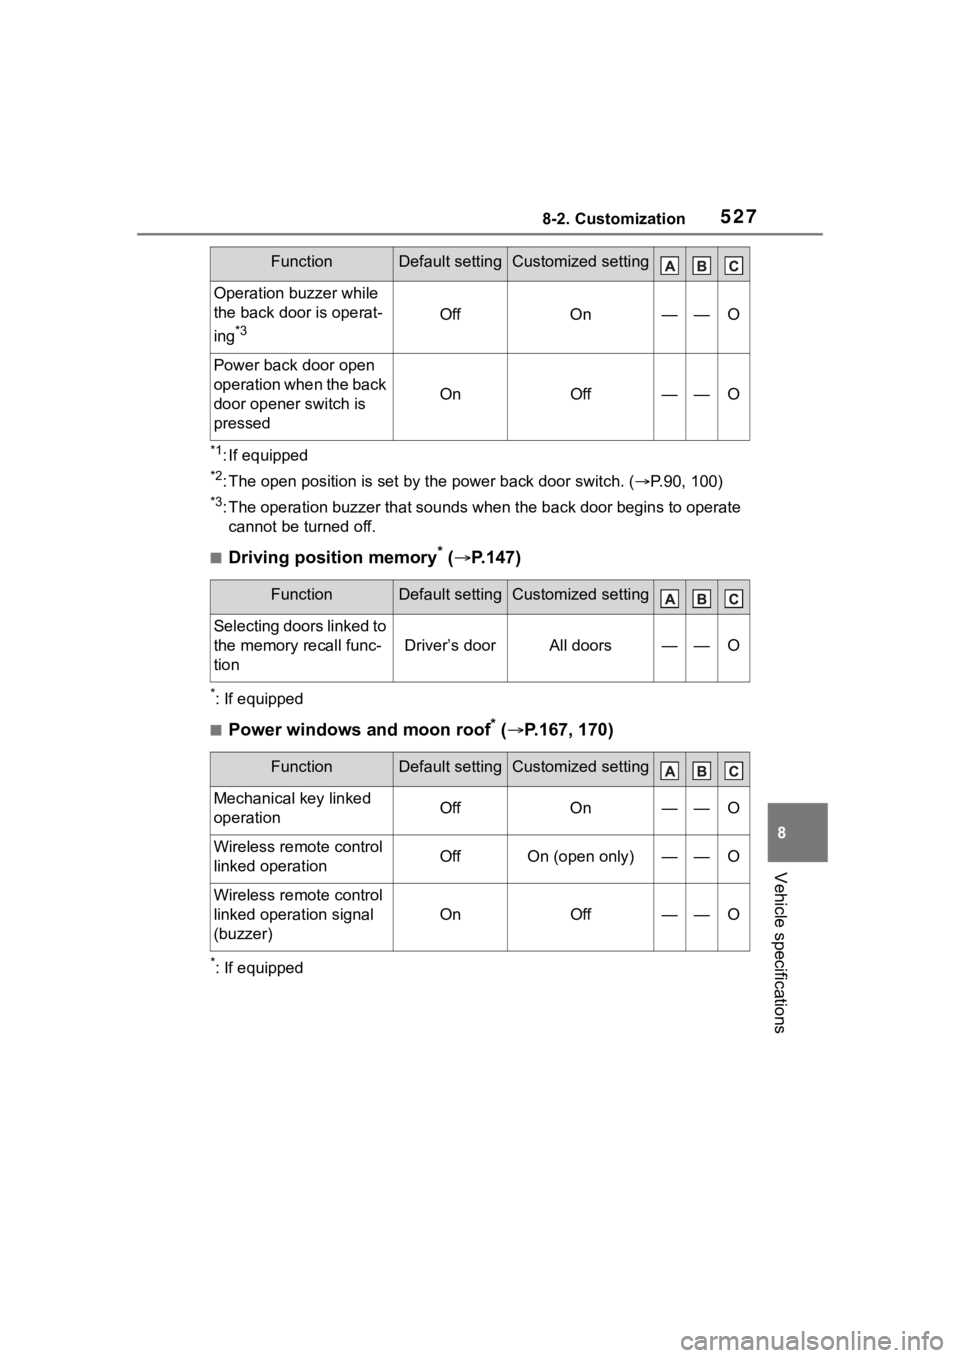
*1: If equipped
*2: The open position is set by the power back door switch. ( P.90, 100)
*3: The operation buzzer that sounds when the back door begins to operate
cannot be turned off.
■Driving position memory* ( P.147)
*: If equipped
■Power windows and moon roof* ( P.167, 170)
*: If equipped
Operation buzzer while
the back door is operat-
ing
*3OffOn——O
Power back door open
operation when the back
door opener switch is
pressed
OnOff——O
FunctionDefault settingCustomized setting
Selecting doors linked to
the memory recall func-
tion
Driver’s doorAll doors——O
FunctionDefault settingCustomized setting
Mechanical key linked
operationOffOn——O
Wireless remote control
linked operationOffOn (open only)——O
Wireless remote control
linked operation signal
(buzzer)
OnOff——O
FunctionDefault settingCustomized setting
Page 528 of 568
5288-2. Customization
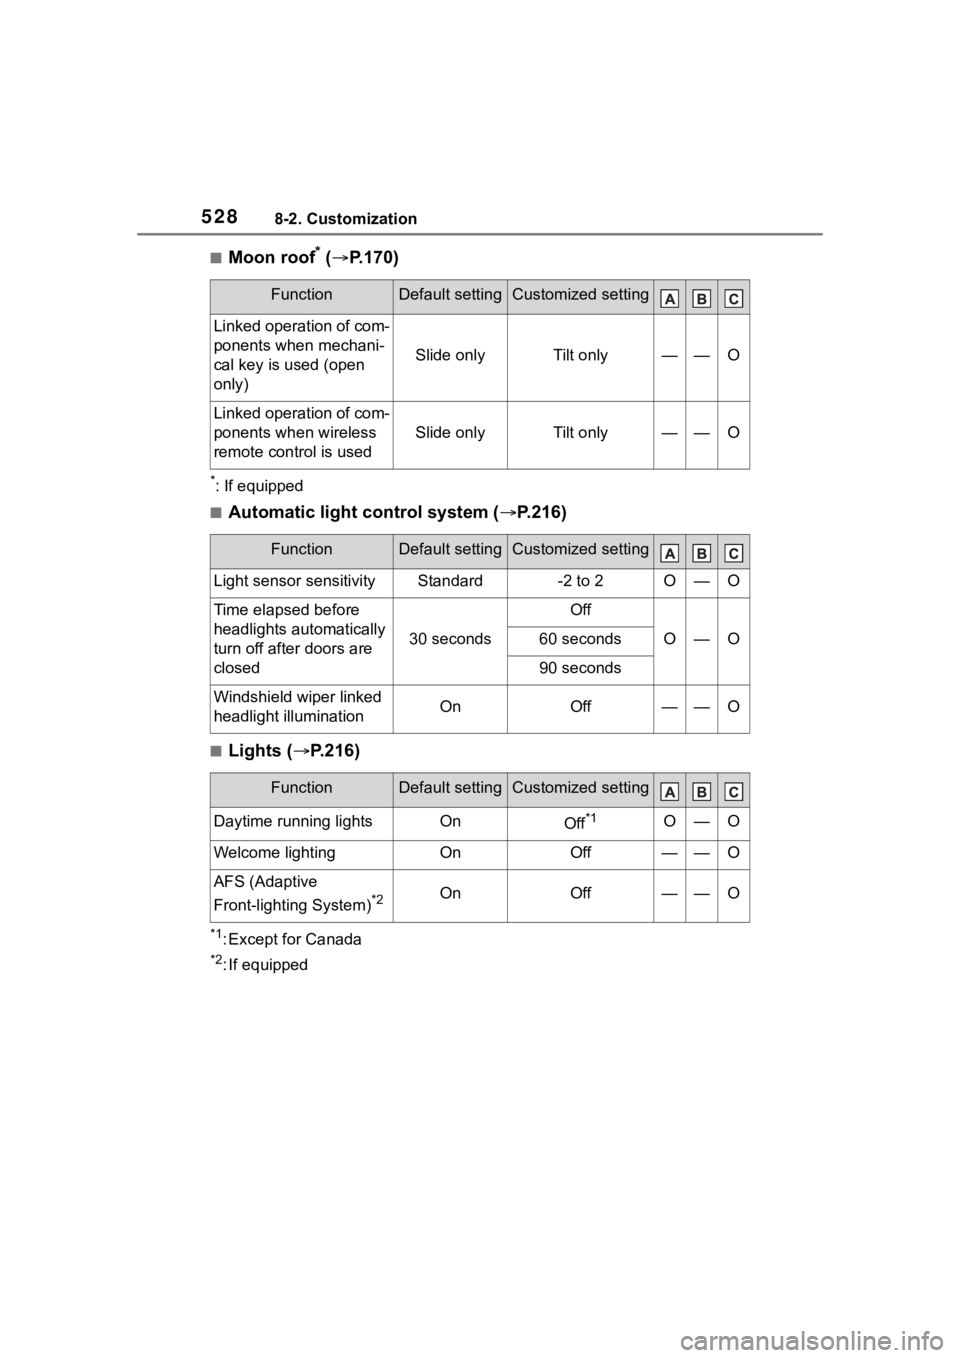
■Moon roof* ( P.170)
*: If equipped
■Automatic light control system ( P.216)
■Lights ( P.216)
*1: Except for Canada
*2: If equipped
FunctionDefault settingCustomized setting
Linked operation of com-
ponents when mechani-
cal key is u sed (open
only)
Slide onlyTilt only——O
Linked operation of com-
ponents when wireless
remote control is used
Slide onlyTilt only——O
FunctionDefault settingCustomized setting
Light sensor sensitivityStandard-2 to 2O—O
Time elapsed before
headlights automatically
turn off after doors are
closed
30 seconds
Off
O—O60 seconds
90 seconds
Windshield wiper linked
headlight illuminationOnOff——O
FunctionDefault settingCustomized setting
Daytime running lightsOnOff*1O—O
Welcome lightingOnOff——O
AFS (Adaptive
Front-lighting System)
*2OnOff——O
Page 552 of 568

552Alphabetical Index
Automatic light control system............................................... 217
Automatic transmission ........ 206 If the shift lever cannot be shifted from P................................. 207
M mode ................................ 208
Auxiliary boxes ............... 367, 372
Average fuel economy ....... 86, 94
Average vehicle speed....... 88, 97
AWD Control ....................... 88, 97
B
Back door ................................ 121
Back-up lights Replacing light bulbs ............ 439
Battery Battery checking................... 414
If the battery is discharged ... 490
Preparing and c hecking before
winter.................................. 324
Replacing ............................. 492
Warning light ........................ 457
Blind Spot Monitor (BSM) ...... 278
Brake Brake hold ............................ 213
Fluid ............................. 414, 504
Parking brake ....................... 210
Warning light ........................ 456
Brake assist ............................ 318
Break-in tips ........ ................... 180
Brightness control Instrument panel light control . 83
BSM (Blind Spot Monitor) ...... 278
Buzzer Hands off steering wheel warn-ing (LTA) ............................. 255
C
Care Exterior ................................. 394
Interior .................................. 397 Seat belts .............................397
Wheels and wheel ornaments
...........................................394
Cargo capacity ........................189
Cargo net hooks .....................369
Chains......................................325
Child restraint system Fixed with a LATCH system ...60
Fixed with a seat belt..............55
Front passenger occupant clas-sification system ...................43
Points to remember ................50
Riding with children ................49
Types of child restraint system installation method ...............52
Using an anchor bracket ........62
Child safety Airbag precautions .................39
Back door precautions..........121
Battery precautions ......415, 493
Child restraint system .............52
Heated steering wheel and seat heater precautio ns..............358
How your child should wear the seat belt ................................28
Moon roof precautions..........171
Panoramic moon roof precau- tions ....................................175
Power window lock switch ....169
Power window precautions...168
Rear door child-protectors ....120
Seat belt extender precautions .............................................29
Seat belt precautions..............49
Child-protectors......................120
Cleaning Exterior .................................394
Interior ..................................397
Radar sensor ........................230
Seat belts .............................397
Wheels and wheel ornaments...........................................394