tow TOYOTA HIGHLANDER 2022 Repair Manual
[x] Cancel search | Manufacturer: TOYOTA, Model Year: 2022, Model line: HIGHLANDER, Model: TOYOTA HIGHLANDER 2022Pages: 568, PDF Size: 13.73 MB
Page 452 of 568
4527-2. Steps to take in an emergency
The following may indicate a
problem with your transmission.
Contact your Toyota dealer or
commercial towing service
before towing.
The engine is running but the
vehicle does not move.
The vehicle makes an abnor-
mal sound.
WARNING
■While towing
When towing using cables or
chains, avoid sudden starts, etc.
which place excessive stress on
the towing eyelets, cables or
chains. The towing eyelets,
cables or chains may become
damaged, broken debris may hit
people, and cause serious dam-
age.
NOTICE
■To prevent damage to the
vehicle when towing using a
wheel-lift type truck
When raising the vehicle, ensure
adequate ground clearance for
towing at the opposite end of the
raised vehicle. Without adequate
clearance, the vehicle could be
damaged while being towed.
■To prevent damage to the
vehicle when towing with a
sling-type truck
Do not tow with a sling-type truck,
either from the front or rear.
■To prevent damage to the
vehicle during emergency
towing
Do not secure cables or chains to
the suspension components.
■When towing a vehicle
equipped with a Stop & Start
system (if equipped)
If it is necessary to tow the vehicle
with all 4 wheels on the ground,
perform the following procedure
before towing the vehicle, in order
to protect t he system.
Turn the engine switch off and
then start the engine or turn the
engine switch to ON.
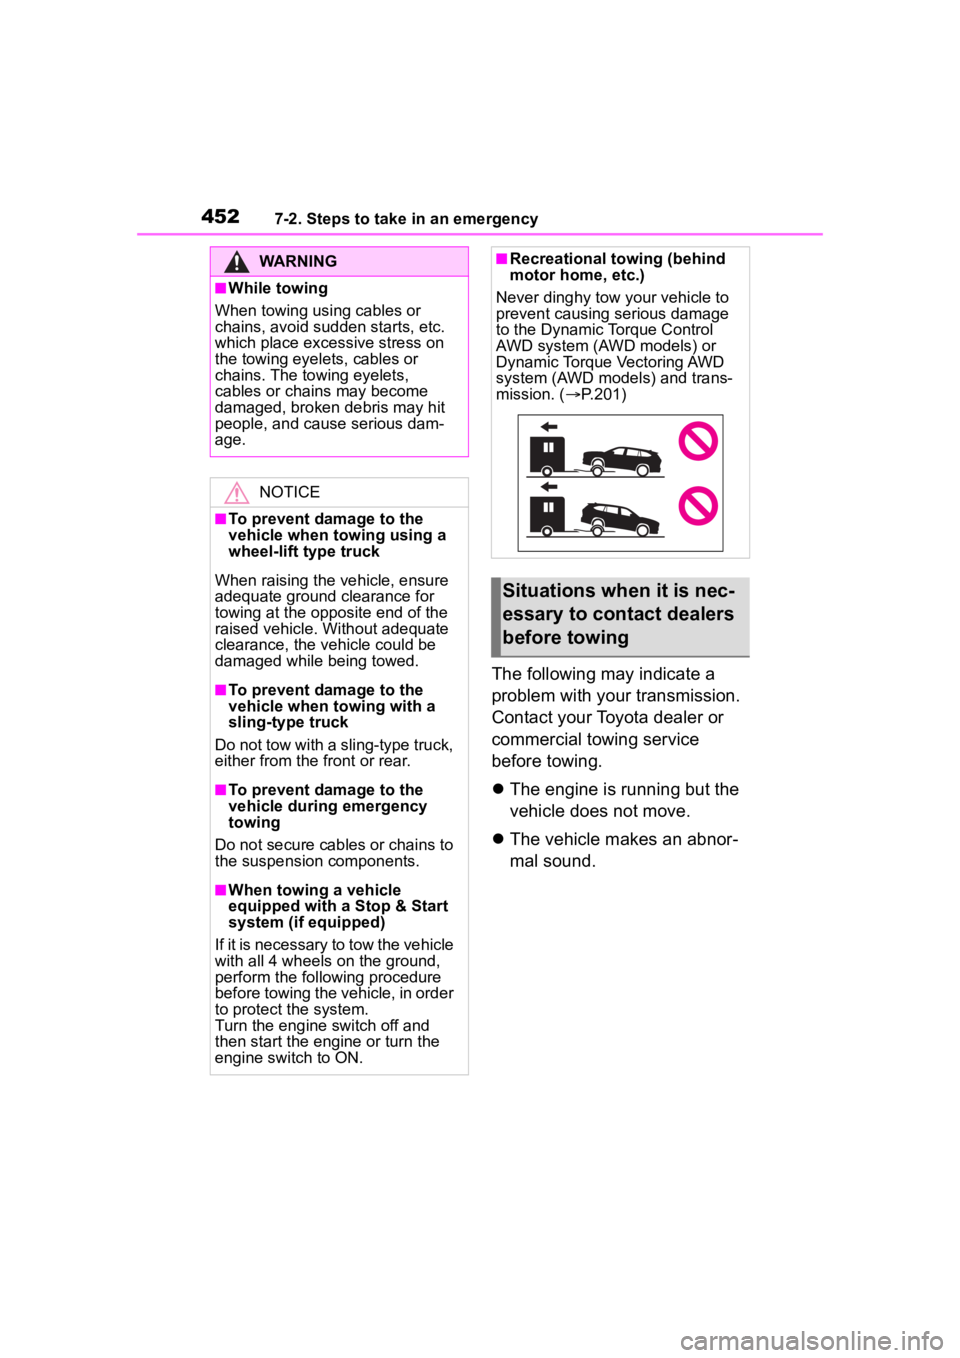
■Recreational towing (behind
motor home, etc.)
Never dinghy tow your vehicle to
prevent causing serious damage
to the Dynamic Torque Control
AWD system (AWD models) or
Dynamic Torque Vectoring AWD
system (AWD models) and trans-
mission. ( P.201)
Situations when it is nec-
essary to contact dealers
before towing
Page 453 of 568
4537-2. Steps to take in an emergency
7
When trouble arises
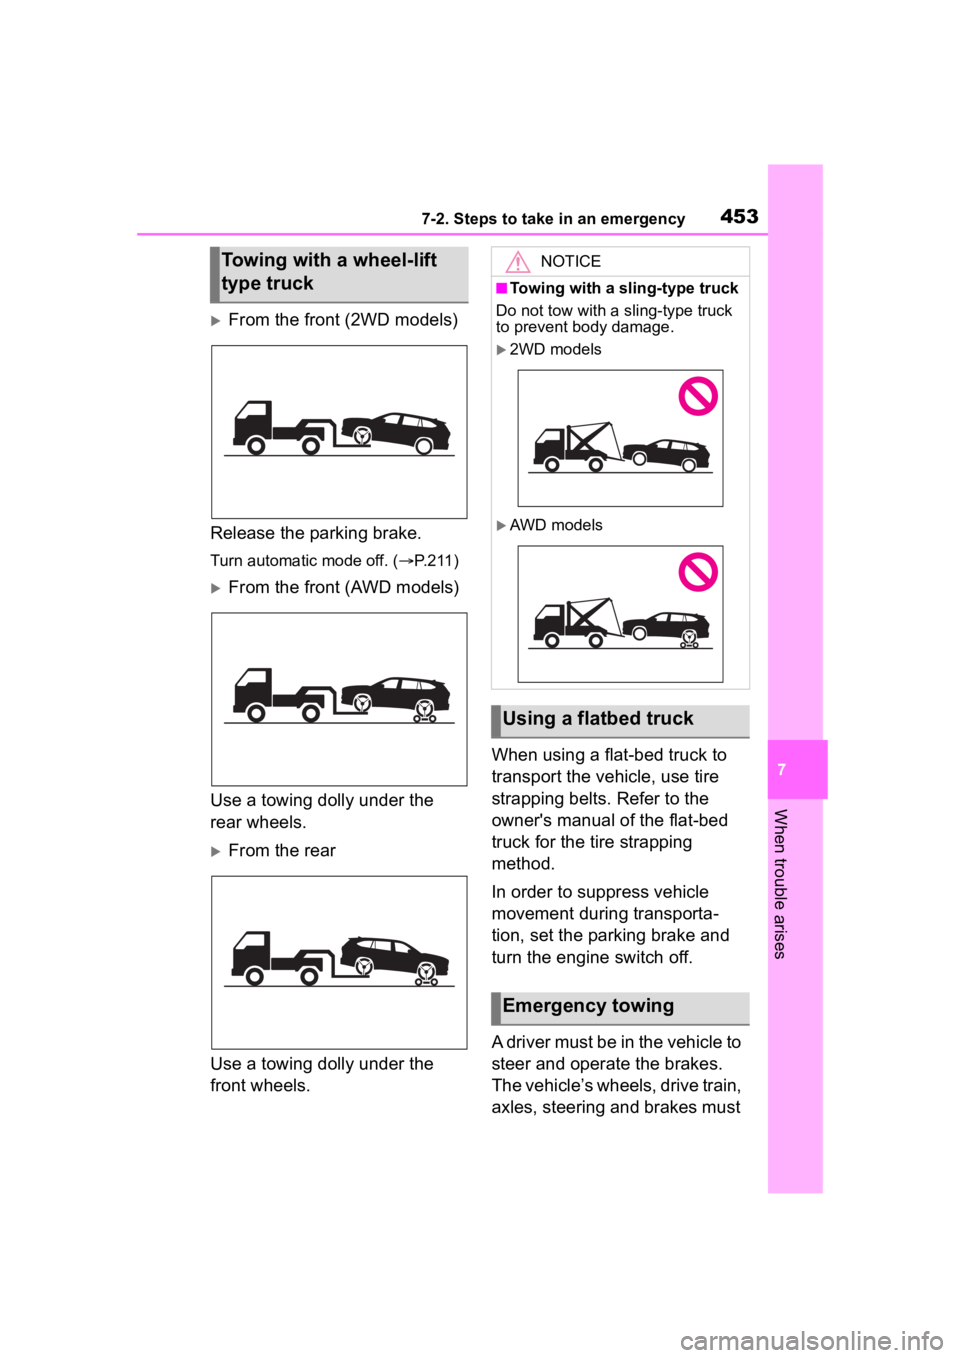
From the front (2WD models)
Release the parking brake.
Turn automatic mode off. ( P.211)
From the front (AWD models)
Use a towing dolly under the
rear wheels.
From the rear
Use a towing dolly under the
front wheels. When using a flat-bed truck to
transport the vehicle, use tire
strapping belts. Refer to the
owner's manual of the flat-bed
truck for the tire strapping
method.
In order to suppress vehicle
movement during transporta-
tion, set the parking brake and
turn the engine switch off.
A driver must be in the vehicle to
steer and operate the brakes.
The vehicle’s wheels, drive train,
axles, steering and brakes must
Towing with a wheel-lift
type truckNOTICE
■Towing with a sling-type truck
Do not tow with a sling-type truck
to prevent body damage.
2WD models
AWD models
Using a flatbed truck
Emergency towing
Page 477 of 568
4777-2. Steps to take in an emergency
7
When trouble arises
lock.
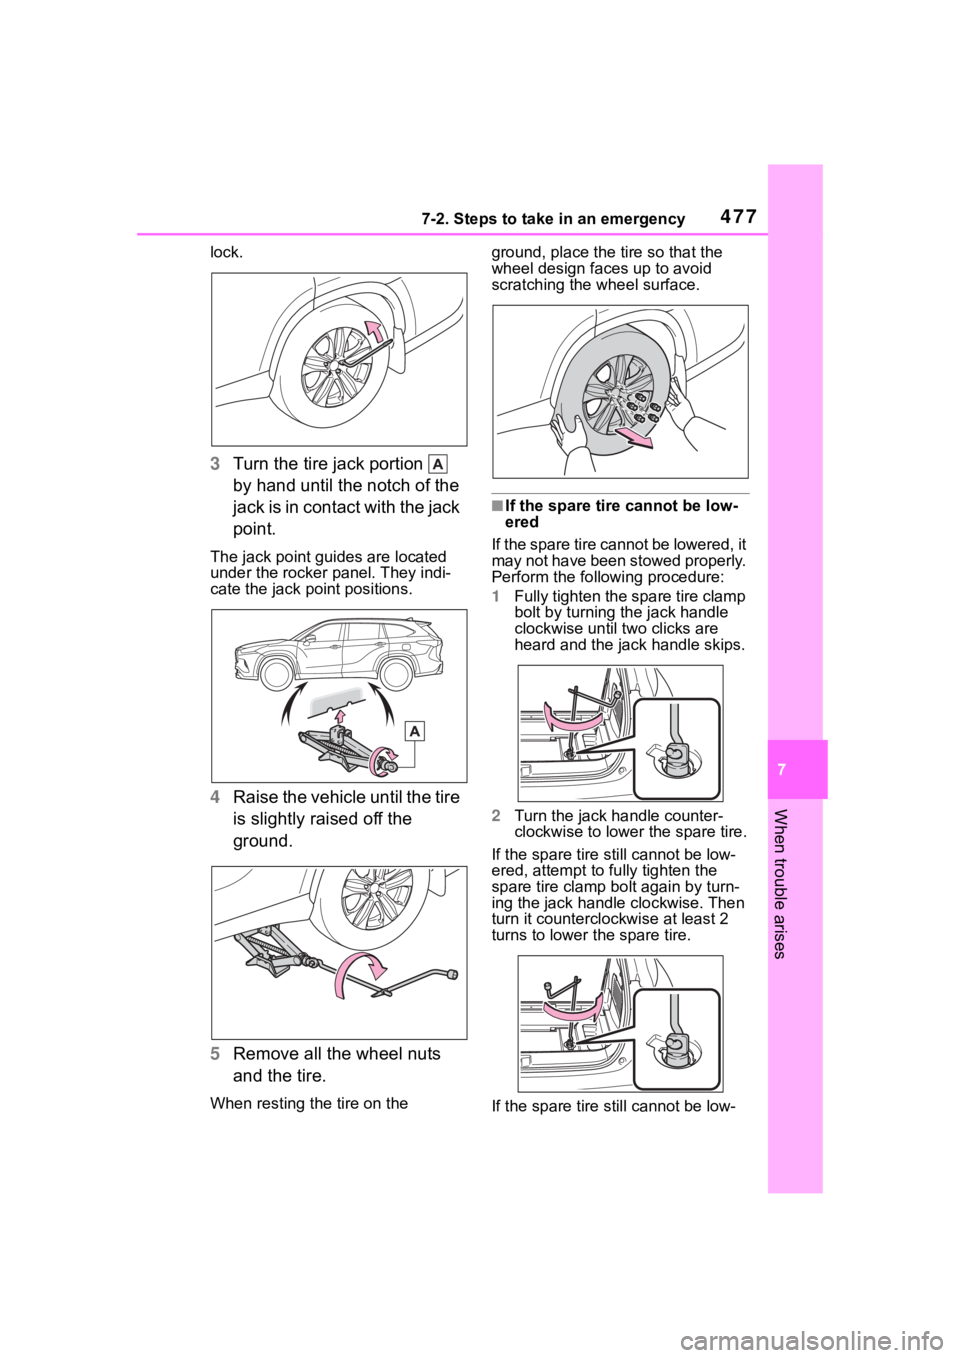
3Turn the tire jack portion
by hand until the notch of the
jack is in contact with the jack
point.
The jack point guides are located
under the rocker panel. They indi-
cate the jack po int positions.
4Raise the vehicle until the tire
is slightly raised off the
ground.
5 Remove all the wheel nuts
and the tire.
When resting the tire on the ground, place the tire so that the
wheel design faces up to avoid
scratching the wheel surface.
■If the spare tire cannot be low-
ered
If the spare tire cannot be lowered, it
may not have been stowed properly.
Perform the following procedure:
1 Fully tighten the spare tire clamp
bolt by turning the jack handle
clockwise until two clicks are
heard and the jack handle skips.
2 Turn the jack handle counter-
clockwise to lower the spare tire.
If the spare tire still cannot be low-
ered, attempt to fully tighten the
spare tire clamp bolt again by turn-
ing the jack handle clockwise. Then
turn it counterclockwise at least 2
turns to lower the spare tire.
If the spare tire still cannot be low-
Page 479 of 568
4797-2. Steps to take in an emergency
7
When trouble arises
motion, causing the tire to come off.
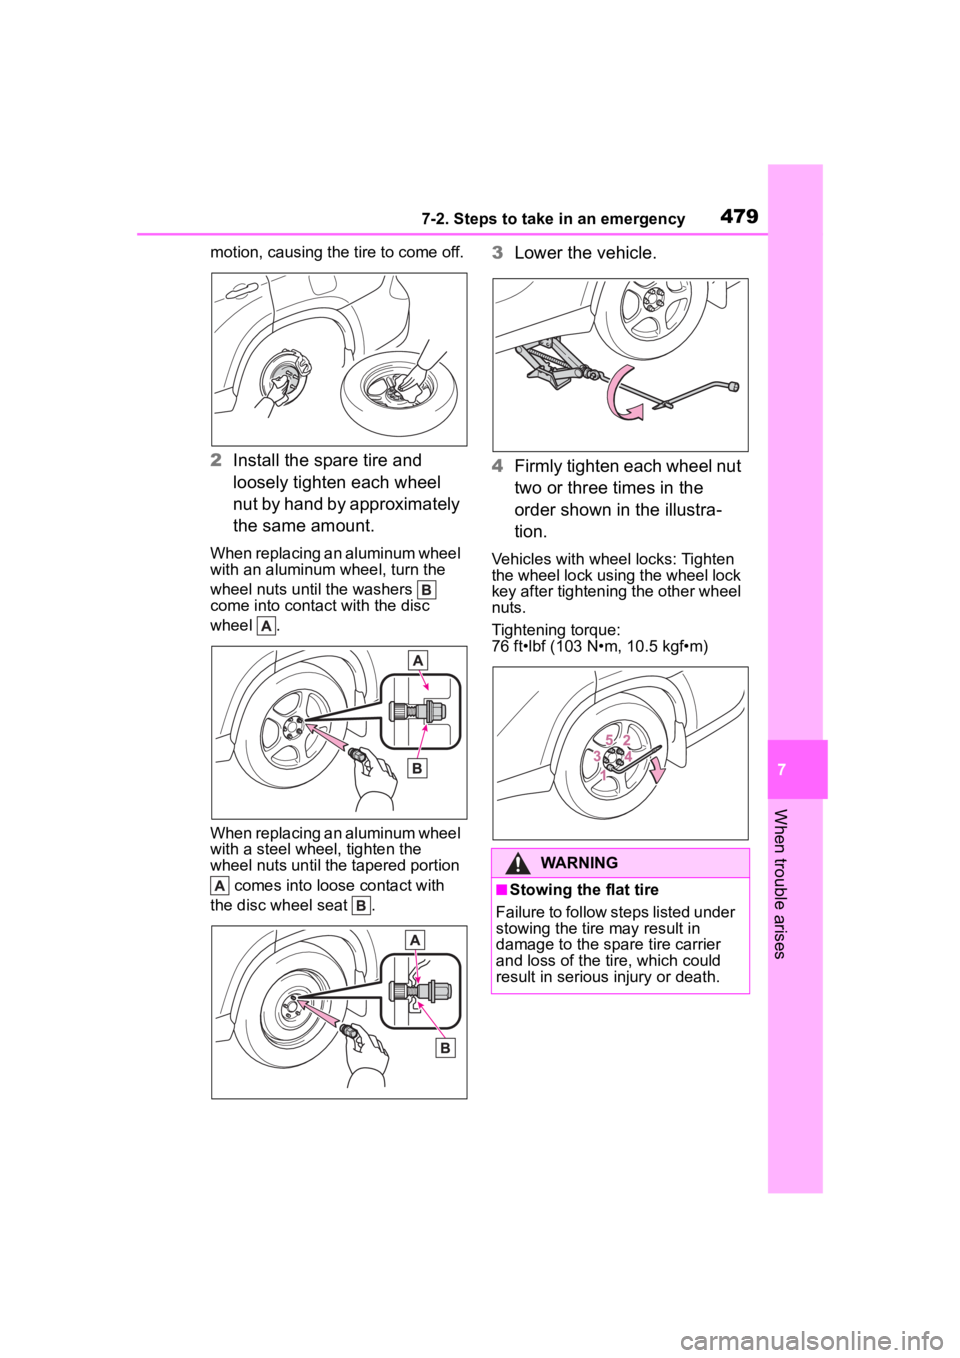
2Install the spare tire and
loosely tighten each wheel
nut by hand by approximately
the same amount.
When replacing an aluminum wheel
with an aluminum wheel, turn the
wheel nuts until the washers
come into contact with the disc
wheel .
When replacing an aluminum wheel
with a steel wheel, tighten the
wheel nuts until the tapered portion
comes into loose contact with
the disc wheel seat .
3 Lower the vehicle.
4 Firmly tighten each wheel nut
two or three times in the
order shown in the illustra-
tion.
Vehicles with wheel locks: Tighten
the wheel lock using the wheel lock
key after tightening the other wheel
nuts.
Tightening torque:
76 ft•lbf (103 N•m, 10.5 kgf•m)
WARNING
■Stowing the flat tire
Failure to follow steps listed under
stowing the tire may result in
damage to the spare tire carrier
and loss of the tire, which could
result in serious injury or death.
Page 480 of 568
4807-2. Steps to take in an emergency
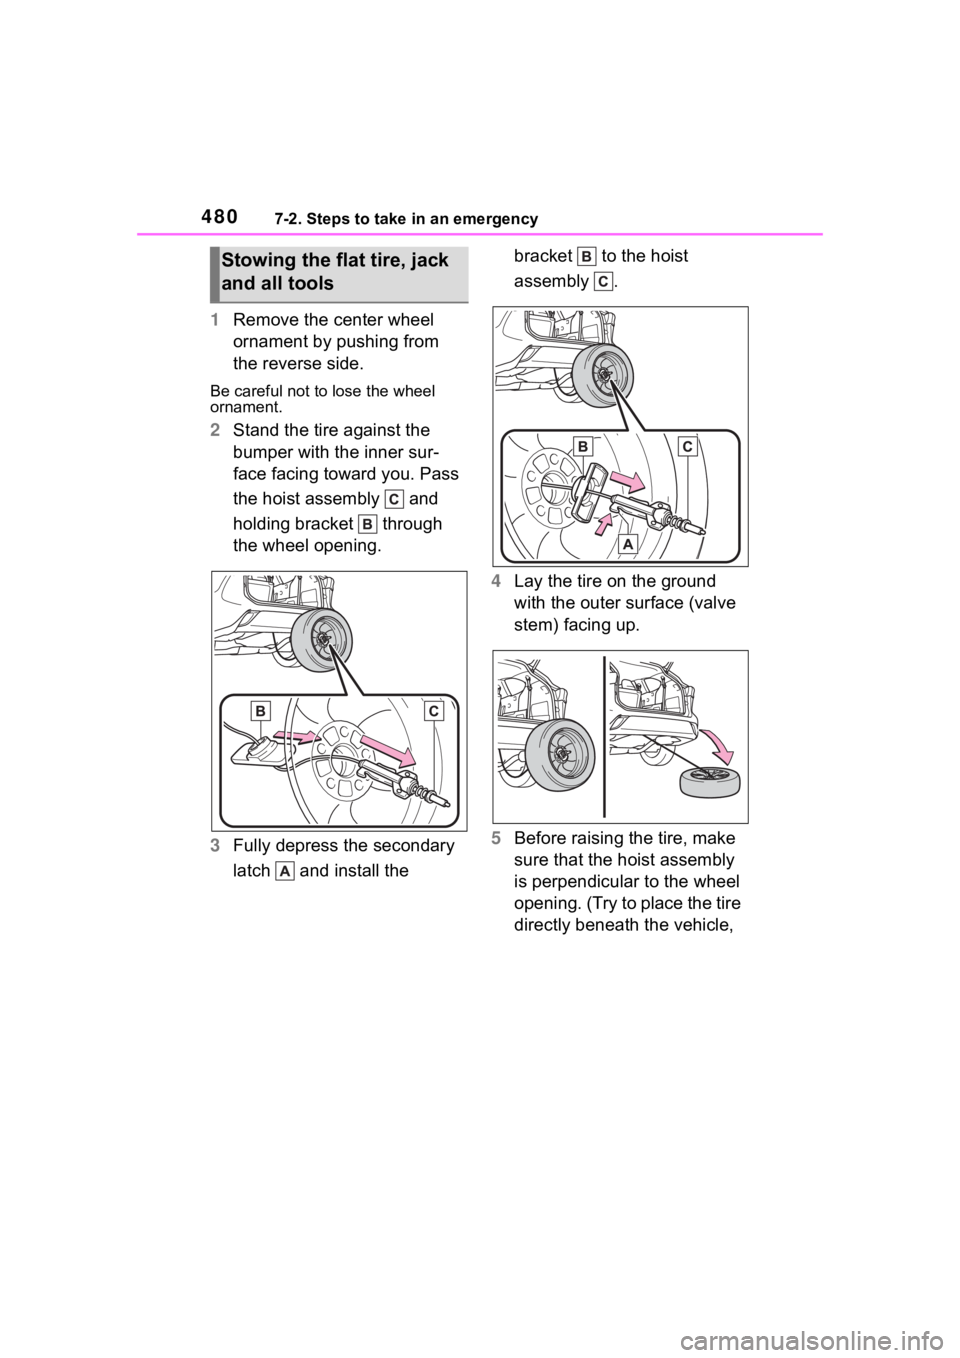
1Remove the center wheel
ornament by pushing from
the reverse side.
Be careful not to lose the wheel
ornament.
2Stand the tire against the
bumper with the inner sur-
face facing toward you. Pass
the hoist assembly and
holding bracket through
the wheel opening.
3 Fully depress the secondary
latch and install the bracket to the hoist
assembly .
4 Lay the tire on the ground
with the outer surface (valve
stem) facing up.
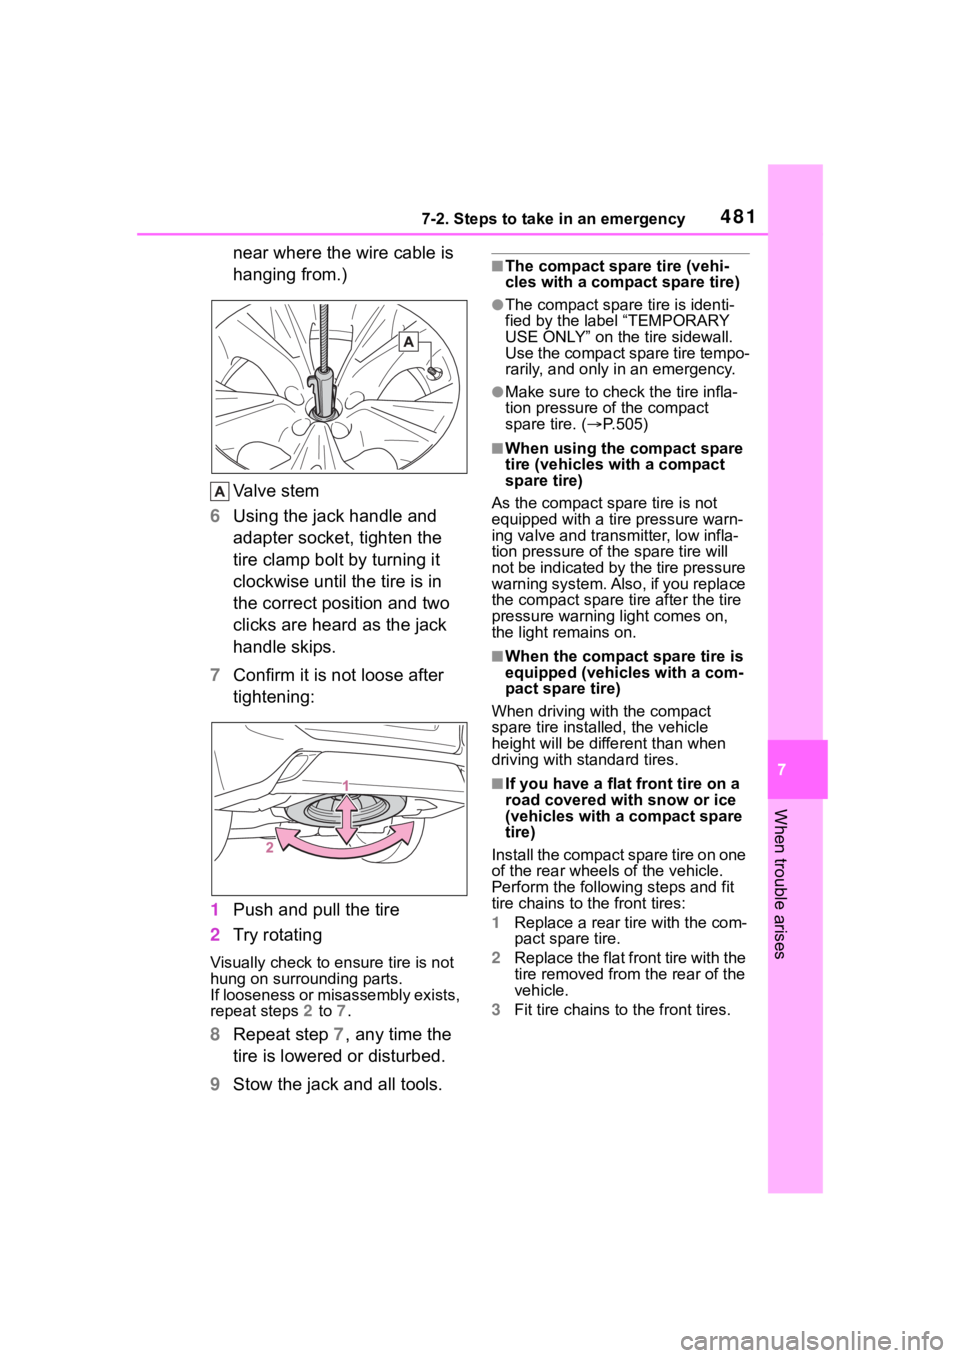
5 Before raising the tire, make
sure that the hoist assembly
is perpendicular to the wheel
opening. (Try to place the tire
directly beneath the vehicle,
Stowing the flat tire, jack
and all tools
Page 481 of 568
4817-2. Steps to take in an emergency
7
When trouble arises
near where the wire cable is
hanging from.)
Valve stem
6 Using the jack handle and
adapter socket, tighten the
tire clamp bolt by turning it
clockwise until the tire is in
the correct position and two
clicks are heard as the jack
handle skips.
7 Confirm it is not loose after
tightening:
1 Push and pull the tire
2 Try rotating
Visually check to ensure tire is not
hung on surrounding parts.
If looseness or misassembly exists,
repeat steps 2 to 7.
8 Repeat step 7, any time the
tire is lowered or disturbed.
9 Stow the jack and all tools.
■The compact spare tire (vehi-
cles with a compact spare tire)
●The compact spare tire is identi-
fied by the label “TEMPORARY
USE ONLY” on the tire sidewall.
Use the compact spare tire tempo-
rarily, and only in an emergency.
●Make sure to check the tire infla-
tion pressure of the compact
spare tire. ( P.505)
■When using the compact spare
tire (vehicles with a compact
spare tire)
As the compact spare tire is not
equipped with a tire pressure warn-
ing valve and transm itter, low infla-
tion pressure of t he spare tire will
not be indicated by the tire pressure
warning system. Also , if you replace
the compact spare ti re after the tire
pressure warning light comes on,
the light remains on.
■When the compact spare tire is
equipped (vehicles with a com-
pact spare tire)
When driving with the compact
spare tire installed, the vehicle
height will be diffe rent than when
driving with standard tires.
■If you have a flat front tire on a
road covered wit h snow or ice
(vehicles with a compact spare
tire)
Install the compact spare tire on one
of the rear wheels of the vehicle.
Perform the following steps and fit
tire chains to the front tires:
1 Replace a rear tire with the com-
pact spare tire.
2 Replace the flat front tire with the
tire removed from the rear of the
vehicle.
3 Fit tire chains to the front tires.
Page 483 of 568
4837-2. Steps to take in an emergency
7
When trouble arises
NOTICE
■Be careful when driving over
bumps with the compact
spare tire installed on the
vehicle (vehicles with a com-
pact spare tire)
The vehicle becomes lower when
driving with the compact spare tire
compared to when driving with
standard tires. Be careful when
driving over uneven road sur-
faces.
■Driving with tire chains and
the compact spare tire (vehi-
cles with a compact spare
tire)
Do not fit tire chains to the com-
pact spare tire. Tire chains may
damage the vehicle body and
adversely affect driving perfor-
mance.
■When replacing the tires
When removing or fitting the
wheels, tires or the tire pressure
warning valve and transmitter,
contact your Toyota dealer as the
tire pressure warning valve and
transmitter may be damaged if not
handled correctly.
■When stowing the flat tire
●Ensure that there is no object
caught between the tire and the
vehicle underbody.
●Securely tighten the spare tire
clamp bolt to hold the spare
wheel carrier by the hook.
●Stow the flat tire in the spare tire
location. Failure to do so may
cause damage to the spare tire
carrier. Proper storage reduces
the possibility of injury in a colli-
sion or during sudden braking.
●Have the flat tire repaired and
the spare tire replaced with it as
soon as possible.
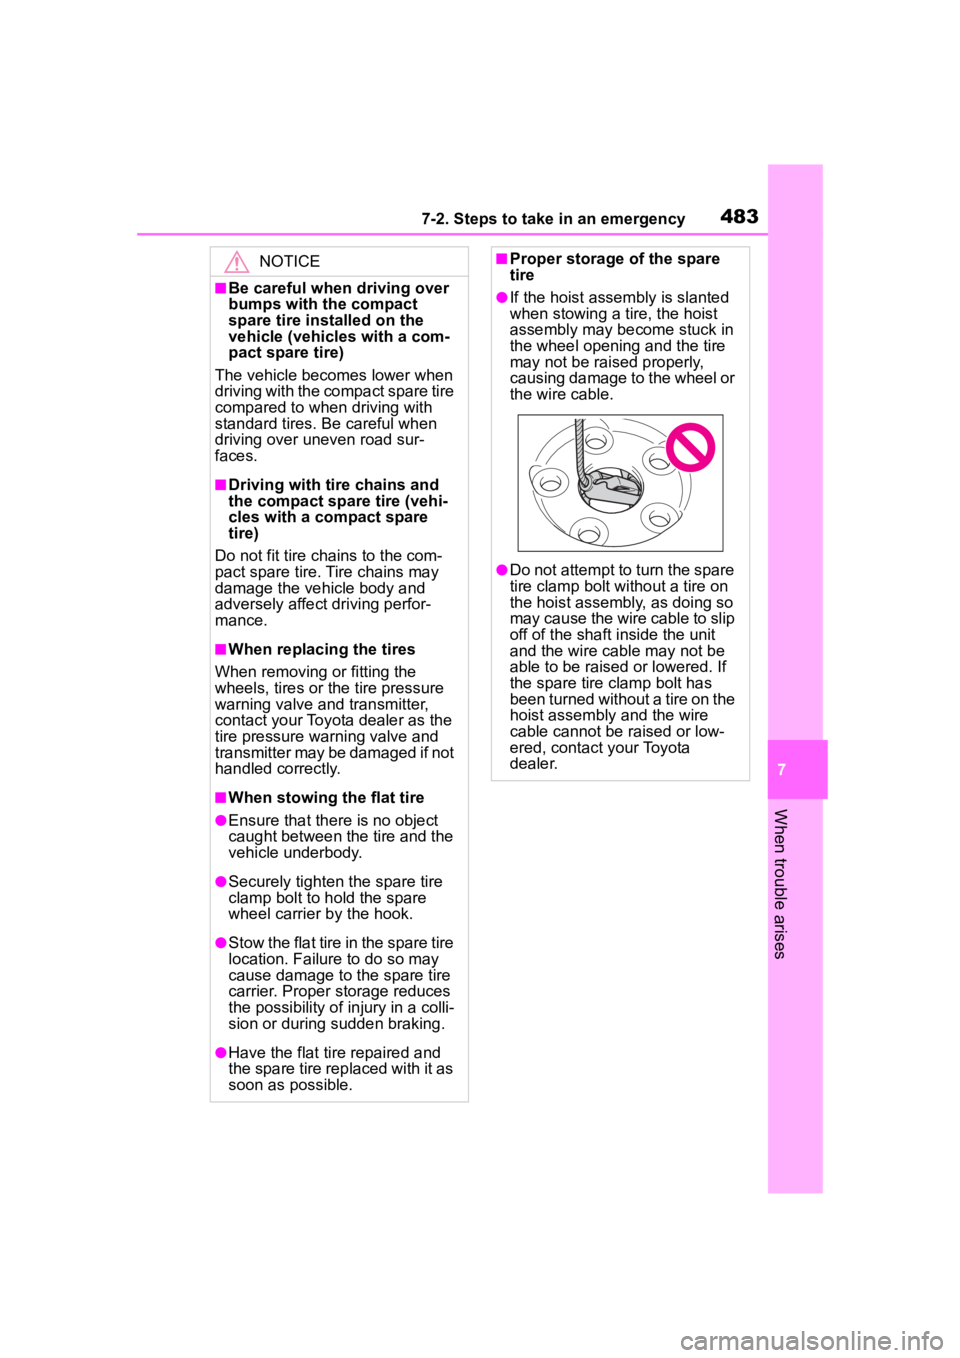
■Proper storage of the spare
tire
●If the hoist assembly is slanted
when stowing a tire, the hoist
assembly may become stuck in
the wheel opening and the tire
may not be raised properly,
causing damage to the wheel or
the wire cable.
●Do not attempt to turn the spare
tire clamp bolt without a tire on
the hoist assembly, as doing so
may cause the wire cable to slip
off of the shaft inside the unit
and the wire cable may not be
able to be raised or lowered. If
the spare tire clamp bolt has
been turned without a tire on the
hoist assembly and the wire
cable cannot be raised or low-
ered, contact your Toyota
dealer.
Page 496 of 568
4967-2. Steps to take in an emergency
WARNING
■When attempting to free a
stuck vehicle
If you choose to push the vehicle
back and forth to free it, make
sure the surrounding area is clear
to avoid striking other vehicles,
objects or people. The vehicle
may also lunge forward or lunge
back suddenly as it becomes free.
Use extreme caution.
■When shifting the shift lever
Be careful not to shift the shift
lever with the ac celerator pedal
depressed.
This may lead to unexpected
rapid acceleration of the vehicle
that may cause an accident
resulting in death or serious injury.
NOTICE
■To avoid damage to the trans-
mission and other compo-
nents
●Avoid spinning the front wheels
and depressing the accelerator
pedal more than necessary.
●If the vehicle remains stuck
even after these procedures are
performed, the vehicle may
require towing to be freed.
Page 553 of 568

553Alphabetical Index
Clock ................................... 81, 84
Coat hooks .............................. 382
Condenser .............................. 414
Console box ............................ 365
Consumption screen.............. 108
Conversation mirror ............... 384
Cooling system ...................... 413Engine overheating .............. 494
Cruise control Dynamic radar cruise control with full-speed range .......... 257
Cup holders ............................ 366
Current fuel consumption . 86, 94
Curtain shield airbags ............. 34
Customizable features ........... 521
D
Daytime running light system216 Replacing light bulbs ............ 439
Defogger Outside rear view mirrors ... 335, 341, 345
Rear window ........ 335, 341, 345
Windshield............ 335, 341, 344
Differential Rear differential oil ............... 504
Digital Rearview Mirror .......... 155
Dimension ............................... 500
Dinghy towing ........................ 201
Display Dynamic radar cruise control with full-speed range .......... 257
Head-up display ................... 103
Intuitive parking assist .......... 284
LTA (Lane Tracing Assist) ..... 252
Multi-information display .. 84, 93
RCTA .................................... 293
Toyota Multi-operation touch 332
Warning message ................ 467
Distance until next engine oil change..................................... 83
Do-it-yourself maintenance ... 401 Door courtesy lights...............361
Door lock
Back door .............................121
Side doors ............................ 117
Smart key system .................133
Wireless remote control........ 115
Doors Automatic door locking and unlocking system ................120
Back door .............................121
Door glasses ........................167
Door lock ..............................121
Open door warning buzzer . 118, 120
Outside rear view mirrors .....165
Rear door child-protectors ....120
Downhill assist control system ...............................................316
Drive distance .....................88, 97
Drive information .. ..............88, 97
Driver’s seat position memory Driving position memory .......147
Memory recall function .........149
Drive-start control ..................180
Driving Break-in tips .........................180
Correct driving posture ...........25
Driving mode select switch ... 311
Procedures ...........................179
Winter drive tips....................324
Driving information display85, 94
Driving mode select switch ... 311
Driving position memory .......147 Memory recall function .........149
Driving range ................86, 94, 95
Driving support system informa- tion display........................87, 97
Dynamic radar cruise control with full-speed range............257Warning message.................267
Dynamic Torque Control AWD system ...................................319
Page 554 of 568

554Alphabetical Index
Dynamic Torque Vectoring AWD system ................................... 319
E
Eco drive mode ...................... 311
Eco Driving Indicator . 86, 95, 106
Eco Driving Indicator Light86, 95
EDR (Event data recorder)......... 8
Elapsed time ....................... 88, 97
Electric Power Steering (EPS) ............................................... 318Warning light ........................ 458
Electronic key ......................... 114 Battery-saving function......... 134
If the electronic key does not operate properly ................. 488
Replacing the battery ........... 434
Electronic roof sunshade Jam protection function ........ 174
Operation ............................. 173
Emergency flashers ............... 448
Emergency, in case of If a warning buzzer sounds .. 456
If a warning light turns on ..... 456
If a warning message is dis-played................................. 467
If the battery is discharged ... 490
If the electronic key does not operate properly ................. 488
If the engin e will not start ..... 485
If the fuel filler door cannot be opened ............................... 487
If the vehicle is submerged or water on the road is rising .. 449
If you have a flat tire ............. 471
If you lose your keys ............ 486
If you think something is wrong ........................................... 454
If your vehicle becomes stuck ........................................... 496
If your vehicle has to be stopped in an emergency................. 448 If your vehicle needs to be towed
...........................................451
If your vehicle ove rheats ......494
Engine ACCESSORY mode . ............204
Compartment........................410
Engine switch .......................202
Fuel pump shut off system ...455
Hood .....................................408
How to start the engine ........202
Identification number ............501
If the engine will not start......485
If your vehicle has to be stopped in an emergency .................448
Ignition switch (engine switch) ...........................................202
Overheating ..........................494
Tachometer.............................81
Engine coolant Capacity ...............................503
Checking ..............................413
Preparing and checking before winter ..................................324
Engine coolant temperature gauge .......................................81
Engine immobilizer system .....71
Engine oil Capacity ...............................502
Checking ..............................410
Preparing and checking before winter ..................................324
Warning light.........................457
Engine oil maintenance data .412
Engine switch .........................202 Auto power off fun ction .........205
Changing the engine switch modes.................................204
If your vehicle has to be stopped in an emergency .................448
EPS (Electric Po wer Steering)
...............................................318 Warning light.........................458