buttons TOYOTA HIGHLANDER 2022 Owners Manual
[x] Cancel search | Manufacturer: TOYOTA, Model Year: 2022, Model line: HIGHLANDER, Model: TOYOTA HIGHLANDER 2022Pages: 568, PDF Size: 13.73 MB
Page 21 of 568

21Pictorial index
■Interior
SRS airbags .................................................... ...................... P.34
Floor mats..................................................... ........................ P.24
Front seats .................................................... ...................... P.141
Rear seats ..................................................... ...................... P.142
Head restraints ................................................ ................... P.150
Seat belts ..................................................... ......................... P.27
Console box ....................................................................... P.365
Inside lock buttons ............................................ ................ P.120
Cup holders .................................................... .................... P.366
Assist grips ................................................... ..................... P.381
Rear seat entertainment system
*1, 2
*1
: If equipped
*2: Refer to “NAVIGATI ON AND MULTIMEDIA SYSTEM OWNER’S MAN-
UAL”.
Page 114 of 568
1143-1. Key information
3-1.Key information
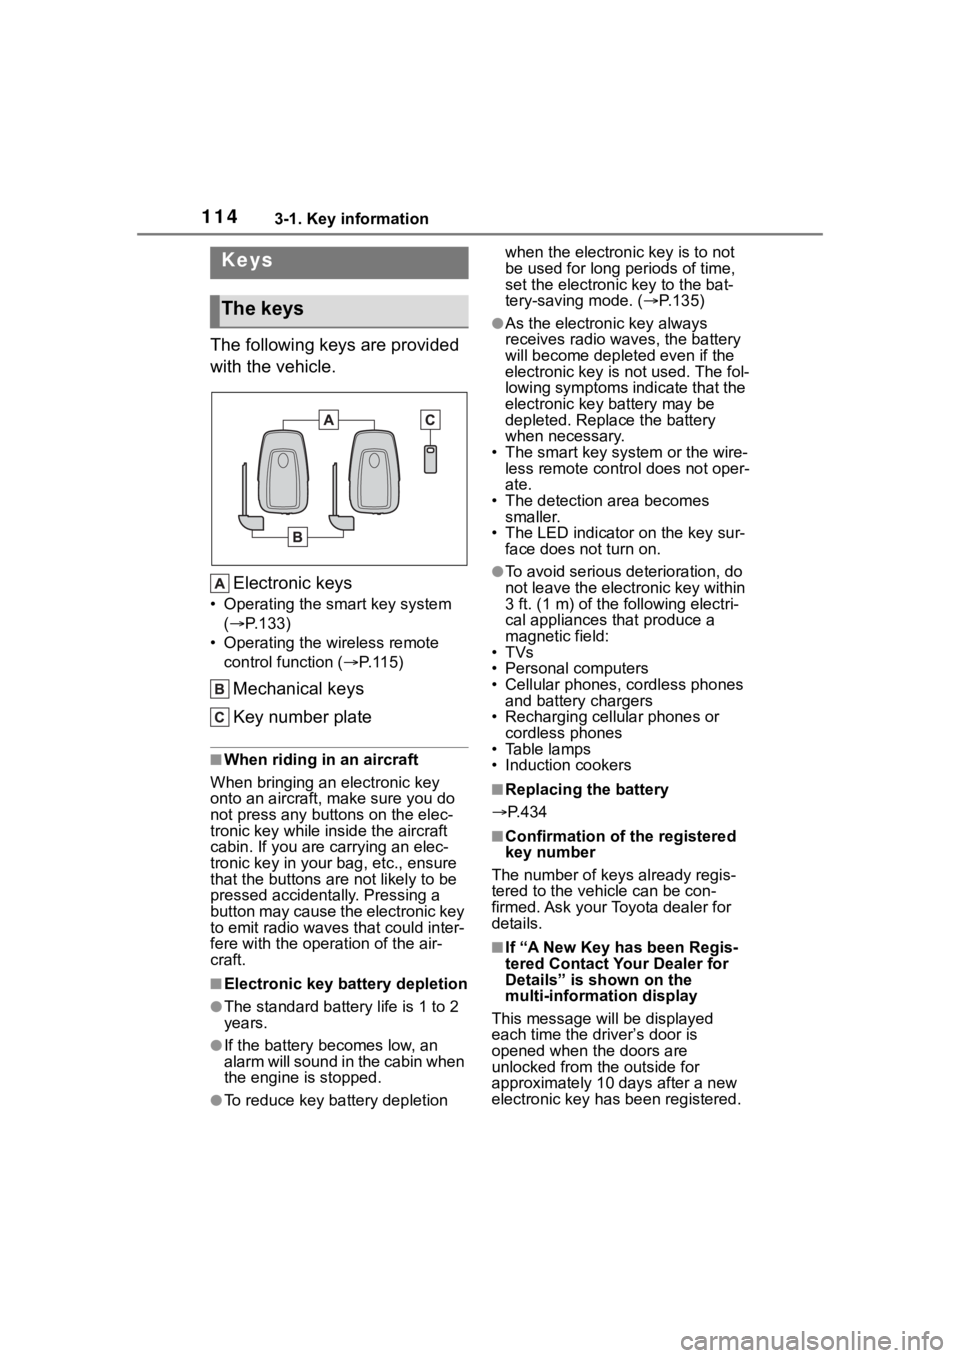
The following keys are provided
with the vehicle.Electronic keys
• Operating the smart key system ( P.133)
• Operating the wireless remote control function ( P. 1 1 5 )
Mechanical keys
Key number plate
■When riding in an aircraft
When bringing an electronic key
onto an aircraft, make sure you do
not press any buttons on the elec-
tronic key while inside the aircraft
cabin. If you are carrying an elec-
tronic key in your bag, etc., ensure
that the buttons are not likely to be
pressed accidentally. Pressing a
button may cause the electronic key
to emit radio waves that could inter-
fere with the oper ation of the air-
craft.
■Electronic key battery depletion
●The standard battery life is 1 to 2
years.
●If the battery becomes low, an
alarm will sound in the cabin when
the engine is stopped.
●To reduce key battery depletion when the electronic key is to not
be used for long periods of time,
set the electronic key to the bat-
tery-saving mode. (
P.135)
●As the electronic key always
receives radio waves, the battery
will become depleted even if the
electronic key is not used. The fol-
lowing symptoms indicate that the
electronic key battery may be
depleted. Replace the battery
when necessary.
• The smart key system or the wire- less remote contro l does not oper-
ate.
• The detection area becomes smaller.
• The LED indicator on the key sur- face does not turn on.
●To avoid serious deterioration, do
not leave the electronic key within
3 ft. (1 m) of the following electri-
cal appliances that produce a
magnetic field:
•TVs
• Personal computers
• Cellular phones, cordless phones and battery chargers
• Recharging cellular phones or cordless phones
• Table lamps
• Induction cookers
■Replacing the battery
P.434
■Confirmation of the registered
key number
The number of keys already regis-
tered to the vehi cle can be con-
firmed. Ask your Toyota dealer for
details.
■If “A New Key has been Regis-
tered Contact Your Dealer for
Details” is shown on the
multi-information display
This message will be displayed
each time the driver’s door is
opened when the doors are
unlocked from the outside for
approximately 10 days after a new
electronic key has been registered.
Keys
The keys
Page 118 of 568
1183-2. Opening, closing and locking the doors
continuously, release the buttons,
wait for at least 5 seconds, and
repeat step 2.)
For vehicles with an alarm: To pre-
vent unintended triggering of the
alarm, unlock the doors using the
wireless remote control and open
and close a door once after the set-
tings have been changed. (If a door
is not opened within 60 seconds
after is press ed, the doors will
be locked again an d the alarm will
automatically be set.)
In case that the alarm is triggered,
immediately stop the alarm. ( P. 7 3 )
■Impact detection door lock
release system
In the event that t he vehicle is sub-
ject to a strong impact, all the doors
are unlocked. Depending on the
force of the impact or the type of
accident, however, the system may
not operate.
■Operation signals
A buzzer sounds and the emer-
gency flashers flash to indicate that
the doors have been
locked/unlocked. (Locked: Once;
Unlocked: Twice)
A buzzer sounds to indicate that the
windows and the moon roof
* or pan-
oramic moon roof* are operating.
*: If equipped
■Security feature
If a door is not opened within
approximately 60 s econds after the
vehicle is unlocked, the security fea-
ture automatically locks the vehicle
again.
■When the door cannot be
locked by the lock sensor on
the surface of the front door
handle
If the door will not lock even when
the topside sensor area is touched,
try touching both the topside and
underside sensor areas at the same
time.
When gloves are being worn,
remove the gloves.
■Door lock buzzer
If an attempt to lock the doors using
the smart key system is made when
a door is not fully closed, a buzzer
will sound continuo usly for 5 sec-
onds. Fully close the door to stop
the buzzer, and lock the doors
again.
■Setting the alarm (if equipped)
Locking the doors will set the alarm
system. ( P. 7 3 )
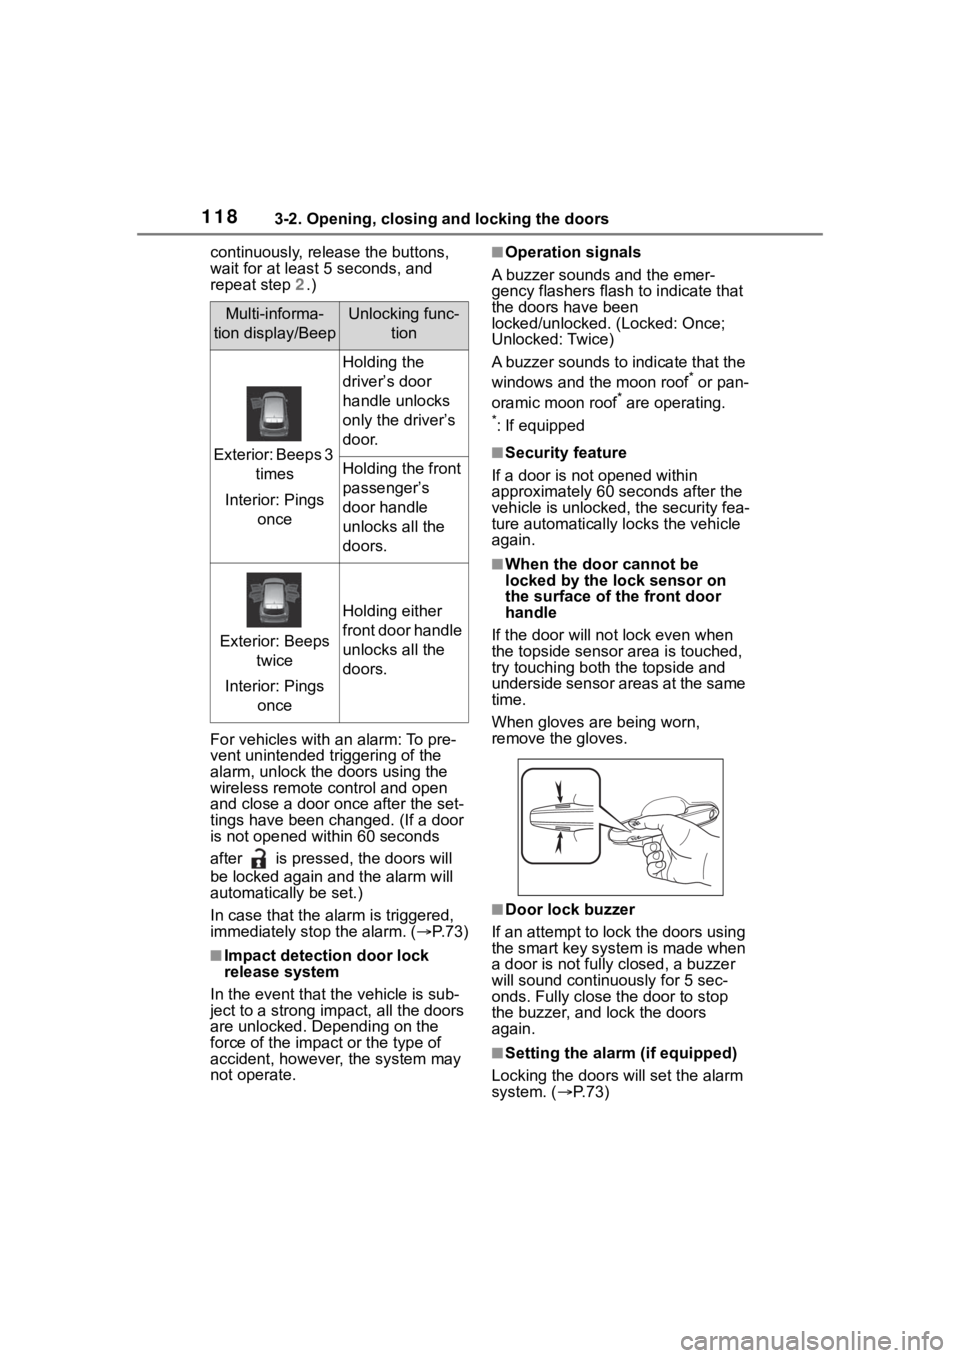
Multi-informa-
tion display/BeepUnlocking func- tion
Exterior: Beeps 3 times
Interior: Pings once
Holding the
driver’s door
handle unlocks
only the driver’s
door.
Holding the front
passenger’s
door handle
unlocks all the
doors.
Exterior: Beeps twice
Interior: Pings once
Holding either
front door handle
unlocks all the
doors.
Page 120 of 568
1203-2. Opening, closing and locking the doors
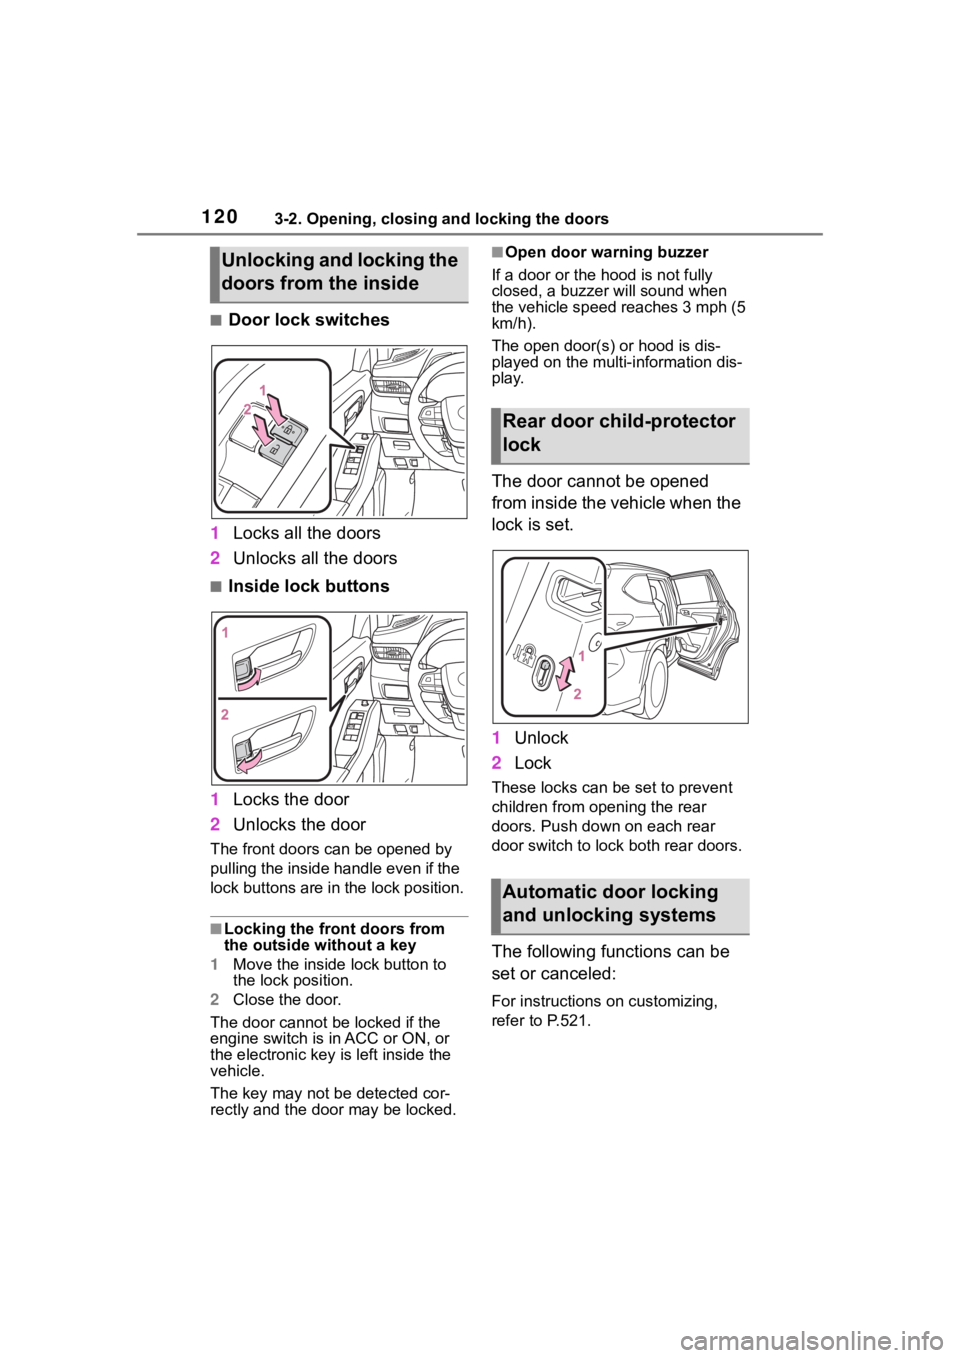
■Door lock switches
1 Locks all the doors
2 Unlocks all the doors
■Inside lock buttons
1 Locks the door
2 Unlocks the door
The front doors can be opened by
pulling the inside ha ndle even if the
lock buttons are in the lock position.
■Locking the front doors from
the outside without a key
1 Move the inside lock button to
the lock position.
2 Close the door.
The door cannot be locked if the
engine switch is in ACC or ON, or
the electronic key is left inside the
vehicle.
The key may not b e detected cor-
rectly and the door may be locked.
■Open door warning buzzer
If a door or the hood is not fully
closed, a buzzer will sound when
the vehicle speed reaches 3 mph (5
km/h).
The open door(s) or hood is dis-
played on the multi-information dis-
play.
The door cannot be opened
from inside the vehicle when the
lock is set.
1 Unlock
2 Lock
These locks can be set to prevent
children from opening the rear
doors. Push down on each rear
door switch to lock both rear doors.
The following functions can be
set or canceled:
For instructions on customizing,
refer to P.521.
Unlocking and locking the
doors from the inside
Rear door child-protector
lock
Automatic door locking
and unlocking systems
Page 135 of 568
1353-2. Opening, closing and locking the doors
3
Before driving
wireless remote control or the
mechanical key, to unlock the
doors.
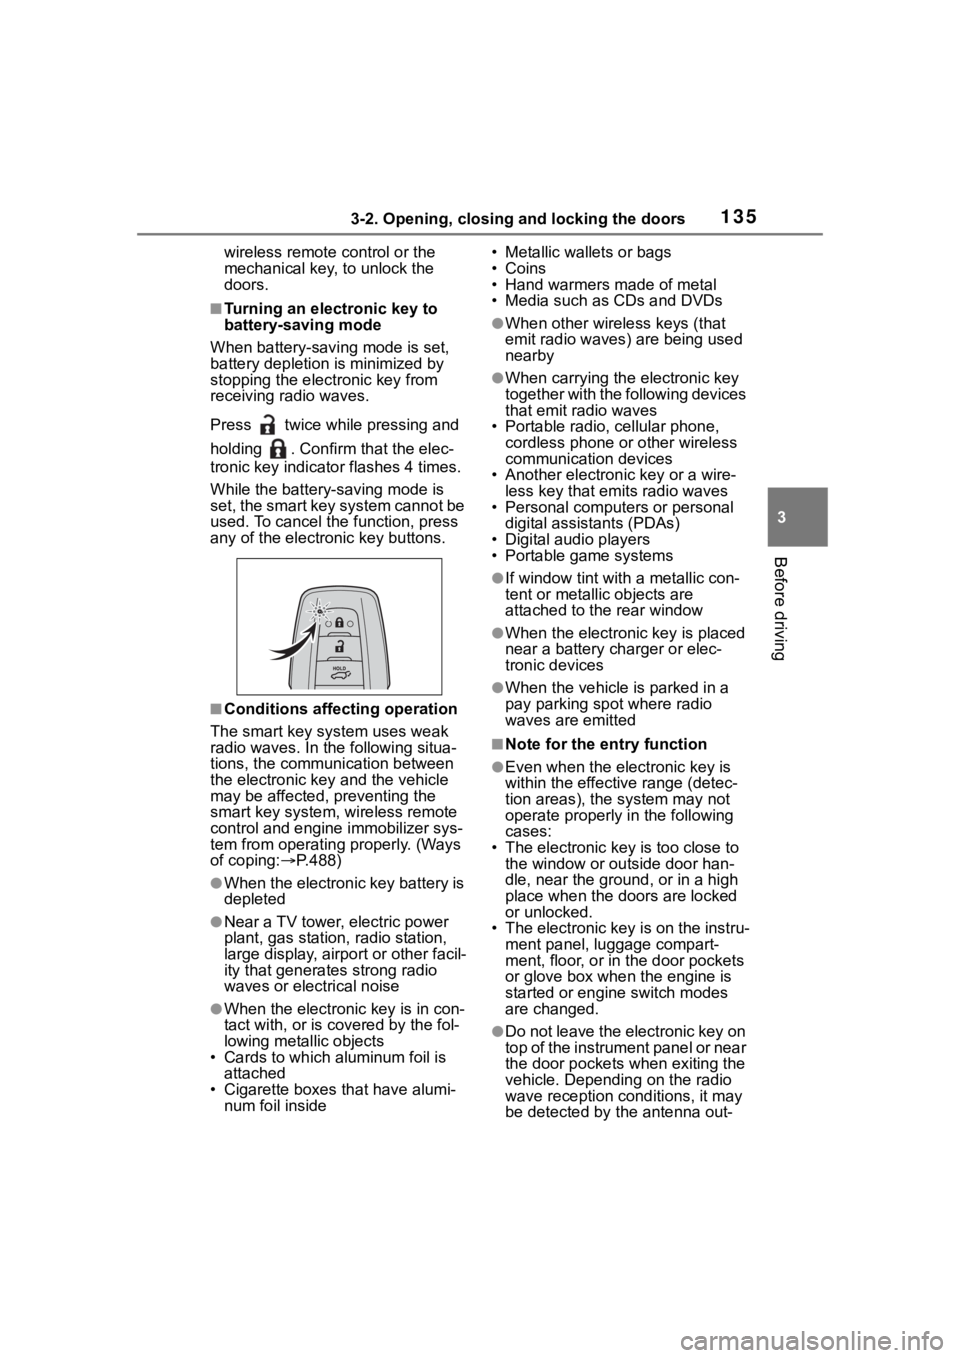
■Turning an electronic key to
battery-saving mode
When battery-savi ng mode is set,
battery depletion is minimized by
stopping the electronic key from
receiving radio waves.
Press twice while pressing and
holding . Confirm that the elec-
tronic key indicator flashes 4 times.
While the battery-saving mode is
set, the smart key system cannot be
used. To cancel the function, press
any of the electronic key buttons.
■Conditions affecting operation
The smart key system uses weak
radio waves. In the following situa-
tions, the communication between
the electronic key and the vehicle
may be affected, preventing the
smart key system, wireless remote
control and engine immobilizer sys-
tem from operating properly. (Ways
of coping: P.488)
●When the electronic key battery is
depleted
●Near a TV tower, electric power
plant, gas station , radio station,
large display, airpo rt or other facil-
ity that generates strong radio
waves or electrical noise
●When the electronic key is in con-
tact with, or is covered by the fol-
lowing metallic objects
• Cards to which al uminum foil is
attached
• Cigarette boxes that have alumi- num foil inside • Metallic wallets or bags
•Coins
• Hand warmers made of metal
• Media such as CDs and DVDs
●When other wirel
ess keys (that
emit radio waves) are being used
nearby
●When carrying the electronic key
together with the following devices
that emit radio waves
• Portable radio, cellular phone, cordless phone or other wireless
communication devices
• Another electronic key or a wire- less key that emits radio waves
• Personal computers or personal
digital assistants (PDAs)
• Digital audio players
• Portable game systems
●If window tint wit h a metallic con-
tent or metallic objects are
attached to the rear window
●When the electronic key is placed
near a battery charger or elec-
tronic devices
●When the vehicle is parked in a
pay parking spot where radio
waves are emitted
■Note for the entry function
●Even when the electronic key is
within the effective range (detec-
tion areas), the system may not
operate properly in the following
cases:
• The electronic key is too close to the window or outside door han-
dle, near the ground, or in a high
place when the doors are locked
or unlocked.
• The electronic key is on the instru-
ment panel, luggage compart-
ment, floor, or in the door pockets
or glove box when the engine is
started or engine switch modes
are changed.
●Do not leave the electronic key on
top of the instrument panel or near
the door pockets when exiting the
vehicle. Depending on the radio
wave reception conditions, it may
be detected by the antenna out-
Page 148 of 568
1483-3. Adjusting the seats
ten.
■Seat positions that can be
memorized
The adjusted positions other than
the position adjusted by lumbar sup-
port switch can be recorded.
■In order to correctly use the
driving position memory func-
tion
If a seat position is already in the
furthest possible position and the
seat is operated in the same direc-
tion, the recorded position may be
slightly different w hen it is recalled.
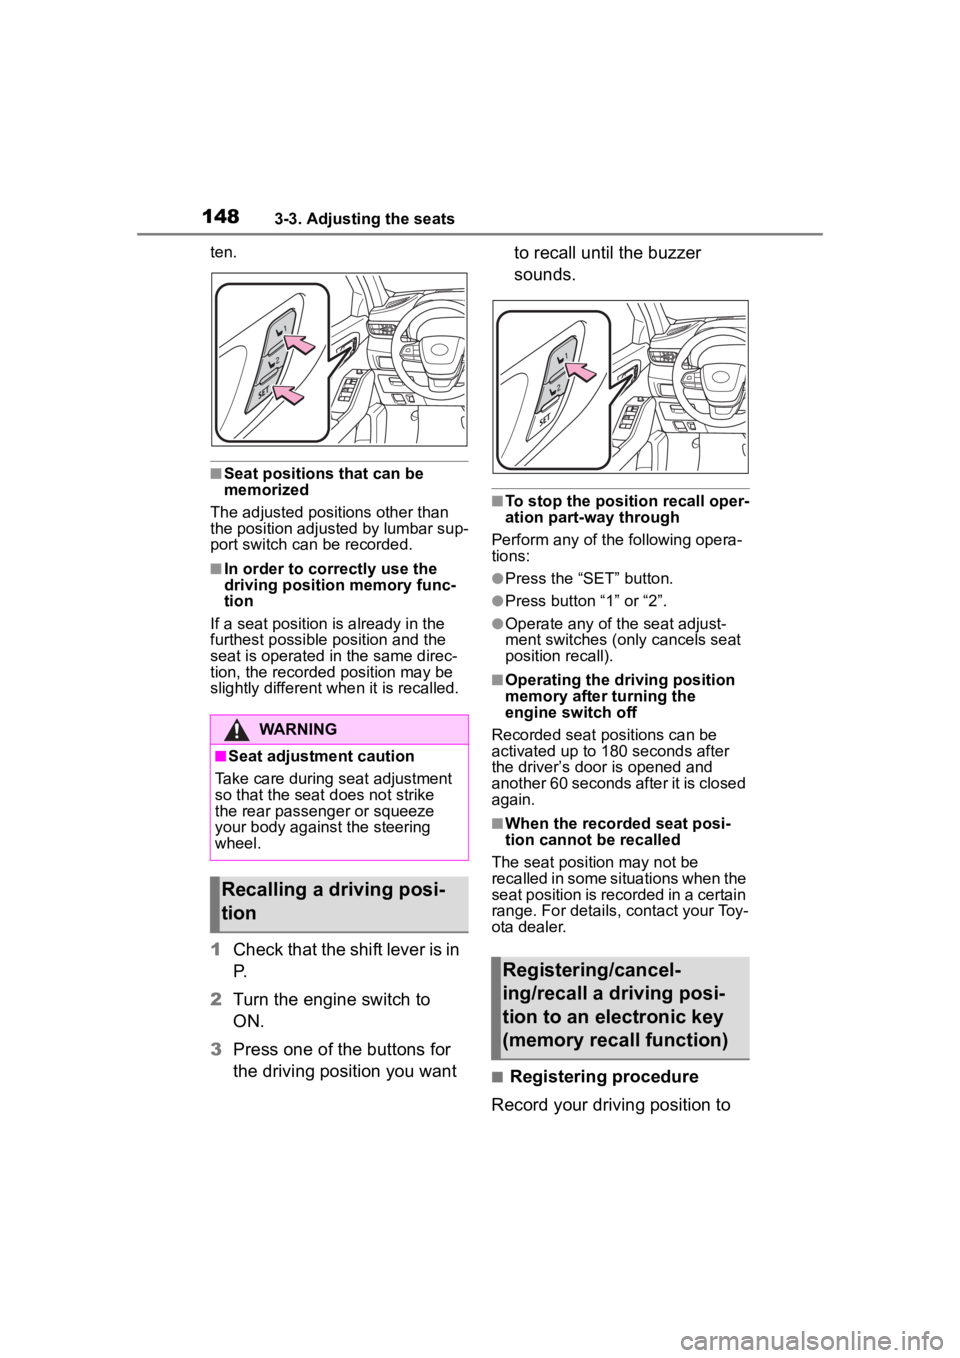
1Check that the shift lever is in
P.
2 Turn the engine switch to
ON.
3 Press one of the buttons for
the driving position you want to recall until the buzzer
sounds.
■To stop the position recall oper-
ation part-way through
Perform any of the following opera-
tions:
●Press the “SET” button.
●Press button “1” or “2”.
●Operate any of t he seat adjust-
ment switches (only cancels seat
position recall).
■Operating the driving position
memory after turning the
engine switch off
Recorded seat positions can be
activated up to 180 seconds after
the driver’s door is opened and
another 60 seconds after it is closed
again.
■When the recorded seat posi-
tion cannot be recalled
The seat position may not be
recalled in some situations when the
seat position is recorded in a certain
range. For details, contact your Toy-
ota dealer.
■Registering procedure
Record your driving position to
WARNING
■Seat adjustment caution
Take care during seat adjustment
so that the seat d oes not strike
the rear passenger or squeeze
your body again st the steering
wheel.
Recalling a driving posi-
tion
Registering/cancel-
ing/recall a driving posi-
tion to an electronic key
(memory recall function)
Page 207 of 568
2074-2. Driving procedures
4
Driving
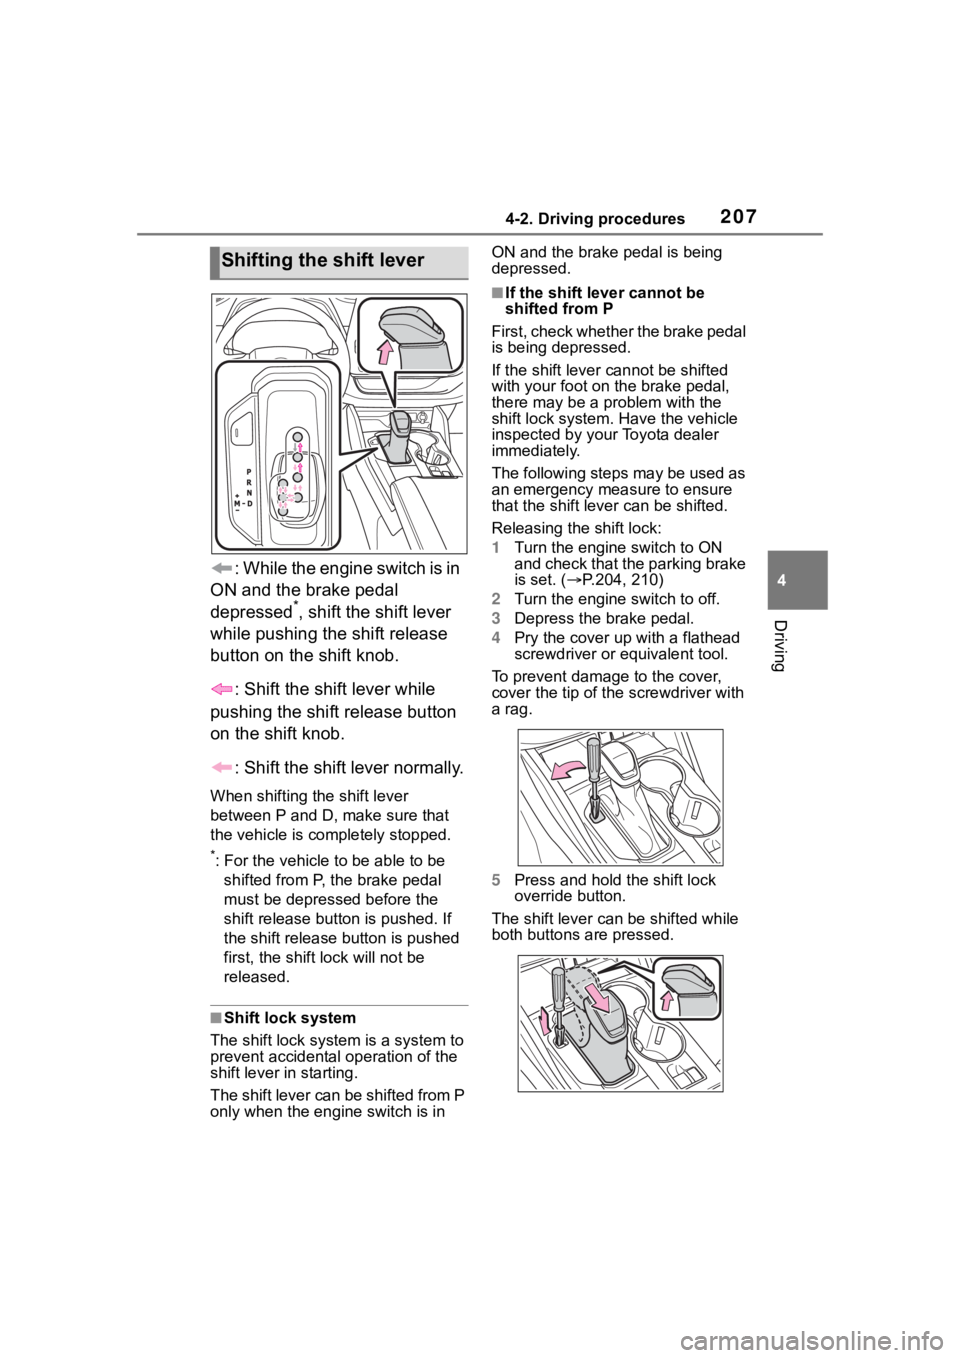
: While the engine switch is in
ON and the brake pedal
depressed
*, shift the shift lever
while pushing the shift release
button on the shift knob.
: Shift the shift lever while
pushing the shift release button
on the shift knob.
: Shift the shift lever normally.
When shifting the shift lever
between P and D, make sure that
the vehicle is completely stopped.
*: For the vehicle to be able to be
shifted from P, the brake pedal
must be depresse d before the
shift release button is pushed. If
the shift release button is pushed
first, the shift lock will not be
released.
■Shift lock system
The shift lock system is a system to
prevent accidental operation of the
shift lever in starting.
The shift lever can be shifted from P
only when the engine switch is in ON and the brake pedal is being
depressed.
■If the shift lever cannot be
shifted from P
First, check whether the brake pedal
is being depressed.
If the shift lever cannot be shifted
with your foot on the brake pedal,
there may be a p roblem with the
shift lock system. Have the vehicle
inspected by your Toyota dealer
immediately.
The following steps may be used as
an emergency measure to ensure
that the shift lev er can be shifted.
Releasing the shift lock:
1 Turn the engine switch to ON
and check that the parking brake
is set. ( P.204, 210)
2 Turn the engine switch to off.
3 Depress the brake pedal.
4 Pry the cover up with a flathead
screwdriver or equivalent tool.
To prevent damag e to the cover,
cover the tip of the screwdriver with
a rag.
5 Press and hold the shift lock
override button.
The shift lever can be shifted while
both buttons are pressed.
Shifting the shift lever
Page 370 of 568
3705-4. Using the storage features
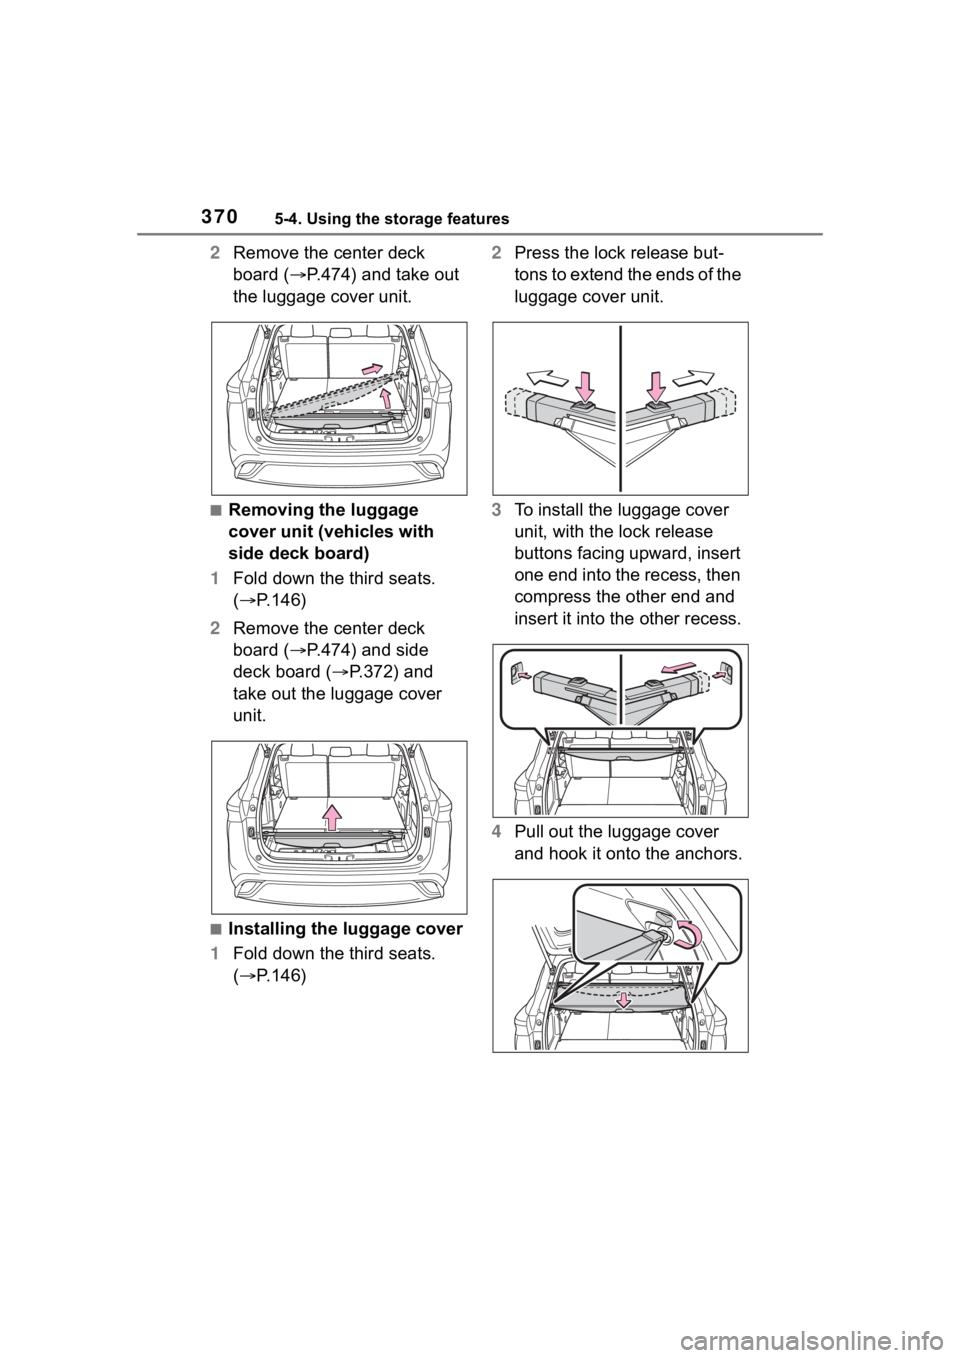
2Remove the center deck
board ( P.474) and take out
the luggage cover unit.
■Removing the luggage
cover unit (vehicles with
side deck board)
1 Fold down the third seats.
( P.146)
2 Remove the center deck
board ( P.474) and side
deck board ( P.372) and
take out the luggage cover
unit.
■Installing the luggage cover
1 Fold down the third seats.
( P.146) 2
Press the lock release but-
tons to extend the ends of the
luggage cover unit.
3 To install the luggage cover
unit, with the lock release
buttons facing upward, insert
one end into the recess, then
compress the other end and
insert it into the other recess.
4 Pull out the luggage cover
and hook it onto the anchors.
Page 371 of 568
3715-4. Using the storage features
5
Interior features
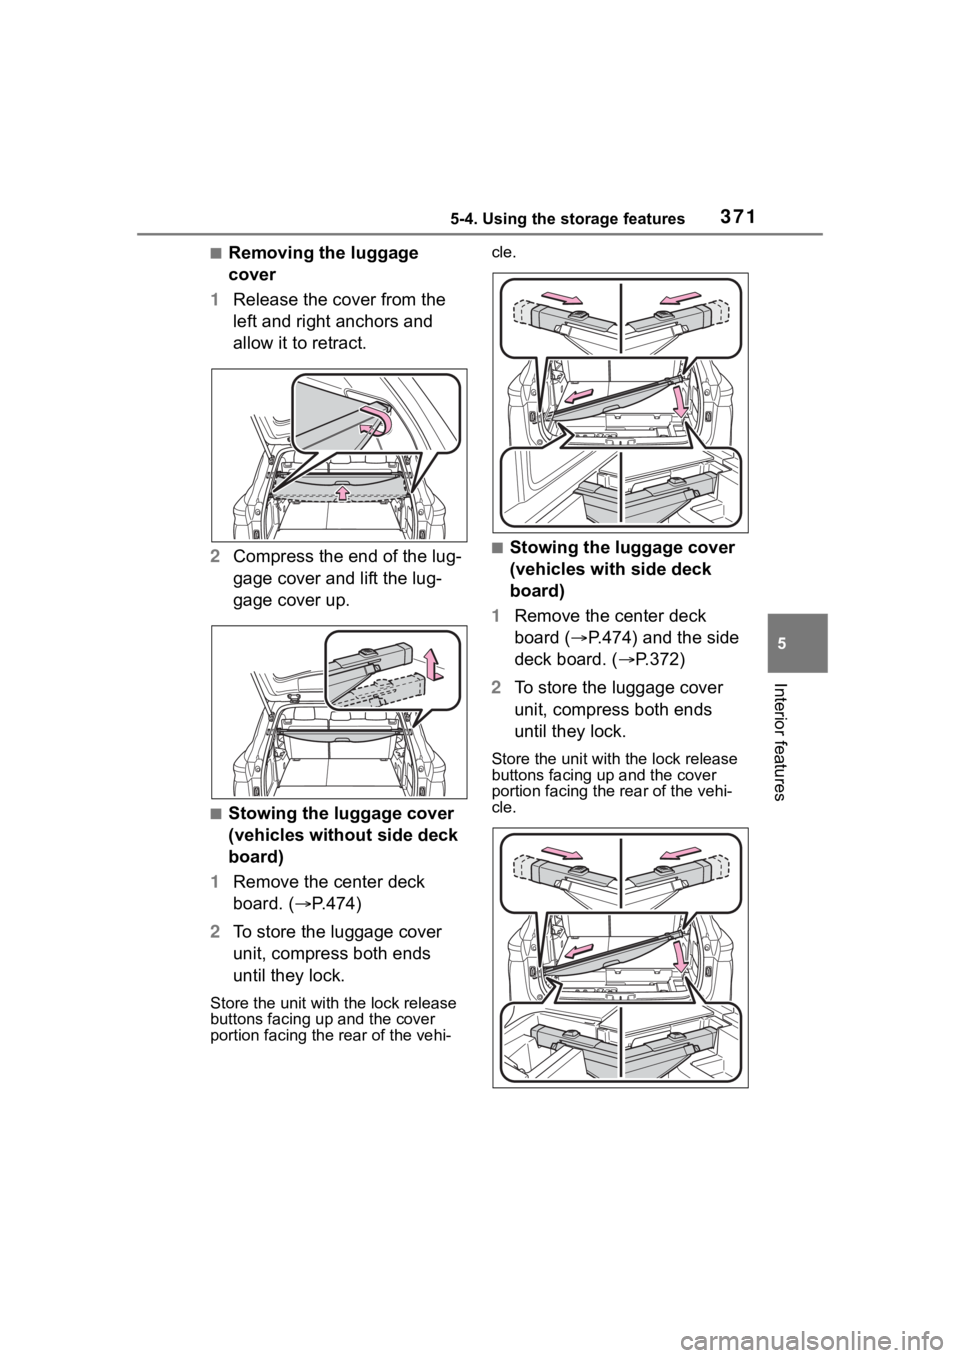
■Removing the luggage
cover
1 Release the cover from the
left and right anchors and
allow it to retract.
2 Compress the end of the lug-
gage cover and lift the lug-
gage cover up.
■Stowing the luggage cover
(vehicles without side deck
board)
1 Remove the center deck
board. ( P.474)
2 To store the luggage cover
unit, compress both ends
until they lock.
Store the unit wit h the lock release
buttons facing up and the cover
portion facing the rear of the vehi- cle.
■Stowing the luggage cover
(vehicles with side deck
board)
1 Remove the center deck
board ( P.474) and the side
deck board. ( P.372)
2 To store the luggage cover
unit, compress both ends
until they lock.
Store the unit with the lock release
buttons facing up and the cover
portion facing the rear of the vehi-
cle.
Page 385 of 568
3855-5. Using the other interior features
5
Interior features
*: If equipped
■HomeLink® programming pro-
cedure
The programming procedures can
also be found at the following URL.
Website: www.homelink.com/toyota
For support, contact customer sup-
port at the following.
Help Line: 1-800-355-3515
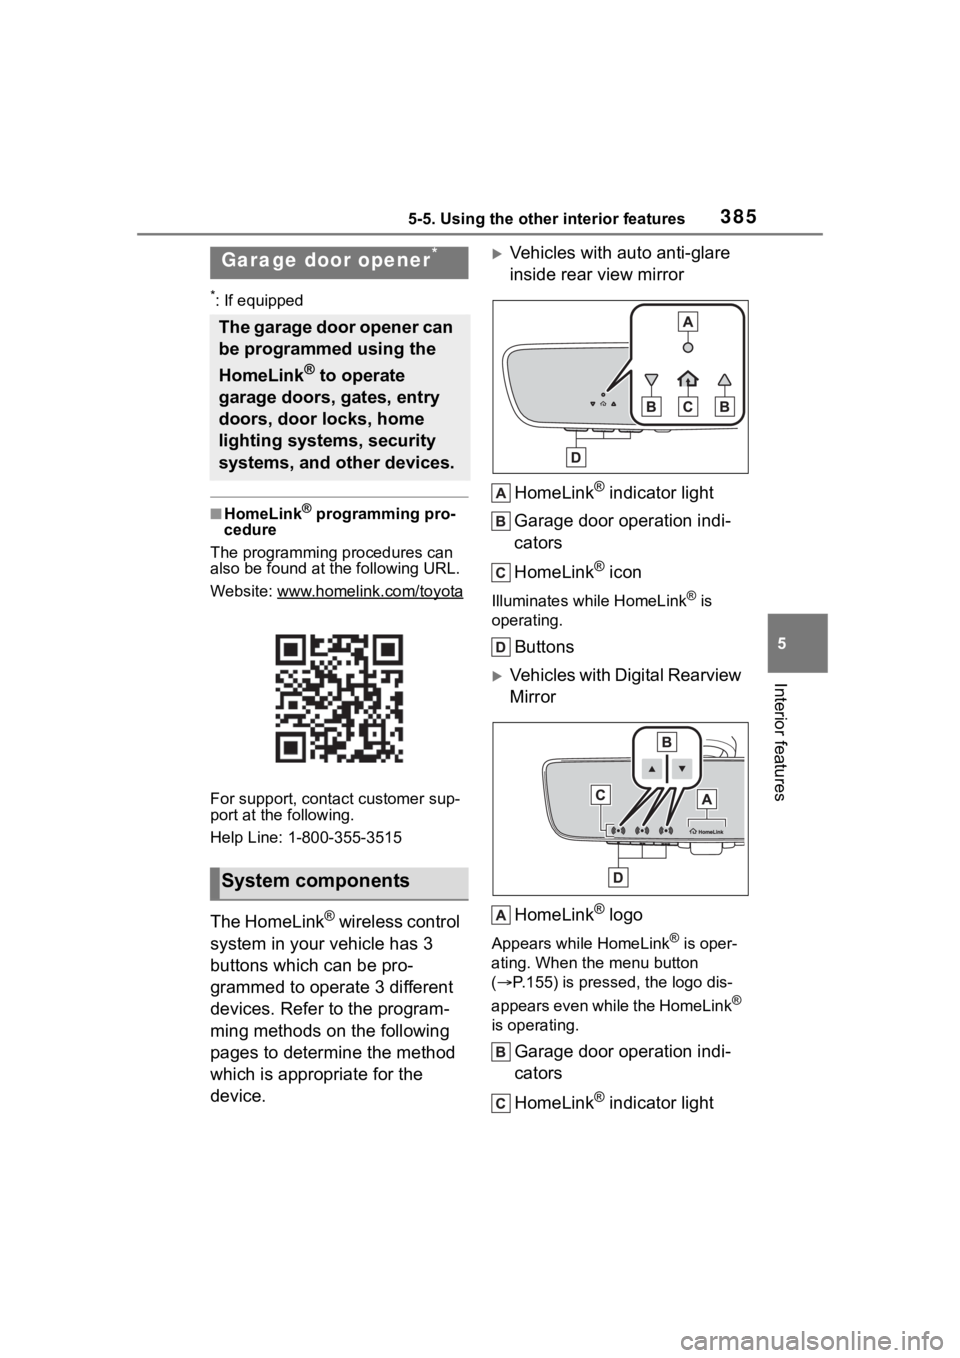
The HomeLink® wireless control
system in your vehicle has 3
buttons which can be pro-
grammed to operate 3 different
devices. Refer to the program-
ming methods on the following
pages to determine the method
which is appropriate for the
device.
Vehicles with auto anti-glare
inside rear view mirror
HomeLink
® indicator light
Garage door operation indi-
cators
HomeLink
® icon
Illuminates while HomeLink® is
operating.
Buttons
Vehicles with Digital Rearview
Mirror
HomeLink
® logo
Appears while HomeLink® is oper-
ating. When the menu button
( P.155) is pressed, the logo dis-
appears even while the HomeLink
®
is operating.
Garage door operation indi-
cators
HomeLink
® indicator light
Garage door opener*
The garage door opener can
be programmed using the
HomeLink
® to operate
garage doors, gates, entry
doors, door locks, home
lighting systems, security
systems, and other devices.
System components