airbag off TOYOTA HIGHLANDER 2023 User Guide
[x] Cancel search | Manufacturer: TOYOTA, Model Year: 2023, Model line: HIGHLANDER, Model: TOYOTA HIGHLANDER 2023Pages: 552, PDF Size: 13.36 MB
Page 55 of 552
551-2. Child safety
1
For safety and security
A child restraint system for a
small child or baby must itself be
properly restrained on the seat
with the lap portion of the
lap/shoulder belt.
■Installing child restraint
system using a seat belt
(child restraint lock func-
tion belt)
Install the child restraint system
in accordance to the operation
manual enclosed with the child
restraint system.
■Rear-facing Infant
seat/convertible seat
1 Adjust the rear seat
If there is a gap between the child
seat and the seatb ack, adjust the
seatback angle until good contact is
achieved.
WARNING
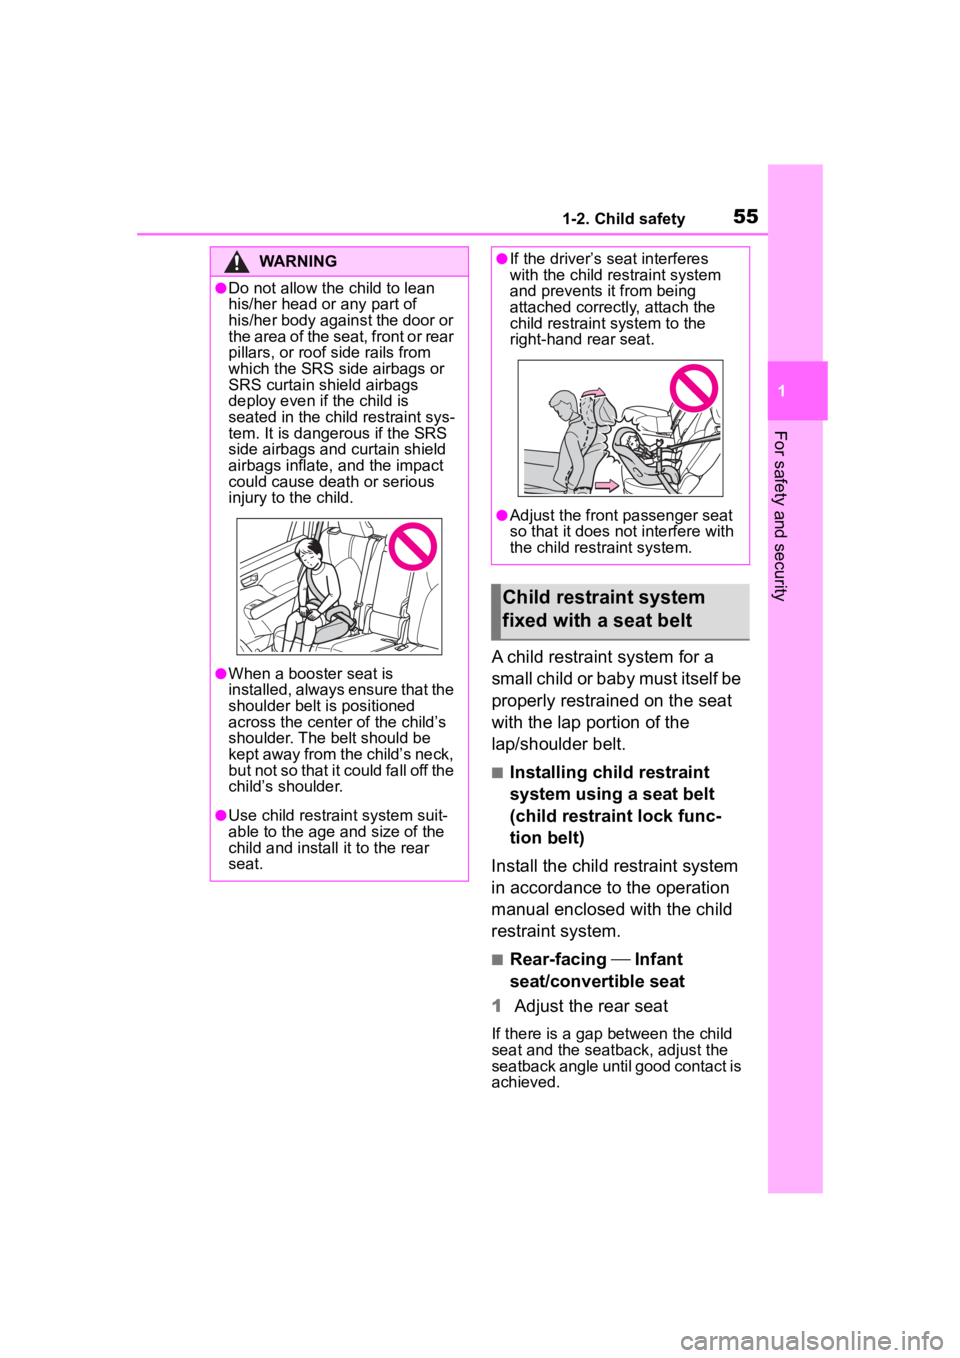
●Do not allow the child to lean
his/her head or any part of
his/her body against the door or
the area of the seat, front or rear
pillars, or roof side rails from
which the SRS side airbags or
SRS curtain shield airbags
deploy even if the child is
seated in the child restraint sys-
tem. It is dangerous if the SRS
side airbags and curtain shield
airbags inflate, and the impact
could cause death or serious
injury to the child.
●When a booster seat is
installed, always ensure that the
shoulder belt is positioned
across the center of the child’s
shoulder. The belt should be
kept away from the child’s neck,
but not so that it could fall off the
child’s shoulder.
●Use child restraint system suit-
able to the age and size of the
child and install it to the rear
seat.
●If the driver’s seat interferes
with the child restraint system
and prevents it from being
attached correct ly, attach the
child restraint system to the
right-hand rear seat.
●Adjust the front passenger seat
so that it does not interfere with
the child restraint system.
Child restraint system
fixed with a seat belt
Page 67 of 552
671-3. Emergency assistance
1
For safety and security
active.
The following indicator light pat-
terns indicate specific system
usage conditions:
Green indicator light on =
Active service
Green indicator light flashing
= Safety Connect call in pro-
cess
Red indicator light (except at
vehicle start-up) = System
malfunction (contact your Toy-
ota dealer)
No indicator light (off) =
Safety Connect service not
active
■Automatic Collision Notifi-
cation
In case of either airbag deploy-
ment or severe rear-end colli-
sion, the system is designed to
automatically call the response
center. The responding agent
receives the vehicle’s location
and attempts to speak with the
vehicle occupants to assess the
level of emergency. If the occu-
pants are unable to communi-
cate, the agent automatically
treats the call as an emergency,
contacts the nearest emer-
gency services provider to
describe the situation, and
requests that assistance be sent
to the location.
■Stolen Vehicle Location
If your vehicle is stolen, Safety
Connect can work with local
authorities to assist them in
locating and recovering the
vehicle. After filing a police
report, call the Customer Experi-
ence Center at 1-800-331-4331
in the United States,
1-877-855-8377 in Puerto Rico
or 1-888-869-6828 in Canada,
and follow the prompts for
Safety Connect to initiate this
service.
In addition to assisting law
enforcement with recovery of a
stolen vehicle, Safety-Con-
nect-equipped vehicle location
data may, under certain circum-
stances, be shared with third
parties to locate your vehicle.
Further information is available
at Toyota.com in the United
States, Toyotapr.com in Puerto
Rico and Toyota.ca in Canada.
■Emergency Assistance But-
ton (“SOS”)
In the event of an emergency on
the road, push the “SOS” button
to reach the Safety Connect
response center. The answer-
ing agent will determine your
vehicle’s location, assess the
emergency, and dispatch the
necessary assistance required.
If you accidentally press the “SOS”
button, tell the response-center
agent that you are not experiencing
an emergency.
Safety Connect services
Page 308 of 552
3084-5. Using the driving support systems
wheel
■Dynamic Torque Control
AWD system (AWD models)
Automatically controls the drive
system such as to front-wheel
drive or AWD (all wheel drive)
according to various running
conditions including normal driv-
ing, during cornering, on a
uphill, when starting off, during
acceleration, on a slippery roads
due to snow or rain, thus con-
tributing to stable operability and
driving stability.
■Dynamic Torque Vectoring
AWD system (AWD models)
Automatically controls the drive
system such as to front-wheel
drive or AWD (all wheel drive)
according to various running
conditions including normal driv-
ing, during cornering, on a
uphill, when starting off, during
acceleration, on a slippery roads
due to snow or rain, thus con-
tributing to stable operability and
driving stability.
Also, drive torque distribution is
precisely controlled during cor-
nering, contributing to improve-
ments in operability and stability.
■The Secondary Collision
Brake
When the SRS airbag sensor
detects a collision and the sys-
tem operates, the brakes and
brake lights are automatically
controlled to reduce the vehicle speed and help reduce the pos-
sibility of further damage due to
a secondary collision.
■When the TRAC/VSC/Trailer
Sway Control systems are oper-
ating
The slip indicator light will flash
while the TRAC/VSC/Trailer Sway
Control systems are operating.
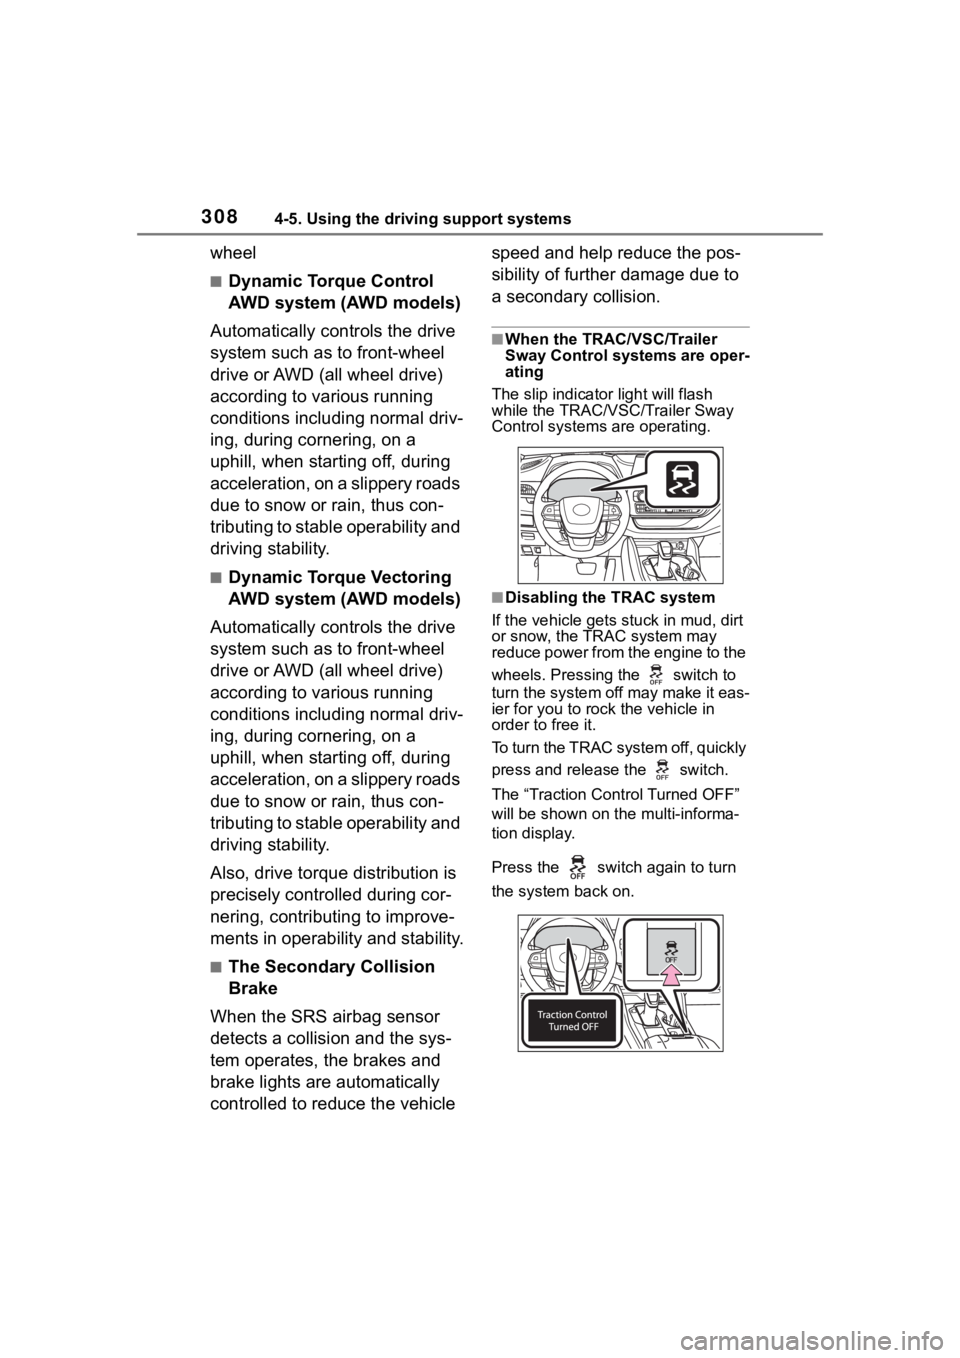
■Disabling the TRAC system
If the vehicle gets stuck in mud, dirt
or snow, the TRAC system may
reduce power from the engine to the
wheels. Pressing the switch to
turn the system off may make it eas-
ier for you to rock the vehicle in
order to free it.
To turn the TRAC system off, quickly
press and release the switch.
The “Traction Cont rol Turned OFF”
will be shown on the multi-informa-
tion display.
Press the switch again to turn
the system back on.
Page 310 of 552

3104-5. Using the driving support systems
■AWD system operation sounds
and vibrations when switching
between AWD and front wheel
drive (if equipped)
When the vehicle switches from
AWD to front wheel drive and vice
versa, operation sounds and vibra-
tions may be generated, but this is
not a malfunction.
■Reduced effectiveness of the
EPS system
The effectiveness of the EPS sys-
tem is reduced to prevent the sys-
tem from overheating when there is
frequent steering input over an
extended period of time. The steer-
ing wheel may feel heavy as a
result. Should this occur, refrain
from excessive steering input or
stop the vehicle and turn the engine
off. The EPS syst em should return
to normal within 10 minutes.
■Automatic reactivation of
TRAC, Trailer Sway Control and
VSC systems
After turning the TRAC, Trailer
Sway Control and VSC systems off,
the systems will be automatically
re-enabled in the following situa-
tions:
●When the engine switch is turned
OFF
●If only the TRAC system is turned
off, the TRAC will turn on when
vehicle speed increases
If both the TRAC and VSC sys-
tems are turned off, automatic
re-enabling will not occur when
vehicle speed increases.
■Operating conditions of Active
Cornering Assist
The system operates when the fol-
lowing occurs.
●TRAC/VSC can operate
●The driver is at tempting to accel-
erate while turning
●The system detects that the vehi-
cle is drifting to the outer side
●The brake pedal is released
■If a message about AWD is
shown on the multi-information
display (AWD models)
Perform the following actions.
●“AWD System Over-heated
Switching to 2WD Mode.” AWD
system is overheated. Stop the
vehicle in a safe place with the
engine running.
*
If the message disappears after a
while, there is no problem. If the
message remains, have the vehi-
cle inspected by your Toyota
dealer immediately.
●“AWD System Over-heated 2WD
Mode Engaged.” AWD system
has been temporarily released
and switched to front-wheel drive
due to overheating. Stop the vehi-
cle in a safe place with the engine
running.
*
If the message disappears after a
while, AWD system will automati-
cally recover. If the message
remains, have the vehicle
inspected by your Toyota dealer
immediately.
●“AWD system Malfunction 2WD
Mode Engaged Visit Your Dealer.”
A malfunction occurs in the AWD
system. Have the vehicle
inspected by your Toyota dealer
immediately.
*: When stopping the vehicle, do not stop the engine until the display
message has turned off.
■Secondary Collision Brake
operating conditions
The system operates when the SRS
airbag sensor de tects a collision
while the vehicle is in motion.
However, the system does not oper-
ate when the components are dam-
aged.
Page 339 of 552
3395-2. Using the interior lights
5
Interior features
■To prevent the battery from
being discharged
If the interior lights remain on when
the engine switch is turned off, the
lights will go off automatically after
20 minutes.
■The interior lights may turn on
automatically when
If any of the SRS airbags deploy
(inflate) or in the event of a strong
rear impact, the interior lights will
turn on automatically.
The interior lights will turn off auto-
matically after approximately 20
minutes.
The interior lights can be turned off
manually. However, in order to help
prevent further collisions, it is rec-
ommended that they be left on until
safety can be ensured.
(The interior lights may not turn on
automatically depending on the
force of the impact and conditions of
the collision.)
■Customization
Some functions can be customized.
( P.494)
NOTICE
■To prevent battery discharge
Do not leave the lights on longer
than necessary when the engine
is not running.
Page 373 of 552
3736-1. Maintenance and care
6
Maintenance and care
Remove dirt and dust using a
vacuum cleaner. Wipe dirty
surfaces with a cloth damp-
ened with lukewarm water.
If dirt cannot be removed,
wipe it off with a soft cloth
dampened with neutral deter-
gent diluted to approximately
1%.
Wring out any excess water
from the cloth and thoroughly
wipe off remaining traces of
detergent and water.
■Shampooing the carpets
There are several commercial foam-
ing-type cleaners available. Use a
sponge or brush to apply the foam.
Rub in overlapping circles. Do not
use water. Wipe dirty surfaces and
let them dry. Excellent results are
obtained by keeping the carpet as
dry as possible.
■Handling the seat belts
Clean with mild soap and lukewarm
water using a cloth or sponge. Also
check the belts periodically for
excessive wear, fraying or cuts.
Cleaning and protect-
ing the vehicle interior
Perform cleaning in a man-
ner appropriate to each
component and its material.
Protecting the vehicle
interior
WARNING
■Water in the vehicle
●Do not splash or spill liquid in
the vehicle.
Doing so may cause electrical
components, etc. to malfunc-
tion or catch fire.
●Do not get any of the SRS com-
ponents or wiring in the vehicle
interior wet.
( P. 3 4 )
An electrical ma lfunction may
cause the airbags to deploy or
not function properly, resulting
in death or serious injury.
●Vehicles with wireless charger:
Do not let the wireless charger
( P.350) get wet. Failure to do
so may cause t he charger to
become hot and cause burns or
could cause electric shock
resulting in death or serious
injury.
■Cleaning the interior (espe-
cially instrument panel)
Do not use polish wax or polish
cleaner. The instrument panel
may reflect off the windshield,
obstructing the driver’s view and
leading to an accident, resulting in
death or serious injury.
NOTICE
■Cleaning detergents
●Do not use the following types
of detergent, as they may dis-
color the vehicle interior or
cause streaks or damage to
painted surfaces:
• Non-seat portions: Organic sub- stances such as benzene or
gasoline, alkaline or acidic solu-
tions, dye, and bleach
• Seats: Alkaline or acidic solu- tions, such as th inner, benzene,
and alcohol
Page 424 of 552
4247-1. Essential information
7-1.Essential information
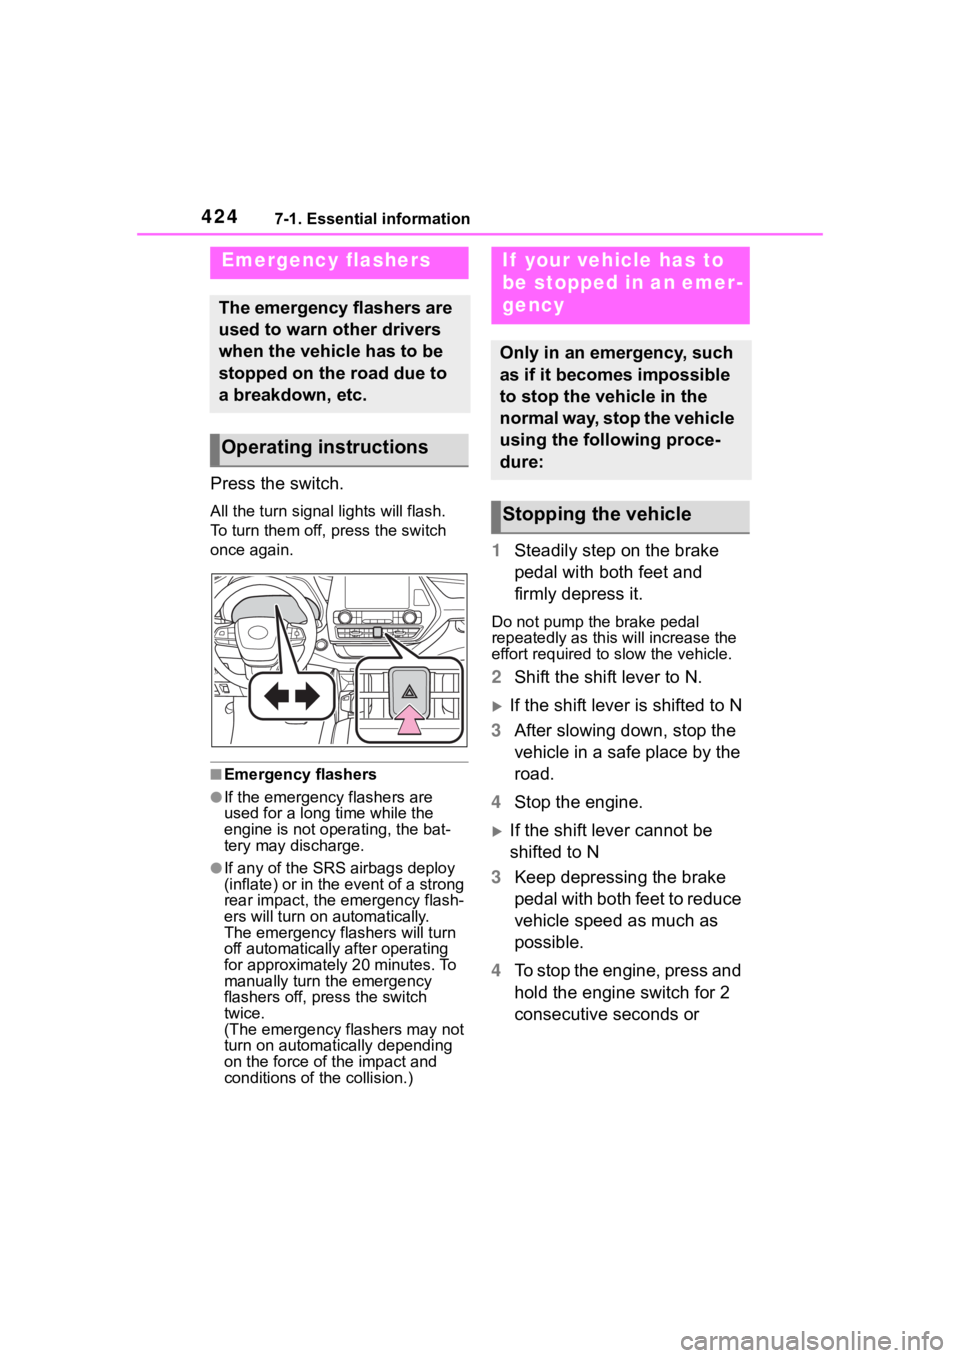
Press the switch.
All the turn signal lights will flash.
To turn them off, press the switch
once again.
■Emergency flashers
●If the emergency flashers are
used for a long time while the
engine is not operating, the bat-
tery may discharge.
●If any of the SRS airbags deploy
(inflate) or in the event of a strong
rear impact, the emergency flash-
ers will turn on automatically.
The emergency flashers will turn
off automatically after operating
for approximately 20 minutes. To
manually turn t he emergency
flashers off, press the switch
twice.
(The emergency flashers may not
turn on automatically depending
on the force of the impact and
conditions of the collision.)
1 Steadily step on the brake
pedal with both feet and
firmly depress it.
Do not pump the brake pedal
repeatedly as this will increase the
effort required to slow the vehicle.
2Shift the shift lever to N.
If the shift lever is shifted to N
3 After slowing down, stop the
vehicle in a safe place by the
road.
4 Stop the engine.
If the shift lever cannot be
shifted to N
3 Keep depressing the brake
pedal with both feet to reduce
vehicle speed as much as
possible.
4 To stop the engine, press and
hold the engine switch for 2
consecutive seconds or
Emergency flashers
The emergency flashers are
used to warn other drivers
when the vehicle has to be
stopped on the road due to
a breakdown, etc.
Operating instructions
If your vehicle has to
be stopped in an emer-
gency
Only in an emergency, such
as if it becomes impossible
to stop the vehicle in the
normal way, stop the vehicle
using the following proce-
dure:
Stopping the vehicle
Page 430 of 552
4307-2. Steps to take in an emergency
side when braking
Vehicle pulls heavily to one
side when driving on a level
road
Loss of brake effectiveness,
spongy feeling, pedal almost
touches the floor
Follow the procedure below to
restart the engine after the sys-
tem is activated.
1Turn the engine switch to
ACC or turn it OFF.
2 Restart the engine.Fuel pump shut off
system
To minimize the risk of fuel
leakage when the engine
stalls or when an airbag
inflates upon collision, the
fuel pump shut off system
stops the supply of fuel to
the engine.
Restarting the engine
NOTICE
■Before starting the engine
Inspect the ground under the
vehicle.
If you find that fuel has leaked
onto the ground, the fuel system
has been damaged and is in need
of repair. Do not restart the
engine.
Page 439 of 552

4397-2. Steps to take in an emergency
7
When trouble arises
ger detection sensor may cause
the warning light to flash and the
warning buzzer to sound even if a
passenger is not sitting in the
seat.
●If a cushion is placed on the seat,
the sensor may not detect a pas-
senger, and the warning light may
not operate properly.
■SRS warning light
This warning light system monitors
the airbag sensor assembly, front
impact sensors, side impact sensors
(front), side impact sensors (front
door), side impact sensors (rear),
driver’s seat position sensor,
driver’s seat belt buckle switch, front
passenger occupant classification
system (ECU and sensors), “PASS
AIR BAG ON” indicator light, “PASS
AIR BAG OFF” indicator light, front
passenger’s seat belt buckle switch,
driver’s seat belt pretensioner, front
passenger’s seat be lt pretensioner
and force limiter, airbags, intercon-
necting wiring and power sources.
( P.34)
■If the malfunction indicator
lamp comes on while driving
First check the following:
●Is the fuel t ank empty?
If it is, fill the f uel tank immediately.
●Is the fuel tank cap loose?
If it is, tighten it securely.
The light will go o ff after several
driving trips.
If the light does not go off even after
several trips, contact your Toyota
dealer as soon as possible.
■Electric power steering system
warning light (warning buzzer)
When the battery charge becomes
insufficient or the voltage temporar-
ily drops, the electric power steering
system warning light may come on
and the warning buzzer may sound.
■When the tire pressure warning
light comes on
Inspect the tires to check if a tire is
punctured.
If a tire is punctured: P. 4 4 6
If none of the tires are punctured:
Turn the engine switch off then turn
it to ON. Check if the tire pressure
warning light com es on or blinks.
If the tire pressure warning light
blinks for 1 minute then stays on
There may be a malfunction in the
tire pressure warning system. Have
the vehicle inspected by your Toyota
dealer immediately.
If the tire pressur e warning light
comes on
1 After the temperature of the tires
has lowered sufficiently, check
the inflation pressure of each tire
and adjust them to the specified
level.
2 If the warning light does not turn
off even after several minutes
have elapsed, check that the
inflation pressure of each tire is
at the specified level and perform
initialization. ( P.399)
If the warning light d oes not turn off
several minutes af ter the initializa-
tion has been performed, have the
vehicle inspected by your Toyota
dealer immediately.
■The tire pressure warning light
may come on due to natural
causes
The tire pressure warning light may
come on due to natural causes such
as natural air leaks and tire inflation
pressure changes caused by tem-
perature. In this ca se, adjusting the
tire inflation pressure will turn off the
warning ligh t (after a few minutes).
■When a tire is replaced with a
spare tire
Vehicles with a co mpact spare tire:
The compact spare tire is not
equipped with a tire pressure warn-
ing valve and tran smitter. If a tire
Page 526 of 552

526Alphabetical Index
AWD Control ............................. 91
B
Back door ................................ 119
Back-up lightsReplacing light bulbs ............ 415
Battery Battery checking................... 391
If the battery is discharged ... 465
Preparing and c hecking before
winter.................................. 314
Replacing ............................. 467
Warning light ........................ 432
Blind Spot Monitor (BSM) ...... 270
Brake Brake hold ............................ 208
Fluid ............................. 390, 479
Parking brake ....................... 205
Warning light ........................ 431
Brake assist ............................ 307
Break-in tips ........ ................... 175
Brightness control Instrument panel light control81, 86
BSM (Blind Spot Monitor) ...... 270
Buzzer Hands off steering wheel warn-ing (LTA) ............................. 248
C
Care Exterior ................................. 370
Interior .................................. 373
Seat belts ............................. 373
Wheels and wheel ornaments........................................... 370
Cargo capacity ....................... 184
Cargo net hooks .. ................... 344
Chains ..................................... 315
Child restraint system Fixed with a LATCH system ... 60 Fixed with a seat belt..............55
Front passenger occupant clas-
sification system ...................43
Points to remember ................50
Riding with children ................49
Types of child restraint system installation method ...............52
Using an anchor bracket ........62
Child safety Airbag precautions .................39
Back door precautions.......... 119
Battery precautions ......392, 468
Child restraint system .............52
Heated steering wheel and seat heater precautio ns..............335
How your child should wear the seat belt ................................28
Moon roof precautions..........166
Panoramic moon roof precau- tions ....................................170
Power window lock switch ....164
Power window precautions...163
Rear door child-protectors .... 118
Seat belt extender precautions .............................................29
Seat belt precautions..............49
Child-protectors...................... 118
Cleaning Exterior .................................370
Interior ..................................373
Radar sensor ........................224
Seat belts .............................373
Wheels and wheel ornaments...........................................370
Clock ................... .....79, 81, 82, 86
Coat hooks ..............................357
Condenser ............. ..................390
Console box ............................341
Consumption screen ..............108
Conversation mirror ...............359
Cooling system .......................389 Engine overheating ..............469