headlights TOYOTA HIGHLANDER 2023 User Guide
[x] Cancel search | Manufacturer: TOYOTA, Model Year: 2023, Model line: HIGHLANDER, Model: TOYOTA HIGHLANDER 2023Pages: 552, PDF Size: 13.36 MB
Page 213 of 552
2134-3. Operating the lights and wipers
4
Driving
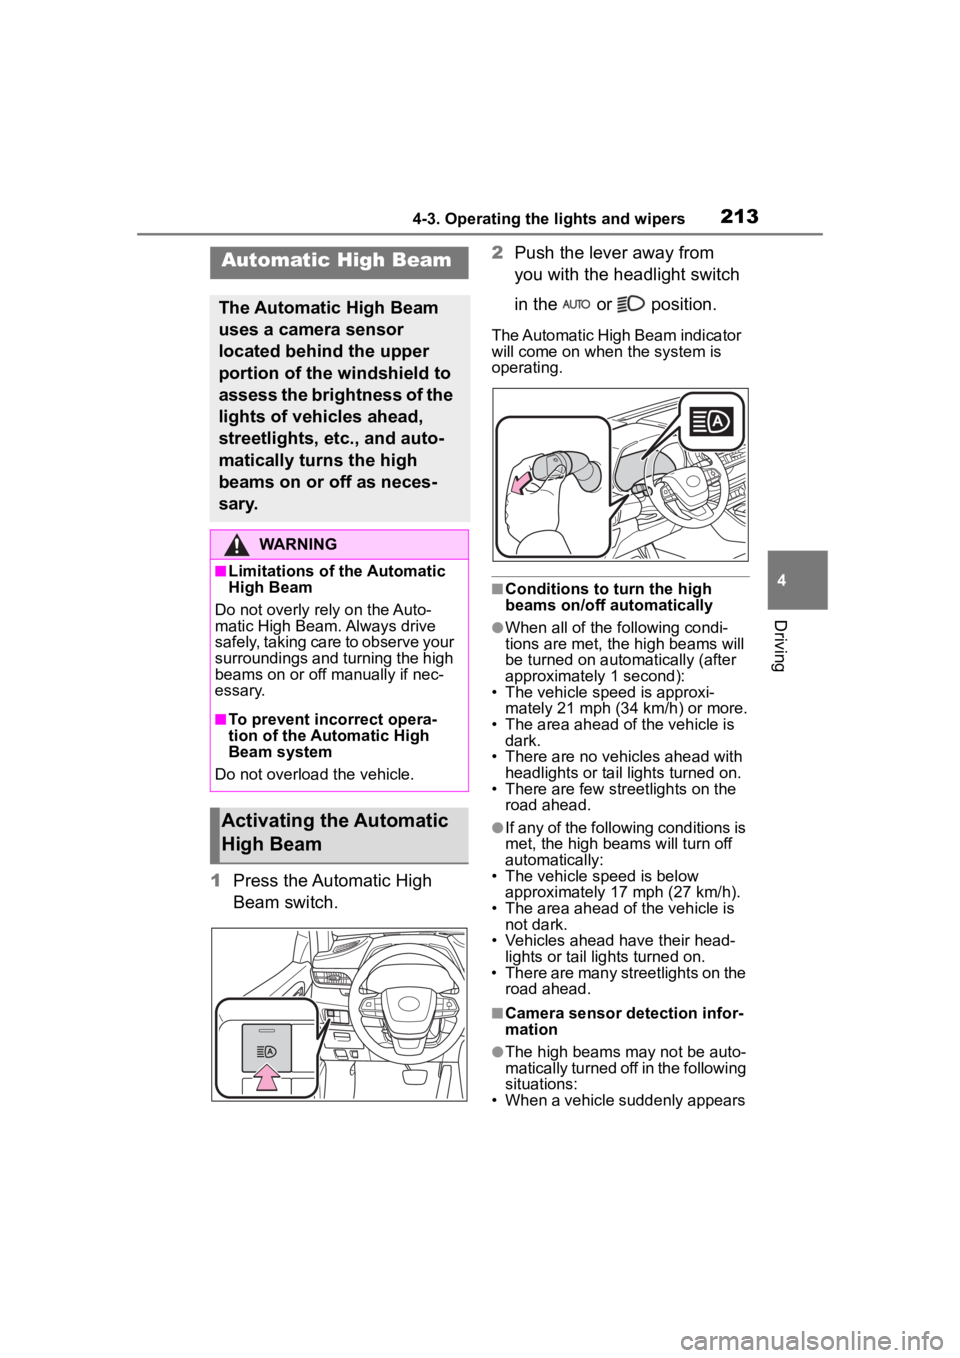
1Press the Automatic High
Beam switch. 2
Push the lever away from
you with the headlight switch
in the or position.
The Automatic High Beam indicator
will come on when the system is
operating.
■Conditions to turn the high
beams on/off automatically
●When all of the following condi-
tions are met, the high beams will
be turned on autom atically (after
approximately 1 second):
• The vehicle speed is approxi-
mately 21 mph (34 km/h) or more.
• The area ahead of the vehicle is dark.
• There are no vehicles ahead with headlights or tail lights turned on.
• There are few str eetlights on the
road ahead.
●If any of the following conditions is
met, the high beams will turn off
automatically:
• The vehicle speed is below
approximately 17 mph (27 km/h).
• The area ahead of the vehicle is not dark.
• Vehicles ahead have their head- lights or tail lights turned on.
• There are many streetlights on the road ahead.
■Camera sensor detection infor-
mation
●The high beams m ay not be auto-
matically turned off in the following
situations:
• When a vehicle suddenly appears
Automatic High Beam
The Automatic High Beam
uses a camera sensor
located behind the upper
portion of the windshield to
assess the brightness of the
lights of vehicles ahead,
streetlights, etc., and auto-
matically turns the high
beams on or off as neces-
sary.
WARNING
■Limitations of the Automatic
High Beam
Do not overly rely on the Auto-
matic High Beam. Always drive
safely, taking care to observe your
surroundings and turning the high
beams on or off manually if nec-
essary.
■To prevent incorrect opera-
tion of the Automatic High
Beam system
Do not overload the vehicle.
Activating the Automatic
High Beam
Page 214 of 552

2144-3. Operating the lights and wipers
from around a curve
• When the vehicle is cut in front of by another vehicle
• When vehicles ahead cannot be detected due to repeated curves,
road dividers or roadside trees
• When vehicles ahead appear in a faraway lane on a wide road
• When the lights of vehicles ahead
are not on
●The high beams may be turned off
if a vehicle ahead that is using fog
lights without its headlights turned
on is detected.
●House lights, street lights, traffic
signals, and illumi nated billboards
or signs and other reflective
objects may cause the high
beams to change to the low
beams, or the low beams to
remain on.
●The following factors may affect
the amount of time taken for the
high beams to turn on or off:
• The brightness of the headlights, fog lights, and ta il lights of vehi-
cles ahead
• The movement and direction of vehicles ahead
• When a vehicle ahead only has
operational lights on one side
• When a vehicle ahead is a two-wheeled vehicle
• The condition of the road (gradi-
ent, curve, condi tion of the road
surface, etc.)
• The number of passengers and amount of luggage in the vehicle
●The high beams may turn on or off
unexpectedly.
●Bicycles or similar vehicles may
not be detected.
●In the following situations the sys-
tem may not be abl e to correctly
detect the surrounding brightness
level. This may cause the low
beams to remain on or the high
beams to flash or dazzle pedestri-
ans or vehicles ahead. In such a
case, it is necess ary to manually
switch between the high and low
beams. • When driving in inclement weather
(heavy rain, snow, fog, sand-
storms, etc.)
• When the windshi eld is obscured
by fog, mist, ice, dirt, etc.
• When the windshield is cracked or
damaged
• When the camera sensor is deformed or dirty
• When the temperature of the cam- era sensor is extremely high
• When the surrounding brightness
level is equal to that of headlights,
tail lights or fog lights
• When headlights or tail lights of
vehicles ahead are turned off,
dirty, changing color, or not aimed
properly
• When the vehicle is hit by water,
snow, dust, etc. from a preceding
vehicle
• When driving through an area of intermittently changing brightness
and darkness
• When frequently and repeatedly driving ascending/descending
roads, or roads with rough, bumpy
or uneven surfaces (such as
stone-paved roads, gravel roads,
etc.)
• When frequently and repeatedly taking curves or driving on a wind-
ing road
• When there is a h ighly reflective
object ahead of the vehicle, such
as a sign or mirror
• When the back of a preceding vehicle is highly reflective, such as
a container on a truck
• When the vehicle’s headlights are damaged or dirty, or are not aimed
properly
• When the vehicle is listing or titling due to a flat tire, a trailer being
towed, etc.
• When the headlights are changed between the high beams and low
beams repeatedly in an abnormal
manner
• When the driver believes that the high beams may be flashing or
dazzling pedestrians or other driv-
ers
Page 215 of 552
2154-3. Operating the lights and wipers
4
Driving
■Temporarily lowering sensor
sensitivity
The sensitivity of the sensor can be
temporarily lowered.
1 Turn the engine s witch off while
the following cond itions are met.
●The headlight switch is in or
.
●The headlight switch lever is in
high beam position.
●Automatic High Beam switch is
on.
2 Turn the engine switch to ON.
3 Within 60 seconds after step 2,
repeat pulling the headlight
switch lever to the original posi-
tion then pushing it to the high
beam position qu ickly 10 times,
then leave the lever in high beam
position.
4 If the sensitivity is changed, the
Automatic High Beam indicator
is turn on and off 3 times.
Automatic High Beam (headlights)
may turn on even w hen the vehicle
is stopped.
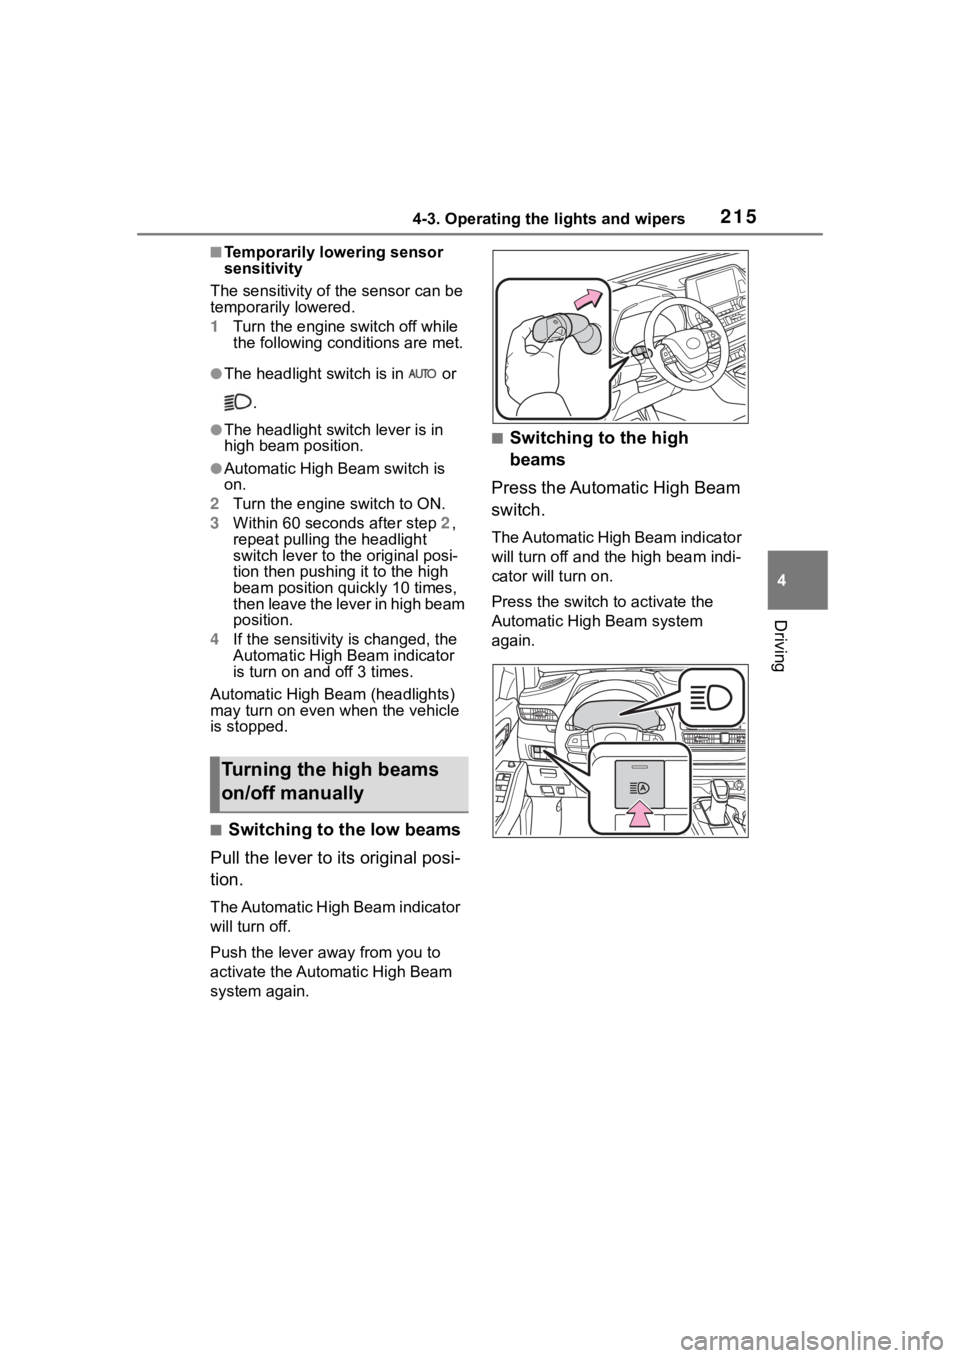
■Switching to the low beams
Pull the lever to its original posi-
tion.
The Automatic High Beam indicator
will turn off.
Push the lever away from you to
activate the Automatic High Beam
system again.
■Switching to the high
beams
Press the Automatic High Beam
switch.
The Automatic High Beam indicator
will turn off and the high beam indi-
cator will turn on.
Press the switch to activate the
Automatic High Beam system
again.
Turning the high beams
on/off manually
Page 216 of 552
2164-3. Operating the lights and wipers
*: If equipped
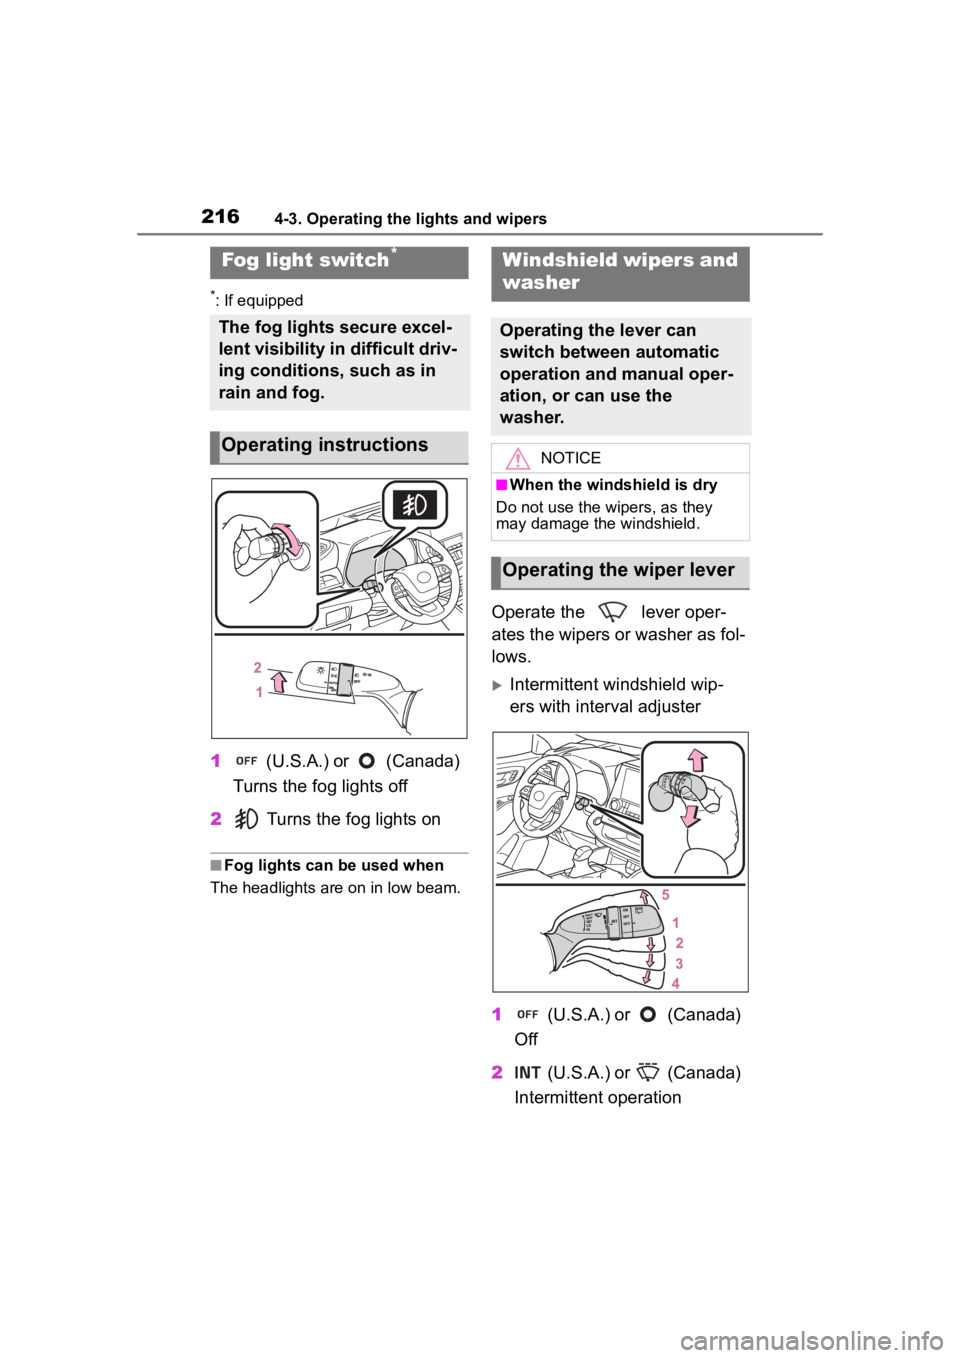
1 (U.S.A.) or (Canada)
Turns the fog lights off
2 Turns the fog lights on
■Fog lights can be used when
The headlights are on in low beam.
Operate the lever oper-
ates the wipers or washer as fol-
lows.
Intermittent windshield wip-
ers with interval adjuster
1 (U.S.A.) or (Canada)
Off
2 (U.S.A.) or (Canada)
Intermittent operation
Fog light switch*
The fog lights secure excel-
lent visibility in difficult driv-
ing conditions, such as in
rain and fog.
Operating instructions
Windshield wipers and
washer
Operating the lever can
switch between automatic
operation and manual oper-
ation, or can use the
washer.
NOTICE
■When the windshield is dry
Do not use the wipers, as they
may damage the windshield.
Operating the wiper lever
Page 225 of 552
2254-5. Using the driving support systems
4
Driving
WARNING
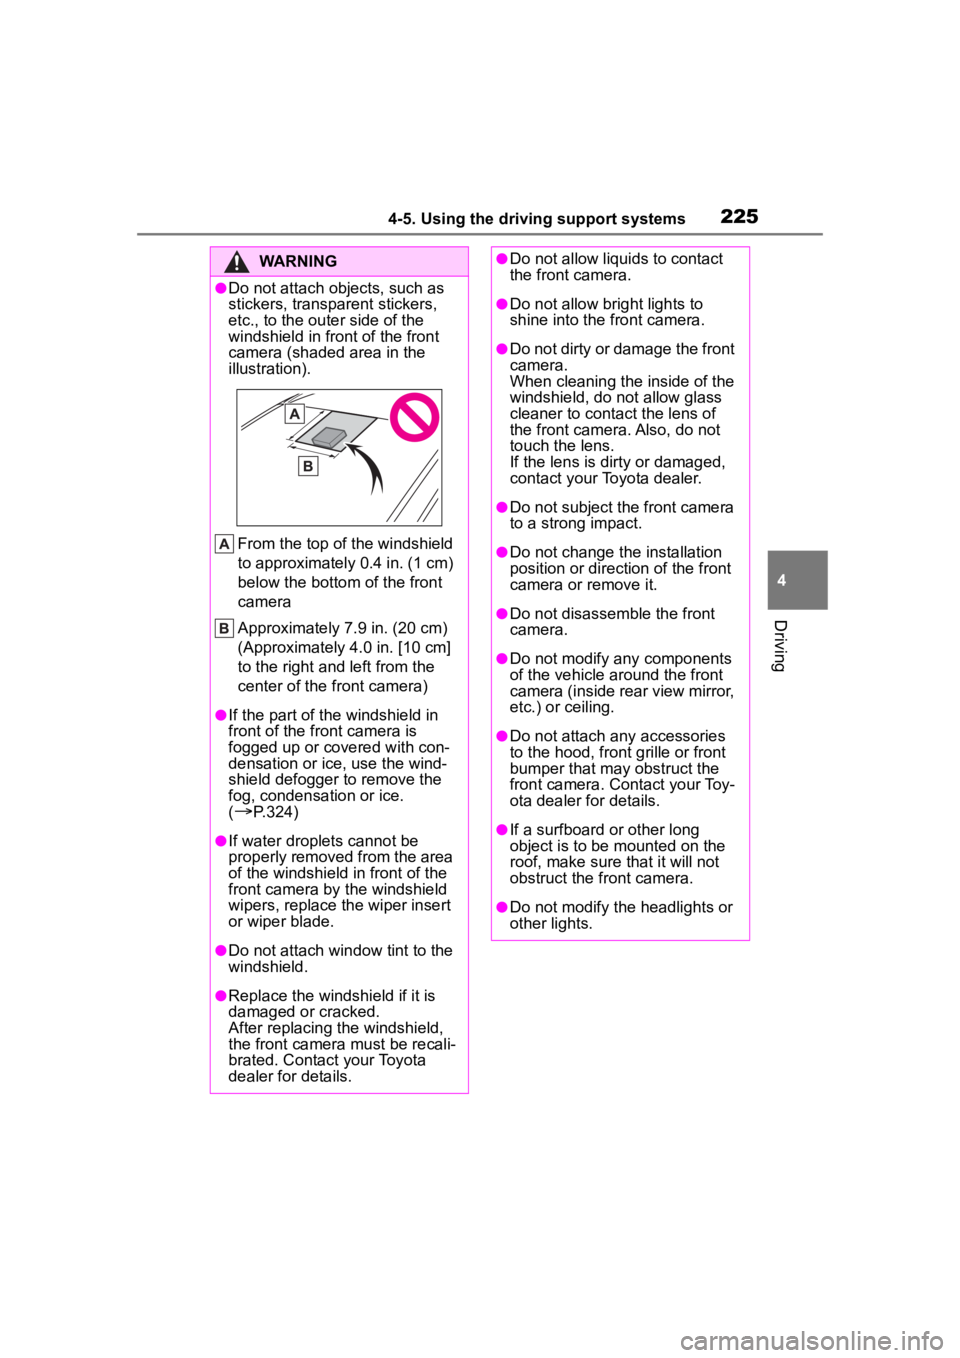
●Do not attach objects, such as
stickers, transparent stickers,
etc., to the outer side of the
windshield in fr ont of the front
camera (shaded area in the
illustration).
From the top of the windshield
to approximately 0.4 in. (1 cm)
below the bottom of the front
camera
Approximately 7.9 in. (20 cm)
(Approximately 4.0 in. [10 cm]
to the right and left from the
center of the front camera)
●If the part of the windshield in
front of the front camera is
fogged up or covered with con-
densation or ice, use the wind-
shield defogger to remove the
fog, condensation or ice.
(
P.324)
●If water droplets cannot be
properly removed from the area
of the windshield in front of the
front camera by the windshield
wipers, replace the wiper insert
or wiper blade.
●Do not attach win dow tint to the
windshield.
●Replace the windshield if it is
damaged or cracked.
After replacing the windshield,
the front camera must be recali-
brated. Contact your Toyota
dealer for details.
●Do not allow liquids to contact
the front camera.
●Do not allow bright lights to
shine into the front camera.
●Do not dirty or damage the front
camera.
When cleaning the inside of the
windshield, do not allow glass
cleaner to contact the lens of
the front camera. Also, do not
touch the lens.
If the lens is dirty or damaged,
contact your Toyota dealer.
●Do not subject the front camera
to a strong impact.
●Do not change the installation
position or direction of the front
camera or remove it.
●Do not disassemble the front
camera.
●Do not modify any components
of the vehicle around the front
camera (inside rear view mirror,
etc.) or ceiling.
●Do not attach any accessories
to the hood, front grille or front
bumper that may obstruct the
front camera. Contact your Toy-
ota dealer for details.
●If a surfboard or other long
object is to be mounted on the
roof, make sure that it will not
obstruct the front camera.
●Do not modify the headlights or
other lights.
Page 237 of 552
2374-5. Using the driving support systems
4
Driving
• When part of a detectable object is hidden by an object, such as
large baggage, an umbrella, or
guardrail
• When there are many things which can reflect the radio waves
of the radar in the vicinity (tunnels,
truss bridges, gravel roads, snow
covered road that have tracks,
etc.)
• When there is an effect on the radio waves to the radar that is
installed on another vehicle
• When multiple detectable objects are close together
• If the sun or other light is shining directly on a detectable object
• When a detectable object is a
shade of white and looks
extremely bright
• When a detectable object appears
to be nearly the same color or
brightness as its surroundings
• If a detectable object cuts or sud-
denly emerges in front of your
vehicle
• When the front of your vehicle is
hit by water, snow, dust, etc.
• When a very bright light ahead, such as the sun or the headlights
of oncoming traffic, shines directly
into the front camera
• When approaching the side or
front of a vehicle ahead
• If a vehicle ahead is a motorcycle
• If a vehicle ahead is narrow, such as a personal mobility vehicle
• If a preceding vehicle has a small rear end, such as an unloaded
truck
• If a preceding vehicle has a low rear end, such as a low bed trailer
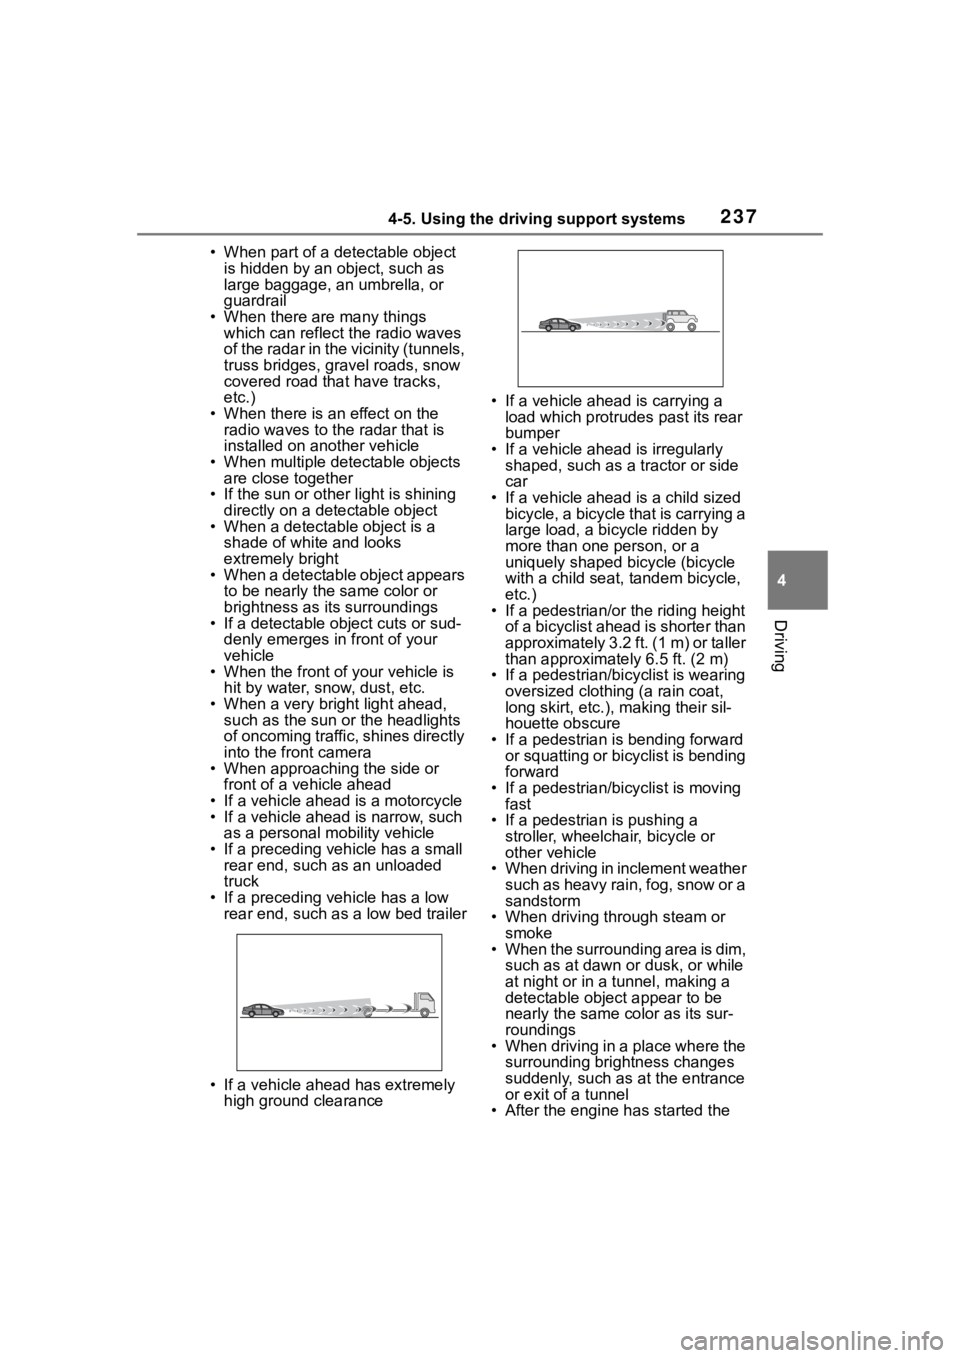
• If a vehicle ahead has extremely high ground clearance • If a vehicle ahead is carrying a
load which protrudes past its rear
bumper
• If a vehicle ahead is irregularly shaped, such as a tractor or side
car
• If a vehicle ahead is a child sized bicycle, a bicycle that is carrying a
large load, a bicycle ridden by
more than one person, or a
uniquely shaped bicycle (bicycle
with a child seat, tandem bicycle,
etc.)
• If a pedestrian/or the riding height of a bicyclist ahead is shorter than
approximately 3.2 ft. (1 m) or taller
than approximate ly 6.5 ft. (2 m)
• If a pedestrian/bic yclist is wearing
oversized clothing (a rain coat,
long skirt, etc.), making their sil-
houette obscure
• If a pedestrian is bending forward or squatting or bicyclist is bending
forward
• If a pedestrian/bicyclist is moving fast
• If a pedestrian is pushing a
stroller, wheelchair, bicycle or
other vehicle
• When driving in inclement weather
such as heavy rain, fog, snow or a
sandstorm
• When driving through steam or
smoke
• When the surrounding area is dim, such as at dawn or dusk, or while
at night or in a tunnel, making a
detectable object appear to be
nearly the same co lor as its sur-
roundings
• When driving in a place where the surrounding brightness changes
suddenly, such as at the entrance
or exit of a tunnel
• After the engine has started the
Page 240 of 552
2404-5. Using the driving support systems
WARNING
■Before using LTA system
●Do not rely solely upon the LTA
system. The LTA system does
not automatically drive the vehi-
cle or reduce the amount of
attention that must be paid to
the area in front of the vehicle.
The driver must always assume
full responsibility for driving
safely by paying careful atten-
tion to the surrounding condi-
tions and operating the steering
wheel to correct the path of the
vehicle. Also, the driver must
take adequate breaks when
fatigued, such as from driving
for a long period of time.
●Failure to perform appropriate
driving operations and pay care-
ful attention may lead to an
accident, resulting in death or
serious injury.
■Situations unsuitable for LTA
system
In the following situations, use the
LTA switch to turn the system off.
Failure to do so may lead to an
accident, resulting in death or
serious injury.
●Vehicle is driven on a road sur-
face which is slippery due to
rainy weather, fallen snow,
freezing, etc.
●Vehicle is driven on a snow-cov-
ered road.
●White (yellow) lines are difficult
to see due to rain, snow, fog,
dust, etc.
●Vehicle is driven in a temporary
lane or restricted lane due to
construction work.
●Vehicle is driven in a construc-
tion zone.
●A spare tire, tire chains, etc. are
equipped.
●When the tires have been
excessively worn, or when the
tire inflation p ressure is low.
●When your vehicle is towing a
trailer or during emergency tow-
ing.
■Preventing LTA system mal-
functions and operations per-
formed by mistake
●Do not modify the headlights or
place stickers, etc. on the sur-
face of the lights.
●Do not modify the suspension
etc. If the suspension etc. needs
to be replaced, contact your
Toyota dealer.
●Do not install or place anything
on the hood or grille. Also, do
not install a gr ille guard (bull
bars, kangaroo bar, etc.).
●If your windshield needs
repairs, contact your Toyota
dealer.
■Conditions in which functions
may not operate properly
In the following situations, the
functions may not operate prop-
erly and the vehicle may depart
from its lane. Drive safely by
always paying careful attention to
your surroundings and operate
the steering wheel to correct the
path of the vehicle without relying
solely on the functions.
Page 242 of 552
2424-5. Using the driving support systems
WARNING
●The vehicle is driven in an area
without white (yellow) lines,
such as in front of a tollgate or
checkpoint, or at an intersec-
tion, etc.
●The white (yellow) lines are
cracked, “Botts’ dots”, “Raised
pavement marker” or stones are
present.
●The white (yellow) lines cannot
be seen or are difficult to see
due to sand, etc.
●The vehicle is driven on a road
surface that is wet due to rain,
puddles, etc.
●The traffic li nes are yellow
(which may be more difficult to
recognize than lines that are
white).
●The white (yellow) lines cross
over a curb, etc.
●The vehicle is driven on a bright
surface, such as concrete.
●If the edge of the road is not
clear or straight.
●The vehicle is driven on a sur-
face that is bright due to
reflected light, etc.
●The vehicle is driven in an area
where the brightness changes
suddenly, such as at the
entrances and exits of tunnels,
etc.
●Light from the h eadlights of an
oncoming vehicle, the sun, etc.
enters the camera.
●The vehicle is driven on a slope.
●The vehicle is driven on a road
which tilts left or right, or a wind-
ing road.
●The vehicle is driven on an
unpaved or rough road.
●The traffic lane is excessively
narrow or wide.
●The vehicle is extremely tilted
due to carrying heavy luggage
or having improper tire pres-
sure.
●The distance to the preceding
vehicle is extremely short.
●The vehicle is moving up and
down a large amount due to
road conditions during driving
(poor roads or road seams).
●When driving in a tunnel or at
night with the headlights off or
when a headlight is dim due to
its lens being dir ty or it being
misaligned.
●The vehicle is struck by a cross-
wind.
●The vehicle is affected by wind
from a vehicle driven in a
nearby lane.
●The vehicle has just changed
lanes or crossed an intersec-
tion.
●Tires which differ by structure,
manufacturer, brand or tread
pattern are used.
●When tires of a size other than
specified are installed.
●Snow tires, etc . are equipped.
●The vehicle is b eing driven at
extremely high speeds.
Page 460 of 552
4607-2. Steps to take in an emergency
One of the following may be the
cause of the problem:
There may not be sufficient
fuel in the vehicle’s tank.
Refuel the vehicle.
The engine may be flooded.
Try to restart the engine again
following correct starting pro-
cedures. ( P.197)
There may be a malfunction
in the engine immobilizer sys-
tem. ( P. 6 9 )
One of the following may be the
cause of the problem:
The battery may be dis-
charged. ( P.465)
The battery terminal connec-
tions may be loose or cor-
roded. ( P.391)
The engine starting system may
be malfunctioning due to an
electrical problem such as elec-
tronic key battery depletion or a
blown fuse. However, an interim
measure is available to start the
engine. ( P.460)
One of the following may be the
cause of the problem:
One or both of the battery ter-
minals may be disconnected.
( P.391)
The battery may be dis-
charged. ( P.465)
Contact your Toyota dealer if the
problem cannot be repaired, or if
repair procedures are unknown.
When the engine does not start,
the following steps can be used
as an interim measure to start
the engine if the engine switch is
If the engine will not
start
If the engine will not start
even though correct starting
procedures are being fol-
lowed ( P.197), consider
each of the following points:
The engine wil l not start
even though the starter
motor operates normally.
The starter motor turns
over slowly, the interior
lights and headlights are
dim, or the horn does not
sound or sounds at a low
volume.
The starter motor does
not turn over
The starter motor does
not turn over, the interior
lights and headlights do
not turn on, or the horn
does not sound.
Starting the engine in an
emergency
Page 466 of 552
4667-2. Steps to take in an emergency
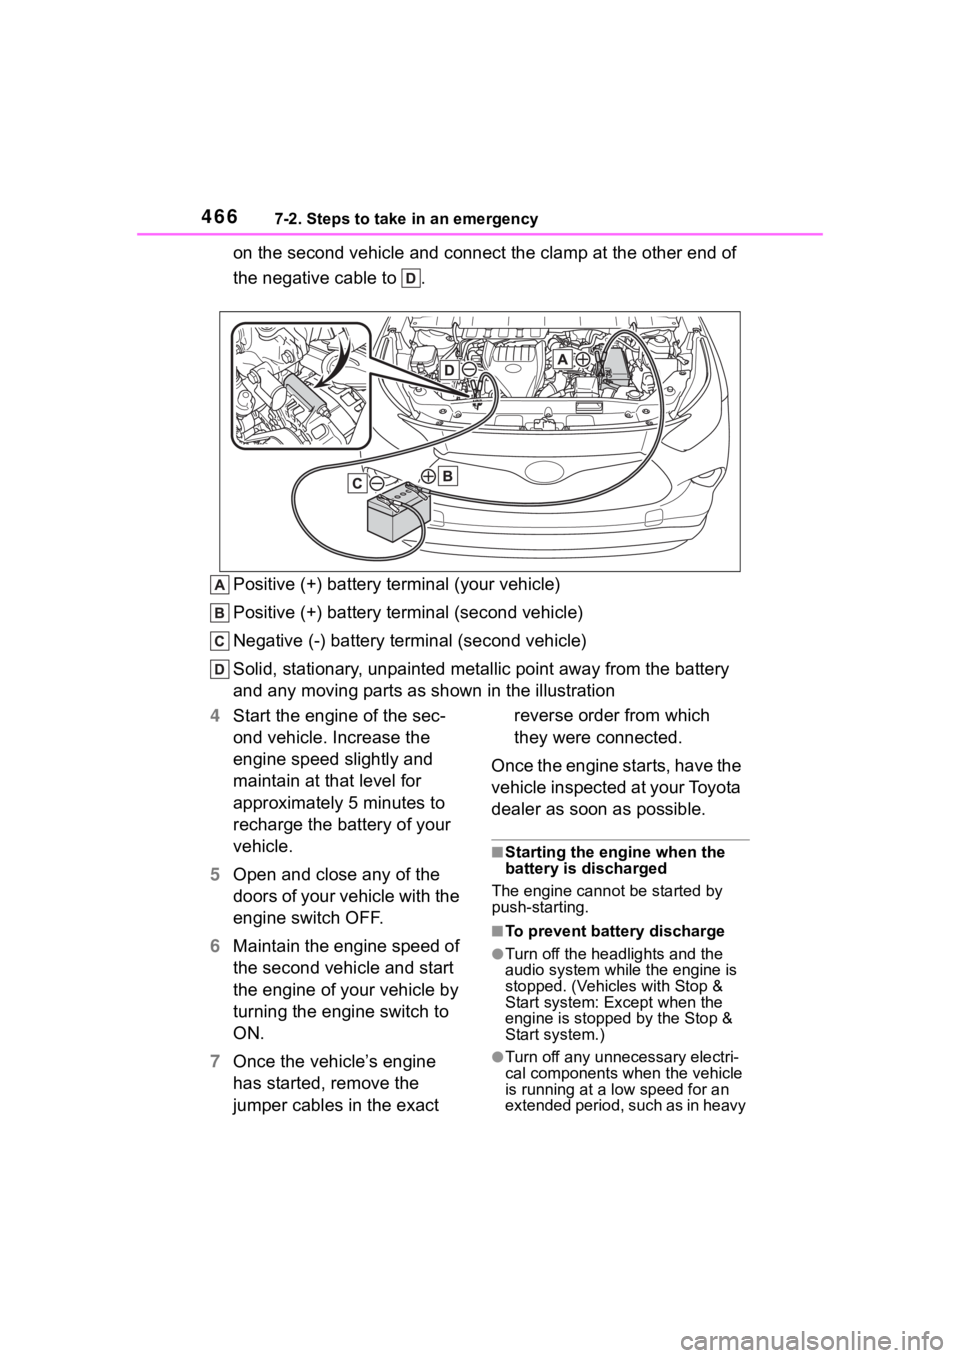
on the second vehicle and connect the clamp at the other end of
the negative cable to .
Positive (+) battery terminal (your vehicle)
Positive (+) battery terminal (second vehicle)
Negative (-) battery term inal (second vehicle)
Solid, stationary, unpainted metallic point away from the batte ry
and any moving parts as shown in the illustration
4 Start the engine of the sec-
ond vehicle. Increase the
engine speed slightly and
maintain at that level for
approximately 5 minutes to
recharge the battery of your
vehicle.
5 Open and close any of the
doors of your vehicle with the
engine switch OFF.
6 Maintain the engine speed of
the second vehicle and start
the engine of your vehicle by
turning the engine switch to
ON.
7 Once the vehicle’s engine
has started, remove the
jumper cables in the exact reverse order from which
they were connected.
Once the engine starts, have the
vehicle inspected at your Toyota
dealer as soon as possible.
■Starting the engine when the
battery is discharged
The engine cannot be started by
push-starting.
■To prevent bat tery discharge
●Turn off the headlights and the
audio system while the engine is
stopped. (Vehicles with Stop &
Start system: Except when the
engine is stopped by the Stop &
Start system.)
●Turn off any unnecessary electri-
cal components when the vehicle
is running at a low speed for an
extended period, such as in heavy