tow TOYOTA HIGHLANDER 2023 User Guide
[x] Cancel search | Manufacturer: TOYOTA, Model Year: 2023, Model line: HIGHLANDER, Model: TOYOTA HIGHLANDER 2023Pages: 552, PDF Size: 13.36 MB
Page 126 of 552

1263-2. Opening, closing and locking the doors
back door will lock when it is com-
pletely closed.
1Close all of the doors, except the
back door.
2 Perform an automatic closing
operation of the power back door
and lock the doors using the
wireless remote control ( P. 1 1 5 )
or smart key system ( P.115)
while the power back door is
closing.
A buzzer sounds and the emer-
gency flashers flash to indicate that
all the doors have been closed and
locked.
●If the electronic key is placed
inside the vehicle after starting a
close operation via the door
reserve lock function, the elec-
tronic key may become locked
inside the vehicle.
●If the back door does not fully
close due to the operation of the
jam protection function, etc., while
the back door is automatically
closing after a door reserve lock
operation is performed, the door
reserve lock function is canceled
and all the do ors will unlock.
●Before leaving t he vehicle, make
sure that all the doors are closed
and locked.
■Kick sensor operating condi-
tions (vehicles with a Hands
Free Power Back Door)
●When the kick sensor operation
setting is turned on ( P.494) and
the engine switch is turned off.
●When an electronic key is carried
within the operation detection
area.
■Situations in which the Hands
Free Power Back Door may not
operate properly (if equipped)
In the following situations, the
Hands Free Power Back Door may
not operate properly:
●When a foot remains under the
rear bumper.
●If the rear bumper is strongly hit
with a foot or is touched for a
while.
If the rear bumper has been touched
for a while, wait f or a short time
before attempting to operate the
Hands Free Power Back Door
again.
●When standing excessively close
to the rear bumper.
●When an external radio wave
source interferes with the commu-
nication between the electronic
key and the vehicle. ( P.133)
●When the vehicle is parked near
an electrical noise source which
affects the sensitivity of the Hands
Free Power Back Door, such as a
pay parking spot, gas station,
electrically heated road, or fluo-
rescent light.
●When the vehicle is near a TV
tower, electric pow er plant, radio
station, large display, airport or
other facility that generates strong
radio waves or electrical noise.
●When a large amount of water is
applied to the rea r bumper, such
as when the vehicle is being
washed or in heavy rain.
●When mud, snow, ice, etc. is
attached to the rear bumper.
●When the vehicle has been
parked for a while near objects
that may move and contact the
rear bumper, such as plants.
●When an accessory i s installed to
the rear bumper.
If an accessory has been installed,
turn the kick sensor operation set-
ting off. ( P.494)
■Preventing unintentional opera-
tion of the Hands Free Power
Back Door (if equipped)
When an electronic key is in the
operation detection area, the Hands
Free Power Back Door may operate
unintentionally, so be careful in the
following situations:
Page 127 of 552

1273-2. Opening, closing and locking the doors
3
Before driving
●When a large amount of water is
applied to the rear bumper, such
as when the vehicle is being
washed or in heavy rain.
●When dirt is wiped off the rear
bumper.
●When a small animal or small
object, such as a ball, moves
under the rear bumper.
●When an object is moved from
under the rear bumper.
●If someone is swinging their legs
while sitting on the rear bumper.
●If the legs or another part of some-
one’s body contacts the rear
bumper while passing by the vehi-
cle.
●When the vehicle is parked near
an electrical noise source which
affects the sensitivity of the Hands
Free Power Back Door, such as a
pay parking spot , gas station,
electrically heated road, or fluo-
rescent light.
●When the vehicle is near a TV
tower, electric po wer plant, radio
station, large display, airport or
other facility that generates strong
radio waves or electrical noise.
●When the vehicle is parked in a
place where objects such as
plants are near the rear bumper.
●When luggage, etc. is set in or
removed from the luggage com-
partment from outside of the vehi-
cle.
●If accessories or a vehicle cover is
installed/removed near the rear
bumper.
●When snow attached to the inner
side of the rear bumper melts.
To prevent unintentional operation,
turn the kick sensor operation set-
ting off. ( P.494)
■When reconnecting the battery
To enable the power back door to
operate properly, close the back
door manually.
■Customization
Some functions can be customized.
( P.494)
WARNING
■Back door closer
●In the event that the back door
is left slightly open, the back
door closer will automatically
close it to the fu lly closed posi-
tion. It takes several seconds
before the back door closer
begins to operate. Be careful
not to get fingers caught or any-
thing else in the back door, as
this may cause bone fractures
or other serious injuries.
●Use caution when using the
back door closer as it still oper-
ates when the power back door
system is disabled.
■Power back door
Observe the following precautions
when operating the power back
door. Failure to do so may cause
death or serious injury.
●Check the safety of the sur-
rounding area to make sure
there are no obs tacles or any-
thing that could cause any of
your belongings to get caught.
●If anyone is in the vicinity, make
sure they are safe and let them
know that the back door is
about to open or close.
Page 133 of 552
1333-2. Opening, closing and locking the doors
3
Before driving
wireless remote control or the
mechanical key, to unlock the
doors.
■Turning an electronic key to
battery-saving mode
When battery-savi ng mode is set,
battery depletion is minimized by
stopping the electronic key from
receiving radio waves.
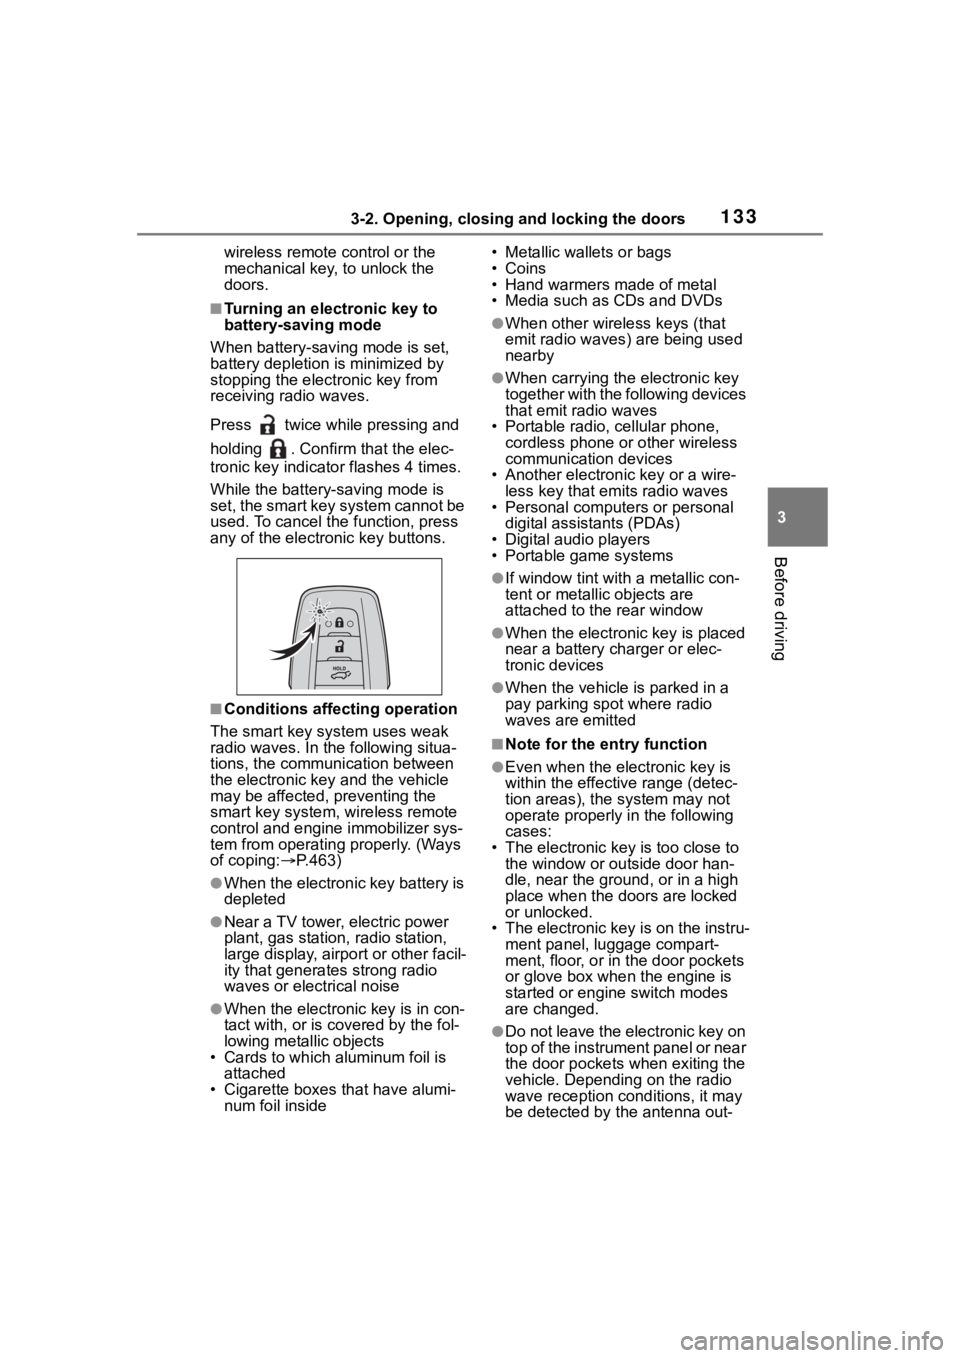
Press twice while pressing and
holding . Confirm that the elec-
tronic key indicator flashes 4 times.
While the battery-saving mode is
set, the smart key system cannot be
used. To cancel the function, press
any of the electronic key buttons.
■Conditions affecting operation
The smart key system uses weak
radio waves. In the following situa-
tions, the communication between
the electronic key and the vehicle
may be affected, preventing the
smart key system, wireless remote
control and engine immobilizer sys-
tem from operating properly. (Ways
of coping: P.463)
●When the electronic key battery is
depleted
●Near a TV tower, electric power
plant, gas station , radio station,
large display, airpo rt or other facil-
ity that generates strong radio
waves or electrical noise
●When the electronic key is in con-
tact with, or is covered by the fol-
lowing metallic objects
• Cards to which al uminum foil is
attached
• Cigarette boxes that have alumi- num foil inside • Metallic wallets or bags
•Coins
• Hand warmers made of metal
• Media such as CDs and DVDs
●When other wirel
ess keys (that
emit radio waves) are being used
nearby
●When carrying the electronic key
together with the following devices
that emit radio waves
• Portable radio, cellular phone, cordless phone or other wireless
communication devices
• Another electronic key or a wire- less key that emits radio waves
• Personal computers or personal
digital assistants (PDAs)
• Digital audio players
• Portable game systems
●If window tint wit h a metallic con-
tent or metallic objects are
attached to the rear window
●When the electronic key is placed
near a battery charger or elec-
tronic devices
●When the vehicle is parked in a
pay parking spot where radio
waves are emitted
■Note for the entry function
●Even when the electronic key is
within the effective range (detec-
tion areas), the system may not
operate properly in the following
cases:
• The electronic key is too close to the window or outside door han-
dle, near the ground, or in a high
place when the doors are locked
or unlocked.
• The electronic key is on the instru-
ment panel, luggage compart-
ment, floor, or in the door pockets
or glove box when the engine is
started or engine switch modes
are changed.
●Do not leave the electronic key on
top of the instrument panel or near
the door pockets when exiting the
vehicle. Depending on the radio
wave reception conditions, it may
be detected by the antenna out-
Page 139 of 552

1393-3. Adjusting the seats
3
Before driving
7-seat modelsSeatback angle adjustment
lever
Seat position adjustment
lever
■Third seatsSeatback angle adjustment
lever
■When entering/exiting the
vehicle
Pull the seatback angle adjust-
ment lever or to tilt the
seatback forward and then slide
the seat forward.
Make sure that the second seat is
free of passengers and obstruc-
tions before operating the lever.
■After passengers have
entered/exited the vehicle
Lift up the seatback and slide
the seat backward until it locks.
■Before folding down the
second seats
1 Stow the armrest. ( P.356)
Moving a second seat for
third seat access
Folding down the second
seats
Page 140 of 552

1403-3. Adjusting the seats
2Stow the second seat belt
buckles.
3 Pass the outer seat belts
through the seat belt hangers
and secure the seat belt
plates.
This prevents the shoulder belts
from being damaged.
4Lower the head restraints to
the lowest position. ( P.145)
■Folding down the second
seats
1 Pull the seatback angle
adjustment lever or to
tilt the seatback forward.
Each seatback may be folded sep- arately.
2
Pull the seatback folding
lever to unlock the seatback.
The seatback will be folded
down.
■After folding down the sec-
ond seats
Slide the folded second seats
backward until they lock.
Page 141 of 552
1413-3. Adjusting the seats
3
Before driving
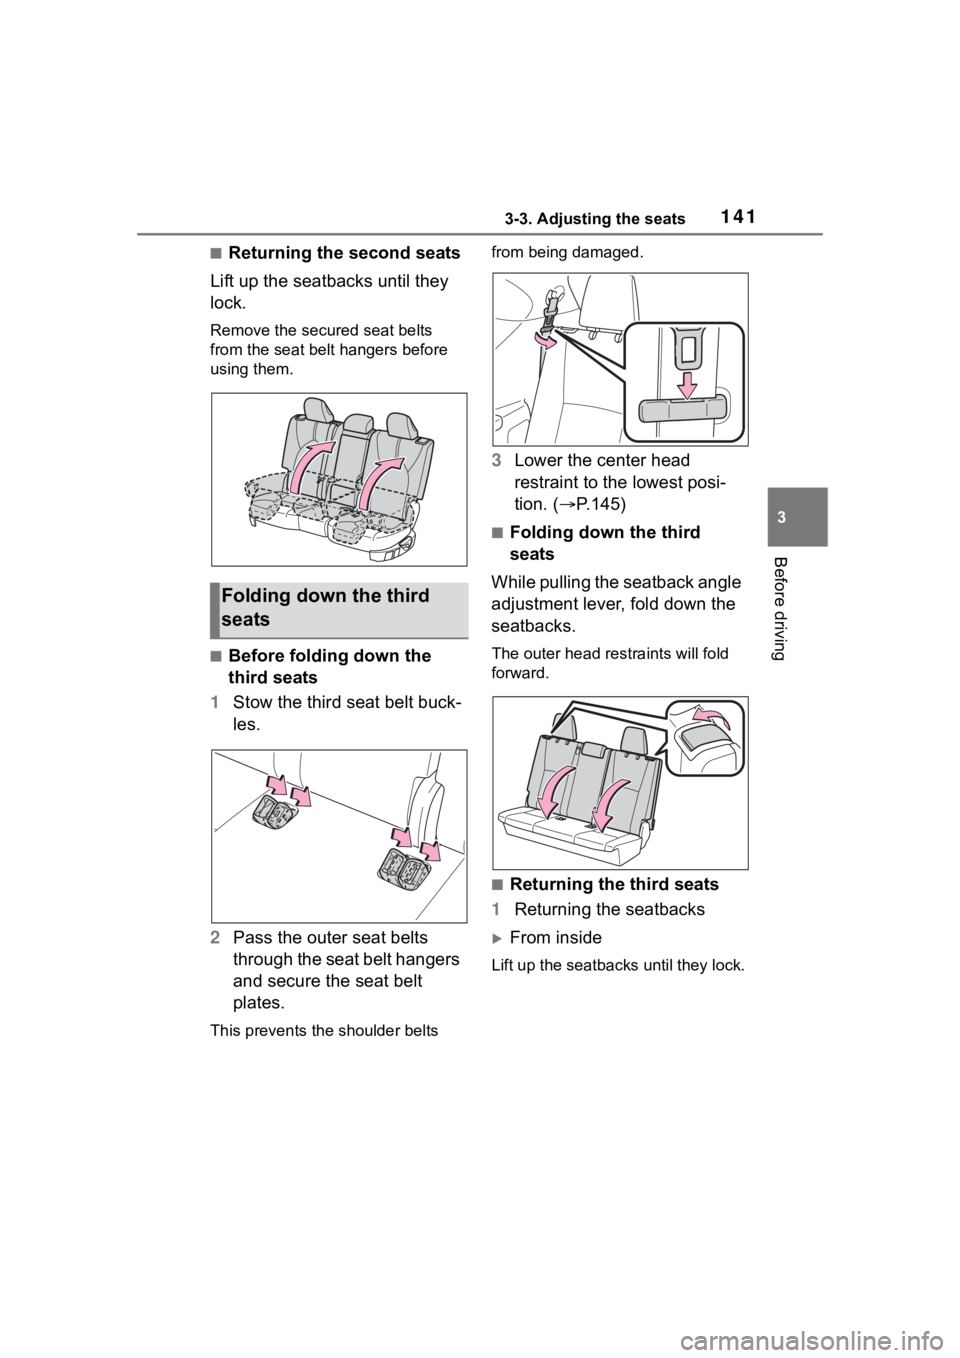
■Returning the second seats
Lift up the seatbacks until they
lock.
Remove the secure d seat belts
from the seat belt hangers before
using them.
■Before folding down the
third seats
1 Stow the third seat belt buck-
les.
2 Pass the outer seat belts
through the seat belt hangers
and secure the seat belt
plates.
This prevents the shoulder belts from being damaged.
3
Lower the center head
restraint to the lowest posi-
tion. ( P.145)
■Folding down the third
seats
While pulling the seatback angle
adjustment lever, fold down the
seatbacks.
The outer head restraints will fold
forward.
■Returning the third seats
1 Returning the seatbacks
From inside
Lift up the seatbacks until they lock.
Folding down the third
seats
Page 146 of 552
1463-3. Adjusting the seats
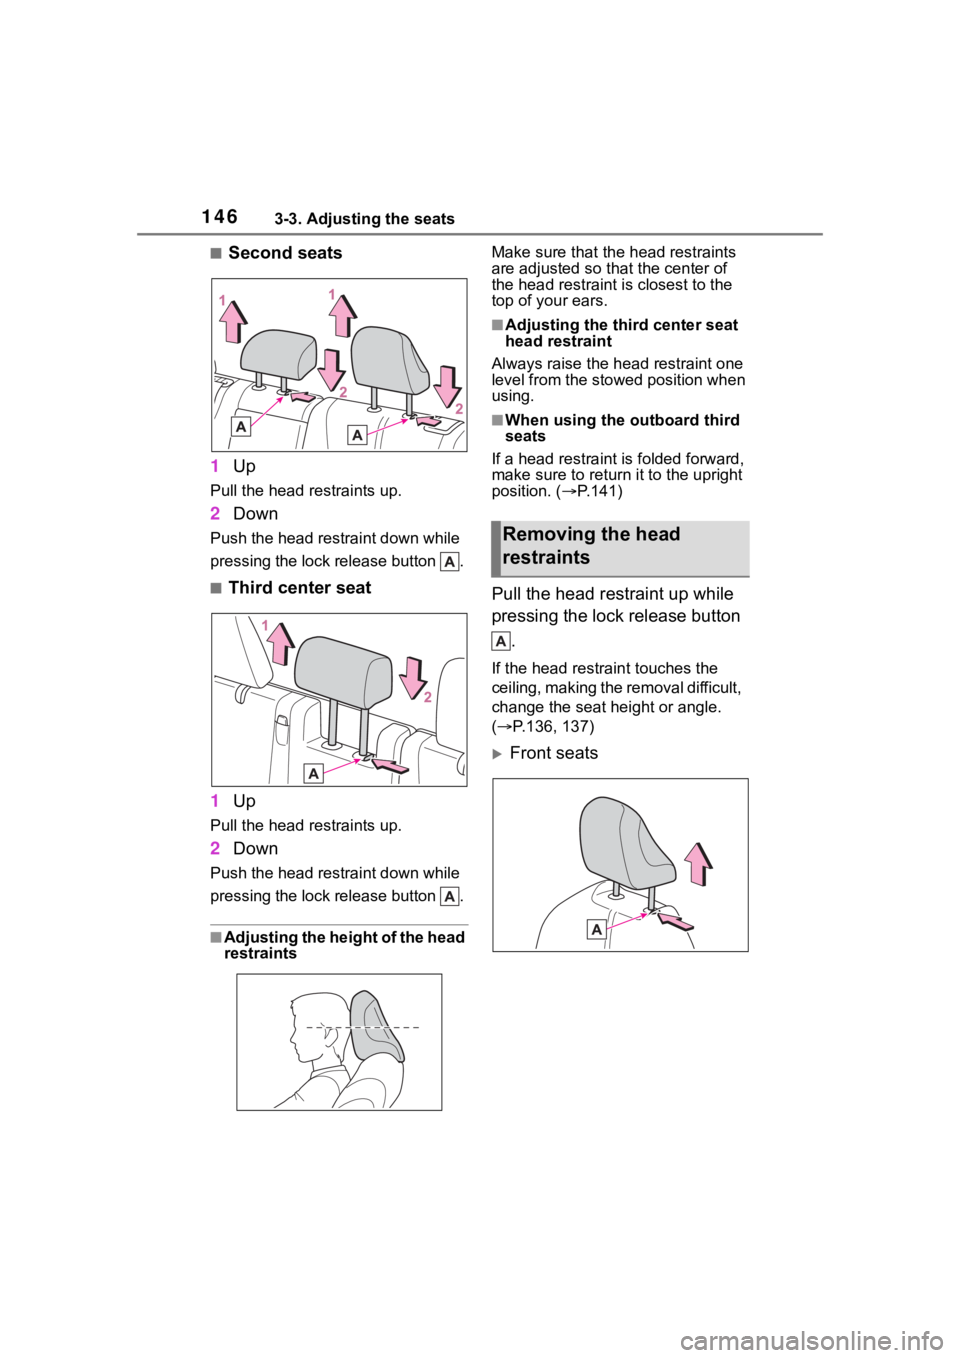
■Second seats
1 Up
Pull the head restraints up.
2Down
Push the head restraint down while
pressing the lock release button .
■Third center seat
1 Up
Pull the head restraints up.
2Down
Push the head restraint down while
pressing the lock release button .
■Adjusting the height of the head
restraints Make sure that the head restraints
are adjusted so that the center of
the head restraint i
s closest to the
top of your ears.
■Adjusting the third center seat
head restraint
Always raise the head restraint one
level from the stowed position when
using.
■When using the outboard third
seats
If a head rest raint is folded forward,
make sure to return it to the upright
position. ( P.141)
Pull the head restraint up while
pressing the lock release button
.
If the head restrai nt touches the
ceiling, making the removal difficult,
change the seat height or angle.
( P.136, 137)
Front seats
Removing the head
restraints
Page 157 of 552
1573-4. Adjusting the steering wheel and mirrors
3
Before driving
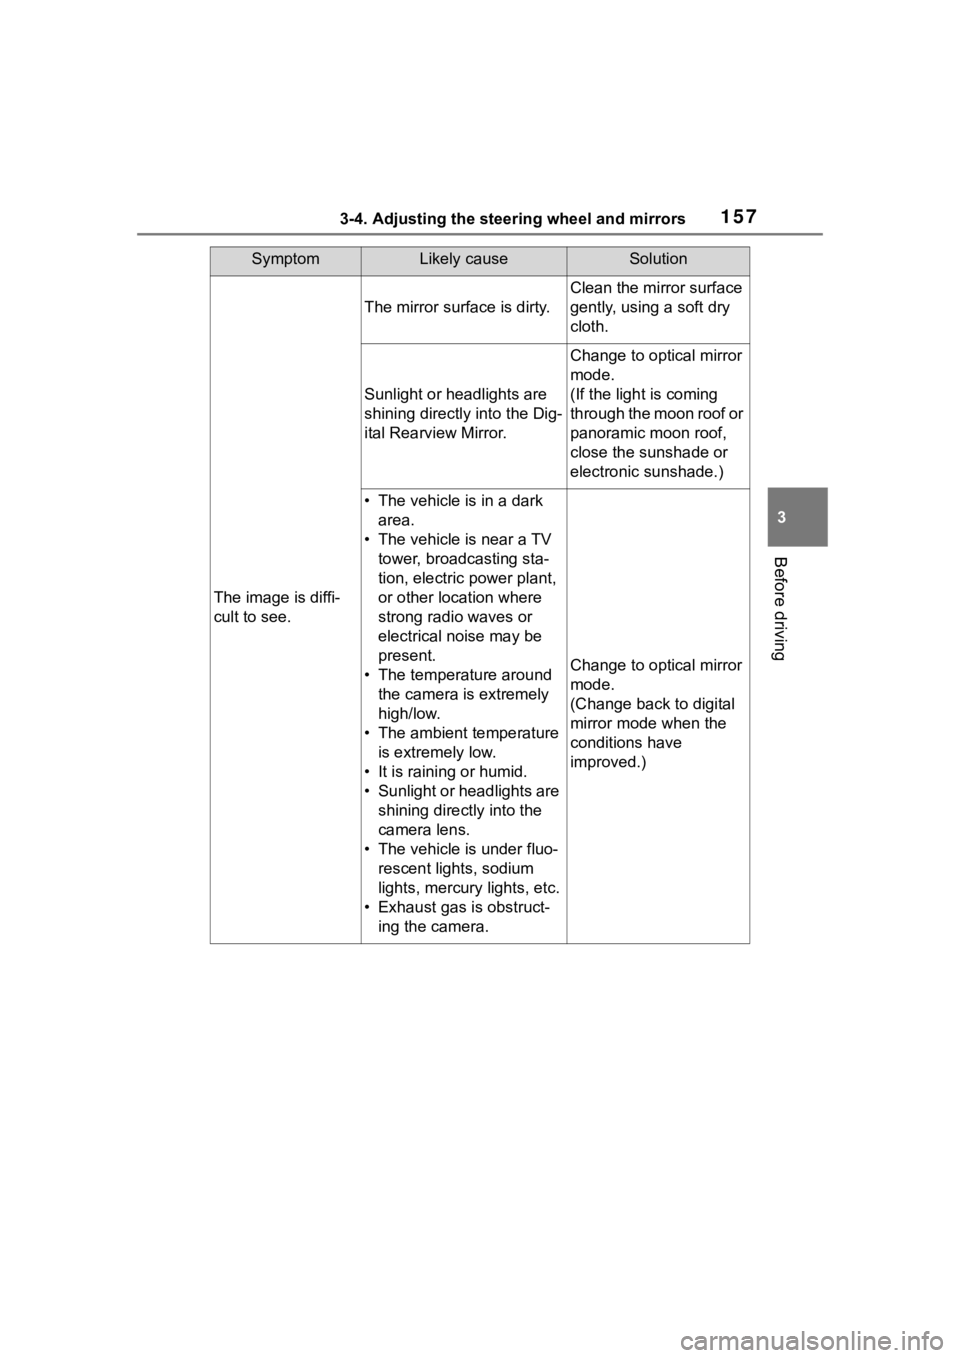
SymptomLikely causeSolution
The image is diffi-
cult to see.
The mirror surface is dirty.
Clean the mirror surface
gently, using a soft dry
cloth.
Sunlight or headlights are
shining directly into the Dig-
ital Rearview Mirror.
Change to optical mirror
mode.
(If the light is coming
through the moon roof or
panoramic moon roof,
close the sunshade or
electronic sunshade.)
• The vehicle is in a dark area.
• The vehicle is near a TV tower, broadcasting sta-
tion, electric power plant,
or other location where
strong radio waves or
electrical noise may be
present.
• The temperature around the camera is extremely
high/low.
• The ambient temperature is extremely low.
• It is raining or humid.
• Sunlight or headlights are shining directly into the
camera lens.
• The vehicle is under fluo- rescent lights, sodium
lights, mercury lights, etc.
• Exhaust gas is obstruct- ing the camera.
Change to optical mirror
mode.
(Change back to digital
mirror mode when the
conditions have
improved.)
Page 161 of 552
1613-4. Adjusting the steering wheel and mirrors
3
Before driving
mirror angle at a desired position
with the shift lever in R.
The adjusted angle will be memo-
rized and the mirror will automati-
cally tilt to the memorized angle
whenever the shift lever is shifted to
R from next time.
The memorized downward tilt posi-
tion of the mirror is linked to the nor-
mal position (angle adjusted with
the shift lever in other than R).
Therefore, if the normal position is
changed after adjustment, the tilt
position will also change.
When the normal position is
changed, readjust the angle in
reversing.
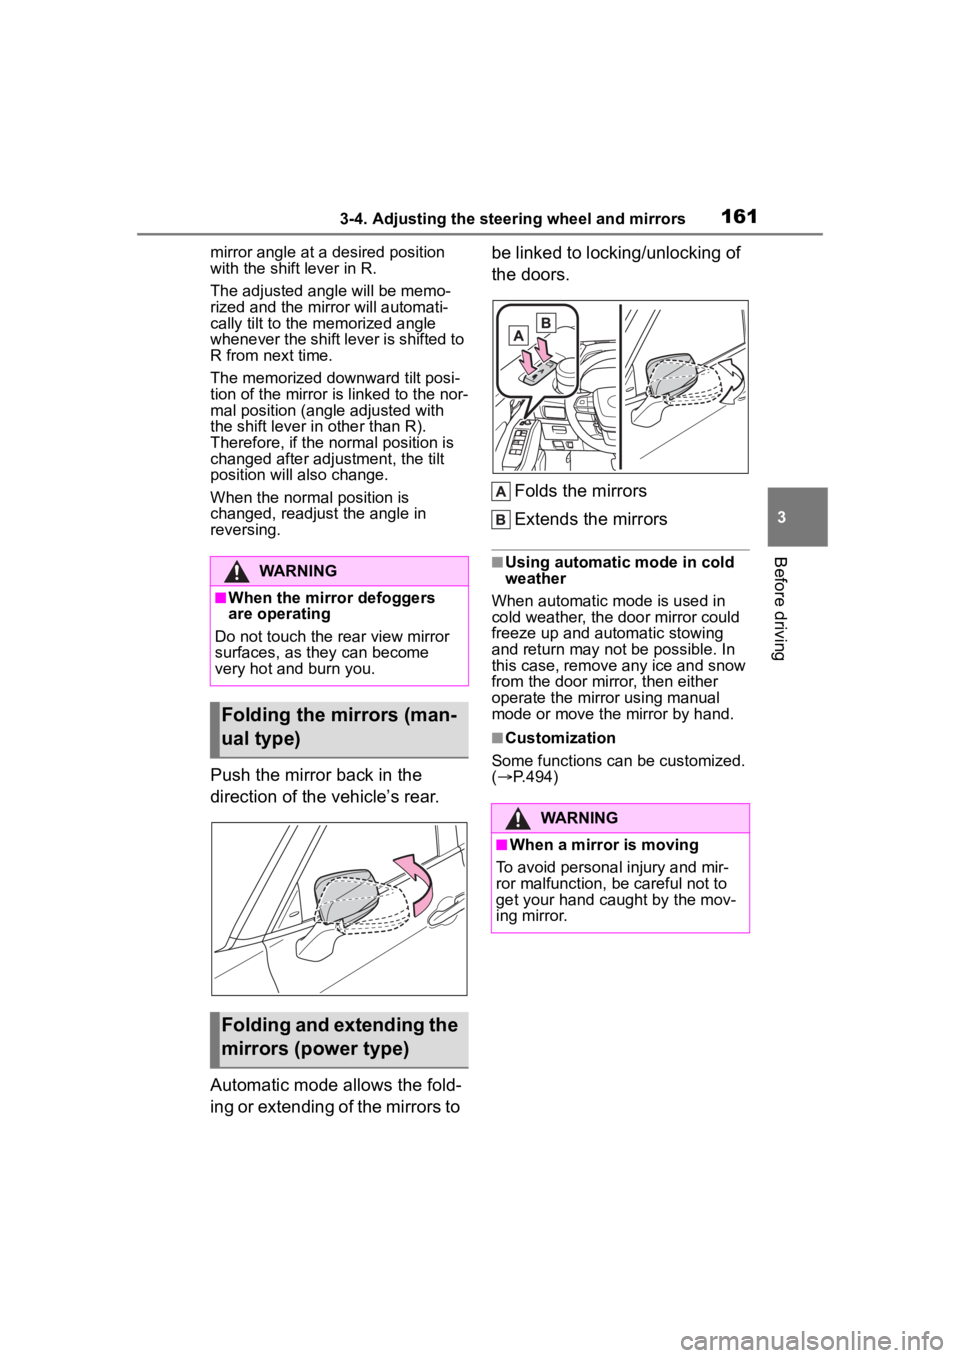
Push the mirror back in the
direction of the vehicle’s rear.
Automatic mode allows the fold-
ing or extending of the mirrors to be linked to locking/unlocking of
the doors.
Folds the mirrors
Extends the mirrors
■Using automatic mode in cold
weather
When automatic mode is used in
cold weather, the door mirror could
freeze up and automatic stowing
and return may not be possible. In
this case, remove any ice and snow
from the door mirror, then either
operate the mirror using manual
mode or move the mirror by hand.
■Customization
Some functions can be customized.
( P.494)
WARNING
■When the mirror defoggers
are operating
Do not touch the rear view mirror
surfaces, as they can become
very hot and burn you.
Folding the mirrors (man-
ual type)
Folding and extending the
mirrors (power type)
WARNING
■When a mirror is moving
To avoid personal injury and mir-
ror malfunction, be careful not to
get your hand caught by the mov-
ing mirror.
Page 173 of 552
173
4
4
Driving
Driving
.4-1. Before drivingDriving the vehicle....... 174
Cargo and luggage ..... 181
Vehicle load limits ....... 184
Trailer towing............... 185
Dinghy towing ............. 196
4-2. Driving procedures Engine (ignition) switch.................................. 197
Automatic transmission .................................. 201
Turn signal lever.......... 204
Parking brake .............. 205
Brake Hold .................. 208
4-3. Operating the lights and wipers
Headlight switch .......... 210
Automatic High Beam . 213
Fog light switch ........... 216
Windshield wipers and washer....................... 216
Rear windshield wiper and washer....................... 219
4-4. Refueling Opening the fuel tank cap.................................. 221
4-5. Using the driving support
systems
Toyota Safety Sense 2.5 + .................................. 223
PCS (Pre-Collision System) .................................. 228LTA (Lane Tracing Assist)
.................................. 239
Dynamic radar cruise con- trol with full-speed range.................................. 249
RSA (Road Sign Assist) .................................. 261
Stop & Start system .... 264
BSM (Blind Spot Monitor) .................................. 270
Intuitive parking assist . 275
RCTA (Rear Cross Traffic Alert) function ............ 283
PKSB (Parking Support Brake) ........................ 289
Parking Support Brake func- tion (static objects) .... 296
Parking Support Brake func- tion (rear-crossing vehi-
cles) ........................... 299
Driving mode select switch .................................. 300
Multi-terrain Select ...... 301
Snow mode switch ...... 304
Downhill assist control sys- tem ............................ 305
Driving assist systems .................................. 307
4-6. Driving tips Winter driving tips........ 314
Utility vehicle precautions .................................. 317