torque TOYOTA HIGHLANDER 2023 Owners Manual
[x] Cancel search | Manufacturer: TOYOTA, Model Year: 2023, Model line: HIGHLANDER, Model: TOYOTA HIGHLANDER 2023Pages: 552, PDF Size: 13.36 MB
Page 91 of 552
912-1. Instrument cluster
2
Vehicle status information and indicators
■Navigation system-linked
display (if equipped)
Select to display the following
navigation system-linked infor-
mation:
Route guidance to destination
Compass display (head-
ing-up display)
Select to enable selection of an
audio source or track on the
meter using the meter control
switches.
This menu icon can be set to be
displayed/not displayed in .
■Tire pressure
P. 3 9 6
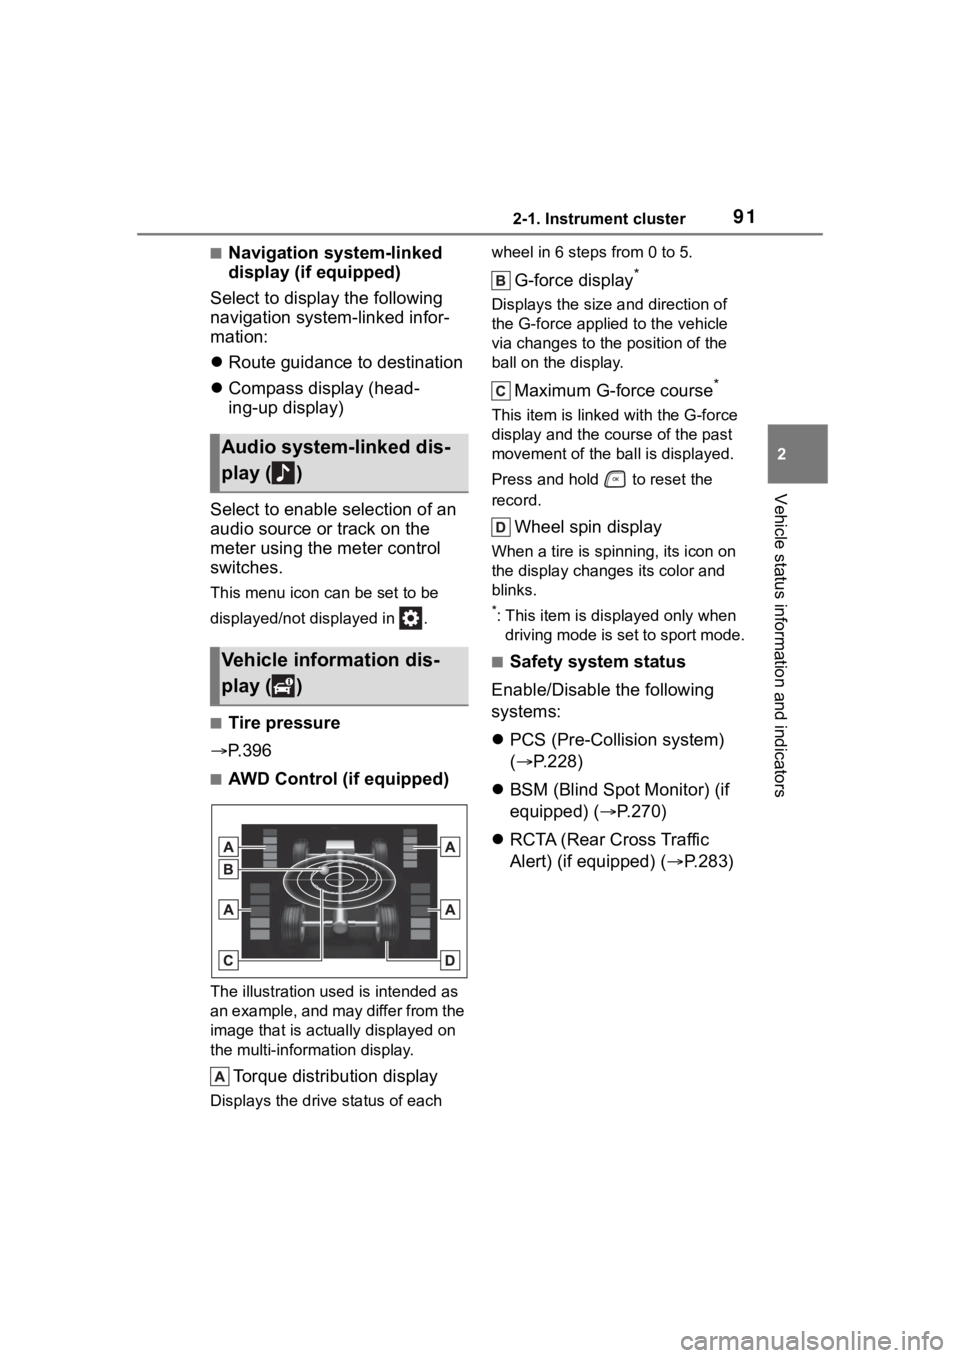
■AWD Control (if equipped)
The illustration used is intended as
an example, and may differ from the
image that is actually displayed on
the multi-information display.
Torque distribution display
Displays the drive status of each wheel in 6 steps from 0 to 5.
G-force display*
Displays the size a
nd direction of
the G-force applied to the vehicle
via changes to the position of the
ball on the display.
Maximum G-force course*
This item is linke d with the G-force
display and the co urse of the past
movement of the ball is displayed.
Press and hold to reset the
record.
Wheel spin display
When a tire is spi nning, its icon on
the display changes its color and
blinks.
*: This item is displayed only when driving mode is set to sport mode.
■Safety system status
Enable/Disable the following
systems:
PCS (Pre-Colli sion system)
( P.228)
BSM (Blind Spot Monitor) (if
equipped) ( P.270)
RCTA (Rear Cross Traffic
Alert) (if equipped) ( P.283)
Audio system-linked dis-
play ( )
Vehicle information dis-
play ( )
Page 101 of 552
1012-1. Instrument cluster
2
Vehicle status information and indicators
Trip time: Displays the
elapsed time since engine
start
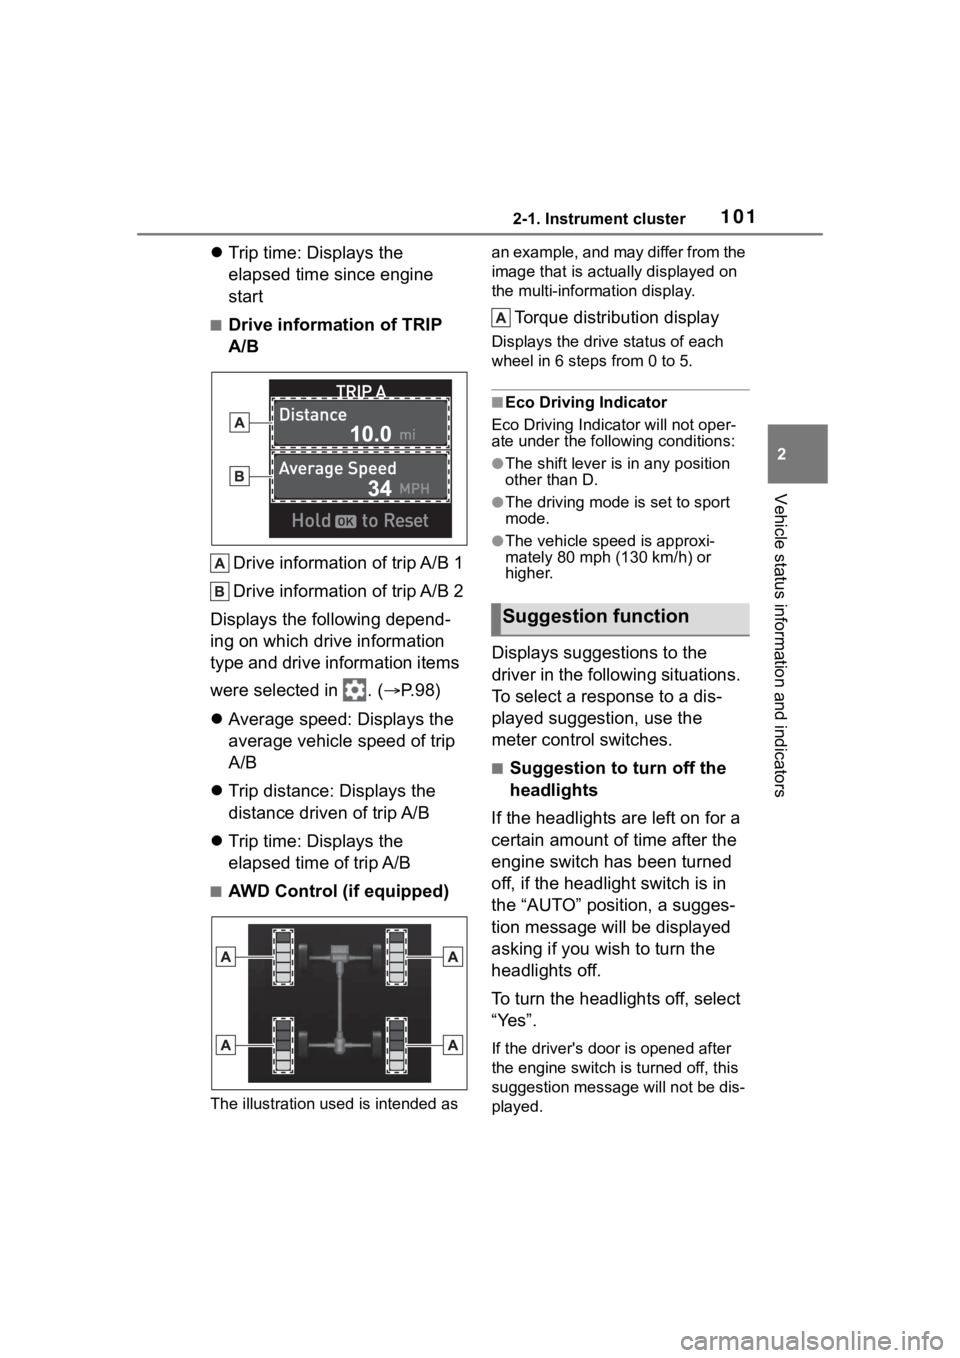
■Drive information of TRIP
A/B
Drive information of trip A/B 1
Drive information of trip A/B 2
Displays the following depend-
ing on which drive information
type and drive information items
were selected in . ( P.98)
Average speed: Displays the
average vehicle speed of trip
A/B
Trip distance: Displays the
distance driven of trip A/B
Trip time: Displays the
elapsed time of trip A/B
■AWD Control (if equipped)
The illustration used is intended as an example, and may differ from the
image that is actually displayed on
the multi-information display.
Torque distribution display
Displays the drive status of each
wheel in 6 steps from 0 to 5.
■Eco Driving Indicator
Eco Driving Indicator will not oper-
ate under the following conditions:
●The shift lever is in any position
other than D.
●The driving mode is set to sport
mode.
●The vehicle spe ed is approxi-
mately 80 mph (130 km/h) or
higher.
Displays suggestions to the
driver in the following situations.
To select a response to a dis-
played suggestion, use the
meter control switches.
■Suggestion to turn off the
headlights
If the headlights are left on for a
certain amount of time after the
engine switch has been turned
off, if the headlight switch is in
the “AUTO” position, a sugges-
tion message will be displayed
asking if you wish to turn the
headlights off.
To turn the headlights off, select
“Yes”.
If the driver's door is opened after
the engine switch is turned off, this
suggestion message will not be dis-
played.
Suggestion function
Page 191 of 552
1914-1. Before driving
4
Driving
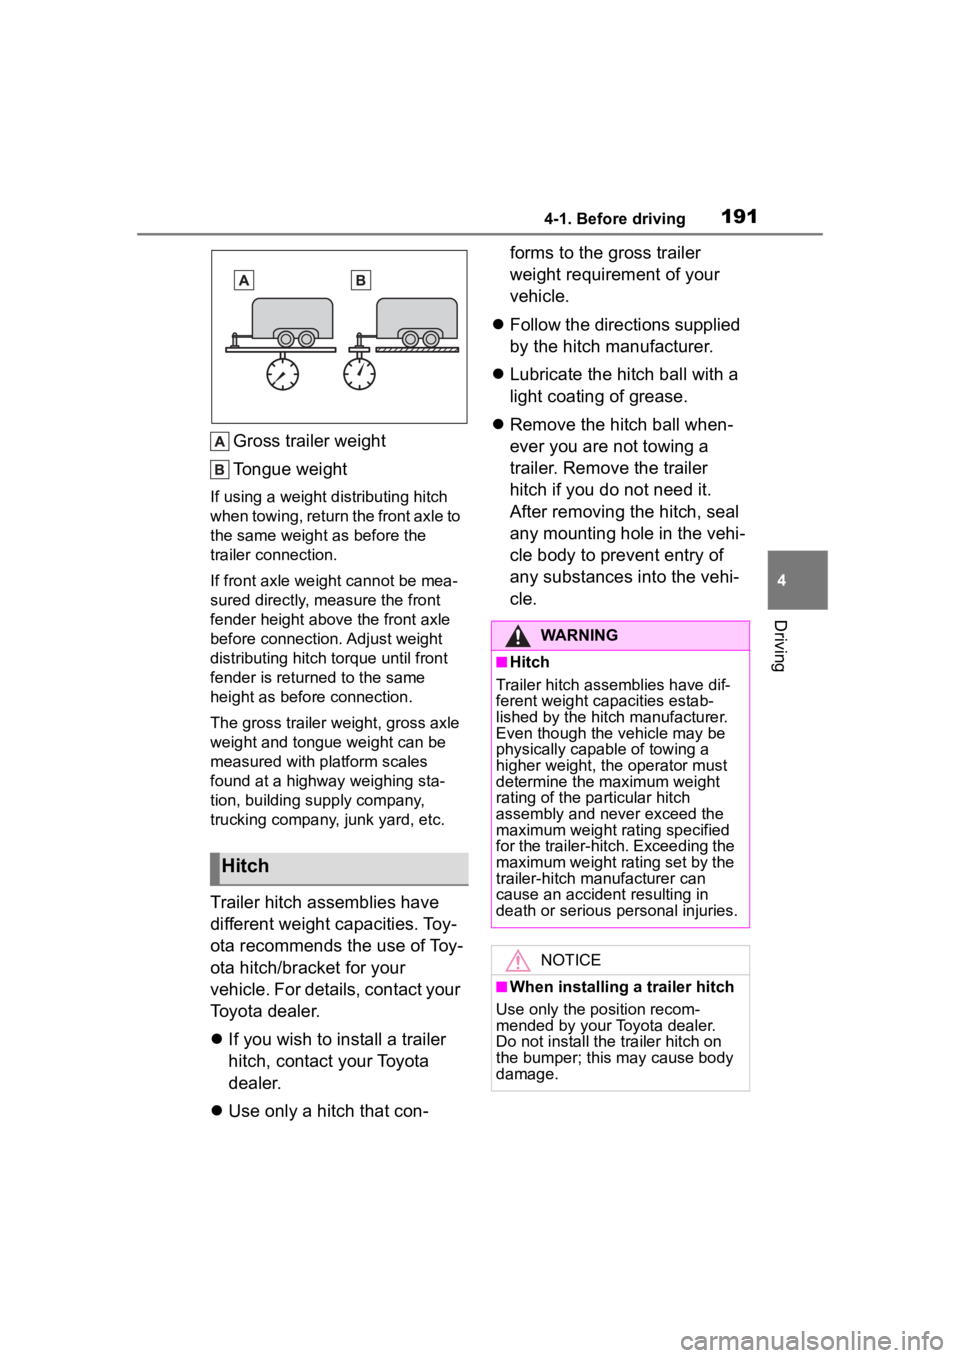
Gross trailer weight
Tongue weight
If using a weight distributing hitch
when towing, return the front axle to
the same weight as before the
trailer connection.
If front axle weight cannot be mea-
sured directly, measure the front
fender height above the front axle
before connection. Adjust weight
distributing hitch torque until front
fender is returned to the same
height as before connection.
The gross trailer weight, gross axle
weight and tongue weight can be
measured with platform scales
found at a highway weighing sta-
tion, building supply company,
trucking company, junk yard, etc.
Trailer hitch assemblies have
different weight capacities. Toy-
ota recommends the use of Toy-
ota hitch/bracket for your
vehicle. For details, contact your
Toyota dealer.
If you wish to install a trailer
hitch, contact your Toyota
dealer.
Use only a hitch that con- forms to the gross trailer
weight requirement of your
vehicle.
Follow the directions supplied
by the hitch manufacturer.
Lubricate the hitch ball with a
light coating of grease.
Remove the hitch ball when-
ever you are not towing a
trailer. Remove the trailer
hitch if you do not need it.
After removing the hitch, seal
any mounting hole in the vehi-
cle body to prevent entry of
any substances into the vehi-
cle.
Hitch
WARNING
■Hitch
Trailer hitch assemblies have dif-
ferent weight capacities estab-
lished by the hitch manufacturer.
Even though the vehicle may be
physically capable of towing a
higher weight, the operator must
determine the maximum weight
rating of the particular hitch
assembly and never exceed the
maximum weight rating specified
for the trailer-hitch. Exceeding the
maximum weight rating set by the
trailer-hitch manufacturer can
cause an accident resulting in
death or serious personal injuries.
NOTICE
■When installing a trailer hitch
Use only the position recom-
mended by your Toyota dealer.
Do not install the trailer hitch on
the bumper; this may cause body
damage.
Page 196 of 552
1964-1. Before driving
Dinghy towing
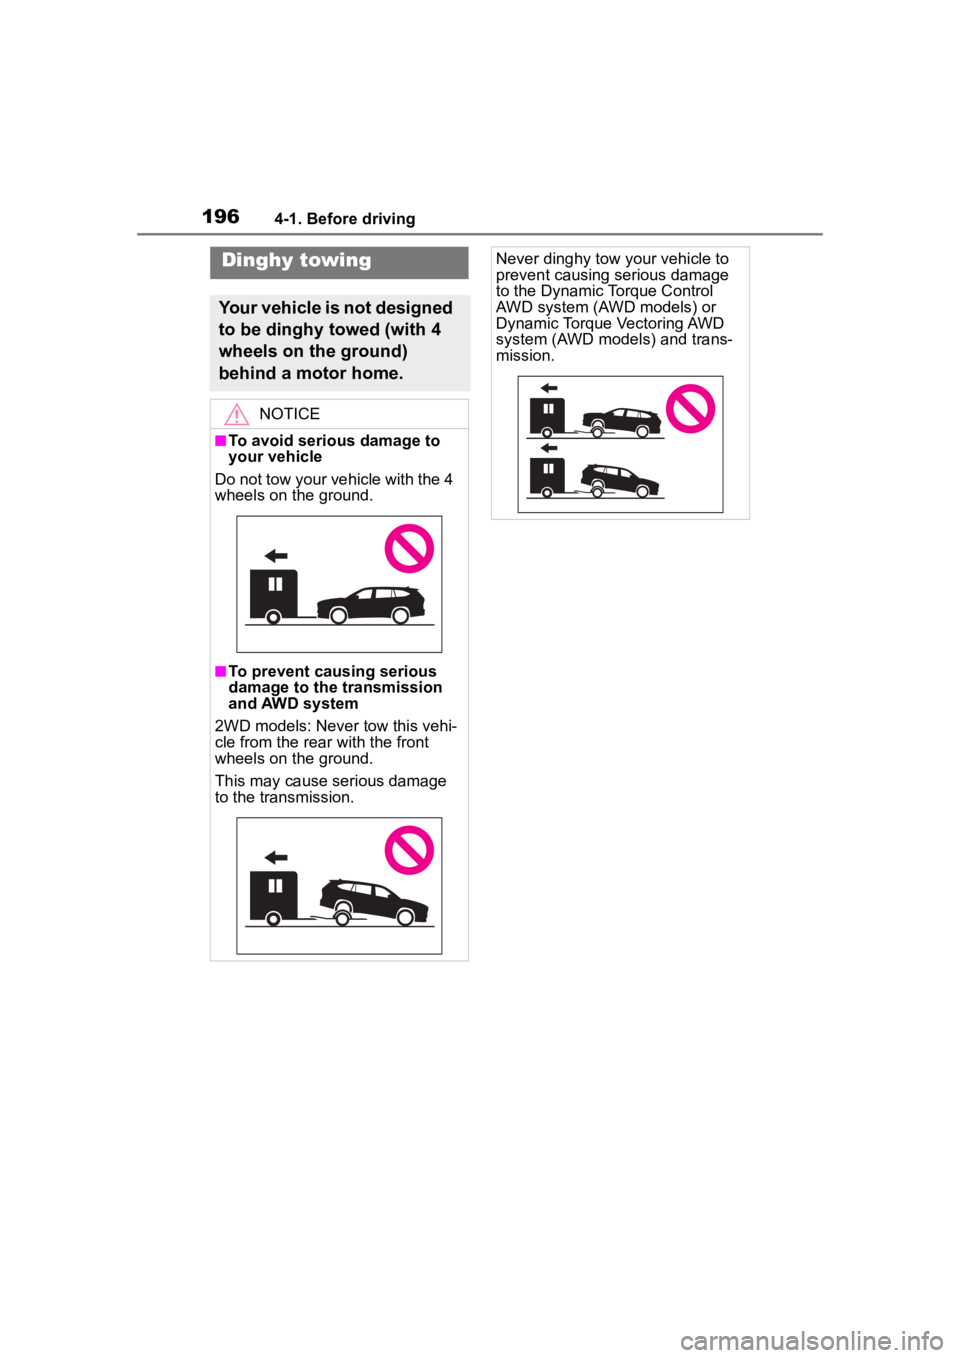
Your vehicle is not designed
to be dinghy towed (with 4
wheels on the ground)
behind a motor home.
NOTICE
■To avoid serious damage to
your vehicle
Do not tow your vehicle with the 4
wheels on the ground.
■To prevent causing serious
damage to the transmission
and AWD system
2WD models: Never tow this vehi-
cle from the rear with the front
wheels on the ground.
This may cause serious damage
to the transmission.
Never dinghy tow your vehicle to
prevent causing serious damage
to the Dynamic Torque Control
AWD system (AWD models) or
Dynamic Torque Vectoring AWD
system (AWD models) and trans-
mission.
Page 301 of 552
3014-5. Using the driving support systems
4
Driving
driving on roads with many curves.
When Sport mode is selected,
Sport mode indicator comes on.
3Eco drive mode
Helps the driver a ccelerate in an
eco-friendly manner and improve
fuel economy through moderate
throttle characteri stics and by con-
trolling the operation of the air con-
ditioning system (heating/cooling).
When Eco drive mode is selected,
Eco drive mode indicator comes
on.
■When changing to a driving
mode other than normal mode
Switches to AWD control suitable for
the selected mode. (for Dynamic
Torque Vectoring AWD vehicles
only)
■Air conditioning system opera-
tion in Eco drive mode
In Eco drive mode, heating/cooling
operations and the fan speed is con-
trolled to improve fuel efficiency.
Perform the following procedures to
increase the air conditioning perfor-
mance.
●Vehicle with 12.3-inch audio sys-
tem screen: Turn eco air condi-
tioning mode off ( P.328)
●Adjust the fan speed ( P.323)
●Cancel Eco drive mode
■Canceling a driving mode
●Sport mode is automatically can-
celed and the driving mode
returns to normal mode when the
engine switch is turned off.
●Normal mode and Eco drive mode
are not canceled until another
driving mode is sel ected. (Even if
the engine switch is turned off,
normal mode and Eco drive mode
will not be automatically can-
celed.)
Multi-terrain Select
(AWD models)
Multi-terrain Select is a sys-
tem that improves drivabil-
ity in off-road situations.
When driving over muddy,
sandy or rough road sur-
faces, the system selects a
suitable driving mode to
switch AWD, brake and
drive force control to per-
form control suitable for the
road condition.
WARNING
■Before using Multi-terrain
Select
Make sure to observe the follow-
ing precautions. Failure to
observe these precautions may
result in an unexp ected accident.
●Check that the Mud & Sand and
Rock & Dirt indicators are illumi-
nated before driving. Multi-ter-
rain Select will not operate
when the indicators are off.
●Do not rely solely upon the
Multi-terrain Select. This func-
tion is not inten ded to expand
the limits of the vehicle. If the
system is continuously used for
a long period of time, the load
on related parts increases and
the system may be unable to
operate normally, which may
lead to an accident. Thoroughly
check the road conditions and
driving route before driving, and
drive with caution.
Page 302 of 552
3024-5. Using the driving support systems
Control that is suitable for the
following road conditions can be
performed by switching to either
of the two modes. Select a
mode that is appropriate for the
road condition.
■Mud & Sand mode
Suitable for driving on roads
with increased driving resis-
tance such as sandy roads,
muddy roads, etc.
■Rock & Dirt mode
Suitable for driving in bumpy
road conditions, such as on
unpaved forest roads.
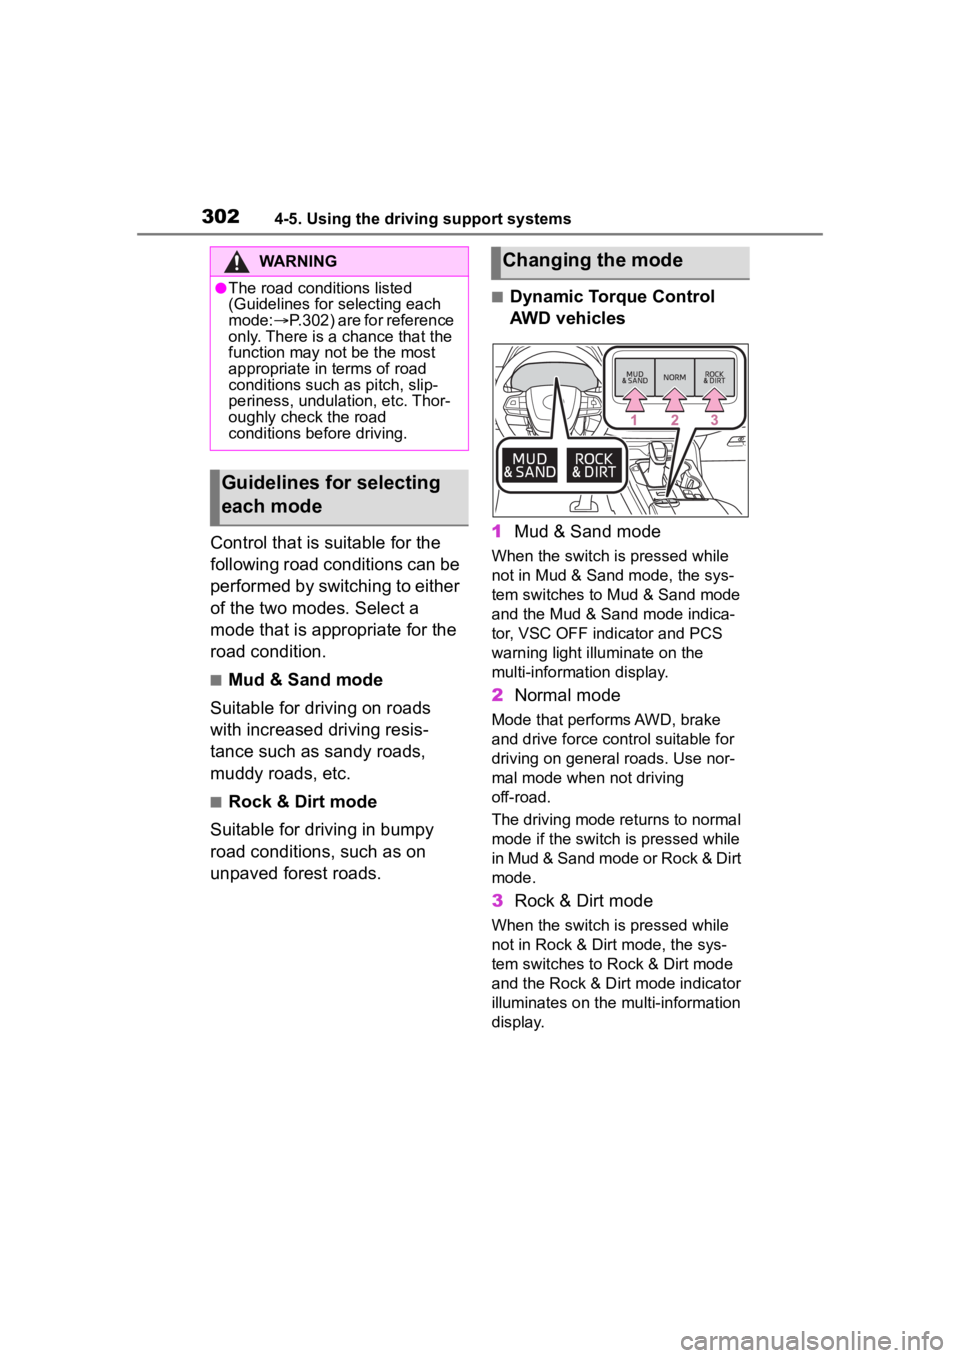
■Dynamic Torque Control
AWD vehicles
1 Mud & Sand mode
When the switch is pressed while
not in Mud & Sand mode, the sys-
tem switches to Mud & Sand mode
and the Mud & Sand mode indica-
tor, VSC OFF indi cator and PCS
warning light illuminate on the
multi-information display.
2 Normal mode
Mode that performs AWD, brake
and drive force cont rol suitable for
driving on general roads. Use nor-
mal mode when not driving
off-road.
The driving mode returns to normal
mode if the switch i s pressed while
in Mud & Sand mode or Rock & Dirt
mode.
3 Rock & Dirt mode
When the switch is pressed while
not in Rock & Dirt mode, the sys-
tem switches to Rock & Dirt mode
and the Rock & Dirt mode indicator
illuminates on the mu lti-information
display.
WARNING
●The road conditions listed
(Guidelines for selecting each
mode: P.302) are for reference
only. There is a chance that the
function may not be the most
appropriate in terms of road
conditions such as pitch, slip-
periness, undulation, etc. Thor-
oughly check the road
conditions before driving.
Guidelines for selecting
each mode
Changing the mode
Page 303 of 552
3034-5. Using the driving support systems
4
Driving
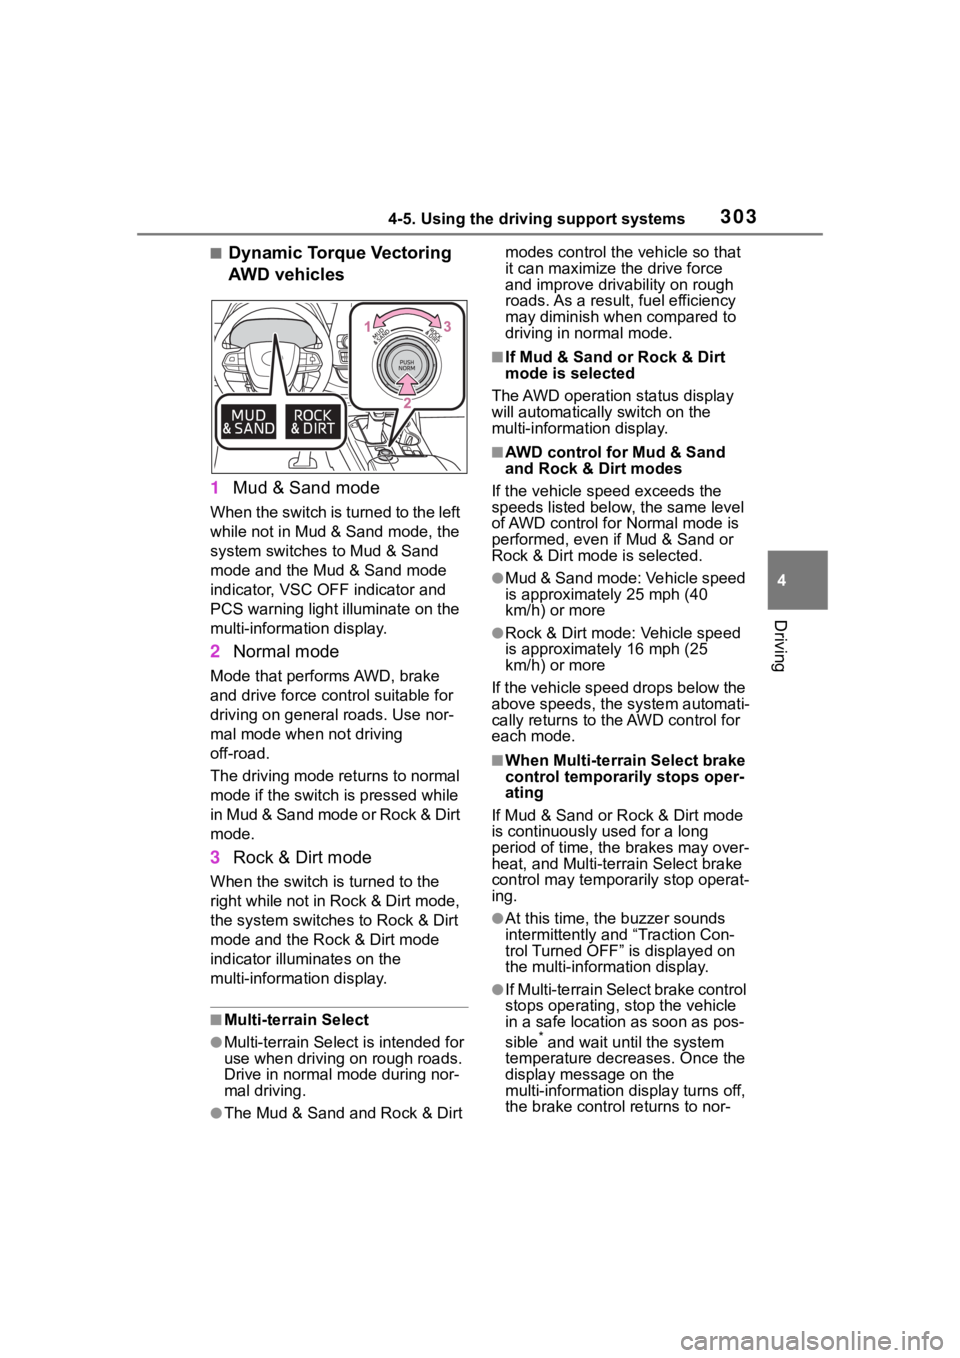
■Dynamic Torque Vectoring
AWD vehicles
1 Mud & Sand mode
When the switch is turned to the left
while not in Mud & Sand mode, the
system switches to Mud & Sand
mode and the Mud & Sand mode
indicator, VSC OFF indicator and
PCS warning light illuminate on the
multi-information display.
2Normal mode
Mode that performs AWD, brake
and drive force control suitable for
driving on general roads. Use nor-
mal mode when not driving
off-road.
The driving mode returns to normal
mode if the switch is pressed while
in Mud & Sand mode or Rock & Dirt
mode.
3Rock & Dirt mode
When the switch is turned to the
right while not in Rock & Dirt mode,
the system switches to Rock & Dirt
mode and the Rock & Dirt mode
indicator illuminates on the
multi-information display.
■Multi-terrain Select
●Multi-terrain Sele ct is intended for
use when driving on rough roads.
Drive in normal mode during nor-
mal driving.
●The Mud & Sand and Rock & Dirt modes control the
vehicle so that
it can maximize the drive force
and improve driv ability on rough
roads. As a result, fuel efficiency
may diminish when compared to
driving in normal mode.
■If Mud & Sand or Rock & Dirt
mode is selected
The AWD operation status display
will automatically switch on the
multi-information display.
■AWD control for Mud & Sand
and Rock & Dirt modes
If the vehicle speed exceeds the
speeds listed below, the same level
of AWD control for Normal mode is
performed, even if Mud & Sand or
Rock & Dirt mode is selected.
●Mud & Sand mode: Vehicle speed
is approximately 25 mph (40
km/h) or more
●Rock & Dirt mode: Vehicle speed
is approximately 16 mph (25
km/h) or more
If the vehicle speed drops below the
above speeds, the system automati-
cally returns to the AWD control for
each mode.
■When Multi-terrain Select brake
control temporarily stops oper-
ating
If Mud & Sand or Rock & Dirt mode
is continuously used for a long
period of time, th e brakes may over-
heat, and Multi-terrain Select brake
control may temporarily stop operat-
ing.
●At this time, the buzzer sounds
intermittently and “Traction Con-
trol Turned OFF” is displayed on
the multi-information display.
●If Multi-terrain Sele ct brake control
stops operating, stop the vehicle
in a safe location as soon as pos-
sible
* and wait until the system
temperature decreases. Once the
display message on the
multi-information d isplay turns off,
the brake control returns to nor-
Page 307 of 552
3074-5. Using the driving support systems
4
Driving■ABS (Anti-lock Brake Sys-
tem)
Helps to prevent wheel lock
when the brakes are applied
suddenly, or if the brakes are
applied while driving on a slip-
pery road surface
■Brake assist
Generates an increased level of
braking force after the brake
pedal is depressed when the
system detects a panic stop sit-
uation
■VSC (Vehicle Stability Con-
trol)
Helps the driver to control skid-
ding when swerving suddenly or
turning on slippery road sur-
faces
■Enhanced VSC (Enhanced
Vehicle Stability Control)
Provides cooperative control of
the ABS, TRAC, VSC and EPS.
Helps to maintain directional
stability when swerving on slip-
pery road surfaces by con-
trolling steering performance.
■Trailer Sway Control
Helps the driver to control trailer
sway by selectively applying
brake pressure for individual
wheels and reducing driving
torque when trailer sway is
detected.
■TRAC (Traction Control)
Helps to maintain drive power
and prevent the drive wheels
from spinning when starting the
vehicle or accelerating on slip-
pery roads
■Active Cornering Assist
(ACA)
Helps to prevent the vehicle
from drifting to the outer side by
performing inner wheel brake
control when attempting to
accelerate while turning
■Hill-start assist control
Helps to reduce the backward
movement of the vehicle when
starting on an uphill
■EPS (Electric Power Steer-
ing)
Employs an electric motor to
reduce the amount of effort
needed to turn the steering
Driving assist systems
To keep driving safety and
performance, the following
systems operate automati-
cally in response to various
driving situations. Be
aware, however, that these
systems are supplementary
and should not be relied
upon too heavily when oper-
ating the vehicle.
Summary of the driving
assist systems
Page 308 of 552
3084-5. Using the driving support systems
wheel
■Dynamic Torque Control
AWD system (AWD models)
Automatically controls the drive
system such as to front-wheel
drive or AWD (all wheel drive)
according to various running
conditions including normal driv-
ing, during cornering, on a
uphill, when starting off, during
acceleration, on a slippery roads
due to snow or rain, thus con-
tributing to stable operability and
driving stability.
■Dynamic Torque Vectoring
AWD system (AWD models)
Automatically controls the drive
system such as to front-wheel
drive or AWD (all wheel drive)
according to various running
conditions including normal driv-
ing, during cornering, on a
uphill, when starting off, during
acceleration, on a slippery roads
due to snow or rain, thus con-
tributing to stable operability and
driving stability.
Also, drive torque distribution is
precisely controlled during cor-
nering, contributing to improve-
ments in operability and stability.
■The Secondary Collision
Brake
When the SRS airbag sensor
detects a collision and the sys-
tem operates, the brakes and
brake lights are automatically
controlled to reduce the vehicle speed and help reduce the pos-
sibility of further damage due to
a secondary collision.
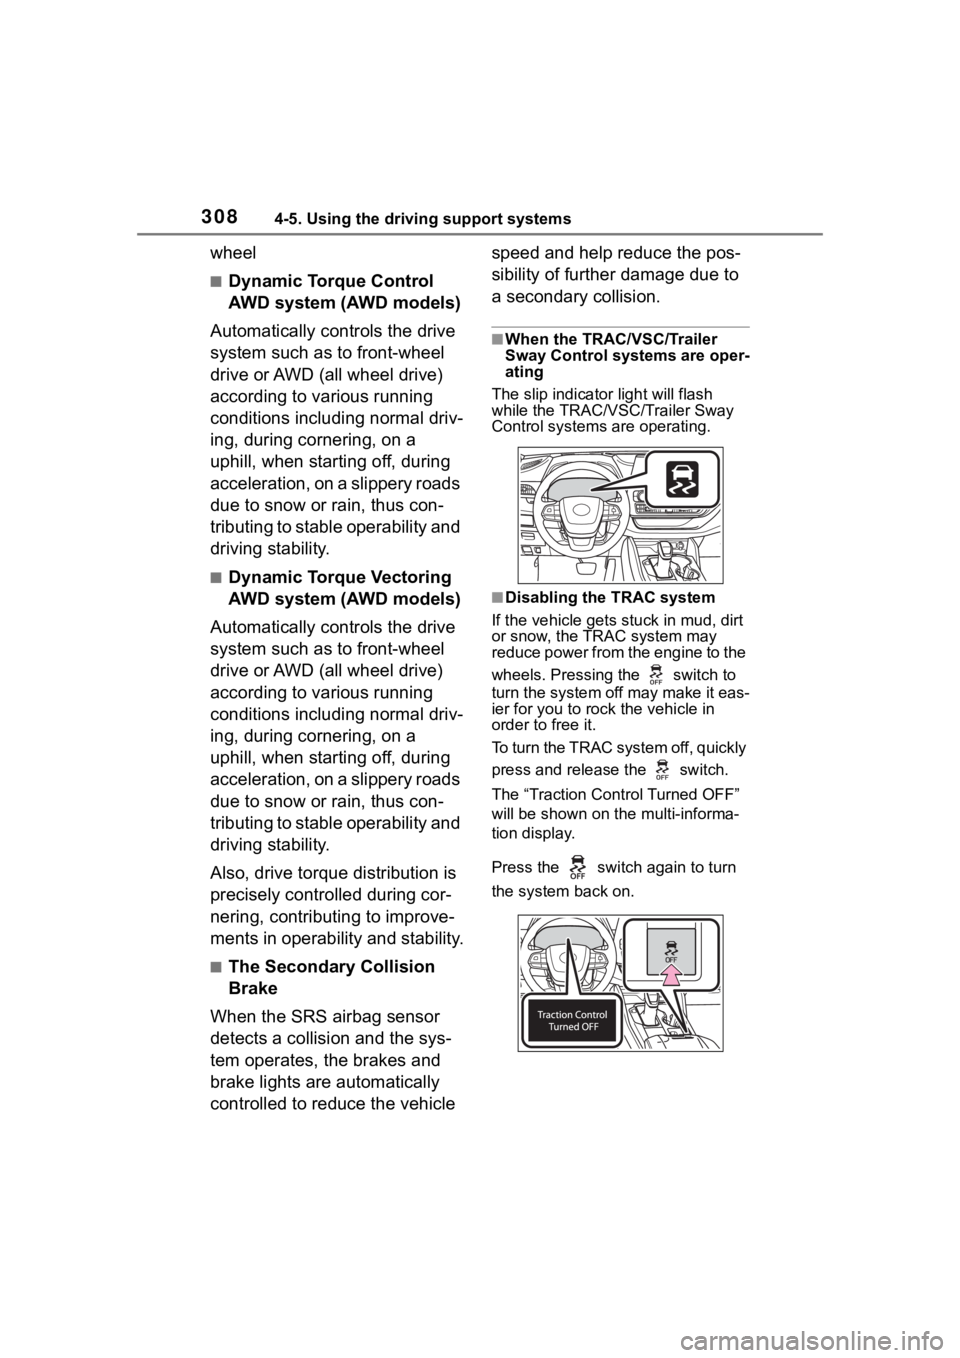
■When the TRAC/VSC/Trailer
Sway Control systems are oper-
ating
The slip indicator light will flash
while the TRAC/VSC/Trailer Sway
Control systems are operating.
■Disabling the TRAC system
If the vehicle gets stuck in mud, dirt
or snow, the TRAC system may
reduce power from the engine to the
wheels. Pressing the switch to
turn the system off may make it eas-
ier for you to rock the vehicle in
order to free it.
To turn the TRAC system off, quickly
press and release the switch.
The “Traction Cont rol Turned OFF”
will be shown on the multi-informa-
tion display.
Press the switch again to turn
the system back on.
Page 312 of 552
3124-5. Using the driving support systems
WARNING
■When the TRAC/VSC/Trailer
Sway Control is activated
The slip indicator light flashes.
Always drive carefully. Reckless
driving may cause an accident.
Exercise particular care when the
indicator light flashes.
■When the TRAC/VSC/Trailer
Sway Control systems are
turned off
●Be especially careful and drive
at a speed appropriate to the
road conditions. As these are
the systems to help ensure
vehicle stability and driving
force, do not turn the
TRAC/VSC/Trailer Sway Con-
trol systems off unless neces-
sary.
●Trailer Sway Control is part of
the VSC system and will not
operate if VSC is turned off or
experiences a malfunction.
■Dynamic Torque Vectoring
AWD system
The cornering performance of the
AWD system has been improved.
However, do not overly rely on the
system and drive with caution.
■Replacing tires
Make sure that all tires are of the
specified size, brand, tread pat-
tern and total load capacity. In
addition, make sure that the tires
are inflated to the recommended
tire inflation pressure level.
The ABS, TRAC, Trailer Sway
Control and VSC systems will not
function correctly if different tires
are installed on the vehicle.
Contact your Toyota dealer for fur-
ther information when replacing
tires or wheels.
■Handling of tires and the sus-
pension
Using tires with any kind of prob-
lem or modifying the suspension
will affect the driving assist sys-
tems, and may cause a system to
malfunction.
■Trailer Sway Control precau-
tion
The Trailer Sway Control system
is not able to red uce trailer sway
in all situations. Depending on
many factors such as the condi-
tions of the vehicle, trailer, road
surface and driving environment,
the Trailer Sway Control system
may not be effective. Refer to
your trailer owner’s manual for
information on how to tow your
trailer properly.
■If trailer sway occurs
Observe the following precau-
tions.
Failing to do so may cause death
or serious injury.
●Firmly grip the steering wheel.
Steer straight ahead. Do not try
to control trailer sway by turning
the steering wheel.
●Begin releasing the accelerator
pedal immediately but very
gradually to reduce speed.
Do not increase speed. Do not
apply vehicle brakes.
If you make no extreme correction
with the steering or brakes, your
vehicle and traile r should stabi-
lize. ( P.186)