TOYOTA HIGHLANDER HYBRID 2017 XU50 / 3.G Owners Manual
Manufacturer: TOYOTA, Model Year: 2017, Model line: HIGHLANDER HYBRID, Model: TOYOTA HIGHLANDER HYBRID 2017 XU50 / 3.GPages: 716, PDF Size: 12.23 MB
Page 611 of 716
6118-2. Steps to take in an emergency
8
When trouble arises
HIGHLANDER_HV_U (OM48F12U)
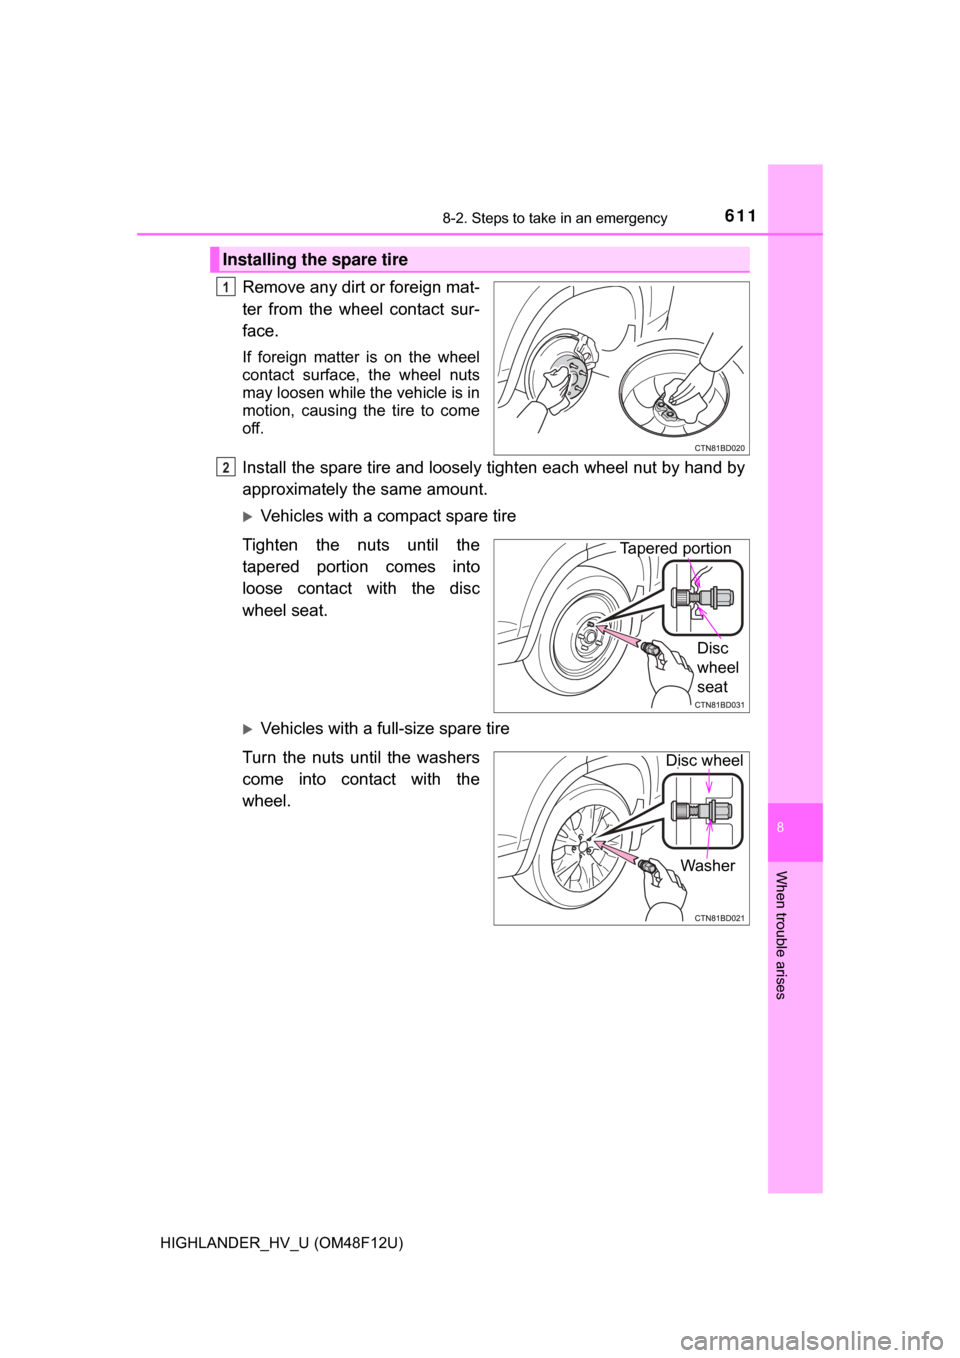
Remove any dirt or foreign mat-
ter from the wheel contact sur-
face.
If foreign matter is on the wheel
contact surface, the wheel nuts
may loosen while the vehicle is in
motion, causing the tire to come
off.
Install the spare tire and loosely tighten each wheel nut by hand by
approximately the same amount.
Vehicles with a compact spare tire
Tighten the nuts until the
tapered portion comes into
loose contact with the disc
wheel seat.
Vehicles with a full-size spare tire
Turn the nuts until the washers
come into contact with the
wheel.
Installing the spare tire
1
2
Tapered portion
Disc
wheel
seat
Washer
Disc wheel
Page 612 of 716
6128-2. Steps to take in an emergency
HIGHLANDER_HV_U (OM48F12U)
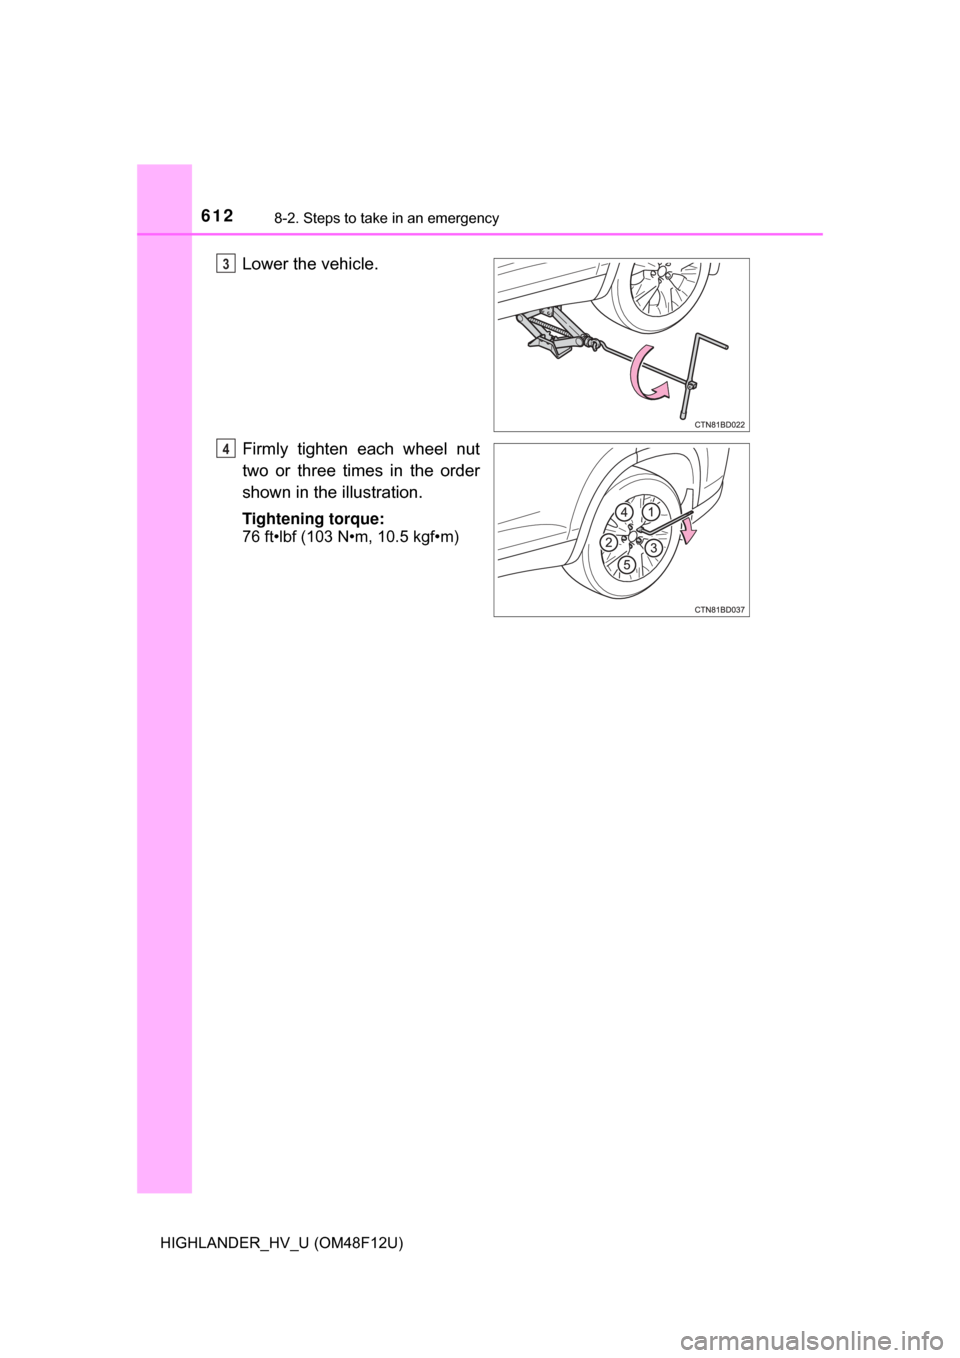
Lower the vehicle.
Firmly tighten each wheel nut
two or three times in the order
shown in the illustration.
Tightening torque:
76 ft•lbf (103 N•m, 10.5 kgf•m)
3
4
Page 613 of 716
6138-2. Steps to take in an emergency
8
When trouble arises
HIGHLANDER_HV_U (OM48F12U)
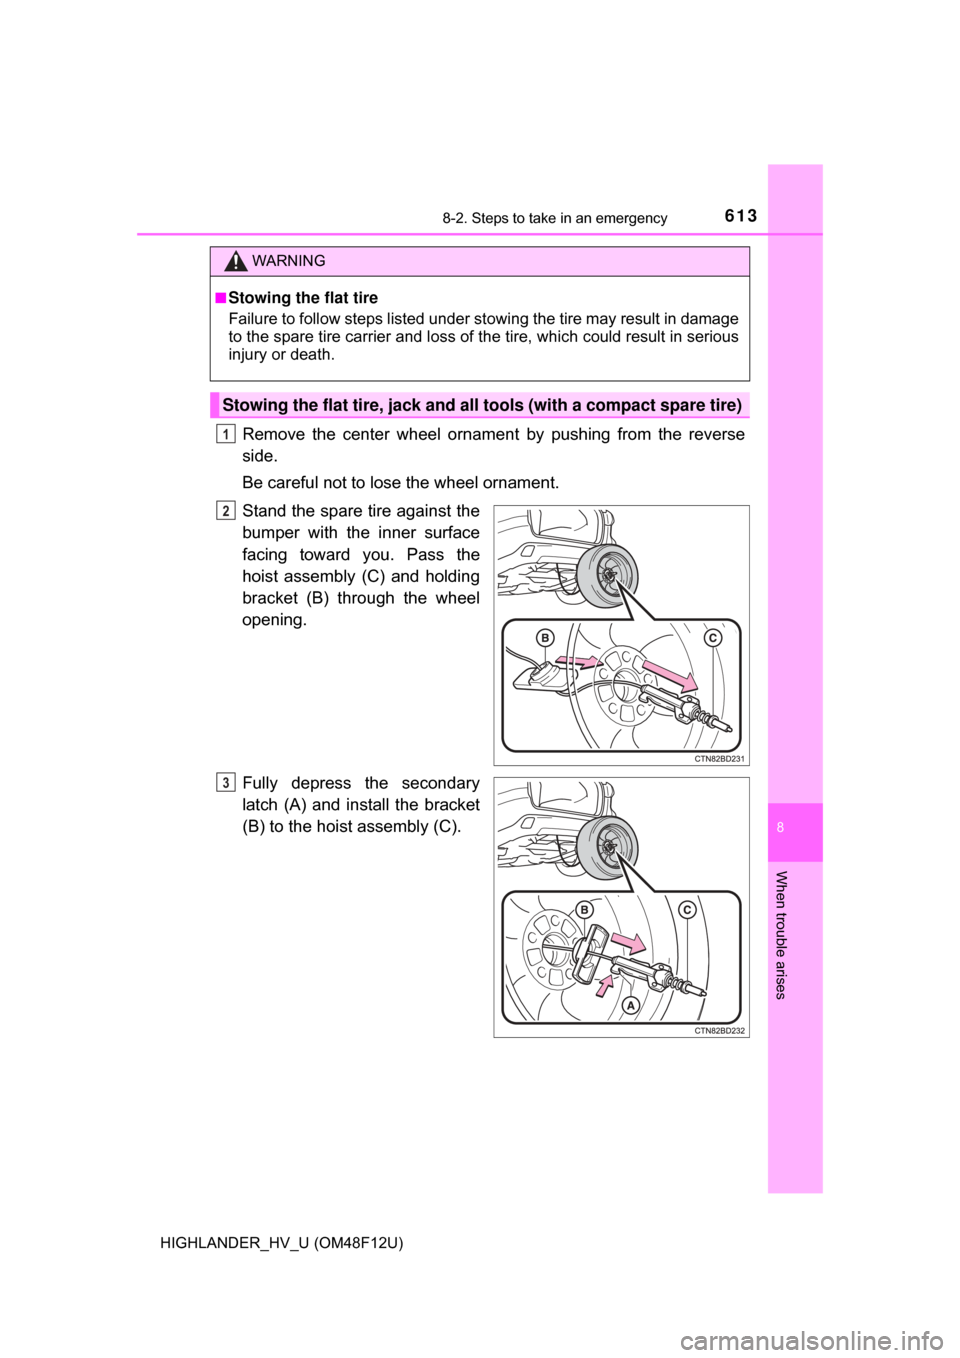
Remove the center wheel ornament by pushing from the reverse
side.
Be careful not to lose the wheel ornament.
Stand the spare tire against the
bumper with the inner surface
facing toward you. Pass the
hoist assembly (C) and holding
bracket (B) through the wheel
opening.
Fully depress the secondary
latch (A) and install the bracket
(B) to the hoist assembly (C).
WARNING
■Stowing the flat tire
Failure to follow steps listed under st owing the tire may result in damage
to the spare tire carrier and loss of the tire, which could result in serious
injury or death.
Stowing the flat tire, jack and all tools (with a compact spare tire)
1
2
3
Page 614 of 716
6148-2. Steps to take in an emergency
HIGHLANDER_HV_U (OM48F12U)
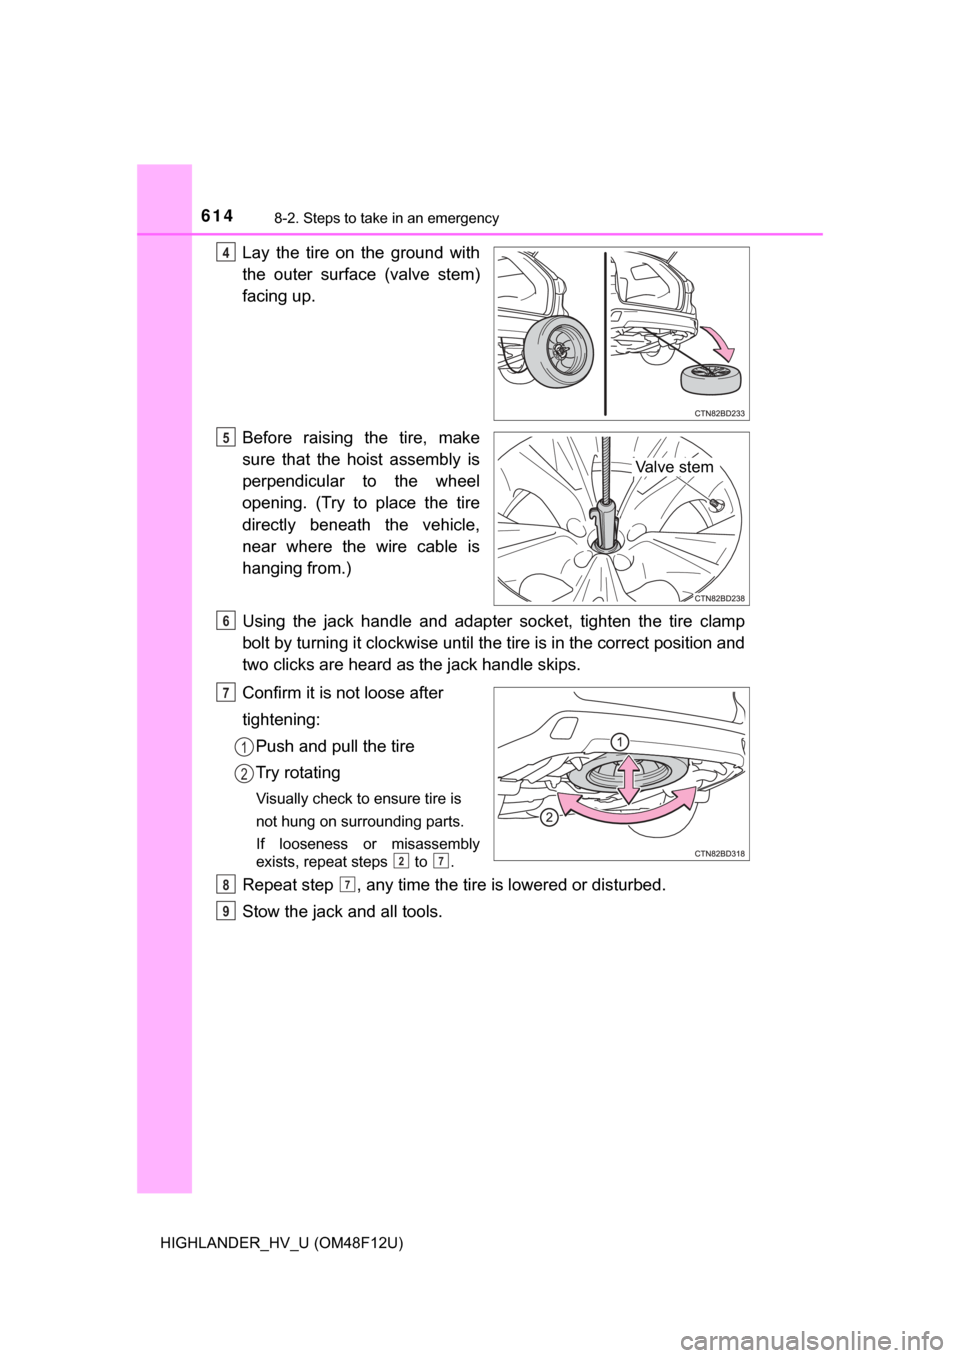
Lay the tire on the ground with
the outer surface (valve stem)
facing up.
Before raising the tire, make
sure that the hoist assembly is
perpendicular to the wheel
opening. (Try to place the tire
directly beneath the vehicle,
near where the wire cable is
hanging from.)
Using the jack handle and adapter socket, tighten the tire clamp
bolt by turning it clockwise until the tire is in the correct position and
two clicks are heard as the jack handle skips.
Confirm it is not loose after
tightening:Push and pull the tire
Try rotating
Visually check to ensure tire is
not hung on surrounding parts.
If looseness or misassembly
exists, repeat steps to .
Repeat step , any time the tire is lowered or disturbed.
Stow the jack and all tools.
4
Valve stem
5
6
7
1
2
27
87
9
Page 615 of 716
6158-2. Steps to take in an emergency
8
When trouble arises
HIGHLANDER_HV_U (OM48F12U)
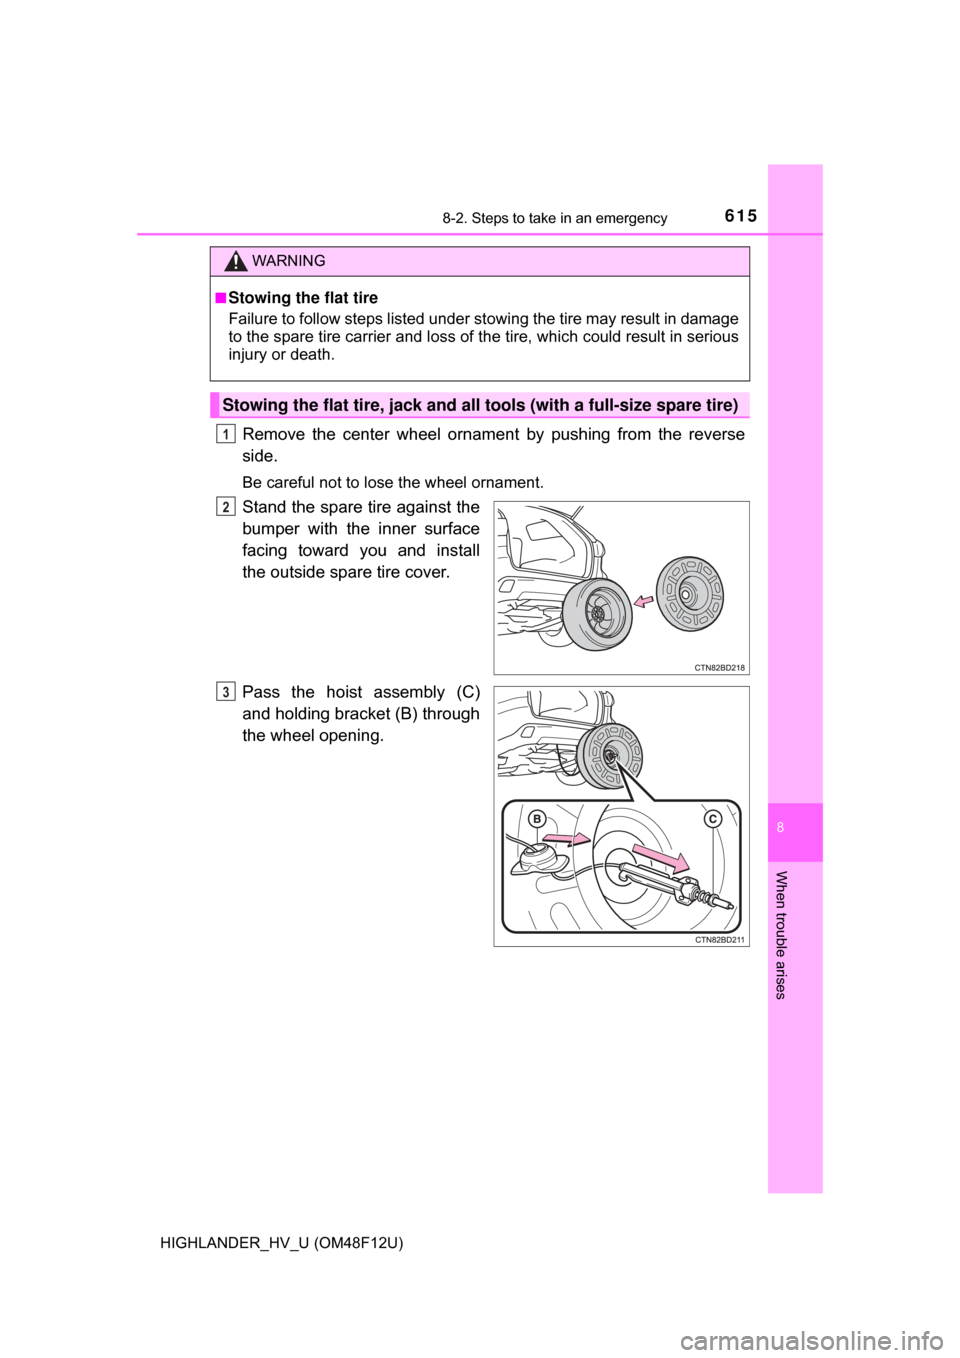
Remove the center wheel ornament by pushing from the reverse
side.
Be careful not to lose the wheel ornament.
Stand the spare tire against the
bumper with the inner surface
facing toward you and install
the outside spare tire cover.
Pass the hoist assembly (C)
and holding bracket (B) through
the wheel opening.
WARNING
■Stowing the flat tire
Failure to follow steps listed under st owing the tire may result in damage
to the spare tire carrier and loss of the tire, which could result in serious
injury or death.
Stowing the flat tire, jack and all tools (with a full-size spare tire)
1
2
3
Page 616 of 716
6168-2. Steps to take in an emergency
HIGHLANDER_HV_U (OM48F12U)
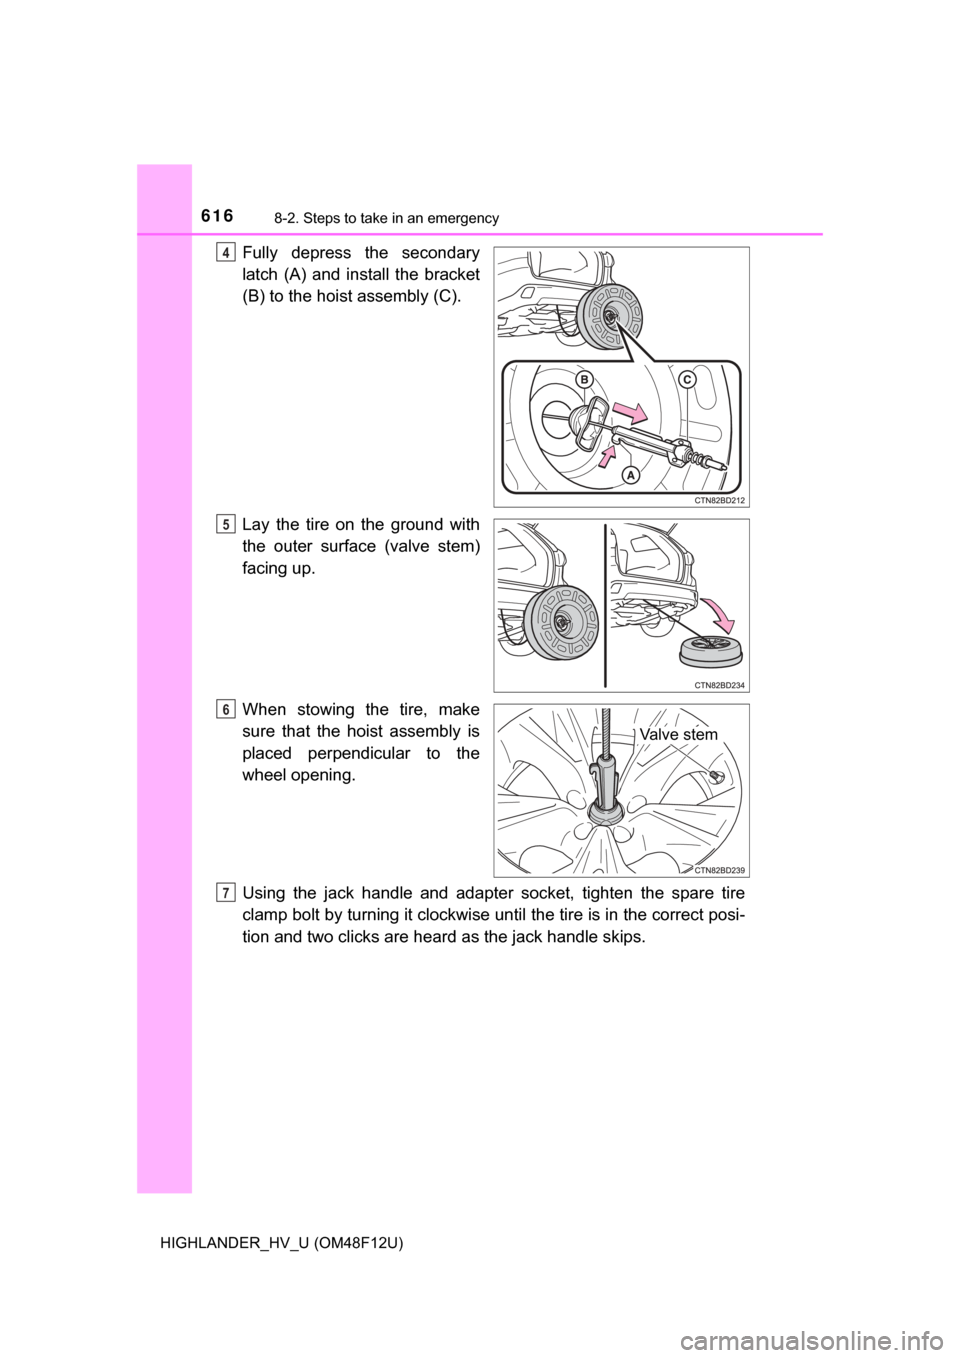
Fully depress the secondary
latch (A) and install the bracket
(B) to the hoist assembly (C).
Lay the tire on the ground with
the outer surface (valve stem)
facing up.
When stowing the tire, make
sure that the hoist assembly is
placed perpendicular to the
wheel opening.
Using the jack handle and adapter socket, tighten the spare tire
clamp bolt by turning it clockwise un til the tire is in the correct posi-
tion and two clicks are heard as the jack handle skips.4
5
Va l v e s t e m
6
7
Page 617 of 716
6178-2. Steps to take in an emergency
8
When trouble arises
HIGHLANDER_HV_U (OM48F12U)
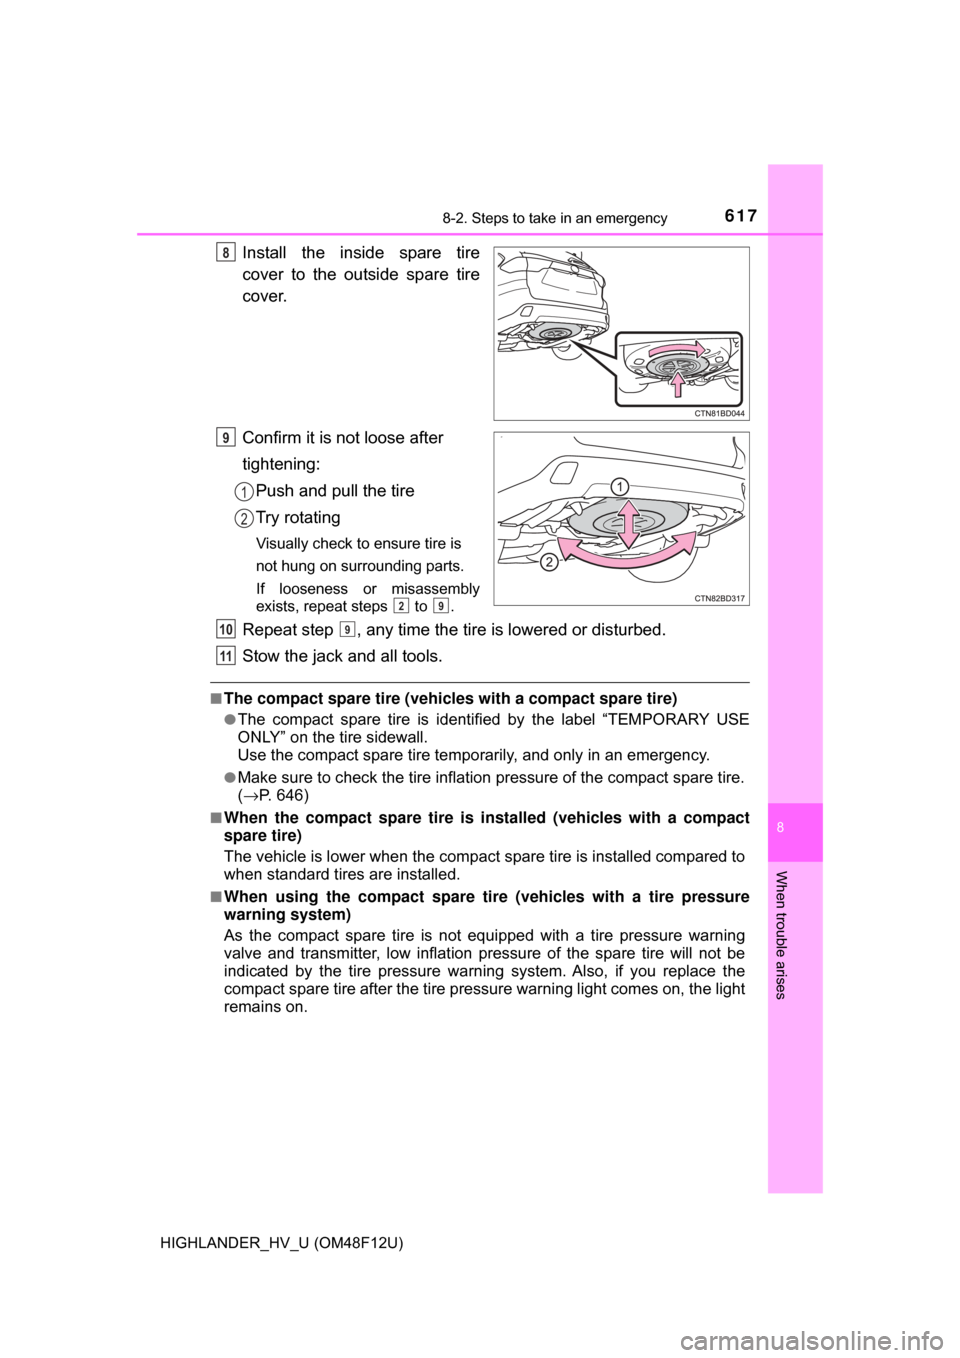
Install the inside spare tire
cover to the outside spare tire
cover.
Confirm it is not loose after
tightening:Push and pull the tire
Try rotating
Visually check to ensure tire is
not hung on surrounding parts.
If looseness or misassembly
exists, repeat steps to .
Repeat step , any time the tire is lowered or disturbed.
Stow the jack and all tools.
■The compact spare tire (vehicles with a compact spare tire)
●The compact spare tire is identified by the label “TEMPORARY USE
ONLY” on the tire sidewall.
Use the compact spare tire temporarily, and only in an emergency.
●Make sure to check the tire inflation pressure of the compact spare tire.
(→ P. 646)
■When the compact spare tire is installed (vehicles with a compact
spare tire)
The vehicle is lower when the compact spare tire is installed compared to
when standard tires are installed.
■When using the compact spare tire (vehicles with a tire pressure
warning system)
As the compact spare tire is not equipped with a tire pressure warning
valve and transmitter, low inflation pressure of the spare tire will not be
indicated by the tire pressure warning system. Also, if you replace the
compact spare tire after the tire pressure warning light comes on, the light
remains on.
8
9
1
2
29
109
11
Page 618 of 716

6188-2. Steps to take in an emergency
HIGHLANDER_HV_U (OM48F12U)■
If you have a flat front tire on a road covered with snow or ice (vehi-
cles with a compact spare tire)
Install the compact spare tire on one of the rear wheels of the vehicle.
Perform the following steps and fit
tire chains to the front tires:
Replace a rear tire with the compact spare tire.
Replace the flat front tire with the tire removed from the rear of the vehi-
cle.
Fit tire chains to the front tires.
WARNING
■When using the compact spare tire (vehicles with a compact spare
tire)
●Remember that the compact spare tire provided is specifically
designed for use with your vehicle. Do not use your compact spare tire
on another vehicle.
●Do not use more than one compact spare tires simultaneously.
●Replace the compact spare tire with a standard tire as soon as possi-
ble.
●Avoid sudden acceleration, abrupt steering, sudden braking and shift-
ing operations that cause sudden engine braking.
■When the compact spare tire is attached (vehicles with a compact
spare tire)
The vehicle speed may not be correctly detected, and the following sys-
tems may not operate correctly:
■Speed limit when using the compact spare tire
Do not drive at speeds in excess of 50 mph (80 km/h) when a compact
spare tire is installed on the vehicle.
The compact spare tire is not designed for driving at high speeds. Fail-
ure to observe this precaution may lead to an accident causing death or
serious injury.
1
2
3
• ABS & Brake assist
•VDIM
•TRAC
• Dynamic radar cruise control
• Pre-Collision System
• EPS • Automatic High Beam
• LDA (Lane Departure Alert with
steering control)
• Intuitive parking assist (if equipped)
• Navigation system (if equipped)
Page 619 of 716
6198-2. Steps to take in an emergency
8
When trouble arises
HIGHLANDER_HV_U (OM48F12U)
WARNING
■Replacing a flat tire for vehicles with power back door
In cases such as when replacing tires, make sure to turn off the power
back door main switch ( →P. 133). Failure to do so may cause the back
door to operate unintentionally if the power back door switch is acciden-
tally touched, resulting in hands and fingers being caught and injured.
■After using the tools and jack
Before driving, make sure all the tools and jack are securely in place in
their storage location to reduce the po ssibility of personal injury during a
collision or sudden braking.
NOTICE
■Be careful when driving over bumps with the compact spare tire
installed on the vehicle.
The vehicle becomes lower when driving with the compact spare tire
compared to when driving with standa rd tires. Be careful when driving
over uneven road surfaces.
■Driving with tire chains and the compact spare tire
Do not fit tire chains to the compact spare tire.
Tire chains may damage the vehicle body and adversely affect driving
performance.
■When replacing the tires
When removing or fitting the wheels, tires or the tire pressure warning
valve and transmitter, contact your Toyota dealer as the tire pressure
warning valve and transmitter may be damaged if not handled correctly.
■To avoid damage to the tire pressure warning valves and transmit-
ters
When a tire is repaired with liquid sealants, the tire pressure warning
valve and transmitter may not operate properly. If a liquid sealant is
used, contact your Toyota dealer or other qualified service shop as soon
as possible. Make sure to replace the tire pressure warning valve and
transmitter when replacing the tire. ( →P. 524)
Page 620 of 716
6208-2. Steps to take in an emergency
HIGHLANDER_HV_U (OM48F12U)
NOTICE
■When stowing the flat tire
●Ensure that there is no object caught between the tire and the vehicle
underbody.
●Securely tighten the spare tire clam p bolt to hold the spare wheel car-
rier by the hook.
●Stow the flat tire in the spare tire location. Failure to do so may cause
damage to the spare tire carrier. Proper storage redu ces the possibility
of injury in a collision or during sudden braking.
●Have the flat tire repaired and the spare tire replaced with it as soon as
possible.
■Proper storage of the spare tire
●Do not attempt to turn the spare tire clamp bolt without a tire on the
hoist assembly, as doing so may cause the wire cable to slip off of the
shaft inside the unit and the wire cable may not be able to be raised or
lowered. If the spare tire clamp bolt has been turned without a tire on
the hoist assembly and the wire cable cannot be raised or lowered,
contact your Toyota dealer.
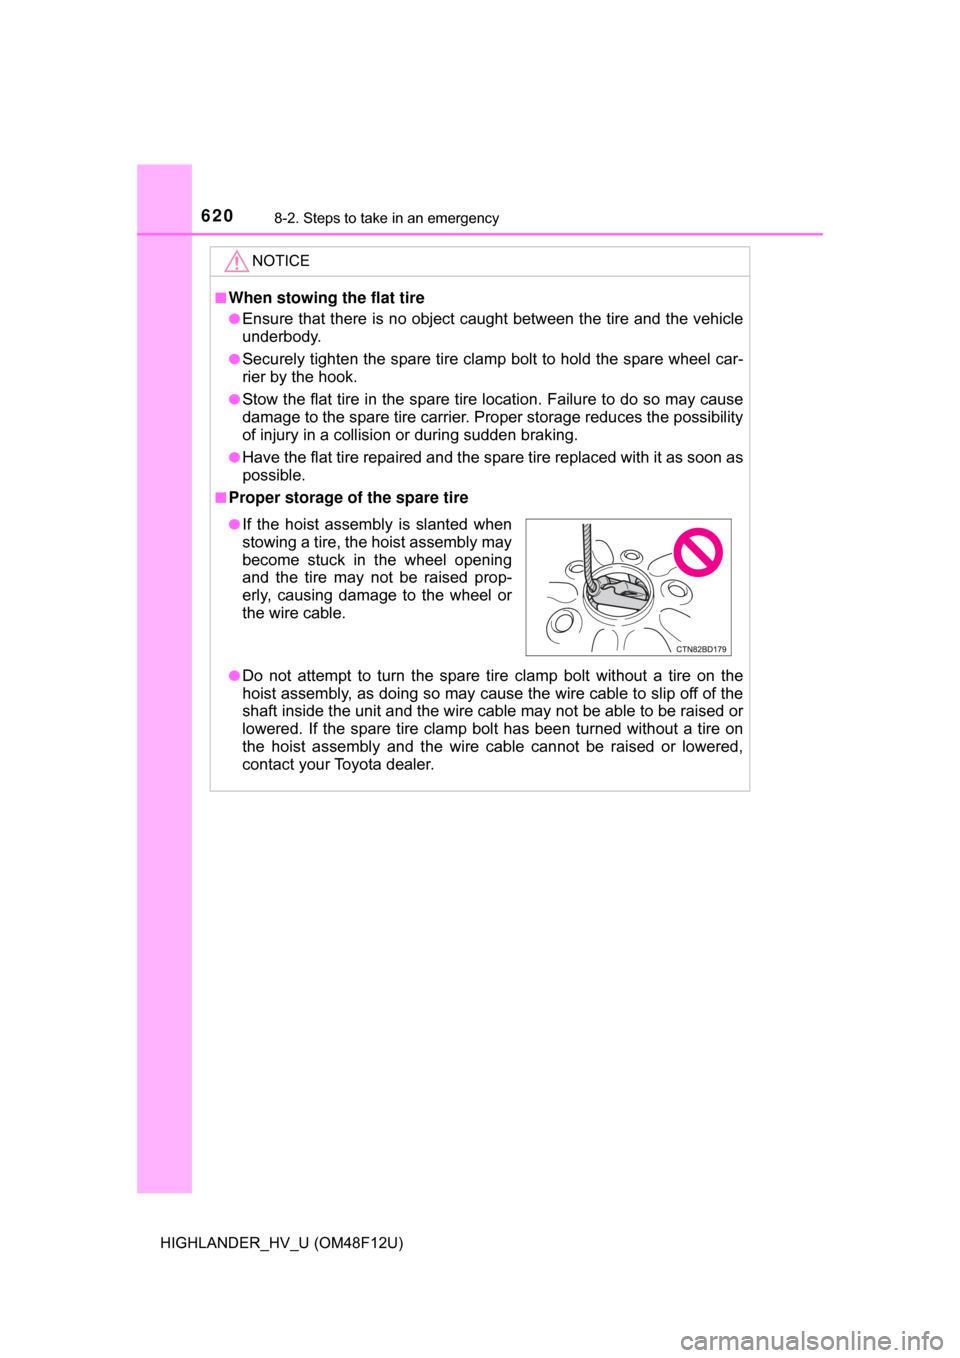
●If the hoist assembly is slanted when
stowing a tire, the hoist assembly may
become stuck in the wheel opening
and the tire may not be raised prop-
erly, causing damage to the wheel or
the wire cable.