key TOYOTA HIGHLANDER HYBRID 2023 Service Manual
[x] Cancel search | Manufacturer: TOYOTA, Model Year: 2023, Model line: HIGHLANDER HYBRID, Model: TOYOTA HIGHLANDER HYBRID 2023Pages: 572, PDF Size: 14.07 MB
Page 224 of 572
2244-3. Operating the lights and wipers
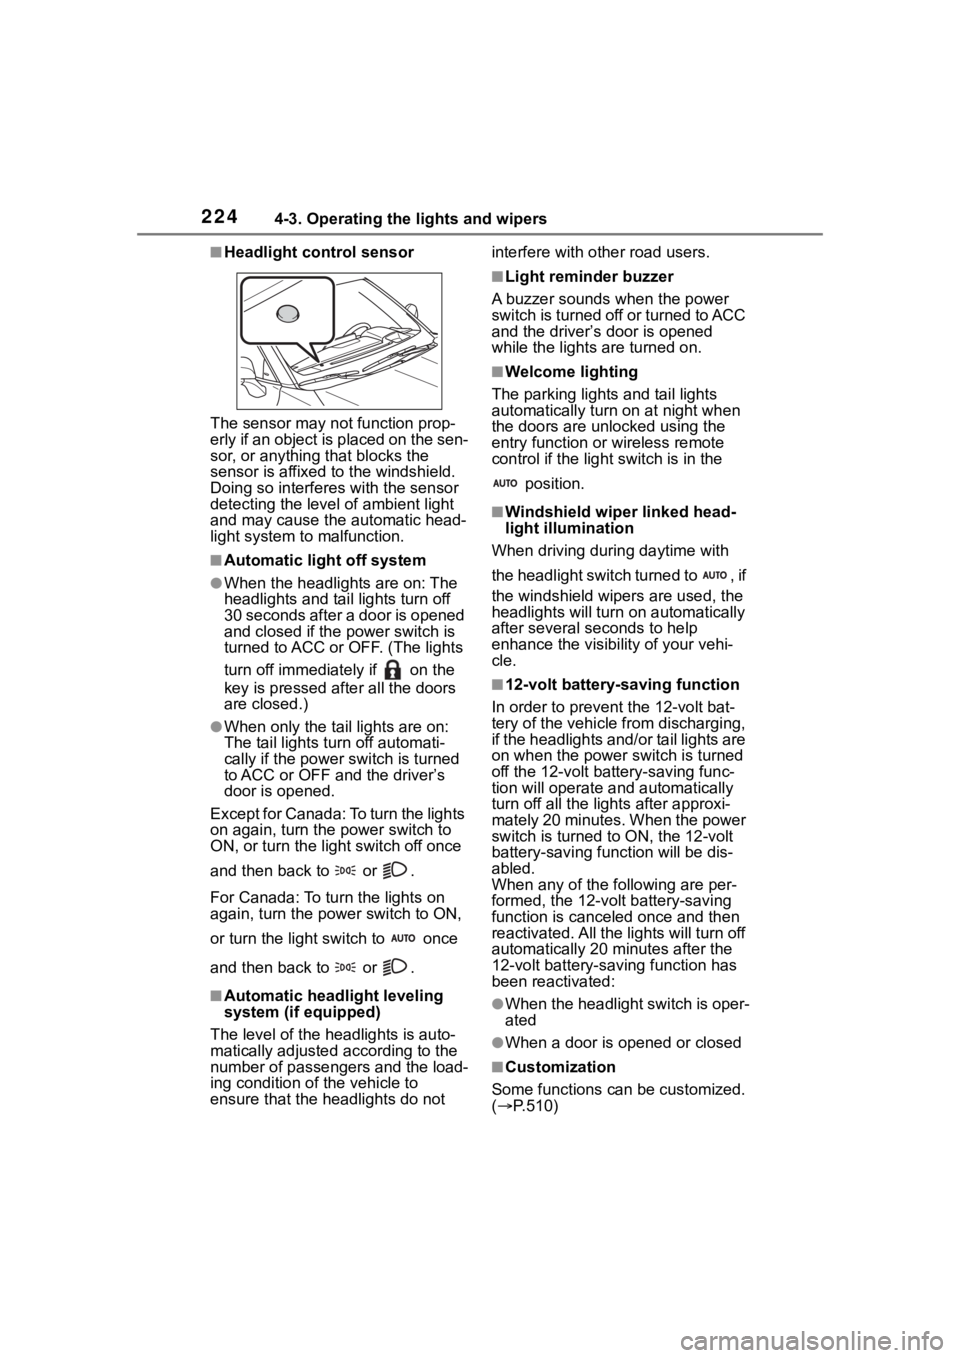
■Headlight control sensor
The sensor may not function prop-
erly if an object is placed on the sen-
sor, or anything that blocks the
sensor is affixed to the windshield.
Doing so interfere s with the sensor
detecting the level of ambient light
and may cause the automatic head-
light system to malfunction.
■Automatic light off system
●When the headlights are on: The
headlights and tail lights turn off
30 seconds after a door is opened
and closed if the power switch is
turned to ACC or OFF. (The lights
turn off immediately if on the
key is pressed afte r all the doors
are closed.)
●When only the tail lights are on:
The tail lights tu rn off automati-
cally if the power switch is turned
to ACC or OFF an d the driver’s
door is opened.
Except for Canada: To turn the lights
on again, turn the power switch to
ON, or turn the light switch off once
and then back to or .
For Canada: To tu rn the lights on
again, turn the power switch to ON,
or turn the light s witch to once
and then back to or .
■Automatic headlight leveling
system (if equipped)
The level of the headlights is auto-
matically adjusted according to the
number of passengers and the load-
ing condition of the vehicle to
ensure that the headlights do not interfere with o
ther road users.
■Light reminder buzzer
A buzzer sounds when the power
switch is turned off or turned to ACC
and the driver’s door is opened
while the lights are turned on.
■Welcome lighting
The parking lights and tail lights
automatically turn on at night when
the doors are un locked using the
entry function or wireless remote
control if the light switch is in the
position.
■Windshield wiper linked head-
light illumination
When driving during daytime with
the headlight switch turned to , if
the windshield wipers are used, the
headlights will turn o n automatically
after several se conds to help
enhance the visibility of your vehi-
cle.
■12-volt battery-saving function
In order to prevent the 12-volt bat-
tery of the vehicle from discharging,
if the headlights and/or tail lights are
on when the power switch is turned
off the 12-volt battery-saving func-
tion will operate and automatically
turn off all the lig hts after approxi-
mately 20 minutes. When the power
switch is turned to ON, the 12-volt
battery-saving function will be dis-
abled.
When any of the following are per-
formed, the 12-volt battery-saving
function is canceled once and then
reactivated. All the lights will turn off
automatically 20 mi nutes after the
12-volt battery-saving function has
been reactivated:
●When the headlight switch is oper-
ated
●When a door is opened or closed
■Customization
Some functions can be customized.
( P.510)
Page 344 of 572
3445-2. Using the interior lights
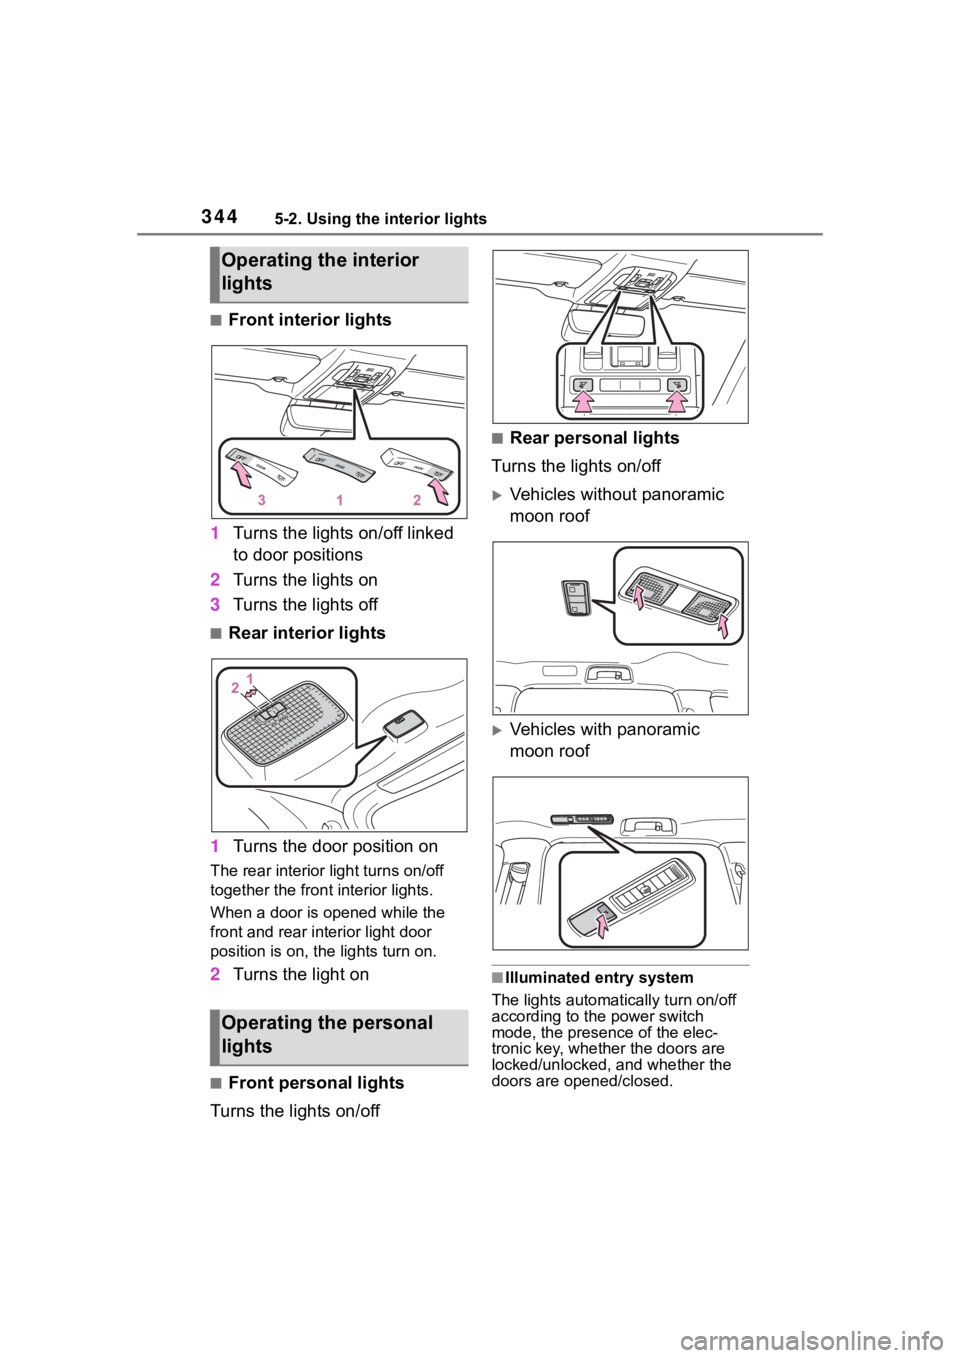
■Front interior lights
1 Turns the lights on/off linked
to door positions
2 Turns the lights on
3 Turns the lights off
■Rear interior lights
1 Turns the door position on
The rear interior light turns on/off
together the front interior lights.
When a door is opened while the
front and rear interior light door
position is on, the lights turn on.
2Turns the light on
■Front personal lights
Turns the lights on/off
■Rear personal lights
Turns the lights on/off
Vehicles without panoramic
moon roof
Vehicles with panoramic
moon roof
■Illuminated entry system
The lights automatically turn on/off
according to the power switch
mode, the presence of the elec-
tronic key, whether the doors are
locked/unlocked, and whether the
doors are opened/closed.
Operating the interior
lights
Operating the personal
lights
Page 347 of 572
3475-3. Using the storage features
5
Interior features
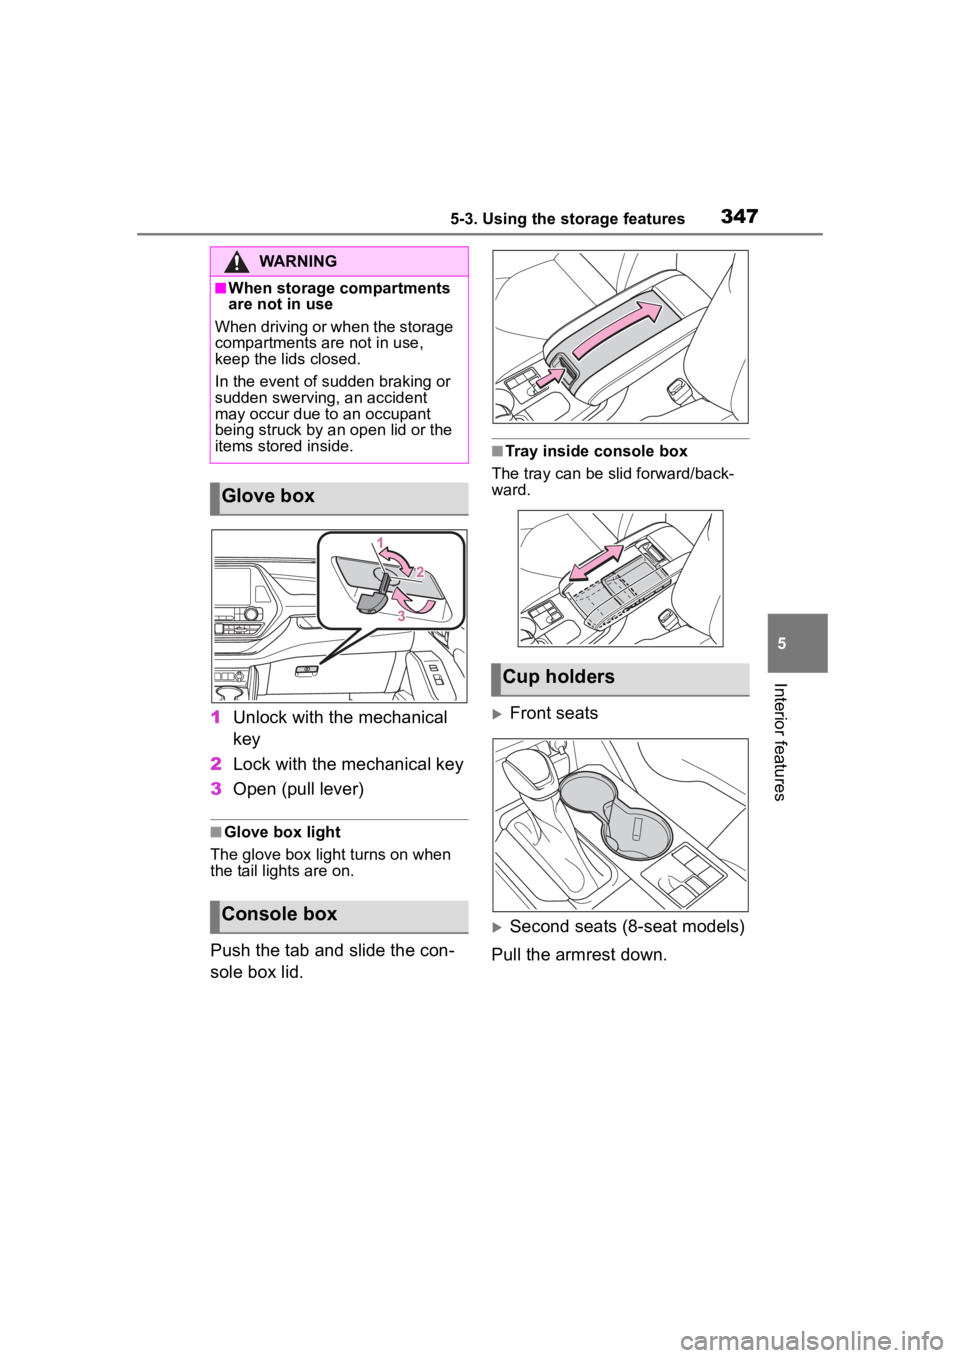
1Unlock with the mechanical
key
2 Lock with the mechanical key
3 Open (pull lever)
■Glove box light
The glove box light turns on when
the tail lights are on.
Push the tab and slide the con-
sole box lid.
■Tray inside console box
The tray can be slid forward/back-
ward.
Front seats
Second seats (8-seat models)
Pull the armrest down.
WARNING
■When storage compartments
are not in use
When driving or when the storage
compartments are not in use,
keep the lids closed.
In the event of sudden braking or
sudden swerving, an accident
may occur due to an occupant
being struck by an open lid or the
items stored inside.
Glove box
Console box
Cup holders
Page 358 of 572
3585-4. Using the other interior features
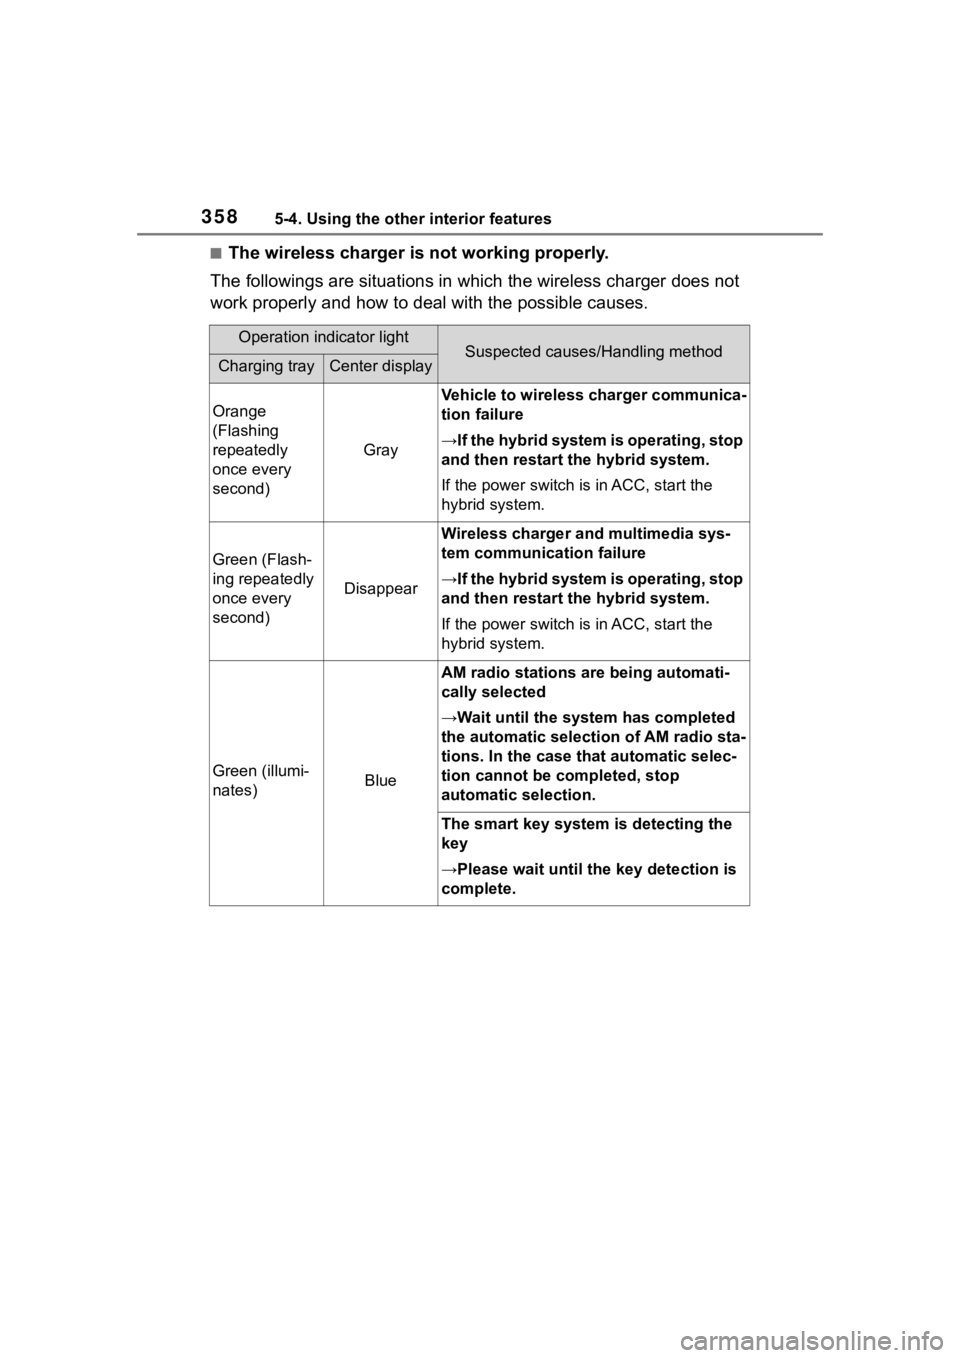
■The wireless charger is not working properly.
The followings are situations in which the wireless charger doe s not
work properly and how to deal with the possible causes.
Operation indicator lightSuspected causes/Handling methodCharging trayCenter display
Orange
(Flashing
repeatedly
once every
second)
Gray
Vehicle to wireless charger communica-
tion failure
→If the hybrid system is operating, stop
and then restart the hybrid system.
If the power switch is in ACC, start the
hybrid system.
Green (Flash-
ing repeatedly
once every
second)
Disappear
Wireless charger and multimedia sys-
tem communica tion failure
→If the hybrid system is operating, stop
and then restart the hybrid system.
If the power switch is in ACC, start the
hybrid system.
Green (illumi-
nates)Blue
AM radio stations are being automati-
cally selected
→Wait until the sys tem has completed
the automatic select ion of AM radio sta-
tions. In the case that automatic selec-
tion cannot be completed, stop
automatic selection.
The smart key system is detecting the
key
→Please wait until the key detection is
complete.
Page 360 of 572
3605-4. Using the other interior features
does not charge, remove the cover
and/or accessories.
■AM radio cooperation function
during charging
●When noise enters the AM radio
during charging, charging fre-
quency will be automatically
changed to reduce noise.
●While the AM radio automatic tun-
ing, charging is temporarily
stopped in order to prevent tuning
error due to noise caused by
charging. When tuning is finished,
charging will be automatically
resumed.
■Charging precautions
●If the electronic key cannot be
detected in the cabin, charging
cannot be performed. When a
door is opened and closed,
charging may be temporarily sus-
pended.
●While charging, the wireless char-
ger and the portable device will
become warm. This is not a mal-
function. If a portable device
becomes warm while charging
and charging stops due to the pro-
tection function of the portable
device, wait until the portable
device cools down and charge it
again.
The fan may start operating to
lower the temperature inside the
wireless charger, however this is
not a malfunction.
■Sound generated during opera-
tion
When the power su pply switch is
turned on or while a portable device
is being identified, operation sounds
may be heard. This is not a malfunc-
tion.
■Cleaning the wireless charger
P. 3 8 3
WARNING
■Caution while driving
When charging a portable device,
for safety reasons, the driver
should not operate the main part
of the portable device while driv-
ing.
■Caution while in motion
Do not charge lightweight devices
such as wireless headphones
while in motion. These devices
are very light and may be ejected
from the charging tray, which may
lead to unforeseen accidents.
■Caution regarding interfer-
ence with electronic devices
People with implantable cardiac
pacemakers, cardiac resynchroni-
zation therapy pacemakers or
implantable cardioverter def ibrilla-
tors, as well as any other electri-
cal medical device, should consult
their physician about the usage of
the wireless charger.
■To prevent malfunctions or
burns
Observe the following precau-
tions.
Failure to do so may result in an
equipment failure and damage,
catch fire, burns due to overheat
or electric shock.
●Do not insert any metallic
objects between the charging
area and the portable device
while charging.
●Do not attach a n aluminum
sticker or other metallic objects
to the charge area.
●Do not attach a n aluminum
sticker or other metallic objects
to the side of the portable
device (or to its case or cover)
that touches the charge area.
Page 362 of 572
3625-4. Using the other interior features
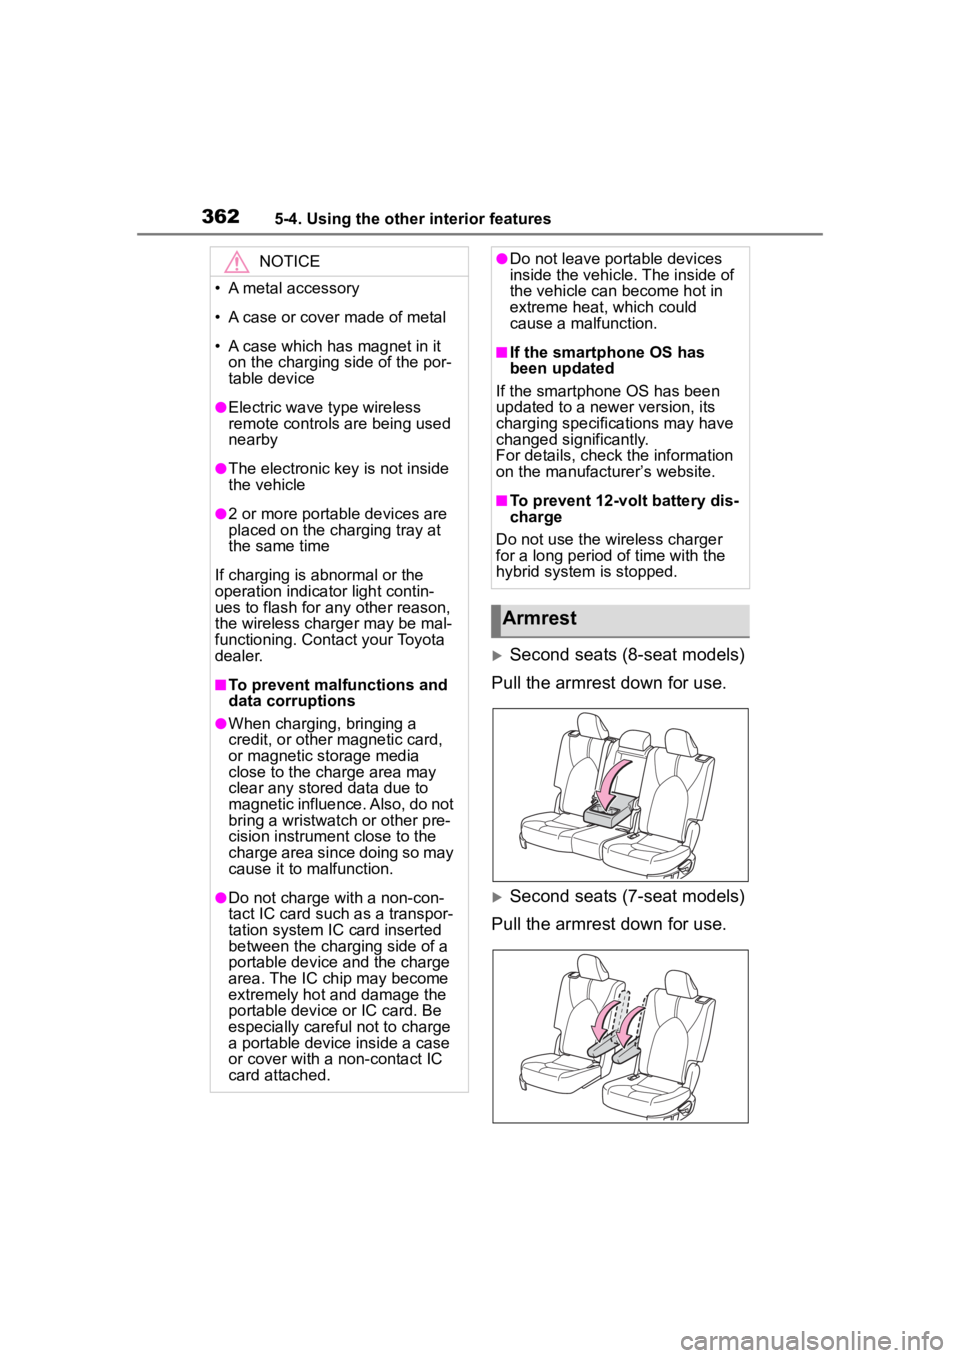
Second seats (8-seat models)
Pull the armrest down for use.
Second seats (7-seat models)
Pull the armrest down for use.
NOTICE
• A metal accessory
• A case or cover made of metal
• A case which ha s magnet in it
on the charging side of the por-
table device
●Electric wave type wireless
remote controls are being used
nearby
●The electronic key is not inside
the vehicle
●2 or more portable devices are
placed on the charging tray at
the same time
If charging is abnormal or the
operation indicator light contin-
ues to flash for any other reason,
the wireless charger may be mal-
functioning. Contact your Toyota
dealer.
■To prevent malfunctions and
data corruptions
●When charging, bringing a
credit, or other magnetic card,
or magnetic storage media
close to the charge area may
clear any stored data due to
magnetic influence. Also, do not
bring a wristwatch or other pre-
cision instrument close to the
charge area since doing so may
cause it to malfunction.
●Do not charge with a non-con-
tact IC card such as a transpor-
tation system IC card inserted
between the charging side of a
portable device and the charge
area. The IC chip may become
extremely hot and damage the
portable device or IC card. Be
especially careful not to charge
a portable device inside a case
or cover with a non-contact IC
card attached.
●Do not leave portable devices
inside the vehicle. The inside of
the vehicle can become hot in
extreme heat, which could
cause a malfunction.
■If the smartphone OS has
been updated
If the smartphone OS has been
updated to a newer version, its
charging specifications may have
changed significantly.
For details, check the information
on the manufacturer’s website.
■To prevent 12-volt battery dis-
charge
Do not use the wireless charger
for a long period of time with the
hybrid system is stopped.
Armrest
Page 379 of 572
379
6
6
Maintenance and care
Maintenance and care
.6-1. Maintenance and careCleaning and protecting the vehicle exterior .......... 380
Cleaning and protecting the vehicle interior ........... 383
6-2. Maintenance Maintenance requirements.................................. 386
General maintenance.. 388
Emission inspection and maintenance (I/M) pro-
grams ........................ 390
6-3. Do-it-yourself mainte- nance
Do-it-yourself service pre- cautions ..................... 392
Hood ........................... 394
Positioning a floor jack .................................. 395
Engine compartment ... 396
12-volt battery ............. 402
Tires ............................ 404
Tire inflation pressure.. 415
Wheels ......... ...............417
Air conditioning filter .... 418
Cleaning the hybrid battery (traction battery) air intake
vents.......................... 420
Electronic key battery.. 423
Checking and replacing fuses.......................... 425
Headlight aim .............. 427Light bulbs ...................
428
Page 380 of 572
3806-1. Maintenance and care
6-1.Maintenance and care
Working from top to bottom,
liberally apply water to the
vehicle body, wheel wells and
underside of the vehicle to
remove any dirt and dust.
Wash the vehicle body using
a sponge or soft cloth, such
as a chamois.
For hard-to-remove marks,
use car wash soap and rinse
thoroughly with water.
Wipe away any water.
Wax the vehicle when the
waterproof coating deterio-
rates.
If water does not bead on a clean
surface, apply wax when the vehi-
cle body is cool.
■Automatic car washes
●Before washing the vehicle:
• Fold the mirrors
• Turn off the power back door
Start washing from the front of the
vehicle. Extend the mirrors before
driving.
●Brushes used in automatic car
washes may scratch the vehicle
surface, parts (wheel, etc.) and
harm your vehicle’s paint.
●Rear spoiler may not be washable
in some automatic car washes.
There may also be an increased
risk of damage to vehicle.
■High pressure car washes
As water may enter the cabin, do
not bring the nozzle tip near the
gaps around the doors or perimeter
of the windows, or spray these
areas continuously.
■When using a car wash
If the door handle becomes wet
while the electronic key is within the
effective range, the door may lock
and unlock repeatedly. In that case,
follow the following correction pro-
cedures to wash the vehicle:
●Place the key in a position 6 ft. (2
m) or more separate from the
vehicle while the vehicle is being
washed. (Take care to ensure that
the key is not stolen.)
●Set the electronic key to bat-
tery-saving mode to disable the
smart key system. ( P.143)
■Wheels and wheel ornaments
●Remove any dirt immediately by
using a neutral detergent.
●Wash detergent off with water
immediately after use.
●To protect the paint from damage,
make sure to obs erve the follow-
ing precautions.
• Do not use acidic, alkaline or abrasive detergent
• Do not use hard brushes
• Do not use detergent on the wheels when they are hot, such
as after driving or parking in hot
weather
■Brake pads and calipers
Rust may form if the vehicle is
parked with wet brake pads or disc
rotors, causing them to stick. Before
parking the vehicle after it is
washed, drive slo wly and apply the
brakes several times to dry the
parts.
Cleaning and protect-
ing the vehicle exte-
rior
Perform cleaning in a man-
ner appropriate to each
component and its material.
Cleaning instructions
Page 403 of 572
4036-3. Do-it-yourself maintenance
6
Maintenance and care
■After recharging/reconnecting
the 12-volt battery
The hybrid system may not start.
Follow the procedure below to ini-
tialize the system.
1 Shift the shift lever to P.
2 Open and close any of the doors.
3 Restart the hybrid system.
●Unlocking the doors using the
smart key system may not be pos-
sible immediately after reconnect-
ing the 12-volt battery. If this
happens, use the wireless remote
control or the mechanical key to
lock/unlock the doors.
●Start the hybrid system with the
power switch in ACC. The hybrid
system may not start with the
power switch turned off. However,
the hybrid system will operate nor-
mally from the second attempt.
●The power switch mode is
recorded by the vehicle. If the
12-volt battery is reconnected, the
vehicle will return the power
switch mode to the status it was in
before the 12-volt battery was dis-
connected. Make sure to turn off
the power before disconnect the
12-volt battery. Take extra care
when connecting the 12-volt bat-
tery if the power switch mode prior
to discharge is unknown.
If the system will not start even after
multiple attempts at all the methods
above, contact your Toyota dealer.
WARNING
■Chemicals in the 12-volt bat-
tery
The 12-volt battery contains poi-
sonous and corrosi ve sulfuric acid
and may produce hydrogen gas
which is flammable and explosive.
To reduce the risk of death or seri-
ous injury, take th e following pre-
cautions while working on or near
the 12-volt battery:
●Do not cause sparks by touch-
ing the 12-volt battery terminals
with tools.
●Do not smoke or light a match
near the 12-volt battery.
●Avoid contact with eyes, skin
and clothes.
●Never inhale or swallow electro-
lyte.
●Wear protective safety glasses
when working near the 12-volt
battery.
●Keep children away from the
12-volt battery.
■Where to safely charge the
12-volt battery
Always charge the 12-volt battery
in an open area. Do not charge
the 12-volt battery in a garage or
closed room where there is insuf-
ficient ventilation.
■How to recharge the 12-volt
battery
Only perform a s low charge (5 A
or less). The 12-volt battery may
explode if charg ed at a quicker
rate.
■Emergency measures regard-
ing electrolyte
●If electrolyte gets in your eyes
Flush your eyes with clean
water for at least 15 minutes
and get immediate medical
attention. If possible, continue
to apply water with a sponge or
cloth while traveling to the near-
est medical facility.
●If electrolyte gets on your skin
Wash the affected area thor-
oughly. If you feel pain or burn-
ing, get medical attention
immediately.
Page 423 of 572
4236-3. Do-it-yourself maintenance
6
Maintenance and care
■If the electronic key battery is
depleted
The following symptoms may occur:
●The smart key system and wire-
less remote contr ol will not func-
tion properly.
●The operational range will be
reduced.
Flathead screwdriver
Small flathead screwdriver
Lithium battery CR2032
■Use a CR2032 lithium battery
●Batteries can be purchased at
your Toyota dealer, local electrical
appliance shops or camera stores.
●Replace only with the same or
equivalent type recommended by
the manufacturer.
●Dispose of used ba tteries accord-
ing to the local laws.
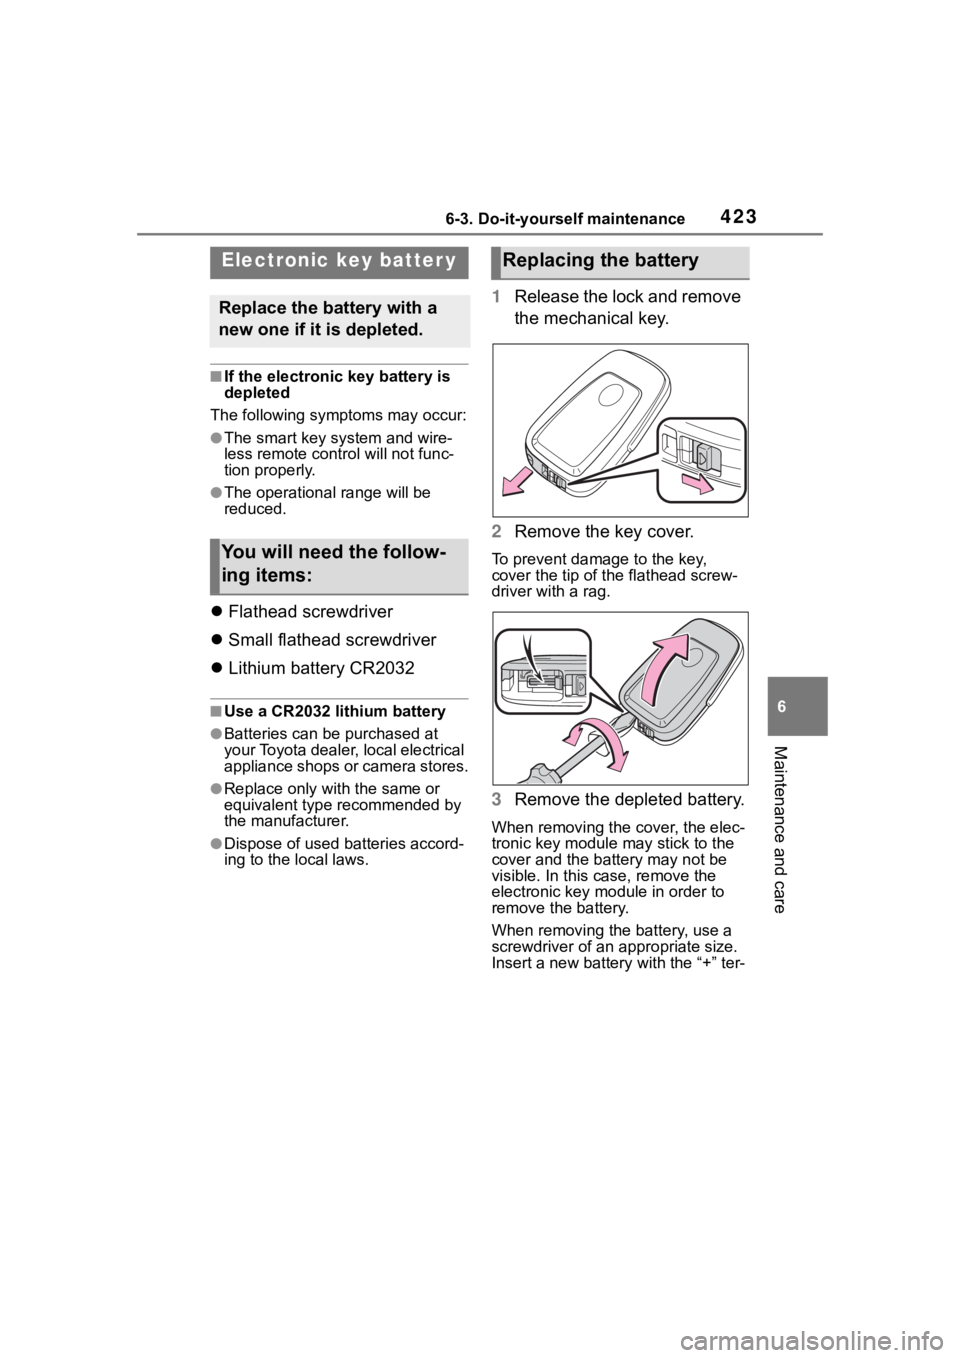
1 Release the lock and remove
the mechanical key.
2 Remove the key cover.
To prevent damage to the key,
cover the tip of the flathead screw-
driver with a rag.
3Remove the depleted battery.
When removing the cover, the elec-
tronic key module may stick to the
cover and the batt ery may not be
visible. In this case, remove the
electronic key module in order to
remove the battery.
When removing the battery, use a
screwdriver of an appropriate size.
Insert a new battery with the “+” ter-
Electronic key batter y
Replace the battery with a
new one if it is depleted.
You will need the follow-
ing items:
Replacing the battery