height TOYOTA HIGHLANDER HYBRID 2023 Owners Manual
[x] Cancel search | Manufacturer: TOYOTA, Model Year: 2023, Model line: HIGHLANDER HYBRID, Model: TOYOTA HIGHLANDER HYBRID 2023Pages: 572, PDF Size: 14.07 MB
Page 31 of 572
311-1. For safe use
1
For safety and security
ing and stowing the seat belt.
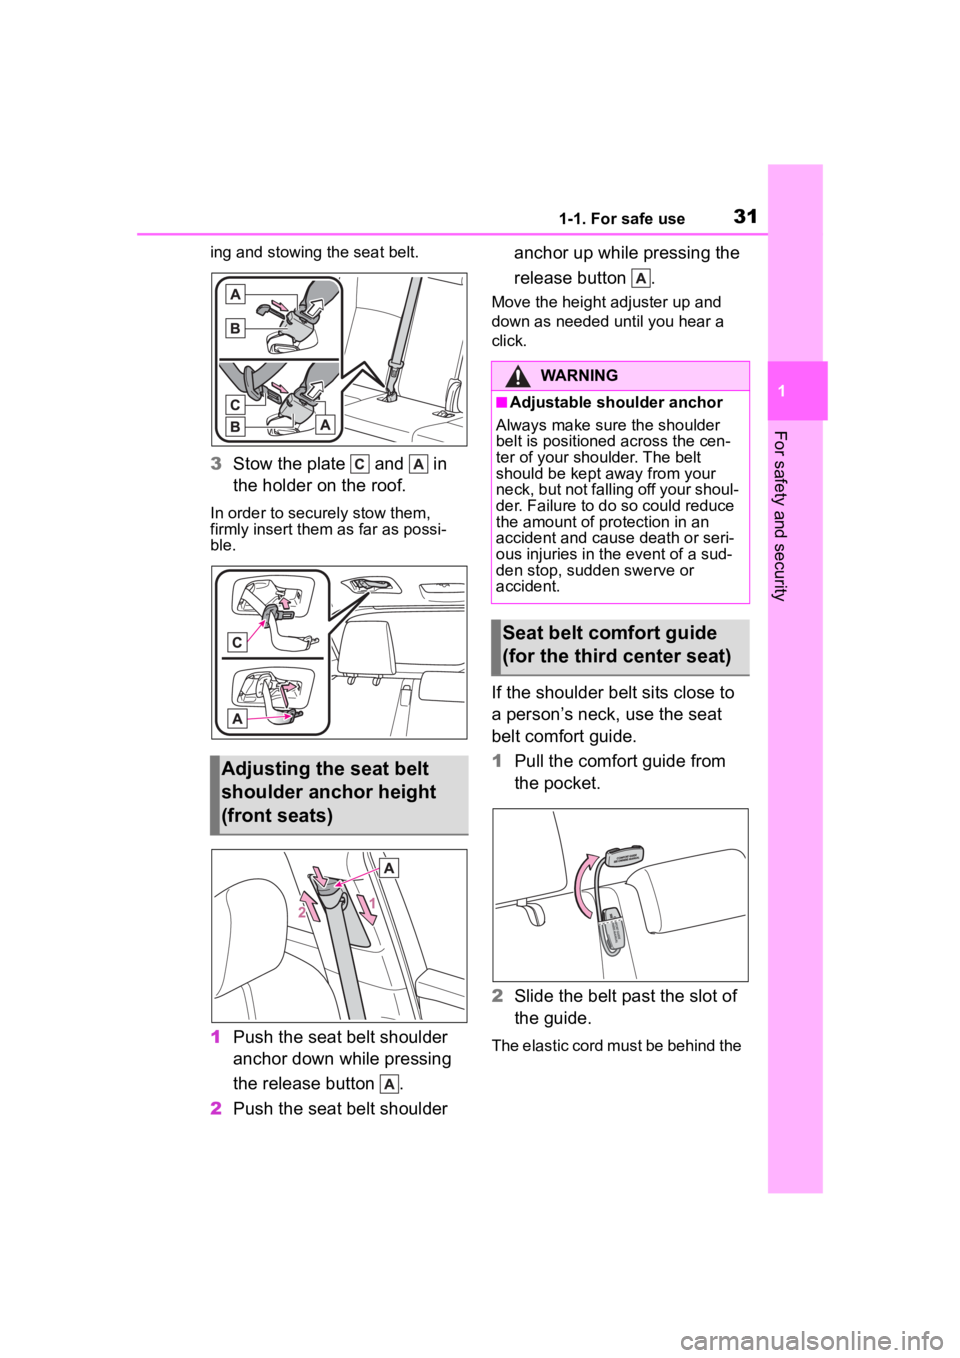
3Stow the plate and in
the holder on the roof.
In order to securely stow them,
firmly insert them as far as possi-
ble.
1Push the seat belt shoulder
anchor down while pressing
the release button .
2 Push the seat belt shoulder anchor up while pressing the
release button .
Move the height adjuster up and
down as needed until you hear a
click.
If the shoulder belt sits close to
a person’s neck, use the seat
belt comfort guide.
1
Pull the comfort guide from
the pocket.
2 Slide the belt past the slot of
the guide.
The elastic cord must be behind the
Adjusting the seat belt
shoulder anchor height
(front seats)
WARNING
■Adjustable shoulder anchor
Always make sure the shoulder
belt is positioned across the cen-
ter of your shoulder. The belt
should be kept away from your
neck, but not falling off your shoul-
der. Failure to do so could reduce
the amount of protection in an
accident and cause death or seri-
ous injuries in the event of a sud-
den stop, sudden swerve or
accident.
Seat belt comfort guide
(for the third center seat)
Page 147 of 572
1473-3. Adjusting the seats
3
Before driving
3-3.Adjusting the seats
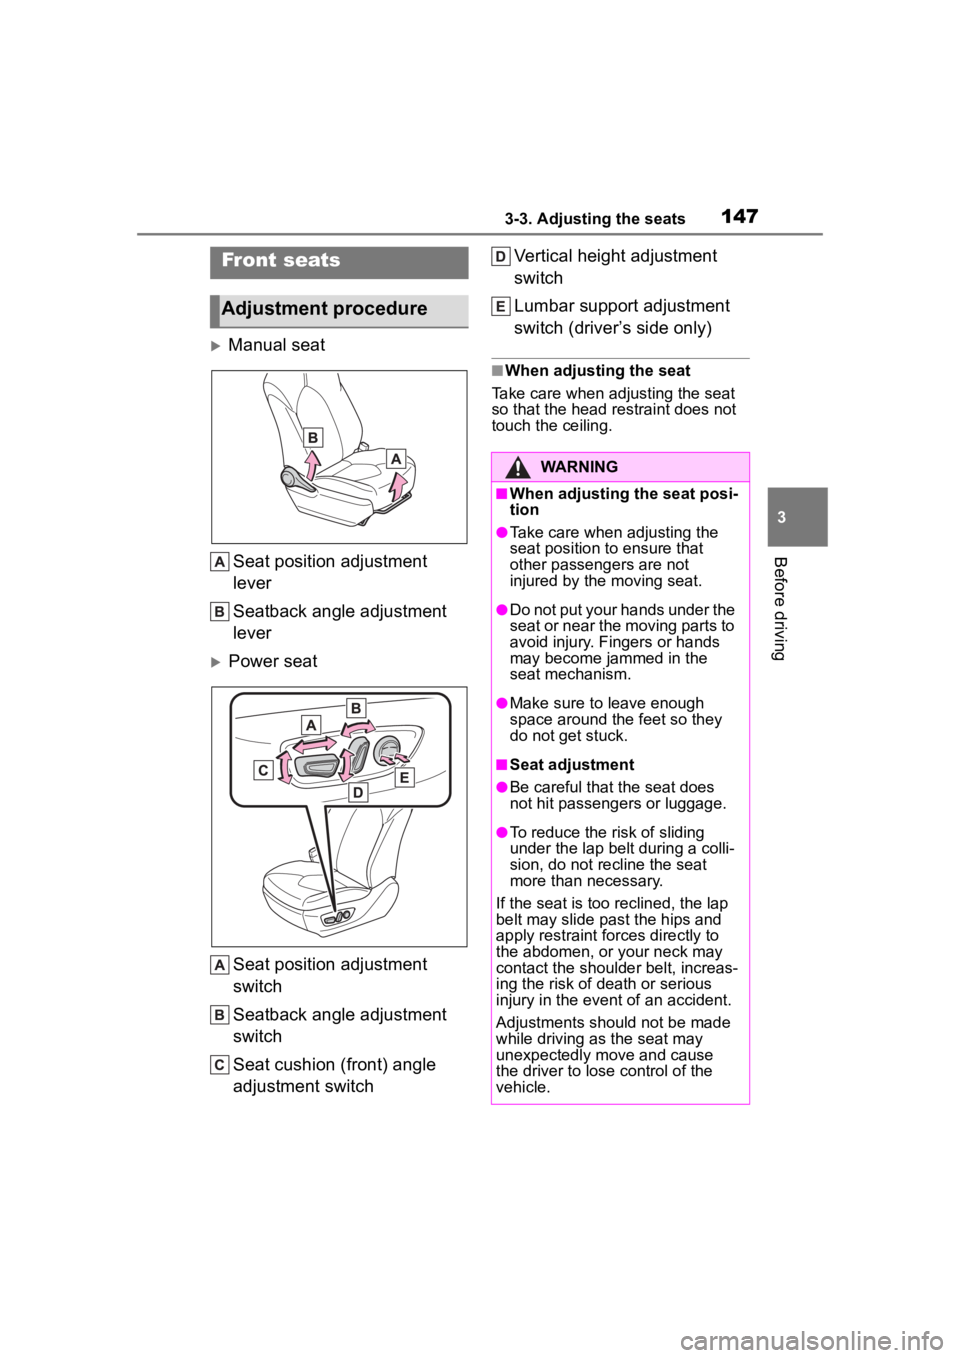
Manual seatSeat position adjustment
lever
Seatback angle adjustment
lever
Power seat
Seat position adjustment
switch
Seatback angle adjustment
switch
Seat cushion (front) angle
adjustment switch Vertical height adjustment
switch
Lumbar support adjustment
switch (driver’s side only)
■When adjusting the seat
Take care when adjusting the seat
so that the head restraint does not
touch the ceiling.
Front seats
Adjustment procedure
WARNING
■When adjusting the seat posi-
tion
●Take care when adjusting the
seat position to ensure that
other passengers are not
injured by the moving seat.
●Do not put your hands under the
seat or near the moving parts to
avoid injury. Fingers or hands
may become jammed in the
seat mechanism.
●Make sure to leave enough
space around the feet so they
do not get stuck.
■Seat adjustment
●Be careful that the seat does
not hit passengers or luggage.
●To reduce the risk of sliding
under the lap bel t during a colli-
sion, do not recline the seat
more than necessary.
If the seat is too reclined, the lap
belt may slide past the hips and
apply restraint for ces directly to
the abdomen, or your neck may
contact the shoulder belt, increas-
ing the risk of death or serious
injury in the event of an accident.
Adjustments should not be made
while driving as the seat may
unexpectedly move and cause
the driver to lose control of the
vehicle.
Page 156 of 572
1563-3. Adjusting the seats
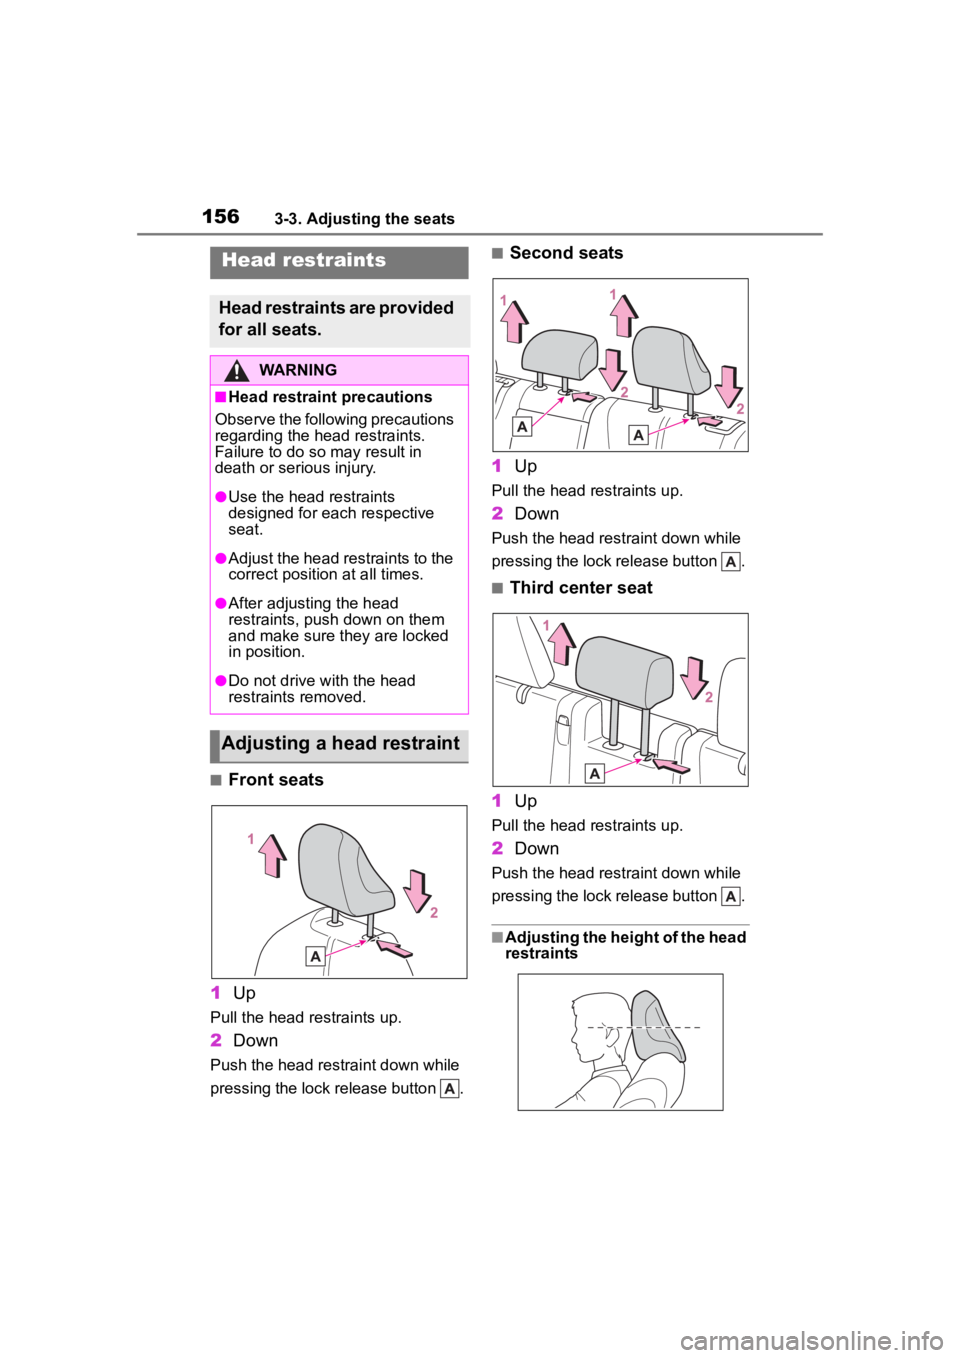
■Front seats
1 Up
Pull the head restraints up.
2Down
Push the head restraint down while
pressing the lock release button .
■Second seats
1 Up
Pull the head restraints up.
2Down
Push the head restraint down while
pressing the lock release button .
■Third center seat
1 Up
Pull the head restraints up.
2Down
Push the head restraint down while
pressing the lock release button .
■Adjusting the height of the head
restraints
Head restraints
Head restraints are provided
for all seats.
WARNING
■Head restraint precautions
Observe the following precautions
regarding the head restraints.
Failure to do so m ay result in
death or serious injury.
●Use the head restraints
designed for each respective
seat.
●Adjust the head restraints to the
correct position at all times.
●After adjusting the head
restraints, push down on them
and make sure they are locked
in position.
●Do not drive with the head
restraints removed.
Adjusting a head restraint
Page 157 of 572

1573-3. Adjusting the seats
3
Before driving
Make sure that the head restraints
are adjusted so that the center of
the head restraint is closest to the
top of your ears.
■Adjusting the third center seat
head restraint
Always raise the head restraint one
level from the stowed position when
using.
■When using the outboard third
seats
If a head restraint is folded forward,
make sure to return it to the upright
position. ( P.152)
Pull the head restraint up while
pressing the lock release button
.
If the head restraint touches the
ceiling, making the removal difficult,
change the seat height or angle.
( P.147, 148)
Front seats
Second seats
Third center seat
Align the head restraint with the
installation holes and push it
down to the lock position.
Press and hold the lock release
button when lowering the
head restraint.
Front seats
Removing the head
restraints
Installing the head
restraints
Page 160 of 572
1603-4. Adjusting the steering wheel and mirrors
*: If equipped
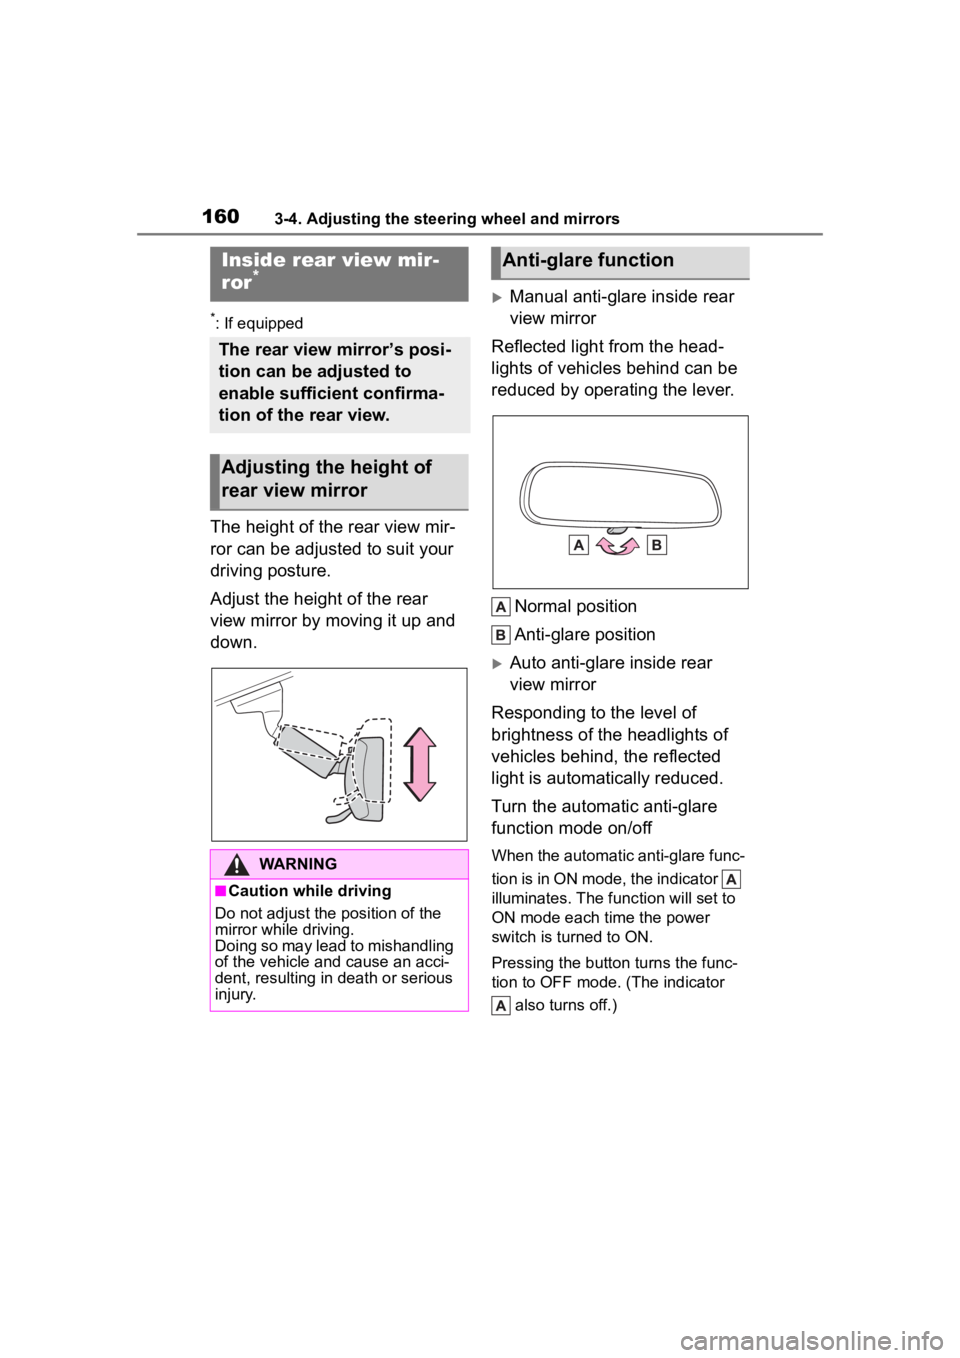
The height of the rear view mir-
ror can be adjusted to suit your
driving posture.
Adjust the height of the rear
view mirror by moving it up and
down.
Manual anti-glare inside rear
view mirror
Reflected light from the head-
lights of vehicles behind can be
reduced by operating the lever.
Normal position
Anti-glare position
Auto anti-glare inside rear
view mirror
Responding to the level of
brightness of the headlights of
vehicles behind, the reflected
light is automatically reduced.
Turn the automatic anti-glare
function mode on/off
When the automatic anti-glare func-
tion is in ON mode, the indicator
illuminates. The func tion will set to
ON mode each time the power
switch is turned to ON.
Pressing the button turns the func-
tion to OFF mode. (The indicator
also turns off.)
Inside rear view mir-
ror*
The rear view mirror’s posi-
tion can be adjusted to
enable sufficient confirma-
tion of the rear view.
Adjusting the height of
rear view mirror
WARNING
■Caution while driving
Do not adjust the position of the
mirror while driving.
Doing so may lead to mishandling
of the vehicle and cause an acci-
dent, resulting in death or serious
injury.
Anti-glare function
Page 163 of 572
1633-4. Adjusting the steering wheel and mirrors
3
Before driving
closed.
●If the display is difficult to see due
to reflected light, close the sun-
shade for the moon roof or the
electronic sunshade for the pan-
oramic moon roof.
●Any of the following conditions
may occur when d riving in the
dark, such as at night. None of
them indicates that a malfunction
has occurred.
• Colors of objects in the displayed image may differ f rom their actual
color.
• Depending on the height of the lights of the vehicle behind, the
area around the vehicle may
appear white and blurry.
• Automatic image adjustment for
brighter surrounding image may
cause flickering.
If it is difficult to see the displayed
image or flickering bothers you,
change to optical mirror mode.
●The Digital Rearview Mirror may
become hot while it is in digital
mirror mode.
This is not a malfunction.
●Depending on your physical con-
dition or age, it may take longer
than usual to focus on the dis-
played image. In this case,
change to optical mirror mode.
●Do not let passengers stare at the
displayed image when the vehicle
is being driven, as doing so may
cause motion sickness.
■When the system malfunctions
If the symbol show n in the illustra-
tion is displayed when using the
Digital Rearview Mirror in digital mir-
ror mode, the system may be mal-
functioning. The symbol will
disappear in a few seconds. Oper-
ate the lever, chang e to optical mir-
ror mode and have the vehicle
inspected by your Toyota dealer.
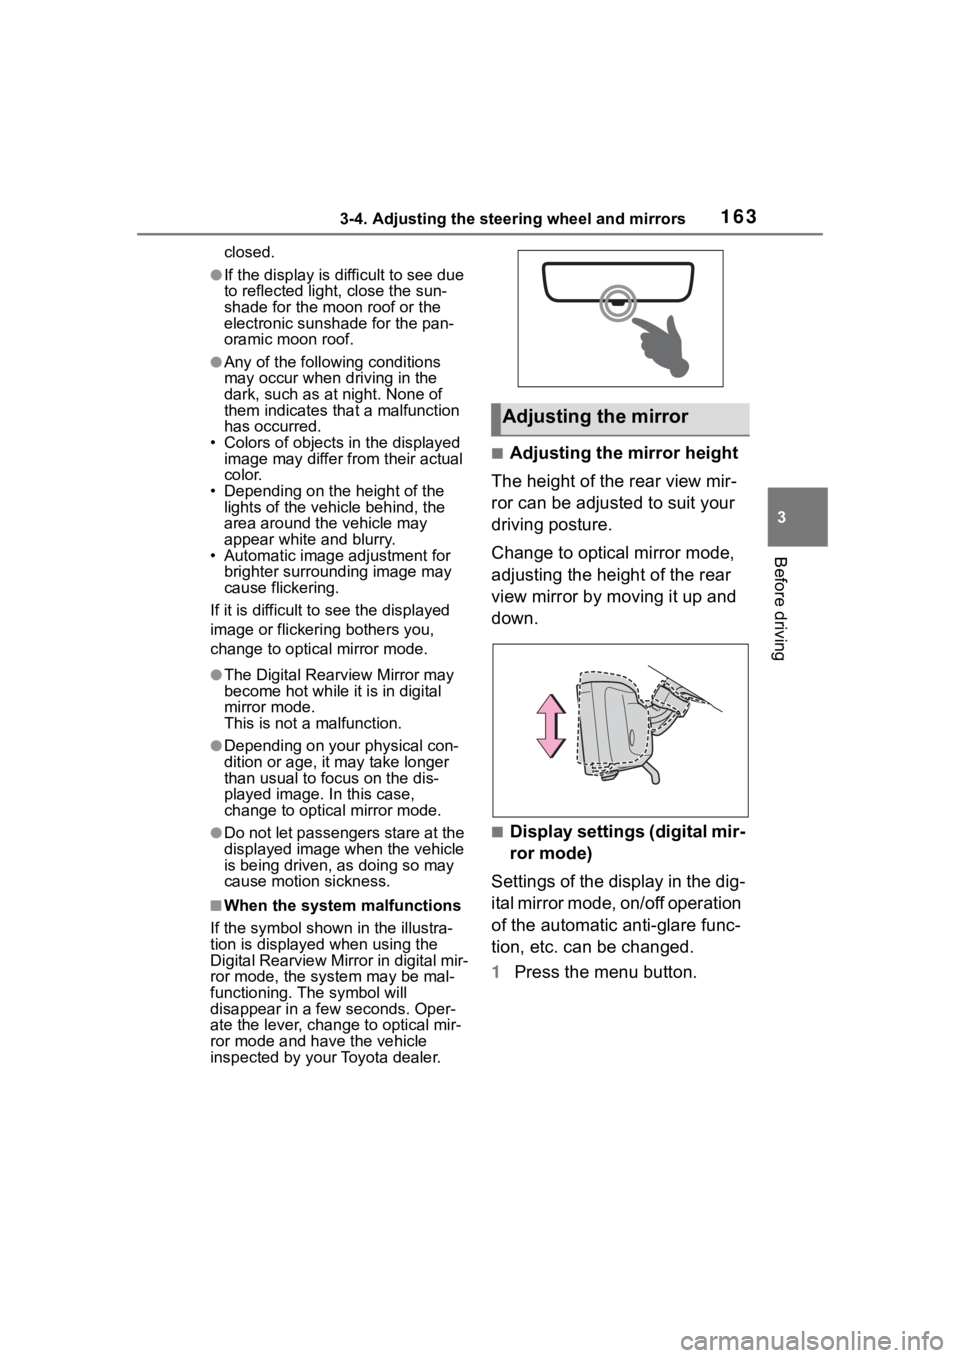
■Adjusting the mirror height
The height of the rear view mir-
ror can be adjusted to suit your
driving posture.
Change to optical mirror mode,
adjusting the height of the rear
view mirror by moving it up and
down.
■Display settings (digital mir-
ror mode)
Settings of the display in the dig-
ital mirror mode, on/off operation
of the automatic anti-glare func-
tion, etc. can be changed.
1 Press the menu button.
Adjusting the mirror
Page 195 of 572
1954-1. Before driving
4
Driving
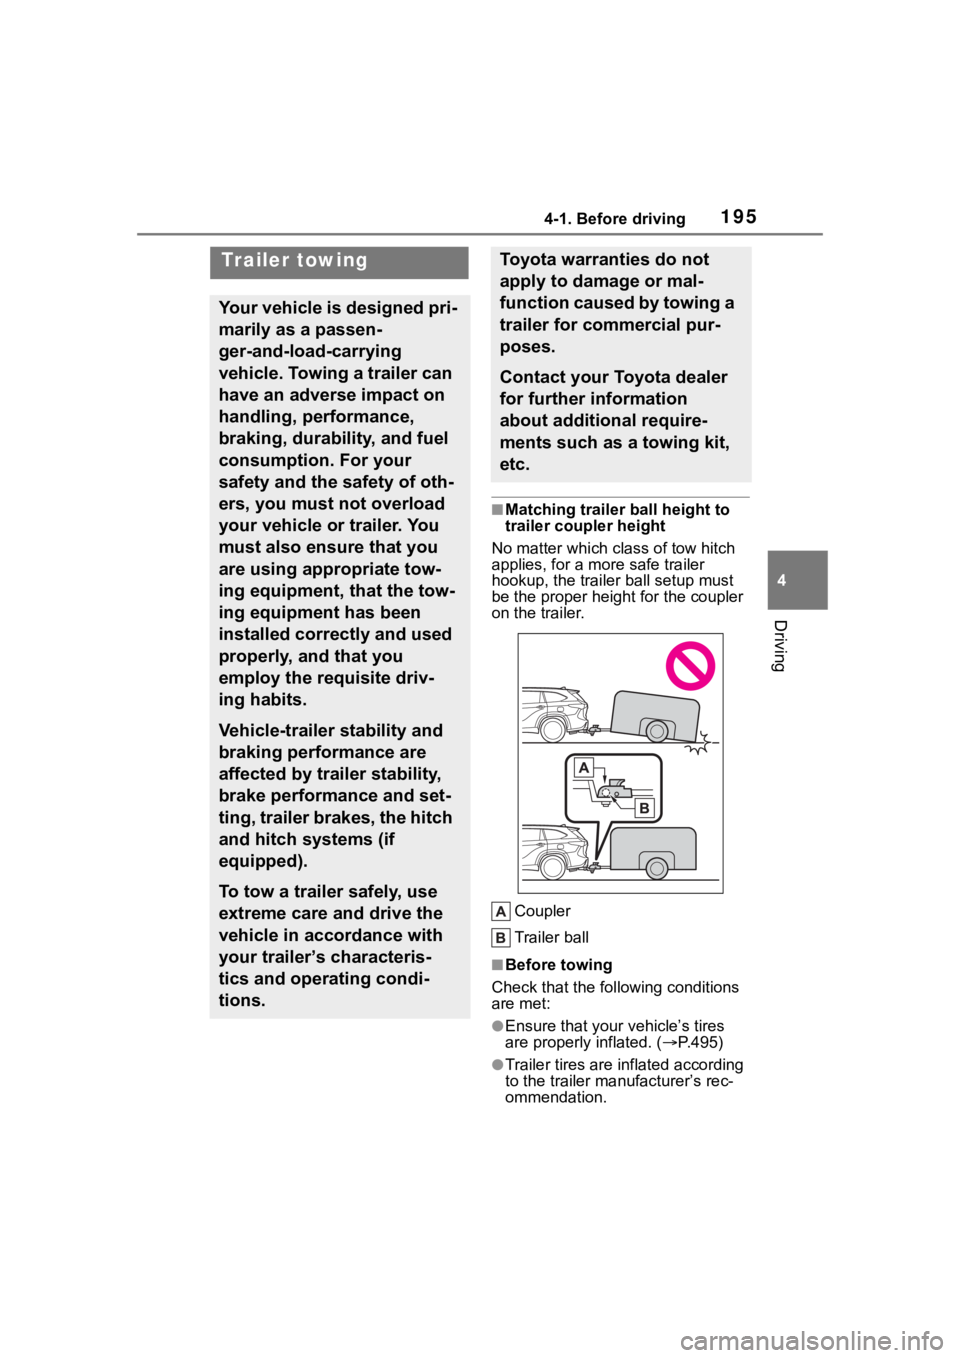
■Matching trailer ball height to
trailer coupler height
No matter wh ich class of tow hitch
applies, for a m ore safe trailer
hookup, the trailer ball setup must
be the proper height for the coupler
on the trailer.
Coupler
Trailer ball
■Before towing
Check that the fo llowing conditions
are met:
●Ensure that your vehicle’s tires
are properly inflated. ( P.495)
●Trailer tires are inflated according
to the trailer manufacturer’s rec-
ommendation.
Trailer towing
Your vehicle is designed pri-
marily as a passen-
ger-and-load-carrying
vehicle. Towing a trailer can
have an adverse impact on
handling, performance,
braking, durability, and fuel
consumption. For your
safety and the safety of oth-
ers, you must not overload
your vehicle or trailer. You
must also ensure that you
are using appropriate tow-
ing equipment, that the tow-
ing equipment has been
installed correctly and used
properly, and that you
employ the requisite driv-
ing habits.
Vehicle-trailer stability and
braking performance are
affected by trailer stability,
brake performance and set-
ting, trailer brakes, the hitch
and hitch systems (if
equipped).
To tow a trailer safely, use
extreme care and drive the
vehicle in accordance with
your trailer’s characteris-
tics and operating condi-
tions.
Toyota warranties do not
apply to damage or mal-
function caused by towing a
trailer for commercial pur-
poses.
Contact your Toyota dealer
for further information
about additional require-
ments such as a towing kit,
etc.
Page 196 of 572

1964-1. Before driving
●All trailer lights work as required
by law.
●All lights work each time you con-
nect them.
●The trailer ball is set at the proper
height for the coupler on the
trailer.
●The trailer is level when it is
hitched.
Do not drive if the trailer is not
level, and check for improper
tongue weight, overloading, worn
suspension, or other possible
causes.
●The trailer cargo is securely
loaded.
●The rear view mirrors conform to
all applicable federal, state/provin-
cial or local regu lations. If they do
not, install rear view mirrors
appropriate for towing purposes.
■Break-in schedule
If your vehicle is new or equipped
with any new power train compo-
nents (such as an engine, hybrid
transmission, rear differential or
wheel bearing), Toyota recommends
that you do not tow a trailer until the
vehicle has been driven for over 500
miles (800 km).
After the vehicle has been driven for
over 500 miles (800 km), you can
start towing. However, for the next
500 miles (800 km), drive the vehi-
cle at a speed of less than 50 mph
(80 km/h) when towing a trailer, and
avoid full throttle acceleration.
■Maintenance
●If you tow a trailer, your vehicle
will require more f requent mainte-
nance due to the additional load.
(See “Scheduled Maintenance
Guide” or “Owner’s Manual Sup-
plement”.)
●Retighten the fixing bolts of the
towing ball and bracket after
approximately 600 miles (1000
km) of trailer towing.
■If trailer sway occurs
One or more factors (crosswinds,
passing vehicles, rough roads, etc.)
can adversely affect handling of
your vehicle and trailer, causing
instability.
●If trailer swaying occurs:
• Firmly grip the steering wheel. Steer straight ahead.
Do not try to contr ol trailer sway-
ing by turning the steering wheel.
• Begin releasing the accelerator pedal immediately but very gradu-
ally to reduce speed.
Do not increase speed. Do not
apply vehicle brakes.
If you make no extreme correction
with the steering or brakes, your
vehicle and trailer should stabilize.
(if enabled, Trailer Sway Control can
also help to stabilize the vehicle and
trailer.)
●After the trailer swaying has
stopped:
• Stop in a safe place. Get all occu- pants out of the vehicle.
• Check the tires of the vehicle and the trailer.
• Check the load in the trailer.
Make sure the load has not
shifted.
Make sure the tongue weight is
appropriate, if possible.
• Check the load in the vehicle. Make sure the vehicle is not over-
loaded after occupants get in.
If you cannot find any problems, the
speed at which trailer swaying
occurred is beyond the limit of your
particular vehicle-trailer combina-
tion. Drive at a lower speed to pre-
vent instability. Remember that
swaying of the towing vehicle-trailer
increases as speed increases.
Page 251 of 572
2514-5. Using the driving support systems
4
Driving
• When part of a detectable object is hidden by an object, such as
large baggage, an umbrella, or
guardrail
• When there are many things which can reflect the radio waves
of the radar in the vicinity (tunnels,
truss bridges, gravel roads, snow
covered road that have tracks,
etc.)
• When there is an effect on the radio waves to the radar that is
installed on another vehicle
• When multiple detectable objects are close together
• If the sun or other light is shining directly on a detectable object
• When a detectable object is a
shade of white and looks
extremely bright
• When a detectable object appears
to be nearly the same color or
brightness as its surroundings
• If a detectable object cuts or sud-
denly emerges in front of your
vehicle
• When the front of your vehicle is
hit by water, snow, dust, etc.
• When a very bright light ahead, such as the sun or the headlights
of oncoming traffic, shines directly
into the front camera
• When approaching the side or
front of a vehicle ahead
• If a vehicle ahead is a motorcycle
• If a vehicle ahead is narrow, such as a personal mobility vehicle
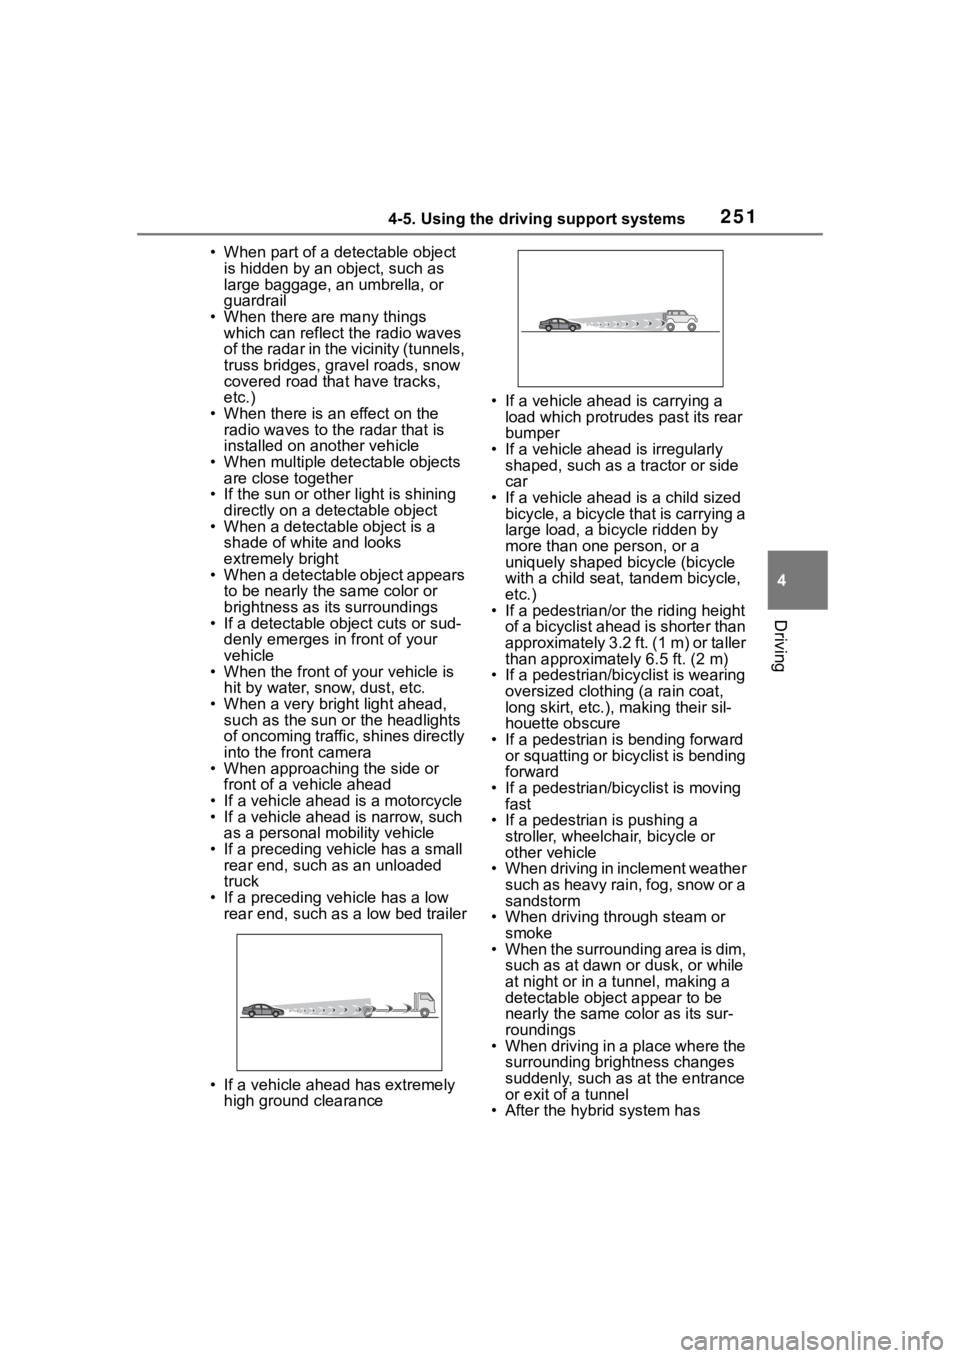
• If a preceding vehicle has a small rear end, such as an unloaded
truck
• If a preceding vehicle has a low rear end, such as a low bed trailer
• If a vehicle ahead has extremely high ground clearance • If a vehicle ahead is carrying a
load which protrudes past its rear
bumper
• If a vehicle ahead is irregularly shaped, such as a tractor or side
car
• If a vehicle ahead is a child sized bicycle, a bicycle that is carrying a
large load, a bicycle ridden by
more than one person, or a
uniquely shaped bicycle (bicycle
with a child seat, tandem bicycle,
etc.)
• If a pedestrian/or the riding height of a bicyclist ahead is shorter than
approximately 3.2 ft. (1 m) or taller
than approximate ly 6.5 ft. (2 m)
• If a pedestrian/bic yclist is wearing
oversized clothing (a rain coat,
long skirt, etc.), making their sil-
houette obscure
• If a pedestrian is bending forward or squatting or bicyclist is bending
forward
• If a pedestrian/bicyclist is moving fast
• If a pedestrian is pushing a
stroller, wheelchair, bicycle or
other vehicle
• When driving in inclement weather
such as heavy rain, fog, snow or a
sandstorm
• When driving through steam or
smoke
• When the surrounding area is dim, such as at dawn or dusk, or while
at night or in a tunnel, making a
detectable object appear to be
nearly the same co lor as its sur-
roundings
• When driving in a place where the surrounding brightness changes
suddenly, such as at the entrance
or exit of a tunnel
• After the hybrid system has
Page 282 of 572

2824-5. Using the driving support systems
from your vehicle*
●Vehicles which are being over-
taken rapidly by your vehicle*
*
: Depending on the conditions, detection of a vehicle and/or
object may occur.
■Conditions under which the
system may not function cor-
rectly
●In the following situations, vehi-
cles may not be detected correctly
(while driving):
• When the sensor is misaligned
due to a strong impact to the sen-
sor or its surrounding area
• When mud, snow, ice, a sticker,
etc. is covering the sensor or sur-
rounding area on the rear bumper
• When driving on a road surface
that is wet with standing water
during bad weather, such as
heavy rain, snow, or fog
• When multiple vehicles are approaching with only a small gap
between each vehicle
• When the distanc e between your
vehicle and a following vehicle is
short
• When there is a significant differ- ence in speed between your vehi-
cle and the vehicle that enters the
detection area
• When the difference in speed between your vehicle and another
vehicle is changing
• When a vehicle enters a detection area traveling at about the same
speed as your vehicle
• As your vehicle starts from a stop, a vehicle remains in the detection
area
• When driving up and down con- secutive steep inclines, such as
hills, dips in the road, etc.
• When driving on roads with sharp bends, consecutive curves, or
uneven surfaces
• When vehicle lanes are wide, or when driving on the edge of a
lane, and the vehicle in an adja-
cent lane is far away from your vehicle
• When an accessory (such as a bicycle carrier) is installed to the
rear of the vehicle
• When there is a significant differ- ence in height between your vehi-
cle and the vehicle that enters the
detection area
• Immediately after the Blind Spot
Monitor is turned on
• When towing with the vehicle●Instances of unnecessary detec-
tion may increase in situations
such as the following (while driv-
ing):
• When the sensor is misaligned due to a strong impact to the sen-
sor or its surrounding area
• When the distance between your vehicle and a guardrail, wall, etc.
that enters the detection area is
short
• When driving up and down con-
secutive steep inclines, such as
hills, dips in the road, etc.
• When vehicle lanes are narrow, or
when driving on the edge of a
lane, and a vehicle traveling in a
lane other than the adjacent lanes
enters the detection area
• When driving on r oads with sharp
bends, consecutive curves, or
uneven surfaces
• When the tires are slipping or spinning
• When the distance between your vehicle and a following vehicle is
short
• When an accessory (such as a bicycle carrier) is installed to the
rear of the vehicle
• When towing with the vehicle