TOYOTA HILUX 2018 Owners Manual
HILUX 2018
TOYOTA
TOYOTA
https://www.carmanualsonline.info/img/14/67058/w960_67058-0.png
TOYOTA HILUX 2018 Owners Manual
Trending: air filter, lights, keyless, oil dipstick, check oil, catalytic converter, roof
Page 221 of 708
2213-3. Adjusting the seats
3
Operation of each component
HILUX_OM_OM0K375E_(EE)
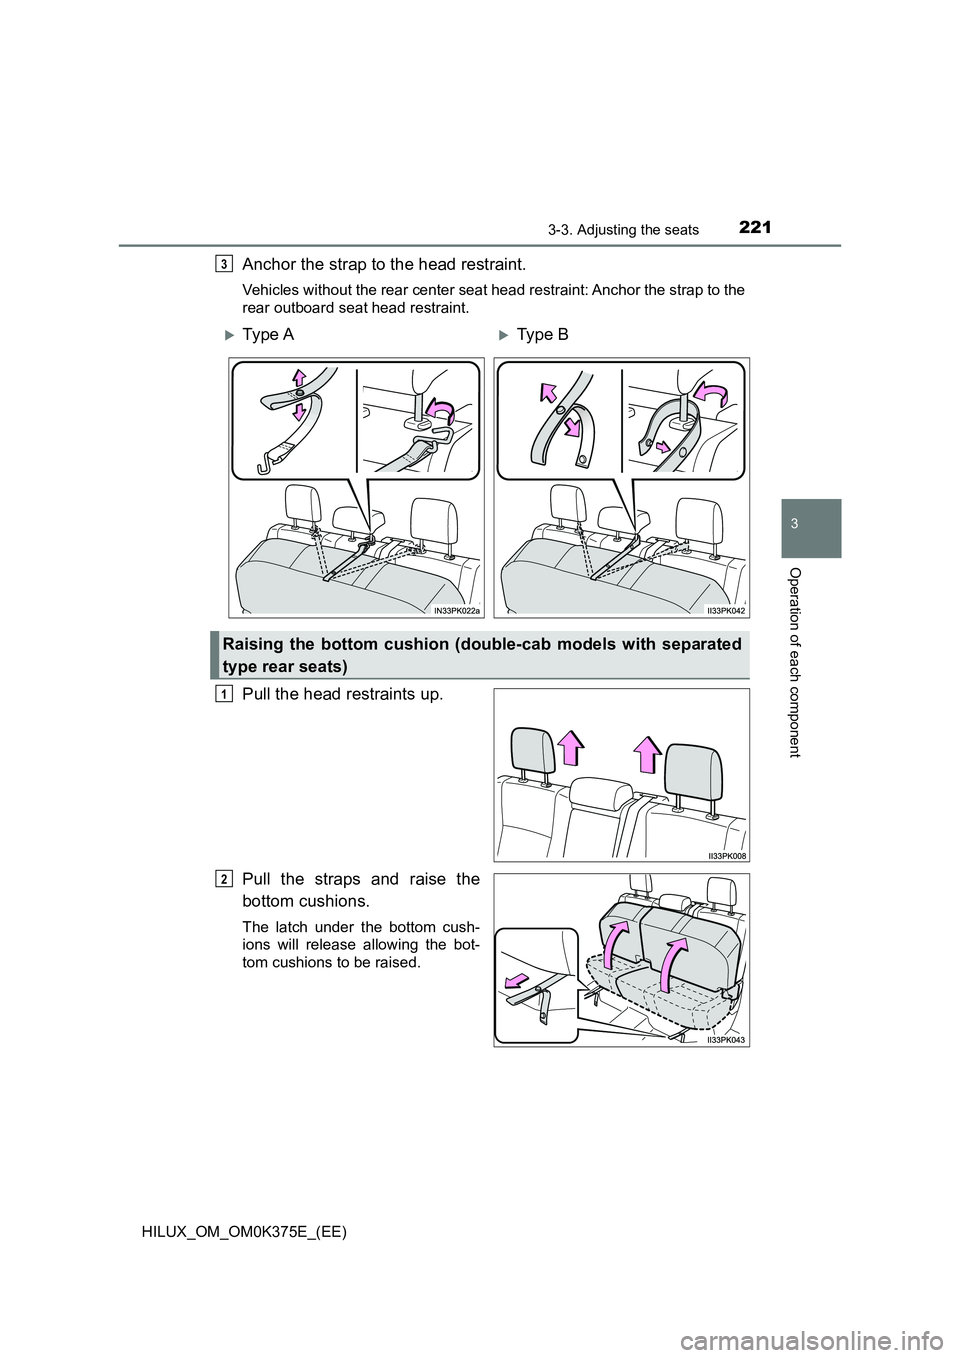
Anchor the strap to the head restraint.
Vehicles without the rear center seat head restraint: Anchor the strap to the
rear outboard seat head restraint.
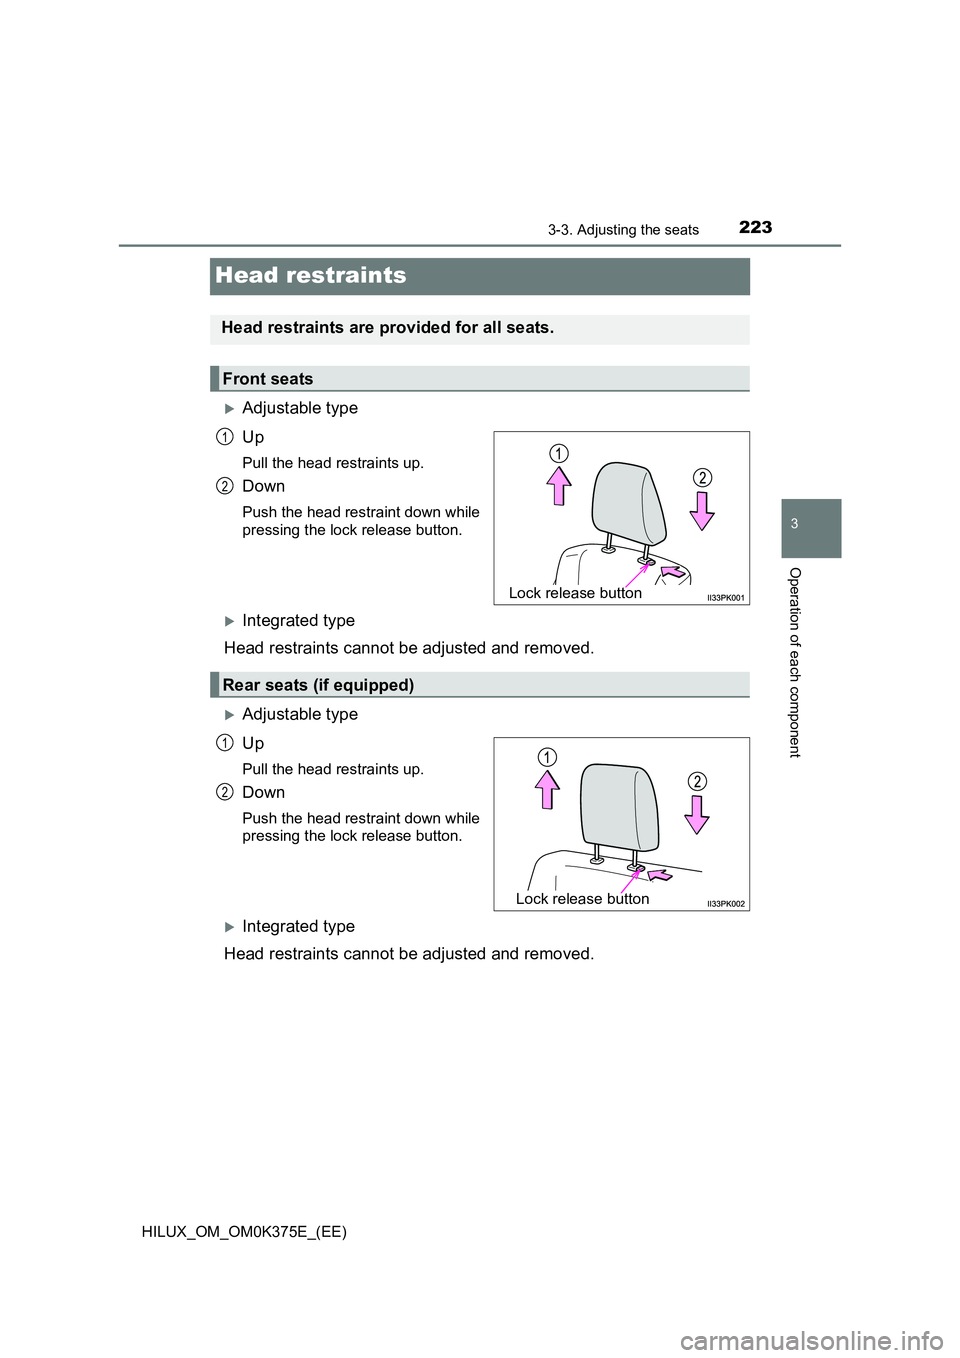
Pull the head restraints up.
Pull the straps and raise the
bottom cushions.
The latch under the bottom cush-
ions will release allowing the bot-
tom cushions to be raised.
3
Ty pe AType B
Raising the bottom cushion (double-cab models with separated
type rear seats)
1
2
Page 222 of 708
2223-3. Adjusting the seats
HILUX_OM_OM0K375E_(EE)
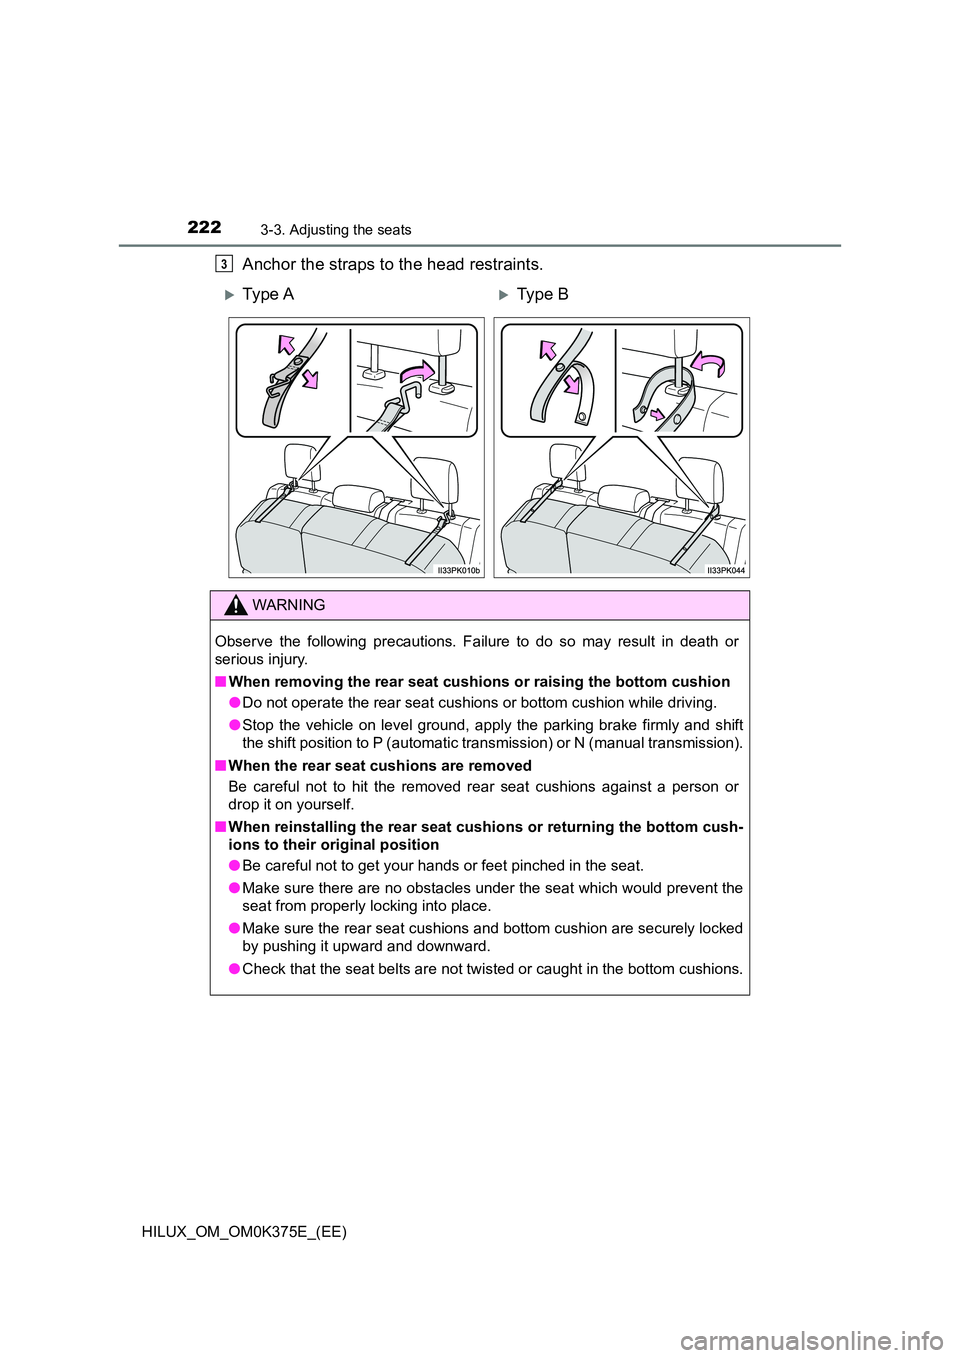
Anchor the straps to the head restraints.3
Ty pe AType B
WARNING
Observe the following precautions. Failure to do so may result in death or
serious injury.
■ When removing the rear seat cushions or raising the bottom cushion
● Do not operate the rear seat cushions or bottom cushion while driving.
● Stop the vehicle on level ground, apply the parking brake firmly and shift
the shift position to P (automatic tr ansmission) or N (manual transmission).
■ When the rear seat cushions are removed
Be careful not to hit the removed rear seat cushions against a person or
drop it on yourself.
■ When reinstalling the rear seat cushions or returning the bottom cush-
ions to their original position
● Be careful not to get your hands or feet pinched in the seat.
● Make sure there are no obstacles under the seat which would prevent the
seat from properly locking into place.
● Make sure the rear seat cushions and bottom cushion are securely locked
by pushing it upward and downward.
● Check that the seat belts are not twisted or caught in the bottom cushions.
Page 223 of 708
223
3
3-3. Adjusting the seats
Operation of each component
HILUX_OM_OM0K375E_(EE)
Head restraints
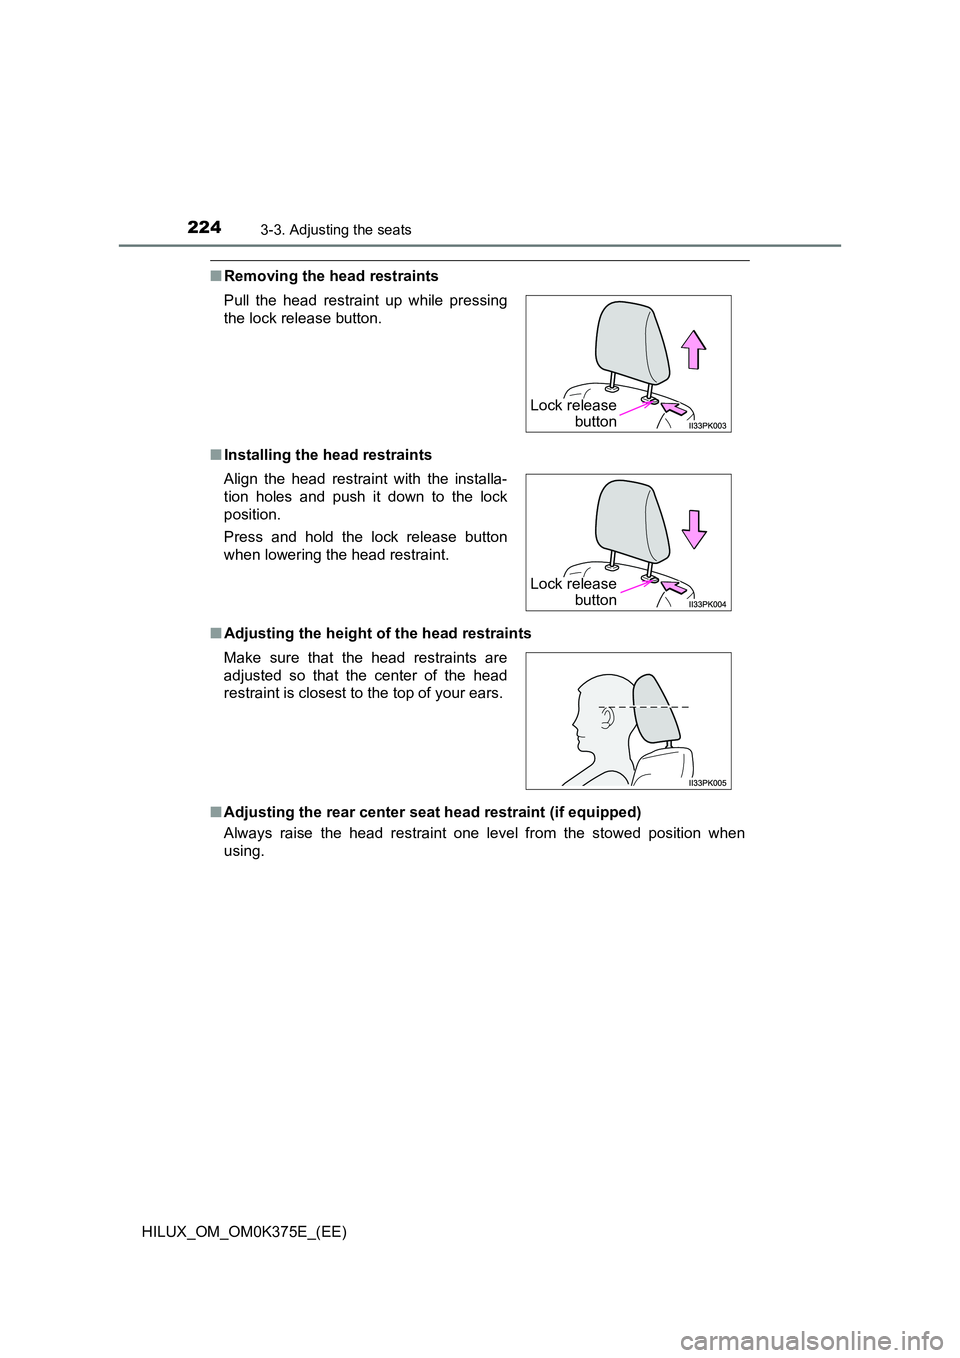
Adjustable type
Up
Pull the head restraints up.
Down
Push the head restraint down while
pressing the lock release button.
Integrated type
Head restraints cannot be adjusted and removed.
Adjustable type
Up
Pull the head restraints up.
Down
Push the head restraint down while
pressing the lock release button.
Integrated type
Head restraints cannot be adjusted and removed.
Head restraints are provided for all seats.
Front seats
Lock release button
1
2
Rear seats (if equipped)
Lock release button
1
2
Page 224 of 708
2243-3. Adjusting the seats
HILUX_OM_OM0K375E_(EE)
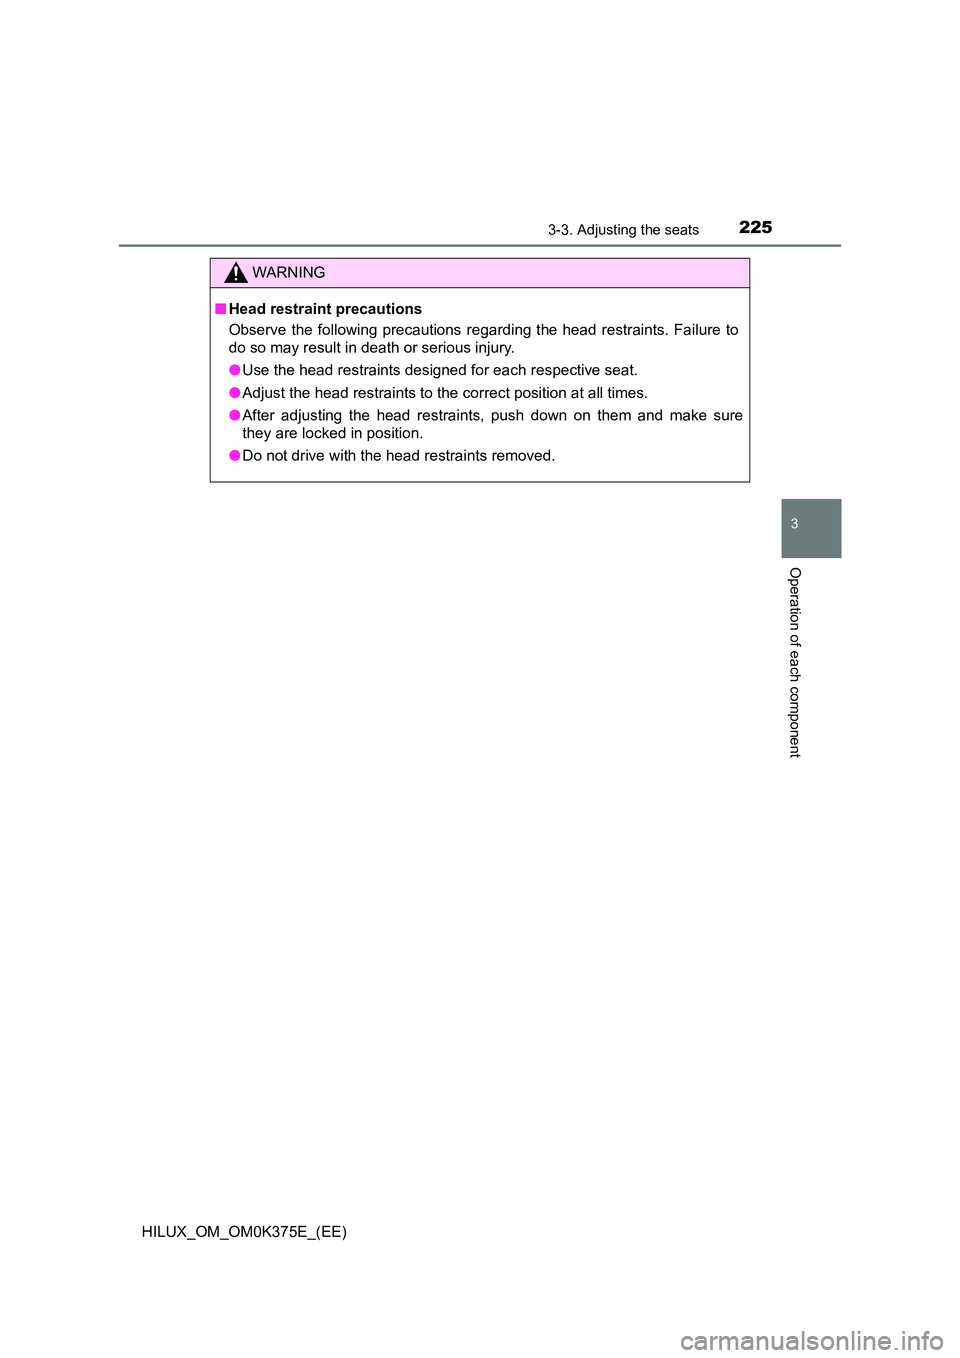
■Removing the head restraints
■ Installing the head restraints
■ Adjusting the height of the head restraints
■ Adjusting the rear center seat head restraint (if equipped)
Always raise the head restraint one level from the stowed position when
using.
Pull the head restraint up while pressing
the lock release button.
Align the head restraint with the installa-
tion holes and push it down to the lock
position.
Press and hold the lock release button
when lowering the head restraint.
Make sure that the head restraints are
adjusted so that the center of the head
restraint is closest to the top of your ears.
Lock release
button
Lock release
button
Page 225 of 708
2253-3. Adjusting the seats
3
Operation of each component
HILUX_OM_OM0K375E_(EE)
WARNING
■Head restraint precautions
Observe the following precautions regarding the head restraints. Failure to
do so may result in death or serious injury.
● Use the head restraints designed for each respective seat.
● Adjust the head restraints to the correct position at all times.
● After adjusting the head restraints, push down on them and make sure
they are locked in position.
● Do not drive with the head restraints removed.
Page 226 of 708
2263-4. Adjusting the steering wheel and mirrors
HILUX_OM_OM0K375E_(EE)
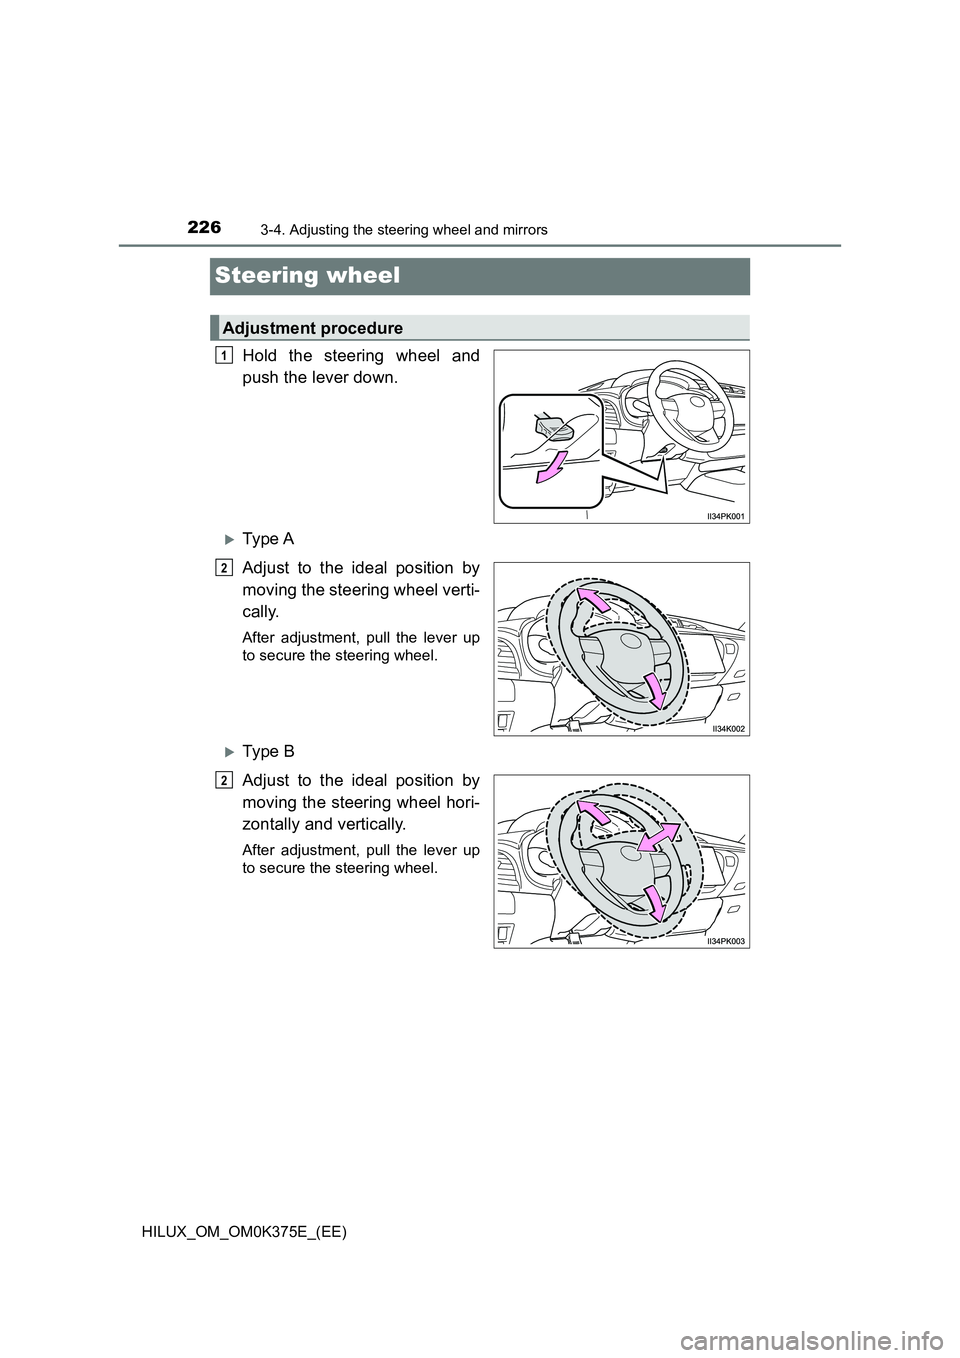
Steering wheel
Hold the steering wheel and
push the lever down.
Ty pe A
Adjust to the ideal position by
moving the steering wheel verti-
cally.
After adjustment, pull the lever up
to secure the steering wheel.
Ty pe B
Adjust to the ideal position by
moving the steering wheel hori-
zontally and vertically.
After adjustment, pull the lever up
to secure the steering wheel.
Adjustment procedure
1
2
2
Page 227 of 708
2273-4. Adjusting the steering wheel and mirrors
3
Operation of each component
HILUX_OM_OM0K375E_(EE)
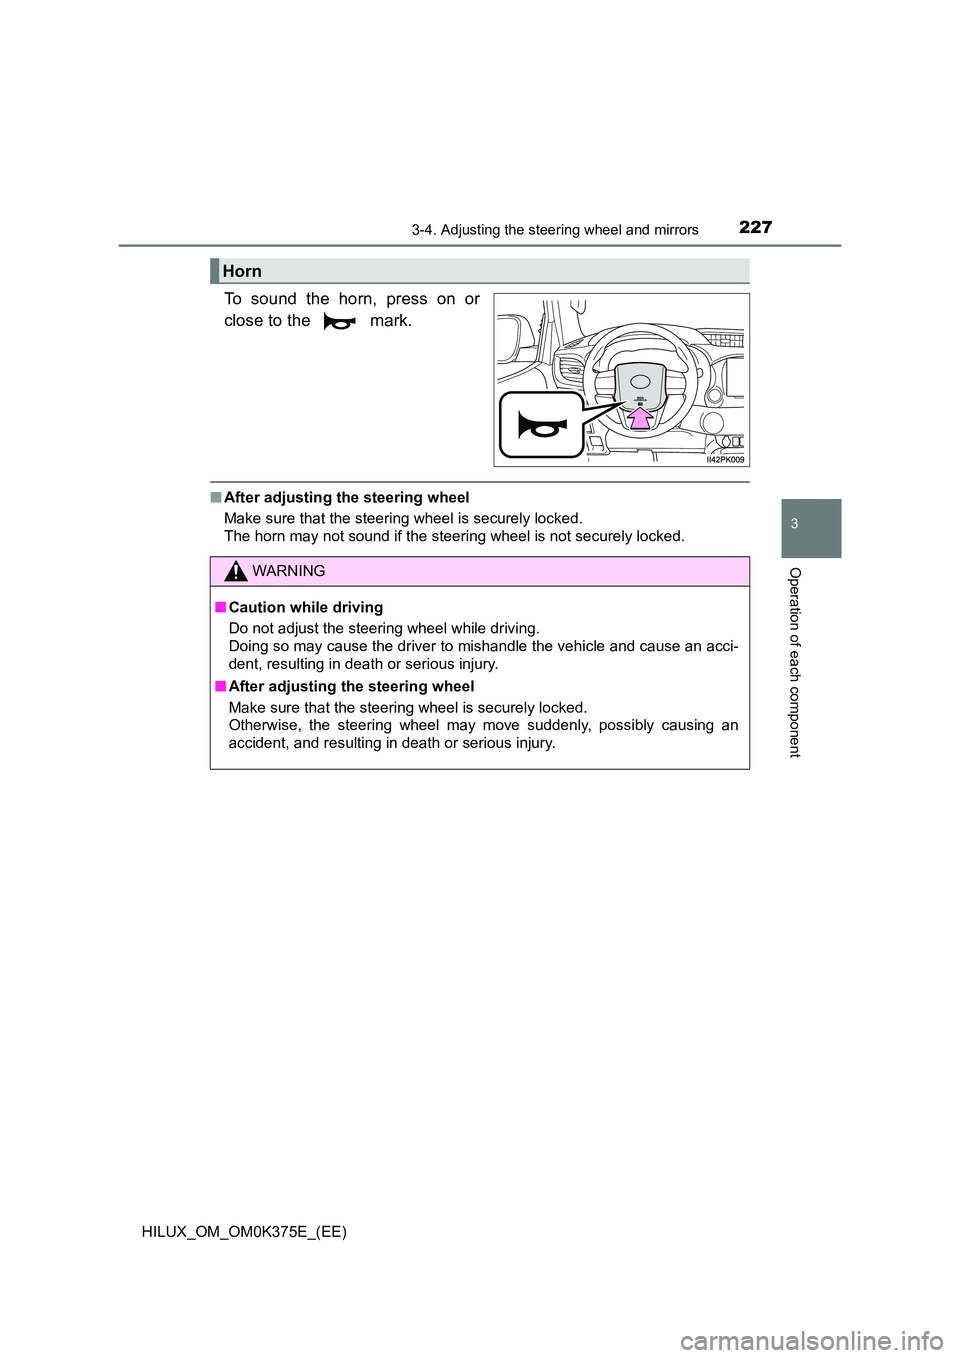
To sound the horn, press on or
close to the mark.
■ After adjusting the steering wheel
Make sure that the steering wheel is securely locked.
The horn may not sound if the steering wheel is not securely locked.
Horn
WARNING
■ Caution while driving
Do not adjust the steering wheel while driving.
Doing so may cause the driver to mishandle the vehicle and cause an acci-
dent, resulting in death or serious injury.
■ After adjusting the steering wheel
Make sure that the steering wheel is securely locked.
Otherwise, the steering wheel may move suddenly, possibly causing an
accident, and resulting in death or serious injury.
Page 228 of 708
2283-4. Adjusting the steering wheel and mirrors
HILUX_OM_OM0K375E_(EE)
Inside rear view mirror
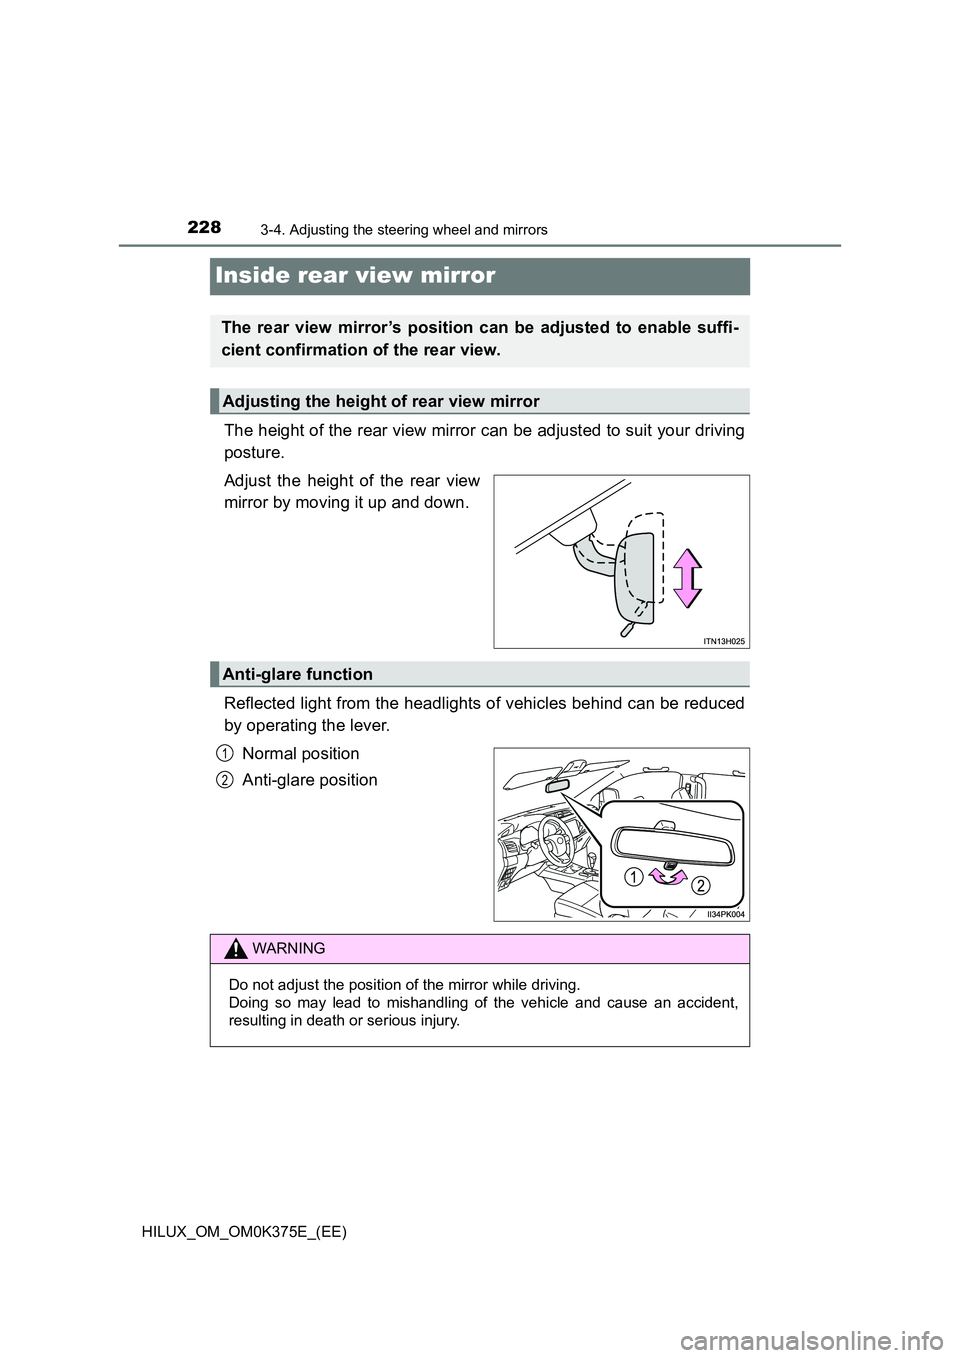
The height of the rear view mirror can be adjusted to suit your driving
posture.
Adjust the height of the rear view
mirror by moving it up and down.
Reflected light from the headlights of vehicles behind can be reduced
by operating the lever.
Normal position
Anti-glare position
The rear view mirror’s position can be adjusted to enable suffi-
cient confirmation of the rear view.
Adjusting the height of rear view mirror
Anti-glare function
1
2
WARNING
Do not adjust the position of the mirror while driving.
Doing so may lead to mishandling of the vehicle and cause an accident,
resulting in death or serious injury.
Page 229 of 708
229
3
3-4. Adjusting the steering wheel and mirrors
Operation of each component
HILUX_OM_OM0K375E_(EE)
Outside rear view mirrors
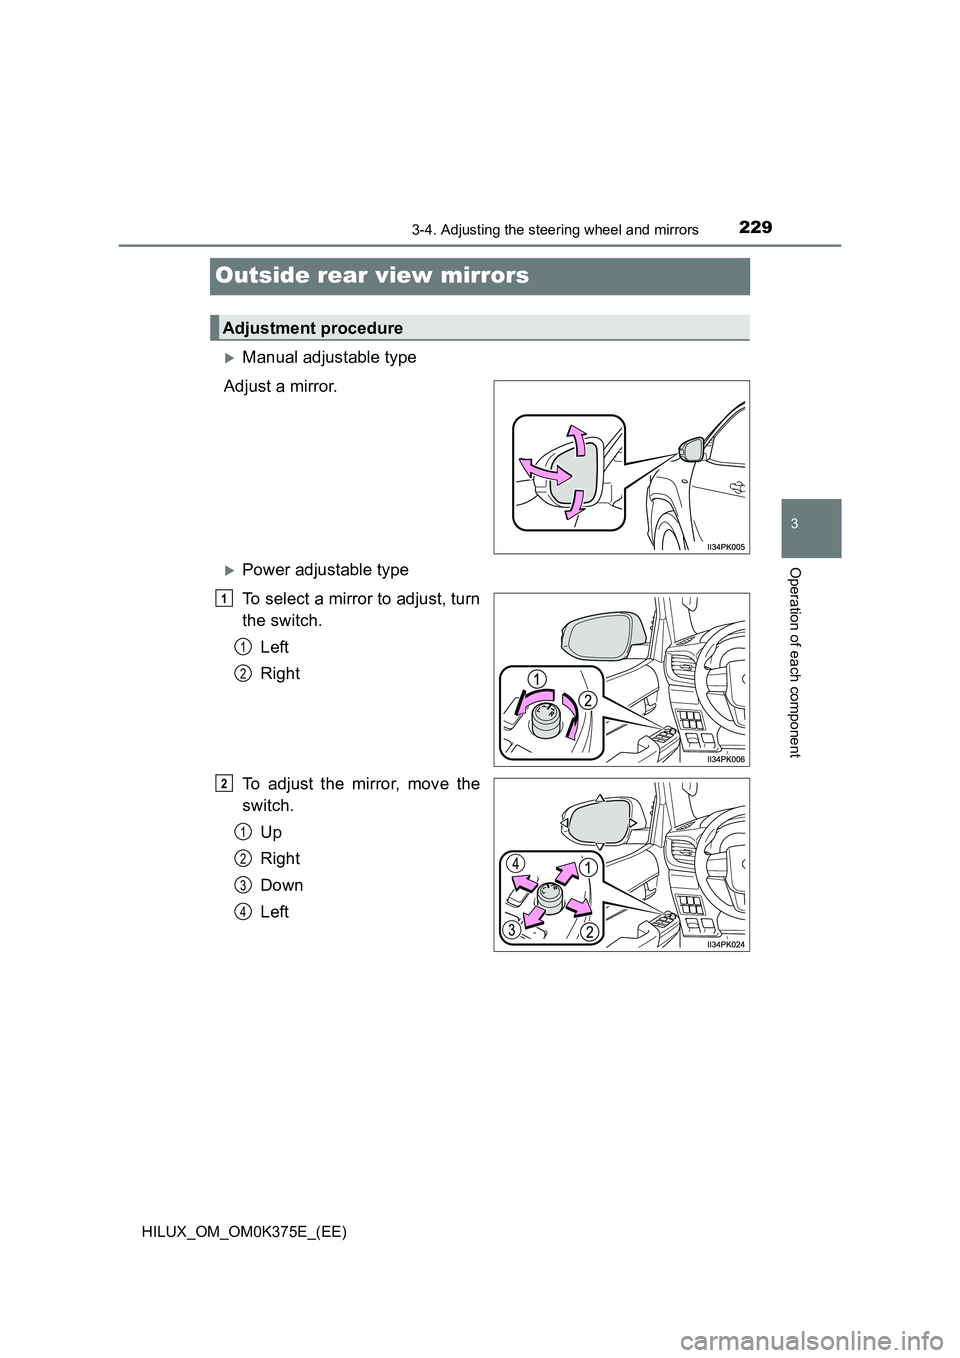
Manual adjustable type
Adjust a mirror.
Power adjustable type
To select a mirror to adjust, turn
the switch.
Left
Right
To adjust the mirror, move the
switch.
Up
Right
Down
Left
Adjustment procedure
1
1
2
2
1
2
3
4
Page 230 of 708
2303-4. Adjusting the steering wheel and mirrors
HILUX_OM_OM0K375E_(EE)
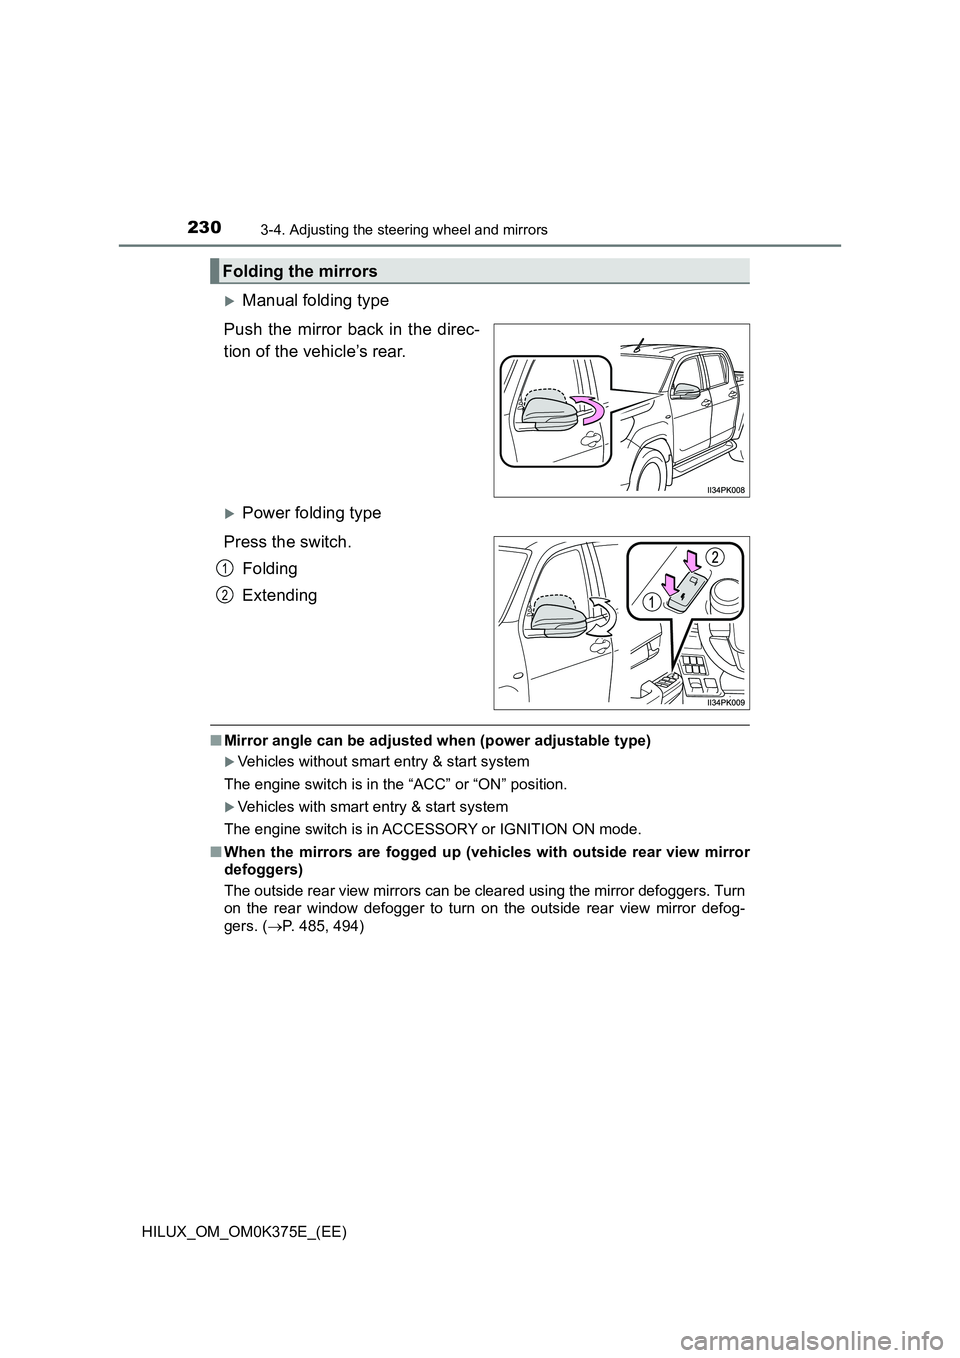
Manual folding type
Push the mirror back in the direc-
tion of the vehicle’s rear.
Power folding type
Press the switch.
Folding
Extending
■ Mirror angle can be adjusted when (power adjustable type)
Vehicles without smart entry & start system
The engine switch is in the “ACC” or “ON” position.
Vehicles with smart entry & start system
The engine switch is in ACCESSORY or IGNITION ON mode.
■ When the mirrors are fogged up (vehicles with outside rear view mirror
defoggers)
The outside rear view mirrors can be cleared using the mirror defoggers. Turn
on the rear window defogger to turn on the outside rear view mirror defog-
gers. ( P. 485, 494)
Folding the mirrors
1
2
Trending: coolant level, low oil pressure, window, oil reset, oil pressure, USB, interior lights
