TOYOTA HILUX 2019 Owners Manual
Manufacturer: TOYOTA, Model Year: 2019, Model line: HILUX, Model: TOYOTA HILUX 2019Pages: 708, PDF Size: 95.31 MB
Page 551 of 708
5517-3. Do-it-yourself maintenance
HILUX_OM_OM0K375E_(EE)
7
Maintenance and care
You may drain the fuel filter yourself. However, as the operation is dif-
ficult, we recommend having it drained by any authorized Toyota
retailer or Toyota authorized repairer, or any reliable repairer. Even if
you decide to drain it yourself, contact any authorized Toyota retailer
or Toyota authorized repairer, or any reliable repairer.
The water in the fuel filter needs to be drained if one of the following
symptoms occurs:
Vehicles without multi-information display
When the fuel system warning light flashes and a buzzer sounds.
( P. 604)
Vehicles with multi-information display
When “WATER ACCUMULATION IN FUEL FILTER SEE
OWNER’S MANUAL”/“Water accumulation in fuel filter See owner’s
manual” is shown on the multi-information display and a buzzer
sounds*1.
Vehicles without smart entry & start system: Turn the engine switch
to the “LOCK” position.
Vehicles with smart entry & start system: Turn the engine switch off.
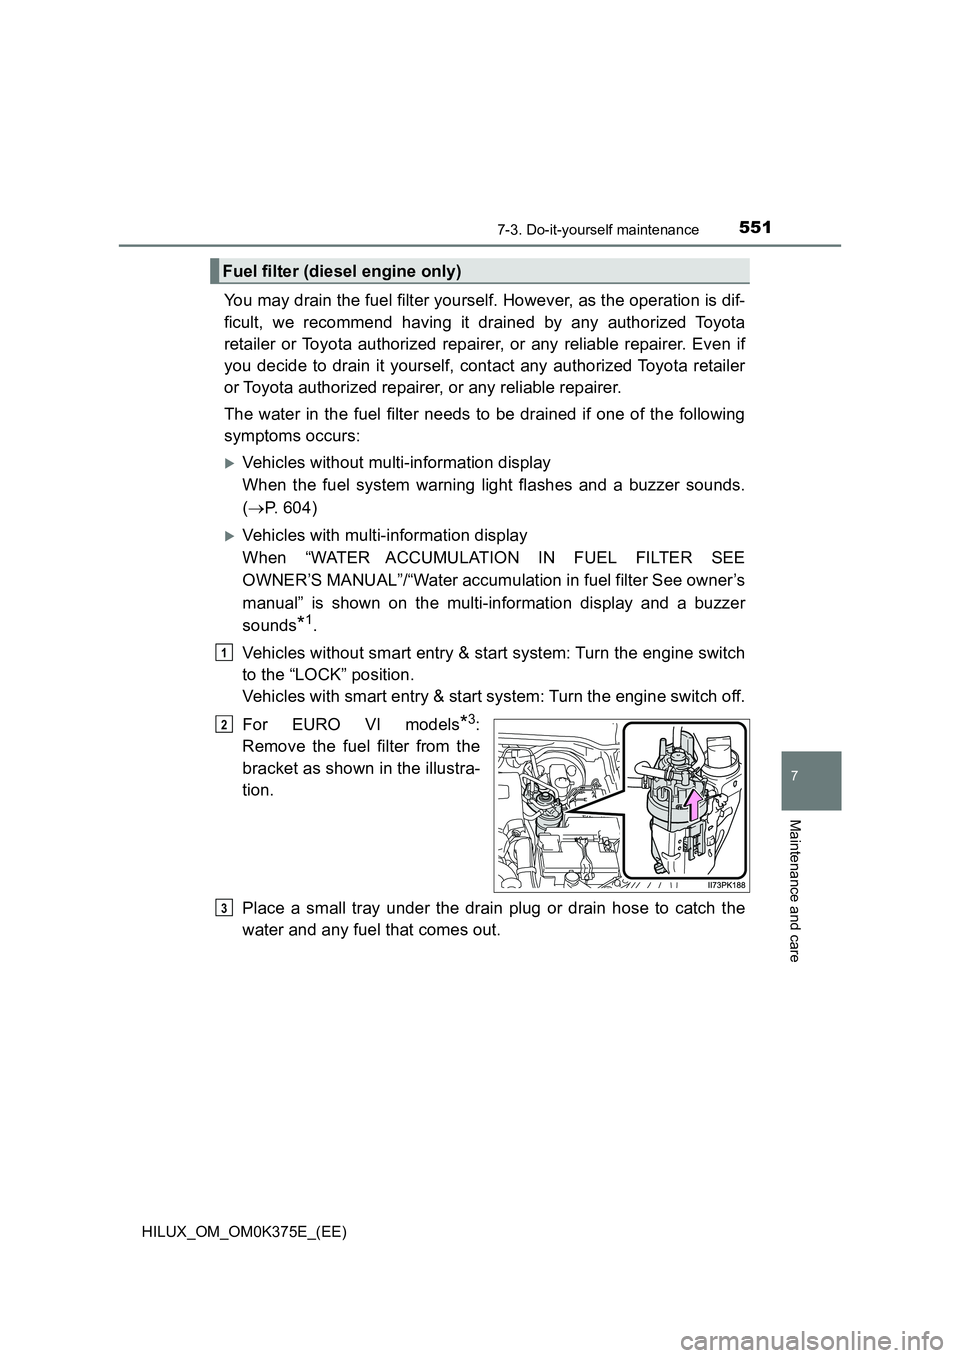
For EURO VI models*3:
Remove the fuel filter from the
bracket as shown in the illustra-
tion.
Place a small tray under the drain plug or drain hose to catch the
water and any fuel that comes out.
Fuel filter (diesel engine only)
1
2
3
Page 552 of 708
5527-3. Do-it-yourself maintenance
HILUX_OM_OM0K375E_(EE)
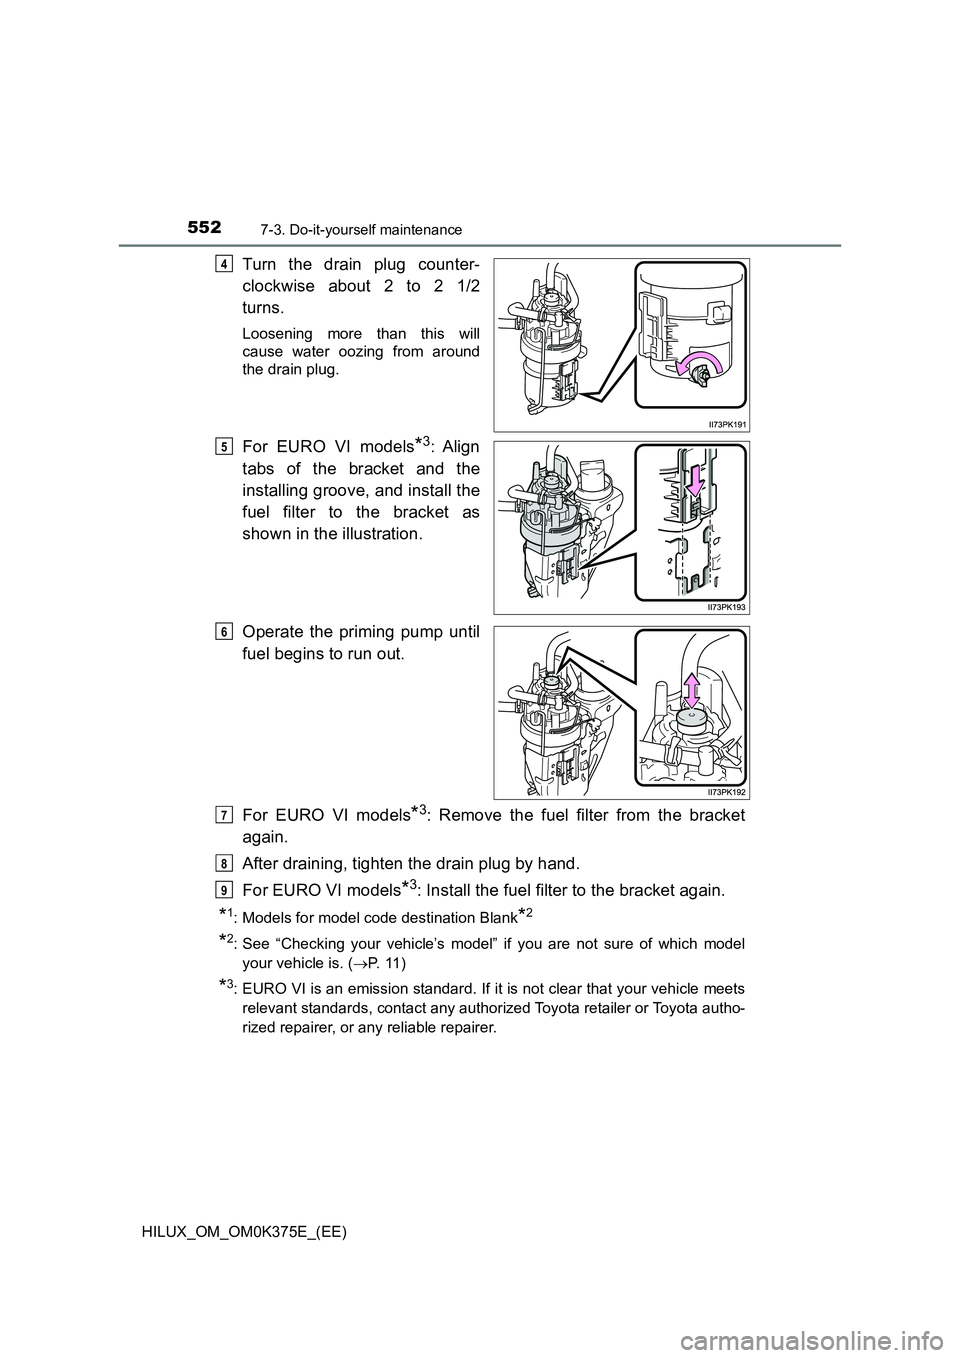
Turn the drain plug counter-
clockwise about 2 to 2 1/2
turns.
Loosening more than this will
cause water oozing from around
the drain plug.
For EURO VI models*3: Align
tabs of the bracket and the
installing groove, and install the
fuel filter to the bracket as
shown in the illustration.
Operate the priming pump until
fuel begins to run out.
For EURO VI models*3: Remove the fuel filter from the bracket
again.
After draining, tighten the drain plug by hand.
For EURO VI models*3: Install the fuel filter to the bracket again.
*1: Models for model code destination Blank*2
*2: See “Checking your vehicle’s model” if you are not sure of which model
your vehicle is. ( P. 1 1 )
*3: EURO VI is an emission standard. If it is not clear that your vehicle meets
relevant standards, contact any authorized Toyota retailer or Toyota autho-
rized repairer, or any reliable repairer.
4
5
6
7
8
9
Page 553 of 708
5537-3. Do-it-yourself maintenance
HILUX_OM_OM0K375E_(EE)
7
Maintenance and care
AdBlue™ is used to reduce the amount of nitrogen oxides in exhaust
gas. AdBlue™ is consumed in the process of driving. Therefore,
observe the following precautions.
● 1.0 L (1.1 qt., 0.9 Imp.qt.) of AdBlue™ is consumed every 1500 km
(932 miles). Normally, after a full refill, the vehicle can be driven for
approximately 15000 km (9321 miles) before all AdBlue™ is
depleted.
However, AdBlue™ may become completely depleted sooner
depending on driving conditions.
● When the possible driving range based on the remaining amount of
AdBlue™ reaches approximately 2400 km (1492 miles), the low
AdBlue™ level warning light turns on and a warning message is
displayed.
● When AdBlue™ is depleted, the engine cannot be restarted.
● If AdBlue™ is accidentally spilled while refilling, vehicle parts, paint,
etc. may be damaged.
When AdBlue™ needs to be refilled, have it refilled at any authorized
Toyota retailer or Toyota authorized repairer, or any reliable repairer.
It may be a criminal offence to use a vehicle that does not consume
any reagent if it is required for the reduction of emissions.
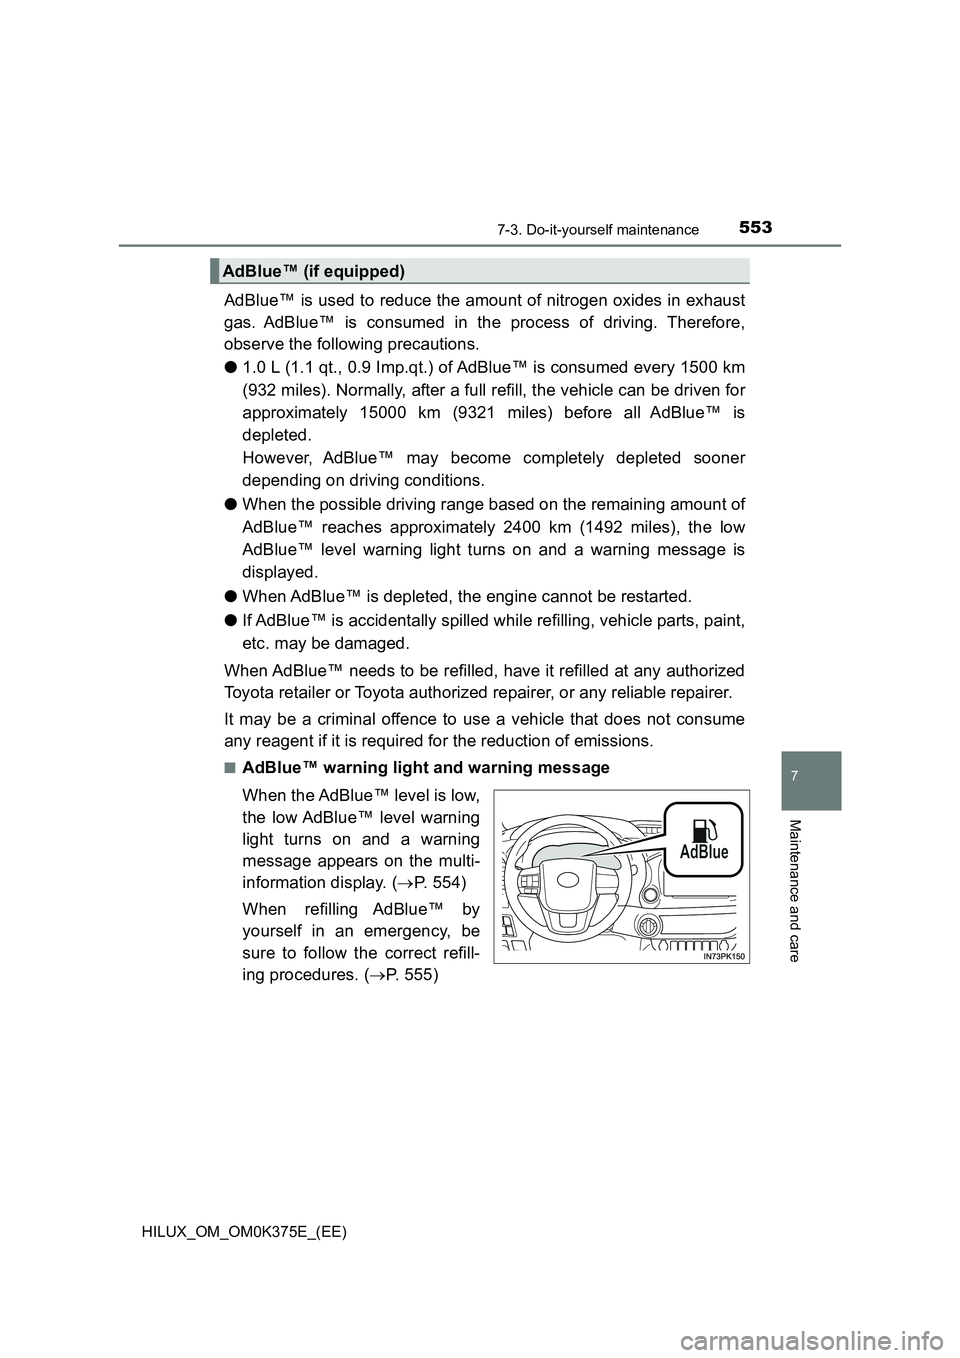
■AdBlue™ warning light and warning message
When the AdBlue™ level is low,
the low AdBlue™ level warning
light turns on and a warning
message appears on the multi-
information display. ( P. 554)
When refilling AdBlue™ by
yourself in an emergency, be
sure to follow the correct refill-
ing procedures. ( P. 555)
AdBlue™ (if equipped)
Page 554 of 708
5547-3. Do-it-yourself maintenance
HILUX_OM_OM0K375E_(EE)
■Refilling AdBlue™
● Use AdBlue™ (compliant with ISO 22241-1).
AdBlue™ is a trademark of the German Association of the Automotive
Industry (VDA).
● Before driving for a long period of time in an area where AdBlue™ cannot
be refilled, consult any authorized Toyota retailer or Toyota authorized
repairer, or any reliable repairer.
■ Warning message
If the following warning message is displayed on the multi-information dis-
play, follow the appropriate troubleshooting procedure.
Warning messageDetails/Actions
“AdBlue level low Fill up
AdBlue in 2400 km See
owner’s manual”
When AdBlue™ needs to be refilled
Have AdBlue™ refilled at any autho-
rized Toyota retailer or Toyota autho-
rized repairer, or any reliable repairer.
“AdBlue LEVEL LOW NO
START IN 800 km! FILL UP
AdBlue SEE OWNER’S
MANUAL”/“AdBlue level low
No start in 800 km! Fill up
AdBlue See owner’s manual”
When AdBlue™ needs to be refilled
If the displayed driving distance is
exceeded, the engine cannot be
restarted.
Have AdBlue™ refilled at any autho-
rized Toyota retailer or Toyota autho-
rized repairer, or any reliable repairer
immediately.
“AdBlue EMPTY UNABLE TO
RESTART ENGINE FILL UP
AdBlue SEE OWNER’S
MANUAL”/“AdBlue empty
Unable to restart engine Fill
up AdBlue See owner’s
manual”
When AdBlue™ needs to be refilled
If the engine is stopped, it cannot be
restarted.
Without stopping the engine, contact
any authorized Toyota retailer or
Toyota authorized repairer, or any
reliable repairer immediately.
NOTICE
■ When the AdBlue™ level is low
When AdBlue™ is depleted, the engine cannot be restarted.
Be sure to have AdBlue™ refilled at any authorized Toyota retailer or Toyota
authorized repairer, or any reliable repairer before it is completely depleted.
Page 555 of 708
5557-3. Do-it-yourself maintenance
HILUX_OM_OM0K375E_(EE)
7
Maintenance and care
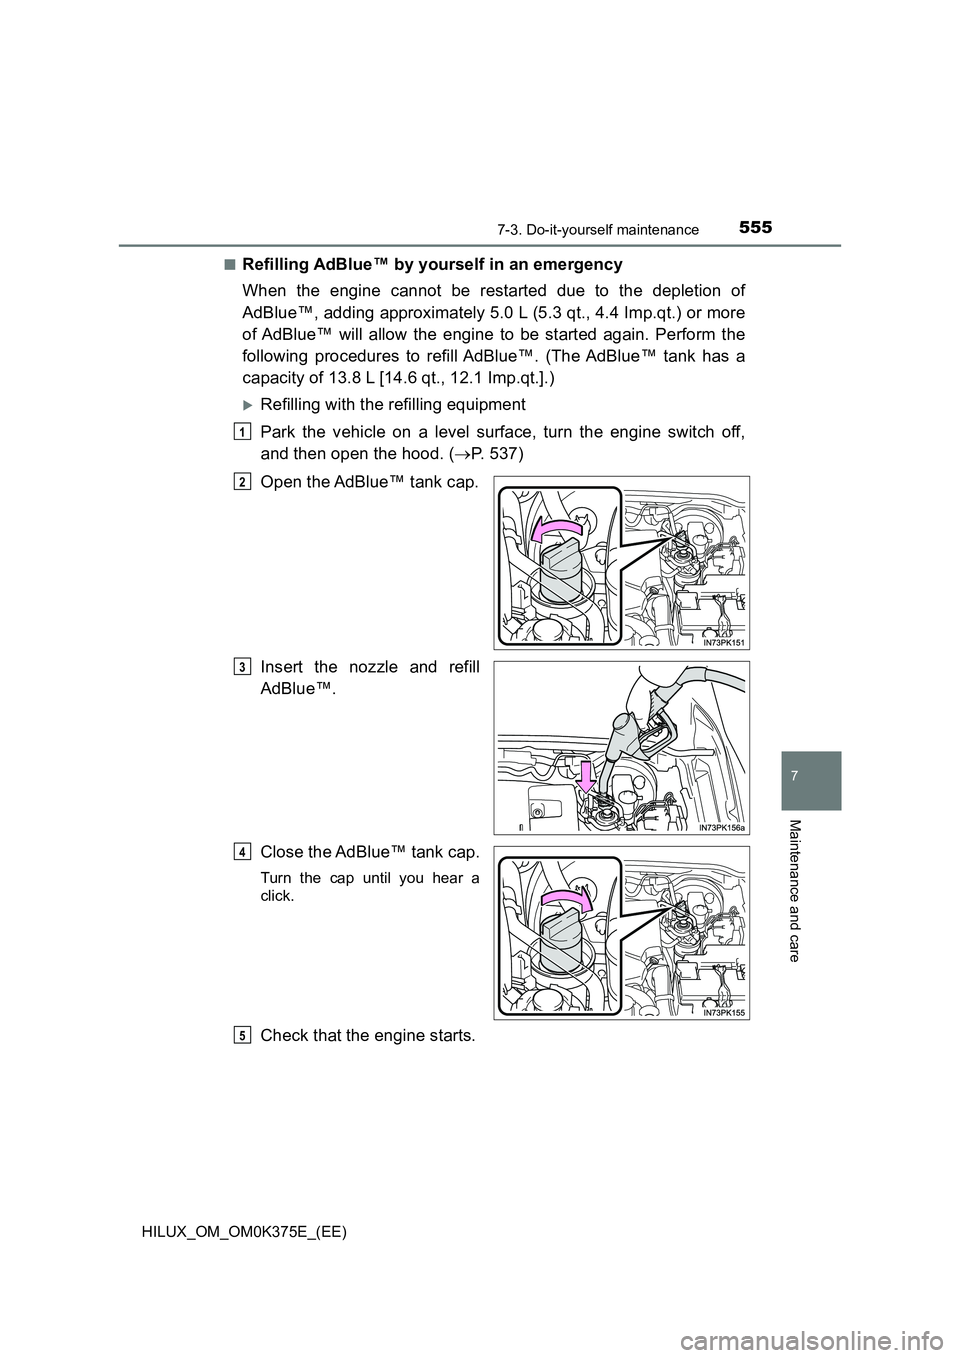
■Refilling AdBlue™ by yourself in an emergency
When the engine cannot be restarted due to the depletion of
AdBlue™, adding approximately 5.0 L (5.3 qt., 4.4 Imp.qt.) or more
of AdBlue™ will allow the engine to be started again. Perform the
following procedures to refill AdBlue™. (The AdBlue™ tank has a
capacity of 13.8 L [14.6 qt., 12.1 Imp.qt.].)
Refilling with the refilling equipment
Park the vehicle on a level surface, turn the engine switch off,
and then open the hood. ( P. 537)
Open the AdBlue™ tank cap.
Insert the nozzle and refill
AdBlue™.
Close the AdBlue™ tank cap.
Turn the cap until you hear a
click.
Check that the engine starts.
1
2
3
4
5
Page 556 of 708
5567-3. Do-it-yourself maintenance
HILUX_OM_OM0K375E_(EE)
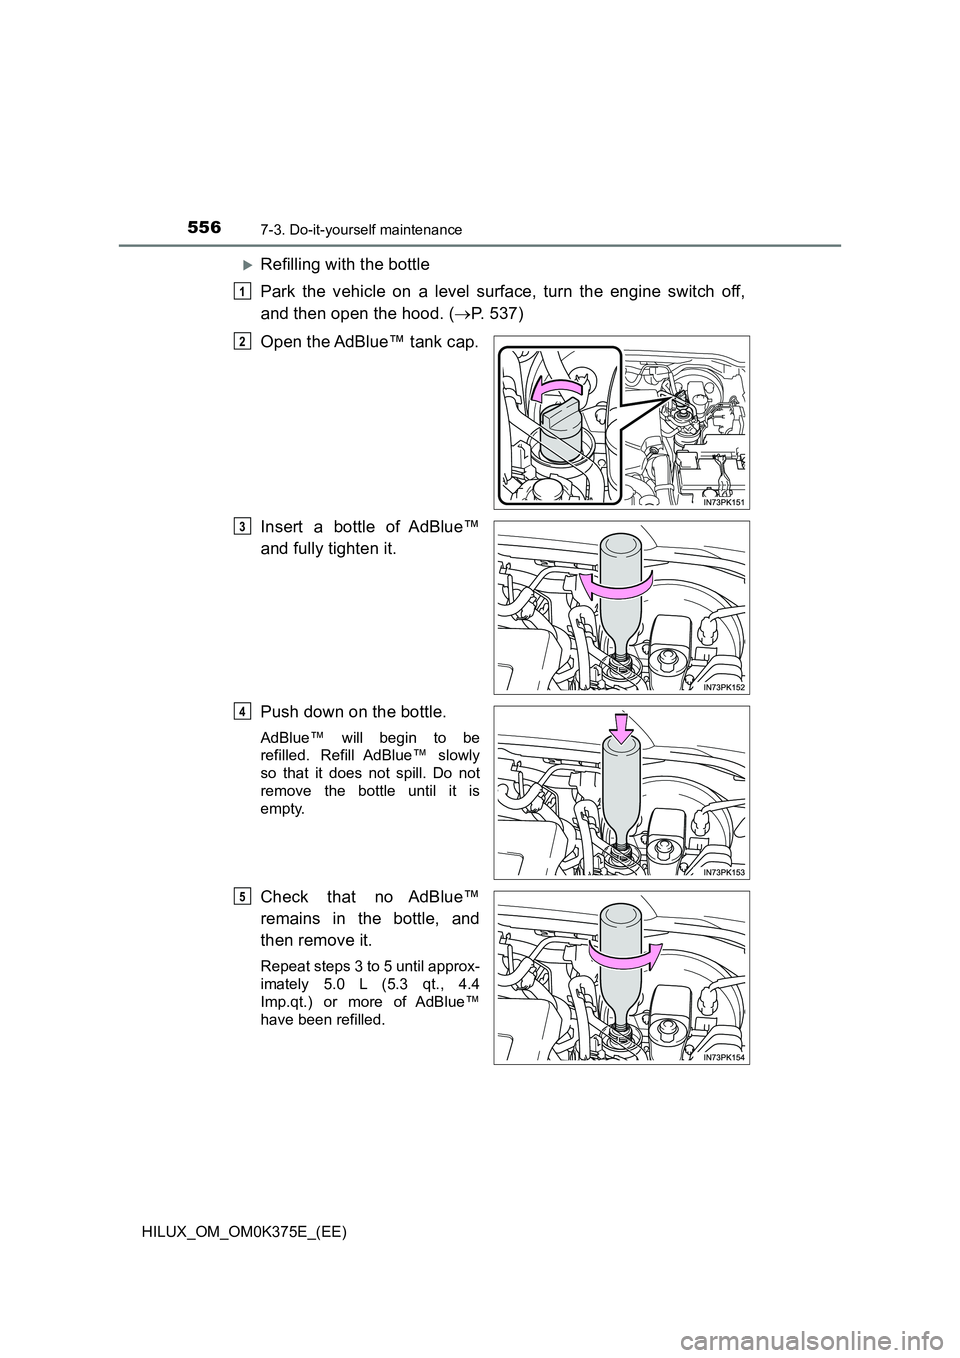
Refilling with the bottle
Park the vehicle on a level surface, turn the engine switch off,
and then open the hood. ( P. 537)
Open the AdBlue™ tank cap.
Insert a bottle of AdBlue™
and fully tighten it.
Push down on the bottle.
AdBlue™ will begin to be
refilled. Refill AdBlue™ slowly
so that it does not spill. Do not
remove the bottle until it is
empty.
Check that no AdBlue™
remains in the bottle, and
then remove it.
Repeat steps 3 to 5 until approx-
imately 5.0 L (5.3 qt., 4.4
Imp.qt.) or more of AdBlue™
have been refilled.
1
2
3
4
5
Page 557 of 708
5577-3. Do-it-yourself maintenance
HILUX_OM_OM0K375E_(EE)
7
Maintenance and care
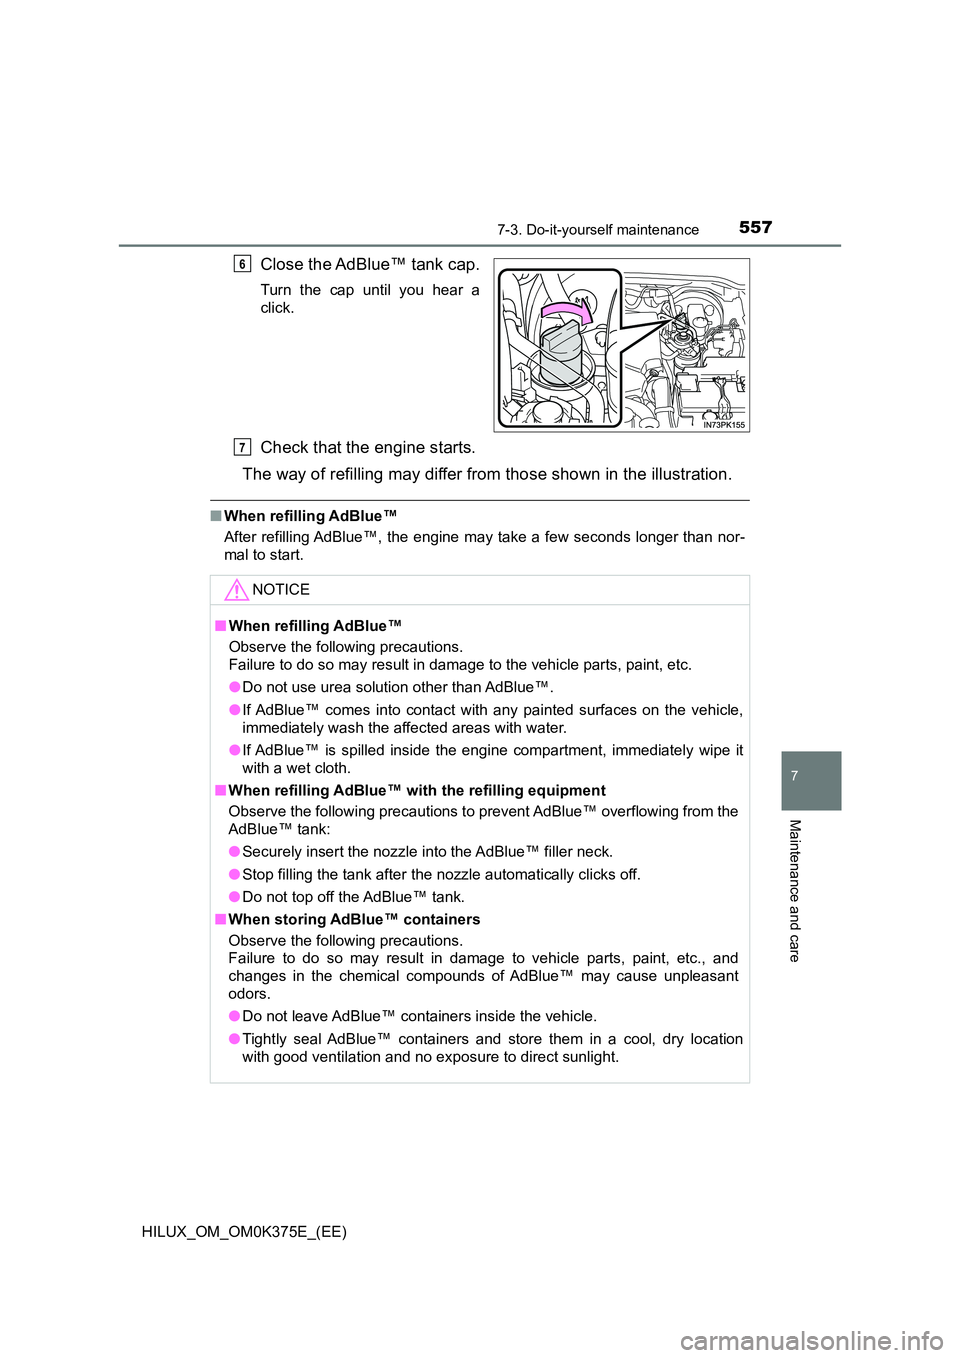
Close the AdBlue™ tank cap.
Turn the cap until you hear a
click.
Check that the engine starts.
The way of refilling may differ from those shown in the illustration.
■ When refilling AdBlue™
After refilling AdBlue™, the engine may take a few seconds longer than nor-
mal to start.
6
NOTICE
■ When refilling AdBlue™
Observe the following precautions.
Failure to do so may result in damage to the vehicle parts, paint, etc.
● Do not use urea solution other than AdBlue™.
● If AdBlue™ comes into contact with any painted surfaces on the vehicle,
immediately wash the affected areas with water.
● If AdBlue™ is spilled inside the engine compartment, immediately wipe it
with a wet cloth.
■ When refilling AdBlue™ with the refilling equipment
Observe the following precautions to prevent AdBlue™ overflowing from the
AdBlue™ tank:
● Securely insert the nozzle into the AdBlue™ filler neck.
● Stop filling the tank after the nozzle automatically clicks off.
● Do not top off the AdBlue™ tank.
■ When storing AdBlue™ containers
Observe the following precautions.
Failure to do so may result in damage to vehicle parts, paint, etc., and
changes in the chemical compounds of AdBlue™ may cause unpleasant
odors.
● Do not leave AdBlue™ containers inside the vehicle.
● Tightly seal AdBlue™ containers and store them in a cool, dry location
with good ventilation and no exposure to direct sunlight.
7
Page 558 of 708
5587-3. Do-it-yourself maintenance
HILUX_OM_OM0K375E_(EE)
Tires
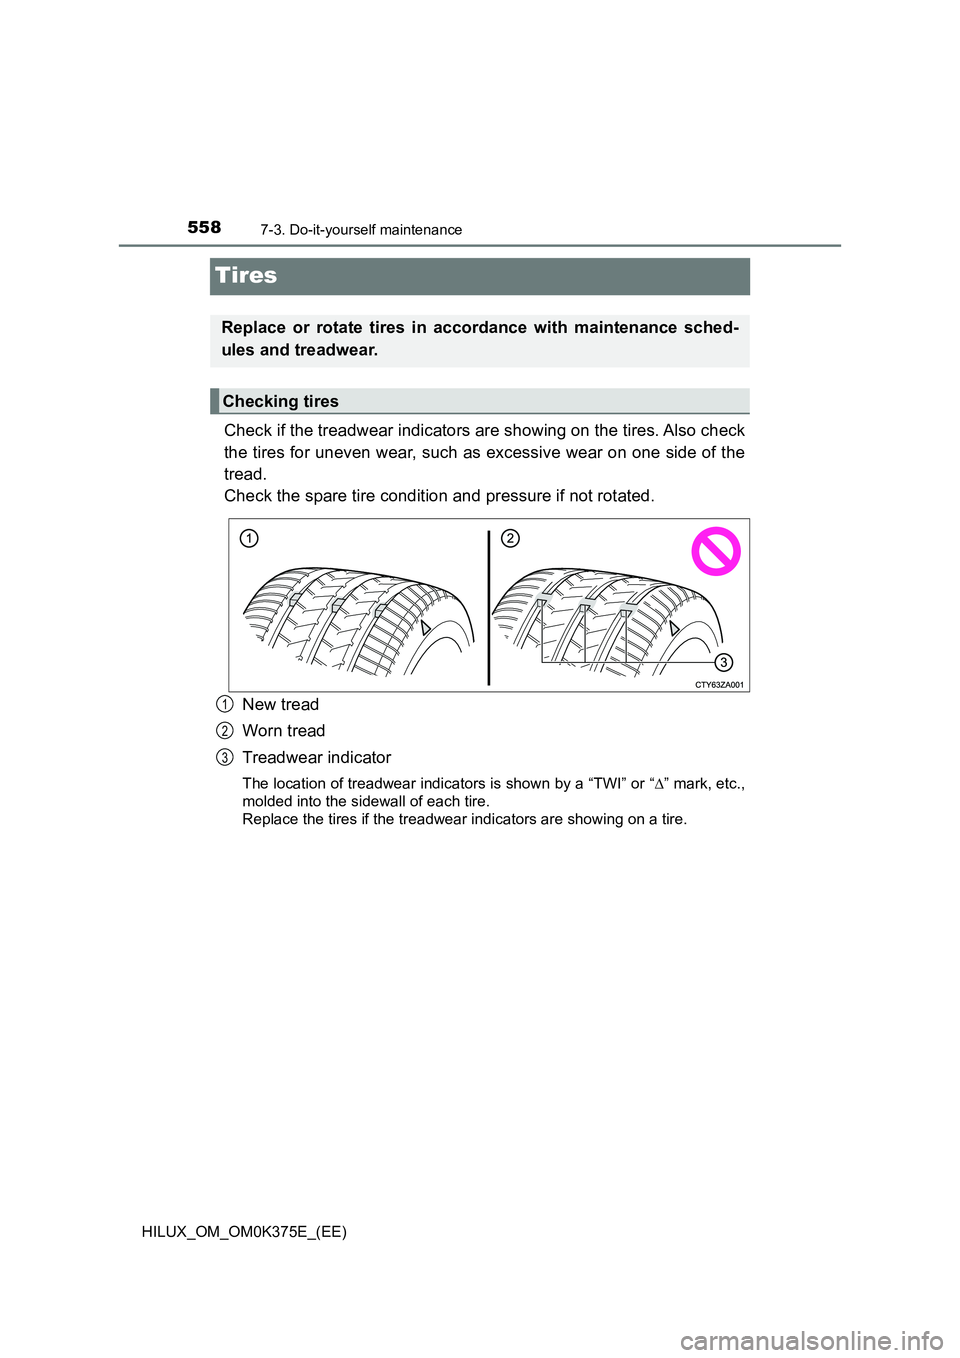
Check if the treadwear indicators are showing on the tires. Also check
the tires for uneven wear, such as excessive wear on one side of the
tread.
Check the spare tire condition and pressure if not rotated.
New tread
Worn tread
Treadwear indicator
The location of treadwear indicators is shown by a “TWI” or “ ” mark, etc.,
molded into the sidewall of each tire.
Replace the tires if the treadwear indicators are showing on a tire.
Replace or rotate tires in accordance with maintenance sched-
ules and treadwear.
Checking tires
1
2
3
Page 559 of 708
5597-3. Do-it-yourself maintenance
HILUX_OM_OM0K375E_(EE)
7
Maintenance and care
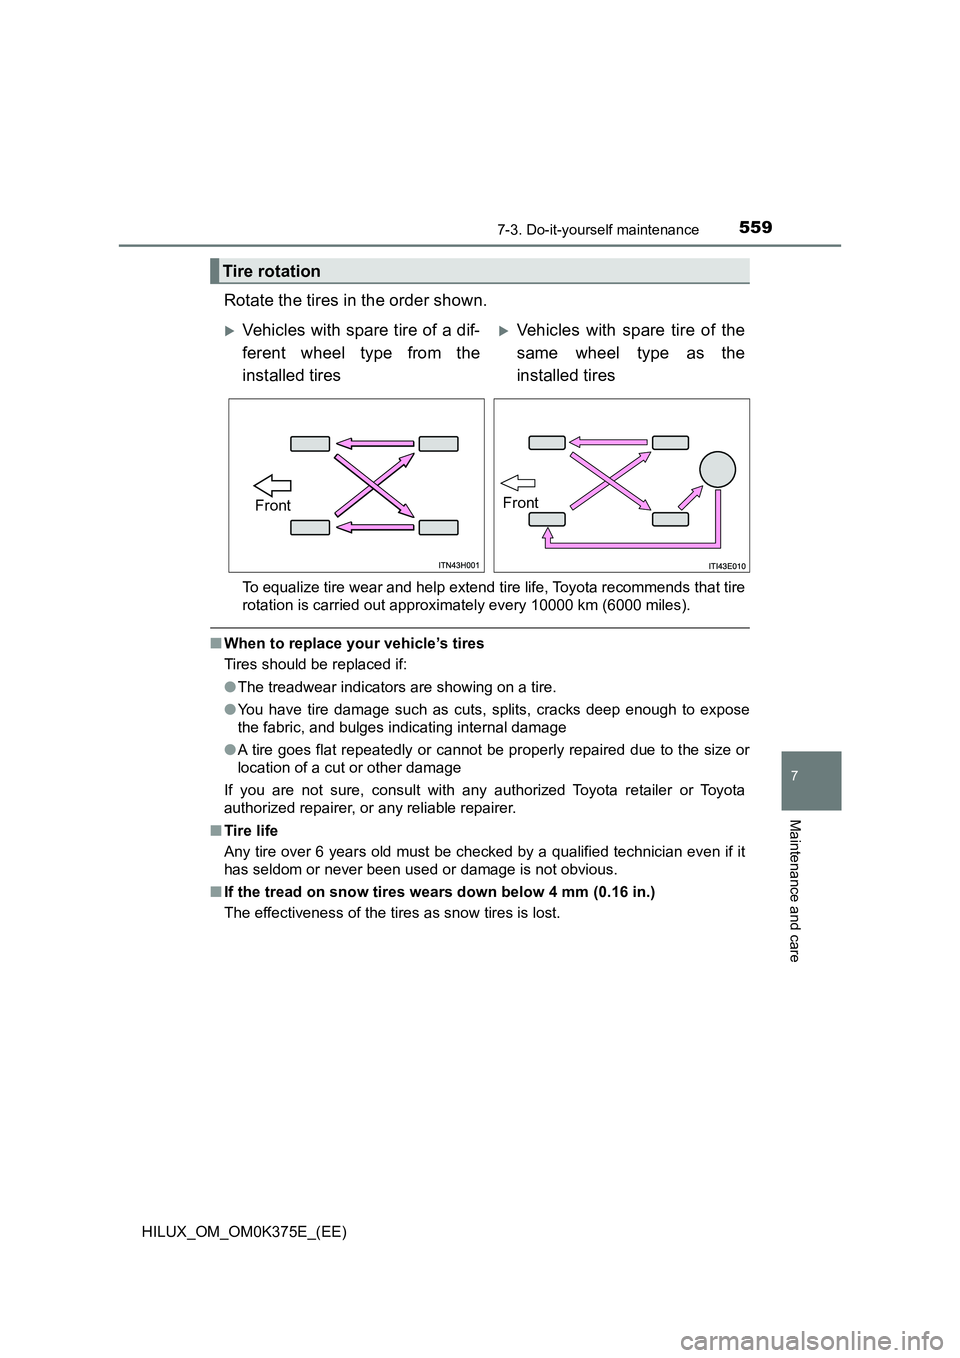
Rotate the tires in the order shown.
To equalize tire wear and help extend tire life, Toyota recommends that tire
rotation is carried out approximately every 10000 km (6000 miles).
■ When to replace your vehicle’s tires
Tires should be replaced if:
● The treadwear indicators are showing on a tire.
● You have tire damage such as cuts, splits, cracks deep enough to expose
the fabric, and bulges indicating internal damage
● A tire goes flat repeatedly or cannot be properly repaired due to the size or
location of a cut or other damage
If you are not sure, consult with any authorized Toyota retailer or Toyota
authorized repairer, or any reliable repairer.
■ Tire life
Any tire over 6 years old must be checked by a qualified technician even if it
has seldom or never been used or damage is not obvious.
■ If the tread on snow tires wears down below 4 mm (0.16 in.)
The effectiveness of the tires as snow tires is lost.
Tire rotation
Vehicles with spare tire of a dif-
ferent wheel type from the
installed tires
Vehicles with spare tire of the
same wheel type as the
installed tires
FrontFront
Page 560 of 708
5607-3. Do-it-yourself maintenance
HILUX_OM_OM0K375E_(EE)
WARNING
■When inspecting or replacing tires
Observe the following precautions to prevent accidents.
Failure to do so may cause damage to parts of the drive train as well as
dangerous handling characteristics, which may lead to an accident resulting
in death or serious injury.
● Do not mix tires of different makes, models or tread patterns.
Also, do not mix tires of remarkably different treadwear.
● Do not use tire sizes other than those recommended by Toyota.
● Do not mix differently constructed tires (radial, bias-belted or bias-ply
tires).
● Do not mix summer, all season and snow tires.
● Do not use tires that have been used on another vehicle.
Do not use tires if you do not know how they were used previously.
NOTICE
■ Driving on rough roads
Take particular care when driving on roads with loose surfaces or potholes.
These conditions may cause losses in tire inflation pressure, reducing the
cushioning ability of the tires. In addition, driving on rough roads may cause
damage to the tires themselves, as well as the vehicle’s wheels and body.
■ If tire inflation pressure of each tire becomes low while driving
Do not continue driving, or your tires and/or wheels may be ruined.