TOYOTA LAND CRUISER 2008 J200 Quick Reference Guide
LAND CRUISER 2008 J200
TOYOTA
TOYOTA
https://www.carmanualsonline.info/img/14/6482/w960_6482-0.png
TOYOTA LAND CRUISER 2008 J200 Quick Reference Guide
Trending: air conditioning, fuel cap, hood release, start stop button, engine, coolant level, spare tire
Page 21 of 30
19
OVERVIEW
FEATURES/OPERATIONS
SAFETY AND EMERGENCY FEATURES
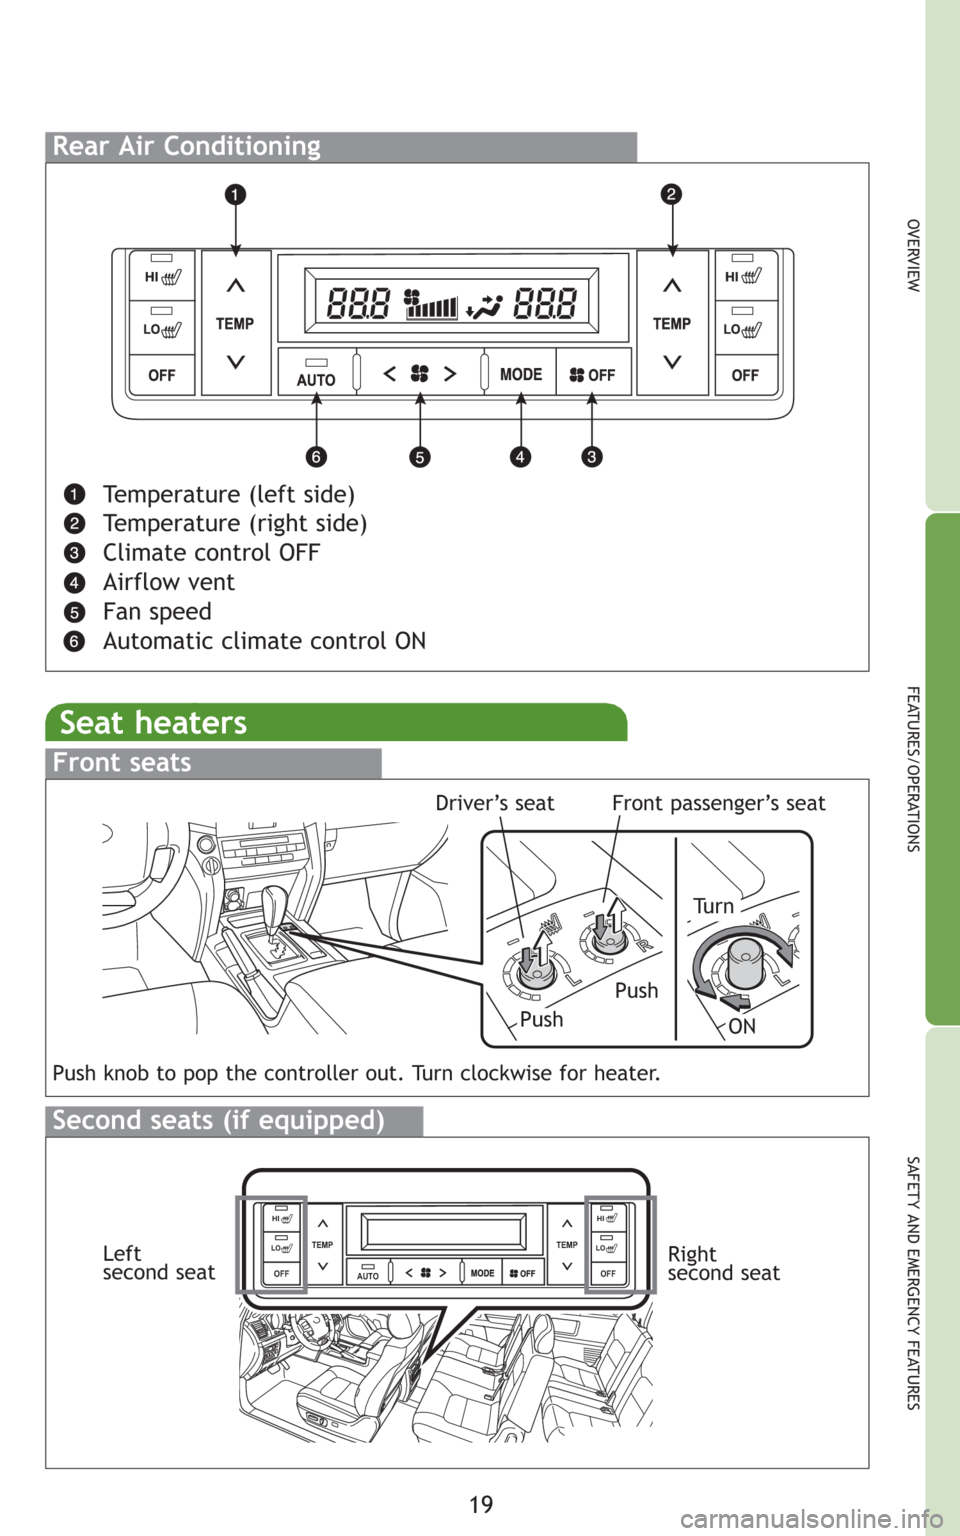
Rear Air Conditioning
Temperature (left side)
Temperature (right side)
Climate control OFF
Airflow vent
Fan speed
Automatic climate control ON
Seat heaters
L
R
L
Front seats
Push
Tu r n
Push knob to pop the controller out. Turn clockwise for heater.
Push
Second seats (if equipped)
Driver’s seatFront passenger’s seat
AUTO TEMP
OFFTEMP
HI
LOOFF
HI
LOLeft
second seatRight
second seat
ON
Page 22 of 30
20
FEATURES/OPERATIONS
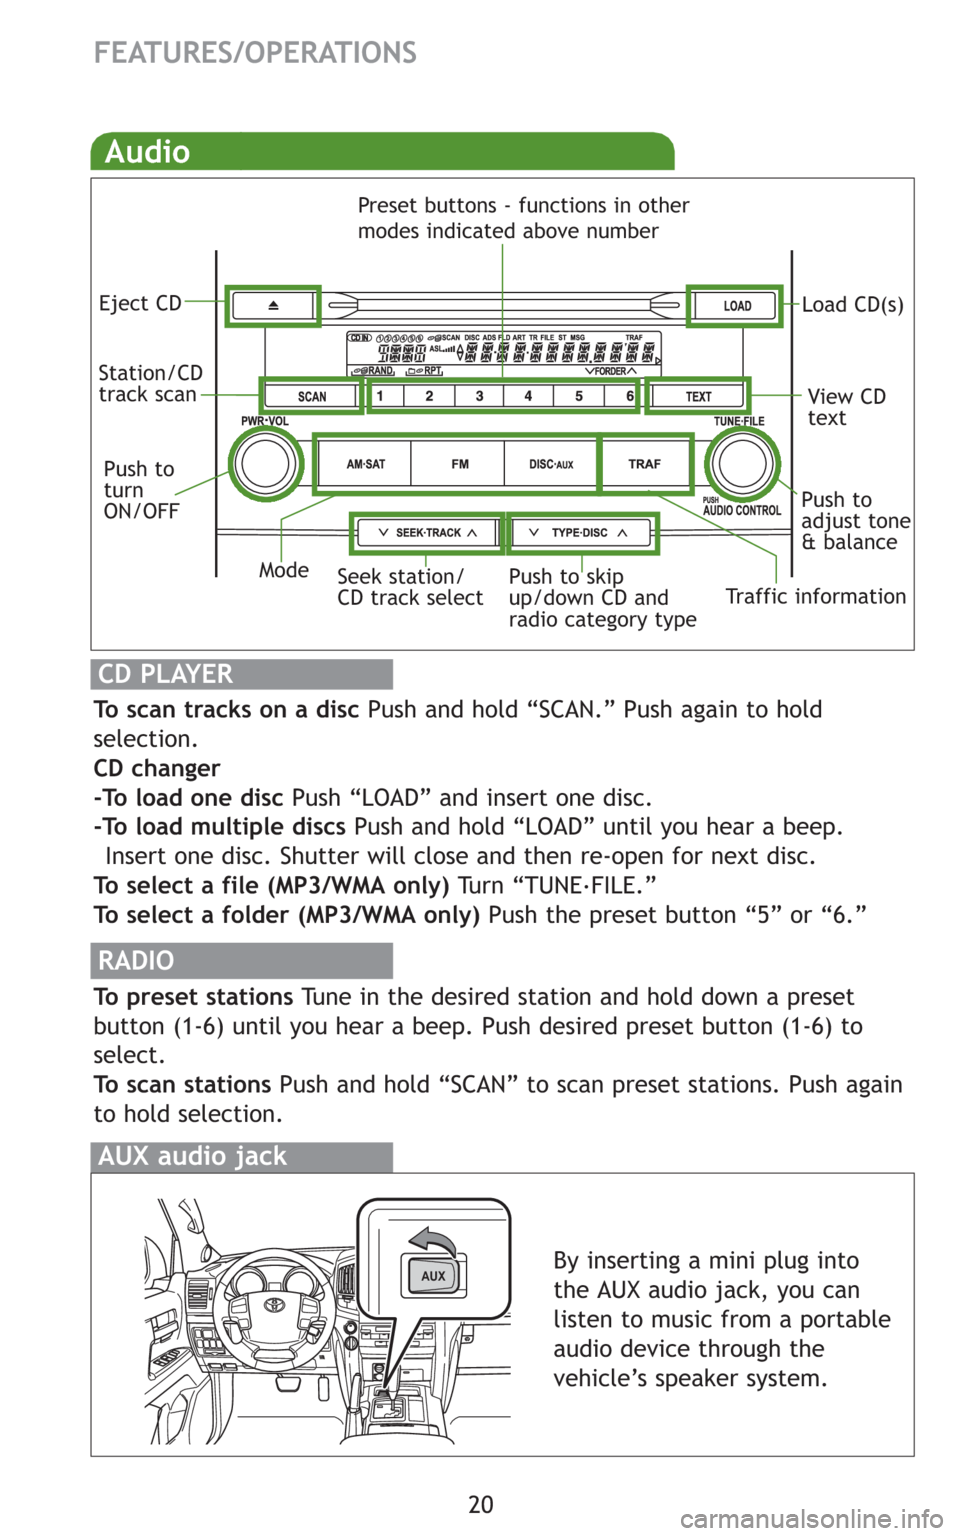
Audio
RADIO
To preset stations Tune in the desired station and hold down a preset
button (1-6) until you hear a beep. Push desired preset button (1-6) to
select.
To scan stations Push and hold “SCAN” to scan preset stations. Push again
to hold selection.
CD PLAYER
To scan tracks on a disc Push and hold “SCAN.” Push again to hold
selection.
CD changer
-To load one disc Push “LOAD” and insert one disc.
-To load multiple discs Push and hold “LOAD” until you hear a beep.
Insert one disc. Shutter will close and then re-open for next disc.
To select a file (MP3/WMA only) Turn “TUNE.
FILE.”
To select a folder (MP3/WMA only) Push the preset button “5” or “6.”
AUX audio jack
Eject CD
Push to
turn
ON/OFFLoad CD(s)
Seek station/
CD track select Station/CD
track scan
Mode
Traffic information Preset buttons - functions in other
modes indicated above number
View CD
text
Push to skip
up/down CD and
radio category type
Push to
adjust tone
& balance
AUXBy inserting a mini plug into
the AUX audio jack, you can
listen to music from a portable
audio device through the
vehicle
Page 23 of 30
21
OVERVIEW
FEATURES/OPERATIONS
SAFETY AND EMERGENCY FEATURES
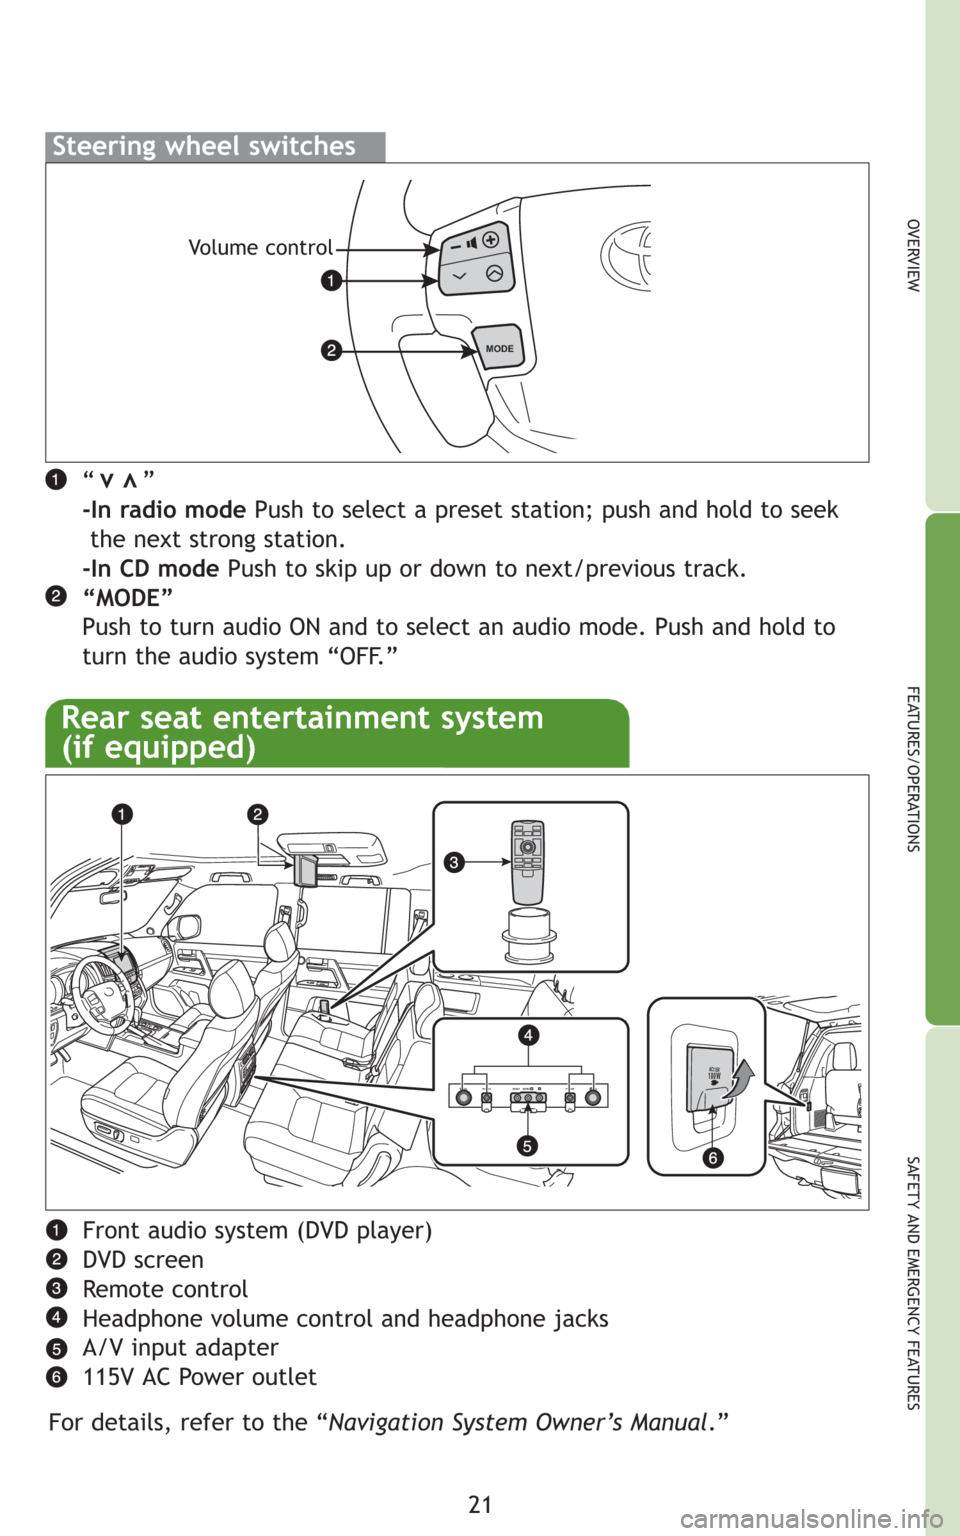
“ ”
-In radio modePush to select a preset station; push and hold to seek
the next strong station.
-In CD modePush to skip up or down to next/previous track.
“MODE”
Push to turn audio ON and to select an audio mode. Push and hold to
turn the audio system “OFF.”vv
Steering wheel switches
MODE
Volume control
Rear seat entertainment system
(if equipped)
PHONE VOL PHONE VIDEO MONOLVOLRAC1
15
V10
0W
Front audio system (DVD player)
DVD screen
Remote control
Headphone volume control and headphone jacks
A/V input adapter
115V AC Power outlet
For details, refer to the “Navigation System Owner’s Manual.”
Page 24 of 30
22
FEATURES/OPERATIONS
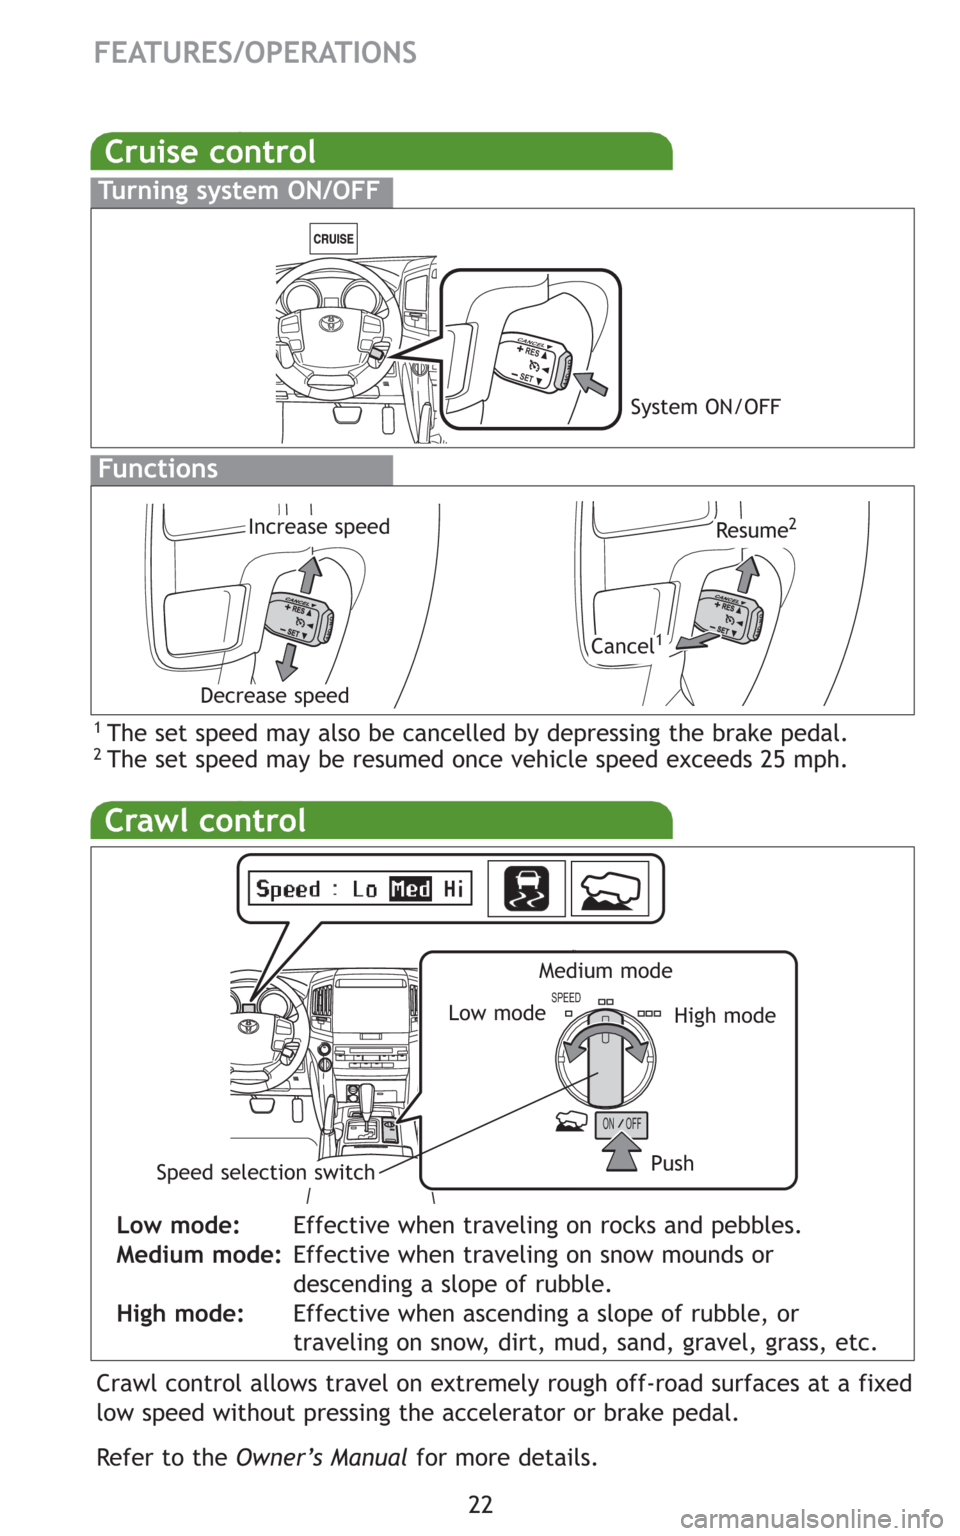
Crawl control
ON
SPEED
OFF
Low mode:Effective when traveling on rocks and pebbles.
Medium mode:Effective when traveling on snow mounds or
descending a slope of rubble.
High mode:Effective when ascending a slope of rubble, or
traveling on snow, dirt, mud, sand, gravel, grass, etc.
Low modeHigh mode
Medium mode
PushSpeed selection switch
Crawl control allows travel on extremely rough off-road surfaces at a fixed
low speed without pressing the accelerator or brake pedal.
Refer to the Owner’s Manualfor more details.
Cruise control
1 The set speed may also be cancelled by depressing the brake pedal.2 The set speed may be resumed once vehicle speed exceeds 25 mph.
Turning system ON/OFF
S E RT E S
L E
C
N A C
Functions
System ON/OFF
Increase speed
Decrease speed
Cancel1
Resume2
Page 25 of 30
23
OVERVIEW
FEATURES/OPERATIONS
SAFETY AND EMERGENCY FEATURES
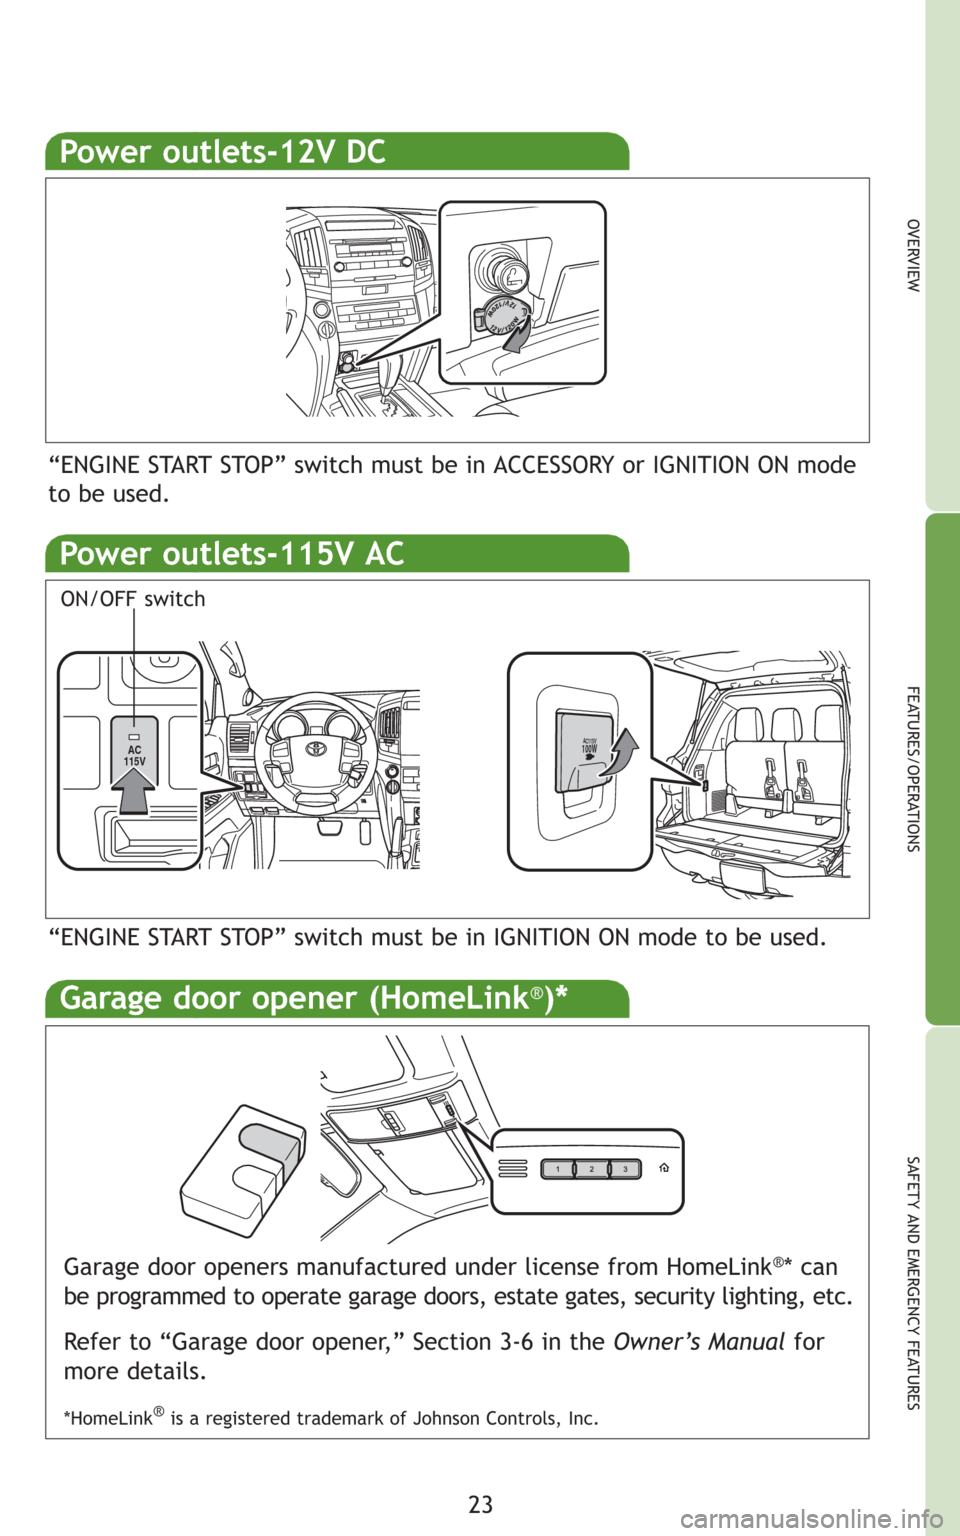
Power outlets-12V DC
“ENGINE START STOP” switch must be in ACCESSORY or IGNITION ON mode
to be used.
Power outlets-115V AC
AC
115VAC115V100W
ON/OFF switch
“ENGINE START STOP” switch must be in IGNITION ON mode to be used.
Garage door openers manufactured under license from HomeLink®* can
be programmed to operate garage doors, estate gates, security lighting, etc.
Refer to “Garage door opener,” Section 3-6 in the Owner’s Manualfor
more details.
*HomeLink®is a registered trademark of Johnson Controls, Inc.
Garage door opener (HomeLink®)*
Page 26 of 30
24
FEATURES/OPERATIONS
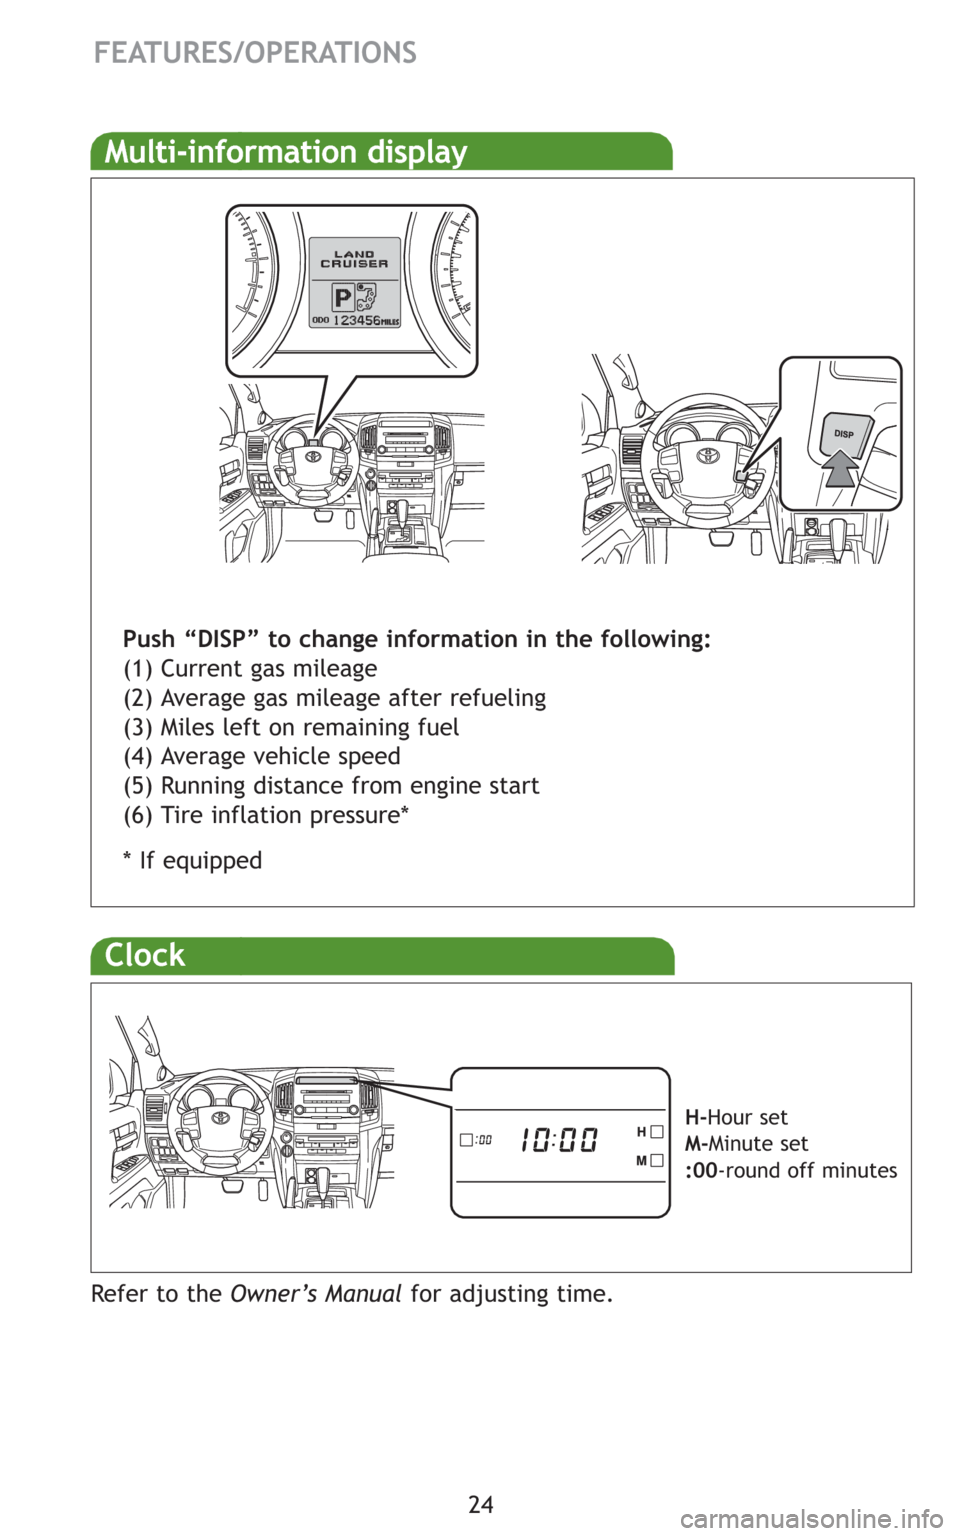
Multi-information display
Push “DISP” to change information in the following:
(1) Current gas mileage
(2) Average gas mileage after refueling
(3) Miles left on remaining fuel
(4) Average vehicle speed
(5) Running distance from engine start
(6) Tire inflation pressure*
* If equipped
Clock
H-Hour set
M-Minute set
:00-round off minutes
Refer to the Owner’s Manualfor adjusting time.
Page 27 of 30
25
OVERVIEW
FEATURES/OPERATIONS
SAFETY AND EMERGENCY FEATURES
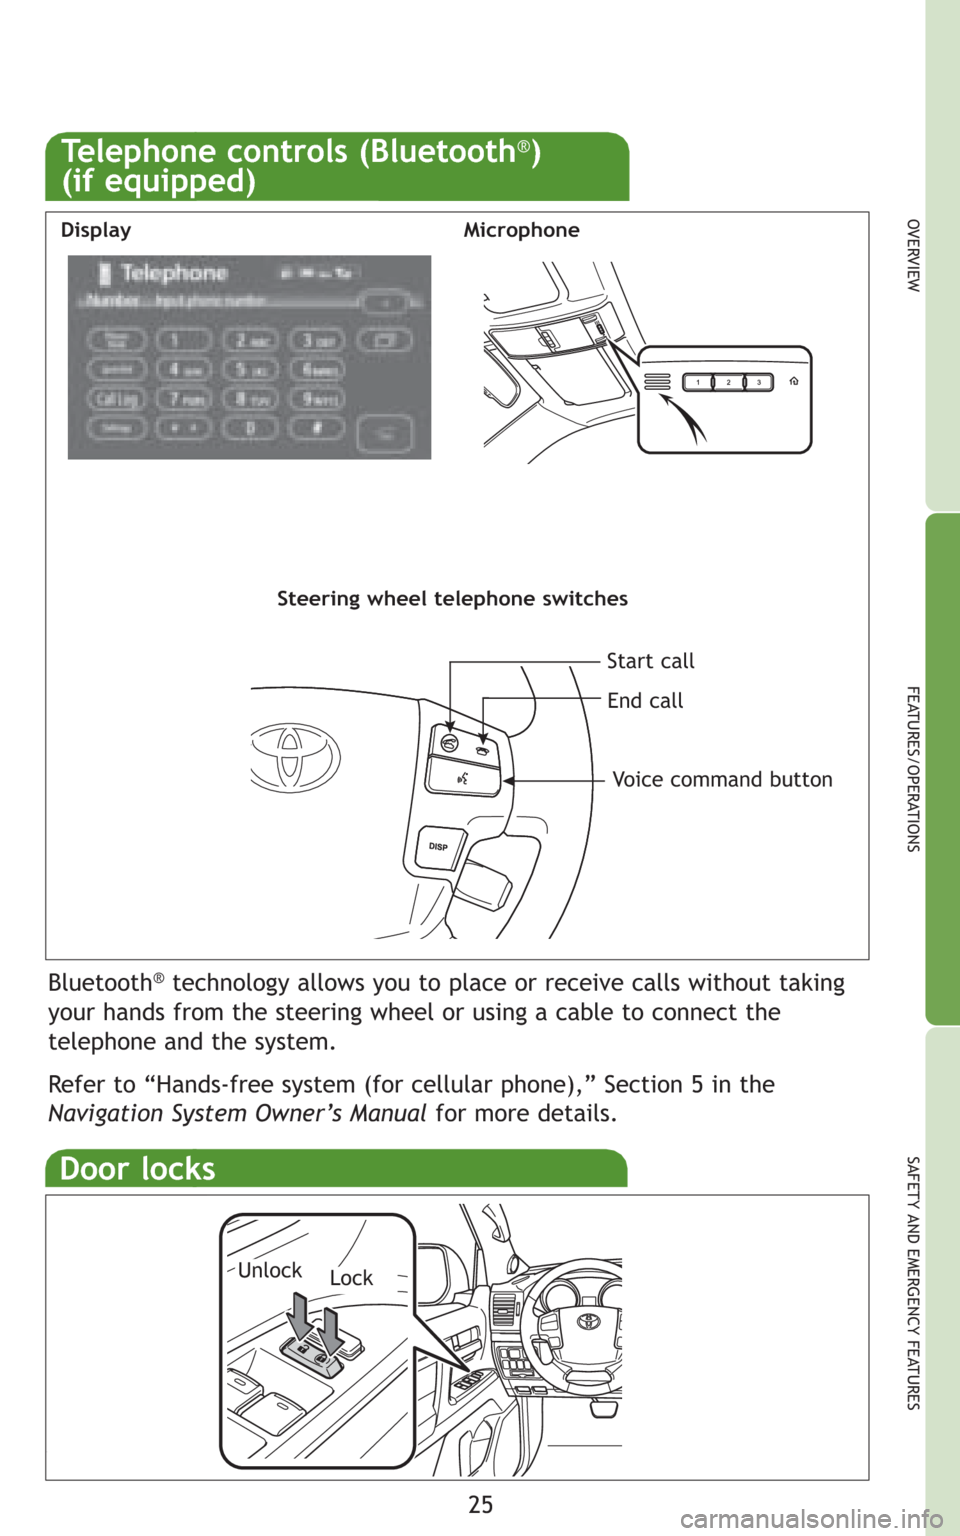
Bluetooth®technology allows you to place or receive calls without taking
your hands from the steering wheel or using a cable to connect the
telephone and the system.
Refer to “Hands-free system (for cellular phone),” Section 5 in the
Navigation System Owner’s Manualfor more details.
Telephone controls (Bluetooth®)
(if equipped)
MicrophoneDisplay
Steering wheel telephone switches
Start call
End call
Voice command button
Door locks
LockUnlock
Page 28 of 30
26
FEATURES/OPERATIONS
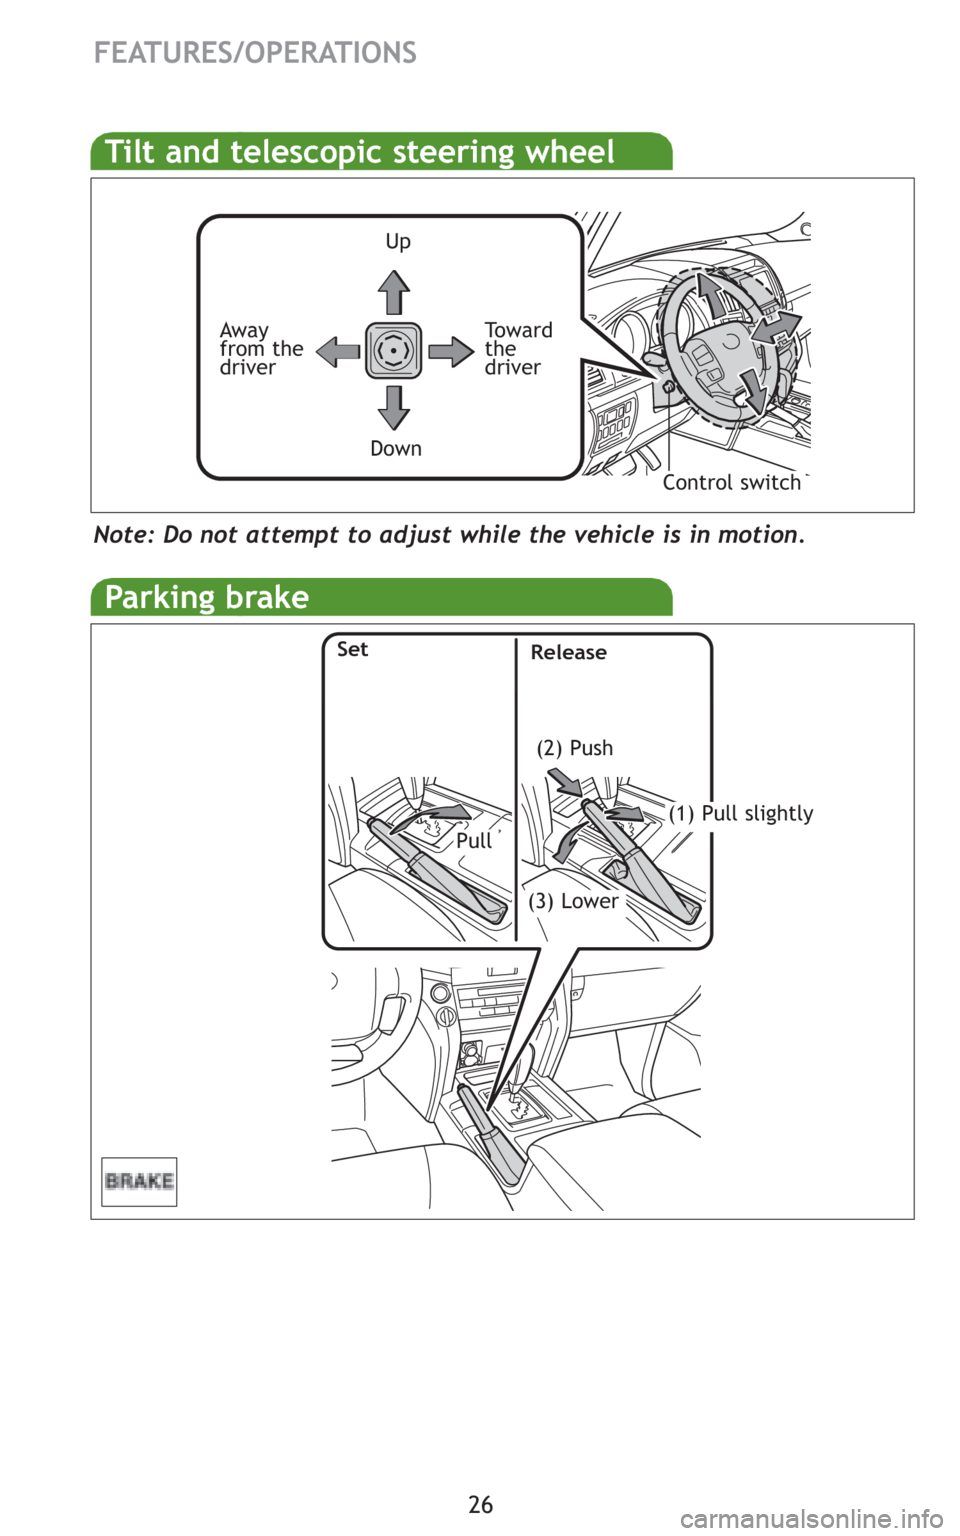
Parking brake
(2) Push
SetRelease
(1) Pull slightly
(3) Lower
Pull
Up
To w a r d
the
driver
Down
Note: Do not attempt to adjust while the vehicle is in motion.
Tilt and telescopic steering wheel
Away
from the
driver
Control switch
Page 29 of 30
27
OVERVIEW
FEATURES/OPERATIONS
SAFETY AND EMERGENCY FEATURES
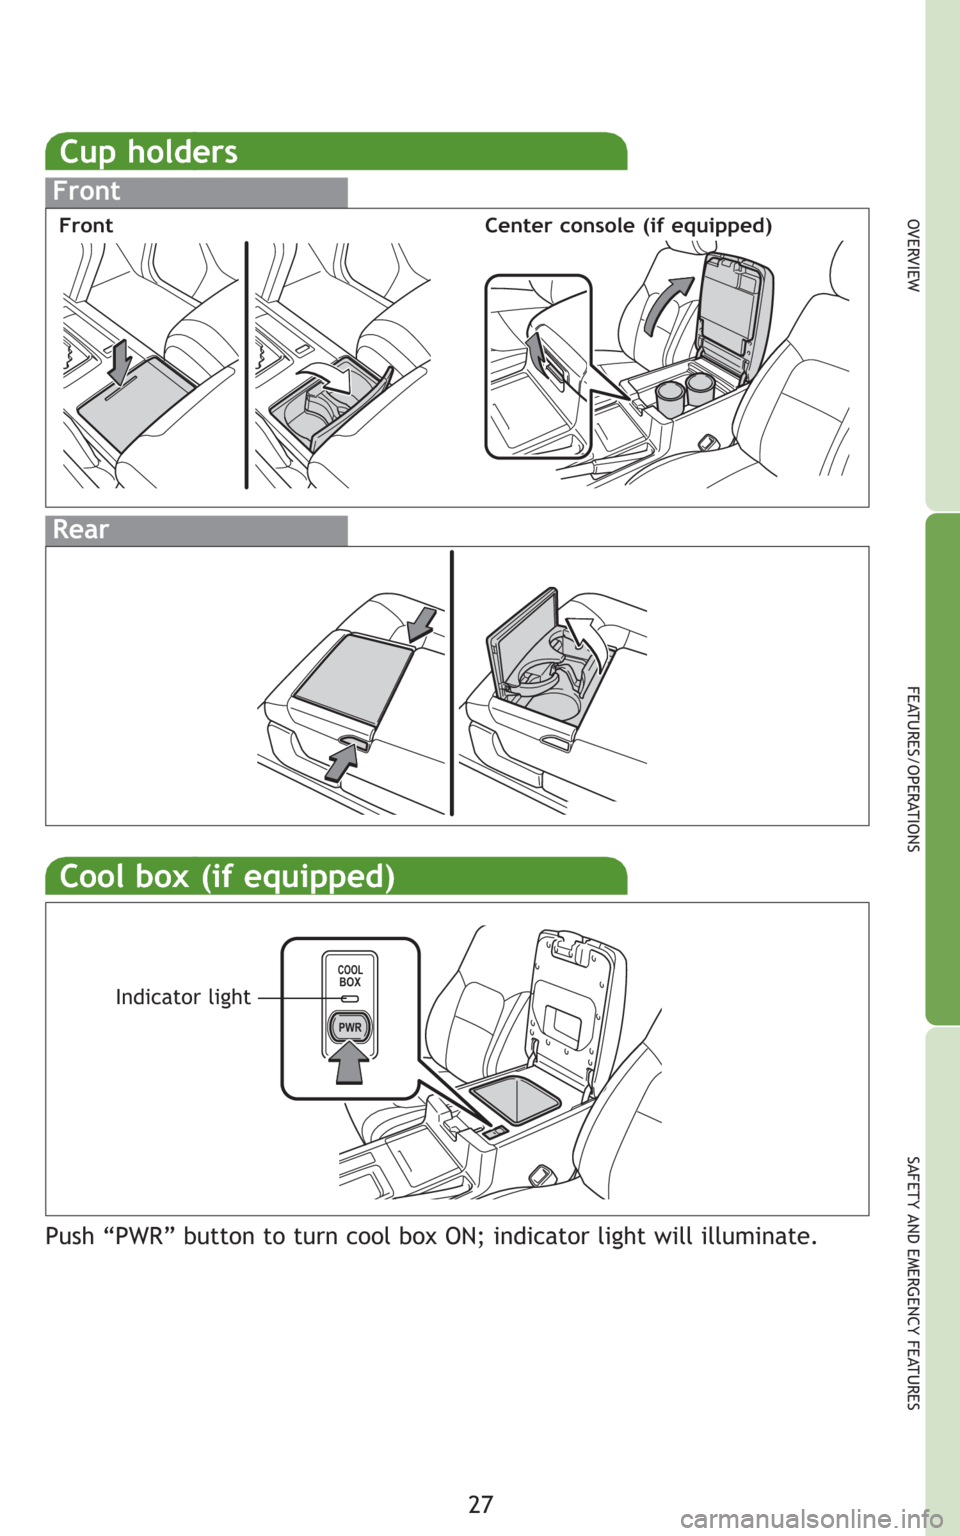
Cup holders
Front
Rear
Front Center console (if equipped)
COOLBOX
PWR
Cool box (if equipped)
Push “PWR” button to turn cool box ON; indicator light will illuminate.
Indicator light
Page 30 of 30
28
SAFETY AND
EMERGENCY FEATURES
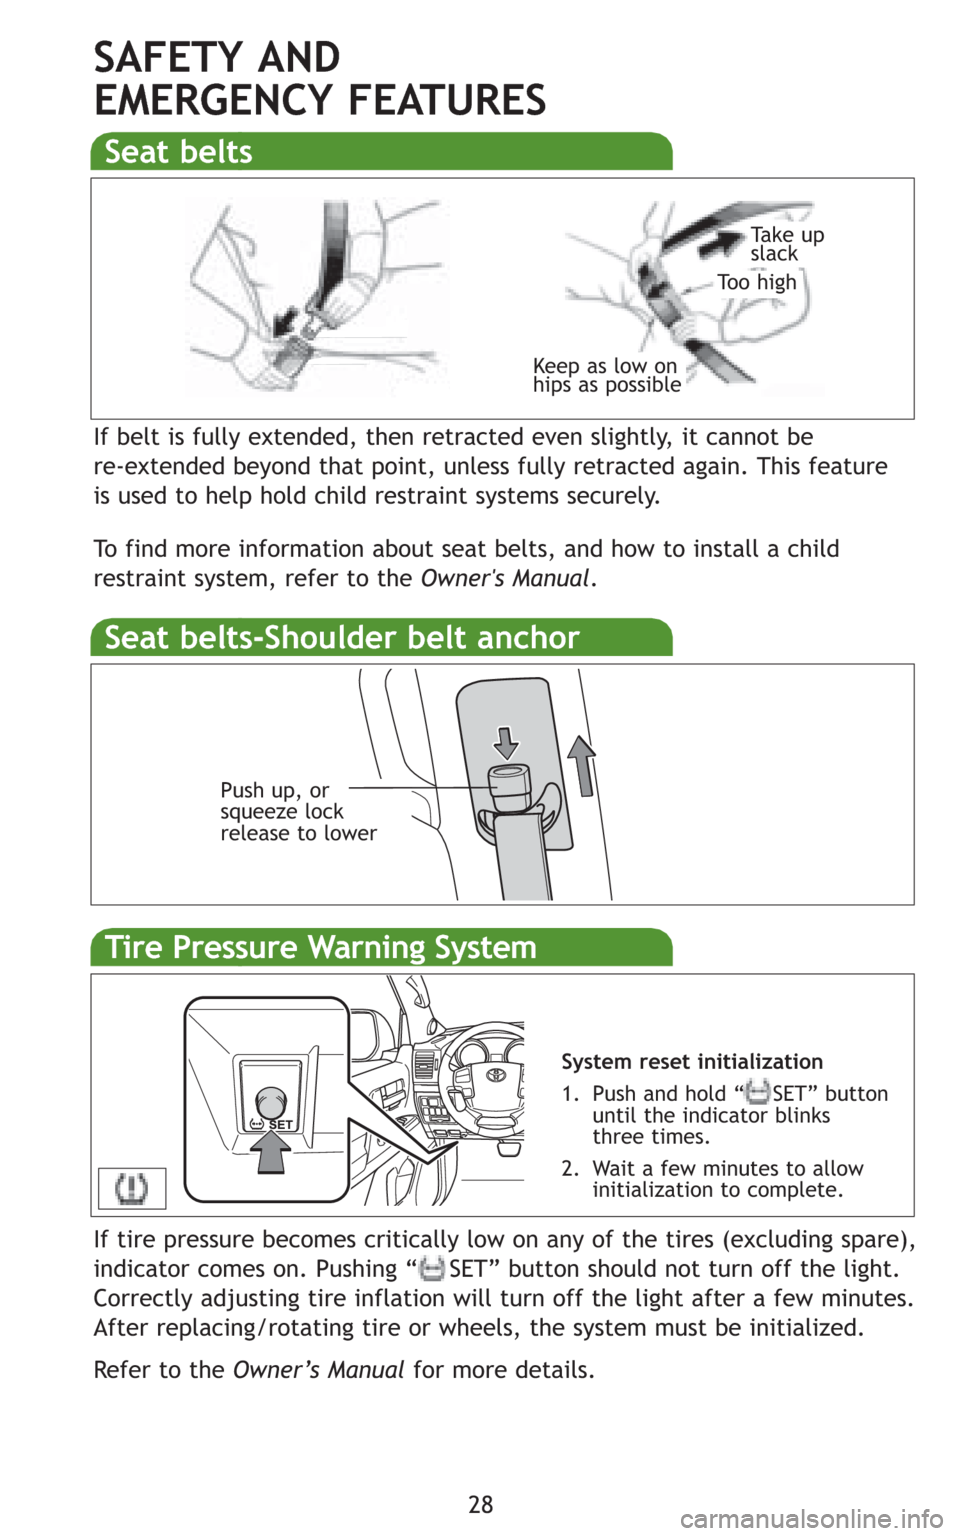
If belt is fully extended, then retracted even slightly, it cannot be
re-extended beyond that point, unless fully retracted again. This feature
is used to help hold child restraint systems securely.
To find more information about seat belts, and how to install a child
restraint system, refer to the Owner's Manual.
Keep as low on
hips as possible
Take up
slack
Too high
Seat belts
Push up, or
squeeze lock
release to lower
Tire Pressure Warning System
If tire pressure becomes critically low on any of the tires (excluding spare),
indicator comes on. Pushing “ SET” button should not turn off the light.
Correctly adjusting tire inflation will turn off the light after a few minutes.
After replacing/rotating tire or wheels, the system must be initialized.
Refer to the Owner’s Manualfor more details.
System reset initialization
1. Push and hold “ SET” button
until the indicator blinks
three times.
2. Wait a few minutes to allow
initialization to complete.
Seat belts-Shoulder belt anchor
Trending: light, gas mileage, inflation pressure, glove box, service, hood release, navigation
