TOYOTA LAND CRUISER 2010 J200 Workshop Manual
LAND CRUISER 2010 J200
TOYOTA
TOYOTA
https://www.carmanualsonline.info/img/14/6488/w960_6488-0.png
TOYOTA LAND CRUISER 2010 J200 Workshop Manual
Trending: light, remote control, window, power steering fluid, dimensions, oil dipstick, oil viscosity
Page 51 of 592
51
1-2. Opening, closing and locking the doors
1
Before driving
L/C200_U
CAUTION
●
Do not pull on the back door damper stay to close the back door, and do
not hang on the back door damper stay.
Doing so may cause hands to be caught or the back door damper stay to
break, causing an accident.
● Do not attach any accessories other than genuine Toyota parts to the back
door. Such additional weight on the back door may cause the back door to
fall closed again after it is opened.
NOTICE
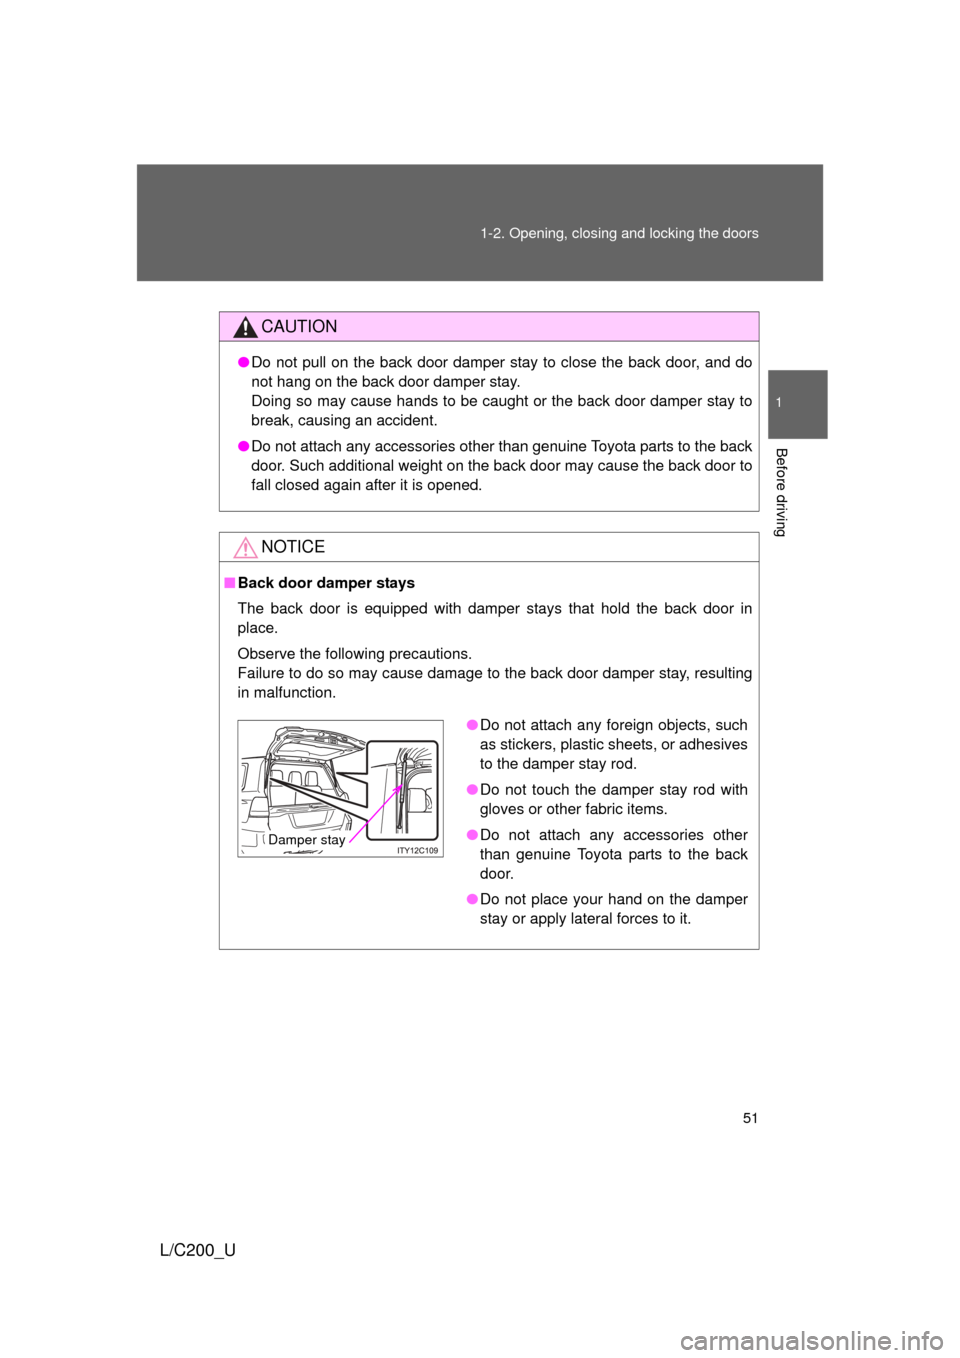
■Back door damper stays
The back door is equipped with damper stays that hold the back door in
place.
Observe the following precautions.
Failure to do so may cause damage to the back door damper stay, resulting
in malfunction.
●Do not attach any foreign objects, such
as stickers, plastic sheets, or adhesives
to the damper stay rod.
● Do not touch the damper stay rod with
gloves or other fabric items.
● Do not attach any accessories other
than genuine Toyota parts to the back
door.
● Do not place your hand on the damper
stay or apply lateral forces to it.
Damper stay
Page 52 of 592
52
L/C200_U
1-3. Adjustable components (seats, mirrors, steering wheel)
Front seats
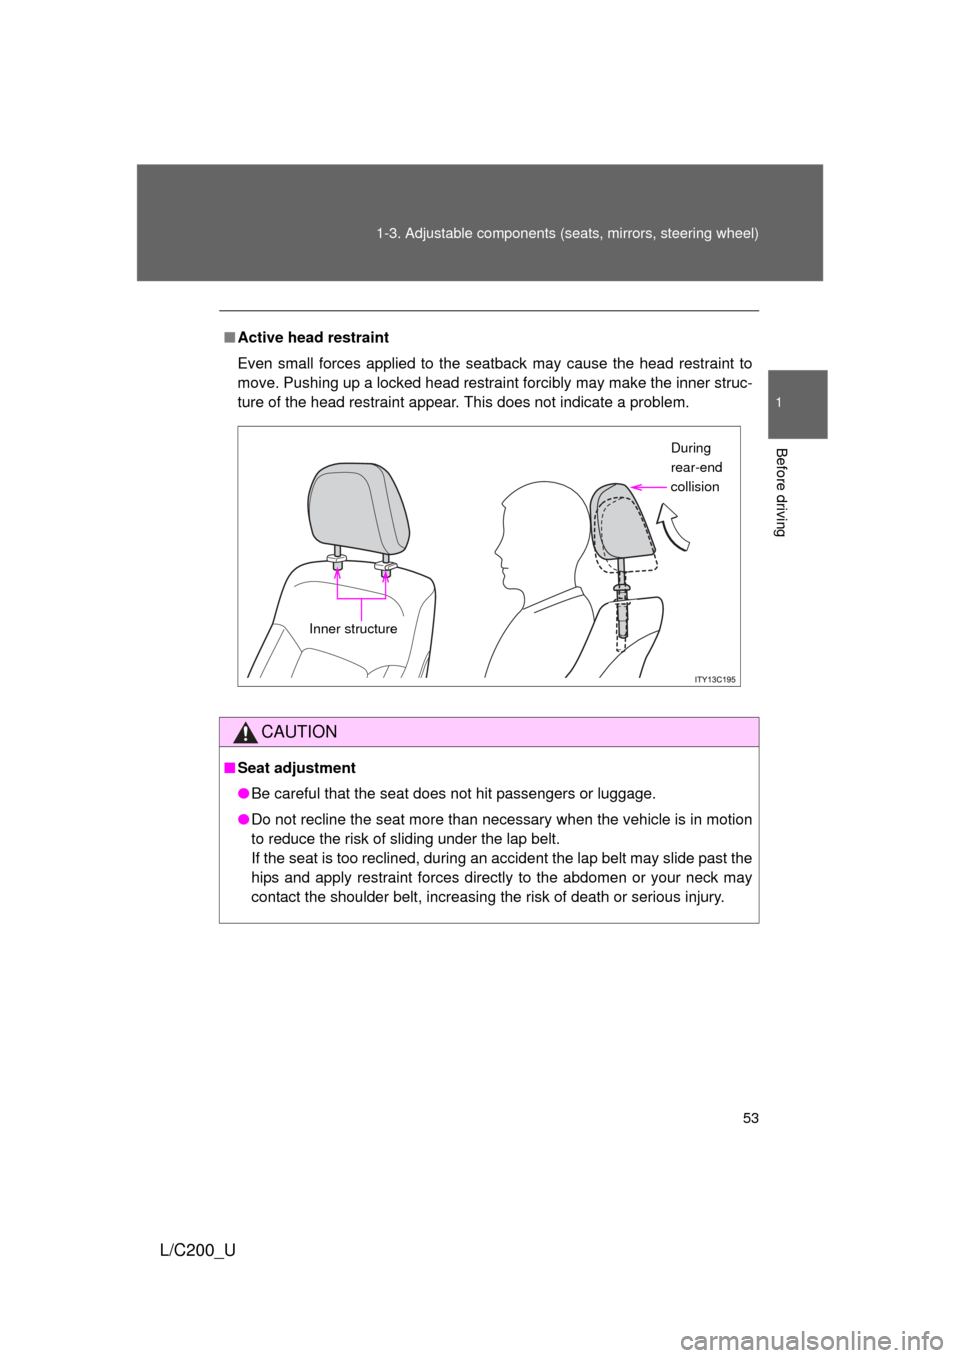
Active head restraint
When the occupant’s lower back
presses against the seatback
during a rear-end collision, the
head restraint moves slightly for-
ward and upward to help reduce
the risk of whiplash on the seat
occupant.
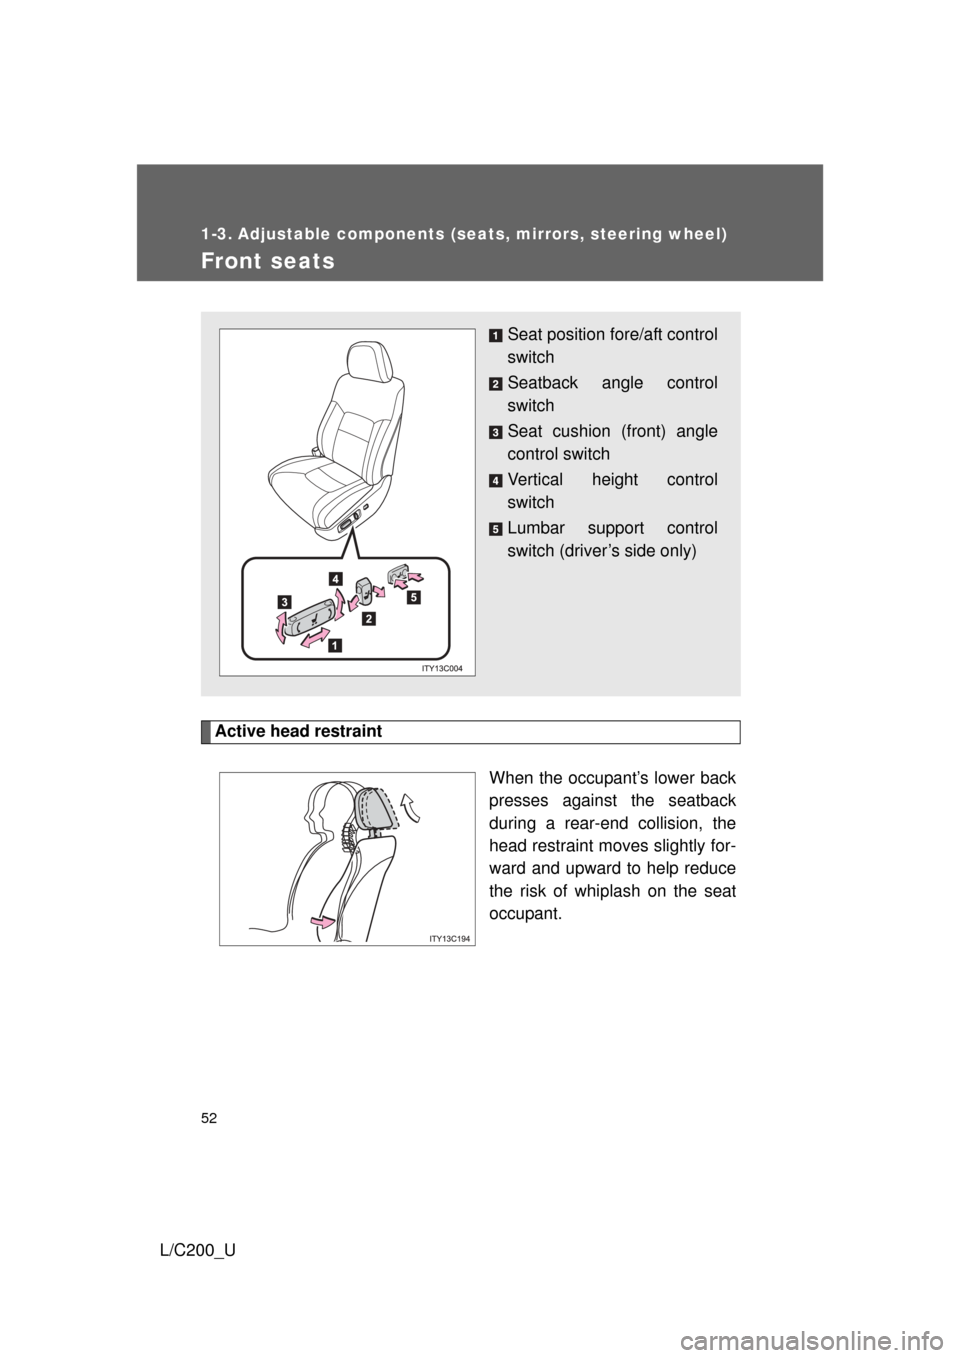
Seat position fore/aft control
switch
Seatback angle control
switch
Seat cushion (front) angle
control switch
Vertical height control
switch
Lumbar support control
switch (driver’s side only)
Page 53 of 592
53
1-3. Adjustable components (s
eats, mirrors, steering wheel)
1
Before driving
L/C200_U
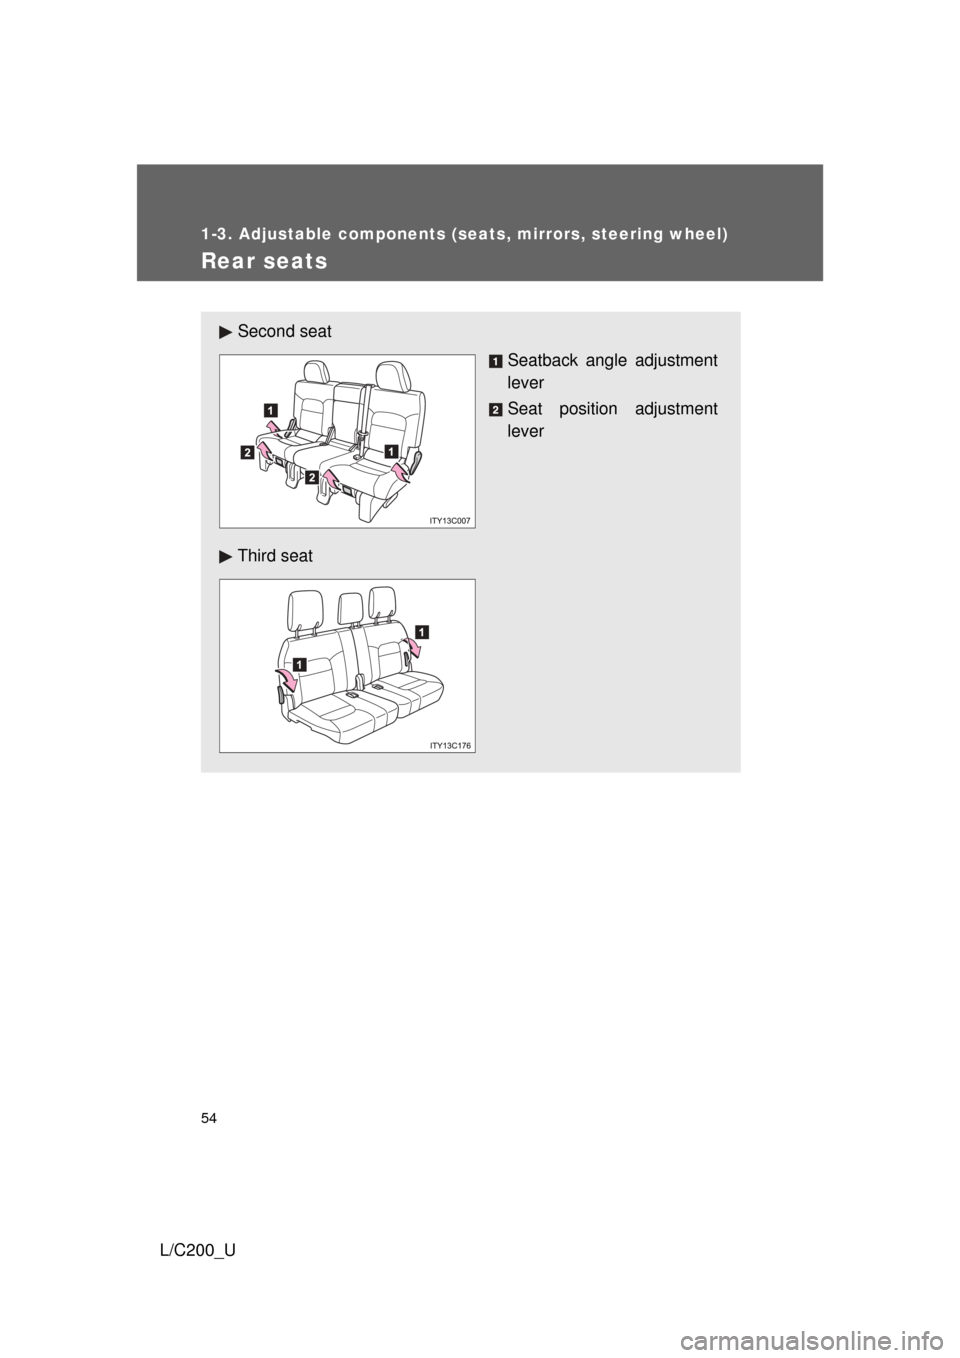
■Active head restraint
Even small forces applied to the seatback may cause the head restraint to
move. Pushing up a locked head restraint forcibly may make the inner struc-
ture of the head restraint appear. This does not indicate a problem.
CAUTION
■Seat adjustment
● Be careful that the seat does not hit passengers or luggage.
● Do not recline the seat more than necessary when the vehicle is in motion
to reduce the risk of sliding under the lap belt.
If the seat is too reclined, during an accident the lap belt may slide past the
hips and apply restraint forces directly to the abdomen or your neck may
contact the shoulder belt, increasing the risk of death or serious injury.
During
rear-end
collision
Inner structure
Page 54 of 592
54
1-3. Adjustable components (seats, mirrors, steering wheel)
L/C200_U
Rear seats
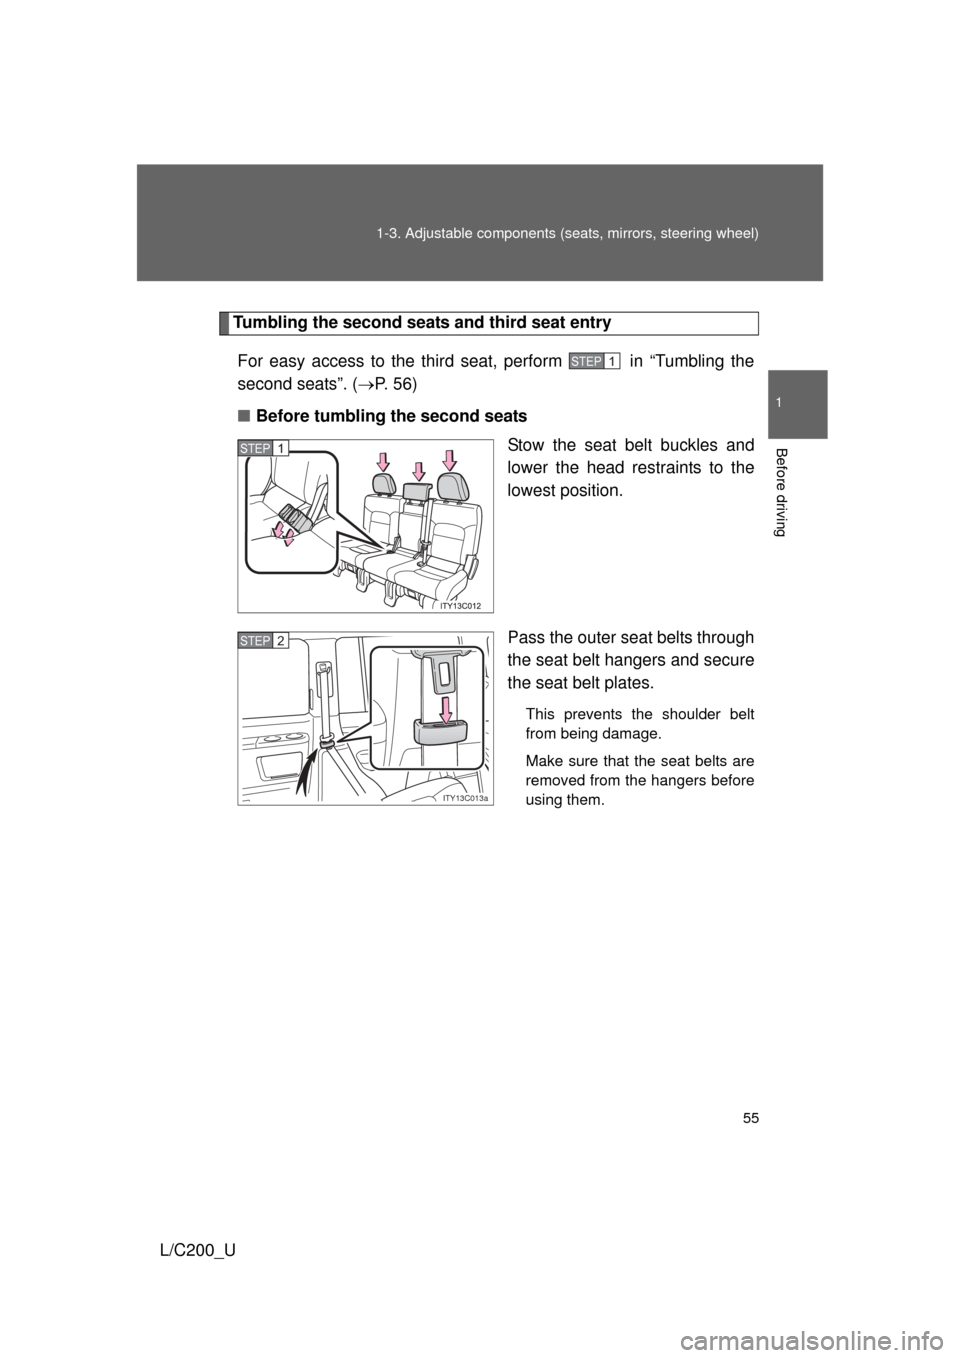
Second seatSeatback angle adjustment
lever
Seat position adjustment
lever
Third seat
Page 55 of 592
55
1-3. Adjustable components (s
eats, mirrors, steering wheel)
1
Before driving
L/C200_U
Tumbling the second seats and third seat entry
For easy access to the third seat, perform in “Tumbling the
second seats”. ( P. 5 6 )
■ Before tumbling the second seats
Stow the seat belt buckles and
lower the head restraints to the
lowest position.
Pass the outer seat belts through
the seat belt hangers and secure
the seat belt plates.
This prevents the shoulder belt
from being damage.
Make sure that the seat belts are
removed from the hangers before
using them.
STEP1
STEP1
ITY13C013a
STEP2
Page 56 of 592
56 1-3. Adjustable components (seats, mirrors, steering wheel)
L/C200_U■
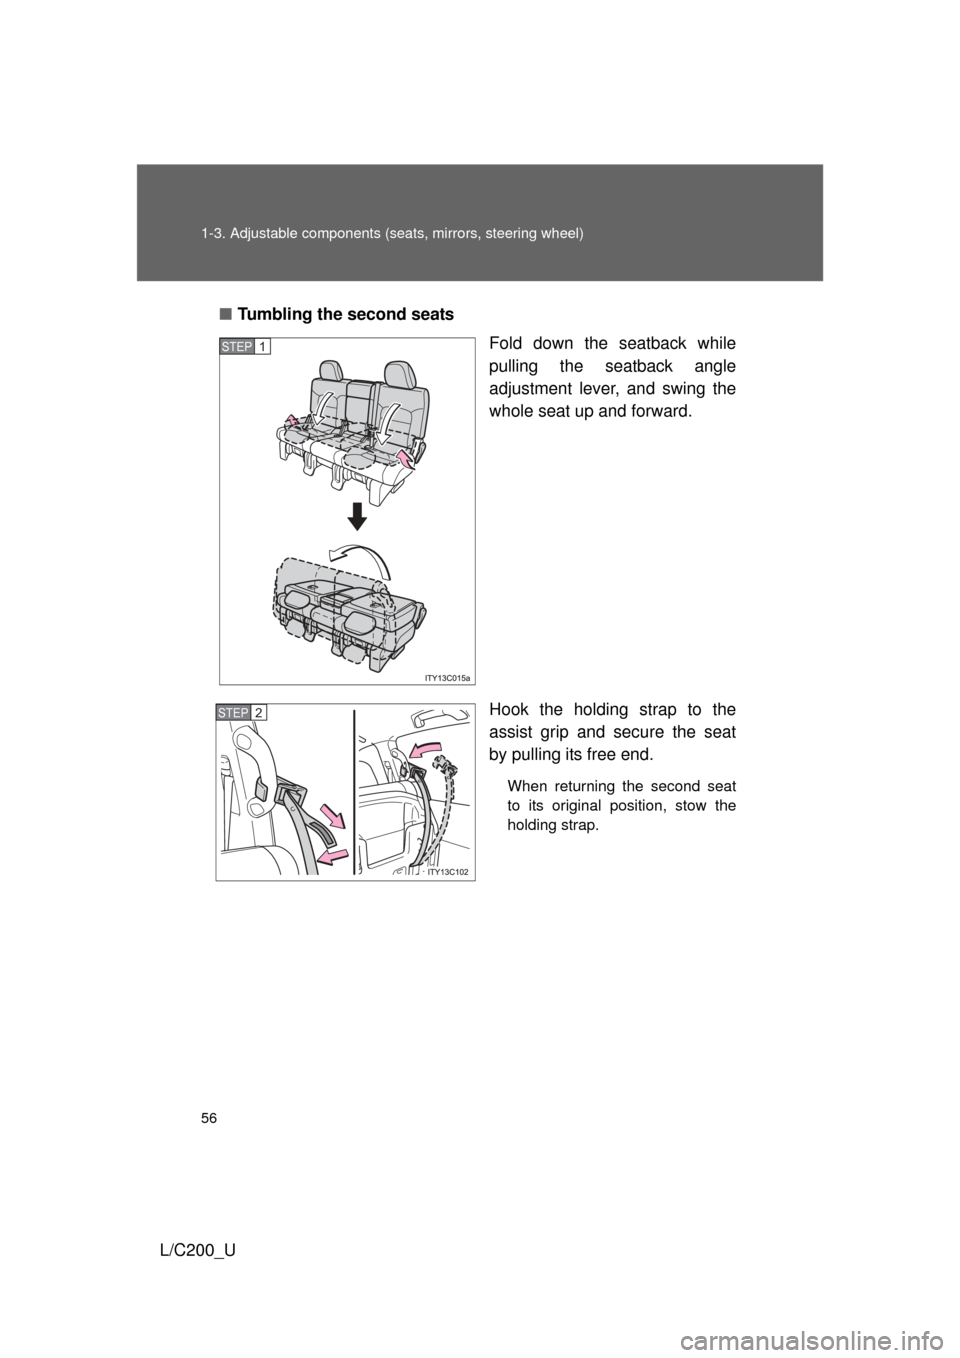
Tumbling the second seats
Fold down the seatback while
pulling the seatback angle
adjustment lever, and swing the
whole seat up and forward.
Hook the holding strap to the
assist grip and secure the seat
by pulling its free end.
When returning the second seat
to its original position, stow the
holding strap.
STEP1
STEP2
Page 57 of 592
57
1-3. Adjustable components (s
eats, mirrors, steering wheel)
1
Before driving
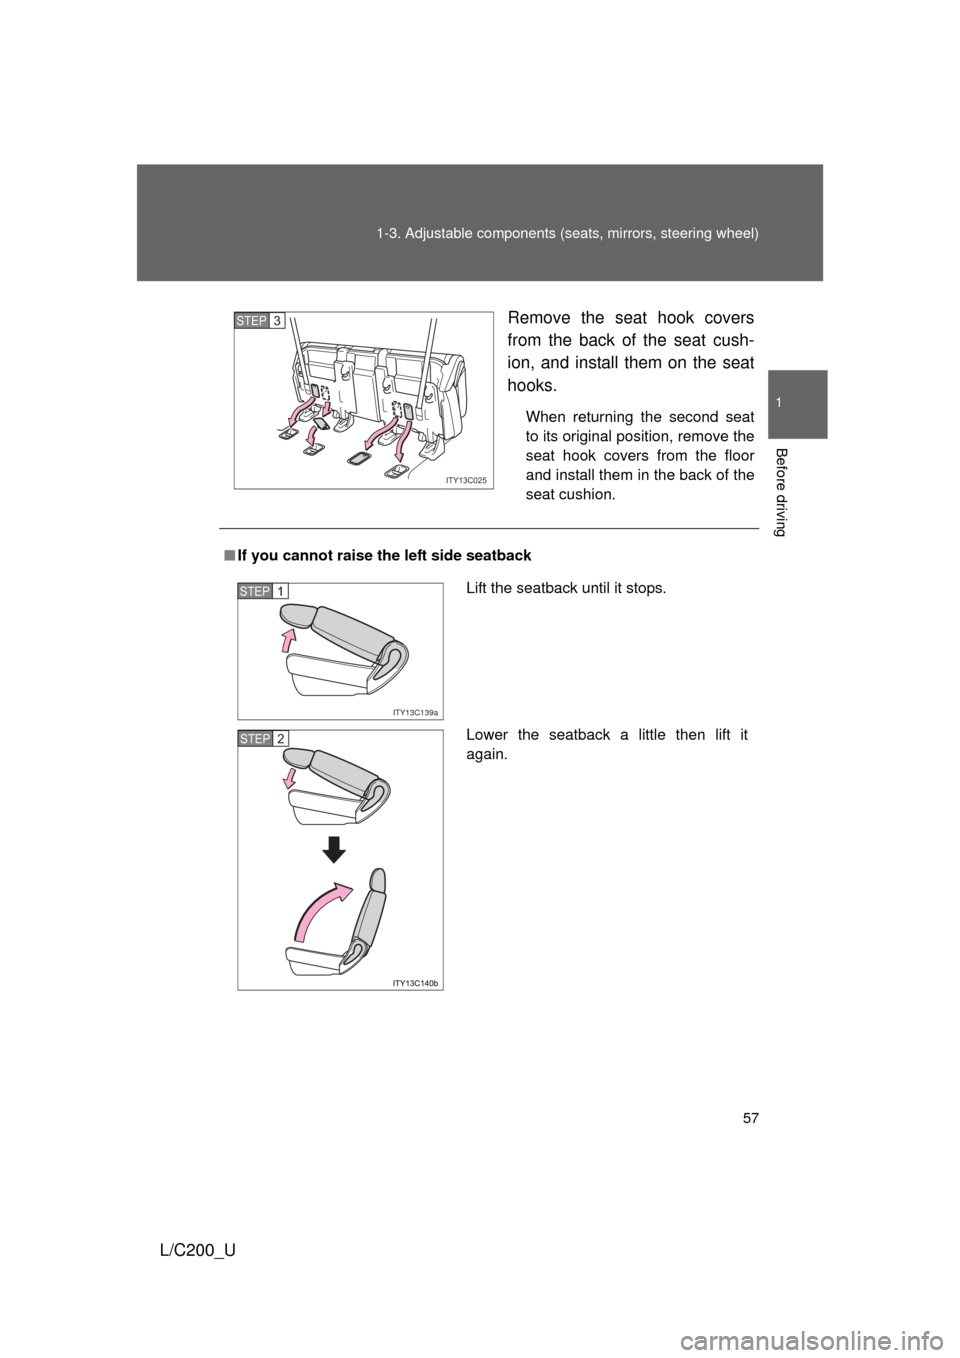
L/C200_U Remove the seat hook covers
from the back of the seat cush-
ion, and install them on the seat
hooks.
When returning the second seat
to its original position, remove the
seat hook covers from the floor
and install them in the back of the
seat cushion.
ITY13C025
STEP3
■
If you cannot raise the left side seatback
Lift the seatback until it stops.
Lower the seatback a little then lift it
again.
ITY13C139a
STEP1
STEP2
Page 58 of 592
58 1-3. Adjustable components (seats, mirrors, steering wheel)
L/C200_U
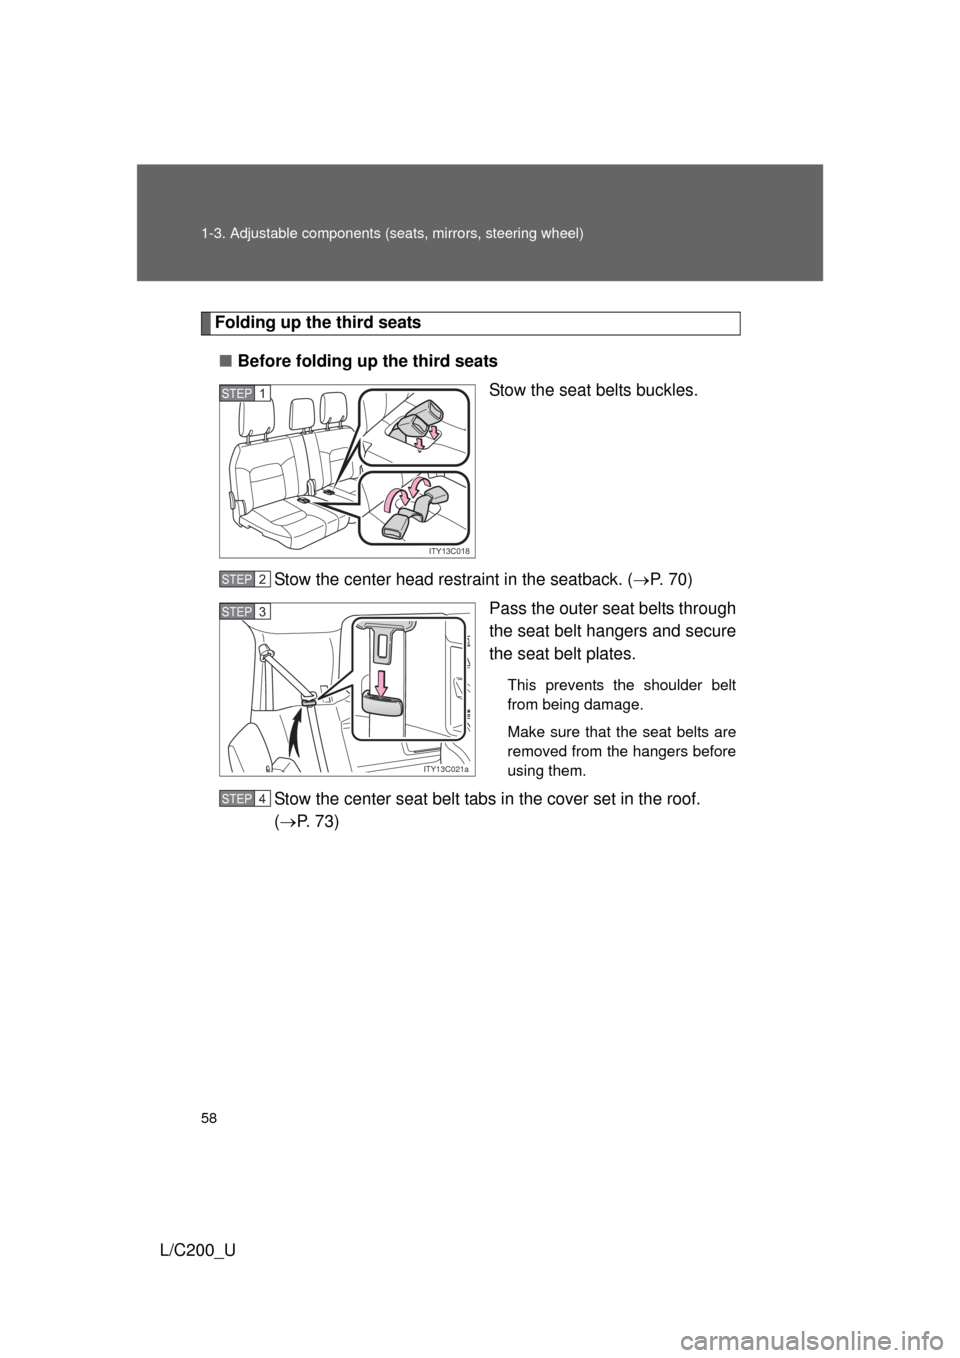
Folding up the third seats
■ Before folding up the third seats
Stow the seat belts buckles.
Stow the center head restraint in the seatback. ( P. 70)
Pass the outer seat belts through
the seat belt hangers and secure
the seat belt plates.
This prevents the shoulder belt
from being damage.
Make sure that the seat belts are
removed from the hangers before
using them.
Stow the center seat belt tabs in the cover set in the roof.
( P. 7 3 )
ITY13C018
STEP1
STEP2
ITY13C021a
STEP3
STEP4
Page 59 of 592
59
1-3. Adjustable components (s
eats, mirrors, steering wheel)
1
Before driving
L/C200_U■
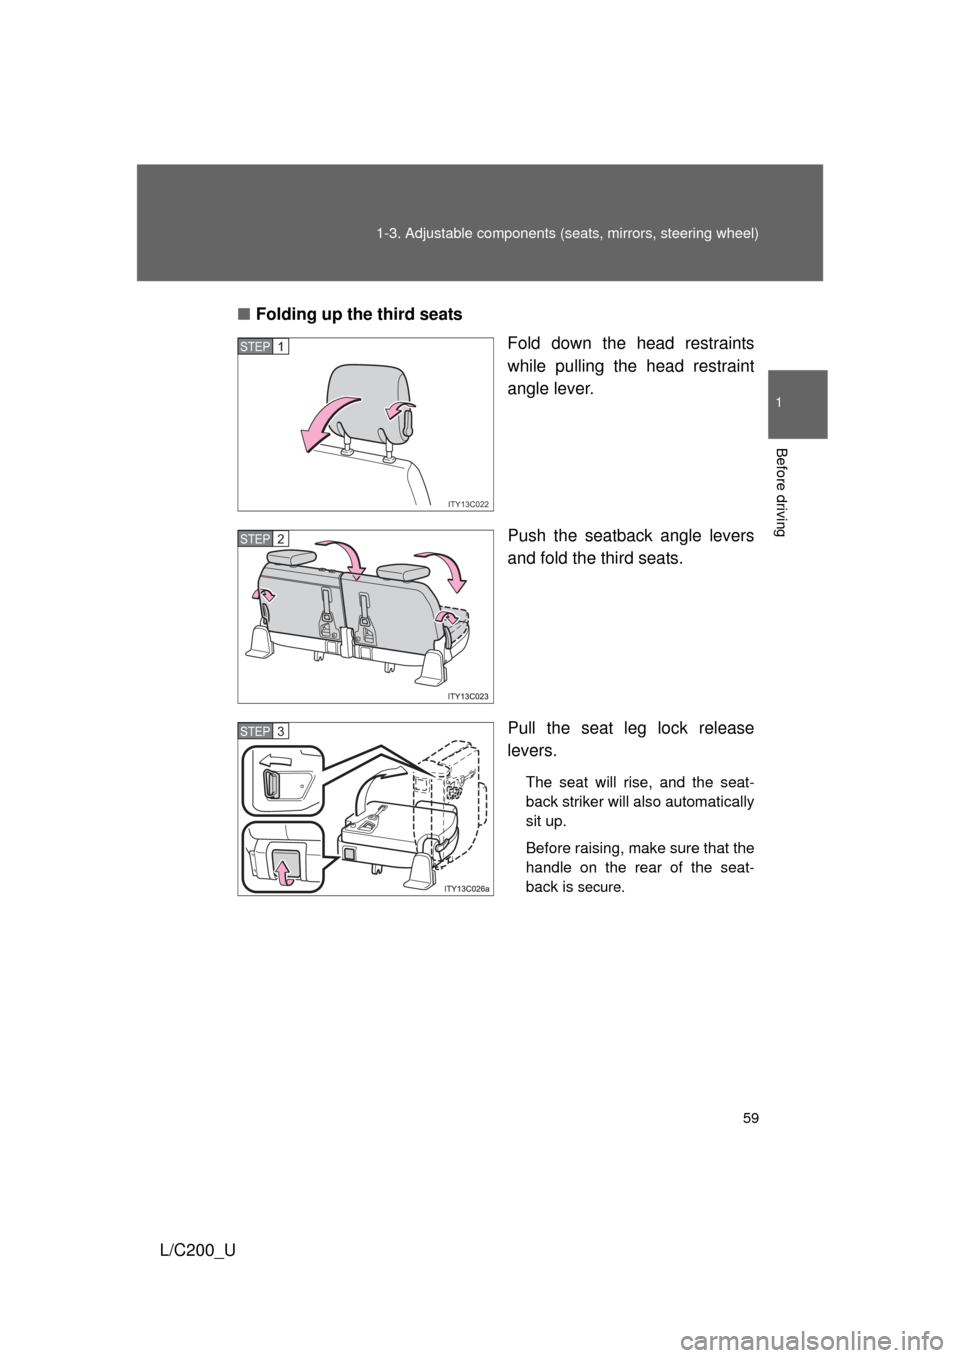
Folding up the third seats
Fold down the head restraints
while pulling the head restraint
angle lever.
Push the seatback angle levers
and fold the third seats.
Pull the seat leg lock release
levers.
The seat will rise, and the seat-
back striker will also automatically
sit up.
Before raising, make sure that the
handle on the rear of the seat-
back is
secure.
ITY13C022
STEP1
STEP2
STEP3
Page 60 of 592
60 1-3. Adjustable components (seats, mirrors, steering wheel)
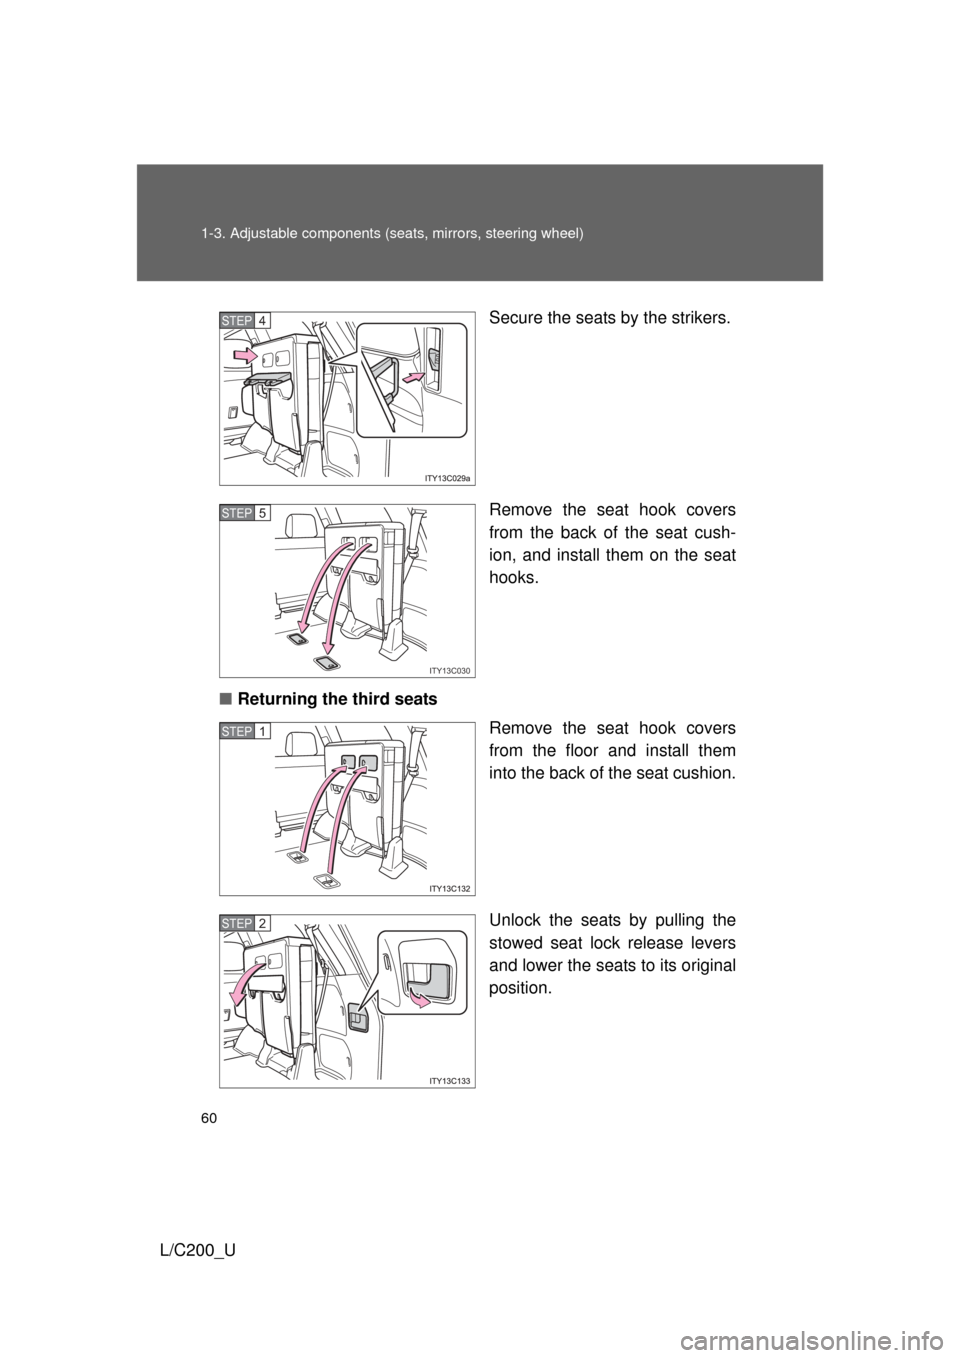
L/C200_U Secure the seats by the strikers.
Remove the seat hook covers
from the back of the seat cush-
ion, and install them on the seat
hooks.
■ Returning the third seats
Remove the seat hook covers
from the floor and install them
into the back of the seat cushion.
Unlock the seats by pulling the
stowed seat lock release levers
and lower the seats to its original
position.
STEP4
ITY13C030
STEP5
STEP1
STEP2
Trending: maintenance schedule, heater, tires, fuel fill door release, fuel consumption, overheating, oil type

