brake TOYOTA LAND CRUISER 2011 J200 User Guide
[x] Cancel search | Manufacturer: TOYOTA, Model Year: 2011, Model line: LAND CRUISER, Model: TOYOTA LAND CRUISER 2011 J200Pages: 608, PDF Size: 8.29 MB
Page 151 of 608
151
2-1. Driving procedures
2
When driving
L/C200_U (OM60F74U)
CAUTION
■
When braking the vehicle
● When the brakes are wet, drive more cautiously.
Braking distance increases when the brakes are wet, and may cause one
side of the vehicle to brake differently than the other side. Also the parking
brake may not securely hold the vehicle.
● If the power brake assist function does not operate, do not follow other
vehicles closely and avoid downhill or sharp turns that require braking.
In this case, braking is still possible, but it will require more force on the
pedal than usual. Braking distance may also increase.
● Do not pump the brake pedal if the engine stalls.
Each push on the brake pedal uses up the reserve for the power-assisted
brakes.
● The brake system consists of 2 individual hydraulic systems: if one of the
systems fails, the other will still operate. In this case, the brake pedal
should be depressed more firmly than usual and braking distance
becomes longer.
Do not drive your vehicle with only a single brake system. Have your
brakes fixed immediately.
Page 152 of 608
152 2-1. Driving procedures
L/C200_U (OM60F74U)
NOTICE
■While driving the vehicle
● Do not depress the accelerator and brake pedals at the same time during
driving. If the brake pedal is depressed while driving with the accelerator
pedal depressed, driving torque may be restrained.
● Do not use the accelerator pedal or depress accelerator and brake pedals
together to hold the vehicle on a hill.
■ When parking the vehicle
Always put the shift lever in “P”. Failure to do so may cause the vehicle to
move or the vehicle may accelerate suddenly if the accelerator pedal is acci-
dentally depressed.
■ Avoiding damage to vehicle parts
● Do not turn the steering wheel fully in either direction and hold it there for a
long time.
Doing so may damage the power steering pump.
● When driving over bumps in the road, drive as slowly as possible to avoid
damaging the wheels, underside of the vehicle, etc.
■ If you hear a squealing or scraping noise (brake pad wear limit indica-
tors)
Have your Toyota dealer check and replace the brake pads as soon as pos-
sible.
The rotor damage can result if the pads are not replaced when needed.
It is dangerous to drive the vehicle when the wear limits of the brake pads
and/or that of the brake discs are exceeded.
Page 153 of 608
153
2-1. Driving procedures
2
When driving
L/C200_U (OM60F74U)
NOTICE
■
If you get a flat tire while driving
A flat or damaged tire may cause the following situations. Hold the steering
wheel firmly and gradually press the brake pedal to slow down the vehicle.
● It may be difficult to control your vehicle.
● The vehicle will make abnormal sounds.
● The vehicle will behave abnormally.
Replace a flat tire with a new one. ( P. 526)
■ When encountering flooded roads
Do not drive on a road that has flooded after heavy rain etc. Doing so may
cause the following serious damage to the vehicle.
● Engine stalling
● Short in electrical components
● Engine damage caused by water immersion
In the event that you drive on a flooded road and the vehicle is flooded, be
sure to have your Toyota dealer check the following.
● Brake function
● Changes in quantity and quality of oil and fluid used for the engine, trans-
mission, transfer, differentials, etc.
● Lubricant condition for the propeller shaft, bearings and suspension joints
(where possible) and the function of all joints, bearings, etc.
Page 154 of 608
154
2-1. Driving procedures
L/C200_U (OM60F74U)
Engine (ignition) switch
Performing the following operations when carrying the electronic
key on your person starts the en gine or changes “ENGINE START
STOP” switch modes.
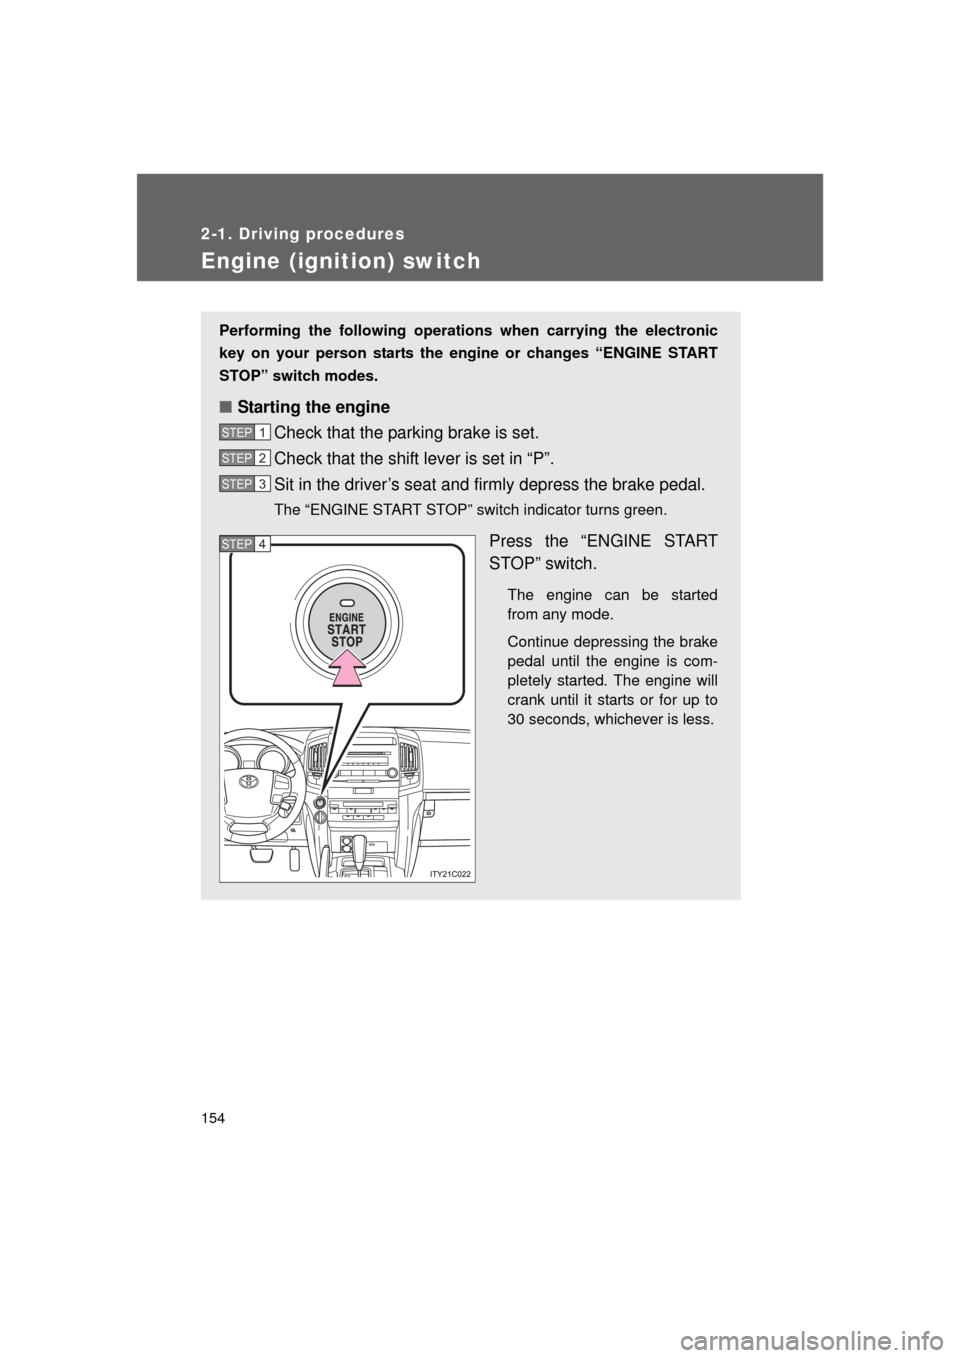
■ Starting the engine
Check that the parking brake is set.
Check that the shift lever is set in “P”.
Sit in the driver’s seat and firmly depress the brake pedal.
The “ENGINE START STOP” switch indicator turns green.
Press the “ENGINE START
STOP” switch.
The engine can be started
from any mode.
Continue depressing the brake
pedal until the engine is com-
pletely started. The engine will
crank until it starts or for up to
30 seconds, whichever is less.
STEP1
STEP2
STEP3
STEP4
Page 155 of 608
155
2-1. Driving procedures
2
When driving
L/C200_U (OM60F74U)
■
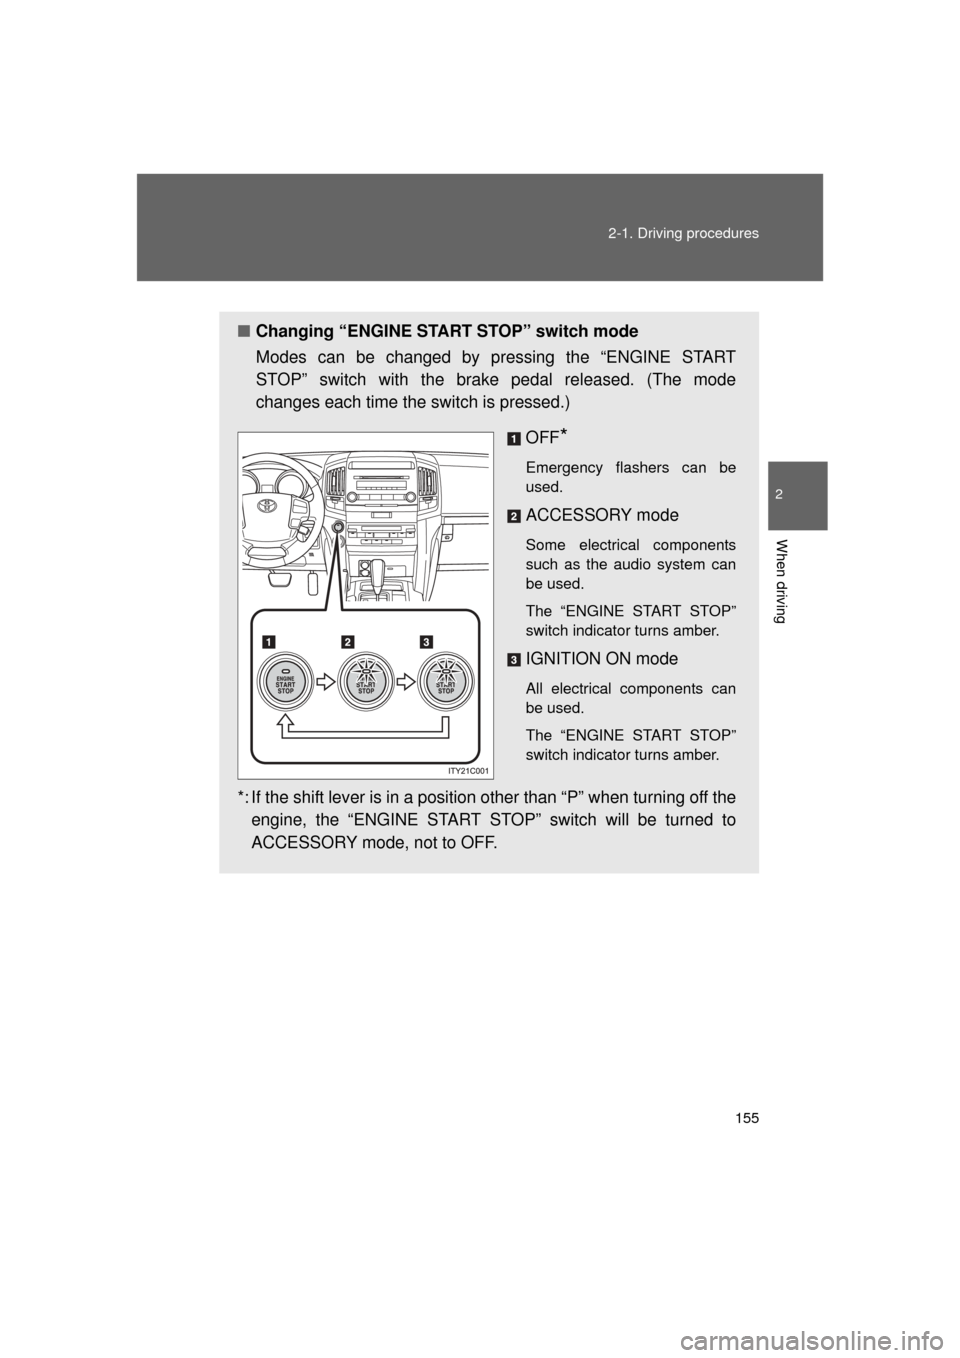
Changing “ENGINE START STOP” switch mode
Modes can be changed by pressing the “ENGINE START
STOP” switch with the brake pedal released. (The mode
changes each time the switch is pressed.)
OFF
*
Emergency flashers can be
used.
ACCESSORY mode
Some electrical components
such as the audio system can
be used.
The “ENGINE START STOP”
switch indicator turns amber.
IGNITION ON mode
All electrical components can
be used.
The “ENGINE START STOP”
switch indicator turns amber.
*: If the shift lever is in a position other than “P” when turning off theengine, the “ENGINE START STOP” switch will be turned to
ACCESSORY mode, not to OFF.
Page 158 of 608
158
2-1. Driving procedures
L/C200_U (OM60F74U)
Automatic transmission
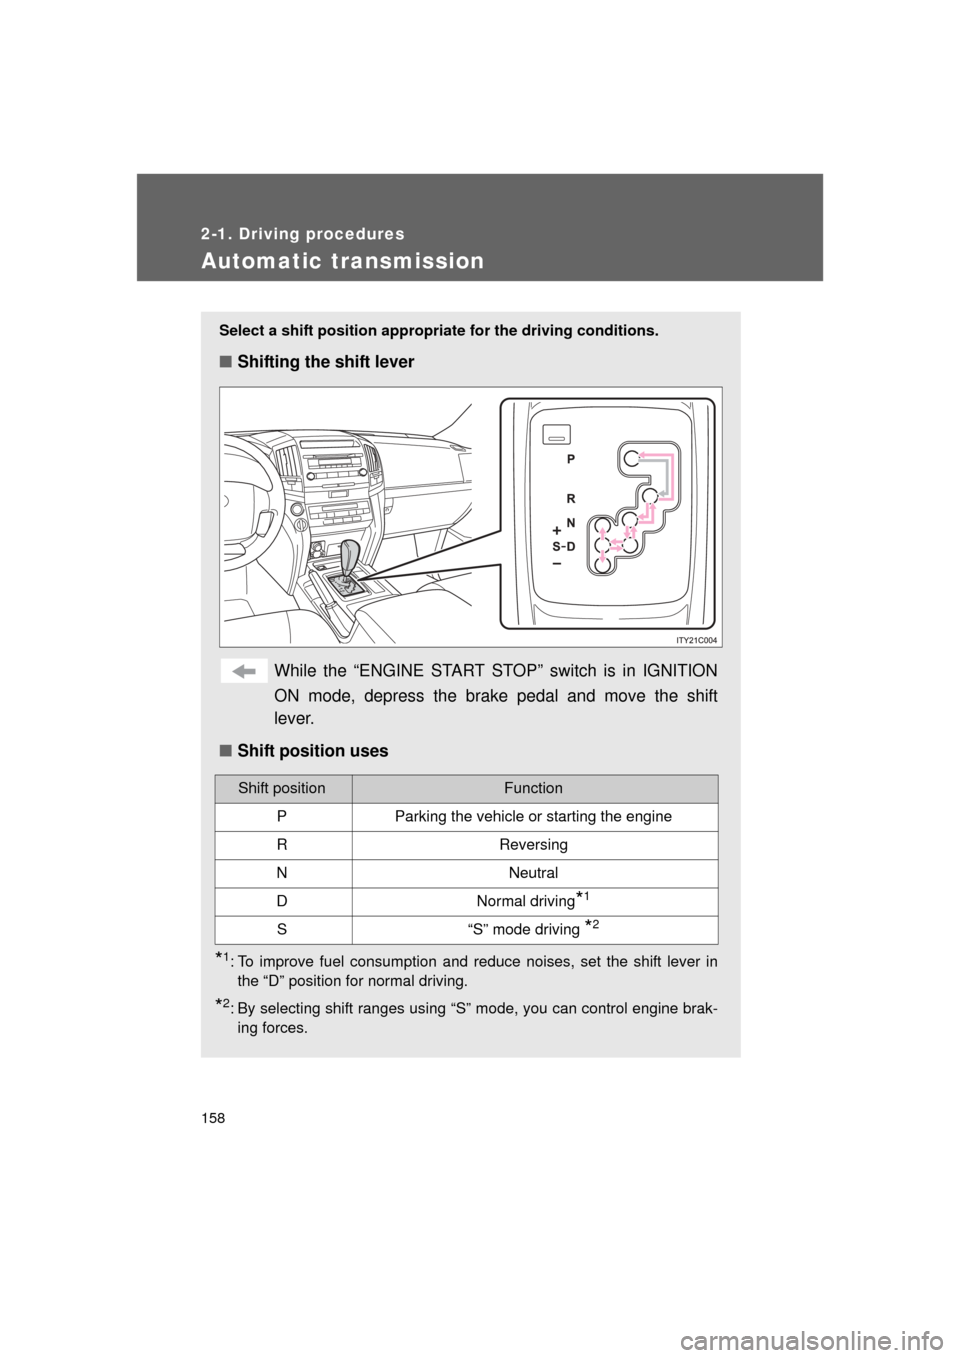
Select a shift position appropriate for the driving conditions.
■Shifting the shift lever
While the “ENGINE START STOP” switch is in IGNITION
ON mode, depress the brake pedal and move the shift
lever.
■ Shift position uses
*1: To improve fuel consumption and reduce noises, set the shift lever in
the “D” position for normal driving.
*2: By selecting shift ranges using “S” mode, you can control engine brak-ing forces.
Shift positionFunction
PParking the vehicle or starting the engine
RReversing
NNeutral
DNormal driving*1
S“S” mode driving *2
Page 162 of 608

162 2-1. Driving procedures
L/C200_U (OM60F74U)
■“S” mode
When the shift range is “5” or lower, holding the shift lever toward “+” sets
the shift range to “6”.
■ Downshifting restrictions warning buzzer (in the “S” mode)
To help ensure safety and driving performance, downshifting operation may
sometimes be restricted. In some circumstances, downshifting may not be
possible even when the shift lever is operated. (The warning buzzer will
sound twice.)
■ When driving with the cruise control system
The engine brake will not operate in t he “S” mode, even when downshifting
to “5” or “4”. ( P. 187)
■ Second start mode au tomatic deactivation
Second start mode is automatically deactivated if the engine is turned off
after driving in second start mode.
■ If the shift lever cannot be shifted from “P”
P. 5 4 2
■If the “S” indicator does not come on even after shifting the shift lever
to “S”
This may indicate a malfunction in the automatic transmission system. Have
the vehicle inspected by your Toyota dealer immediately.
(In this situation, the vehicle will operate as if the shift lever is in “D”.)
■ AI-SHIFT
The AI-SHIFT automatically shifts the gear to the optimal position according
to the driver performance and driving conditions.
The AI-SHIFT automatically operates when the shift lever is in the “D” posi-
tion. (Shifting the shift lever to the “S” position cancels the function.)
While in power mode, the engine speed may stay high while depressing the
accelerator pedal and may remain high after releasing the accelerator pedal.
This does not indicate a malfunction.
Page 164 of 608
164
2-1. Driving procedures
L/C200_U (OM60F74U)
Parking brake
■Usage in winter time
See “Winter driving tips” for parking brake usage in winter time. ( P. 229)
NOTICE
■Before driving
Fully release the parking brake.
Driving the vehicle with the parking brake set will lead to brake components
overheating, which may affect braking performance and increase brake
wear.
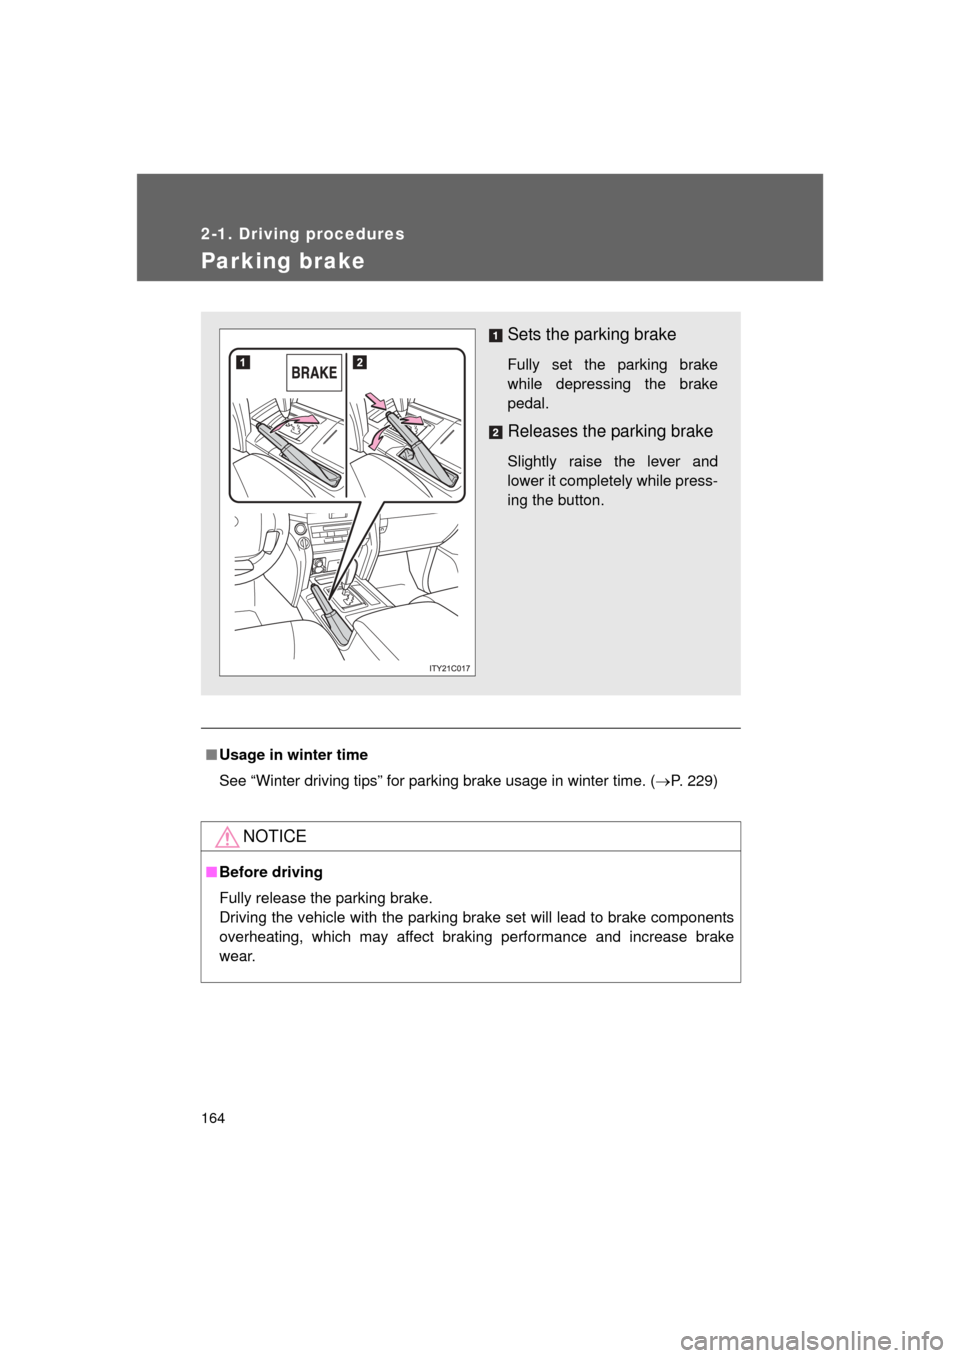
Sets the parking brake
Fully set the parking brake
while depressing the brake
pedal.
Releases the parking brake
Slightly raise the lever and
lower it completely while press-
ing the button.
Page 177 of 608
177
2-3. Operating the lights and wipers
2
When driving
L/C200_U (OM60F74U)
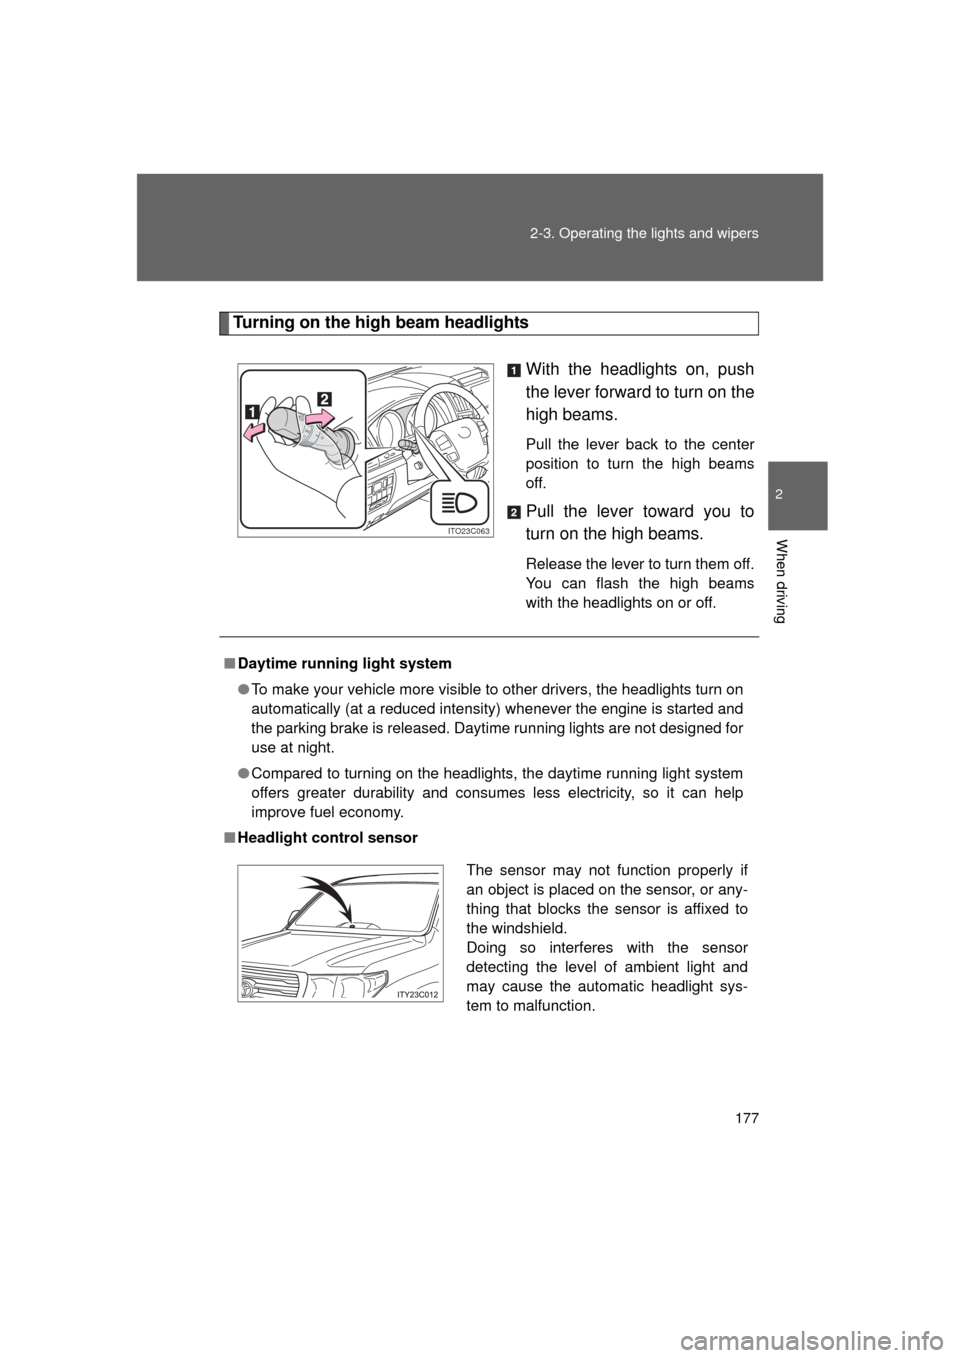
Turning on the high beam headlights
With the headlights on, push
the lever forward to turn on the
high beams.
Pull the lever back to the center
position to turn the high beams
off.
Pull the lever toward you to
turn on the high beams.
Release the lever to turn them off.
You can flash the high beams
with the headlights on or off.
ITO23C063
■Daytime running light system
● To make your vehicle more visible to other drivers, the headlights turn on
automatically (at a reduced intensity) whenever the engine is started and
the parking brake is released. Daytime running lights are not designed for
use at night.
● Compared to turning on the headlights, the daytime running light system
offers greater durability and consumes less electricity, so it can help
improve fuel economy.
■ Headlight control sensor
The sensor may not function properly if
an object is placed on the sensor, or any-
thing that blocks the sensor is affixed to
the windshield.
Doing so interferes with the sensor
detecting the level of ambient light and
may cause the automatic headlight sys-
tem to malfunction.
Page 188 of 608
188 2-4. Using other driving systems
L/C200_U (OM60F74U)
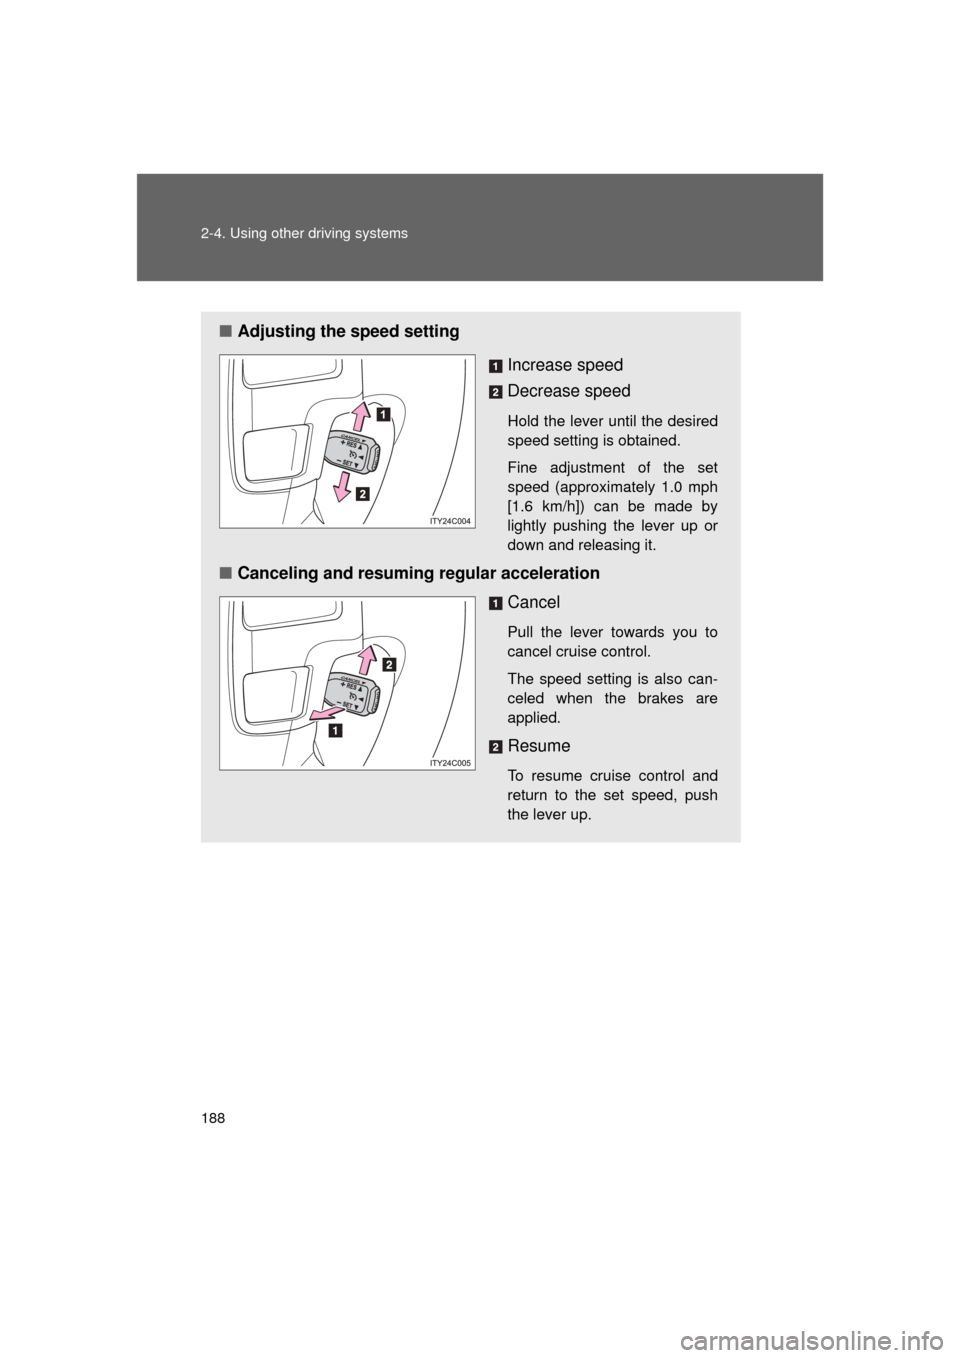
■Adjusting the speed setting
Increase speed
Decrease speed
Hold the lever until the desired
speed setting is obtained.
Fine adjustment of the set
speed (approximately 1.0 mph
[1.6 km/h]) can be made by
lightly pushing the lever up or
down and releasing it.
■Canceling and resuming regular acceleration
Cancel
Pull the lever towards you to
cancel cruise control.
The speed setting is also can-
celed when the brakes are
applied.
Resume
To resume cruise control and
return to the set speed, push
the lever up.