steering TOYOTA LAND CRUISER 2014 J200 Navigation Manual
[x] Cancel search | Manufacturer: TOYOTA, Model Year: 2014, Model line: LAND CRUISER, Model: TOYOTA LAND CRUISER 2014 J200Pages: 427, PDF Size: 25.75 MB
Page 162 of 427
162
2. SETUP
L/C200_Navi_OM60L27U_(U)
13.06.03 19:43
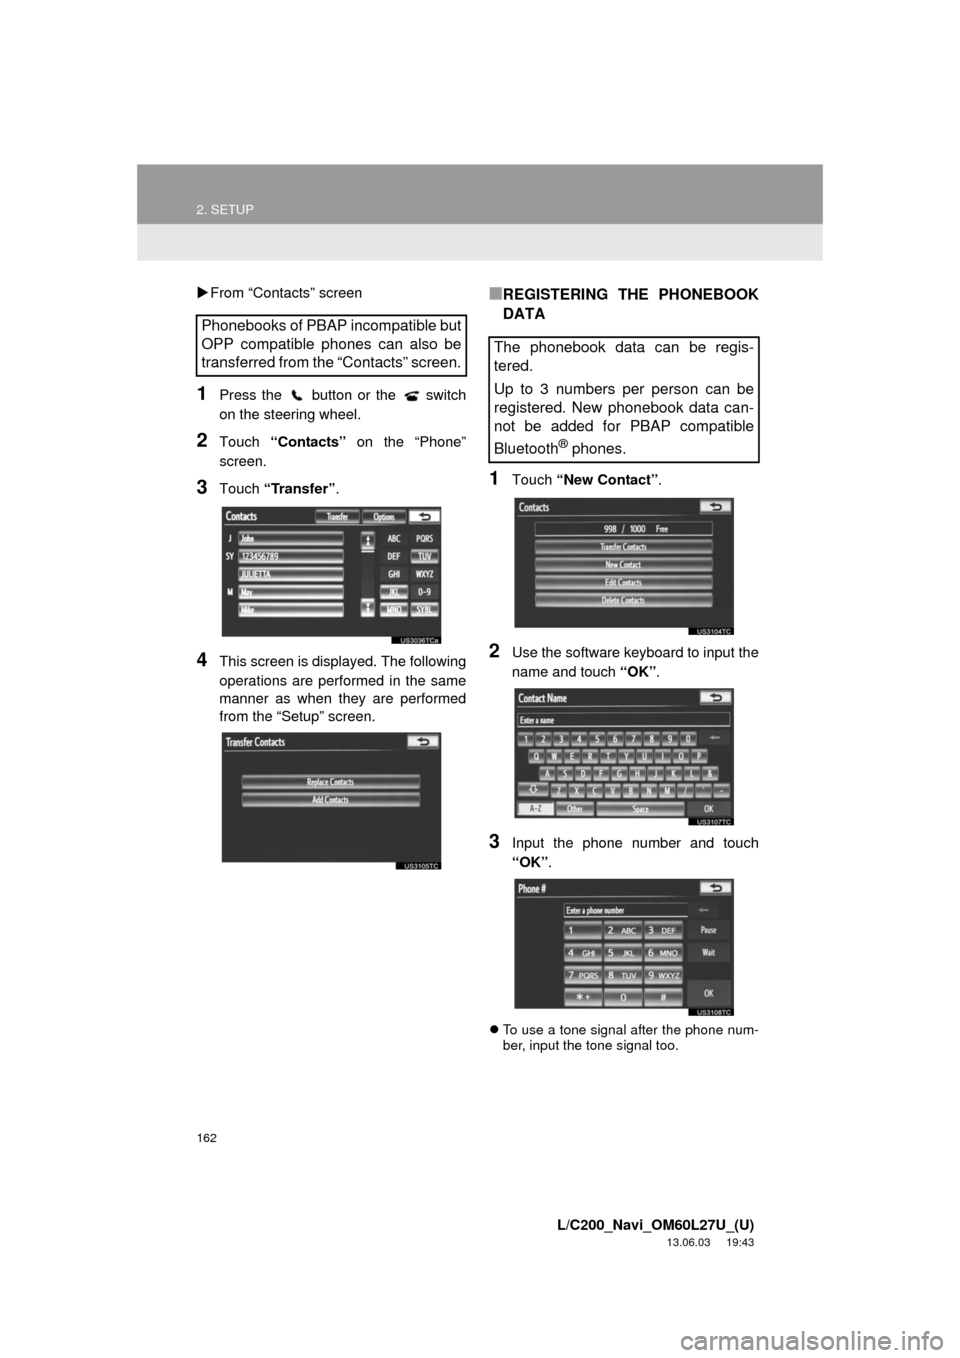
From “Contacts” screen
1Press the button or the switch
on the steering wheel.
2Touch “Contacts” on the “Phone”
screen.
3Touch “Transfer”.
4This screen is displayed. The following
operations are performed in the same
manner as when they are performed
from the “Setup” screen.
■REGISTERING THE PHONEBOOK
DATA
1Touch “New Contact”.
2Use the software keyboard to input the
name and touch “OK”.
3Input the phone number and touch
“OK”.
To use a tone signal after the phone num-
ber, input the tone signal too.
Phonebooks of PBAP incompatible but
OPP compatible phones can also be
transferred from the “Contacts” screen.
The phonebook data can be regis-
tered.
Up to 3 numbers per person can be
registered. New phonebook data can-
not be added for PBAP compatible
Bluetooth
® phones.
Page 164 of 427
164
2. SETUP
L/C200_Navi_OM60L27U_(U)
13.06.03 19:43
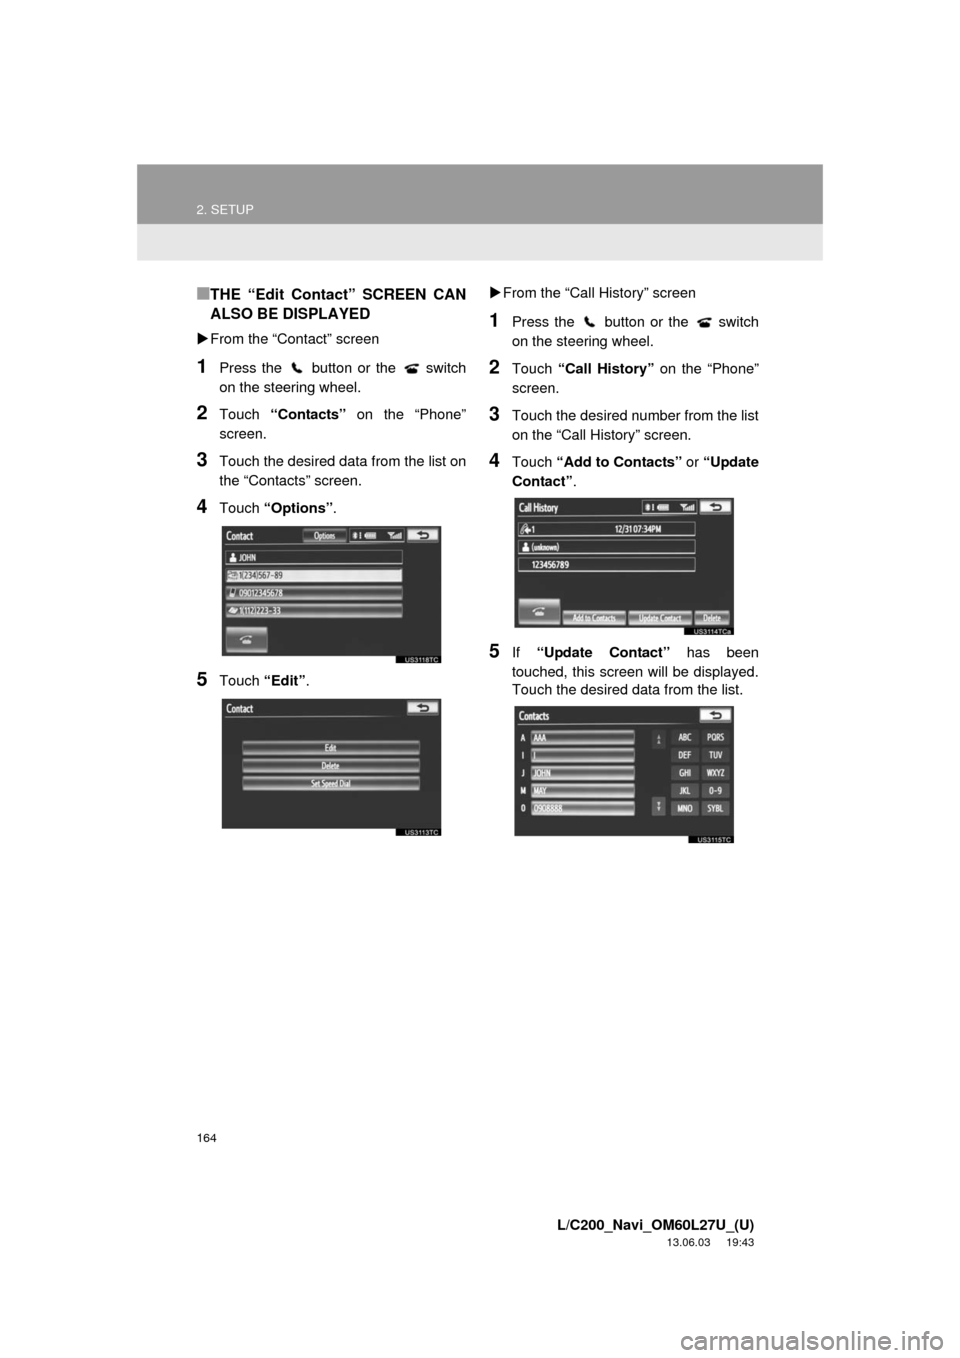
■THE “Edit Contact” SCREEN CAN
ALSO BE DISPLAYED
From the “Contact” screen
1Press the button or the switch
on the steering wheel.
2Touch “Contacts” on the “Phone”
screen.
3Touch the desired data from the list on
the “Contacts” screen.
4Touch “Options”.
5Touch “Edit”.From the “Call History” screen
1Press the button or the switch
on the steering wheel.
2Touch “Call History” on the “Phone”
screen.
3Touch the desired number from the list
on the “Call History” screen.
4Touch “Add to Contacts” or “Update
Contact”.
5If “Update Contact” has been
touched, this screen will be displayed.
Touch the desired data from the list.
Page 165 of 427
165
2. SETUP
4
PHONE
L/C200_Navi_OM60L27U_(U)
13.06.03 19:43
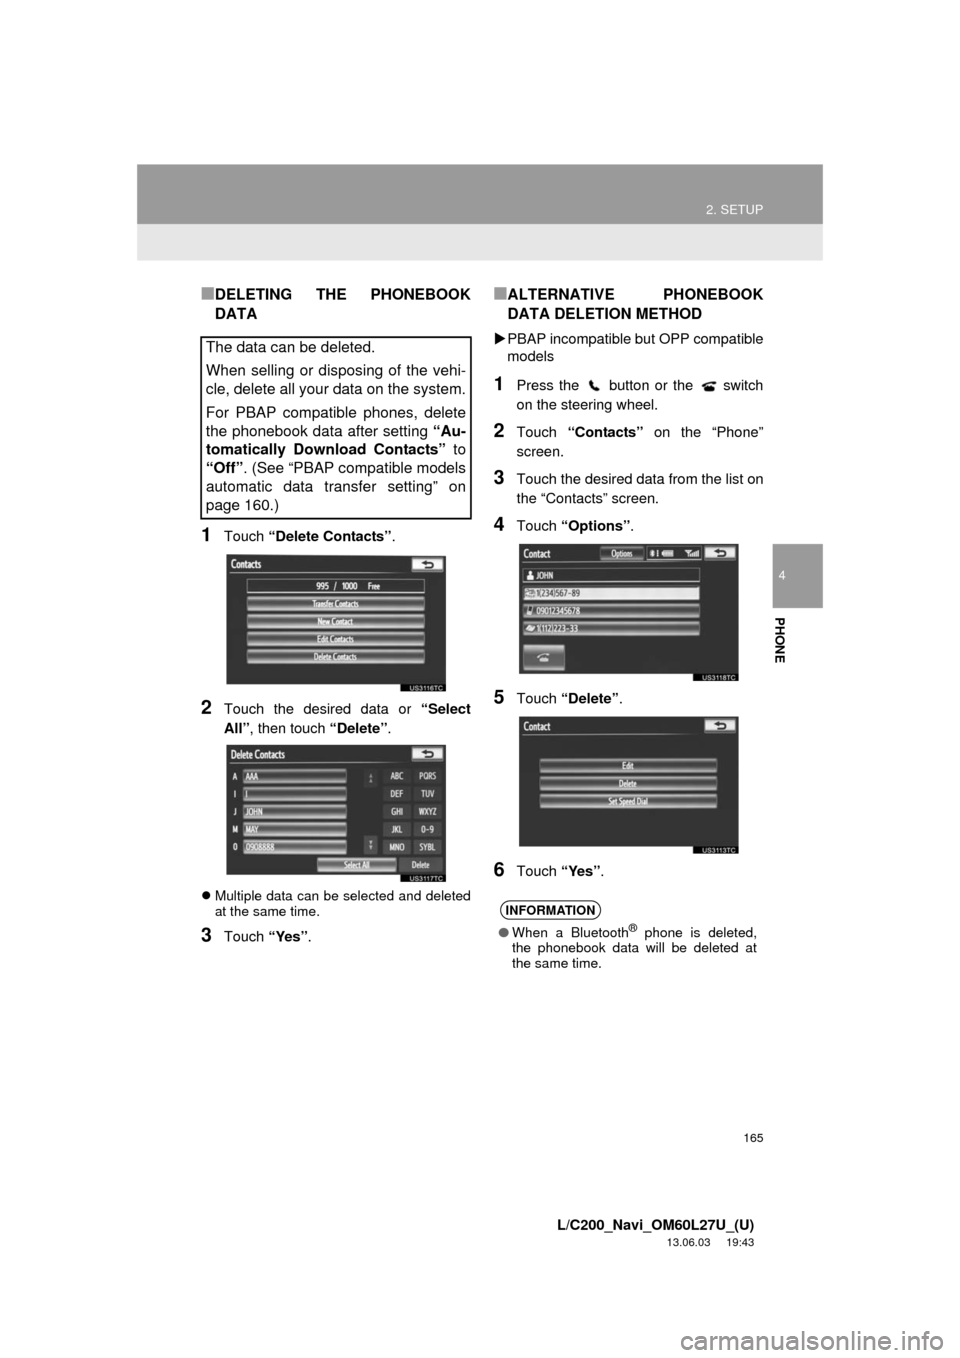
■DELETING THE PHONEBOOK
DATA
1Touch “Delete Contacts”.
2Touch the desired data or “Select
All”, then touch “Delete”.
Multiple data can be selected and deleted
at the same time.
3Touch “Yes”.
■ALTERNATIVE PHONEBOOK
DATA DELETION METHOD
PBAP incompatible but OPP compatible
models
1Press the button or the switch
on the steering wheel.
2Touch “Contacts” on the “Phone”
screen.
3Touch the desired data from the list on
the “Contacts” screen.
4Touch “Options”.
5Touch “Delete”.
6Touch “Yes”.
The data can be deleted.
When selling or disposing of the vehi-
cle, delete all your data on the system.
For PBAP compatible phones, delete
the phonebook data after setting “Au-
tomatically Download Contacts” to
“Off”. (See “PBAP compatible models
automatic data transfer setting” on
page 160.)
INFORMATION
●When a Bluetooth® phone is deleted,
the phonebook data will be deleted at
the same time.
Page 166 of 427
166
2. SETUP
L/C200_Navi_OM60L27U_(U)
13.06.03 19:43
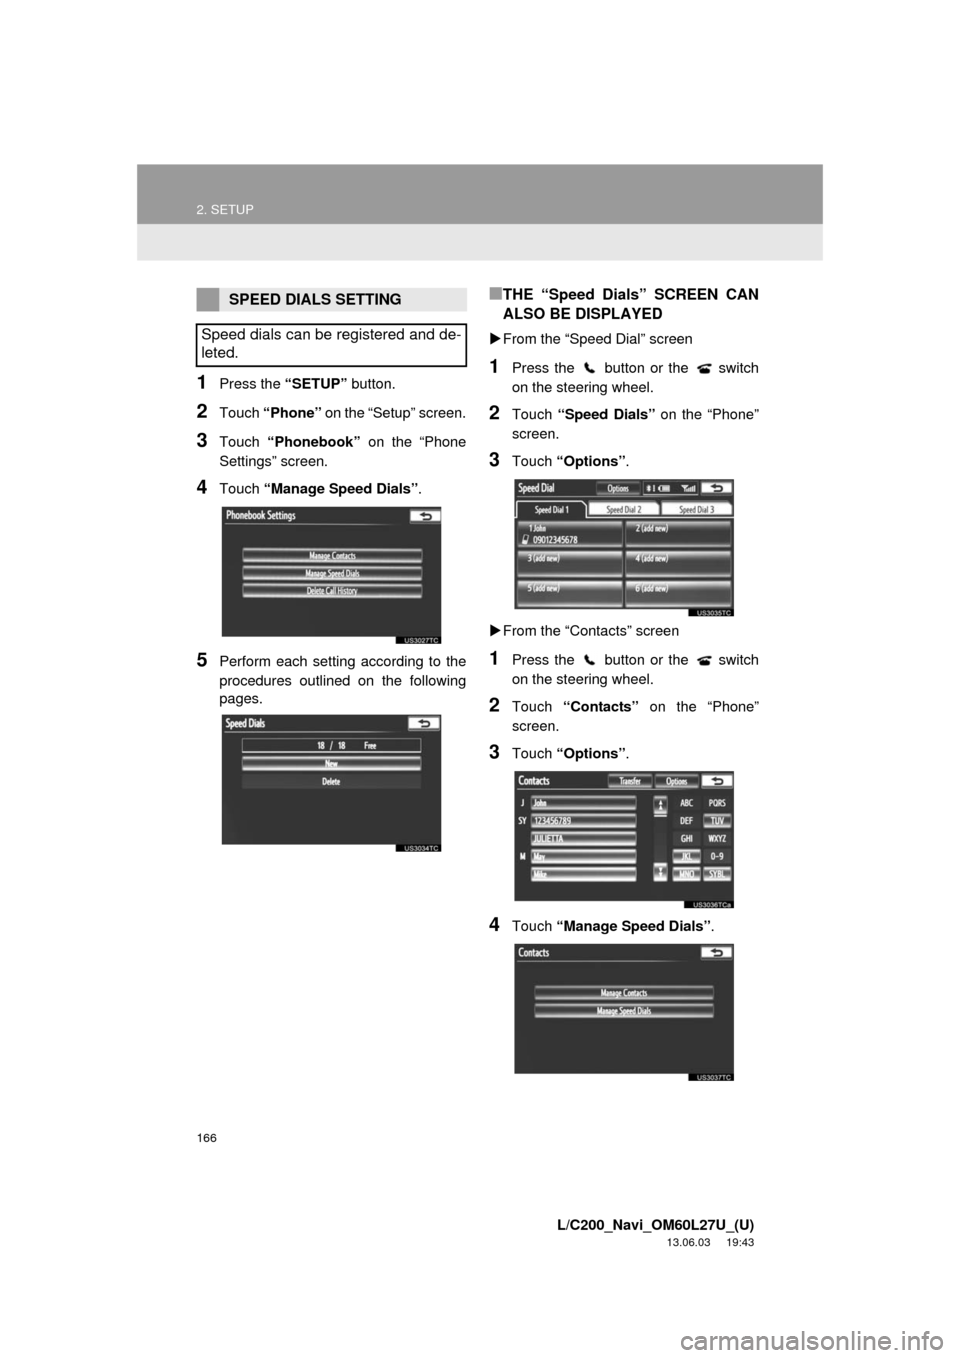
1Press the “SETUP” button.
2Touch “Phone” on the “Setup” screen.
3Touch “Phonebook” on the “Phone
Settings” screen.
4Touch “Manage Speed Dials”.
5Perform each setting according to the
procedures outlined on the following
pages.
■THE “Speed Dials” SCREEN CAN
ALSO BE DISPLAYED
From the “Speed Dial” screen
1Press the button or the switch
on the steering wheel.
2Touch “Speed Dials” on the “Phone”
screen.
3Touch “Options”.
From the “Contacts” screen
1Press the button or the switch
on the steering wheel.
2Touch “Contacts” on the “Phone”
screen.
3Touch “Options”.
4Touch “Manage Speed Dials”.
SPEED DIALS SETTING
Speed dials can be registered and de-
leted.
Page 168 of 427
168
2. SETUP
L/C200_Navi_OM60L27U_(U)
13.06.03 19:43
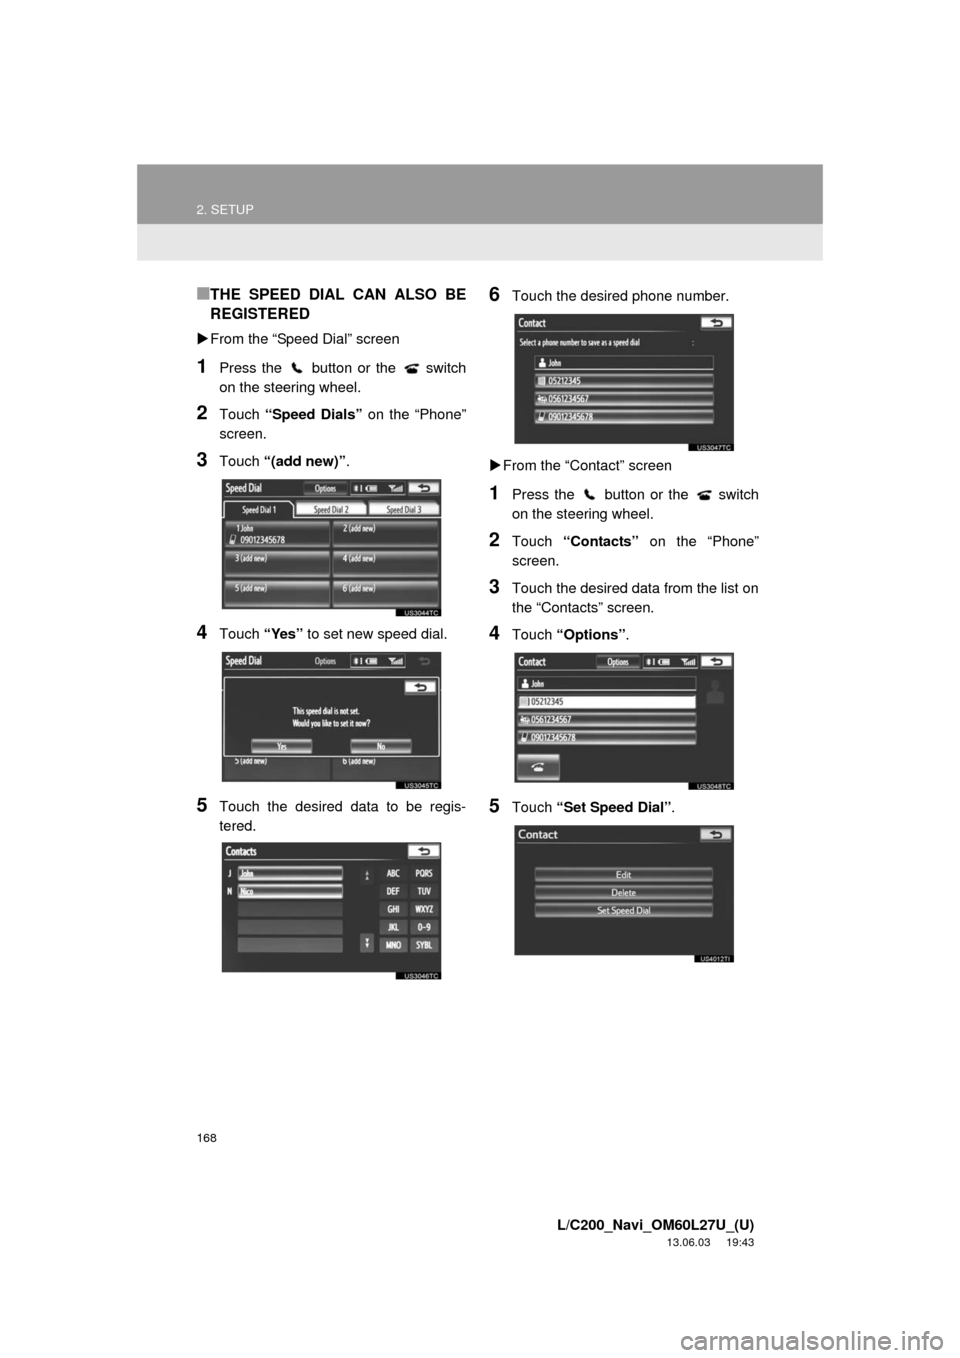
■THE SPEED DIAL CAN ALSO BE
REGISTERED
From the “Speed Dial” screen
1Press the button or the switch
on the steering wheel.
2Touch “Speed Dials” on the “Phone”
screen.
3Touch “(add new)”.
4Touch “Yes” to set new speed dial.
5Touch the desired data to be regis-
tered.
6Touch the desired phone number.
From the “Contact” screen
1Press the button or the switch
on the steering wheel.
2Touch “Contacts” on the “Phone”
screen.
3Touch the desired data from the list on
the “Contacts” screen.
4Touch “Options”.
5Touch “Set Speed Dial”.
Page 170 of 427
170
2. SETUP
L/C200_Navi_OM60L27U_(U)
13.06.03 19:43
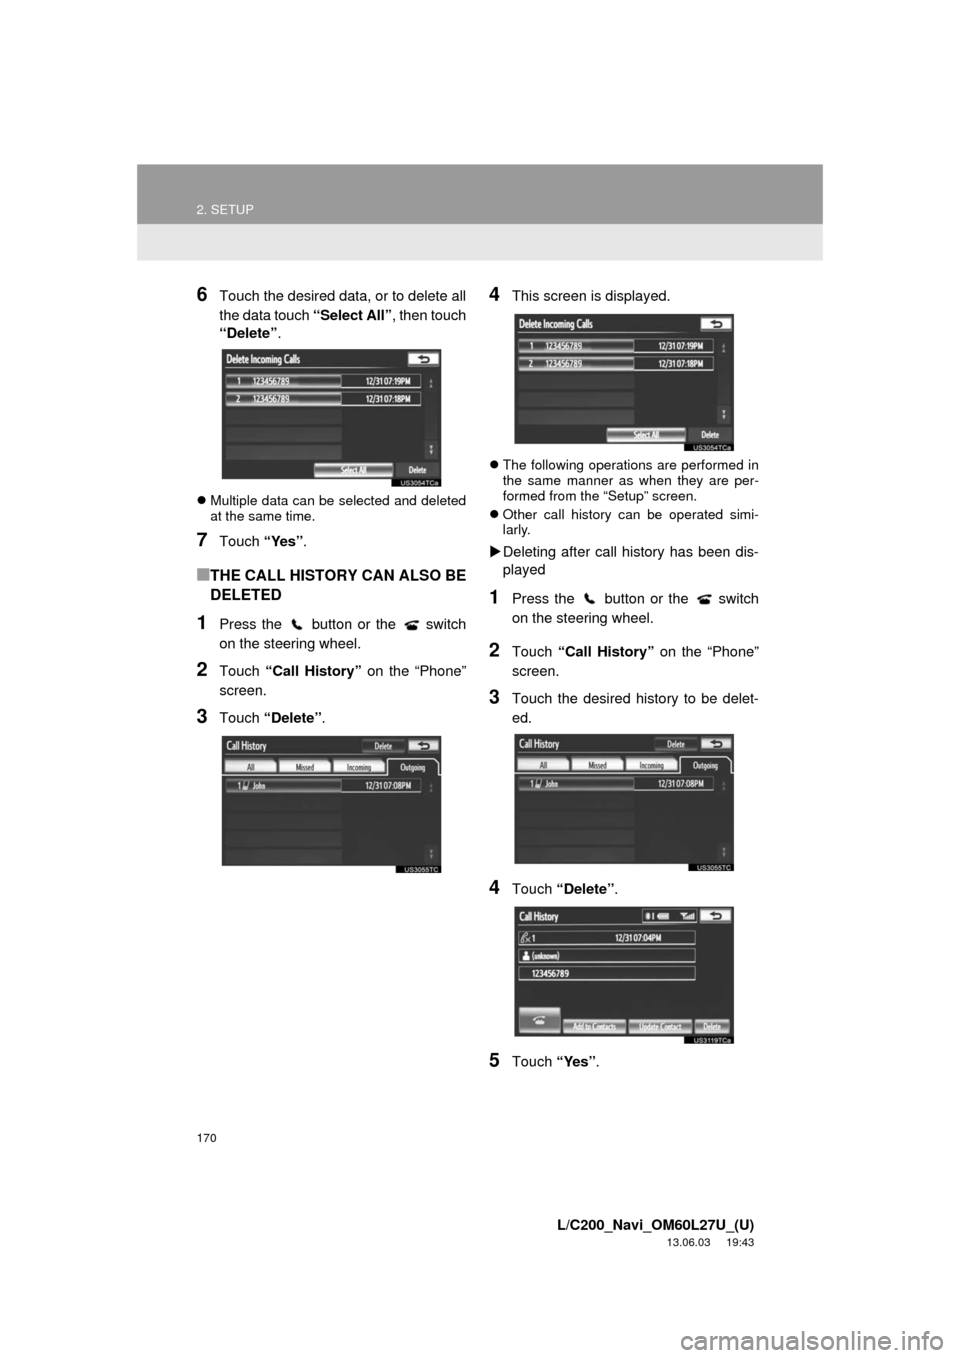
6Touch the desired data, or to delete all
the data touch “Select All”, then touch
“Delete”.
Multiple data can be selected and deleted
at the same time.
7Touch “Yes”.
■THE CALL HISTORY CAN ALSO BE
DELETED
1Press the button or the switch
on the steering wheel.
2Touch “Call History” on the “Phone”
screen.
3Touch “Delete”.
4This screen is displayed.
The following operations are performed in
the same manner as when they are per-
formed from the “Setup” screen.
Other call history can be operated simi-
larly.
Deleting after call history has been dis-
played
1Press the button or the switch
on the steering wheel.
2Touch “Call History” on the “Phone”
screen.
3Touch the desired history to be delet-
ed.
4Touch “Delete”.
5Touch “Yes”.
Page 171 of 427
171
2. SETUP
4
PHONE
L/C200_Navi_OM60L27U_(U)
13.06.03 19:43
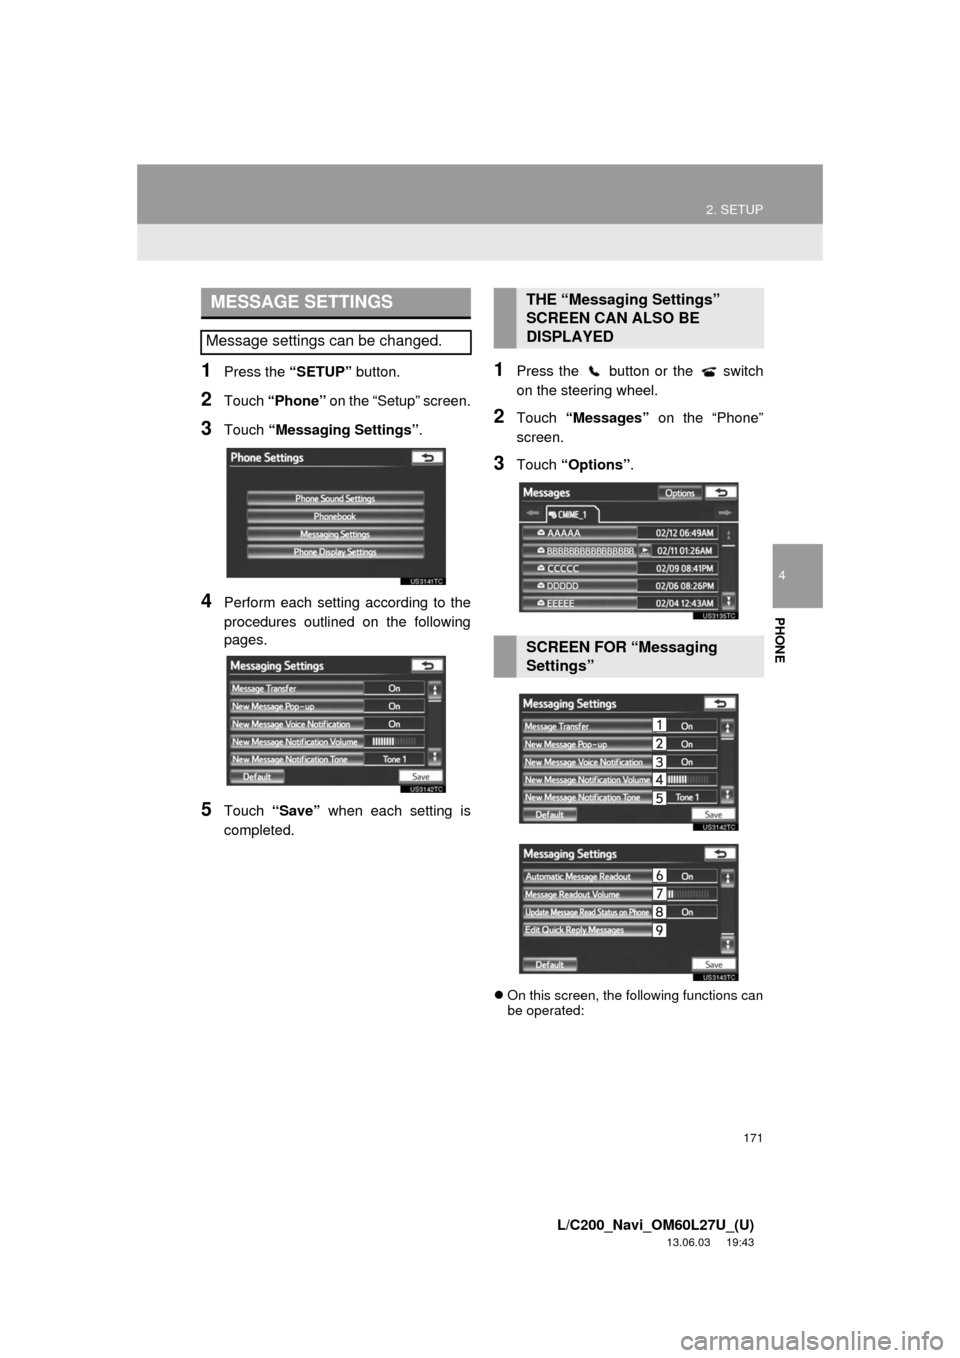
1Press the “SETUP” button.
2Touch “Phone” on the “Setup” screen.
3Touch “Messaging Settings”.
4Perform each setting according to the
procedures outlined on the following
pages.
5Touch “Save” when each setting is
completed.
1Press the button or the switch
on the steering wheel.
2Touch “Messages” on the “Phone”
screen.
3Touch “Options”.
On this screen, the following functions can
be operated:
MESSAGE SETTINGS
Message settings can be changed.
THE “Messaging Settings”
SCREEN CAN ALSO BE
DISPLAYED
SCREEN FOR “Messaging
Settings”
Page 176 of 427
176
2. SETUP
L/C200_Navi_OM60L27U_(U)
13.06.03 19:43
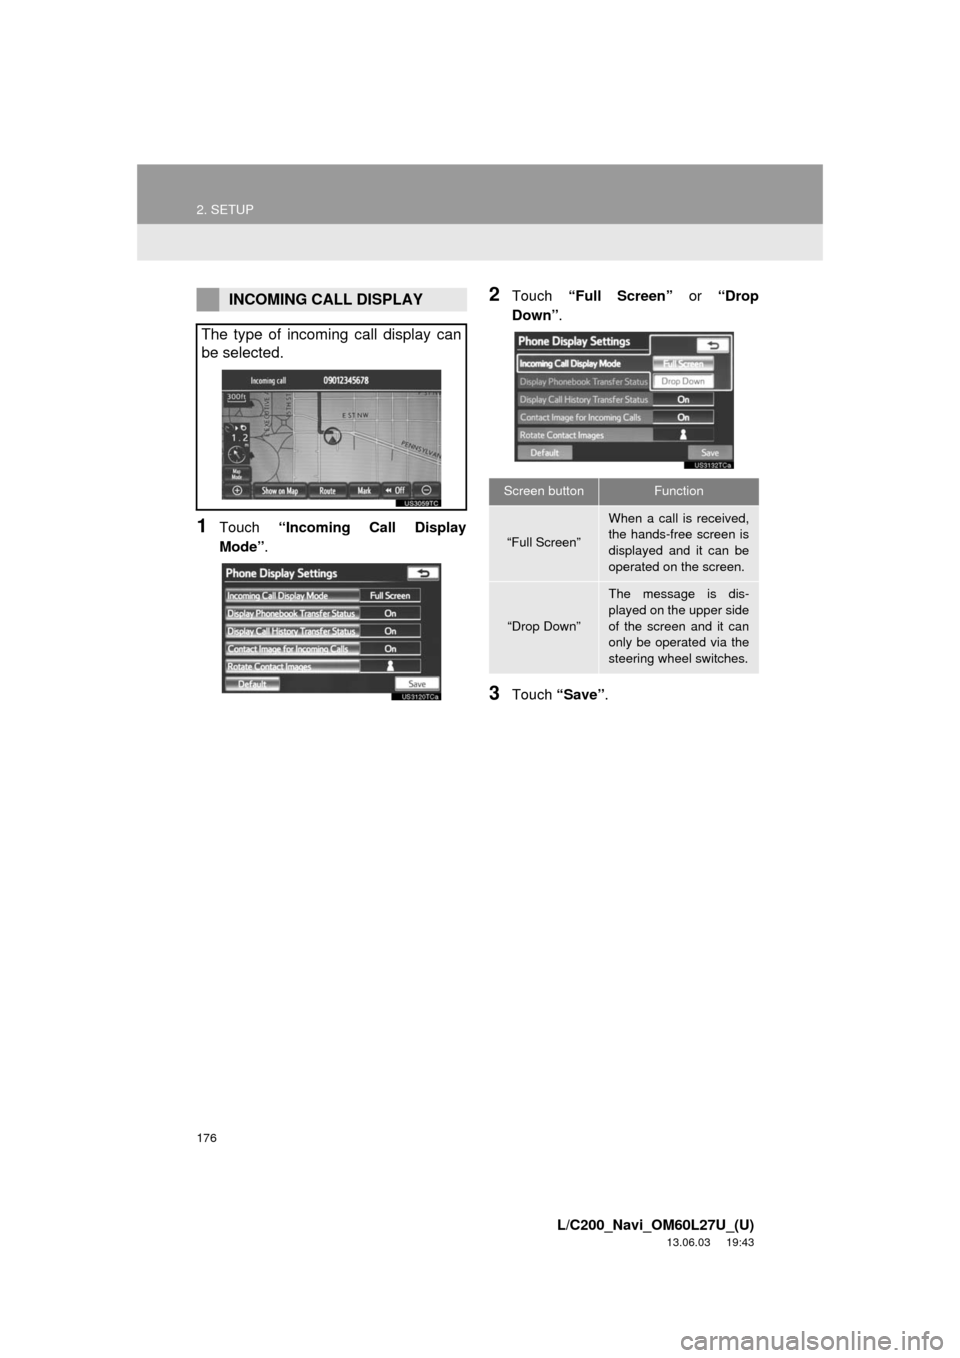
1Touch “Incoming Call Display
Mode”.
2Touch “Full Screen” or “Drop
Down”.
3Touch “Save”.
INCOMING CALL DISPLAY
The type of incoming call display can
be selected.
Screen buttonFunction
“Full Screen”
When a call is received,
the hands-free screen is
displayed and it can be
operated on the screen.
“Drop Down”
The message is dis-
played on the upper side
of the screen and it can
only be operated via the
steering wheel switches.
Page 191 of 427
5
191
1
2
3
4
5
6
7
8
L/C200_Navi_OM60L27U_(U)
13.06.03 19:43
9
10
8. USB MEMORY OPERATION ...... 236
CONNECTING A USB MEMORY ....... 236
PLAYING A USB MEMORY ................ 237
9. iPod OPERATION ....................... 241
CONNECTING iPod ............................ 241
PLAYING iPod MUSIC ........................ 242
PLAYING iPod VIDEO......................... 245
iPod VIDEO OPTIONS ........................ 248
10. Bluetooth® AUDIO
OPERATION .............................. 249
CONNECTING A Bluetooth®
AUDIO PLAYE
R................................ 252
PLAYING Bluetooth
® AUDIO .............. 253
11. VTR OPERATION ........................ 258
CONNECTING AUDIO/VIDEO DEVICE ............................................. 258
PLAYING VTR ..................................... 259
VTR OPTIONS .................................... 259
12. REAR SEAT ENTERTAINMENT SYSTEM FEATURES ................ 260
DISPLAY ............................................. 261
REAR SEAT ENTERTAINMENT SYSTEM CONTROLLER .................. 261
HEADPHONE JACKS ......................... 262
HEADPHONES ................................... 262
VOLUME ............................................. 262
OPENING AND CLOSING THE DISPLAY ........................................... 263
TILTING THE DISPLAY ...................... 263
CAUTION SCREEN ............................ 263
CHANGING THE SOURCE ................. 264
CHANGING THE SPEAKER OUTPUT ........................................... 264 OPERATION FROM THE
FRONT SEATS ................................. 266
USING THE RADIO ............................. 266
USING THE RADIO (INTERNET RADIO BROADCAST)....................... 267
PLAYING iPod ..................................... 268
PLAYING A USB MEMORY ................ 269
PLAYING Bluetooth
® AUDIO ............... 269
PLAYING AN AUDIO CD/CD TEXT ..................................... 270
PLAYING MP3/WMA DISCS ............... 271
PLAYING DVD VIDEO......................... 271
USING THE VIDEO MODE ................. 277
CHANGING SETTINGS....................... 278
13. AUDIO/VIDEO REMOTE CONTROLS (STEERING
SWITCHES)............................... 281
14. AUDIO/VIDEO SYSTEM OPERATING HINTS.................. 283
RADIO RECEPTION............................ 283
iPod ...................................................... 284
USB MEMORY .................................... 285
CARING FOR YOUR DVD PLAYER AND DISC.................. 285
MP3/WMA FILES ................................. 287
CD-R AND CD-RW DISCS .................. 289
TERMS ................................................ 289
1. AUDIO SETTINGS ...................... 293
HD Radio™ SYSTEM SETTINGS ....... 293
iPod AND EXTERNAL VIDEO SETTINGS ........................................ 294
2SETUP
AUDIO/VIDEO SYSTEM
Page 214 of 427
214
1. AUDIO/VIDEO SYSTEM OPERATION
L/C200_Navi_OM60L27U_(U)
13.06.03 19:41
6. RADIO OPERATION (INTERNET RADIO BROADCAST)
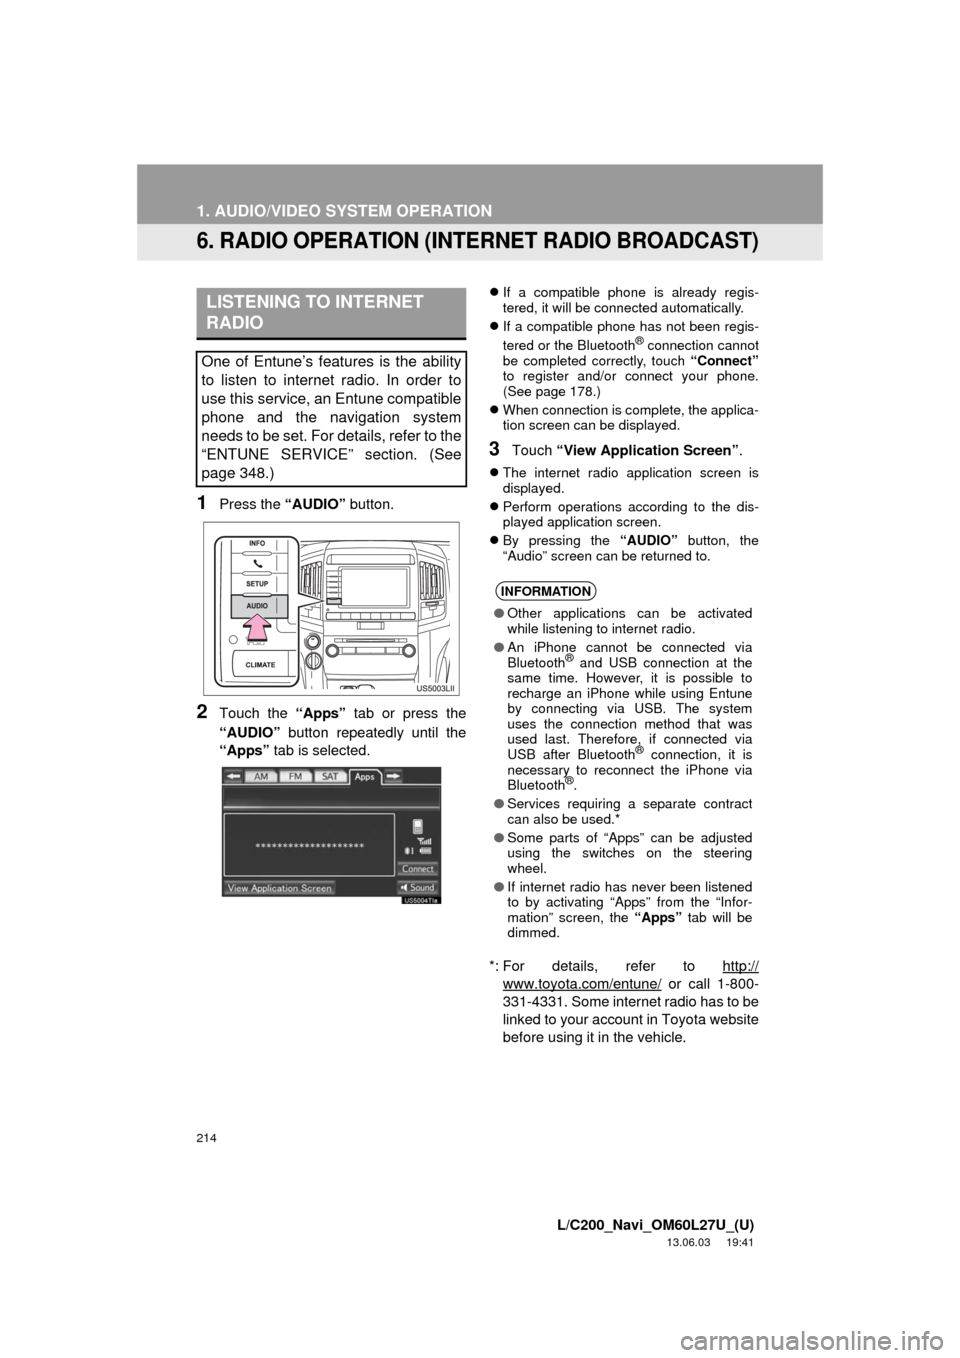
1Press the “AUDIO” button.
2Touch the “Apps” tab or press the
“AUDIO” button repeatedly until the
“Apps” tab is selected.
If a compatible phone is already regis-
tered, it will be connected automatically.
If a compatible phone has not been regis-
tered or the Bluetooth
® connection cannot
be completed correctly, touch “Connect”
to register and/or connect your phone.
(See page 178.)
When connection is complete, the applica-
tion screen can be displayed.
3Touch “View Application Screen”.
The internet radio application screen is
displayed.
Perform operations according to the dis-
played application screen.
By pressing the “AUDIO” button, the
“Audio” screen can be returned to.
*: For details, refer to http://
www.toyota.com/entune/ or call 1-800-
331-4331. Some internet radio has to be
linked to your account in Toyota website
before using it in the vehicle.
LISTENING TO INTERNET
RADIO
One of Entune’s features is the ability
to listen to internet radio. In order to
use this service, an Entune compatible
phone and the navigation system
needs to be set. For details, refer to the
“ENTUNE SERVICE” section. (See
page 348.)
INFORMATION
●Other applications can be activated
while listening to internet radio.
●An iPhone cannot be connected via
Bluetooth
® and USB connection at the
same time. However, it is possible to
recharge an iPhone while using Entune
by connecting via USB. The system
uses the connection method that was
used last. Therefore, if connected via
USB after Bluetooth
® connection, it is
necessary to reconnect the iPhone via
Bluetooth
®.
●Services requiring a separate contract
can also be used.*
●Some parts of “Apps” can be adjusted
using the switches on the steering
wheel.
●If internet radio has never been listened
to by activating “Apps” from the “Infor-
mation” screen, the “Apps” tab will be
dimmed.