TOYOTA LAND CRUISER 2014 J200 Navigation Manual
Manufacturer: TOYOTA, Model Year: 2014, Model line: LAND CRUISER, Model: TOYOTA LAND CRUISER 2014 J200Pages: 427, PDF Size: 25.75 MB
Page 291 of 427

291
1. AUDIO/VIDEO SYSTEM OPERATION
5
AUDIO/VIDEO SYSTEM
L/C200_Navi_OM60L27U_(U)
13.06.03 19:41
Gracenote® End User License
Agreement
This application or device contains
software from Gracenote, Inc. of
Emeryville, California (“Gracenote”).
The software from Gracenote (the
“Gracenote Software”) enables this
application to perform disc and/or file
identification and obtain music-related
information, including name, artist,
track, and title information
(“Gracenote Data”) from online
servers or embedded databases
(collectively, “Gracenote Servers”)
and to perform other functions. You
may use Gracenote Data only by
means of the intended End-User
functions of this application or device.
You agree that you will use Gracenote
Data, the Gracenote Software, and
Gracenote Servers for your own
personal non-commercial use only.
You agree not to assign, copy, transfer
or transmit the Gracenote Software or
any Gracenote Data to any third party.
YOU AGREE NOT TO USE OR
EXPLOIT GRACENOTE DATA, THE
GRACENOTE SOFTWARE, OR
GRACENOTE SERVERS, EXCEPT
AS EXPRESSLY PERMITTED
HEREIN.
You agree that your non-exclusive
license to use the Gracenote Data, the
Gracenote Software, and Gracenote
Servers will terminate if you violate
these restrictions. If your license
terminates, you agree to cease any
and all use of the Gracenote Data, the
Gracenote Software, and Gracenote
Servers. Gracenote reserves all rights
in Gracenote Data, the Gracenote
Software, and the Gracenote Servers,
including all ownership rights. Under
no circumstances will Gracenote
become liable for any payment to you
for any information that you provide.
You agree that Gracenote, Inc. may
enforce its rights under this
Agreement against you directly in its
own name.
The Gracenote service uses a unique
identifier to track queries for statistical
purposes. The purpose of a randomly
assigned numeric identifier is to allow
the Gracenote service to count
queries without knowing anything
about who you are. For more
information, see the web page for the
Gracenote Privacy Policy for the
Gracenote service.
Page 292 of 427

292
1. AUDIO/VIDEO SYSTEM OPERATION
L/C200_Navi_OM60L27U_(U)
13.06.03 19:41
The Gracenote Software and each
item of Gracenote Data are licensed to
you “AS IS.” Gracenote makes no
representations or warranties,
express or implied, regarding the
accuracy of any Gracenote Data from
in the Gracenote Servers. Gracenote
reserves the right to delete data from
the Gracenote Servers or to change
data categories for any cause that
Gracenote deems sufficient. No
warranty is made that the Gracenote
Software or Gracenote Servers are
error-free or that functioning of
Gracenote Software or Gracenote
Servers will be uninterrupted.
Gracenote is not obligated to provide
you with new enhanced or additional
data types or categories that
Gracenote may provide in the future
and is free to discontinue its services
at any time.GRACENOTE DISCLAIMS ALL
WARRANTIES EXPRESS OR
IMPLIED, INCLUDING, BUT NOT
LIMITED TO, IMPLIED
WARRANTIES OF
MERCHANTABILITY, FITNESS FOR
A PARTICULAR PURPOSE, TITLE,
AND NON-INFRINGEMENT.
GRACENOTE DOES NOT
WARRANT THE RESULTS THAT
WILL BE OBTAINED BY YOUR USE
OF THE GRACENOTE SOFTWARE
OR ANY GRACENOTE SERVER. IN
NO CASE WILL GRACENOTE BE
LIABLE FOR ANY CONSEQUENTIAL
OR INCIDENTAL DAMAGES OR
FOR ANY LOST PROFITS OR LOST
REVENUES.
copyright
© 2000 to present
Gracenote
Page 293 of 427
293
5
AUDIO/VIDEO SYSTEM
L/C200_Navi_OM60L27U_(U)
13.02.20 14:56
2. SETUP
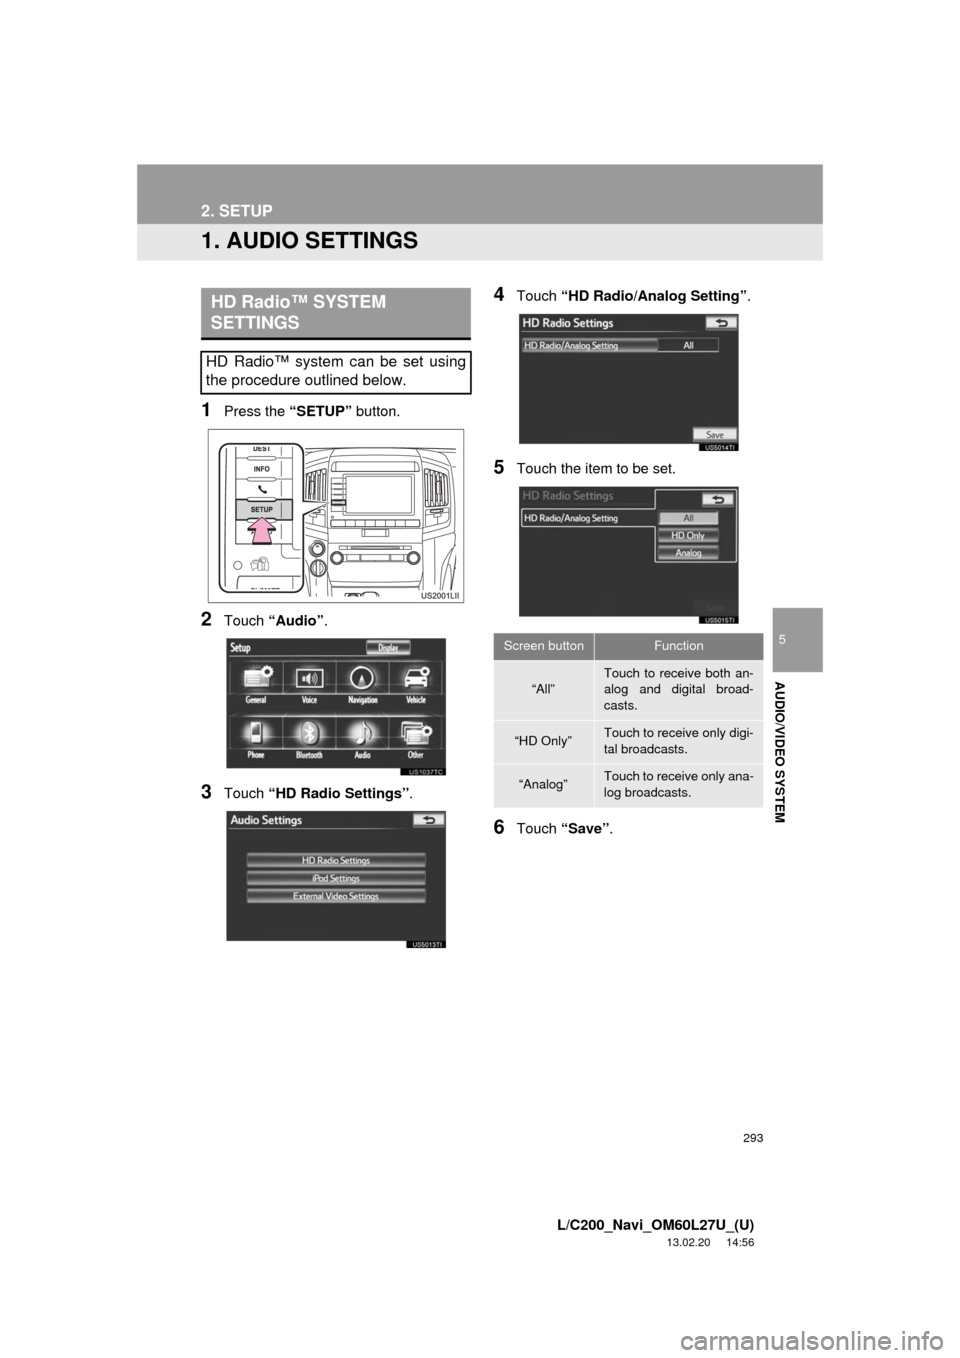
1. AUDIO SETTINGS
1Press the “SETUP” button.
2Touch “Audio”.
3Touch “HD Radio Settings”.
4Touch “HD Radio/Analog Setting”.
5Touch the item to be set.
6Touch “Save”.
HD Radio™ SYSTEM
SETTINGS
HD Radio™ system can be set using
the procedure outlined below.
Screen buttonFunction
“All”Touch to receive both an-
alog and digital broad-
casts.
“HD Only”Touch to receive only digi-
tal broadcasts.
“Analog”Touch to receive only ana-
log broadcasts.
Page 294 of 427
294
2. SETUP
L/C200_Navi_OM60L27U_(U)
13.02.20 14:56
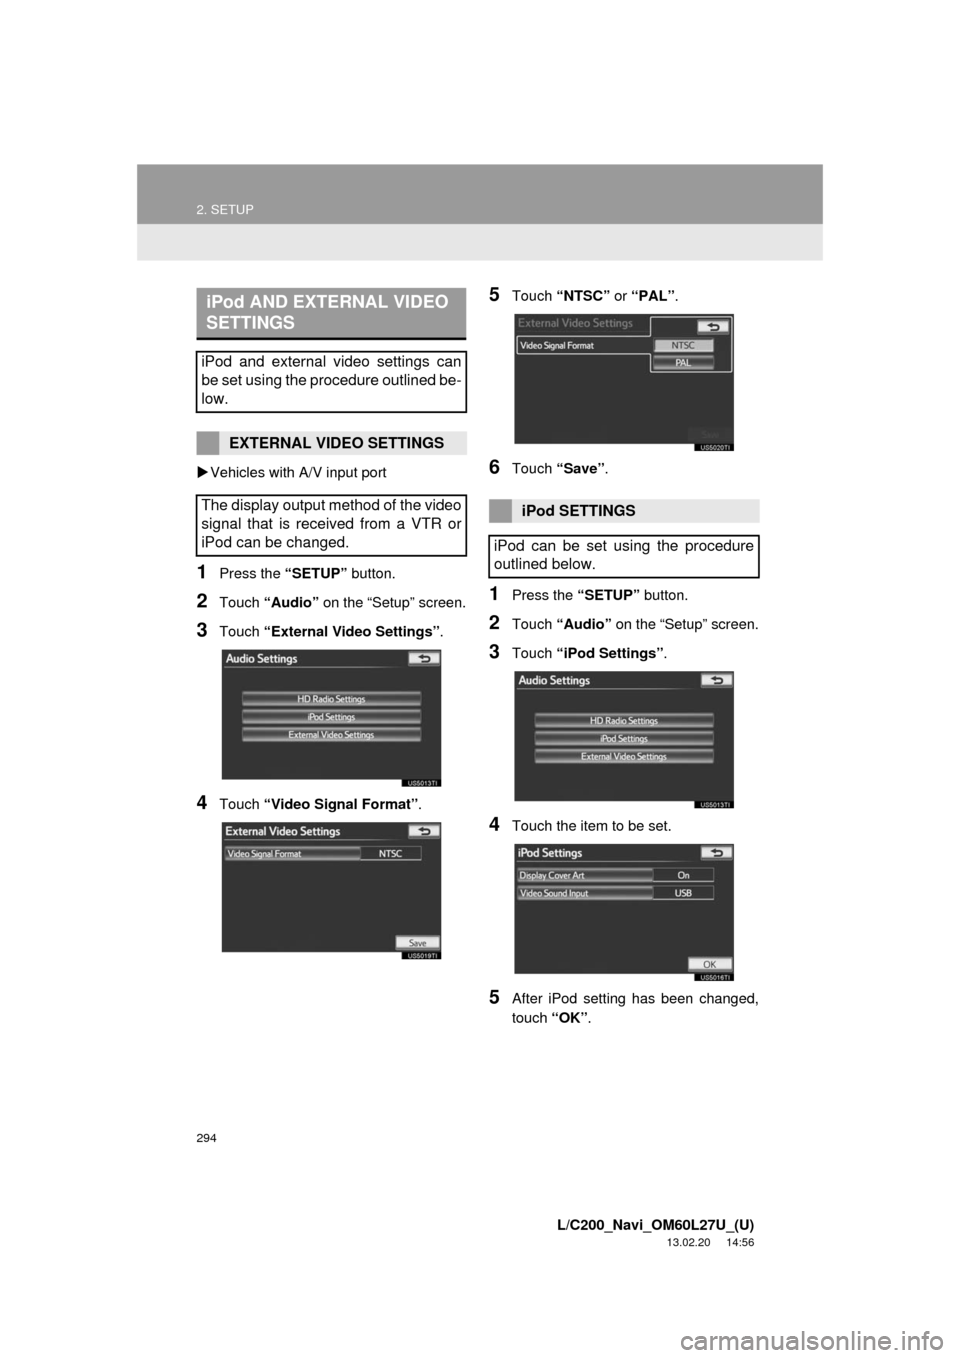
Vehicles with A/V input port
1Press the “SETUP” button.
2Touch “Audio” on the “Setup” screen.
3Touch “External Video Settings”.
4Touch “Video Signal Format”.
5Touch “NTSC” or “PAL”.
6Touch “Save”.
1Press the “SETUP” button.
2Touch “Audio” on the “Setup” screen.
3Touch “iPod Settings”.
4Touch the item to be set.
5After iPod setting has been changed,
touch “OK”.
iPod AND EXTERNAL VIDEO
SETTINGS
iPod and external video settings can
be set using the procedure outlined be-
low.
EXTERNAL VIDEO SETTINGS
The display output method of the video
signal that is received from a VTR or
iPod can be changed.
iPod SETTINGS
iPod can be set using the procedure
outlined below.
Page 295 of 427
295
2. SETUP
5
AUDIO/VIDEO SYSTEM
L/C200_Navi_OM60L27U_(U)
13.02.20 14:56
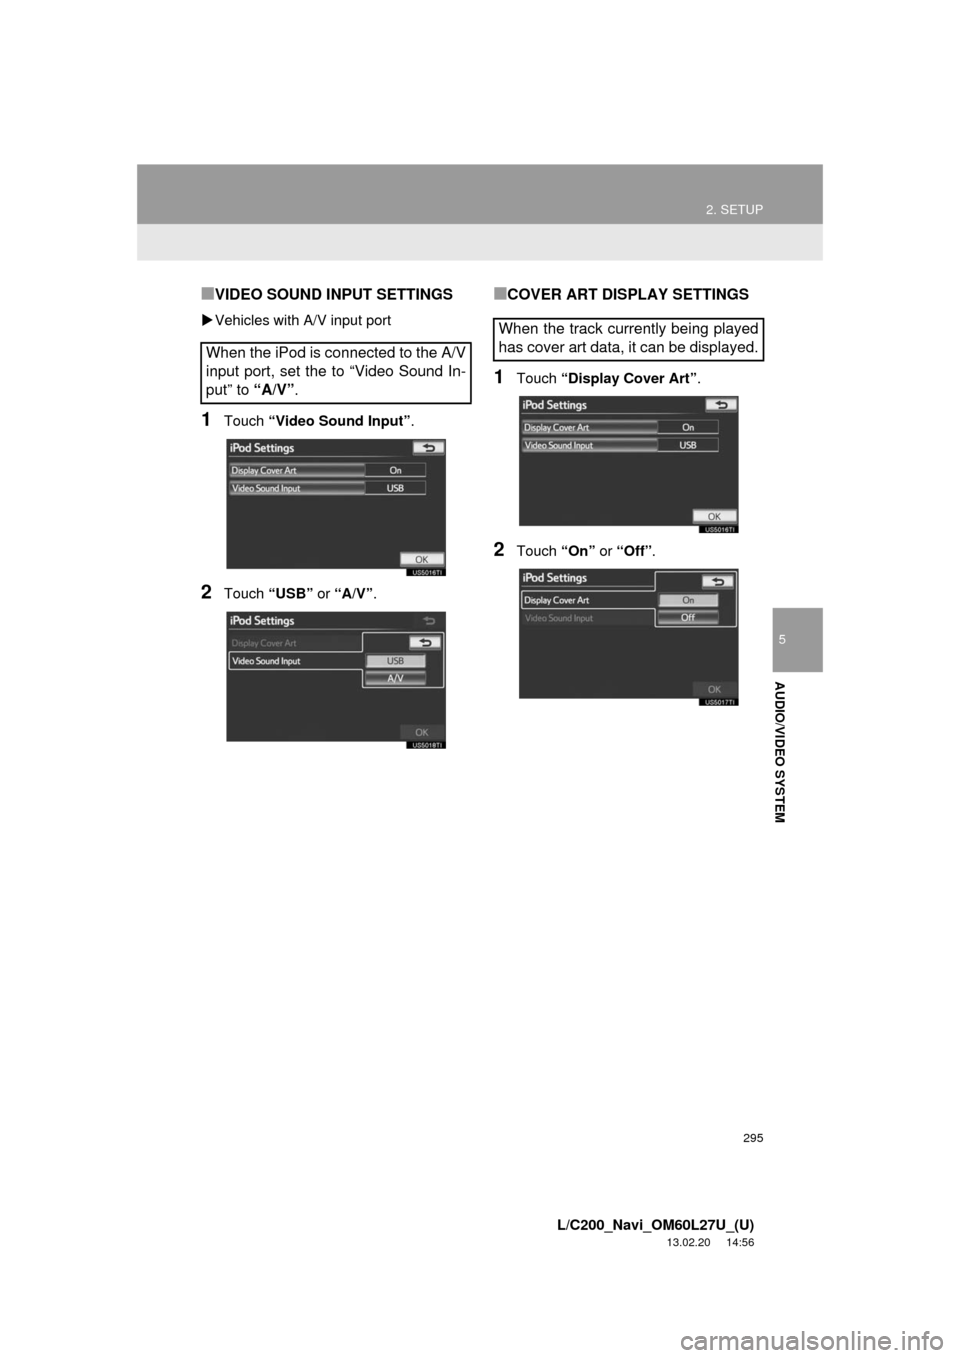
■VIDEO SOUND INPUT SETTINGS
Vehicles with A/V input port
1Touch “Video Sound Input”.
2Touch “USB” or “A/V”.
■COVER ART DISPLAY SETTINGS
1Touch “Display Cover Art”.
2Touch “On” or “Off”.
When the iPod is connected to the A/V
input port, set the to “Video Sound In-
put” to “A/V”.
When the track currently being played
has cover art data, it can be displayed.
Page 296 of 427

296
2. SETUP
L/C200_Navi_OM60L27U_(U)
13.02.20 14:56
Page 297 of 427
6
297
1
2
3
4
5
6
7
8
L/C200_Navi_OM60L27U_(U)
13.02.20 14:56
9
10
1. QUICK REFERENCE .................. 298
2. SOME BASICS ............................ 300
CLIMATE CONTROL ........................... 300
VOICE COMMAND SYSTEM .............. 300
3. FRONT AUTOMATIC AIR
CONDITIONING SYSTEM ........ 301
USING THE AIR CONDITIONING
SYSTEM ............................................ 301
AIR CONDITIONING SYSTEM
OPERATING HINTS.......................... 306
4. REAR AUTOMATIC AIR
CONDITIONING SYSTEM ........ 308
REAR AIR CONDITIONING
CONTROLS ...................................... 308
1AIR CONDITIONING SYSTEM
OPERATION
AIR CONDITIONING
Page 298 of 427

298
L/C200_Navi_OM60L27U_(U)
13.06.03 19:43
1. AIR CONDITIONING SYSTEM OPERATION
1. QUICK REFERENCE
*1: Driver side temperature display
*2: Outside temperature display
*3: Passenger side temperature display
Operations such as changing the air outlets or fan speed are carried out on the
screen. Press the “CLIMATE” button to display the air conditioning control screen.
No.NameFunctionPage
Air flow control buttonsTouch to change the air outlets.303
Rear air conditioning
control buttonTouch to display the rear air conditioning control
screen.308
Windshield wiper
de-icer (If equipped)Touch to prevent ice from building up on the
windshield and wiper blades.Owner’s
Manual
“4-ZONE”Touch to set the temperatures independently for
the driver’s, front passenger’s and rear seats.301
“A/C”Touch to change the air conditioning between on
and off.306
*1*2*3
Page 299 of 427
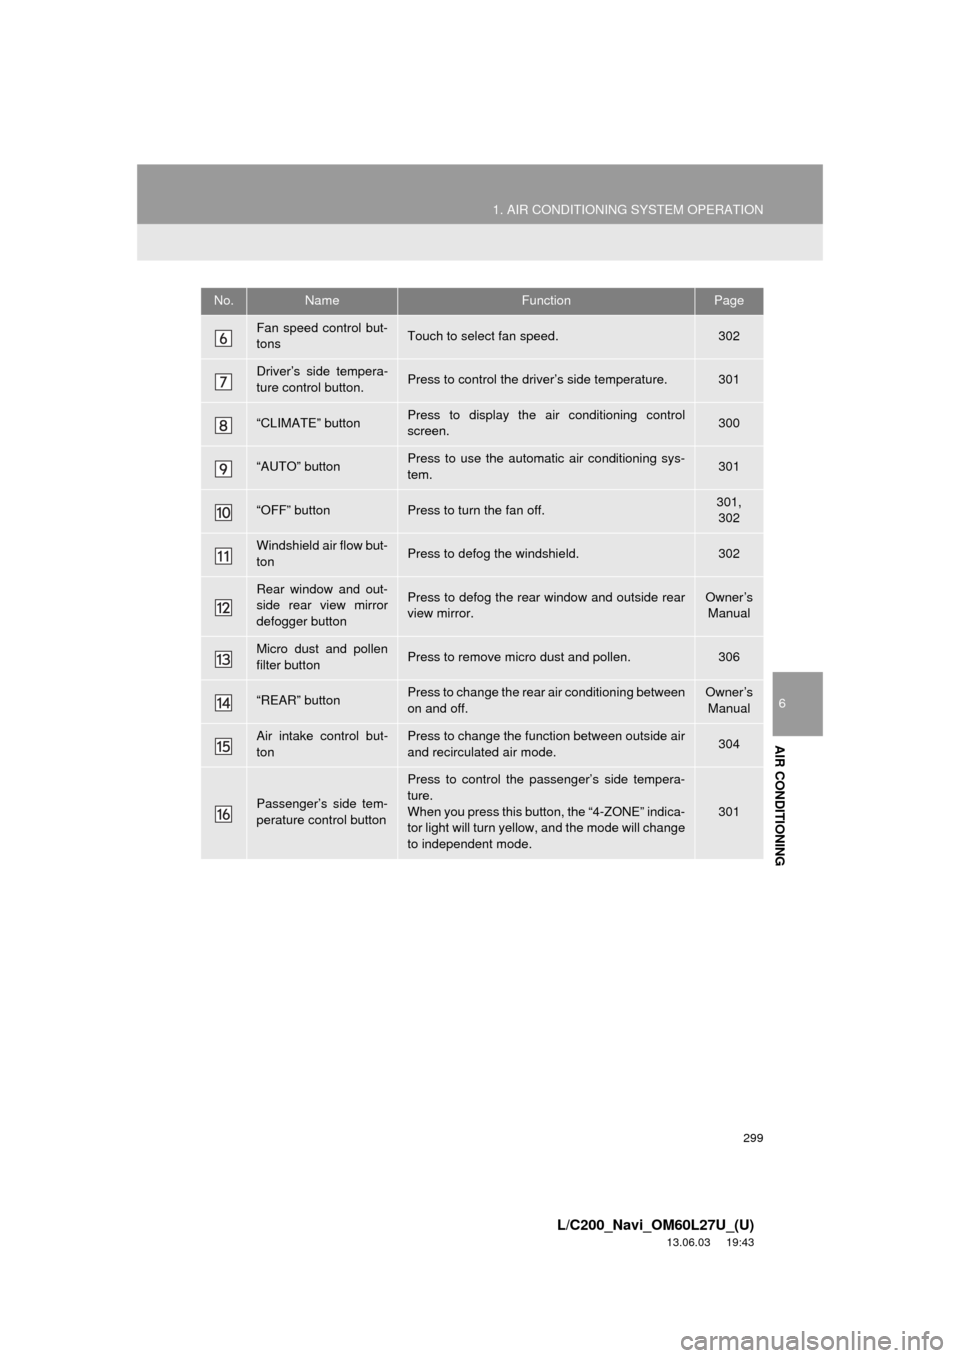
299
1. AIR CONDITIONING SYSTEM OPERATION
6
AIR CONDITIONING
L/C200_Navi_OM60L27U_(U)
13.06.03 19:43
Fan speed control but-
tonsTouch to select fan speed.302
Driver’s side tempera-
ture control button.Press to control the driver’s side temperature.301
“CLIMATE” buttonPress to display the air conditioning control
screen.300
“AUTO” buttonPress to use the automatic air conditioning sys-
tem.301
“OFF” buttonPress to turn the fan off.301,
302
Windshield air flow but-
tonPress to defog the windshield.302
Rear window and out-
side rear view mirror
defogger buttonPress to defog the rear window and outside rear
view mirror.Owner’s
Manual
Micro dust and pollen
filter buttonPress to remove micro dust and pollen.306
“REAR” buttonPress to change the rear air conditioning between
on and off.Owner’s
Manual
Air intake control but-
tonPress to change the function between outside air
and recirculated air mode.304
Passenger’s side tem-
perature control button
Press to control the passenger’s side tempera-
ture.
When you press this button, the “4-ZONE” indica-
tor light will turn yellow, and the mode will change
to independent mode.
301
No.NameFunctionPage
Page 300 of 427
300
1. AIR CONDITIONING SYSTEM OPERATION
L/C200_Navi_OM60L27U_(U)
13.06.03 19:43
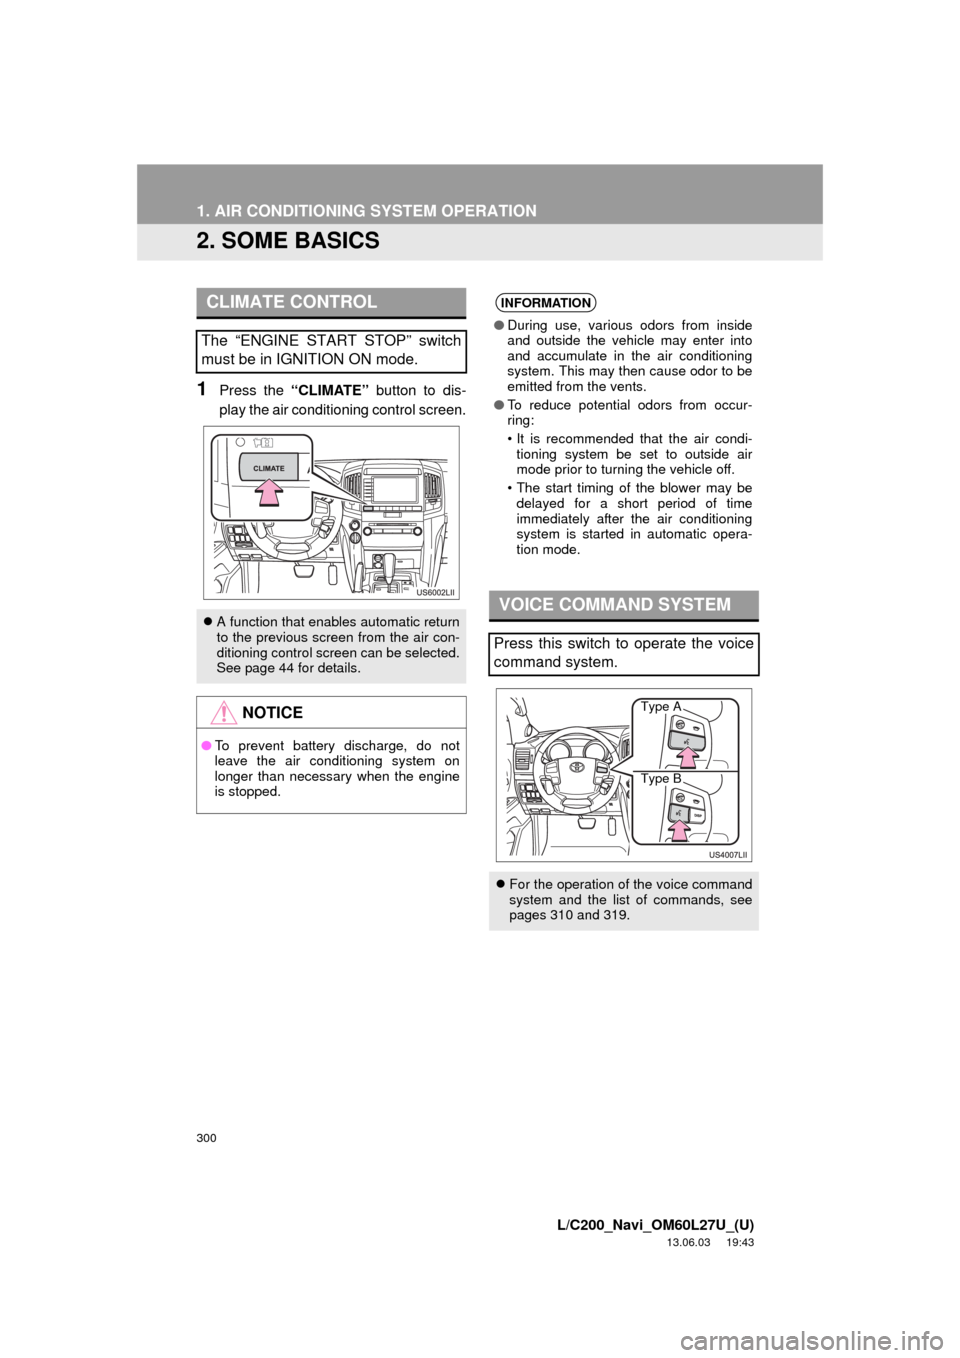
2. SOME BASICS
1Press the “CLIMATE” button to dis-
play the air conditioning control screen.
CLIMATE CONTROL
The “ENGINE START STOP” switch
must be in IGNITION ON mode.
A function that enables automatic return
to the previous screen from the air con-
ditioning control screen can be selected.
See page 44 for details.
NOTICE
●To prevent battery discharge, do not
leave the air conditioning system on
longer than necessary when the engine
is stopped.
INFORMATION
●During use, various odors from inside
and outside the vehicle may enter into
and accumulate in the air conditioning
system. This may then cause odor to be
emitted from the vents.
●To reduce potential odors from occur-
ring:
• It is recommended that the air condi-
tioning system be set to outside air
mode prior to turning the vehicle off.
• The start timing of the blower may be
delayed for a short period of time
immediately after the air conditioning
system is started in automatic opera-
tion mode.
VOICE COMMAND SYSTEM
Press this switch to operate the voice
command system.
For the operation of the voice command
system and the list of commands, see
pages 310 and 319.
Type A
Type B