TOYOTA LAND CRUISER 2014 J200 Manual PDF
Manufacturer: TOYOTA, Model Year: 2014, Model line: LAND CRUISER, Model: TOYOTA LAND CRUISER 2014 J200Pages: 724, PDF Size: 11 MB
Page 71 of 724
71
1-3. Adjustable components (s
eats, mirrors, steering wheel)
1
Before driving
LC200_OM_OM60L09U_(U)
â– Canceling the linked door unlock operation
Turn the “ENGINE START STOP” switch to OFF after closing the
driver’s door.
Using the wireless remote control: While pressing “SET” button,
press button on the wireless remote control until the signal
beeps.
Using the door lock switch: While pressing “SET” button, press the
lock or unlock side on the door lock switch until the signal beeps.
â– Retained accessory power
â—ŹEach memorized position (except for the steering wheel position) can be
activated within 3 minutes after the driver’s door is opened, even if the
“ENGINE START STOP” switch is turned off.
â—Ź Each memorized position (except for the steering wheel position) can be
activated within 60 seconds after the driver’s door is closed, even if the
“ENGINE START STOP” switch is turned off.
â– To cancel seat position recall
Perform any one of the following operations.
●Press the “SET” button
● Press button “1”, “2” or “3”.
â—Ź Adjust the seat using the switches (only cancels seat position recall)
â—Ź Adjust the steering wheel using the tilt and telescopic steering control
switch (only cancels steering wheel position recall)
â– If the battery is disconnected
The memorized positions must be reset because the computer’s memory is
erased when the battery is disconnected.
CAUTION
â– Seat adjustment caution
Take care during seat adjustment that the seat does not strike the rear pas-
senger or squeeze your body against the steering wheel.
STEP1
STEP2
Page 72 of 724
72
1-3. Adjustable components (seats, mirrors, steering wheel)
LC200_OM_OM60L09U_(U)
Head restraints
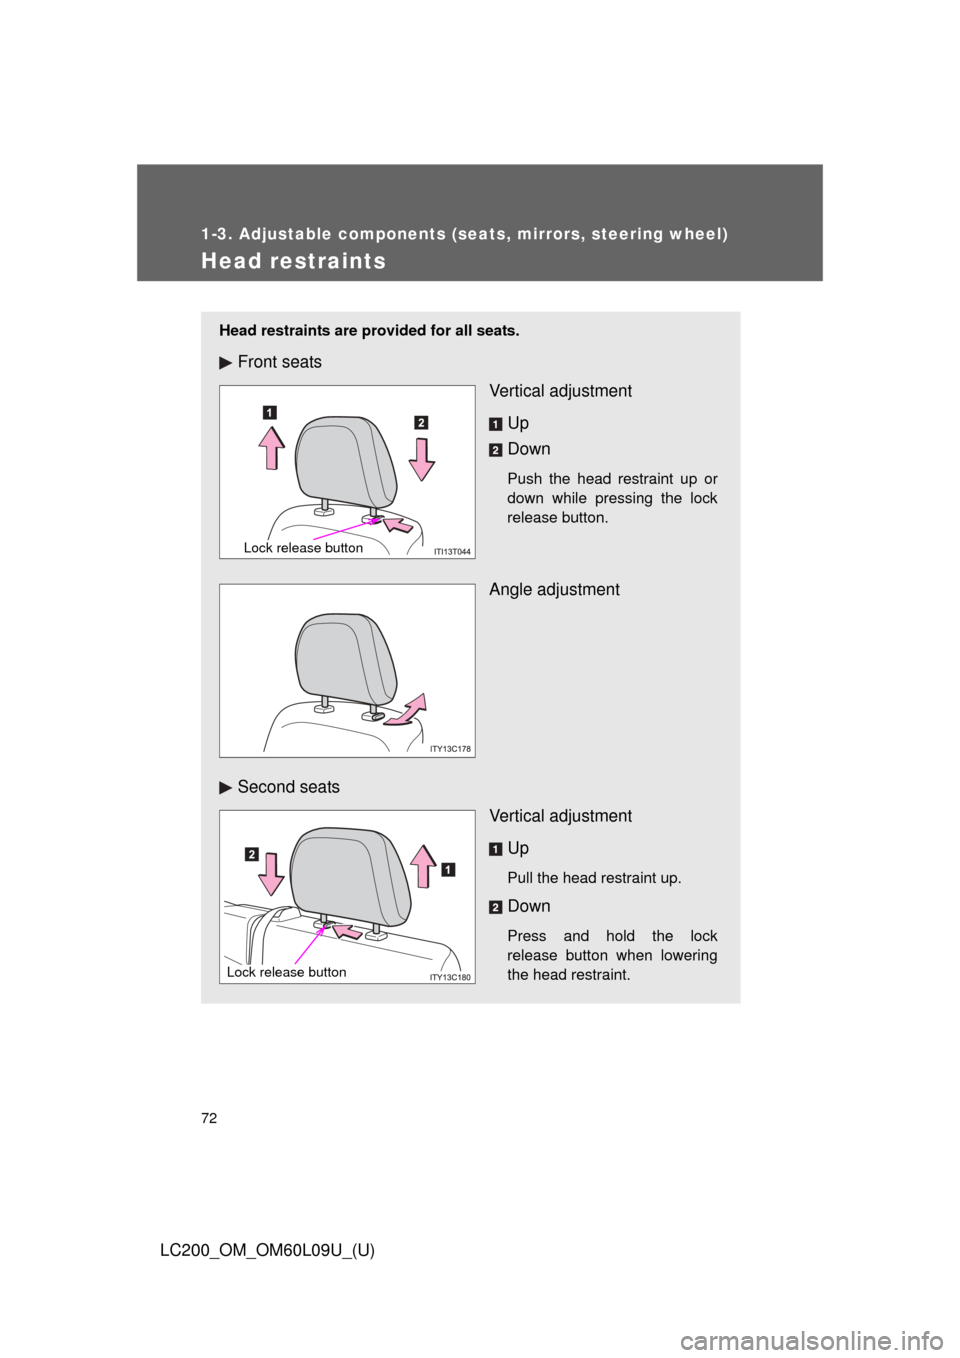
Head restraints are provided for all seats.
Front seatsVertical adjustment
Up
Down
Push the head restraint up or
down while pressing the lock
release button.
Angle adjustment
Second seats Vertical adjustment
Up
Pull the head restraint up.
Down
Press and hold the lock
release button when lowering
the head restraint.
Lock release button
Lock release button
Page 73 of 724
73
1-3. Adjustable components (s
eats, mirrors, steering wheel)
1
Before driving
LC200_OM_OM60L09U_(U)
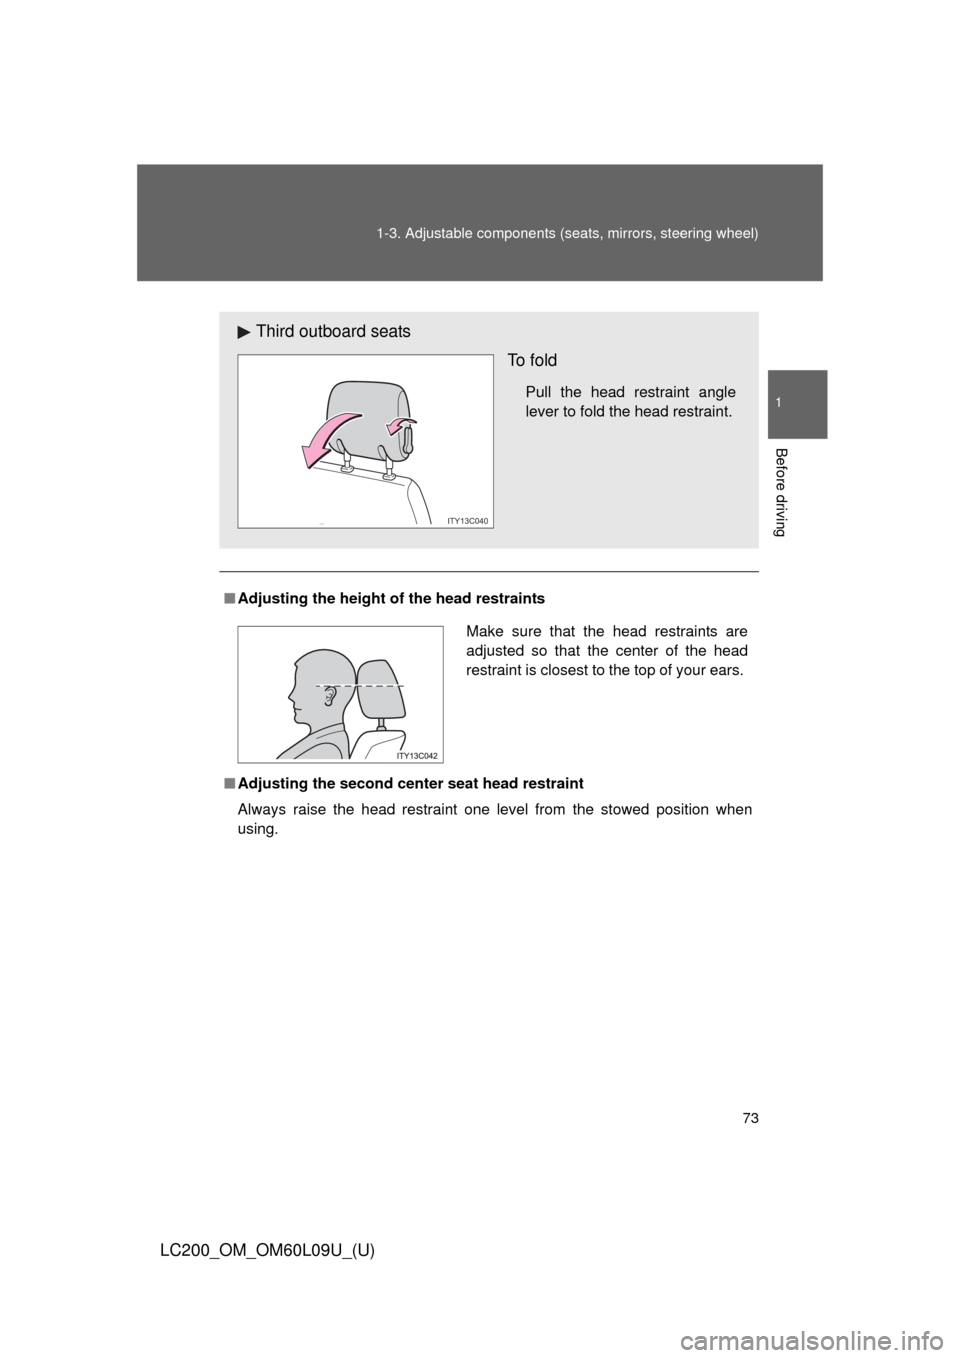
â– Adjusting the height of the head restraints
â– Adjusting the second cen ter seat head restraint
Always raise the head restraint one level from the stowed position when
using.
Third outboard seats
To f o l d
Pull the head restraint angle
lever to fold the head restraint.
ITY13C040
Make sure that the head restraints are
adjusted so that the center of the head
restraint is closest to the top of your ears.
Page 74 of 724
74 1-3. Adjustable components (seats, mirrors, steering wheel)
LC200_OM_OM60L09U_(U)
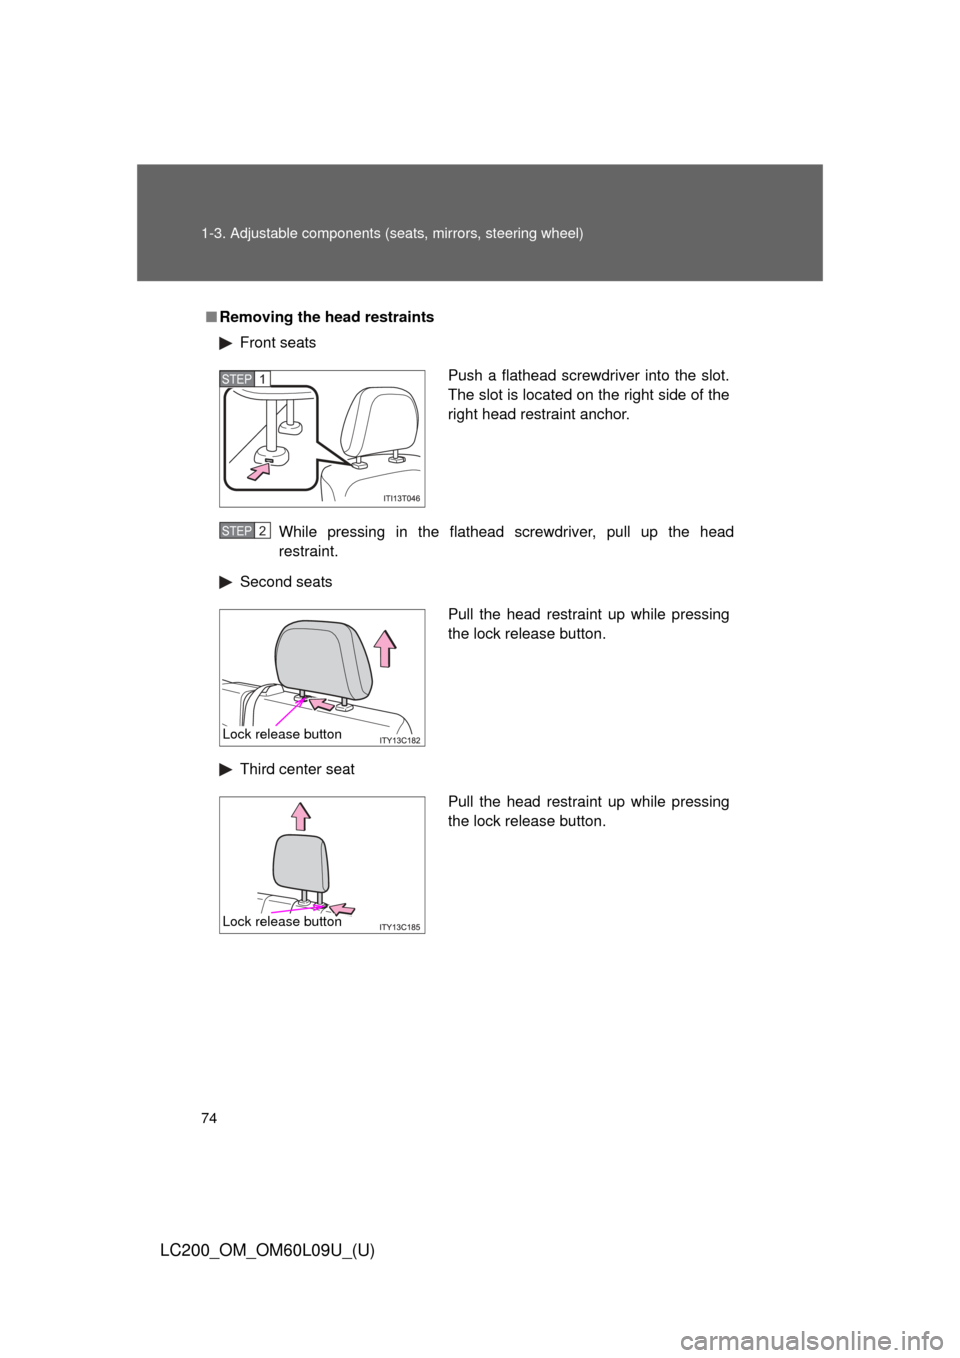
â– Removing the head restraints
Front seats
While pressing in the flathead screwdriver, pull up the head
restraint.
Second seats
Third center seat
Push a flathead screwdriver into the slot.
The slot is located on the right side of the
right head restraint anchor.STEP1
STEP2
Pull the head restraint up while pressing
the lock release button.
Lock release button
Pull the head restraint up while pressing
the lock release button.
Lock release button
Page 75 of 724
75
1-3. Adjustable components (s
eats, mirrors, steering wheel)
1
Before driving
LC200_OM_OM60L09U_(U)
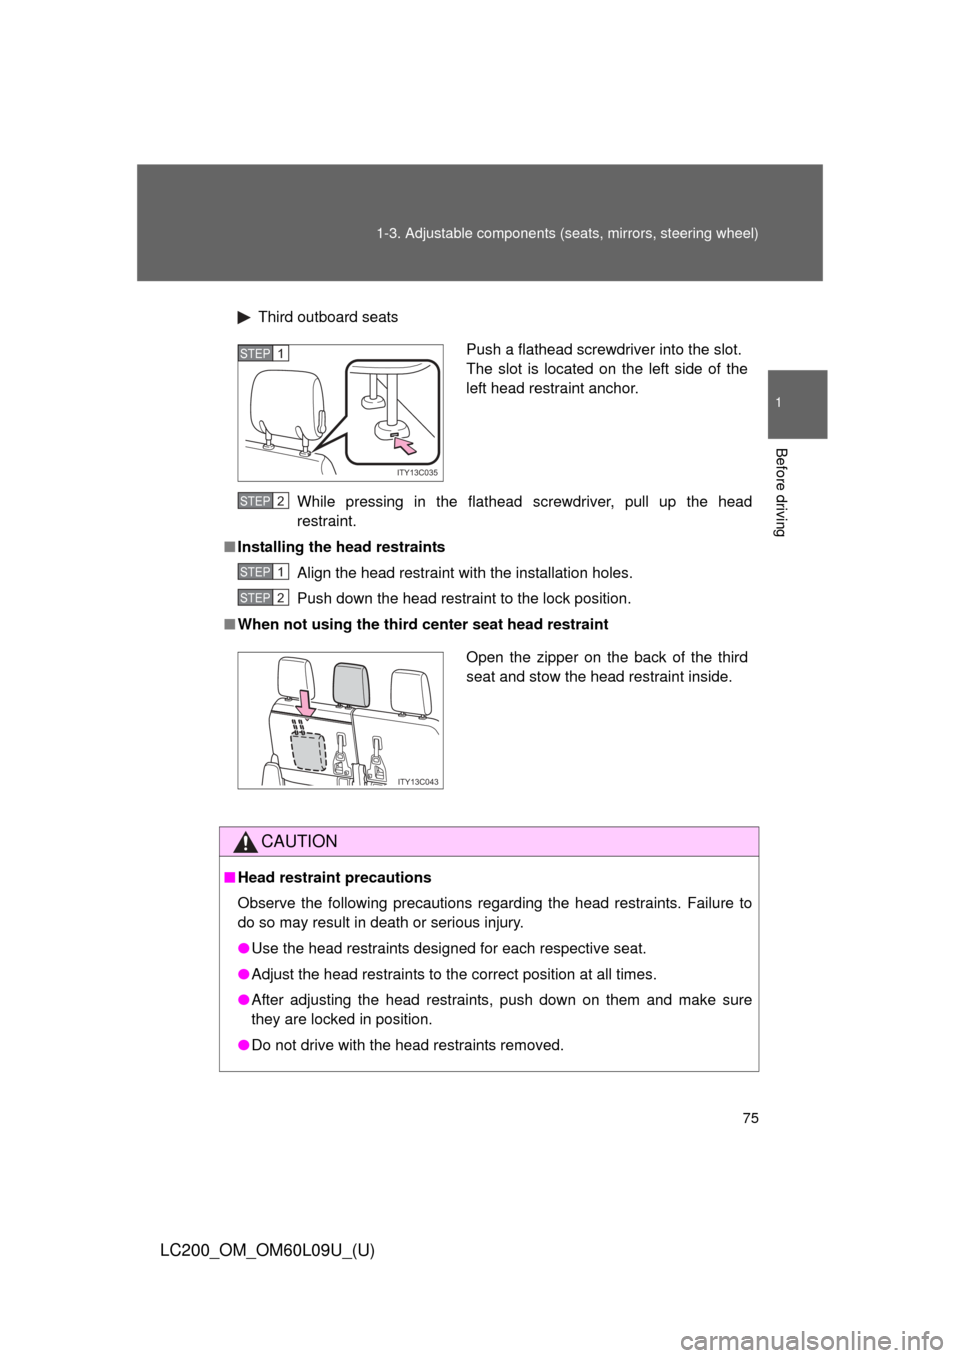
Third outboard seats
While pressing in the flathead screwdriver, pull up the head
restraint.
â– Installing the head restraints
Align the head restraint with the installation holes.
Push down the head restraint to the lock position.
â– When not using the third center seat head restraint
CAUTION
â– Head restraint precautions
Observe the following precautions regarding the head restraints. Failure to
do so may result in death or serious injury.
â—ŹUse the head restraints designed for each respective seat.
â—Ź Adjust the head restraints to the correct position at all times.
â—Ź After adjusting the head restraints, push down on them and make sure
they are locked in position.
â—Ź Do not drive with the head restraints removed.
Push a flathead screwdriver into the slot.
The slot is located on the left side of the
left head restraint anchor.
ITY13C035
STEP1
STEP2
STEP1
STEP2
Open the zipper on the back of the third
seat and stow the head restraint inside.
ITY13C043
Page 76 of 724
76
1-3. Adjustable components (seats, mirrors, steering wheel)
LC200_OM_OM60L09U_(U)
Seat belts
Make sure that all occupants are wearing their seat belts before driv-
ing the vehicle.
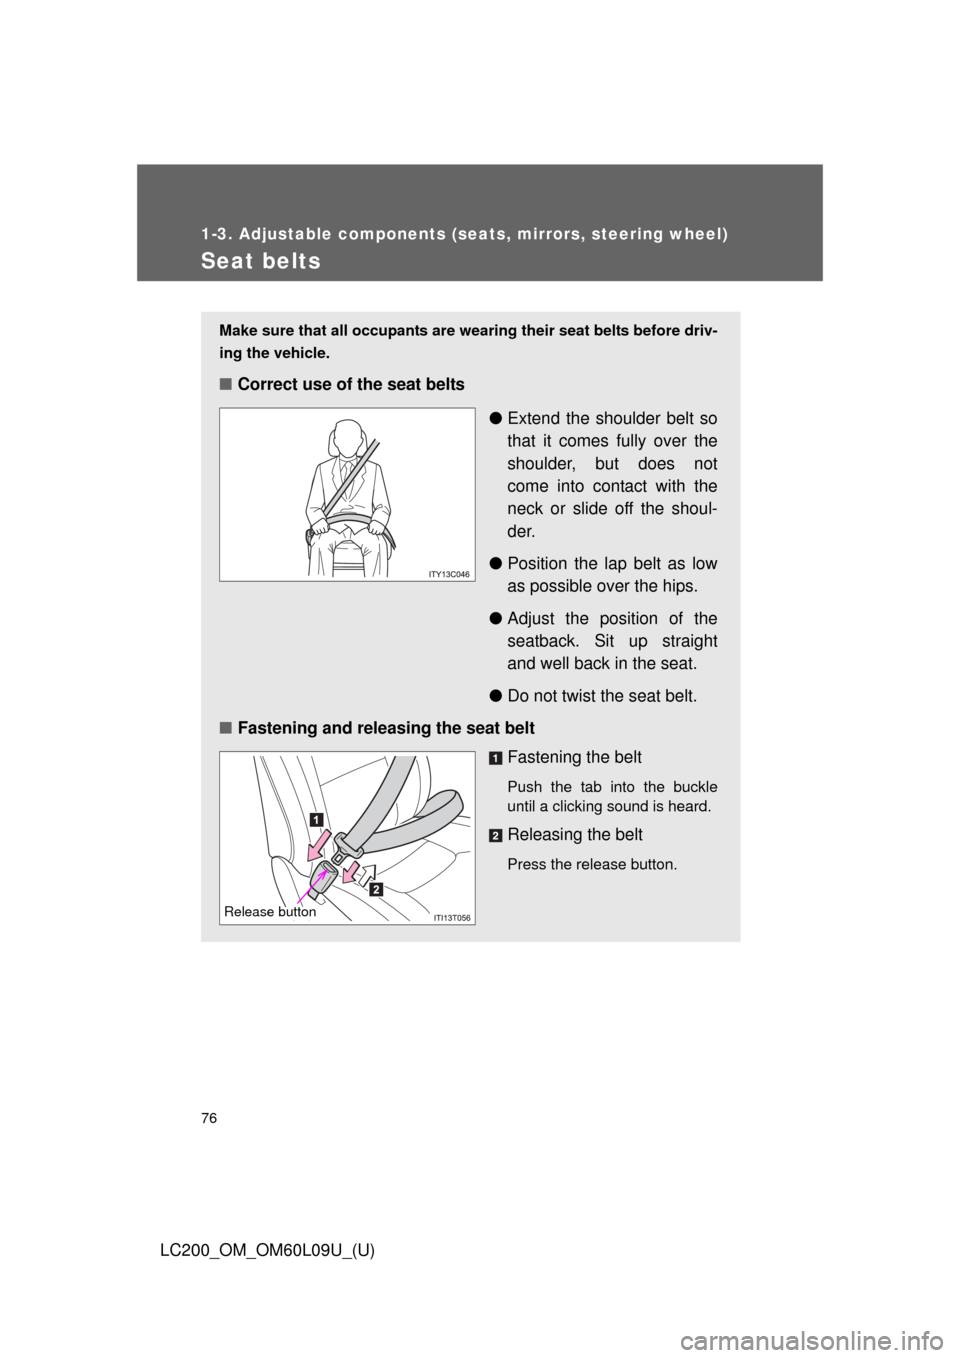
â– Correct use of the seat belts
â—ŹExtend the shoulder belt so
that it comes fully over the
shoulder, but does not
come into contact with the
neck or slide off the shoul-
der.
â—Ź Position the lap belt as low
as possible over the hips.
â—Ź Adjust the position of the
seatback. Sit up straight
and well back in the seat.
â—Ź Do not twist the seat belt.
â– Fastening and releasing the seat belt
Fastening the belt
Push the tab into the buckle
until a clicking sound is heard.
Releasing the belt
Press the release button.
Release button
Page 77 of 724
77
1-3. Adjustable components (s
eats, mirrors, steering wheel)
1
Before driving
LC200_OM_OM60L09U_(U)
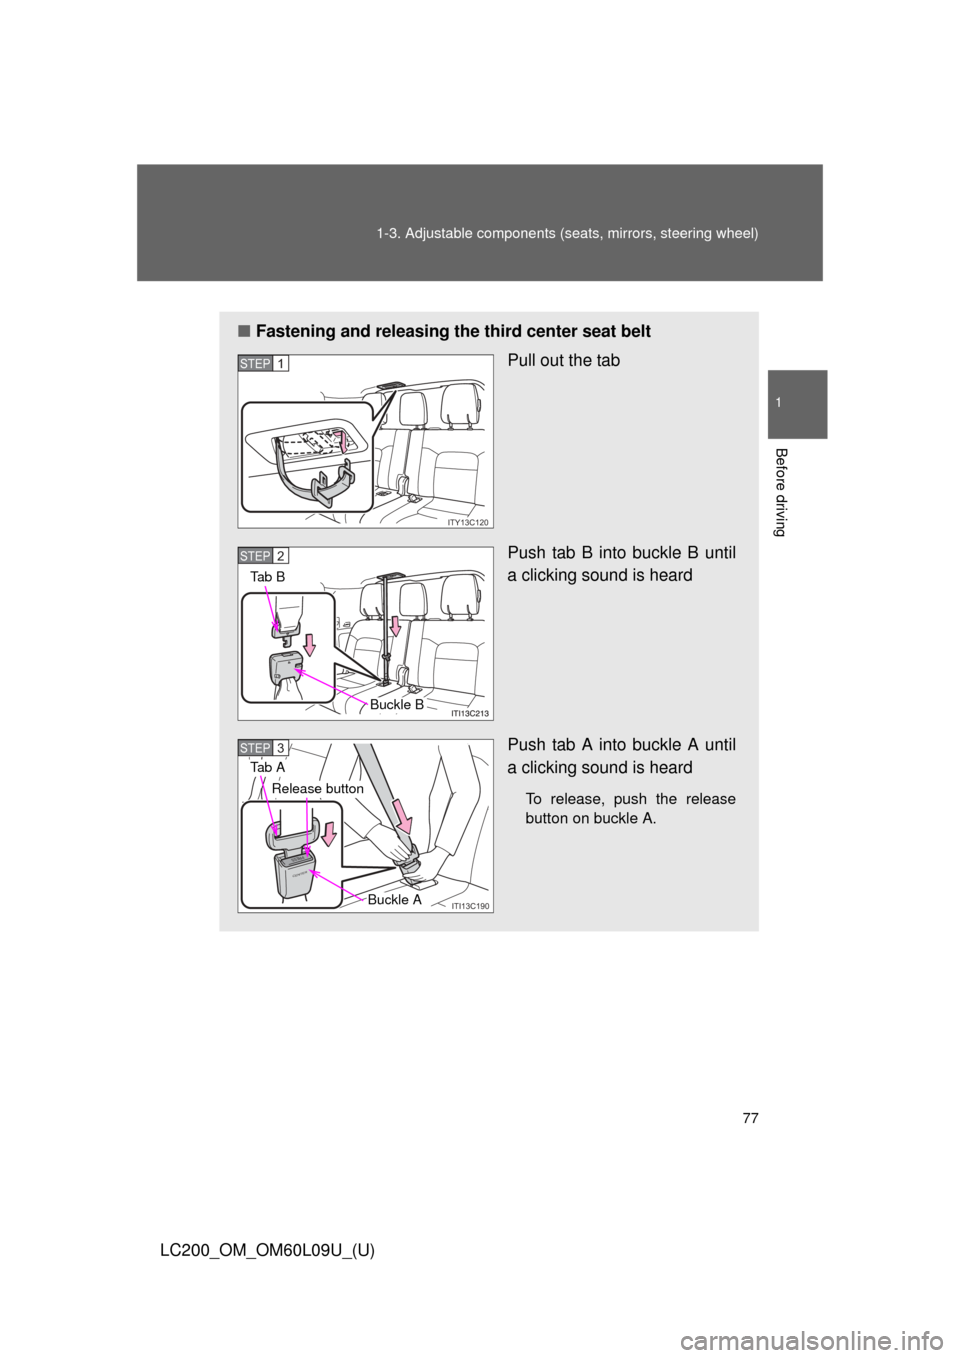
â– Fastening and releasing the third center seat belt
Pull out the tab
Push tab B into buckle B until
a clicking sound is heard
Push tab A into buckle A until
a clicking sound is heard
To release, push the release
button on buckle A.
ITY13C120
STEP1
Ta b B
Buckle B
STEP2
PRESS
CENTER
ITI13C190
Ta b A
Buckle A
Release button
STEP3
Page 78 of 724
78 1-3. Adjustable components (seats, mirrors, steering wheel)
LC200_OM_OM60L09U_(U)
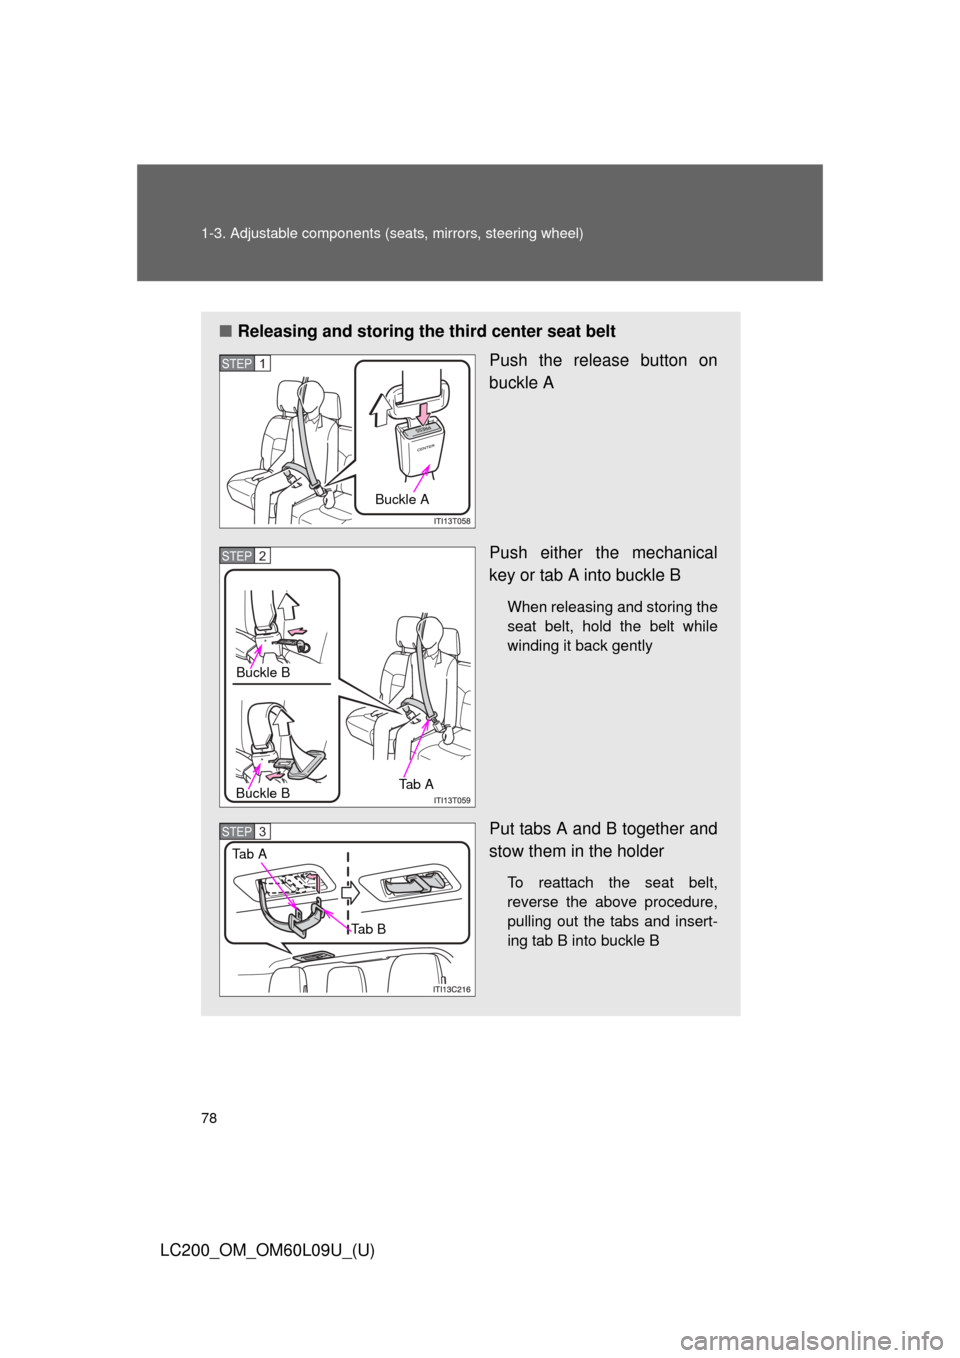
â– Releasing and storing the third center seat belt
Push the release button on
buckle A
Push either the mechanical
key or tab A into buckle B
When releasing and storing the
seat belt, hold the belt while
winding it back gently
Put tabs A and B together and
stow them in the holder
To reattach the seat belt,
reverse the above procedure,
pulling out the tabs and insert-
ing tab B into buckle B
Buckle A
STEP1
Buckle B
Ta b A
Buckle B
STEP2
Ta b A
Ta b B
STEP3
Page 79 of 724
79
1-3. Adjustable components (s
eats, mirrors, steering wheel)
1
Before driving
LC200_OM_OM60L09U_(U)
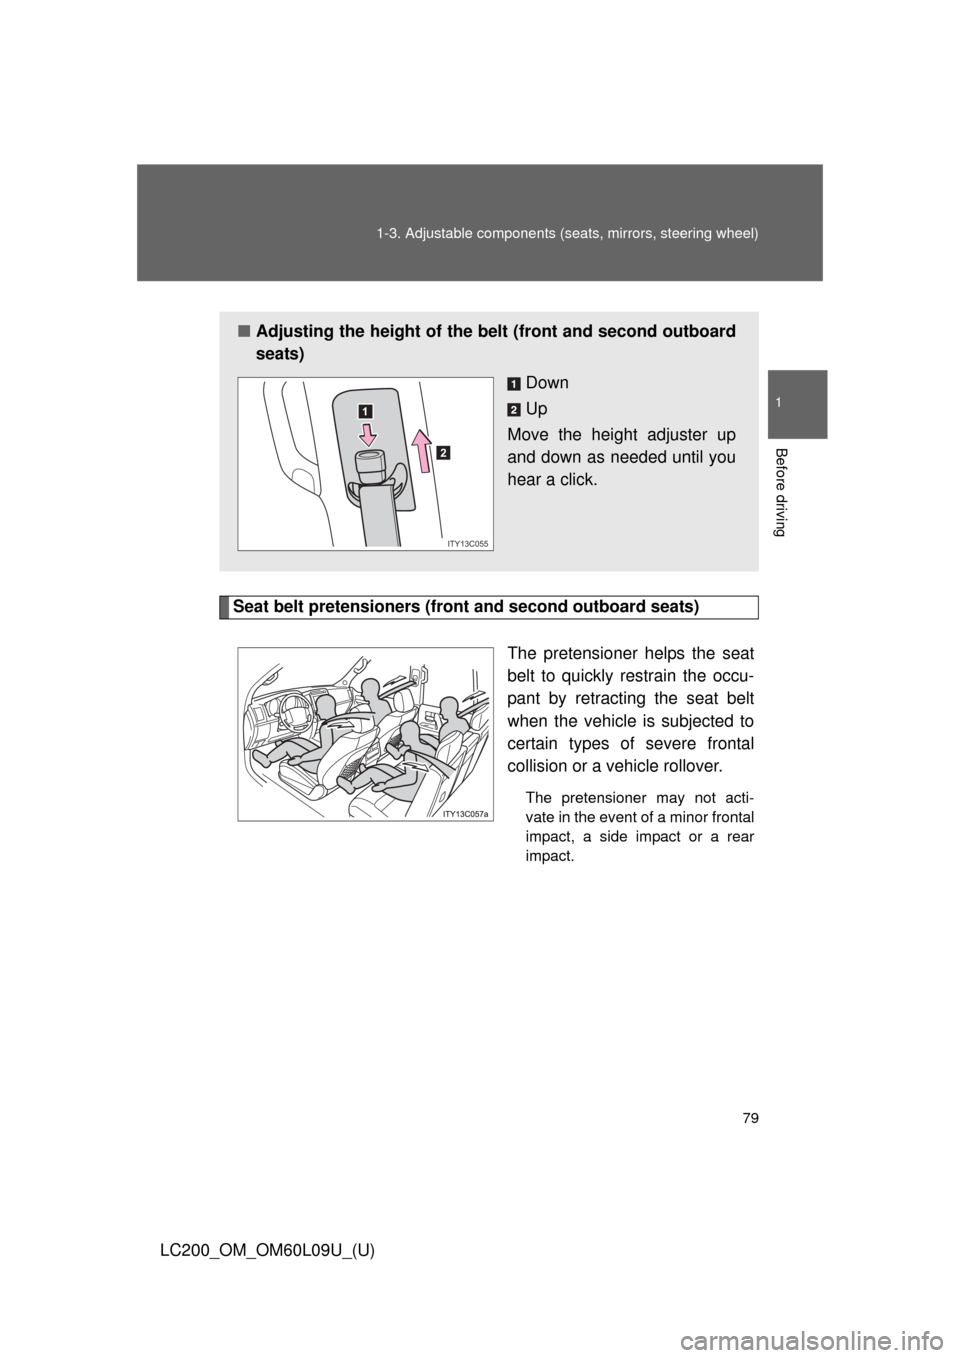
Seat belt pretensioners (front and second outboard seats)
The pretensioner helps the seat
belt to quickly restrain the occu-
pant by retracting the seat belt
when the vehicle is subjected to
certain types of severe frontal
collision or a vehicle rollover.
The pretensioner may not acti-
vate in the event of a minor frontal
impact, a side impact or a rear
impact.
â– Adjusting the height of the belt (front and second outboard
seats)
Down
Up
Move the height adjuster up
and down as needed until you
hear a click.
1
2
ITY13C055
Page 80 of 724

80 1-3. Adjustable components (seats, mirrors, steering wheel)
LC200_OM_OM60L09U_(U)
Pre-collision seat belts (front seats of vehicles with pre-collision
system)
Brake-linked pre-collision system
If the system determines that emergency braking is being per-
formed or the vehicle is out of c ontrol, the front seat belts will
retract.( ď‚®P. 289)
Radar type pre- collision system
If the system determines that a collision is unavoidable, the front
seat belts will retract before the collision. (ď‚®P. 289)
â– Emergency locking retractor (ELR)
The retractor will lock the belt during a sudden stop or on impact. It may also
lock if you lean forward too quickly. A slow, easy motion will allow the belt to
extend, and you can move around fully.
â– Automatic locking retractor (ALR)
When a passenger’s shoulder belt is completely extended and then
retracted even slightly, the belt is locked in that position and cannot be
extended. This feature is used to hold the child restraint system (CRS) firmly.
To free the belt again, fully retract the belt and then pull the belt out once
more. ( ď‚®P. 140)