Audio system TOYOTA LAND CRUISER 2016 J200 Navigation Manual
[x] Cancel search | Manufacturer: TOYOTA, Model Year: 2016, Model line: LAND CRUISER, Model: TOYOTA LAND CRUISER 2016 J200Pages: 275, PDF Size: 28.47 MB
Page 37 of 275
LC200_Navi_OM60N15U_(U)
15.07.08 16:48
Basic function
2
372. Bluetooth® settings
1Display the “Bluetooth* Setup” screen.
(P.36)
2Select “Add”.
When another Bluetooth® device is con-
nected
To disconnect the Bluetooth® device,
select “Yes”.
When 5 Bluetooth® devices have al-
ready been registered
A registered device needs to be replaced.
Select “Yes”, and select the device to be
replaced.
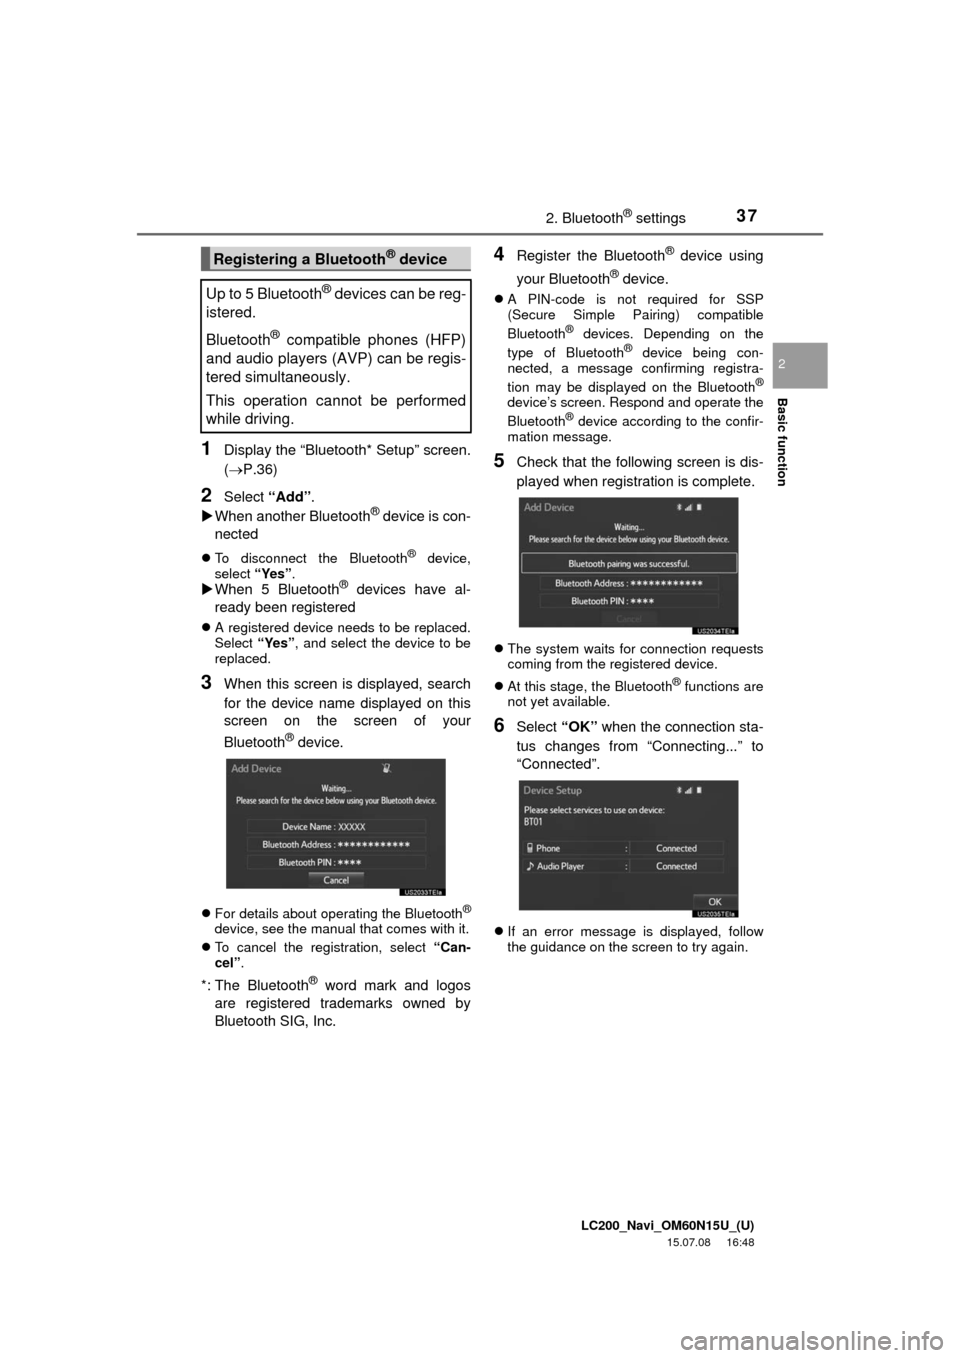
3When this screen is displayed, search
for the device name displayed on this
screen on the screen of your
Bluetooth
® device.
For details about operating the Bluetooth®
device, see the manual that comes with it.
To cancel the registration, select “Can-
cel”.
*: The Bluetooth® word mark and logos
are registered trademarks owned by
Bluetooth SIG, Inc.
4Register the Bluetooth® device using
your Bluetooth
® device.
A PIN-code is not required for SSP
(Secure Simple Pairing) compatible
Bluetooth
® devices. Depending on the
type of Bluetooth® device being con-
nected, a message confirming registra-
tion may be displayed on the Bluetooth
®
device’s screen. Respond and operate the
Bluetooth® device according to the confir-
mation message.
5Check that the following screen is dis-
played when registration is complete.
The system waits for connection requests
coming from the registered device.
At this stage, the Bluetooth
® functions are
not yet available.
6Select “OK” when the connection sta-
tus changes from “Connecting...” to
“Connected”.
If an error message is displayed, follow
the guidance on the screen to try again.
Registering a Bluetooth® device
Up to 5 Bluetooth
® devices can be reg-
istered.
Bluetooth
® compatible phones (HFP)
and audio players (AVP) can be regis-
tered simultaneously.
This operation cannot be performed
while driving.
Page 39 of 275

LC200_Navi_OM60N15U_(U)
15.07.08 16:48
Basic function
2
392. Bluetooth® settings
3Select the desired connection.
When another Bluetooth
® device is con-
nected
To disconnect the Bluetooth® device,
select “Yes”.
4Check that a confirmation screen is
displayed when the connection is com-
plete.
If an error message is displayed, follow
the guidance on the screen to try again.
■Auto connection mode
When the engine switch is in ACCES-
SORY or IGNITION ON mode, the system
searches for a nearby registered device.
The system will connect with the regis-
tered device that was last connected, if it
is nearby.
■Connecting manually
1Press the “SETUP” button.
2Select “Bluetooth*”.
3Follow the steps in “Connecting a
Bluetooth
® device” from step 2.
(P.38)
■Reconnecting the Bluetooth®
phone
If a Bluetooth® phone is disconnected on
purpose, such as turning it off, this does
not happen. Reconnect the Bluetooth
®
phone manually.
*: The Bluetooth® word mark and logos
are registered trademarks owned by
Bluetooth SIG, Inc.
INFORMATION
●It may take time if the device connection
is carried out during Bluetooth® audio
playback.
●Depending on the type of Bluetooth
®
device being connected, it may be nec-
essary to perform additional steps on
the device.
●When disconnecting a Bluetooth
®
device, it is recommended to disconnect
using the navigation system.
To turn auto connection mode on, set
“Bluetooth* Power” to on. (P.41)
Leave the Bluetooth
® device in a loca-
tion where the connection can be es-
tablished.
When the auto connection has failed or
“Bluetooth* Power” is turned off, it is
necessary to connect Bluetooth
® man-
ually.
If a Bluetooth
® phone is disconnected
due to poor reception from the
Bluetooth
® network when the engine
switch is in ACCESSORY or IGNITION
ON mode, the system automatically re-
connects the Bluetooth
® phone.
Page 41 of 275
LC200_Navi_OM60N15U_(U)
15.07.08 16:48
Basic function
2
412. Bluetooth® settings
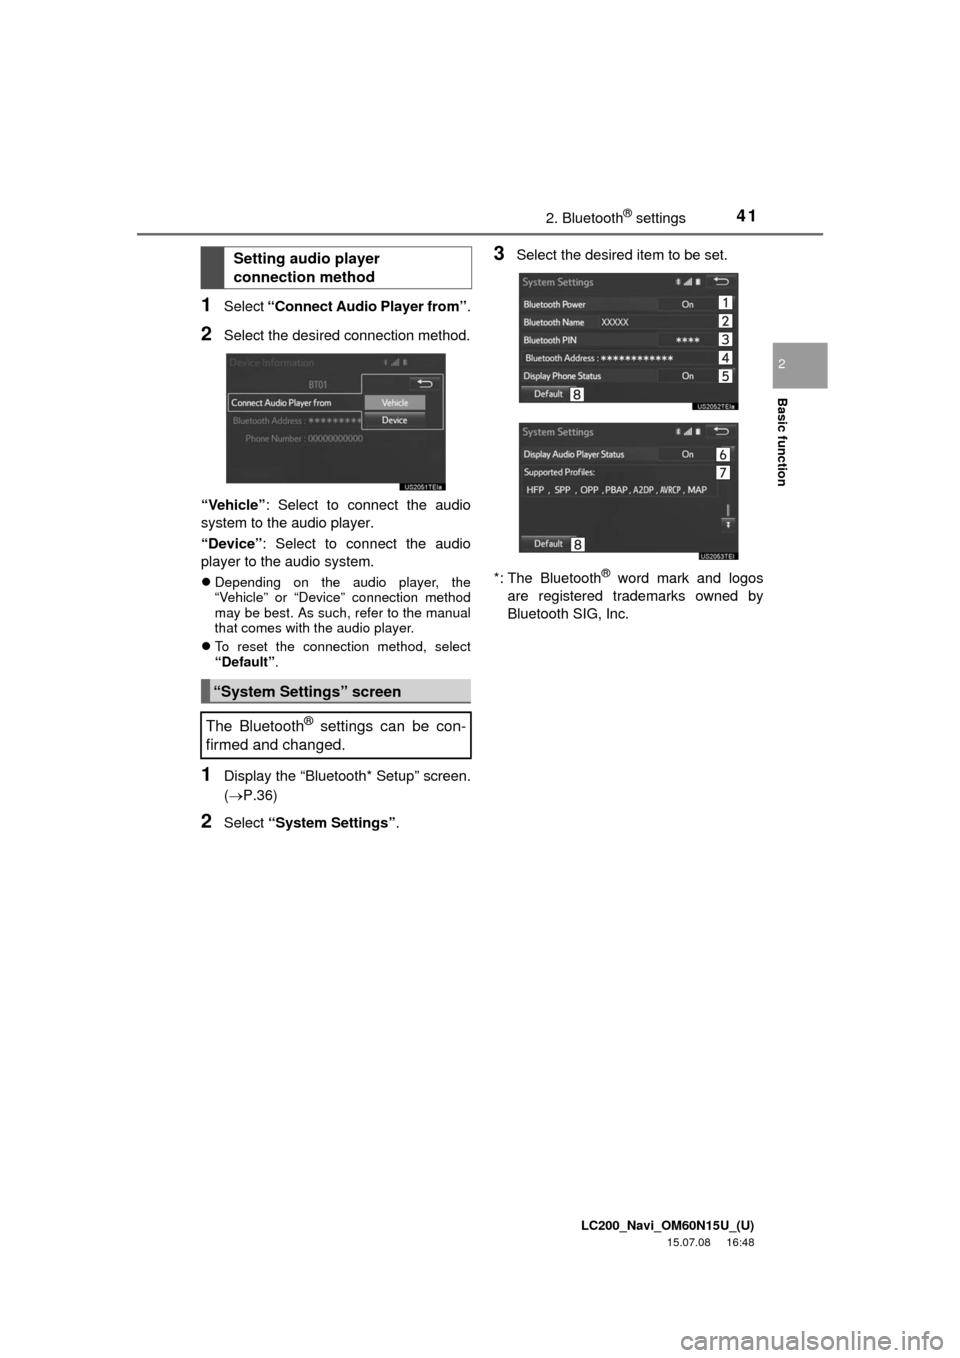
1Select “Connect Audio Player from”.
2Select the desired connection method.
“Vehicle”: Select to connect the audio
system to the audio player.
“Device”: Select to connect the audio
player to the audio system.
Depending on the audio player, the
“Vehicle” or “Device” connection method
may be best. As such, refer to the manual
that comes with the audio player.
To reset the connection method, select
“Default”.
1Display the “Bluetooth* Setup” screen.
(P.36)
2Select “System Settings”.
3Select the desired item to be set.
*: The Bluetooth
® word mark and logos
are registered trademarks owned by
Bluetooth SIG, Inc.
Setting audio player
connection method
“System Settings” screen
The Bluetooth
® settings can be con-
firmed and changed.
Page 42 of 275
LC200_Navi_OM60N15U_(U)
15.07.08 16:48
422. Bluetooth® settings
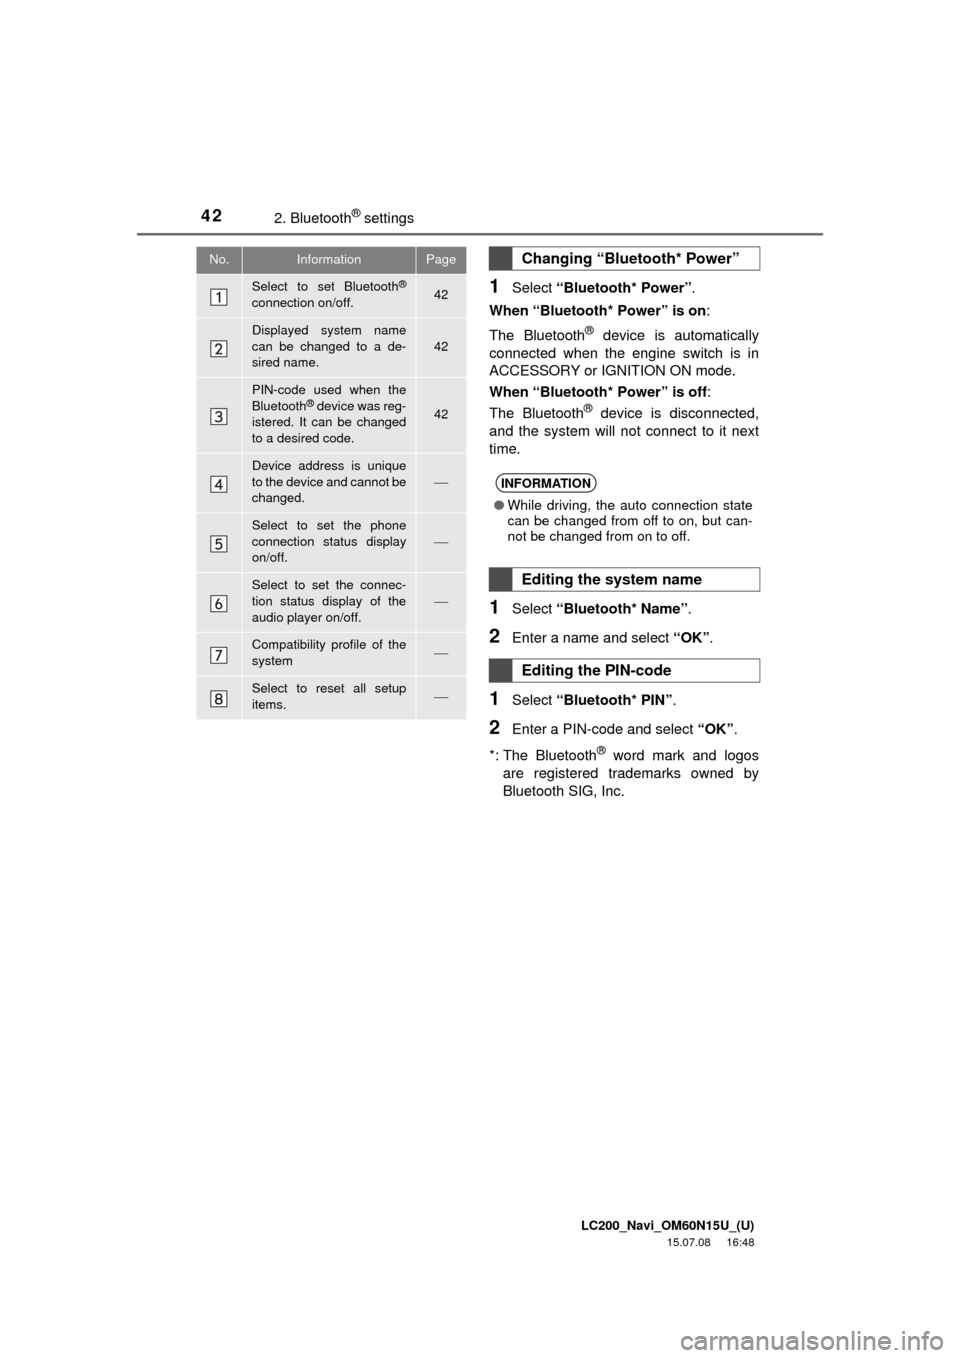
1Select “Bluetooth* Power”.
When “Bluetooth* Power” is on:
The Bluetooth
® device is automatically
connected when the engine switch is in
ACCESSORY or IGNITION ON mode.
When “Bluetooth* Power” is off:
The Bluetooth
® device is disconnected,
and the system will not connect to it next
time.
1Select “Bluetooth* Name”.
2Enter a name and select “OK”.
1Select “Bluetooth* PIN”.
2Enter a PIN-code and select “OK”.
*: The Bluetooth
® word mark and logos
are registered trademarks owned by
Bluetooth SIG, Inc.
No.InformationPage
Select to set Bluetooth®
connection on/off.42
Displayed system name
can be changed to a de-
sired name.
42
PIN-code used when the
Bluetooth® device was reg-
istered. It can be changed
to a desired code.42
Device address is unique
to the device and cannot be
changed.
Select to set the phone
connection status display
on/off.
Select to set the connec-
tion status display of the
audio player on/off.
Compatibility profile of the
system
Select to reset all setup
items.
Changing “Bluetooth* Power”
INFORMATION
●While driving, the auto connection state
can be changed from off to on, but can-
not be changed from on to off.
Editing the system name
Editing the PIN-code
Page 44 of 275
LC200_Navi_OM60N15U_(U)
15.07.15 16:26
443. Other settings
1Display the “General Settings” screen.
(P.43)
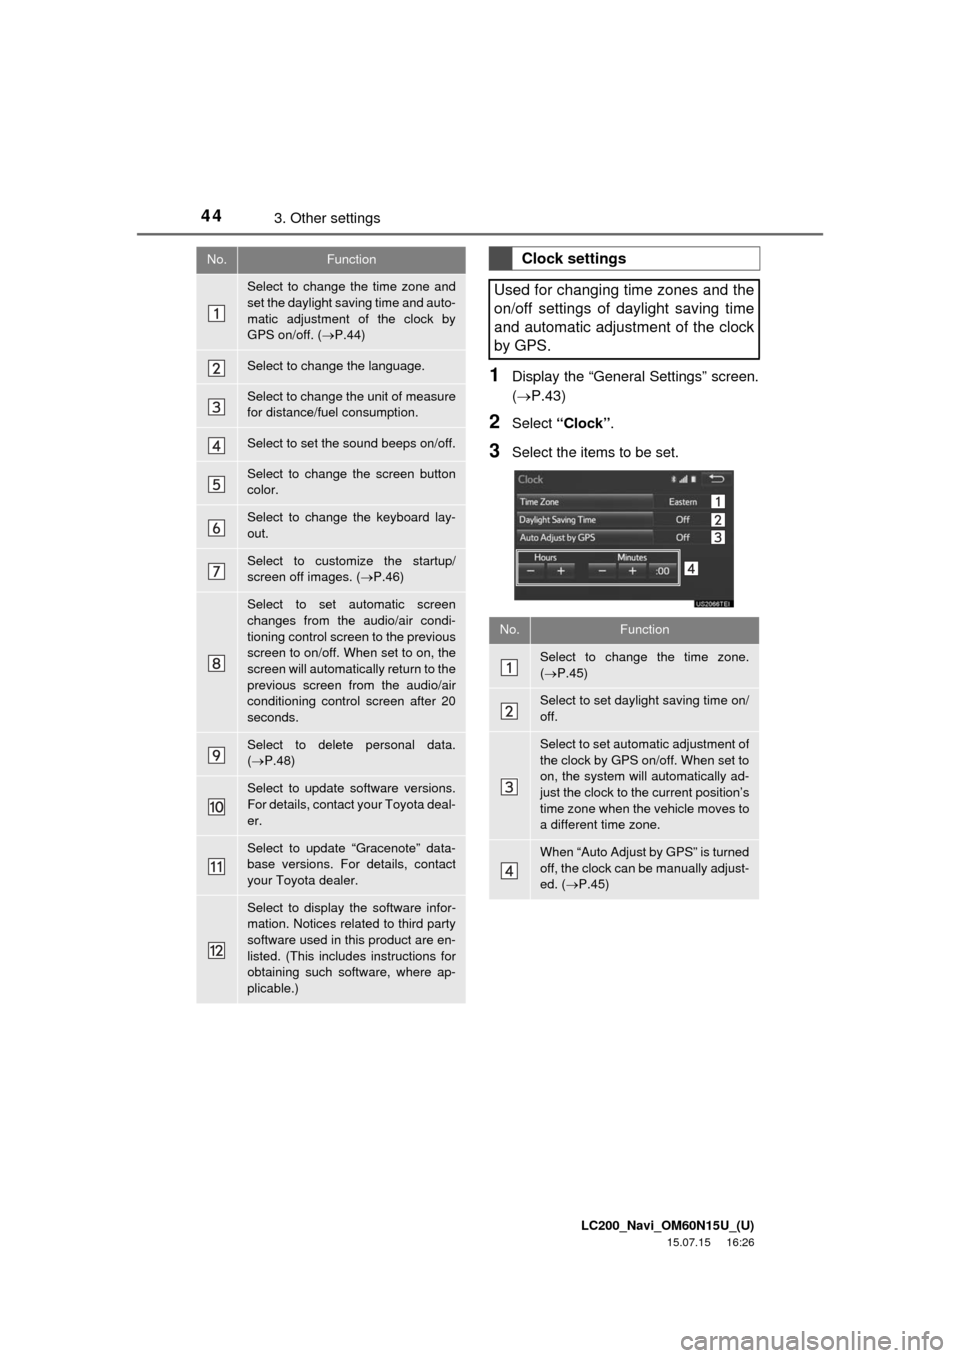
2Select “Clock”.
3Select the items to be set.
No.Function
Select to change the time zone and
set the daylight saving time and auto-
matic adjustment of the clock by
GPS on/off. (P.44)
Select to change the language.
Select to change the unit of measure
for distance/fuel consumption.
Select to set the sound beeps on/off.
Select to change the screen button
color.
Select to change the keyboard lay-
out.
Select to customize the startup/
screen off images. (P.46)
Select to set automatic screen
changes from the audio/air condi-
tioning control screen to the previous
screen to on/off. When set to on, the
screen will automatically return to the
previous screen from the audio/air
conditioning control screen after 20
seconds.
Select to delete personal data.
(P.48)
Select to update software versions.
For details, contact your Toyota deal-
er.
Select to update “Gracenote” data-
base versions. For details, contact
your Toyota dealer.
Select to display the software infor-
mation. Notices related to third party
software used in this product are en-
listed. (This includes instructions for
obtaining such software, where ap-
plicable.)
Clock settings
Used for changing time zones and the
on/off settings of daylight saving time
and automatic adjustment of the clock
by GPS.
No.Function
Select to change the time zone.
(P.45)
Select to set daylight saving time on/
off.
Select to set automatic adjustment of
the clock by GPS on/off. When set to
on, the system will automatically ad-
just the clock to the current position’s
time zone when the vehicle moves to
a different time zone.
When “Auto Adjust by GPS” is turned
off, the clock can be manually adjust-
ed. (P.45)
Page 49 of 275
LC200_Navi_OM60N15U_(U)
15.07.15 16:26
Basic function
2
493. Other settings
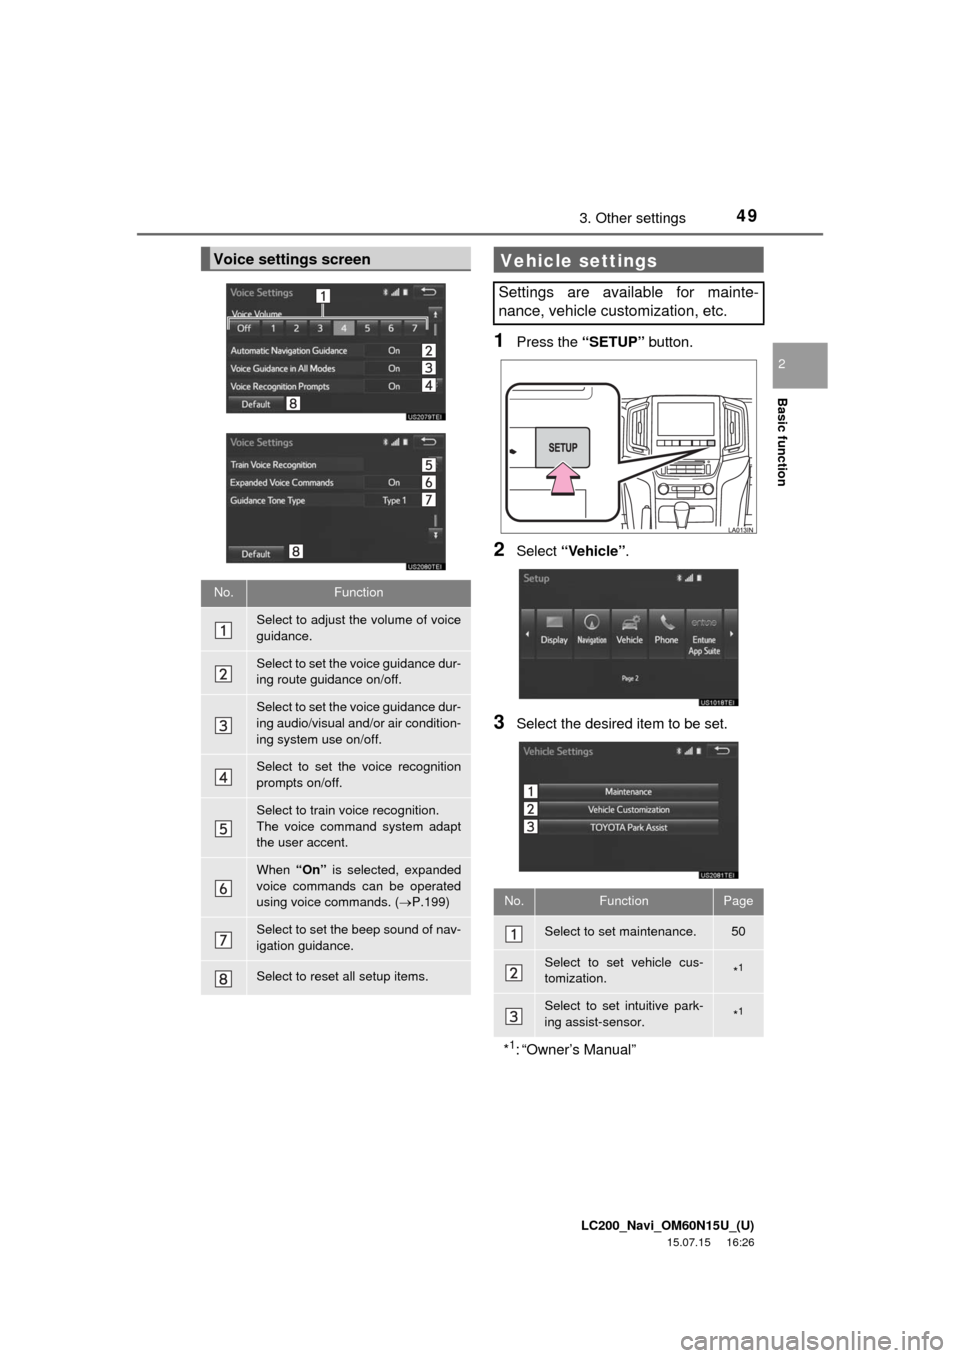
1Press the “SETUP” button.
2Select “Vehicle”.
3Select the desired item to be set.
Voice settings screen
No.Function
Select to adjust the volume of voice
guidance.
Select to set the voice guidance dur-
ing route guidance on/off.
Select to set the voice guidance dur-
ing audio/visual and/or air condition-
ing system use on/off.
Select to set the voice recognition
prompts on/off.
Select to train voice recognition.
The voice command system adapt
the user accent.
When “On” is selected, expanded
voice commands can be operated
using voice commands. (P.199)
Select to set the beep sound of nav-
igation guidance.
Select to reset all setup items.
Vehicle settings
Settings are available for mainte-
nance, vehicle customization, etc.
No.FunctionPage
Select to set maintenance.50
Select to set vehicle cus-
tomization.*1
Select to set intuitive park-
ing assist-sensor.*1
*1: “Owner’s Manual”
Page 106 of 275
LC200_Navi_OM60N15U_(U)
15.07.08 16:49
1066. Tips for the navigation system
About the map data
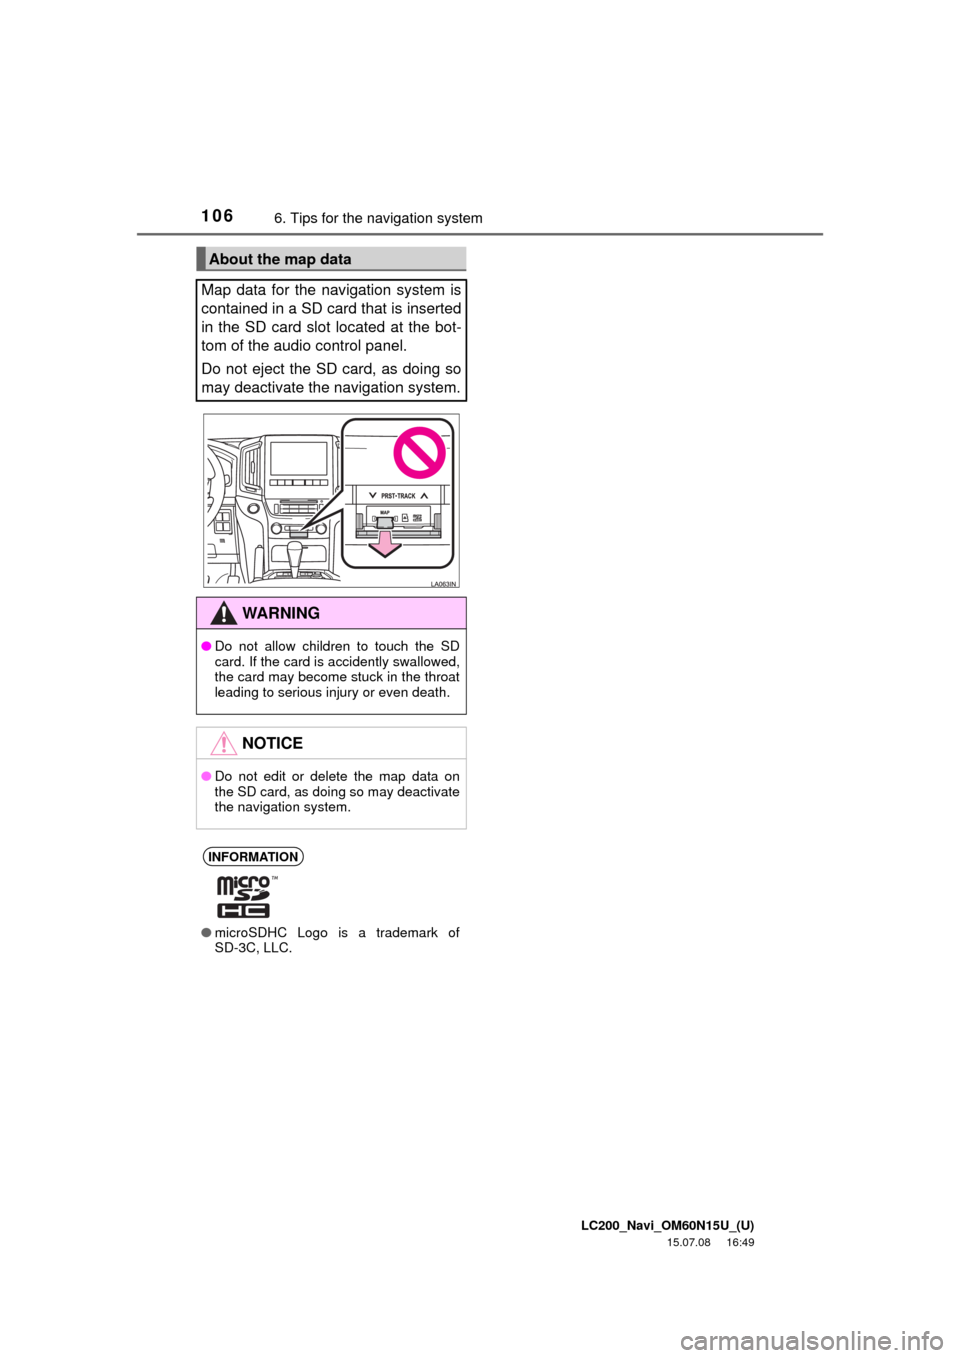
Map data for the navigation system is
contained in a SD card that is inserted
in the SD card slot located at the bot-
tom of the audio control panel.
Do not eject the SD card, as doing so
may deactivate the navigation system.
WA R N I N G
●Do not allow children to touch the SD
card. If the card is accidently swallowed,
the card may become stuck in the throat
leading to serious injury or even death.
NOTICE
●Do not edit or delete the map data on
the SD card, as doing so may deactivate
the navigation system.
INFORMATION
●microSDHC Logo is a trademark of
SD-3C, LLC.
Page 108 of 275

LC200_Navi_OM60N15U_(U)
15.07.07 11:02
108
1. Basic operation
Quick reference....................... 110
Some basics ........................... 111
Turning the system on and off ... 111
Selecting an audio source ......... 111
Disc slot ..................................... 112
USB/AUX port ........................... 113
Sound settings........................... 114
Audio screen adjustment ........... 115
Voice command system ............ 116
2. Radio operation
AM/FM radio ........................... 117
Overview ................................... 117
Presetting a station.................... 118
Selecting a station from the
list ........................................... 119
Caching a radio program ........... 119
Radio broadcast data system .... 120
Traffic announcement
(FM radio) ............................... 121
Using HD Radio™ technology... 122
Available HD Radio™
technology .............................. 122
Troubleshooting guide ............... 124
XM Satellite Radio ................... 125
Overview ................................... 125
How to subscribe to an XM
Satellite Radio ........................ 126
Displaying the radio ID .............. 127
Presetting a channel ................. 128
Selecting a channel from the
list ........................................... 128
If the satellite radio tuner
malfunctions ........................... 129
Internet radio ........................... 130
Listening to internet radio.......... 130
3. Media operation
CD ........................................... 131
Overview ................................... 131
Playing an audio CD ................. 132
Playing an MP3/WMA/
AAC disc................................. 133
DVD ......................................... 134
Overview ................................... 134
DVD options .............................. 136
USB memory ........................... 138
Overview ................................... 138
USB audio ................................. 139
iPod ......................................... 140
Overview ................................... 140
iPod audio ................................. 143
iPod video ................................. 143
Page 109 of 275

LC200_Navi_OM60N15U_(U)
15.07.07 11:02
109
4
Bluetooth® audio ..................... 144
Overview ................................... 144
Connecting a Bluetooth®
device ..................................... 146
Listening to Bluetooth
® audio .... 146
AUX......................................... 147
Overview ................................... 147
VTR ......................................... 148
Overview ................................... 148
VTR options............................... 149
4. Rear seat entertainment
system operation
Rear seat entertainment
system features .................... 150
Display....................................... 151
Rear seat entertainment system
controller ................................. 152
Headphone jacks....................... 153
Headphones .............................. 153
Caution screen .......................... 153
Turning the rear display on/off... 153
Changing the display to be
operated .................................. 154
Turning on/off the display .......... 154
Changing the source ................. 154
Changing the speaker output .... 155
Operation from the front seats... 157
Using the radio .......................... 157
Using the radio (internet radio
broadcast) ............................... 159Playing an audio CD/
a CD-TEXT disc ..................... 159
Playing MP3/WMA/
AAC discs ............................... 159
Playing DVD video .................... 160
Playing a USB memory ............. 164
Playing iPod .............................. 165
Playing Bluetooth
® audio .......... 166
Using the external devices ........ 167
Rear seat entertainment
system settings....................... 168
If the rear seat entertainment
system malfunctions ............... 170
5. Audio/visual remote
controls
Steering switches .................... 171
6. Setup
Audio settings .......................... 173
Audio settings screen................ 173
7. Tips for operating the
audio/visual system
Operating information .............. 178
Radio......................................... 178
DVD player and disc ................. 179
iPod ........................................... 184
File information ......................... 185
Terms ........................................ 188
Error messages......................... 190
Audio/visual system
Page 110 of 275
LC200_Navi_OM60N15U_(U)
15.07.08 16:49
1101. Basic operation
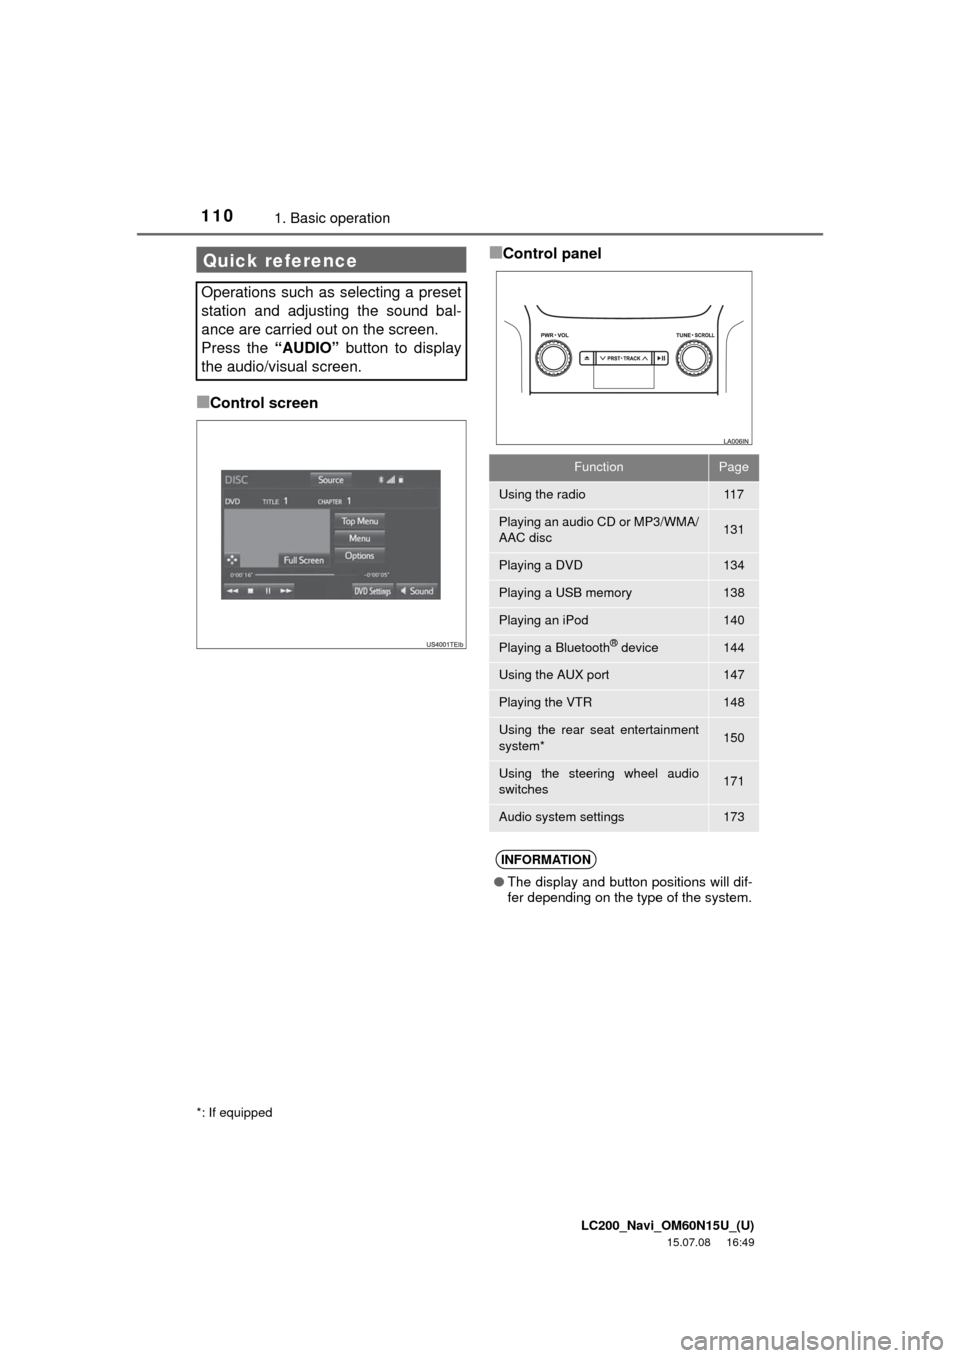
■Control screen
■Control panelQuick reference
Operations such as selecting a preset
station and adjusting the sound bal-
ance are carried out on the screen.
Press the “AUDIO” button to display
the audio/visual screen.
*: If equipped
FunctionPage
Using the radio11 7
Playing an audio CD or MP3/WMA/
AAC disc131
Playing a DVD134
Playing a USB memory138
Playing an iPod140
Playing a Bluetooth® device144
Using the AUX port147
Playing the VTR148
Using the rear seat entertainment
system*150
Using the steering wheel audio
switches171
Audio system settings173
INFORMATION
●The display and button positions will dif-
fer depending on the type of the system.