ECO mode TOYOTA LAND CRUISER 2017 J200 Owners Manual
[x] Cancel search | Manufacturer: TOYOTA, Model Year: 2017, Model line: LAND CRUISER, Model: TOYOTA LAND CRUISER 2017 J200Pages: 608, PDF Size: 15.88 MB
Page 21 of 608
21Pictorial index
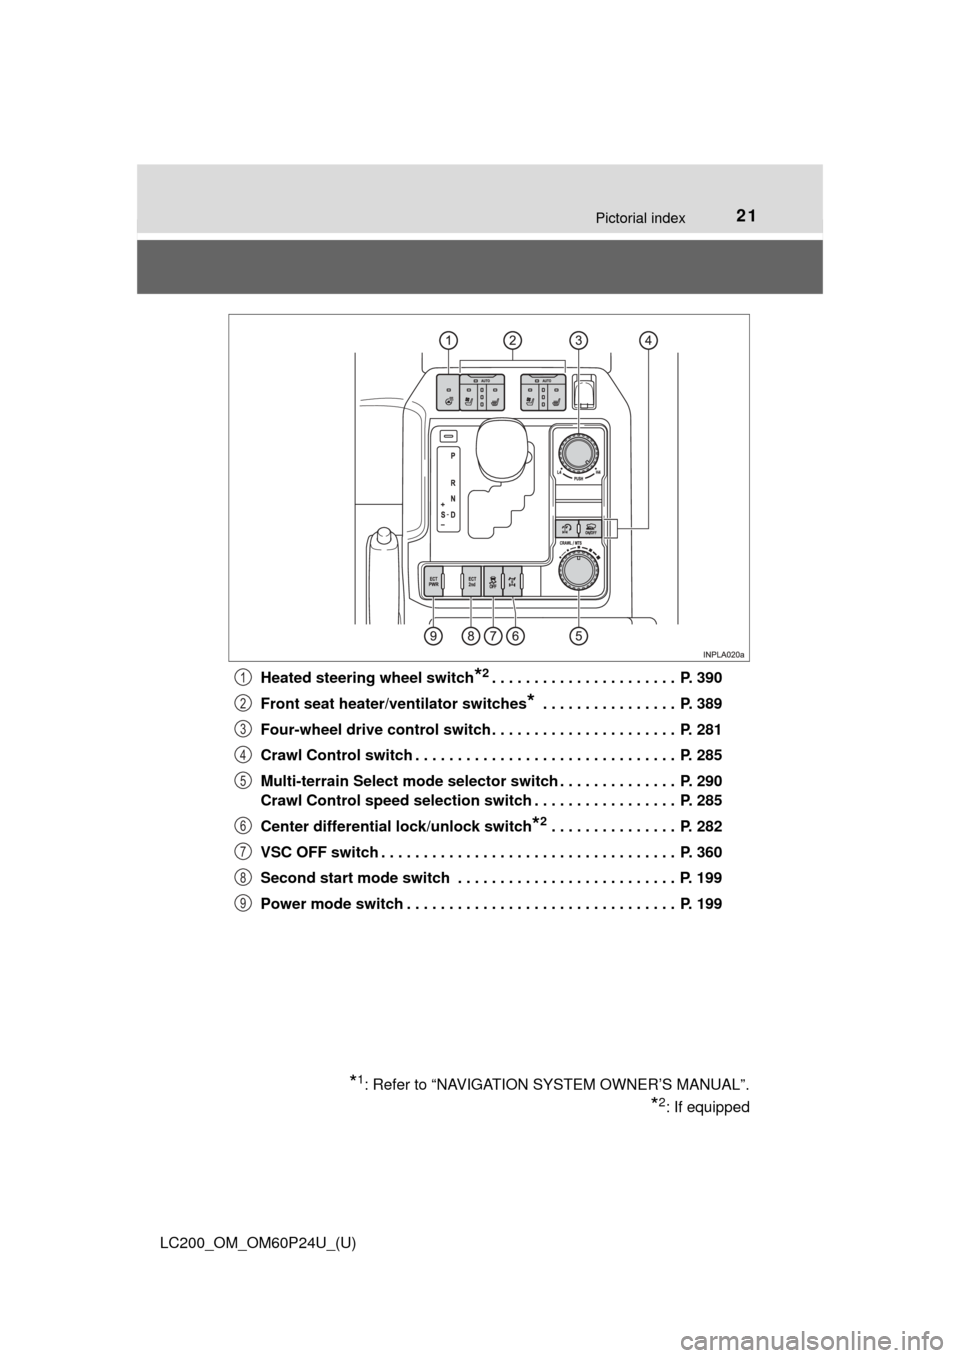
LC200_OM_OM60P24U_(U)Heated steering wheel switch
*2. . . . . . . . . . . . . . . . . . . . . . P. 390
Front seat heater/ventilator switches
* . . . . . . . . . . . . . . . . P. 389
Four-wheel drive control switch . . . . . . . . . . . . . . . . . . . . . . P. 281
Crawl Control switch . . . . . . . . . . . . . . . . . . . . . . . . . . . . . . . P. 285
Multi-terrain Select mode selector switch . . . . . . . . . . . . . . P. 290
Crawl Control speed selection switch . . . . . . . . . . . . . . . . . P. 285
Center differential lock/unlock switch
*2 . . . . . . . . . . . . . . . P. 282
VSC OFF switch . . . . . . . . . . . . . . . . . . . . . . . . . . . . . . . . . . . P. 360
Second start mode switch . . . . . . . . . . . . . . . . . . . . . . . . . . P. 199
Power mode switch . . . . . . . . . . . . . . . . . . . . . . . . . . . . . . . . P. 199
*1: Refer to “NAVIGATION SYSTEM OWNER’S MANUAL”.
*2: If equipped
1
2
3
4
5
6
7
8
9
Page 27 of 608
271-1. For safe use
LC200_OM_OM60P24U_(U)
1
For safety and security
WARNING
Observe the following precautions.
Failure to do so may cause the driver’s floor mat to slip, possibly interfering
with the pedals while driving. An unexpectedly high speed may result or it may
become difficult to stop the vehicle. This could lead to an accident, resulting in
death or serious injury.
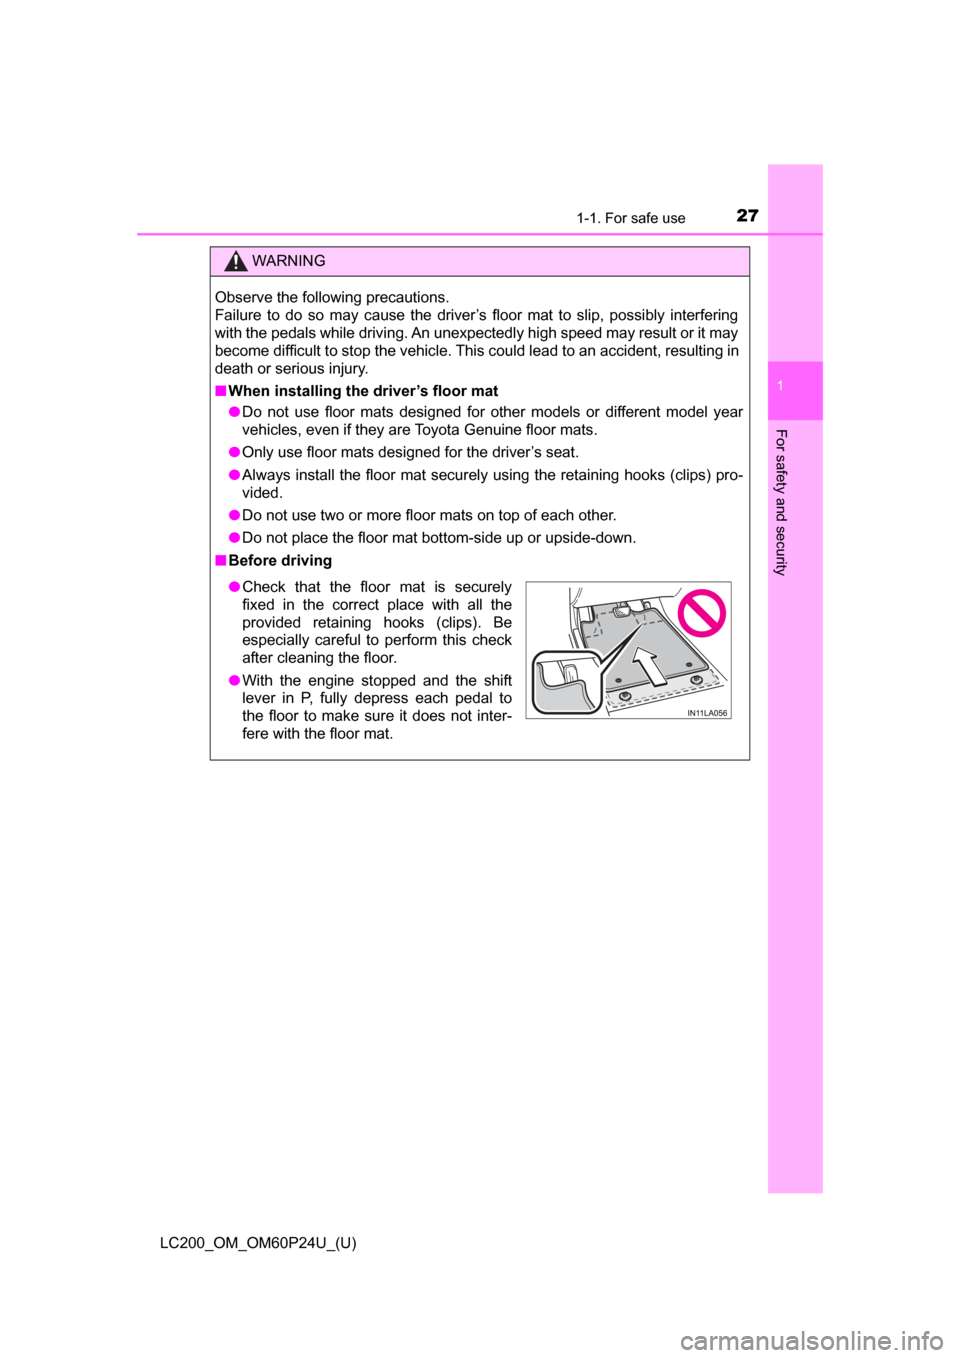
■When installing the driver’s floor mat
● Do not use floor mats designed for other models or different model year
vehicles, even if they are Toyota Genuine floor mats.
● Only use floor mats designed for the driver’s seat.
● Always install the floor mat securely using the retaining hooks (clips) pro-
vided.
● Do not use two or more floor mats on top of each other.
● Do not place the floor mat bottom-side up or upside-down.
■ Before driving
● Check that the floor mat is securely
fixed in the correct place with all the
provided retaining hooks (clips). Be
especially careful to perform this check
after cleaning the floor.
● With the engine stopped and the shift
lever in P, fully depress each pedal to
the floor to make sure it does not inter-
fere with the floor mat.
Page 50 of 608
501-1. For safe use
LC200_OM_OM60P24U_(U)
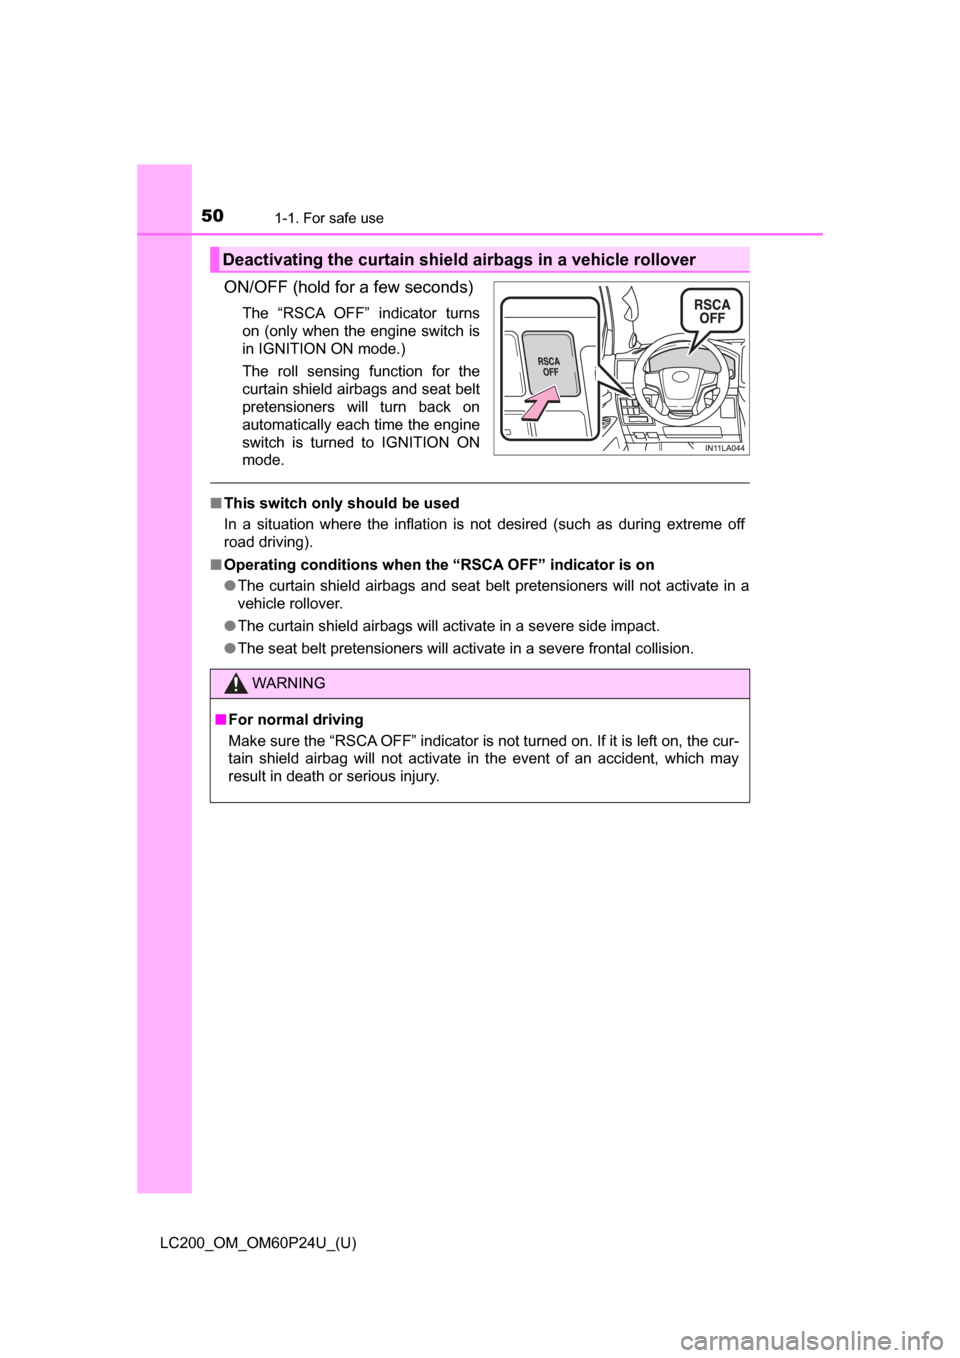
ON/OFF (hold for a few seconds)
The “RSCA OFF” indicator turns
on (only when the engine switch is
in IGNITION ON mode.)
The roll sensing function for the
curtain shield airbags and seat belt
pretensioners will turn back on
automatically each time the engine
switch is turned to IGNITION ON
mode.
■This switch only should be used
In a situation where the inflation is not desired (such as during extreme off
road driving).
■ Operating conditions when th e “RSCA OFF” indicator is on
● The curtain shield airbags and seat belt pretensioners will not activate in a
vehicle rollover.
● The curtain shield airbags will activate in a severe side impact.
● The seat belt pretensioners will activate in a severe frontal collision.
Deactivating the curtain shield airbags in a vehicle rollover
WARNING
■ For normal driving
Make sure the “RSCA OFF” indicator is not turned on. If it is left on, the cur-
tain shield airbag will not activate in the event of an accident, which may
result in death or serious injury.
Page 67 of 608
671-1. For safe use
LC200_OM_OM60P24U_(U)
1
For safety and security
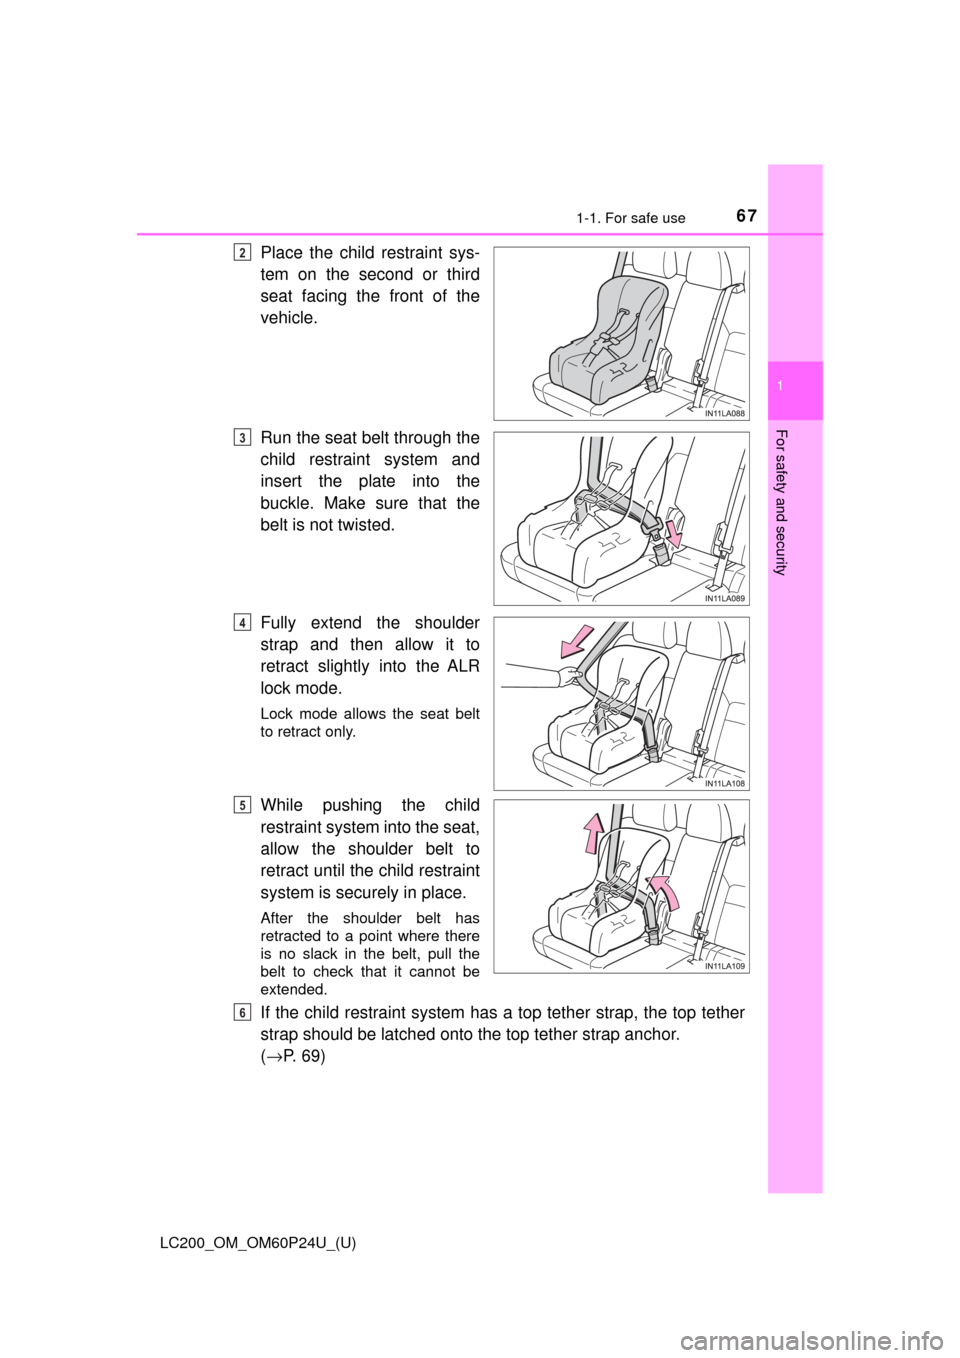
Place the child restraint sys-
tem on the second or third
seat facing the front of the
vehicle.
Run the seat belt through the
child restraint system and
insert the plate into the
buckle. Make sure that the
belt is not twisted.
Fully extend the shoulder
strap and then allow it to
retract slightly into the ALR
lock mode.
Lock mode allows the seat belt
to retract only.
While pushing the child
restraint system into the seat,
allow the shoulder belt to
retract until the child restraint
system is securely in place.
After the shoulder belt has
retracted to a point where there
is no slack in the belt, pull the
belt to check that it cannot be
extended.
If the child restraint system has a top tether strap, the top tether
strap should be latched onto the top tether strap anchor.
(→ P. 69)
2
3
4
5
6
Page 71 of 608
711-1. For safe use
LC200_OM_OM60P24U_(U)
1
For safety and security
WARNING
■When installing a booster seat
To prevent the belt from going into ALR lock mode, do not fully extend the
shoulder belt. ALR mode causes the belt to tighten only. This could cause
injury or discomfort to the child. ( →P. 34)
■ When installing a child restraint system
Follow the directions given in the child restraint system installation manual
and fix the child restraint system securely in place.
If the child restraint system is not correctly fixed in place, the child or other
passengers may be seriously injured or even killed in the event of sudden
braking, sudden swerving or an accident.
● When installing a child restraint system on the second center seat, adjust
both seat cushions to the same position and align both seatbacks at the
same angle. Otherwise, the child restraint system cannot be securely
restrained and this may cause death or serious injuries in the event of sud-
den braking, sudden swerving or an accident.
● When using the LATCH anchors for a child restraint system, move the seat
as far back as possible, with the seatback close to the child restraint sys-
tem.
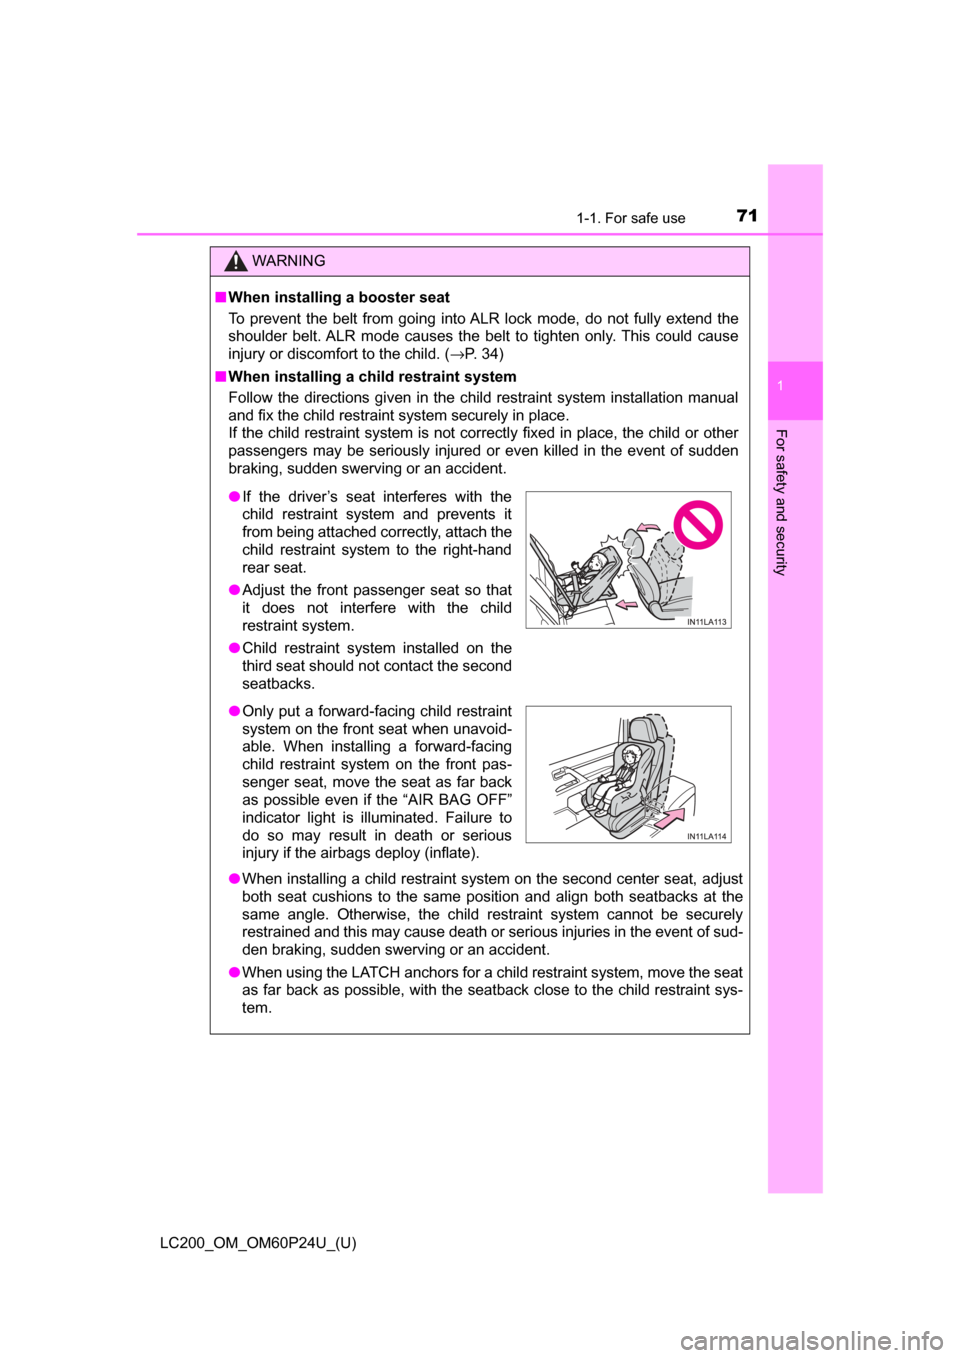
●If the driver’s seat interferes with the
child restraint system and prevents it
from being attached correctly, attach the
child restraint system to the right-hand
rear seat.
● Adjust the front passenger seat so that
it does not interfere with the child
restraint system.
● Child restraint system installed on the
third seat should not contact the second
seatbacks.
● Only put a forward-facing child restraint
system on the front seat when unavoid-
able. When installing a forward-facing
child restraint system on the front pas-
senger seat, move the seat as far back
as possible even if the “AIR BAG OFF”
indicator light is illuminated. Failure to
do so may result in death or serious
injury if the airbags deploy (inflate).
Page 76 of 608
761-2. Theft deterrent system
LC200_OM_OM60P24U_(U)
Alarm
The alarm uses light and sound to give an alert when an intrusion is
detected.
The alarm is triggered in the following situations when the alarm is
set:
●A locked door is unlocked or opened in any way other than using
the entry function or wireless re mote control. (The doors will lock
again automatically.)
● The hood is opened.
● The battery is reconnected.
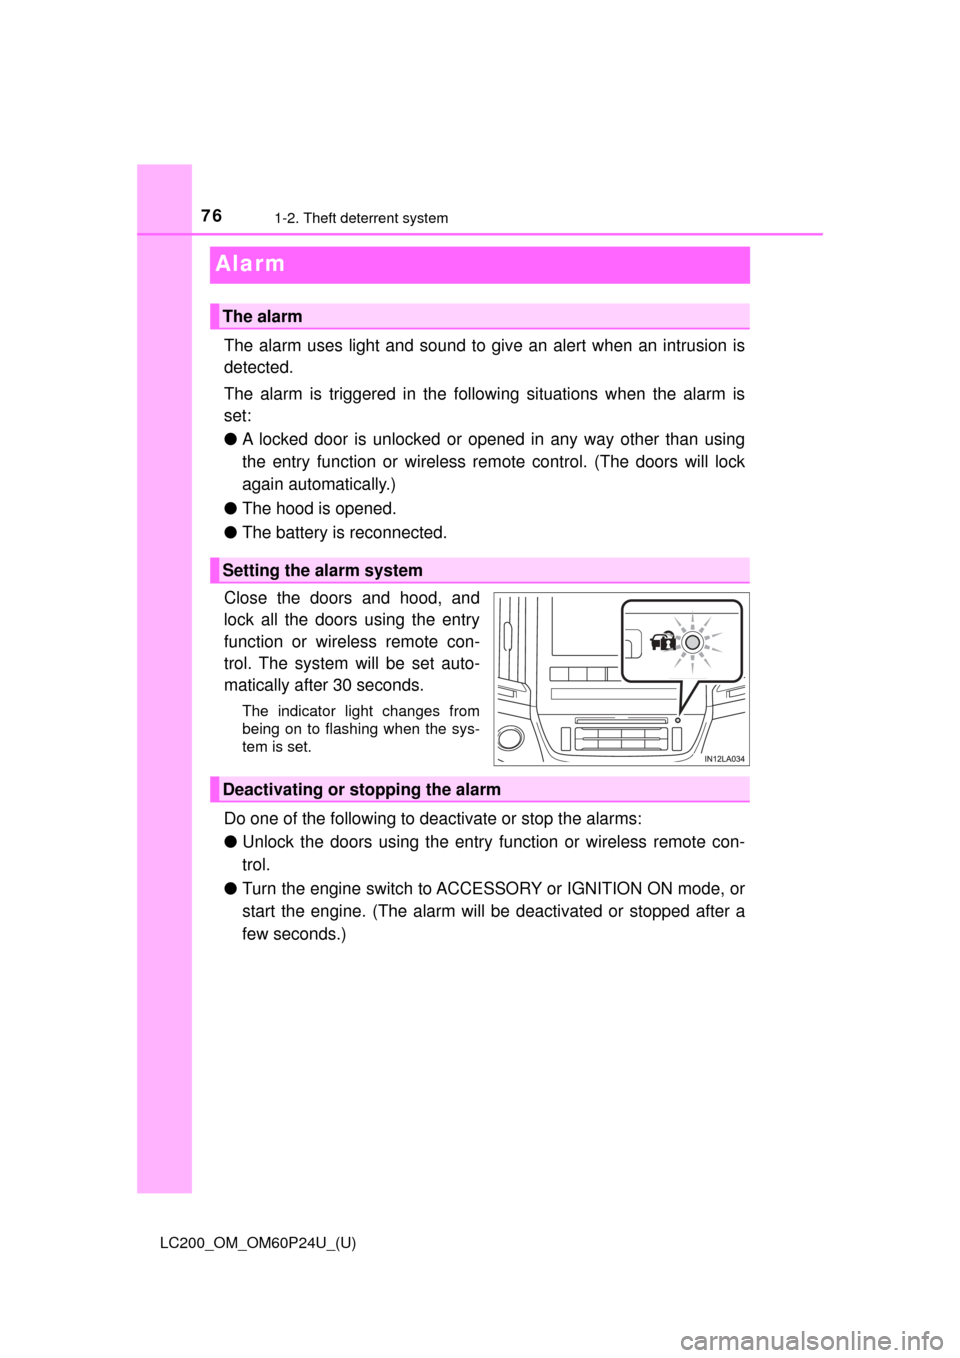
Close the doors and hood, and
lock all the doors using the entry
function or wireless remote con-
trol. The system will be set auto-
matically after 30 seconds.
The indicator light changes from
being on to flashing when the sys-
tem is set.
Do one of the following to d eactivate or stop the alarms:
● Unlock the doors using the entry function or wireless remote con-
trol.
● Turn the engine switch to ACCESSORY or IGNITION ON mode, or
start the engine. (The alarm will be deactivated or stopped after a
few seconds.)
The alarm
Setting the alarm system
Deactivating or stopping the alarm
Page 81 of 608
LC200_OM_OM60P24U_(U)
812. Instrument cluster
2
Instrument cluster
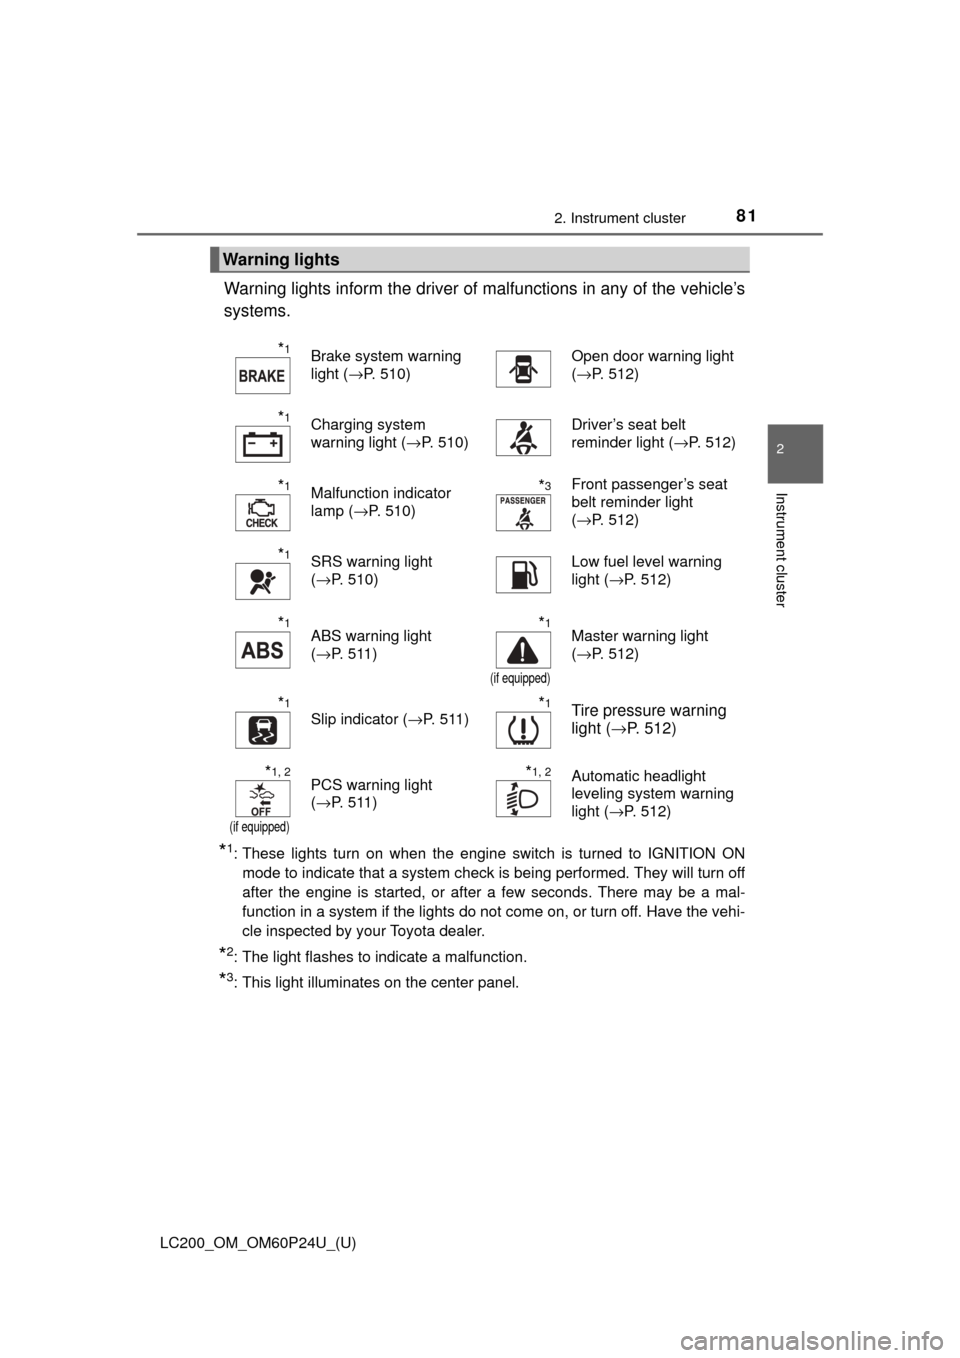
Warning lights inform the driver of malfunctions in any of the vehicle’s
systems.
*1: These lights turn on when the engine switch is turned to IGNITION ON mode to indicate that a system check is being performed. They will turn off
after the engine is started, or after a few seconds. There may be a mal-
function in a system if the lights do not come on, or turn off. Have the vehi-
cle inspected by your Toyota dealer.
*2: The light flashes to indicate a malfunction.
*3: This light illuminates on the center panel.
Warning lights
*1Brake system warning
light ( →P. 510)Open door warning light
(→P. 512)
*1Charging system
warning light ( →P. 510)Driver’s seat belt
reminder light ( →P. 512)
*1Malfunction indicator
lamp (→P. 510)*3Front passenger’s seat
belt reminder light
(→P. 512)
*1SRS warning light
(→P. 510)Low fuel level warning
light ( →P. 512)
*1ABS warning light
(→P. 511)*1
(if equipped)
Master warning light
(→P. 512)
*1
Slip indicator ( →P. 511)*1Tire pressure warning
light (→P. 512)
*1, 2
(if equipped)
PCS warning light
(→P. 511)*1, 2Automatic headlight
leveling system warning
light ( →P. 512)
Page 82 of 608
82
LC200_OM_OM60P24U_(U)
2. Instrument cluster
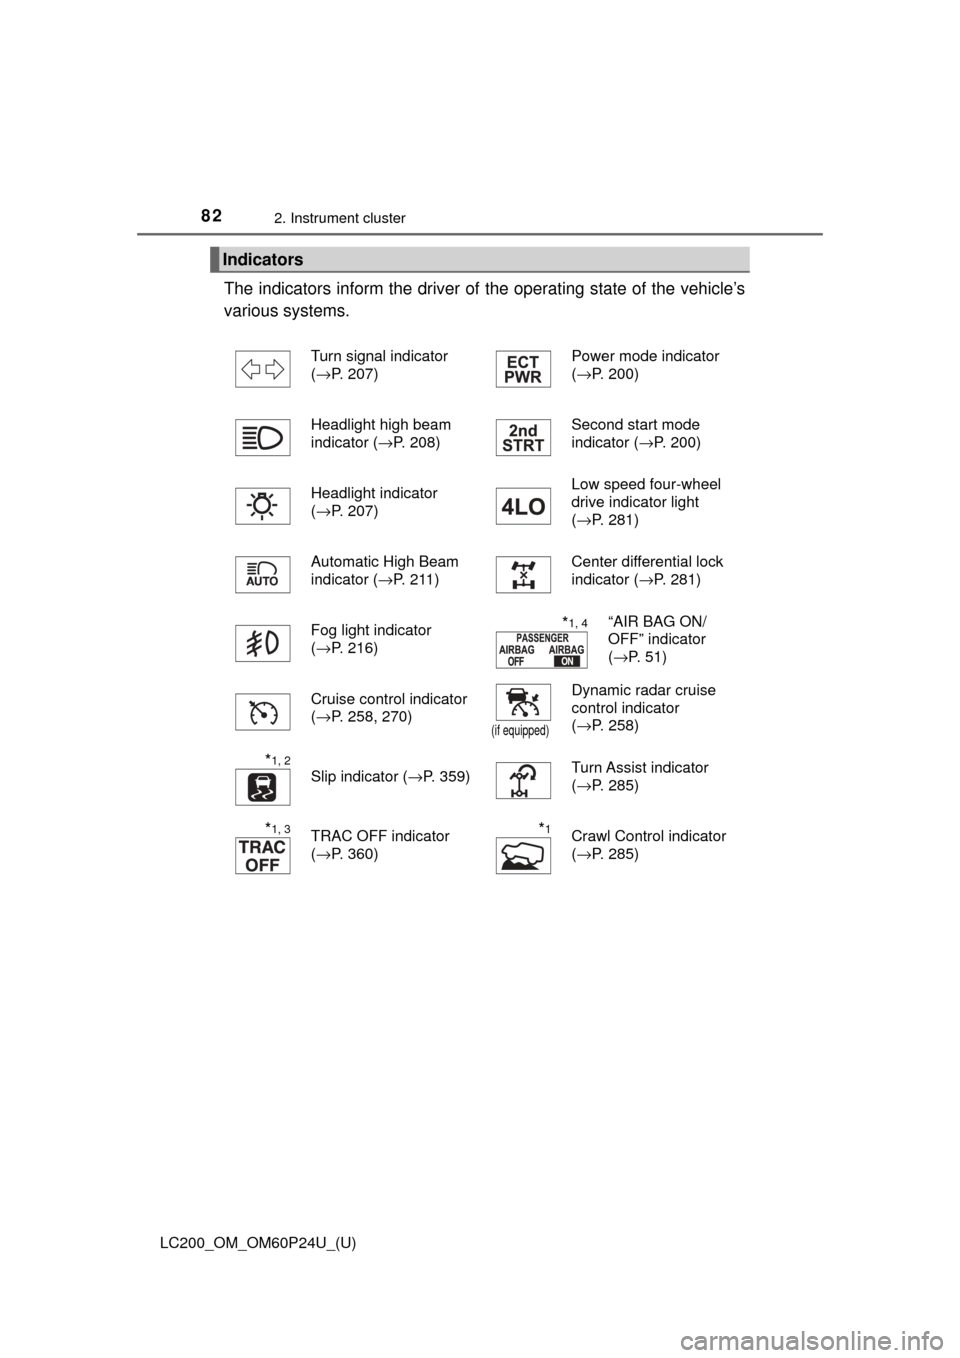
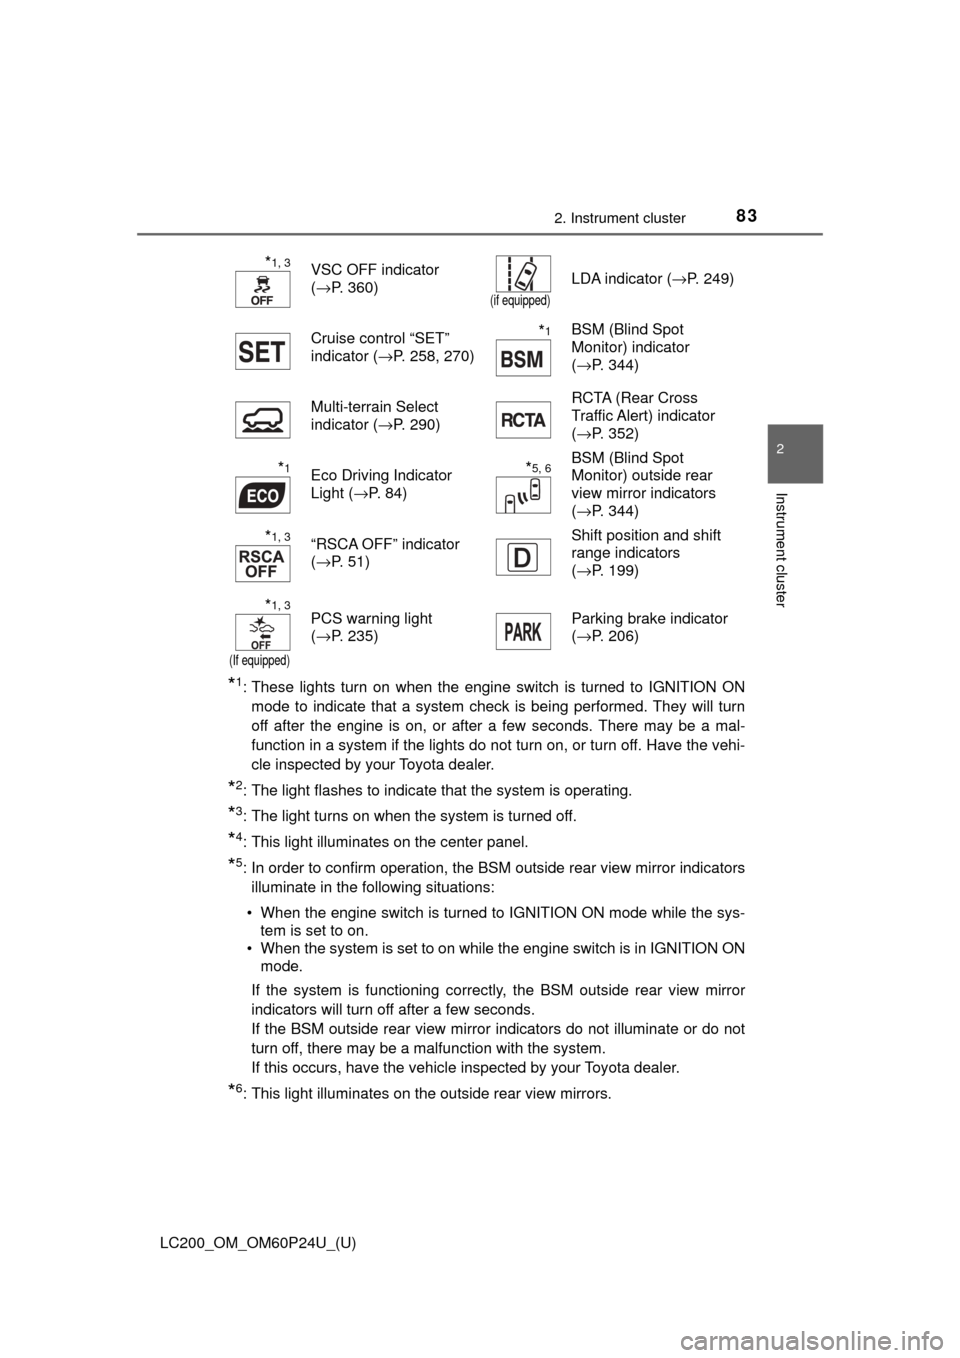
The indicators inform the driver of the operating state of the vehicle’s
various systems.
Indicators
Turn signal indicator
( →P. 207) Power mode indicator
(
→P. 200)
Headlight high beam
indicator ( →P. 208) Second start mode
indicator (
→P. 200)
Headlight indicator
( →P. 207) Low speed four-wheel
drive indicator light
(
→P. 281)
Automatic High Beam
indicator ( →P. 2 1 1 ) Center differential lock
indicator (
→P. 281)
Fog light indicator
( →P. 216)
*1, 4“AIR BAG ON/
OFF” indicator
(→P. 51)
Cruise control indicator
( →P. 258, 270)
(if equipped)
Dynamic radar cruise
control indicator
(→P. 258)
*1, 2
Slip indicator ( →P. 359)Turn Assist indicator
(→P. 285)
*1, 3TRAC OFF indicator
(→P. 360)*1Crawl Control indicator
(→P. 285)
Page 83 of 608
LC200_OM_OM60P24U_(U)
832. Instrument cluster
2
Instrument cluster
*1: These lights turn on when the engine switch is turned to IGNITION ONmode to indicate that a system check is being performed. They will turn
off after the engine is on, or after a few seconds. There may be a mal-
function in a system if the lights do not turn on, or turn off. Have the vehi-
cle inspected by your Toyota dealer.
*2: The light flashes to indicate that the system is operating.
*3: The light turns on when the system is turned off.
*4: This light illuminates on the center panel.
*5: In order to confirm operation, the BSM outside rear view mirror indicators
illuminate in the following situations:
• When the engine switch is turned to IGNITION ON mode while the sys- tem is set to on.
• When the system is set to on while the engine switch is in IGNITION ON mode.
If the system is functioning correctly, the BSM outside rear view mirror
indicators will turn off after a few seconds.
If the BSM outside rear view mirror indicators do not illuminate or do not
turn off, there may be a malfunction with the system.
If this occurs, have the vehicle inspected by your Toyota dealer.
*6: This light illuminates on the outside rear view mirrors.
*1, 3VSC OFF indicator
( →P. 360)
(if equipped)
LDA indicator ( →P. 249)
Cruise control “SET”
indicator ( →P. 258, 270)
*1BSM (Blind Spot
Monitor) indicator
(→P. 344)
Multi-terrain Select
indicator ( →P. 290) RCTA (Rear Cross
Traffic Alert) indicator
(
→P. 352)
*1Eco Driving Indicator
Light ( →P. 84)*5, 6BSM (Blind Spot
Monitor) outside rear
view mirror indicators
(→P. 344)
*1, 3“RSCA OFF” indicator
(→P. 51) Shift position and shift
range indicators
(
→P. 199)
*1, 3
(If equipped)
PCS warning light
(→P. 235) Parking brake indicator
(
→P. 206)
Page 84 of 608
84
LC200_OM_OM60P24U_(U)
2. Instrument cluster
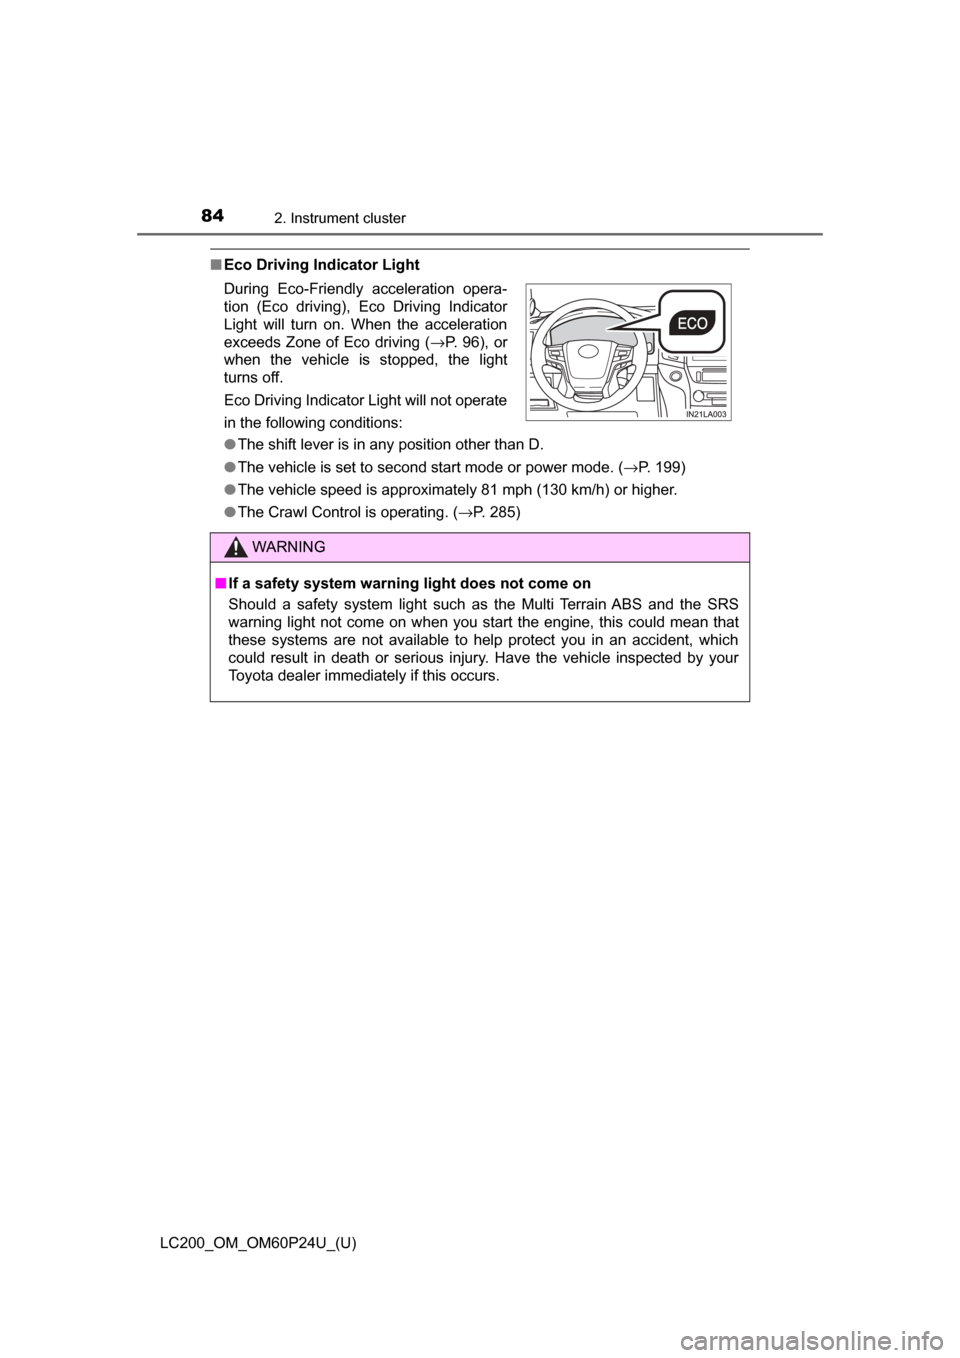
■Eco Driving Indicator Light
●The shift lever is in any position other than D.
● The vehicle is set to second start mode or power mode. ( →P. 199)
● The vehicle speed is approximately 81 mph (130 km/h) or higher.
● The Crawl Control is operating. ( →P. 285)
During Eco-Friendly acceleration opera-
tion (Eco driving), Eco Driving Indicator
Light will turn on. When the acceleration
exceeds Zone of Eco driving (
→P. 96), or
when the vehicle is stopped, the light
turns off.
Eco Driving Indicator Light will not operate
in the following conditions:
WARNING
■ If a safety system warning light does not come on
Should a safety system light such as the Multi Terrain ABS and the SRS
warning light not come on when you start the engine, this could mean that
these systems are not available to help protect you in an accident, which
could result in death or serious injury. Have the vehicle inspected by your
Toyota dealer immediately if this occurs.