TOYOTA LAND CRUISER 2018 Owners Manual (in English)
LAND CRUISER 2018
TOYOTA
TOYOTA
https://www.carmanualsonline.info/img/14/42589/w960_42589-0.png
TOYOTA LAND CRUISER 2018 Owners Manual (in English)
Trending: deactivate airbag, steering, battery replacement, windshield wipers, fold seats, hood open, sensor
Page 131 of 620
LC200_OM_OM60Q26U_(U)
1313-2. Opening, closing and locking the doors
3
Operation of each component
■If the smart key system do es not operate properly
● Locking and unlocking the doors: Use the mechanical key. ( →P. 548)
● Starting the engine: →P. 549
■ Customization
Settings (e. g. smart key system) can be changed.
(Customizable features: →P. 582)
■ If the smart key system has been deactivated in a customized setting
●Locking and unlocking the doors:
Use the wireless remote control or mechanical key. ( →P. 106, 548)
● Starting the engine and changing engine switch modes: →P. 549
● Stopping the engine: →P. 200
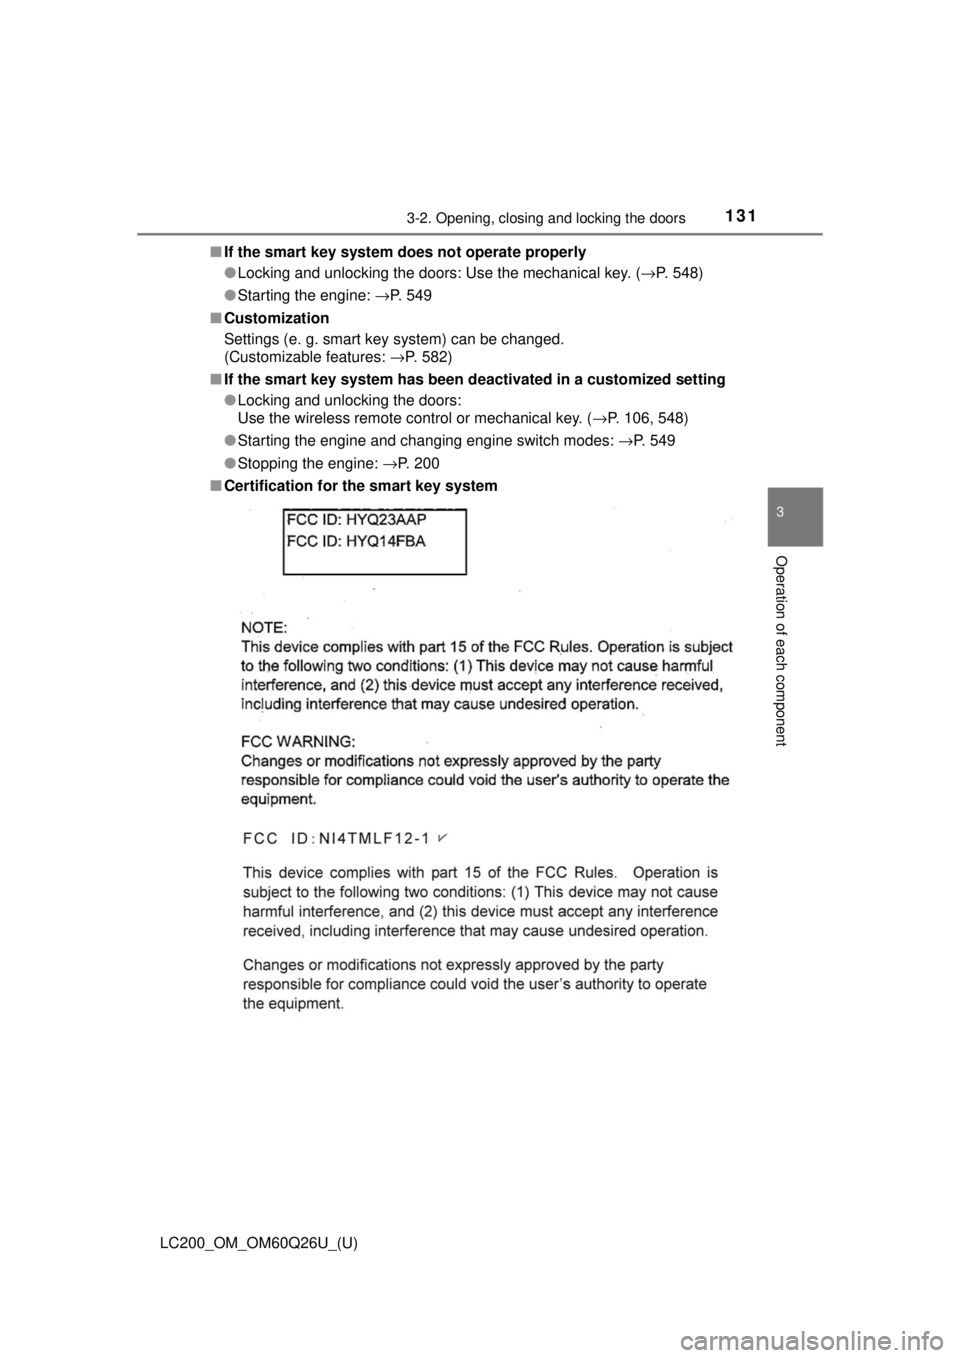
■ Certification for the smart key system
Page 132 of 620
132
LC200_OM_OM60Q26U_(U)
3-2. Opening, closing and locking the doors
WARNING
■Caution regarding interfer ence with electronic devices
● People with implantable cardiac pacemakers, cardiac resynchronization
therapy-pacemakers or implantable card ioverter defibrillators should keep
away from the smart key system antennas. ( →P. 126)
The radio waves may affect the operation of such devices. If necessary,
the entry function can be disabled. Ask your Toyota dealer for details, such
as the frequency of radio waves and timing of the emitted radio waves.
Then, consult your doctor to see if you should disable the entry function.
● Users of any electrical medical device other than implantable cardiac
pacemakers, cardiac resynchronization therapy-pacemakers or implant-
able cardioverter defibrillators should consult the manufacturer of the
device for information about its operation under the influence of radio
waves.
Radio waves could have unexpected effects on the operation of such
medical devices.
Ask your Toyota dealer for details on disabling the entry function.
Page 133 of 620
133
LC200_OM_OM60Q26U_(U)
3-3. Adjusting the seats
3
Operation of each component
Front seats
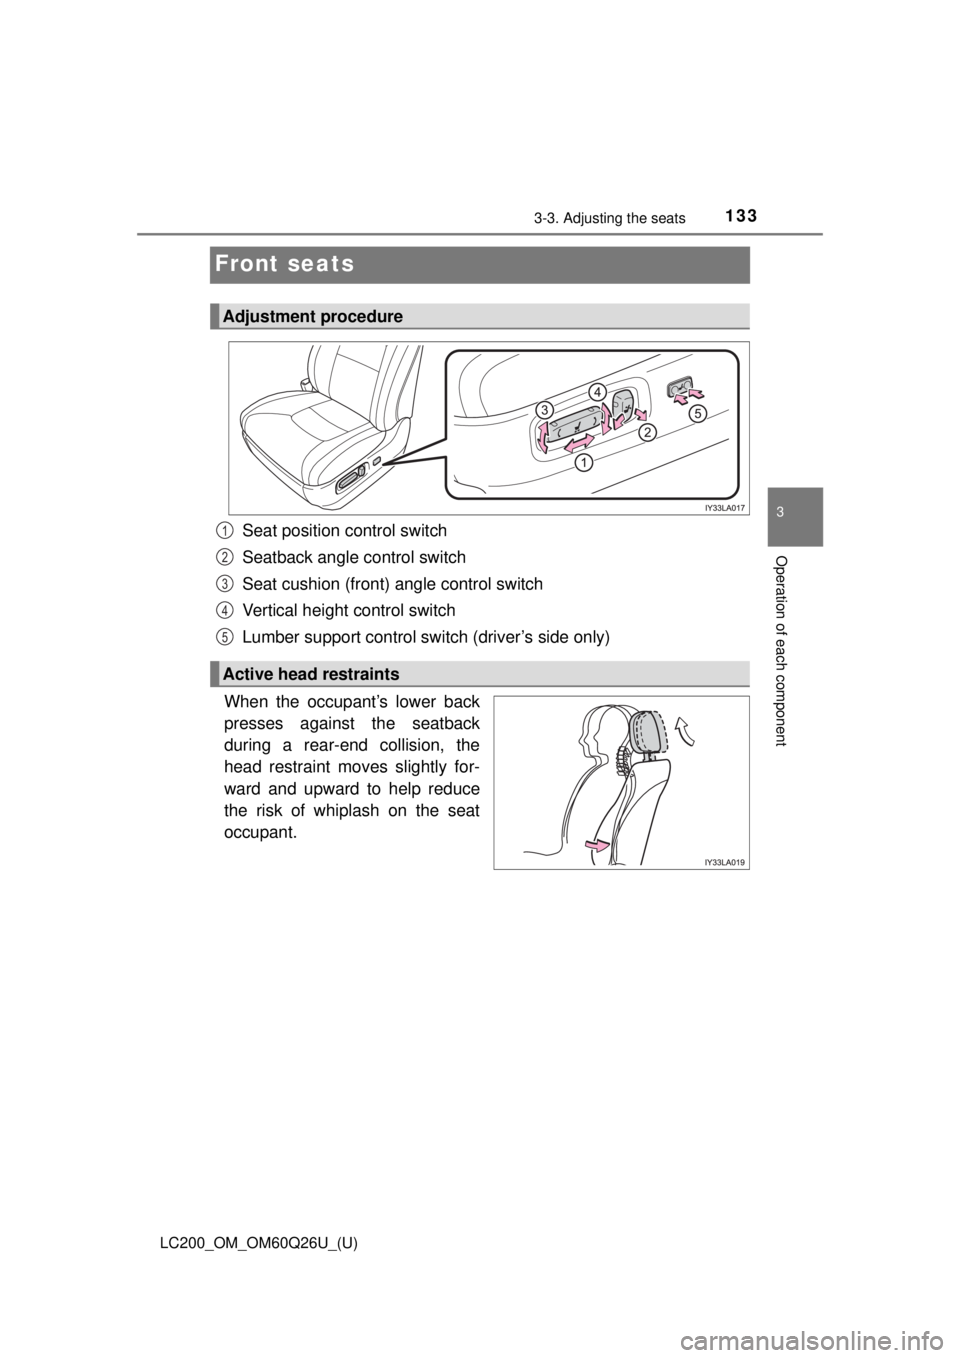
Seat position control switch
Seatback angle control switch
Seat cushion (front) angle control switch
Vertical height control switch
Lumber support control switch (driver’s side only)
When the occupant’s lower back
presses against the seatback
during a rear-end collision, the
head restraint moves slightly for-
ward and upward to help reduce
the risk of whiplash on the seat
occupant.
Adjustment procedure
Active head restraints
1
2
3
4
5
Page 134 of 620
134
LC200_OM_OM60Q26U_(U)
3-3. Adjusting the seats
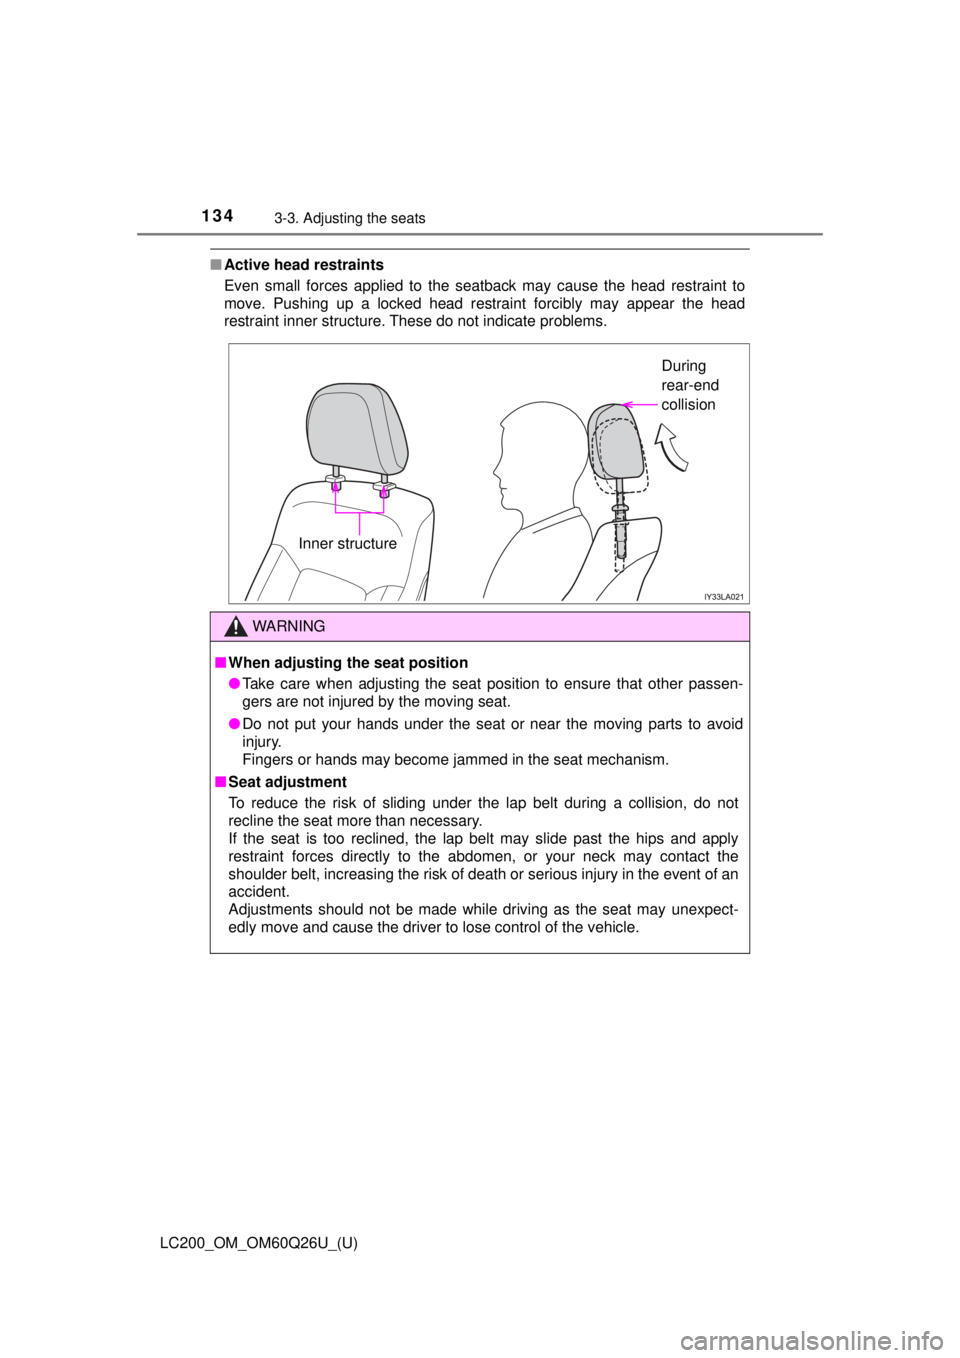
■Active head restraints
Even small forces applied to the seatback may cause the head restraint to
move. Pushing up a locked head restraint forcibly may appear the head
restraint inner structure. These do not indicate problems.
WARNING
■When adjusting the seat position
● Take care when adjusting the seat position to ensure that other passen-
gers are not injured by the moving seat.
● Do not put your hands under the seat or near the moving parts to avoid
injury.
Fingers or hands may become jammed in the seat mechanism.
■ Seat adjustment
To reduce the risk of sliding under the lap belt during a collision, do not
recline the seat more than necessary.
If the seat is too reclined, the lap belt may slide past the hips and apply
restraint forces directly to the abdomen, or your neck may contact the
shoulder belt, increasing the risk of death or serious injury in the event of an
accident.
Adjustments should not be made while driving as the seat may unexpect-
edly move and cause the driver to lose control of the vehicle.
During
rear-end
collision
Inner structure
Page 135 of 620
135
LC200_OM_OM60Q26U_(U)
3-3. Adjusting the seats
3
Operation of each component
Rear seats
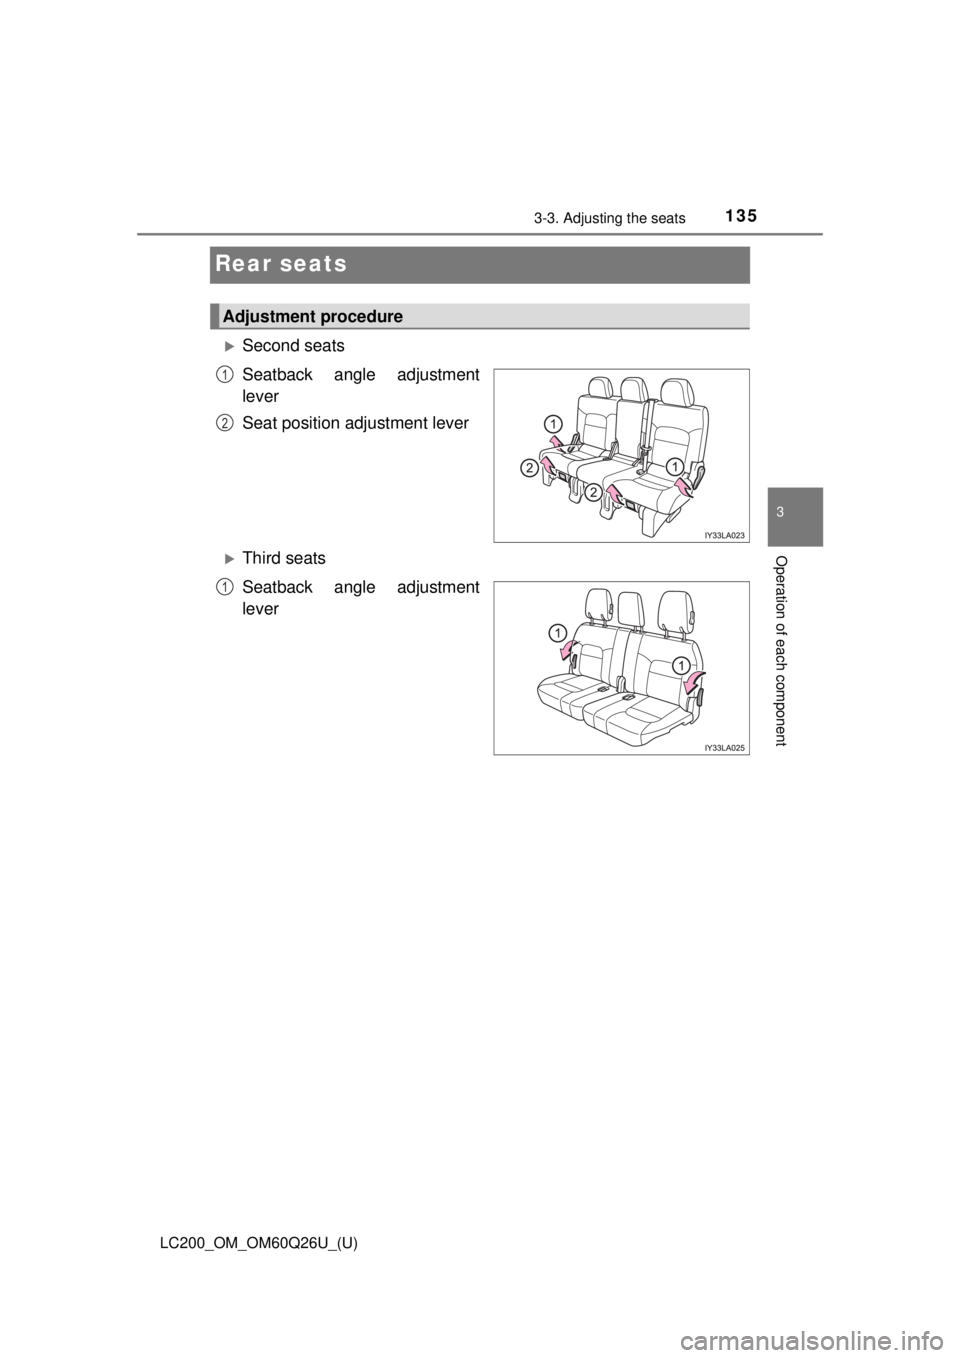
Second seats
Seatback angle adjustment
lever
Seat position adjustment lever
Third seats
Seatback angle adjustment
lever
Adjustment procedure
1
2
1
Page 136 of 620
136
LC200_OM_OM60Q26U_(U)
3-3. Adjusting the seats
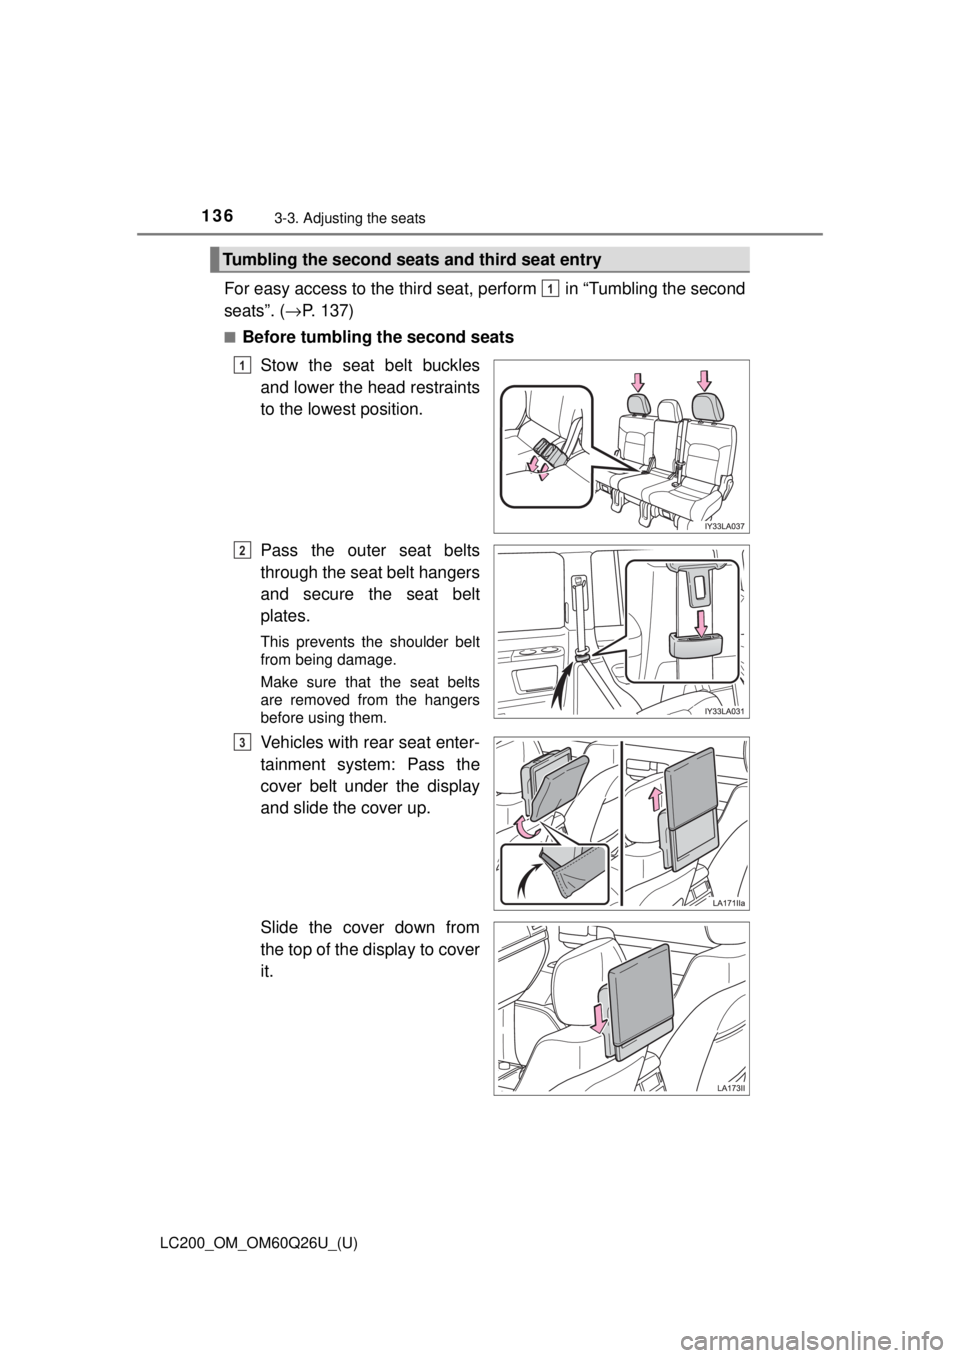
For easy access to the third seat, perform in “Tumbling the second
seats”. (→P. 137)
■Before tumbling the second seats
Stow the seat belt buckles
and lower the head restraints
to the lowest position.
Pass the outer seat belts
through the seat belt hangers
and secure the seat belt
plates.
This prevents the shoulder belt
from being damage.
Make sure that the seat belts
are removed from the hangers
before using them.
Vehicles with rear seat enter-
tainment system: Pass the
cover belt under the display
and slide the cover up.
Slide the cover down from
the top of the display to cover
it.
Tumbling the second seats and third seat entry
1
1
2
3
Page 137 of 620
LC200_OM_OM60Q26U_(U)
1373-3. Adjusting the seats
3
Operation of each component
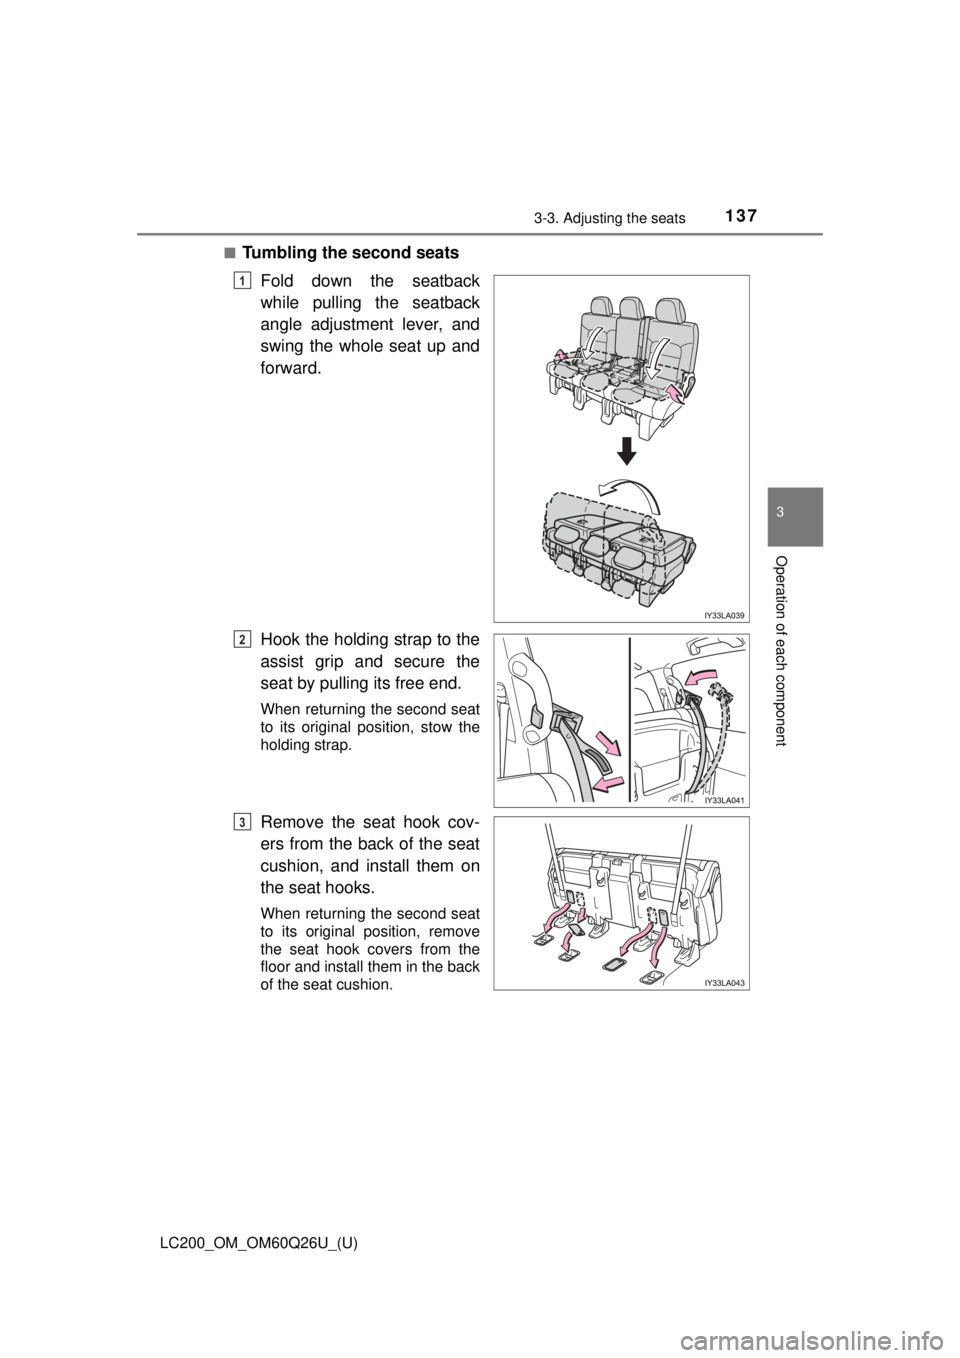
■Tumbling the second seatsFold down the seatback
while pulling the seatback
angle adjustment lever, and
swing the whole seat up and
forward.
Hook the holding strap to the
assist grip and secure the
seat by pulling its free end.
When returning the second seat
to its original position, stow the
holding strap.
Remove the seat hook cov-
ers from the back of the seat
cushion, and install them on
the seat hooks.
When returning the second seat
to its original position, remove
the seat hook covers from the
floor and install them in the back
of the seat cushion.
1
2
3
Page 138 of 620
138
LC200_OM_OM60Q26U_(U)
3-3. Adjusting the seats
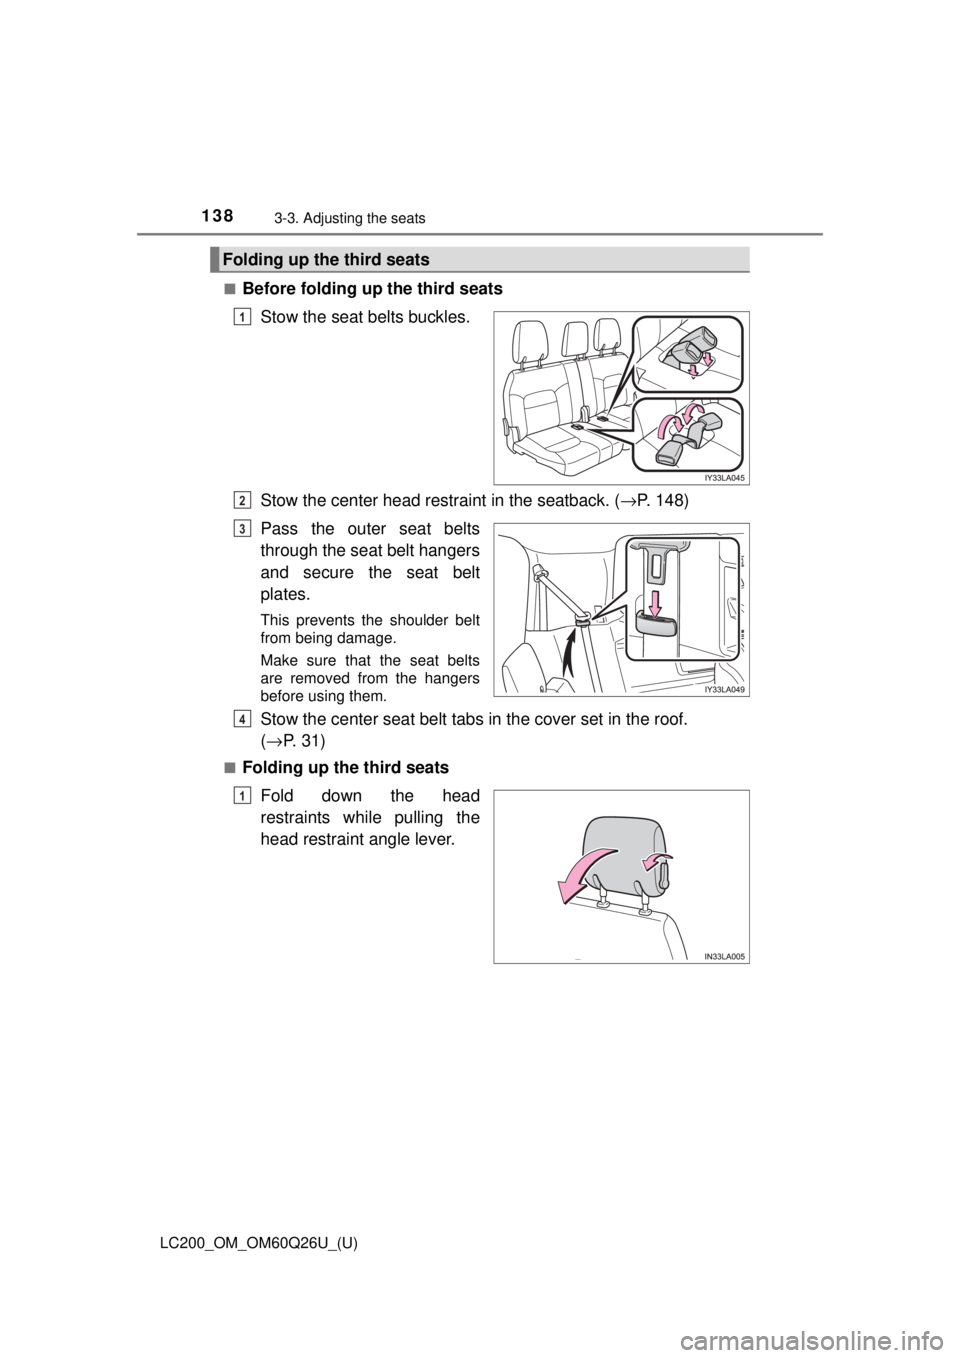
■Before folding up the third seatsStow the seat belts buckles.
Stow the center head restraint in the seatback. ( →P. 148)
Pass the outer seat belts
through the seat belt hangers
and secure the seat belt
plates.
This prevents the shoulder belt
from being damage.
Make sure that the seat belts
are removed from the hangers
before using them.
Stow the center seat belt tabs in the cover set in the roof.
( → P. 31)
■Folding up the third seats
Fold down the head
restraints while pulling the
head restraint angle lever.
Folding up the third seats
1
2
3
4
1
Page 139 of 620
LC200_OM_OM60Q26U_(U)
1393-3. Adjusting the seats
3
Operation of each component
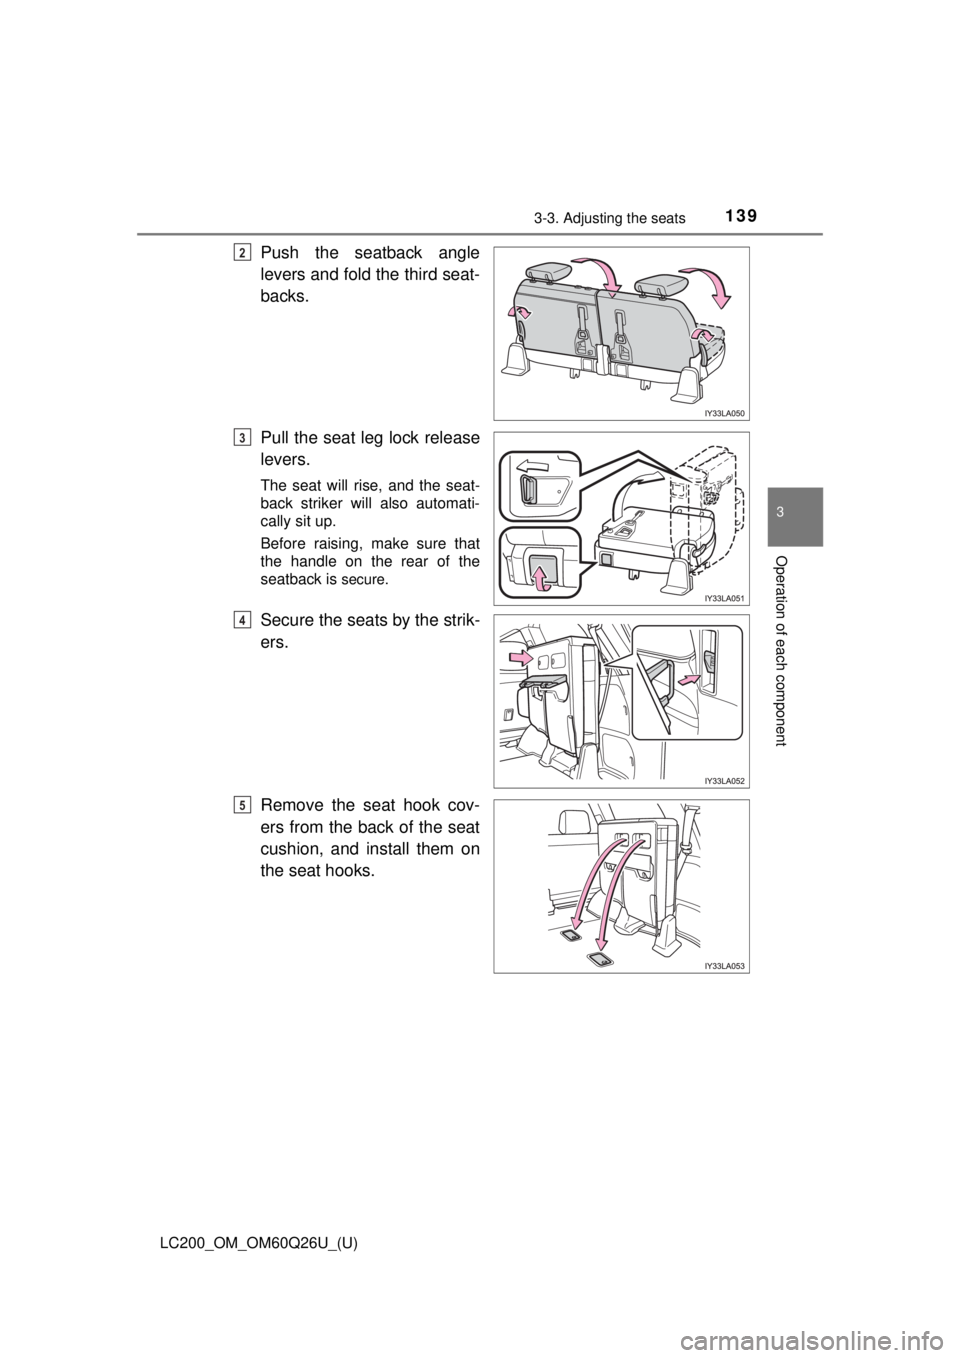
Push the seatback angle
levers and fold the third seat-
backs.
Pull the seat leg lock release
levers.
The seat will rise, and the seat-
back striker will also automati-
cally sit up.
Before raising, make sure that
the handle on the rear of the
seatback is
secure.
Secure the seats by the strik-
ers.
Remove the seat hook cov-
ers from the back of the seat
cushion, and install them on
the seat hooks.
2
3
4
5
Page 140 of 620
140
LC200_OM_OM60Q26U_(U)
3-3. Adjusting the seats
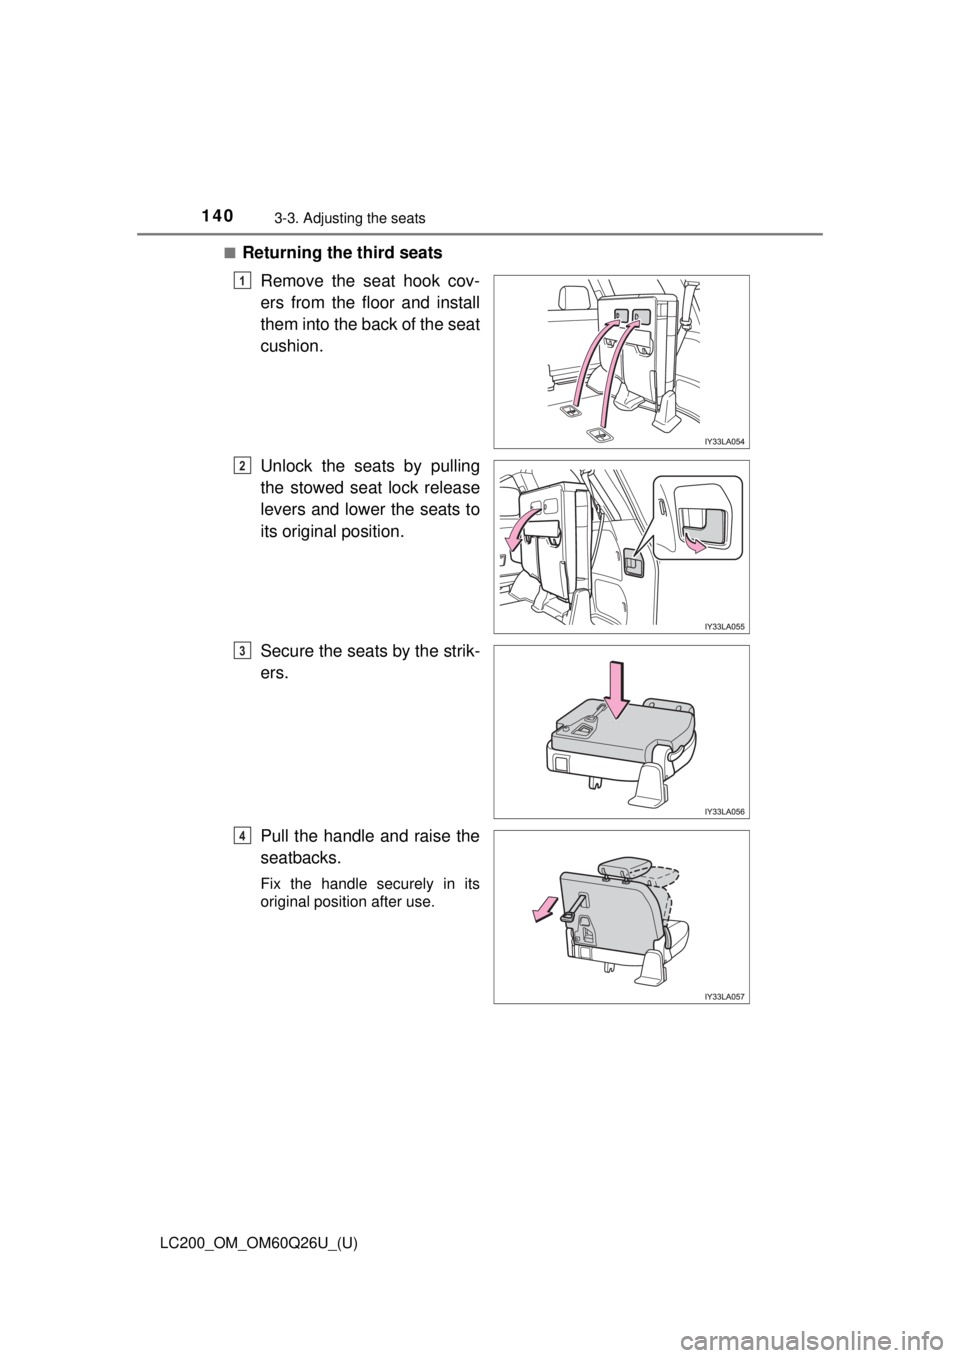
■Returning the third seatsRemove the seat hook cov-
ers from the floor and install
them into the back of the seat
cushion.
Unlock the seats by pulling
the stowed seat lock release
levers and lower the seats to
its original position.
Secure the seats by the strik-
ers.
Pull the handle and raise the
seatbacks.
Fix the handle securely in its
original position after use.
1
2
3
4
Trending: steering wheel, towing capacity, CD player, oil, garage door opener, remove seats, battery capacity
