eco TOYOTA LAND CRUISER 2021 (in English) Service Manual
[x] Cancel search | Manufacturer: TOYOTA, Model Year: 2021, Model line: LAND CRUISER, Model: TOYOTA LAND CRUISER 2021Pages: 632, PDF Size: 13.87 MB
Page 106 of 632
106
LC200_OM_OM60T03U_(U)
2. Instrument cluster
Items displayed can be switched by operating up and down.
■Front tire angle (if equipped)
Displays the direction of the front tires.
The tire direction is displayed in 3 stages for both left and r ight, in
accordance with the angle of the tire.
If a battery terminal is disconnected and reconnected, the disp lay may
be disabled temporarily. After driving the vehicle for a while, the display
will be enabled.
■
Tire inflation pressure
Displays inflation pressure of each tire
The inflation pre ssure of the spare tire will be displayed.
■Oil maintenance
Displays the remaining distance before the next maintenance is
required.
The settings of some features can be changed by using the meter
control switches.
■Setting procedure On the setting screen, choose the desired item using , and
then press .
• For functions that can be enabled or disabled, the function switchesbetween on and off each time is pressed.
• For functions that allow to select operation contents, display con-
tents, etc., the setting screen is displayed.
Select the desired setting by operating , and then press
.
To stop the selection, press to return to the previous screen.
Vehicle information
Settings display
1
2
Page 107 of 632
LC200_OM_OM60T03U_(U)
1072. Instrument cluster
2
Instrument cluster
■Setting items
● LDA (Lane Departure Alert)
*
Select to set up LDA. ( P. 594)
• Alert sensitivity
• Sway warning
• Sway sensitivity
● BSM (Blind Spot Monitor)
*
Select to activate/deactivate BSM. ( P. 594)
• BSM on/off
• RCTA (Rear Cross Traffic Alert) on/off
● Scheduled maintenance
Select to reset the message indi cating maintenance is required.
● Oil maintenance
Select to reset the engine o il maintenance information
● Meter settings
Select to set the following items.
• Language Select to change the language on the display.
•Units Select to change the unit for measure.
• Eco Driving Indicator Light Select to activate/deactivate the Eco Driving Indicator Light.
(
P. 9 6 )
• switch settings You can register 1 screen as the top screen. To register, press
and hold while the desired screen is displayed.
• Drive information 1 and 2 Select to select up to 2 items t hat will be displayed on a drive
information screen, up to 2 drive information screens can be
set.
• Pop-up display Select to set the pop-up displays ( P. 108), which may appear
in some situations, on/off.
Page 108 of 632
108
LC200_OM_OM60T03U_(U)
2. Instrument cluster
• Accent colorSelect to change the accent colors on the screen, such as the
cursor color.
• Initialization Select to reset the mete r display settings.
*: If equipped
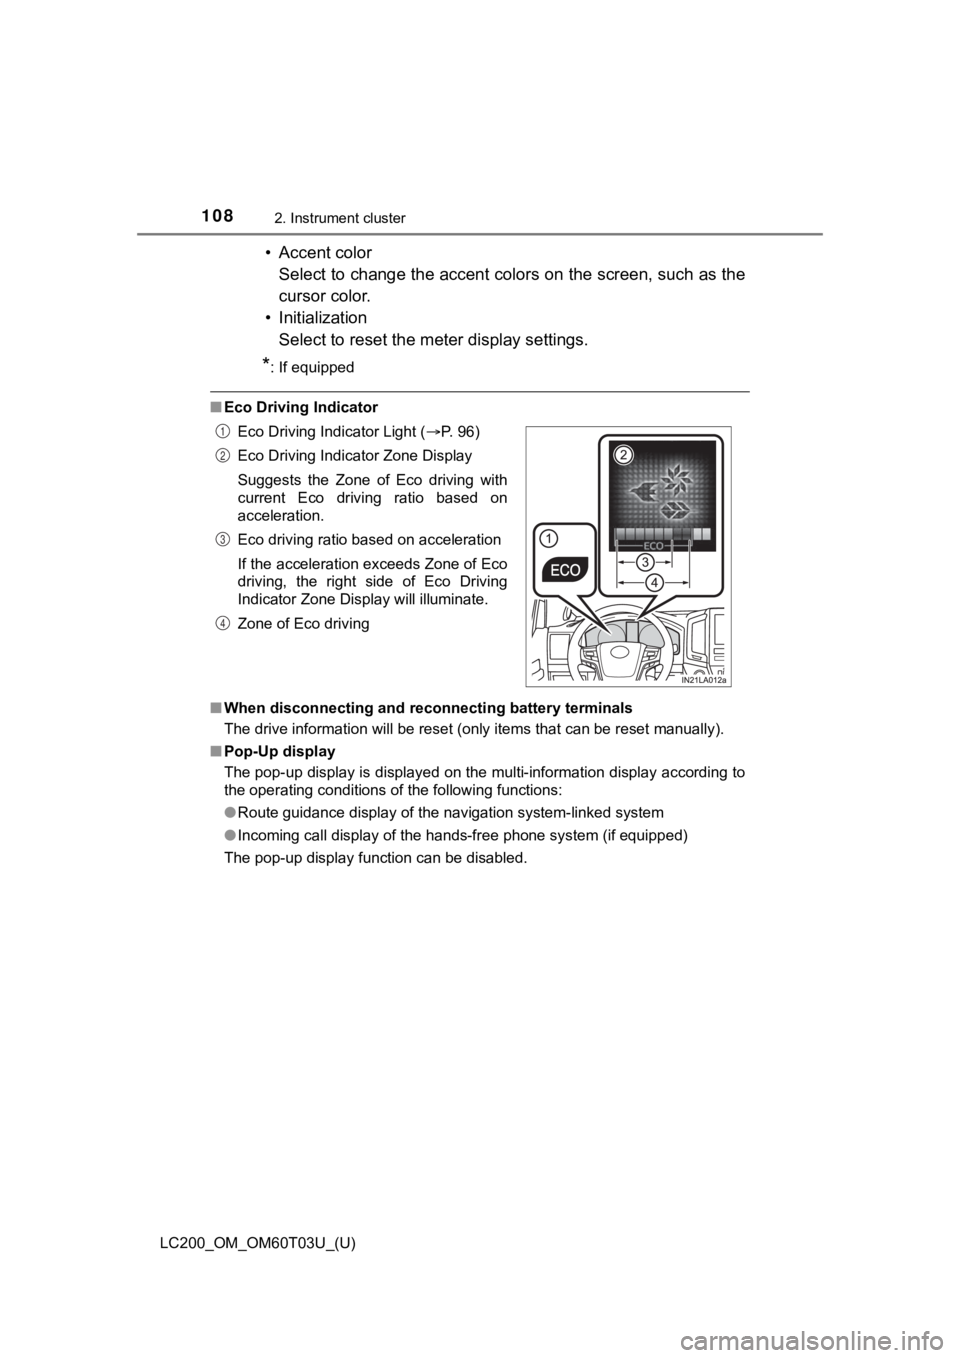
■Eco Driving Indicator
■ When disconnecting and reco nnecting battery terminals
The drive information will be reset (only items that can be res et manually).
■ Pop-Up display
The pop-up display is displayed on the multi-information displa y according to
the operating conditions of the following functions:
● Route guidance display of the navigation system-linked system
● Incoming call display of the hands-free phone system (if equipp ed)
The pop-up display function can be disabled. Eco Driving Indicator Light (
P. 96)
Eco Driving Indicator Zone Display
Suggests the Zone of Eco driving with
current Eco driving ratio based on
acceleration.
Eco driving ratio based on acceleration
If the acceleration exceeds Zone of Eco
driving, the right side of Eco Driving
Indicator Zone Display will illuminate.
Zone of Eco driving
1
2
3
4
Page 110 of 632
110
LC200_OM_OM60T03U_(U)
2. Instrument cluster
Fuel consumption information
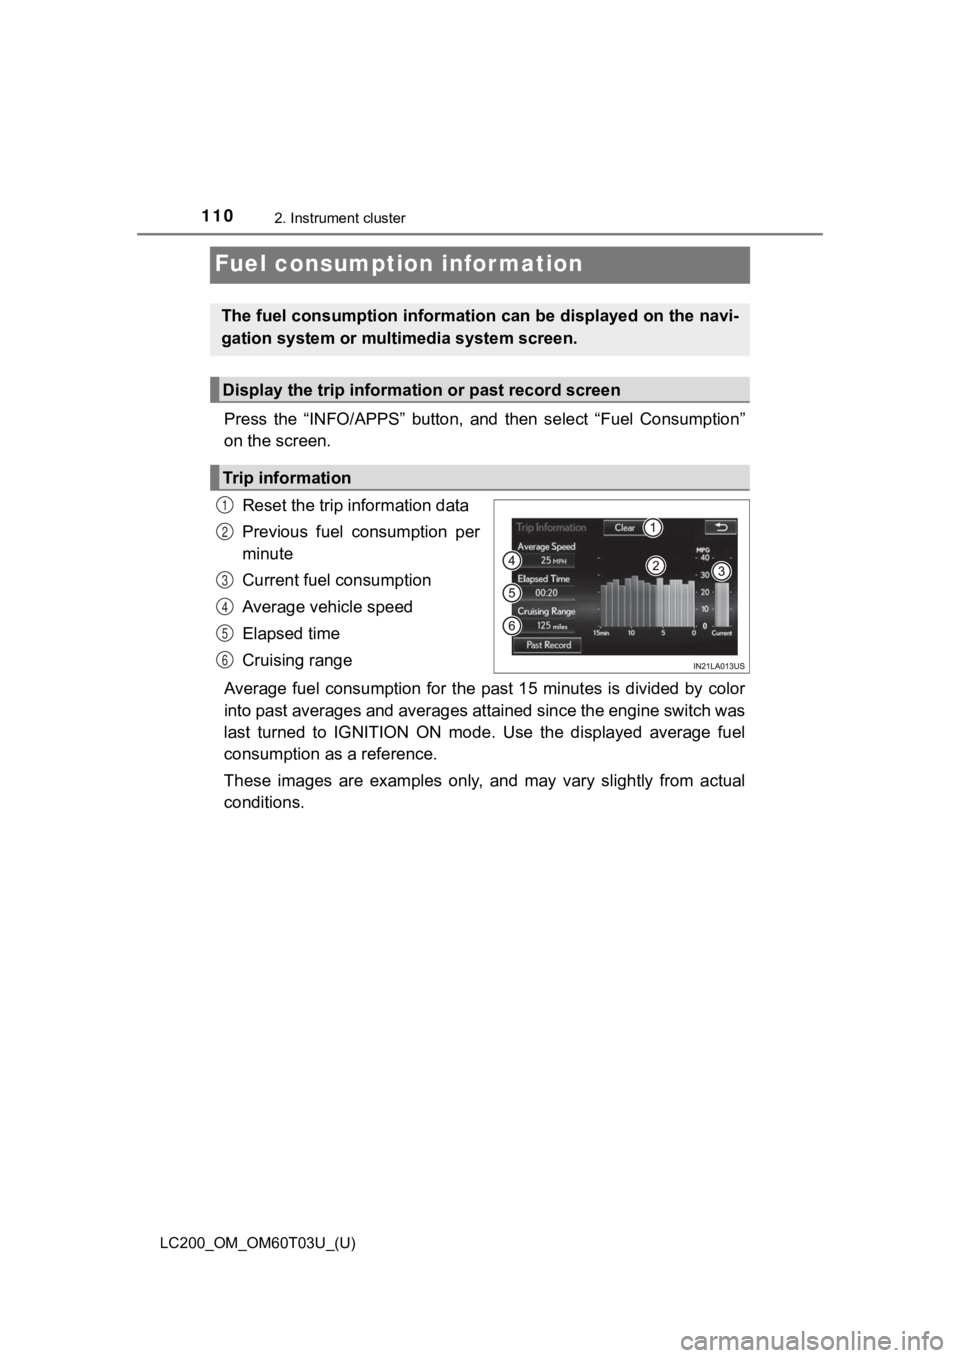
Press the “INFO/APPS” button, and then select “Fuel Consumption”
on the screen.
Reset the trip information data
Previous fuel consumption per
minute
Current fuel consumption
Average vehicle speed
Elapsed time
Cruising range
Average fuel consumption for the past 15 minutes is divided by color
into past averages and averages attained since the engine switch was
last turned to IGNITION ON mode. Use the displayed average fuel
consumption as a reference.
These images are examples only, and may vary slightly from actu al
conditions.
The fuel consumption information can be displayed on the navi-
gation system or multimedia system screen.
Display the trip information or past record screen
Trip information
1
2
3
4
5
6
Page 111 of 632

LC200_OM_OM60T03U_(U)
1112. Instrument cluster
2
Instrument cluster
Reset the past record data
Best recorded fuel consumption
Average fuel consumption
Previous fuel consumption
record
Update the past record data
These images are examples only, and may vary slightly from actu al
conditions.
■ Resetting the data
Selecting “Clear” on the “Trip information” screen will reset t he trip informa-
tion data.
Selecting “Clear” on the “Past record” screen will reset the pa st record data.
■ Updating the past record data
Selecting “Update” on the “Past record” screen will update the past record
data.
Also, the average fuel consumption displayed in the multi-infor mation display
will be reset at the same time.
■ Cruising range
Displays the estimated maximum distance that can be driven with the quan-
tity of fuel remaining.
This distance is computed based on your average fuel consumptio n. As a
result, the actual distance that can be driven may differ from that displayed.
Past record
1
2
3
4
5
Page 115 of 632
LC200_OM_OM60T03U_(U)
1153-1. Key information
3
Operation of each component
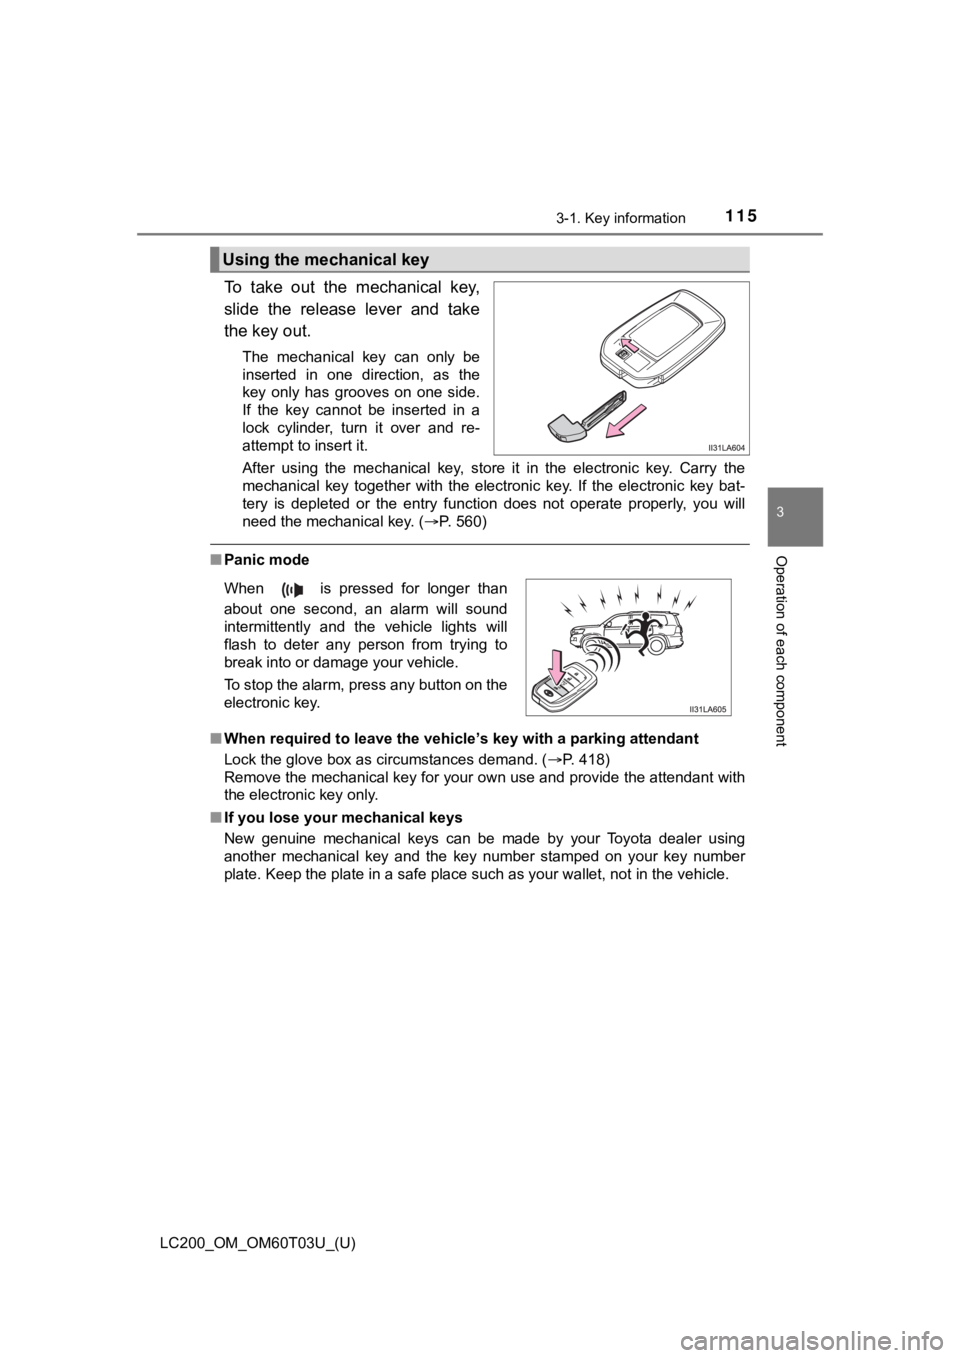
To take out the mechanical key,
slide the release lever and take
the key out.
The mechanical key can only be
inserted in one direction, as the
key only has grooves on one side.
If the key cannot be inserted in a
lock cylinder, turn it over and re-
attempt to insert it.
After using the mechanical key, store it in the electronic key. Carry the
mechanical key together with the electronic key. If the electro nic key bat-
tery is depleted or the entry function does not operate properl y, you will
need the mechanical key. ( P. 560)
■Panic mode
■ When required to leave the vehicle’s key with a parking attendant
Lock the glove box as circumstances demand. ( P. 418)
Remove the mechanical key for your own use and provide the attendant with
the electronic key only.
■ If you lose your mechanical keys
New genuine mechanical keys can be made by your Toyota dealer u sing
another mechanical key and the key number stamped on your key n umber
plate. Keep the plate in a safe place such as your wallet, not in the vehicle.
Using the mechanical key
When is pressed for longer than
about one second, an alarm will sound
intermittently and the vehicle lights will
flash to deter any person from trying to
break into or damage your vehicle.
To stop the alarm, press any button on the
electronic key.
Page 116 of 632

116
LC200_OM_OM60T03U_(U)
3-1. Key information
■When riding in an aircraft
When bringing an electronic key onto an aircraft, make sure you do not press
any buttons on the electronic key while inside the aircraft cab in. If you are
carrying an electronic key in your bag etc., ensure that the bu ttons are not
likely to be pressed accidentally. Pressing a button may cause the electronic
key to emit radio waves that could interfere with the operation of the aircraft.
■ Electronic key battery depletion
●The standard battery life is 1 to 2 years.
● If the battery becomes low, an alarm will sound in the cabin wh en the engine
stops.
● As the electronic key always receives radio waves, the battery will become
depleted even if the electronic key is not used. The following symptoms indi-
cate that the electronic key battery may be depleted. Replace the battery
when necessary. ( P. 499)
• The smart key system or the wireless remote control does not o perate.
• The detection area becomes smaller.
• The LED indicator on the key surface does not turn on.
● To avoid serious deterioration, do not leave the electronic key within 3 ft. (1
m) of the following electrical appliances that produce a magnet ic field:
•TVs
• Personal computers
• Recharging cellular phones or cordless phones
• Table lamps
• Induction cookers
■ Replacing the key battery
P. 499
Page 118 of 632
118
LC200_OM_OM60T03U_(U)
3-2. Opening, closing and locking the doors
Side doors
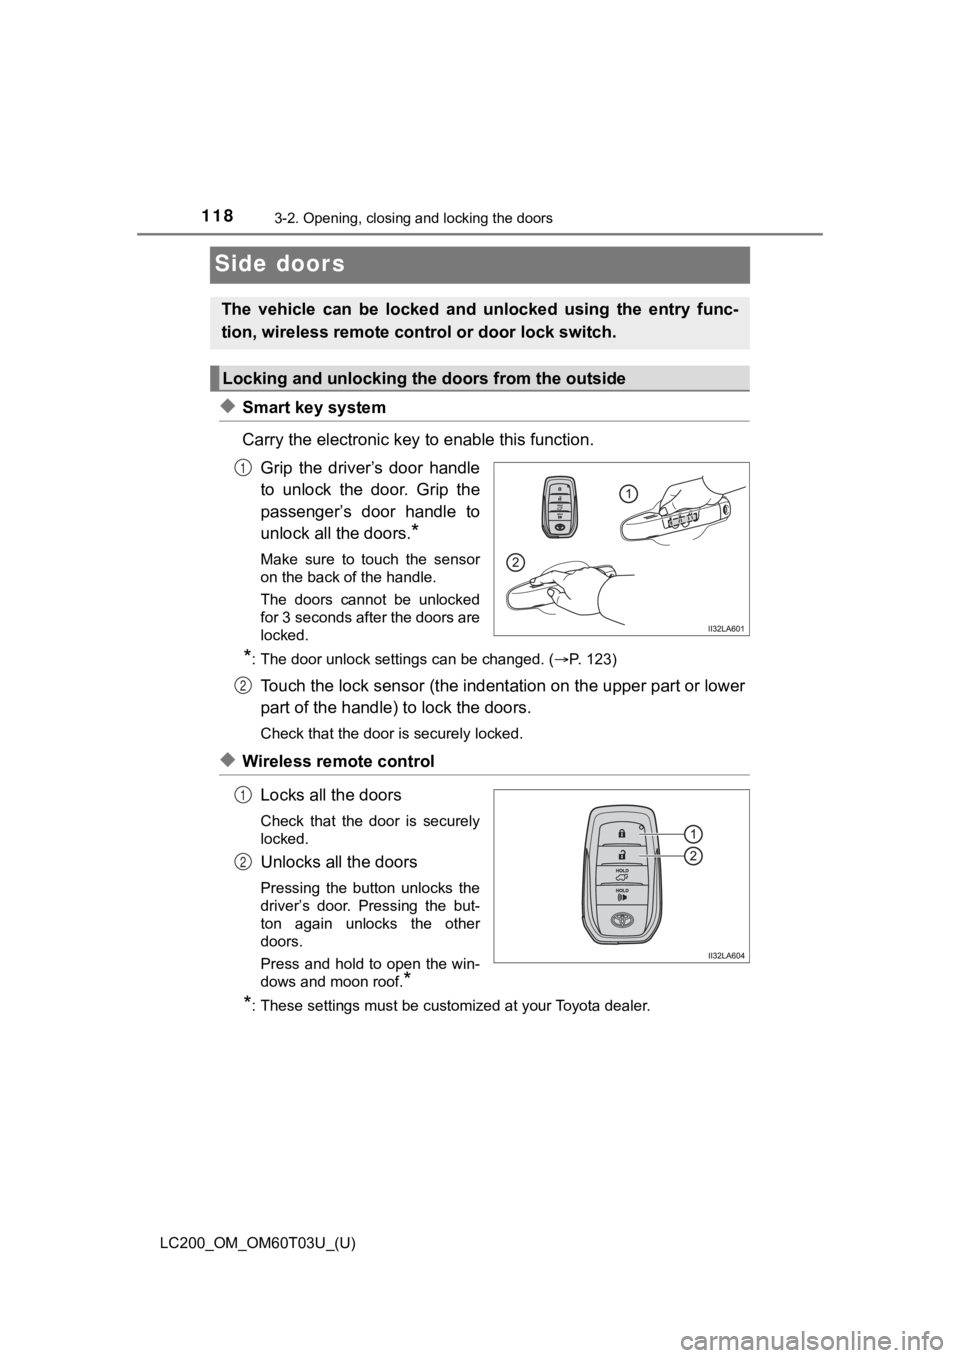
◆Smart key system
Carry the electronic key to enable this function.
Grip the driver’s door handle
to unlock the door. Grip the
passenger’s door handle to
unlock all the doors.
*
Make sure to touch the sensor
on the back of the handle.
The doors cannot be unlocked
for 3 seconds after the doors are
locked.
*: The door unlock settings can be changed. ( P. 123)
Touch the lock sensor (the indentation on the upper part or lower
part of the handle) to lock the doors.
Check that the door is securely locked.
◆Wireless remote control
Locks all the doors
Check that the door is securely
locked.
Unlocks all the doors
Pressing the button unlocks the
driver’s door. Pressing the but-
ton again unlocks the other
doors.
Press and hold to open the win-
dows and moon roof.
*
*
: These settings must be customized at your Toyota dealer.
The vehicle can be locked and unlocked using the entry func-
tion, wireless remote cont rol or door lock switch.
Locking and unlocking the doors from the outside
1
2
1
2
Page 119 of 632
LC200_OM_OM60T03U_(U)
1193-2. Opening, closing and locking the doors
3
Operation of each component
■Operation signals
Doors: A buzzer sounds and the emergency flashers flash to indi cate that the
doors have been locked/unlocked. (Locked: once; Unlocked: twice)
Windows and moon roof: A buzzer sounds to indicate that the win dows and
moon roof are operating.
■ Security feature
If a door is not opened within approximately 60 seconds after t he vehicle is
unlocked, the security feature automatically locks the vehicle again.
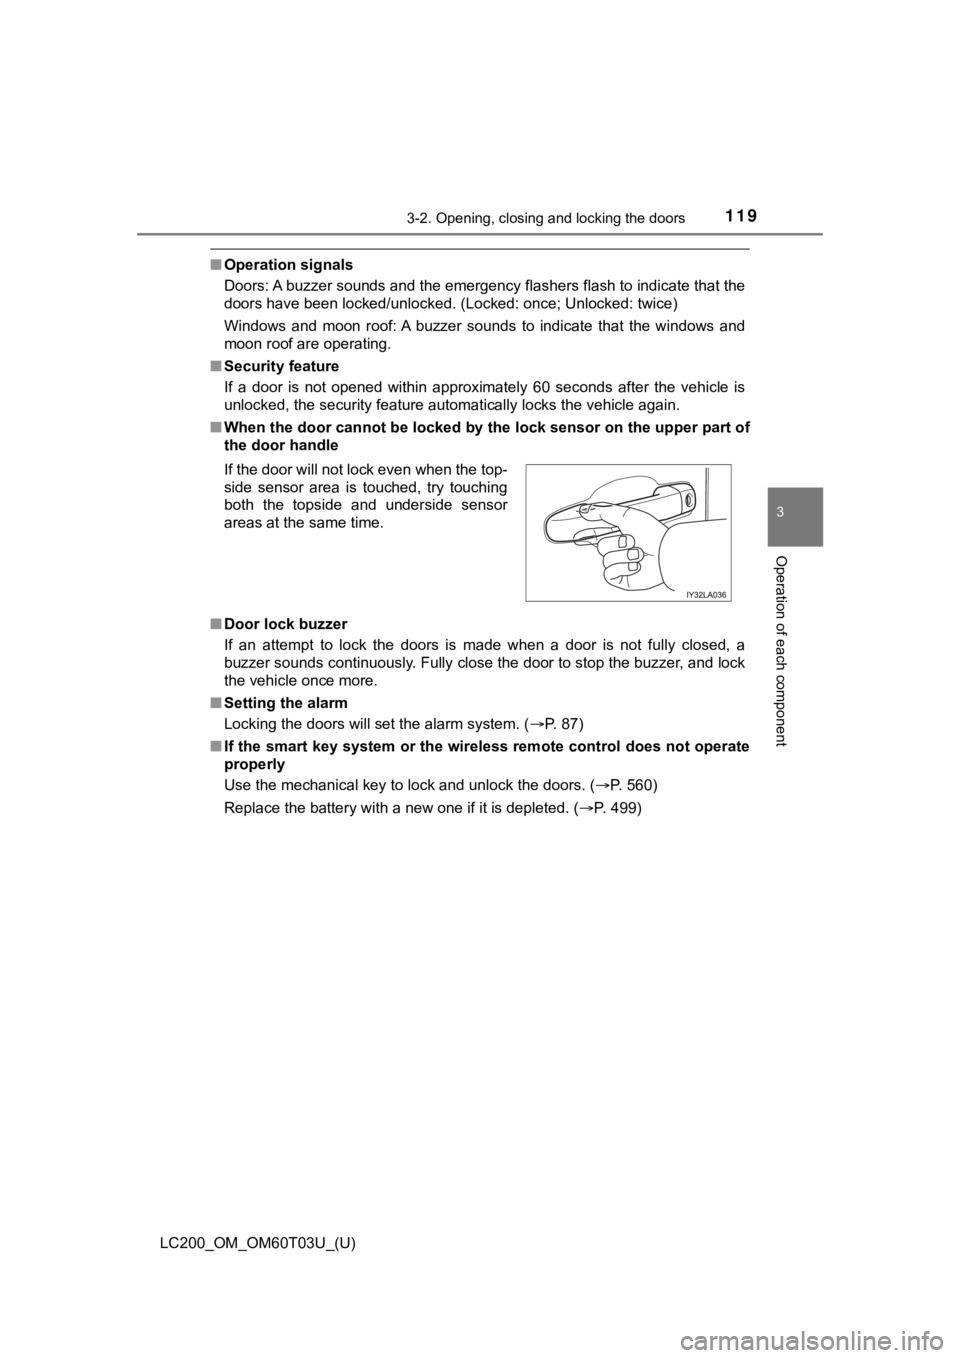
■ When the door cannot be locked by the lock sensor on the upper part of
the door handle
■ Door lock buzzer
If an attempt to lock the doors is made when a door is not full y closed, a
buzzer sounds continuously. Fully close the door to stop the bu zzer, and lock
the vehicle once more.
■ Setting the alarm
Locking the doors will set the alarm system. ( P. 87)
■ If the smart key system or the wireless remote control does not operate
properly
Use the mechanical key to lock and unlock the doors. ( P. 560)
Replace the battery with a new one if it is depleted. ( P. 499)
If the door will not lock even when the top-
side sensor area is touched, try touching
both the topside and underside sensor
areas at the same time.
Page 123 of 632
LC200_OM_OM60T03U_(U)
1233-2. Opening, closing and locking the doors
3
Operation of each component
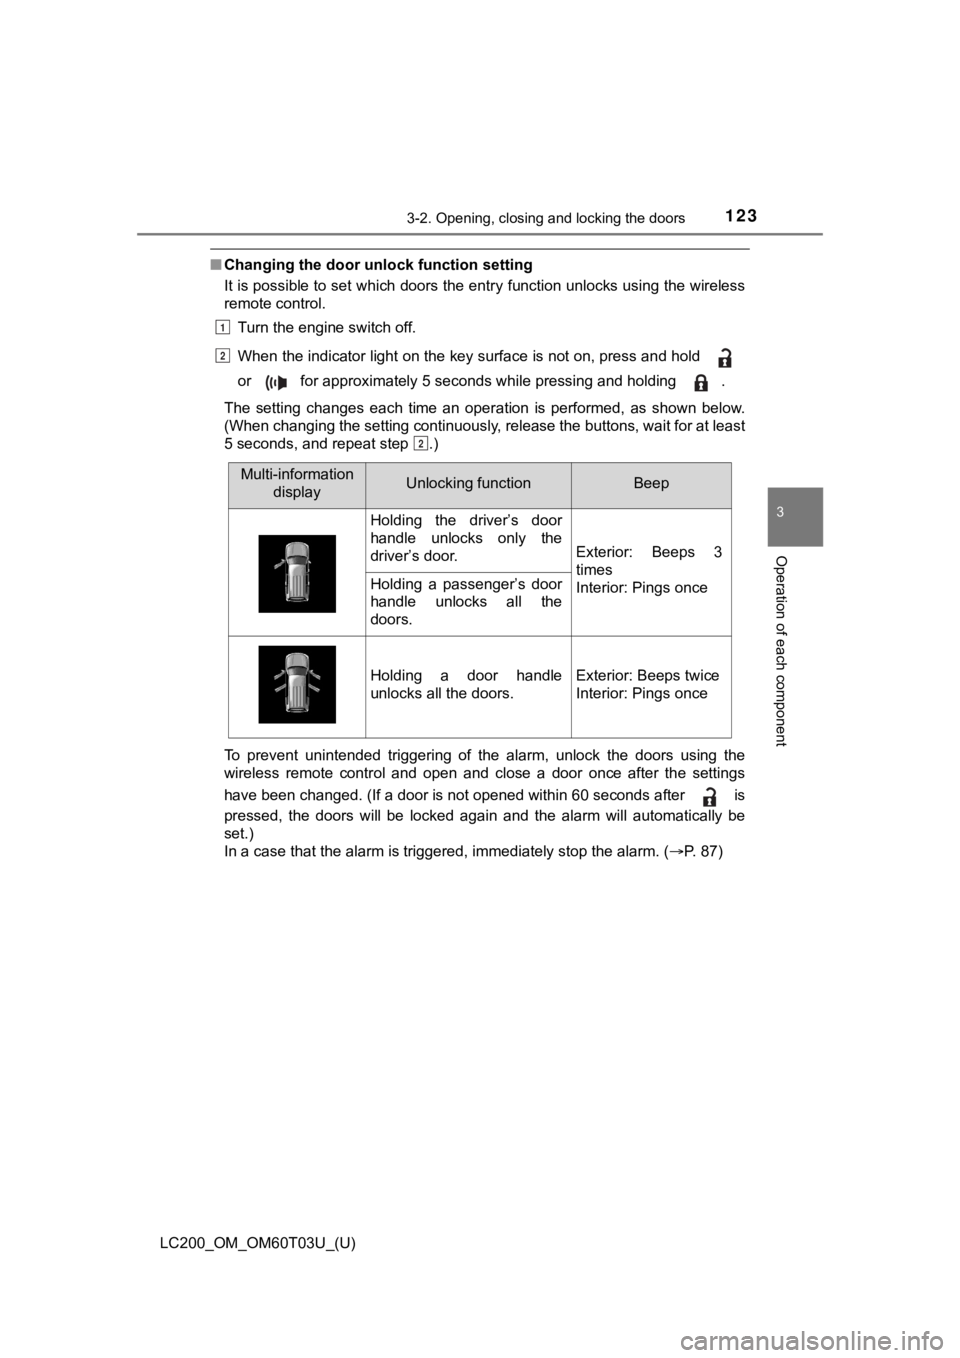
■Changing the door unlock function setting
It is possible to set which doors the entry function unlocks using the wireless
remote control.
Turn the engine switch off.
When the indicator light on the key surface is not on, press an d hold
or for approximately 5 seconds while pressing and holding .
The setting changes each time an operation is performed, as sho wn below.
(When changing the setting continuously, release the buttons, w ait for at least
5 seconds, and repeat step .)
To prevent unintended triggering of the alarm, unlock the doors using the
wireless remote control and open and close a door once after th e settings
have been changed. (If a door is not opened within 60 seconds a fter is
pressed, the doors will be locked again and the alarm will auto matically be
set.)
In a case that the alarm is triggered, immediately stop the alarm. ( P. 87)
1
2
2
Multi-information
displayUnlocking functionBeep
Holding the driver’s door
handle unlocks only the
driver’s door.
Exterior: Beeps 3
times
Interior: Pings once
Holding a passenger’s door
handle unlocks all the
doors.
Holding a door handle
unlocks all the doors.Exterior: Beeps twice
Interior: Pings once