wheel TOYOTA MATRIX 2010 E140 / 2.G Manual PDF
[x] Cancel search | Manufacturer: TOYOTA, Model Year: 2010, Model line: MATRIX, Model: TOYOTA MATRIX 2010 E140 / 2.GPages: 448, PDF Size: 9.74 MB
Page 365 of 448
5
When trouble arises
365 5-2. Steps to take in an emergency
■When a tire is replaced with a spare tire
The compact spare tire is not equipped with the tire pressure warning
valve and transmitter. If a tire goes flat, the tire pressure warning light will
not turn off even though the flat tire is replaced with the spare tire.
Replace the spare tire with the repaired tire and adjust the proper tire
inflation pressure. The tire pressure warning light will turn off after a few
minutes.
■If the tire pressure warning system is inoperative
The tire pressure warning system will be disabled in the following condi-
tions:
(When the condition becomes normal, the system will work properly.)
●If tires not equipped with tire pressure warning valves and transmit-
ters are used.
●If the ID code on the tire pressure warning valves and transmitters is
not registered in the tire pressure warning computer.
●If the tire inflation pressure is 73 psi (500 kPa, 5.1 kgf/cm2 or bar) or
higher.
The tire pressure warning system may be disabled in the following condi-
tions:
(When the condition becomes normal, the system will work properly.)
●If electronic devices or facilities using similar radio wave frequencies
are nearby.
●If a radio set at similar frequencies is in use in the vehicle.
●If a window tint that affects the radio wave signals is installed.
●If there is a lot of snow or ice on the vehicle, in particular around the
wheels or wheel housings.
●If non-genuine Toyota wheels are used. (Even if you use Toyota
wheels, the tire pressure warning system may not work properly with
some types of tires.)
●If tire chains are used.
Page 366 of 448
366 5-2. Steps to take in an emergency
■If the tire pressure warning light comes on after blinking for 1
minute frequently
If the tire pressure warning light comes on after blinking for 1 minute fre-
quently when the engine switch is turned to the “ON” position, have it
checked by your Toyota dealer.
■Customization that can be configured at Toyota dealer
The vehicle speed linked seat belt reminder buzzer can be disabled.
(Customizable features P. 427) However, Toyota recommends that the
seat belt reminder buzzer be operational to alert the driver and front passen-
ger that the seat belts are not fastened.
CAUTION
■If the tire pressure warning light comes on
Be sure to observe the following precautions. Failure to do so could
cause loss of vehicle control and result in death or serious injury.
●Stop your vehicle in a safe place as soon as possible. Adjust the tire
inflation pressure immediately.
●If the tire pressure warning light comes on even after tire inflation pres-
sure adjustment, it is probable that you have a flat tire. Check the tires.
If the tire is flat, change to the spare tire and have the flat tire repaired
by the nearest Toyota dealer.
●Avoid abrupt maneuvering and braking. If the vehicle tires deteriorate,
you could lose control of the steering wheel or the brakes.
■If a blowout or sudden air leakage should occur
The tire pressure warning system may not activate immediately.
Page 368 of 448
368 5-2. Steps to take in an emergency
CAUTION
Your vehicle has also been equipped with a TPMS (tire pressure warning
system) malfunction indicator to indicate when the system is not operat-
ing properly. The TPMS (tire pressure warning system) malfunction indi-
cator is combined with the low tire pressure telltale (tire pressure
warning light). When the system detects a malfunction, the telltale will
flash for approximately one minute and then remain continuously illumi-
nated. This sequence will continue upon subsequent vehicle start-ups as
long as the malfunction exists. When the malfunction indicator is illumi-
nated, the system may not be able to detect or signal low tire pressure
as intended.
TPMS (tire pressure warning system) malfunctions may occur for a vari-
ety of reasons, including the installation of replacement or alternate tires
or wheels on the vehicle that prevent the TPMS (tire pressure warning
system) from functioning properly. Always check the TPMS (tire pres-
sure warning system) malfunction telltale after replacing one or more
tires or wheels on your vehicle to ensure that the replacement or alter-
nate tires and wheels allow the TPMS (tire pressure warning system) to
continue to function properly.
NOTICE
■Precaution when installing a different tire
When a tire of a different specification or maker is installed, the tire pres-
sure warning system may not operate properly.
Page 369 of 448
5
When trouble arises
369
5-2. Steps to take in an emergency
If you have a flat tire
Remove the flat tire and replace it with the spare provided.
■Before jacking up the vehicle
●Stop the vehicle on a hard, flat surface.
●Set the parking brake.
●Shift the shift lever to P (automatic transmission) or R (manual
transmission).
●Stop the engine.
●Turn on the emergency flashers.
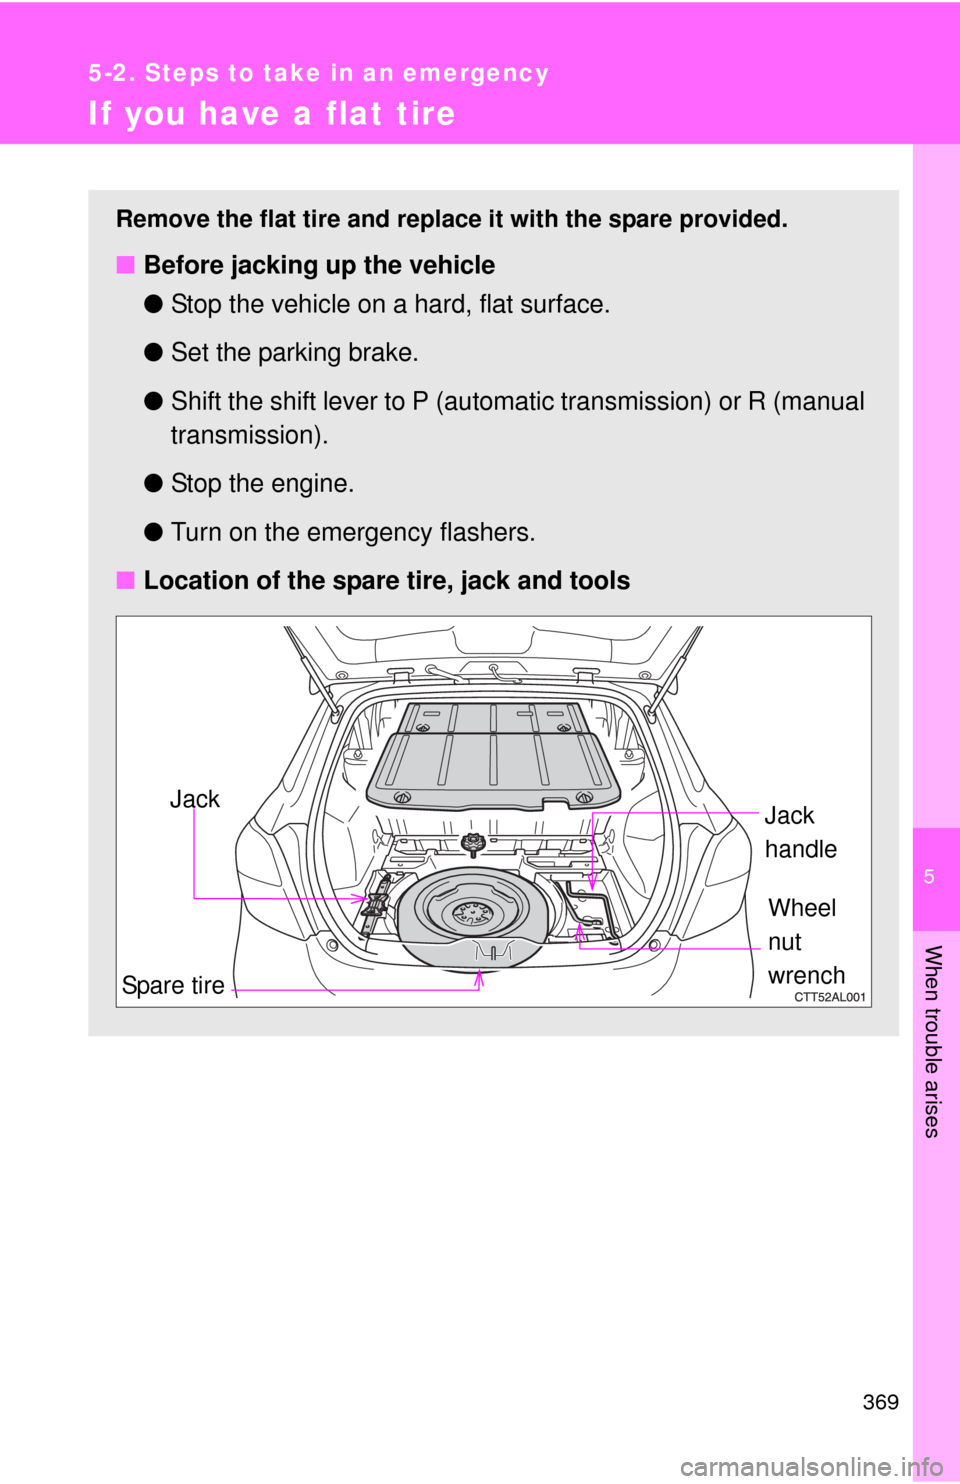
■Location of the spare tire, jack and tools
Spare tireJack
Wheel
nut
wrench
Jack
handle
Page 372 of 448
372 5-2. Steps to take in an emergency
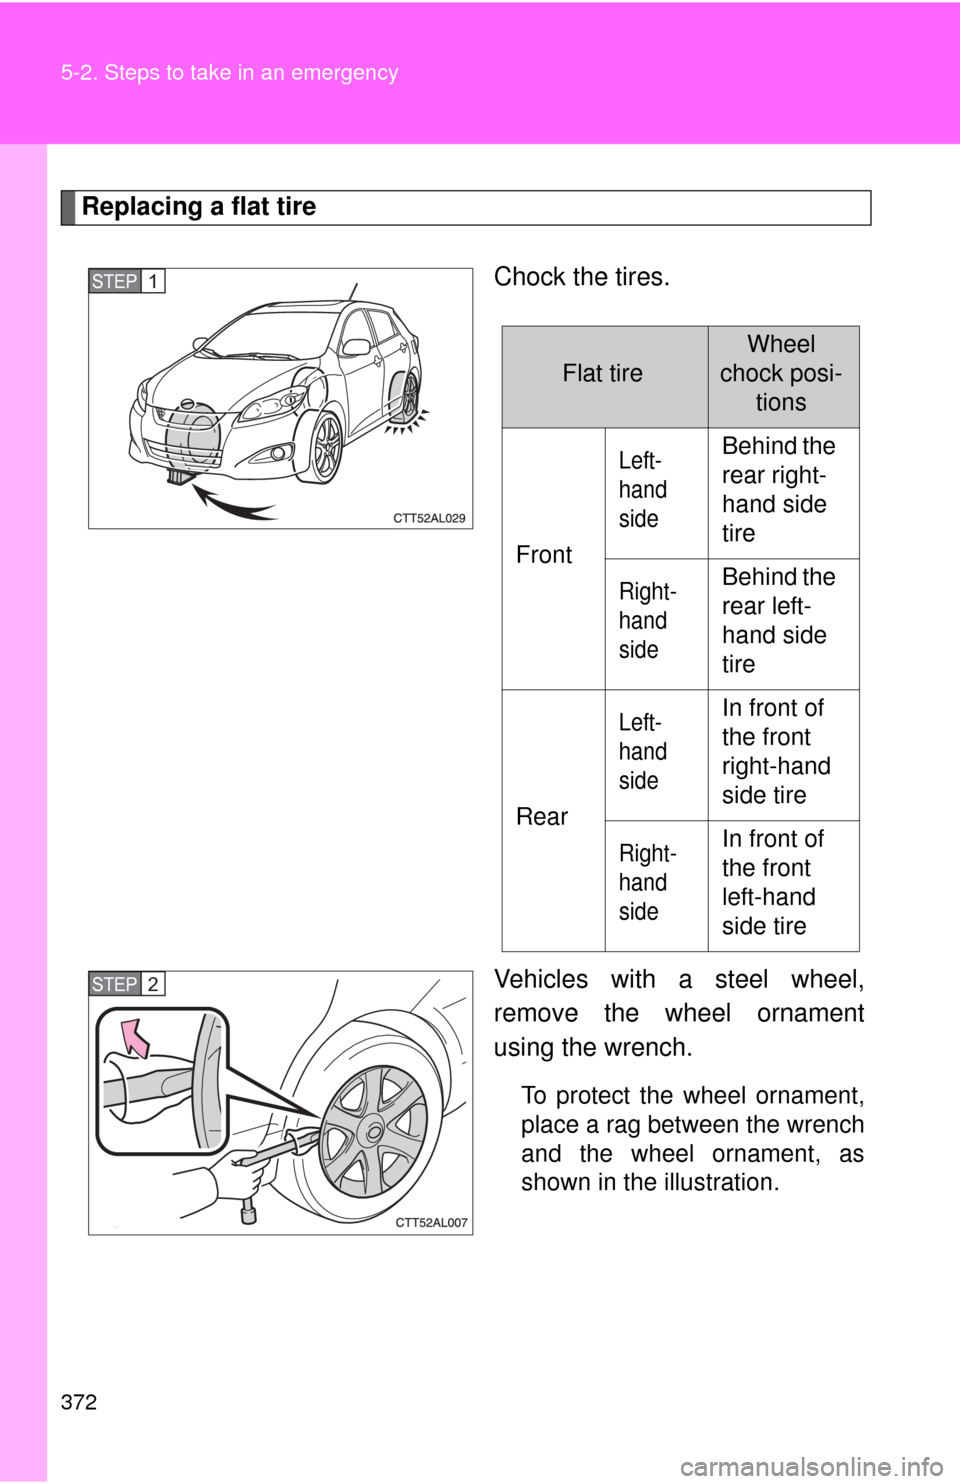
Replacing a flat tire
Chock the tires.
Vehicles with a steel wheel,
remove the wheel ornament
using the wrench.
To protect the wheel ornament,
place a rag between the wrench
and the wheel ornament, as
shown in the illustration.
STEP1
Flat tire
Wheel
chock posi-
tions
Front
Left-
hand
sideBehind the
rear right-
hand side
tire
Right-
hand
sideBehind the
rear left-
hand side
tire
Rear
Left-
hand
sideIn front of
the front
right-hand
side tire
Right-
hand
sideIn front of
the front
left-hand
side tire
STEP2
Page 373 of 448

5
When trouble arises
373 5-2. Steps to take in an emergency
Slightly loosen the wheel nuts
(one turn).
Turn the tire jack portion “A” by
hand until the notch of the jack is
in contact with the jack point.
The jack point guides are
located under the rocker panel.
They indicate the jack point
positions.
STEP3
STEP4
Page 374 of 448

374 5-2. Steps to take in an emergency
Raise the vehicle until the tire is
slightly raised off the ground.
Remove all the wheel nuts and
the tire.
When resting the tire on the
ground, place the tire so that the
wheel design faces up to avoid
scratching the wheel surface.
STEP5
STEP6
Page 375 of 448
5
When trouble arises
375 5-2. Steps to take in an emergency
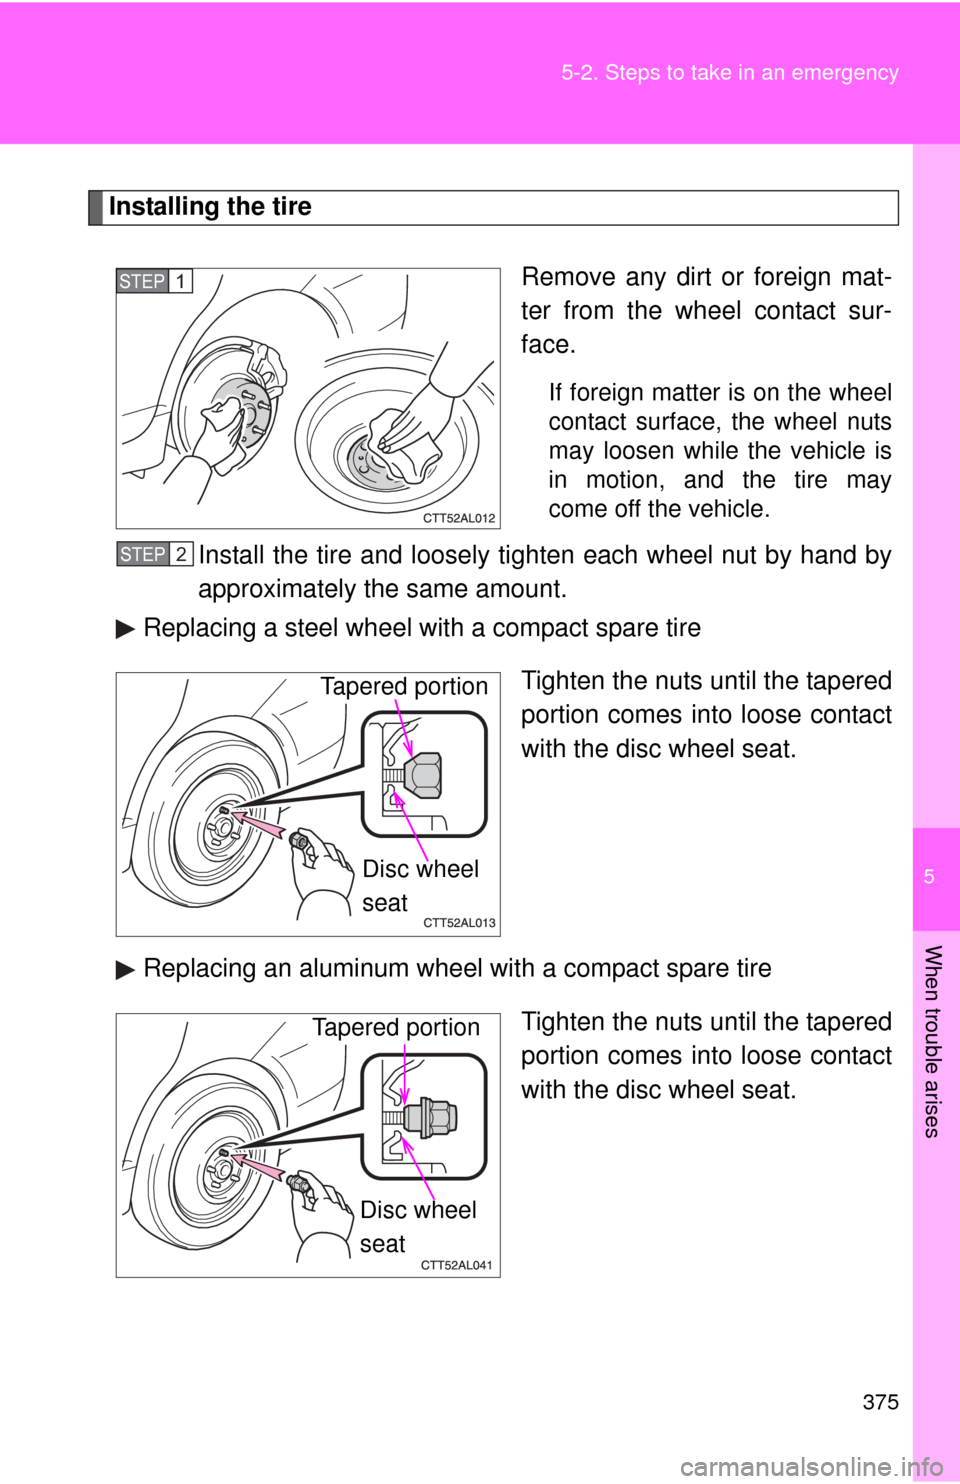
Installing the tire
Remove any dirt or foreign mat-
ter from the wheel contact sur-
face.
If foreign matter is on the wheel
contact surface, the wheel nuts
may loosen while the vehicle is
in motion, and the tire may
come off the vehicle.
Install the tire and loosely tighten each wheel nut by hand by
approximately the same amount.
Replacing a steel wheel with a compact spare tire
Tighten the nuts until the tapered
portion comes into loose contact
with the disc wheel seat.
Replacing an aluminum wheel with a compact spare tire
Tighten the nuts until the tapered
portion comes into loose contact
with the disc wheel seat.
STEP1
STEP2
Tapered portion
Disc wheel
seat
Tapered portion
Disc wheel
seat
Page 376 of 448

376 5-2. Steps to take in an emergency
Lower the vehicle.
Firmly tighten each nut two or
three times in the order shown in
the illustration.
Tightening torque:
76 ft•lbf (103 N•m, 10.5 kgf•m)
Stow the flat tire, tire jack and all tools.
Stowing the flat tire
Vehicles with aluminum wheel:
Before stowing the flat tire,
remove the center wheel orna-
ment by pushing from the
reveres side.
STEP3
STEP4
STEP5
STEP1
Page 377 of 448

5
When trouble arises
377 5-2. Steps to take in an emergency
Put the flat tire on the deck
boards with the outer side of the
wheel facing up. Hook the belt
clips closest to the buckles onto
the front cargo hooks.
Pass the belts through the center
hole of the wheel.
Hook the other side of the clips
of the belts to the rear hooks.
Position the tire edge against the
rear center end of the luggage
compartment.STEP2
STEP3
STEP4
STEP5