ECO mode TOYOTA MIRAI 2019 (in English) Owner's Manual
[x] Cancel search | Manufacturer: TOYOTA, Model Year: 2019, Model line: MIRAI, Model: TOYOTA MIRAI 2019Pages: 528, PDF Size: 11.84 MB
Page 168 of 528

1684-5. Opening and closing the windows
MIRAI_OM_USA_OM62054U(18MY)_O
M62048U(19MY)■
When the window cannot be opened or closed
When the jam protection function or catch protection function o perates
unusually and the door window cannot be opened or closed, perfo rm the fol-
lowing operations with the power window switch of that door.
● Stop the vehicle. With the power switch in ON mode, within 4 se conds of the
jam protection function or catch protection function activating , continuously
operate the power window switch in the one-touch closing direct ion or one-
touch opening direction so that the door window can be opened a nd closed.
● If the door window cannot be opened and closed even when perfor ming the
above operations, perform the following procedure for function initialization.
Turn the power switch to ON mode.
Pull and hold the power window switch in the one-touch closing direction
and completely close the door window.
Release the power window switch for a moment, resume pulling the
switch in the one-touch closing direction, and hold it there for approxi-
mately 6 seconds or more.
Press and hold the power window switch in the one-touch opening direc-
tion. After the door window is completely opened, continue hold ing the
switch for an additional 1 second or more.
Release the power window switch for a moment, resume pushing th e
switch in the one-touch opening direction, and hold it there fo r approxi-
mately 4 seconds or more.
Pull and hold the power window switch in the one-touch closing direction
again. After the door window is completely closed, continue holding the
switch for a further 1 second or more.
If you release the switch while the window is moving, start aga in from the
beginning. If the window reverses and cannot be fully closed or opened, have
the vehicle inspected by your Toyota dealer.
■ Door lock linked window operation
●The power windows can be opened using the mechanical key.
* (P. 450)
● The power windows can be opened using the wireless remote control.
*
(P. 132)
*: These settings must be customized at your Toyota dealer.
■ Power windows open warning buzzer
The buzzer sounds and a message is shown on the multi-informati on display
in the instrument cluster when the power switch is turned off and the driver’s
door is opened with the power windows open.
■ Customization
Settings (e.g. key linked operation) can be changed.
(Customizable features: P. 488)
1
2
3
4
5
6
Page 192 of 528

1925-2. Driving procedures
MIRAI_OM_USA_OM62054U(18MY)_O
M62048U(19MY)
WARNING
■When starting the fuel cell system
Always start the fuel cell system while sitting in the driver’s seat. Do not
depress the accelerator pedal while starting the fuel cell syst em under any
circumstances.
Doing so may cause an accident resulting in death or serious in jury.
■ Stopping the fuel cell system in an emergency
If you want to stop the fuel cell system in an emergency while driving the
vehicle, press and hold the power switch for more than 2 second s, or press
it briefly 3 times or more in succession. ( P. 409)
However, do not touch the power switch while driving except in an emer-
gency. Turning the fuel cell system off while driving will not cause loss of
steering or braking control, however, power assist to the steer ing will be
lost. This will make it more difficult to steer smoothly, so yo u should pull over
and stop the vehicle as soon as it is safe to do so.
NOTICE
■ To prevent 12-volt b attery discharge
Do not leave the power switch in ACCESSORY or ON mode for long peri-
ods if the fuel cell system is off.
■ When starting the fuel cell system
If the fuel cell system becomes difficult to start, have your vehicle checked
by your Toyota dealer immediately.
■ Symptoms indicating a malfunction with the power switch
If the power switch seems to be operating somewhat differently than usual,
such as the switch sticking slightly, there may be a malfunctio n. Contact
your Toyota dealer immediately.
Page 195 of 528
1955-2. Driving procedures
5
Driving
MIRAI_OM_USA_OM62054U(18MY)_O
M62048U(19MY)
The following modes can be selected to suit driving conditions.
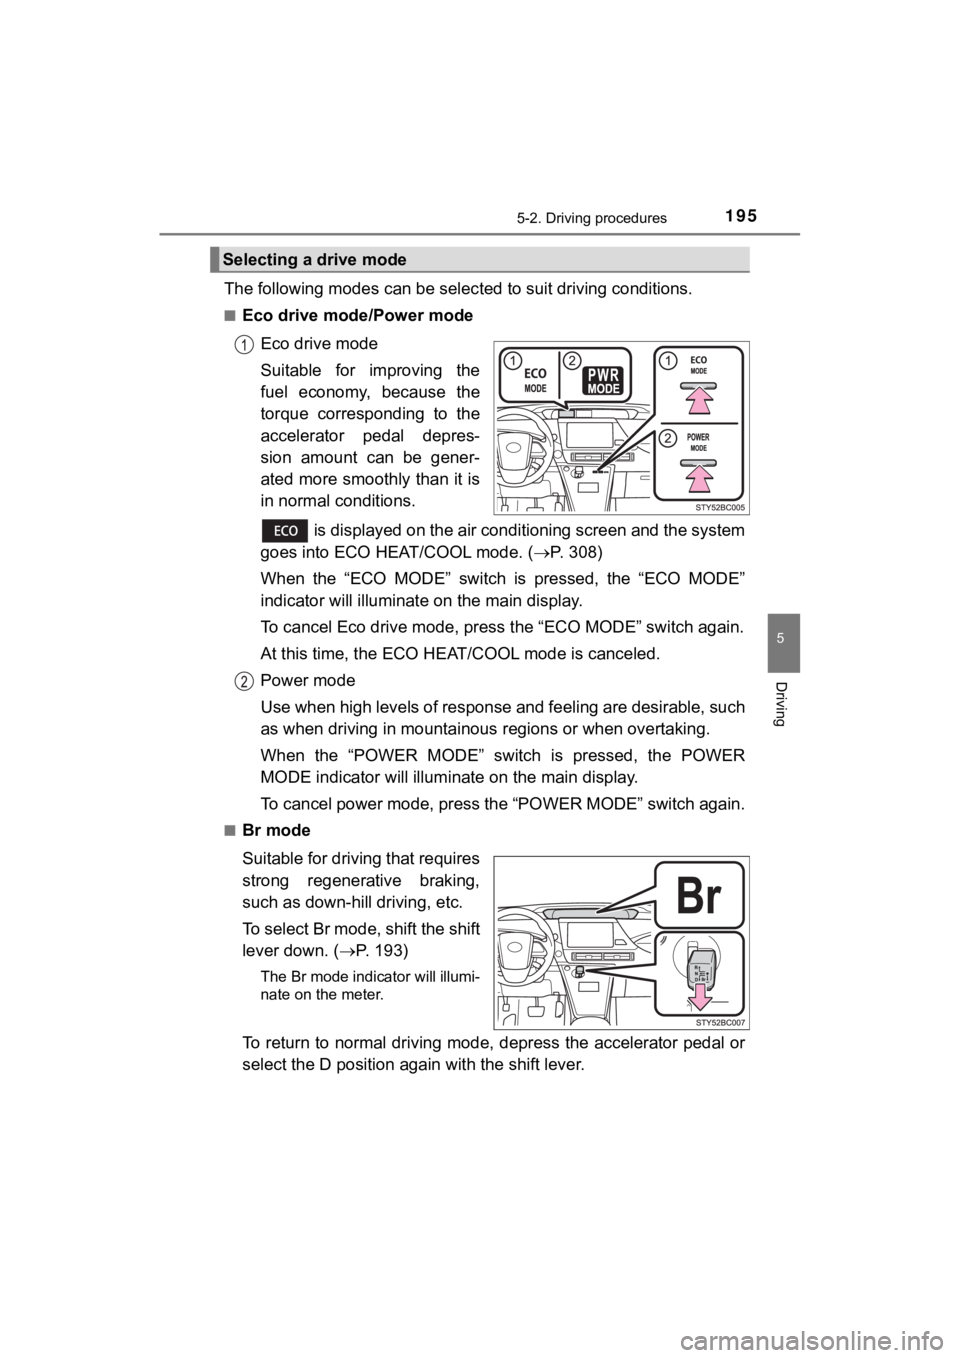
■Eco drive mode/Power mode
Eco drive mode
Suitable for improving the
fuel economy, because the
torque corresponding to the
accelerator pedal depres-
sion amount can be gener-
ated more smoothly than it is
in normal conditions.
is displayed on the air conditioning screen and the system
goes into ECO HEAT/COOL mode. ( P. 308)
When the “ECO MODE” switch is pressed, the “ECO MODE”
indicator will illuminate on the main display.
To cancel Eco drive mode, press the “ECO MODE” switch again.
At this time, the ECO HE AT/COOL mode is canceled.
Power mode
Use when high levels of response and feeling are desirable, such
as when driving in mountainous regions or when overtaking.
When the “POWER MODE” switch is pressed, the POWER
MODE indicator will illumi nate on the main display.
To cancel power mode, press the “POWER MODE” switch again.
■Br mode
Suitable for driving that requires
strong regenerative braking,
such as down-hill driving, etc.
To select Br mode, shift the shift
lever down. ( P. 193)
The Br mode indicator will illumi-
nate on the meter.
To return to normal driving mode, depress the accelerator pedal or
select the D position again with the shift lever.
Selecting a drive mode
Page 197 of 528
1975-2. Driving procedures
5
Driving
MIRAI_OM_USA_OM62054U(18MY)_O
M62048U(19MY)■
Regenerative Braking
When the shift position is in D, regenerative braking is engage d when the foot
is released from the accelerator pedal.
■ ECO HEAT/COOL mode operation for Eco drive mode
●When the “ECO MODE” switch is pressed, the system switches over to
ECO HEAT/COOL mode. ( P. 311) During the use of Eco drive mode, only
the ECO HEAT/COOL mode can be canceled.
● When it is desired to improve the effectiveness of the air cond itioning sys-
tem, perform the following operations.
• Adjust the temperature settings and airflow mode.
• Press of the air conditioning operation panel ( P. 306) and can-
cel the ECO HEAT/COOL mode, or cancel Eco drive mode.
■ Power mode automatic deactivation
Power mode is automatically deactivated if the power switch is turned off after
driving in power mode.
■ Shifting from P on a slope
When changing to another position from P when parked on a slope in the P
position, vibrations may be felt.
WARNING
■When driving on slippery road surfaces
Do not accelerate or shift the shift position suddenly.
Sudden changes in regenerative braking may cause the vehicle to spin or
skid, resulting in an accident.
■ For the shift lever
Do not remove the shift lever knob or use anything but a genuin e Toyota
shift lever knob. Also, do not hang anything on the shift lever .
Doing so could prevent the shift lever from returning to position, causing
unexpected accidents to occur when the vehicle is in motion.
■ P position switch
Do not press the P position switch while the vehicle is moving.
If the P position switch is pressed when driving at very low speeds (for
example, directly before stopping the vehicle), the vehicle may stop sud-
denly when the shift position switches to P, which could lead t o an accident.
Page 211 of 528
2115-3. Operating the lights and wipers
5
Driving
MIRAI_OM_USA_OM62054U(18MY)_O
M62048U(19MY)
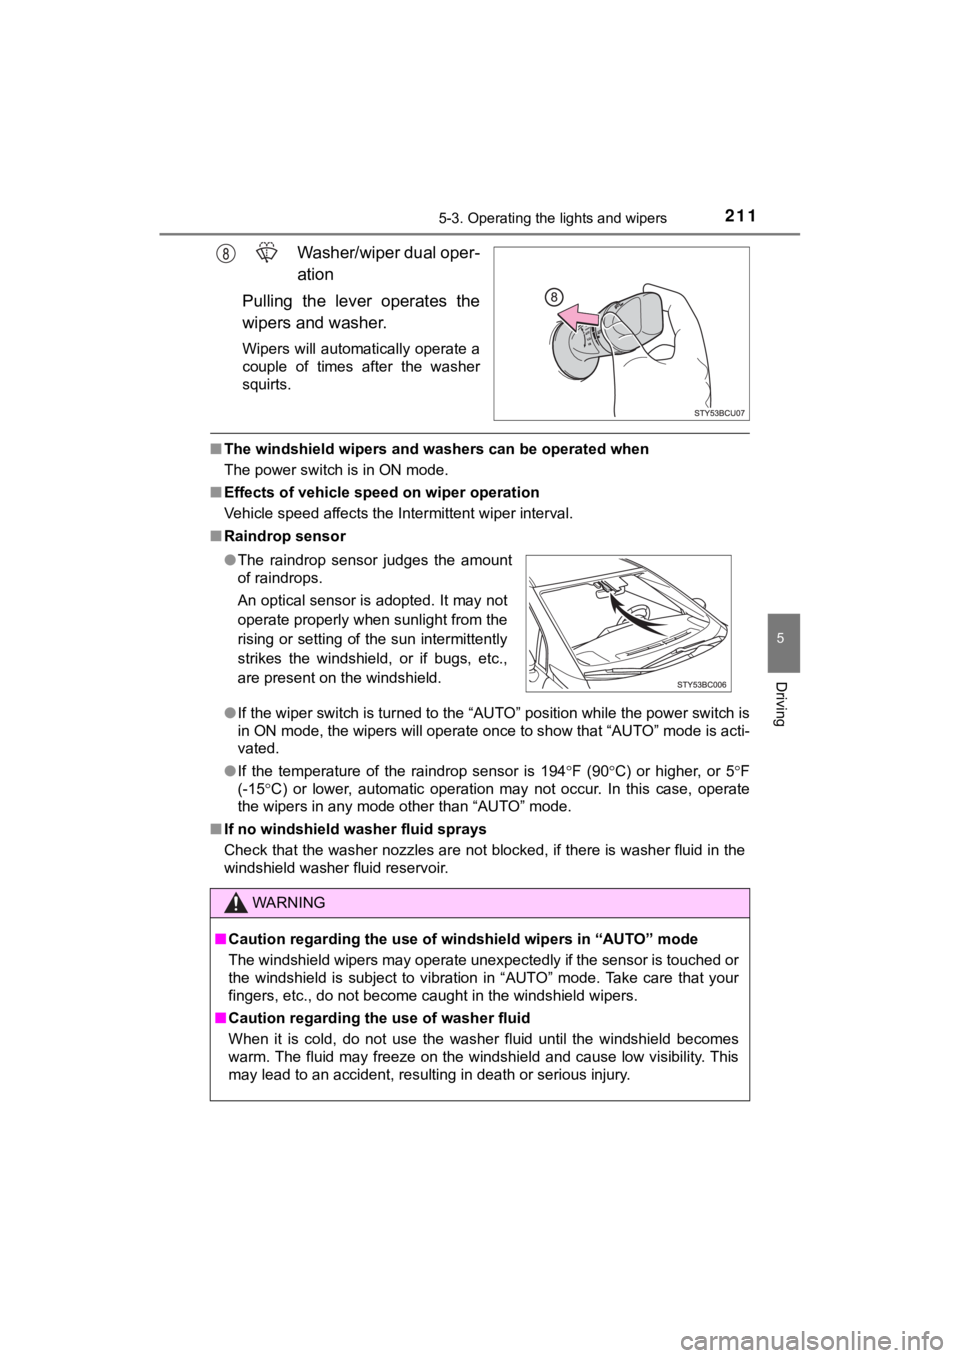
Washer/wiper dual oper-
ation
Pulling the lever operates the
wipers and washer.
Wipers will automatically operate a
couple of times after the washer
squirts.
■ The windshield wipers and washers can be operated when
The power switch is in ON mode.
■ Effects of vehicle speed on wiper operation
Vehicle speed affects the Intermittent wiper interval.
■ Raindrop sensor
●If the wiper switch is turned to the “AUTO” position while the power switch is
in ON mode, the wipers will operate once to show that “AUTO” mo de is acti-
vated.
● If the temperature of the raindrop sensor is 194 F (90 C) or higher, or 5 F
(-15 C) or lower, automatic operation may not occur. In this case, o perate
the wipers in any mode other than “AUTO” mode.
■ If no windshield washer fluid sprays
Check that the washer nozzles are not blocked, if there is wash er fluid in the
windshield washer fluid reservoir.
● The raindrop sensor judges the amount
of raindrops.
An optical sensor is adopted. It may not
operate properly when sunlight from the
rising or setting of the sun intermittently
strikes the windshield, or if bugs, etc.,
are present on the windshield.
WARNING
■Caution regarding the use of windshield wipers in “AUTO” mode
The windshield wipers may operate unexpectedly if the sensor is touched or
the windshield is subject to vibration in “AUTO” mode. Take car e that your
fingers, etc., do not become caught in the windshield wipers.
■ Caution regarding the use of washer fluid
When it is cold, do not use the washer fluid until the windshie ld becomes
warm. The fluid may freeze on the windshield and cause low visi bility. This
may lead to an accident, resulting in death or serious injury.
Page 245 of 528
2455-5. Using the driving support systems
5
Driving
MIRAI_OM_USA_OM62054U(18MY)_O
M62048U(19MY)
■Operation conditions of each function
●Lane departure alert function
This function operates when all of the following conditions are met.
• LDA is turned on.
• Vehicle speed is approximately 32 mph (50 km/h) or more.
• System recognizes white (yellow) lane lines or a course
*. (When a white
[yellow] line or course* is recognized on only one side, the sy stem will
operate only for the recognized side.)
• Width of traffic lane is approximately 9.8 ft. (3 m) or more.
• Turn signal lever is not operated.
• Vehicle is not being driven around a sharp curve.
• No system malfunctions are detected. ( P. 247)
*: Boundary between asphalt and the side of the road, such as gra ss, soil, or
a curb
● Steering assist function
This function operates when all of the following conditions are met in addi-
tion to the operation conditions for the lane departure alert function.
• Setting for “LDA Steering Assist Mode” in on the multi-inform ation
display ( P. 117) is set to “ON”.
Press or of the meter control switches ( P. 118) and select
.
Press or of the meter control switches, select and press to select the “ON”.
• Vehicle is not accelerated or decelerated by a fixed amount or more.
• Steering wheel is not operated with a steering force level suitable for
changing lanes.
• ABS, VSC, TRAC and PCS are not operating.
• TRAC or VSC is not turned off.
• Hands off steering wheel warning is not displayed. ( P. 246)
● Vehicle sway warning function
This function operates when all of the following conditions are met.
• Setting for “Lane Sway Warning Status” in on the multi-information display ( P. 117) is set to “On”.
Press or of the meter control switches ( P. 118) and select
.
Press or of the meter control switches, select and press to select the “ON”.
• Vehicle speed is approximately 32 mph (50 km/h) or more.
• Width of traffic lane is approximately 9.8 ft. (3 m) or more.
• No system malfunctions are detected. ( P. 247)
1
2
1
2
Page 252 of 528

2525-5. Using the driving support systems
MIRAI_OM_USA_OM62054U(18MY)_O
M62048U(19MY)●
Roundabout exit road speed signs may be detected and displayed (if posi-
tioned in sight of the front camera) while traveling on a round about.
● The front of the vehicle is raised or lowered due to the carrie d load.
● The surrounding brightness is not sufficient or changes suddenly.
● When a sign intended for trucks, etc. is recognized.
■ Speed limit sign display
If the power switch was last turned off while a speed limit sig n was displayed
on the multi-information display, the same sign displays again when the
power switch is turned to ON mode.
■ If “RSA Malfunction Visit Your Dealer” is shown
The system may be malfunctioning. Have the vehicle inspected by your Toy-
ota dealer.
■ Customization
Some functions can be customized.
(Customizable features: P. 484)
Page 256 of 528
2565-5. Using the driving support systems
MIRAI_OM_USA_OM62054U(18MY)_O
M62048U(19MY)
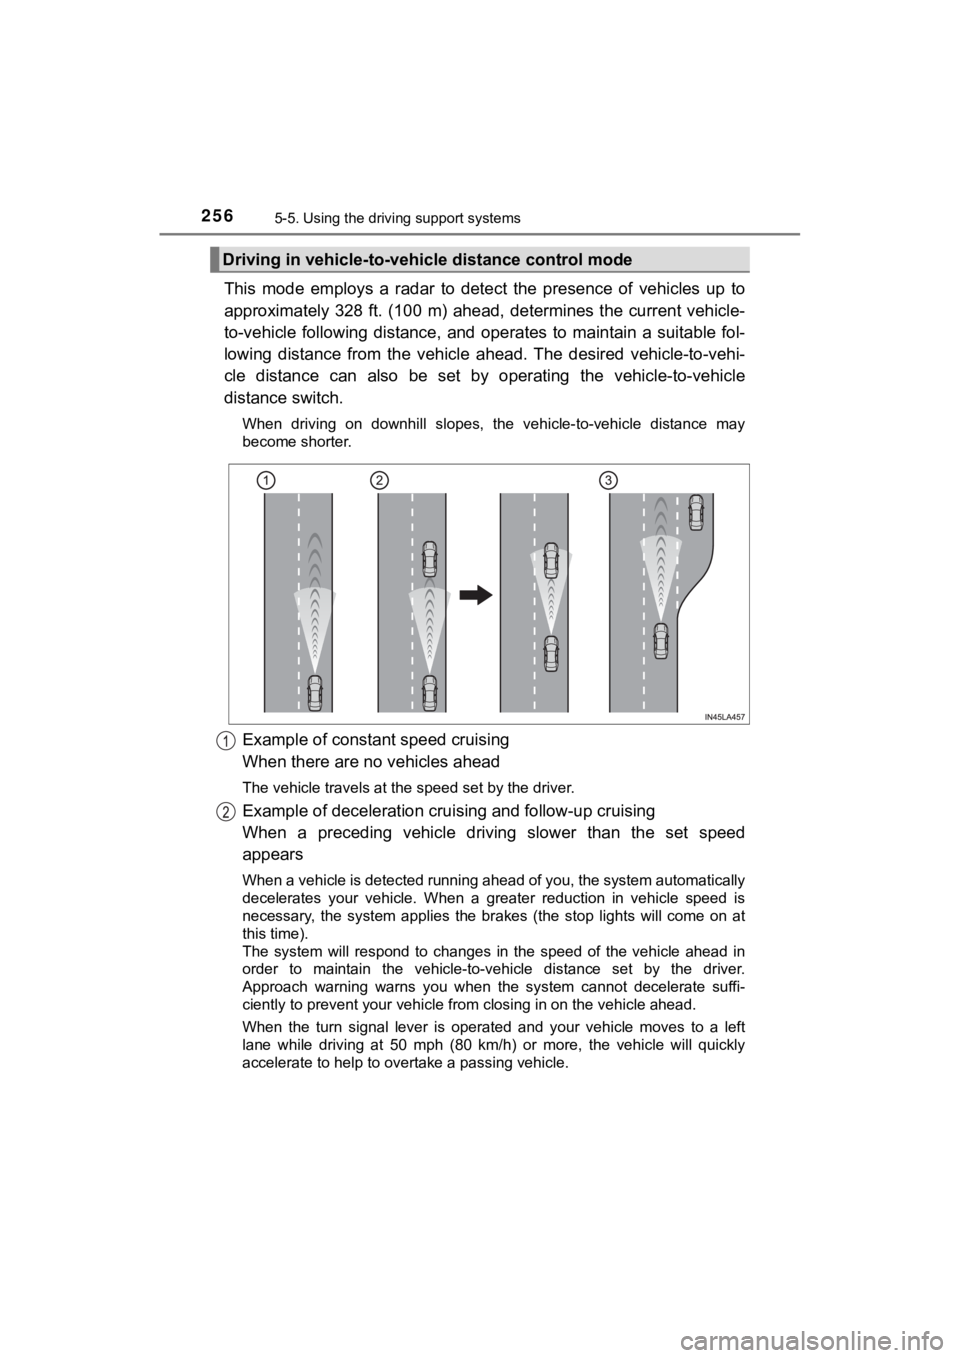
This mode employs a radar to detect the presence of vehicles up to
approximately 328 ft. (100 m) ahead, determines the current veh icle-
to-vehicle following distance, and operates to maintain a suita ble fol-
lowing distance from the vehicle ahead. The desired vehicle-to- vehi-
cle distance can also be set by operating the vehicle-to-vehicl e
distance switch.
When driving on downhill slopes, the vehicle-to-vehicle distance may
become shorter.
Example of constant speed cruising
When there are no vehicles ahead
The vehicle travels at the speed set by the driver.
Example of deceleration crui sing and follow-up cruising
When a preceding vehicle driving slower than the set speed
appears
When a vehicle is detected running ahead of you, the system automatically
decelerates your vehicle. When a greater reduction in vehicle s peed is
necessary, the system applies the brakes (the stop lights will come on at
this time).
The system will respond to changes in the speed of the vehicle ahead in
order to maintain the vehicle-to-vehicle distance set by the dr iver.
Approach warning warns you when the system cannot decelerate su ffi-
ciently to prevent your vehicle fr om closing in on the vehicle ahead.
When the turn signal lever is operated and your vehicle moves to a left
lane while driving at 50 mph (80 km/h) or more, the vehicle wil l quickly
accelerate to help to overtake a passing vehicle.
Driving in vehicle-to-vehi cle distance control mode
Page 257 of 528
2575-5. Using the driving support systems
5
Driving
MIRAI_OM_USA_OM62054U(18MY)_O
M62048U(19MY)
Example of acceleration
When there are no longer any preceding vehicles driving slower
than the set speed
The system accelerates until the set speed is reached. The system then
returns to constant speed cruising.
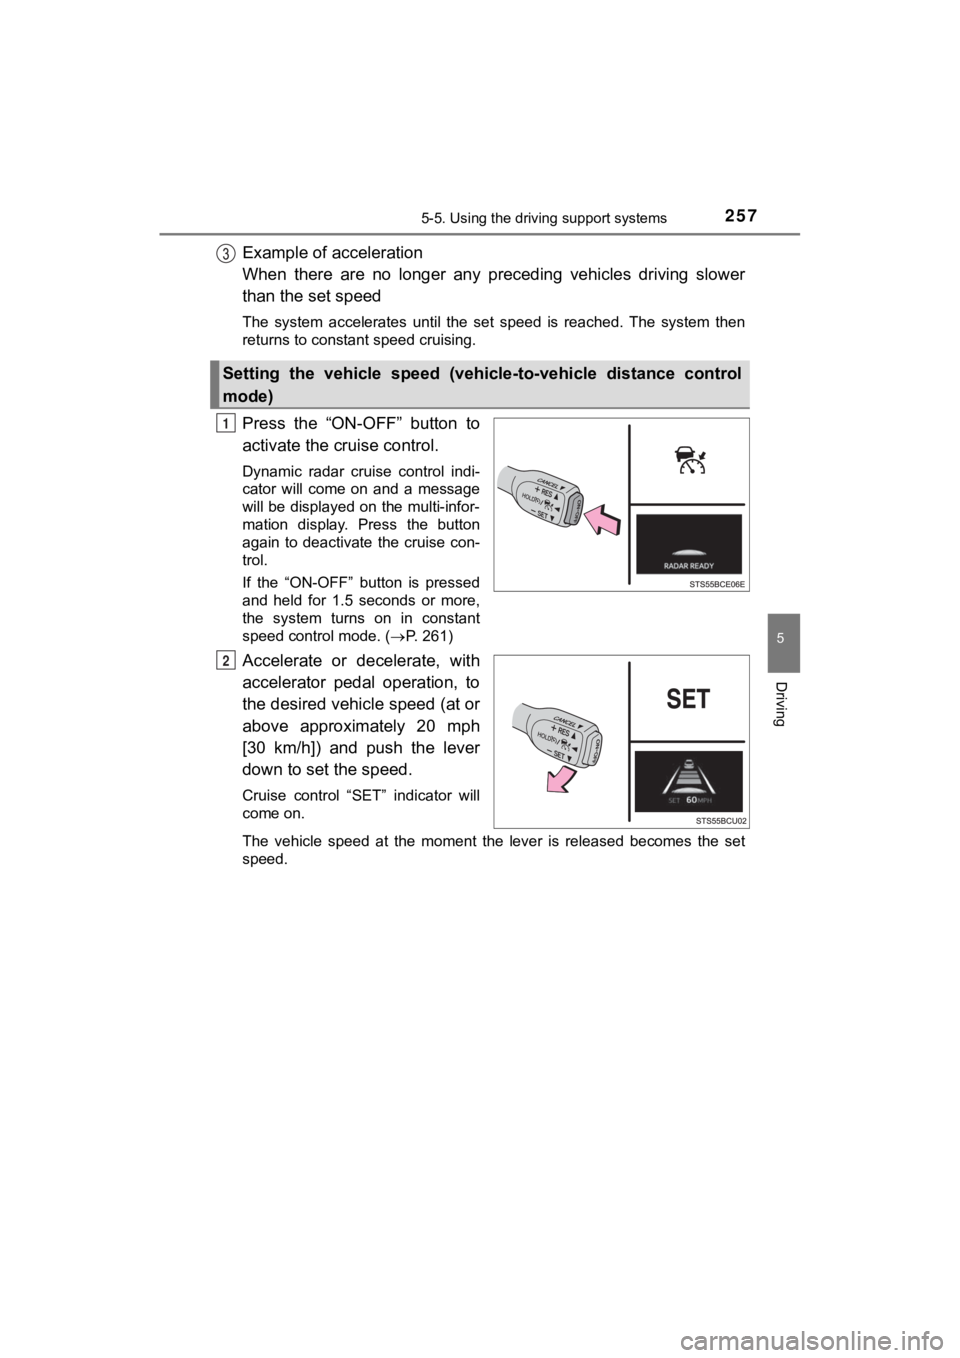
Press the “ON-OFF” button to
activate the cruise control.
Dynamic radar cruise control indi-
cator will come on and a message
will be displayed on the multi-infor-
mation display. Press the button
again to deactivate the cruise con-
trol.
If the “ON-OFF” button is pressed
and held for 1.5 seconds or more,
the system turns on in constant
speed control mode. ( P. 261)
Accelerate or decelerate, with
accelerator pedal operation, to
the desired vehicle speed (at or
above approximately 20 mph
[30 km/h]) and push the lever
down to set the speed.
Cruise control “SET” indicator will
come on.
The vehicle speed at the moment the lever is released becomes the set
speed.
Setting the vehicle speed (vehicle-to-vehicle distance control
mode)
1
2
Page 261 of 528
2615-5. Using the driving support systems
5
Driving
MIRAI_OM_USA_OM62054U(18MY)_O
M62048U(19MY)
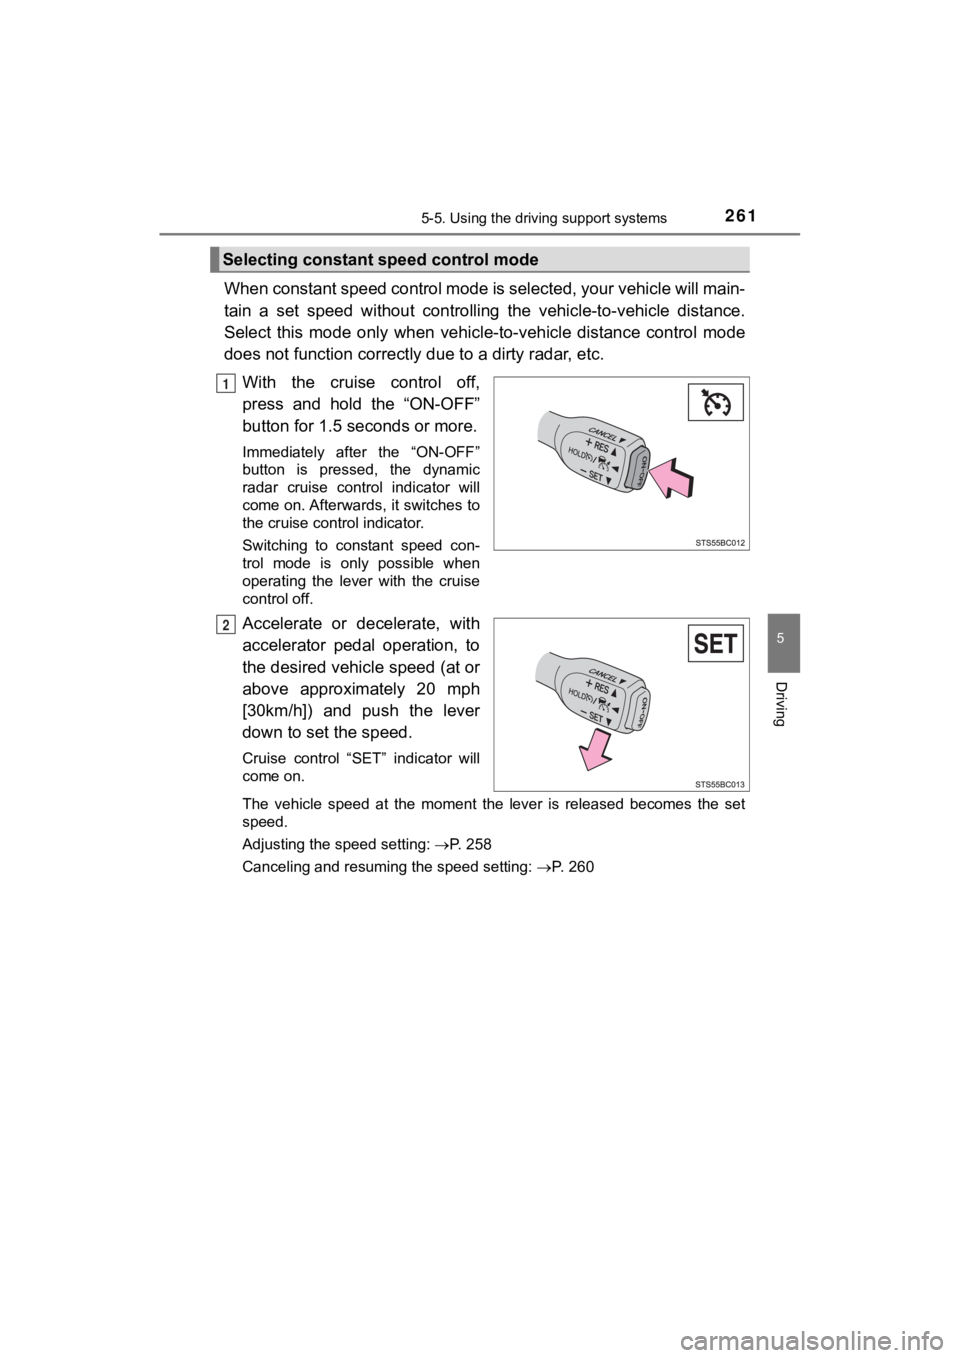
When constant speed control mode is selected, your vehicle will main-
tain a set speed without controllin g the vehicle-to-vehicle distance.
Select this mode only when vehic le-to-vehicle distance control mode
does not function correctly due to a dirty radar, etc.
With the cruise control off,
press and hold the “ON-OFF”
button for 1.5 seconds or more.
Immediately after the “ON-OFF”
button is pressed, the dynamic
radar cruise control indicator will
come on. Afterwards, it switches to
the cruise control indicator.
Switching to constant speed con-
trol mode is only possible when
operating the lever with the cruise
control off.
Accelerate or decelerate, with
accelerator pedal operation, to
the desired vehicle speed (at or
above approximately 20 mph
[30km/h]) and push the lever
down to set the speed.
Cruise control “SET” indicator will
come on.
The vehicle speed at the moment the lever is released becomes the set
speed.
Adjusting the speed setting: P. 258
Canceling and resuming the speed setting: P. 260
Selecting constant speed control mode
1
2