buttons TOYOTA MIRAI 2022 Owners Manual
[x] Cancel search | Manufacturer: TOYOTA, Model Year: 2022, Model line: MIRAI, Model: TOYOTA MIRAI 2022Pages: 556, PDF Size: 17.34 MB
Page 20 of 556
20Pictorial index
Owners Manual_USA_M62084_en
P position switch.............................................. .................. P.178
Advanced Park main switch
*1........................................... P.284
Driving mode select switch ..................................... .......... P.313
Parking brake switch ........................................... .............. P.183
Applying/releasing the parking brake ........................... ........ P.183
Precautions for winter seas on.............................................. P.321
Warning buzzer/messages.. ......................................... P.185, 451
Brake hold switch .............................................. ................ P.186
*1: If equipped
*2: Refer to “NAVIGATION AND MULTIMEDIA SYSTEM OWNER’S MAN-
UAL”.
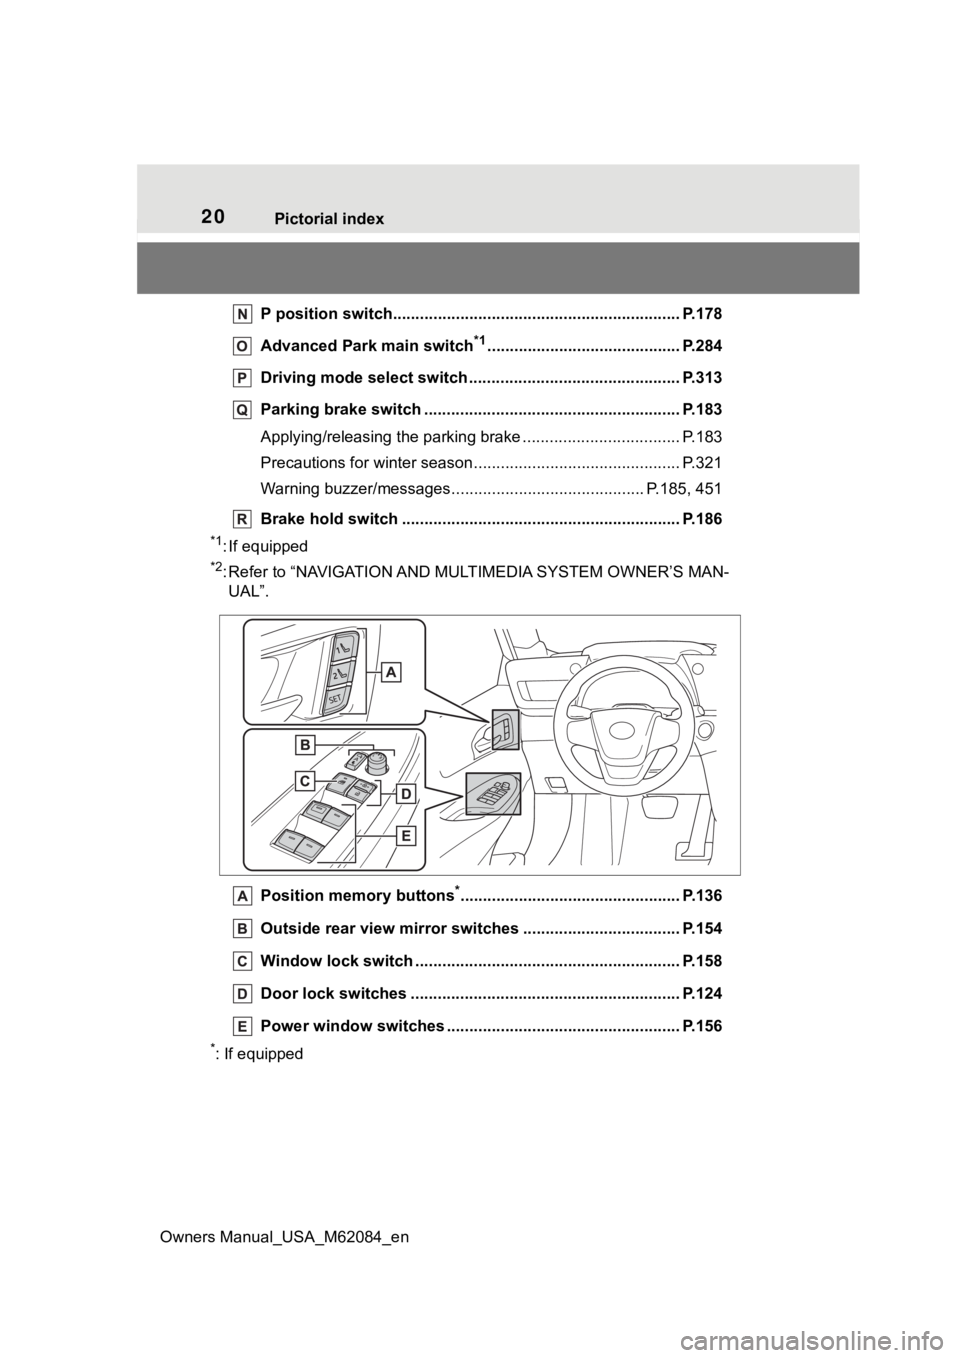
Position memory buttons
*................................................. P.136
Outside rear view mirror swi tches ................................... P.154
Window lock switch ............................................. .............. P.158
Door lock switches ............................................................ P.124
Power window switches ....... ............................................. P.156
*: If equipped
Page 22 of 556
22Pictorial index
Owners Manual_USA_M62084_en
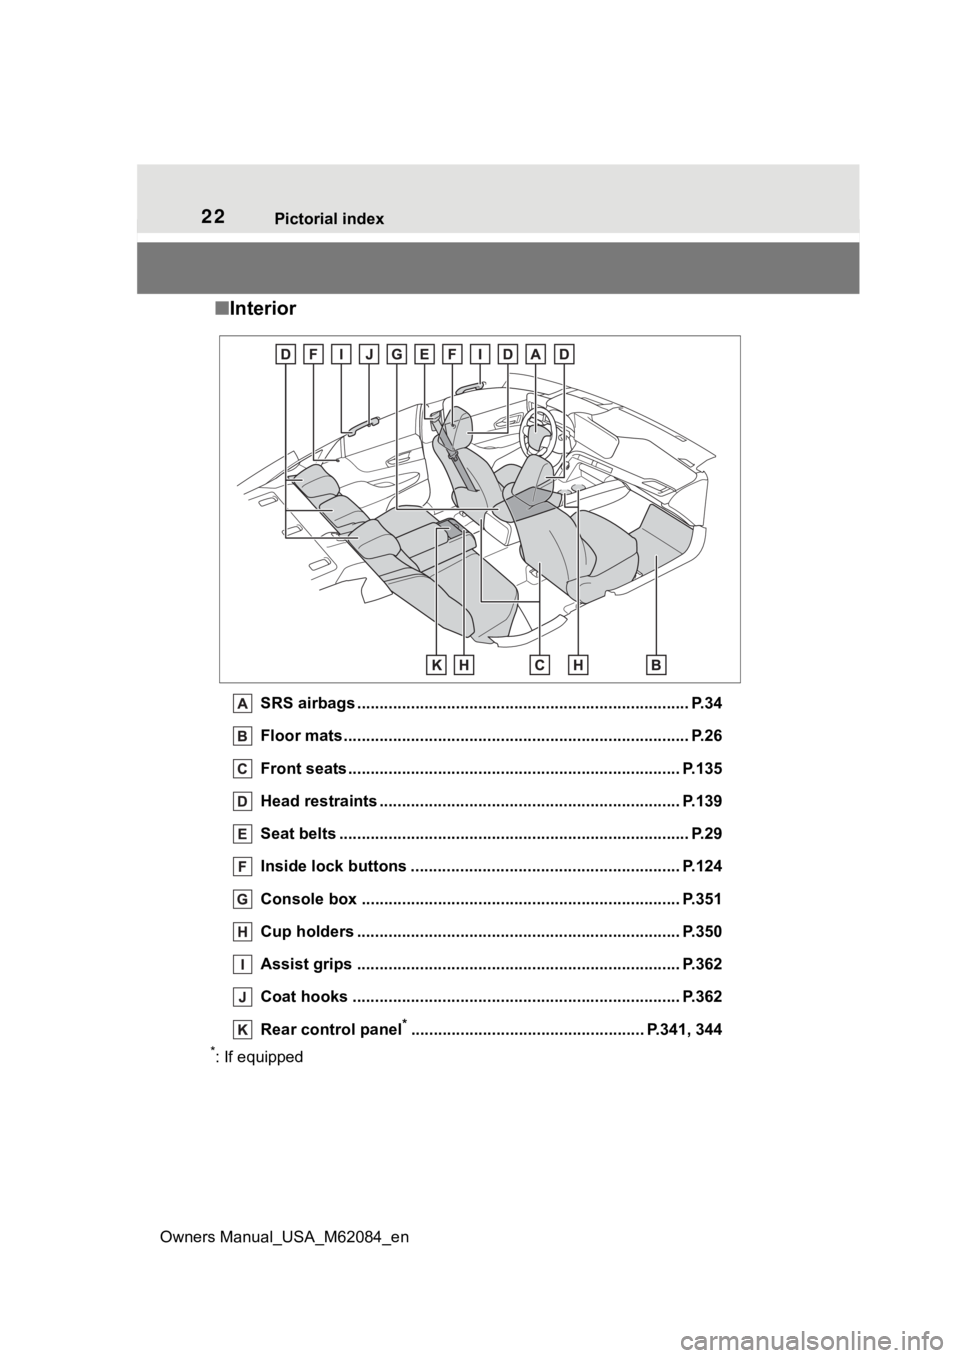
■ Interior
SRS airbags .................................................... ...................... P.34
Floor mats..................................................... ........................ P.26
Front seats .................................................... ...................... P.135
Head restraints ................................................ ................... P.139
Seat belts ..................................................... ......................... P.29
Inside lock buttons ............................................ ................ P.124
Console box ....................................................................... P.351
Cup holders .................................................... .................... P.350
Assist grips ................................................... ..................... P.362
Coat hooks ..................................................... .................... P.362
Rear control panel
*.................................................... P.341, 344
*: If equipped
Page 23 of 556
23Pictorial index
Owners Manual_USA_M62084_en
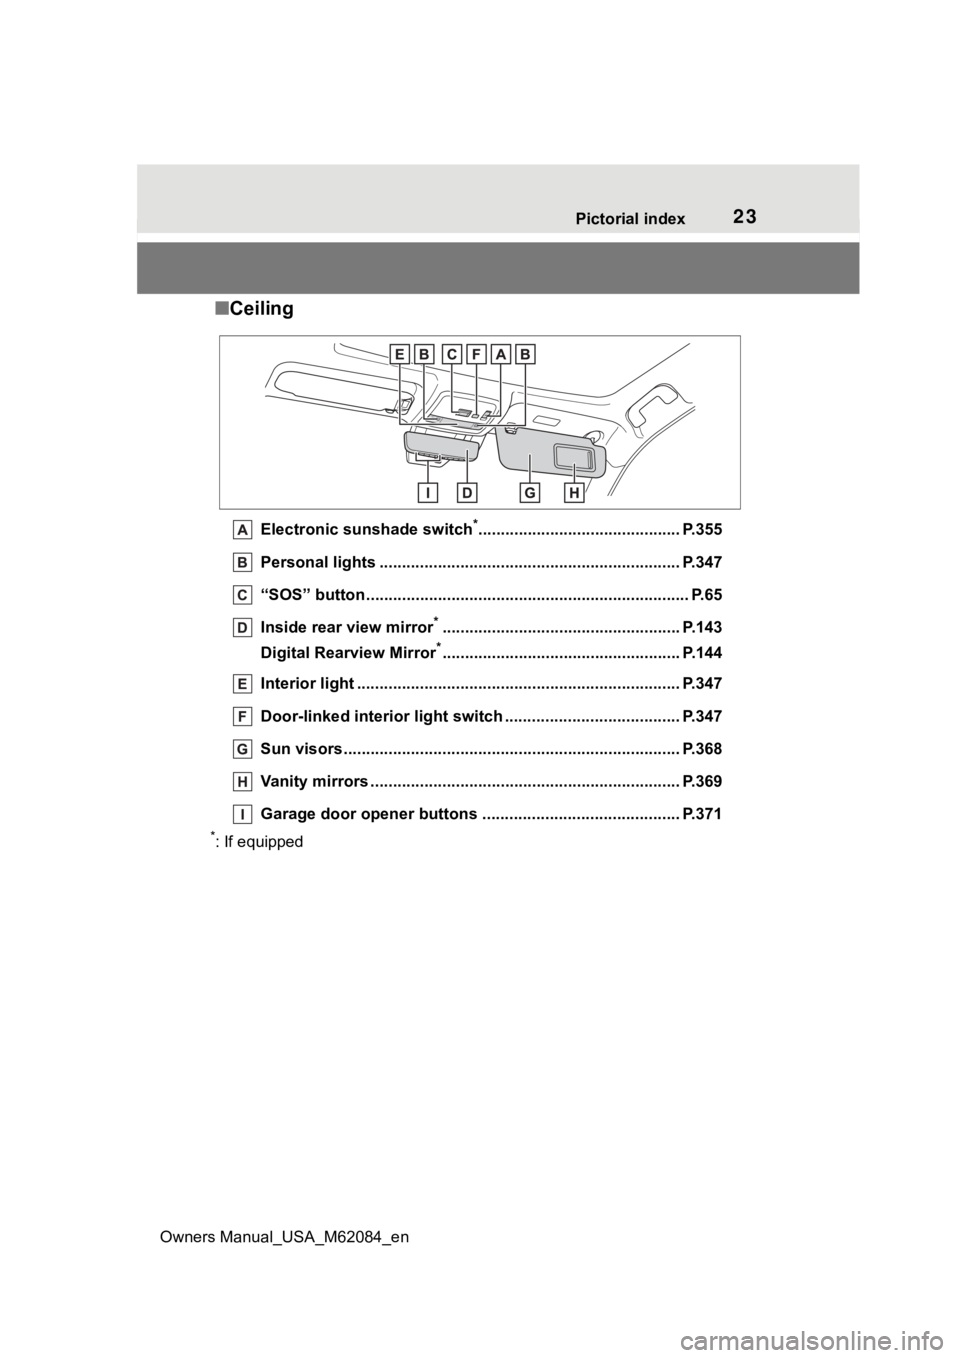
■ Ceiling
Electronic sunshade switch*............................................. P.355
Personal lights ................................................ ................... P.347
“SOS” button ................................................... ..................... P.65
Inside rear view mirror
*..................................................... P.143
Digital Rearview Mirror
*..................................................... P.144
Interior light ........................................................................ P.347
Door-linked interior light switch .............................. ......... P.347
Sun visors........................................................................... P.368
Vanity mirrors ................................................. .................... P.369
Garage door opener buttons ..................................... ....... P.371
*: If equipped
Page 60 of 556
601-2. Child safety
Owners Manual_USA_M62084_en
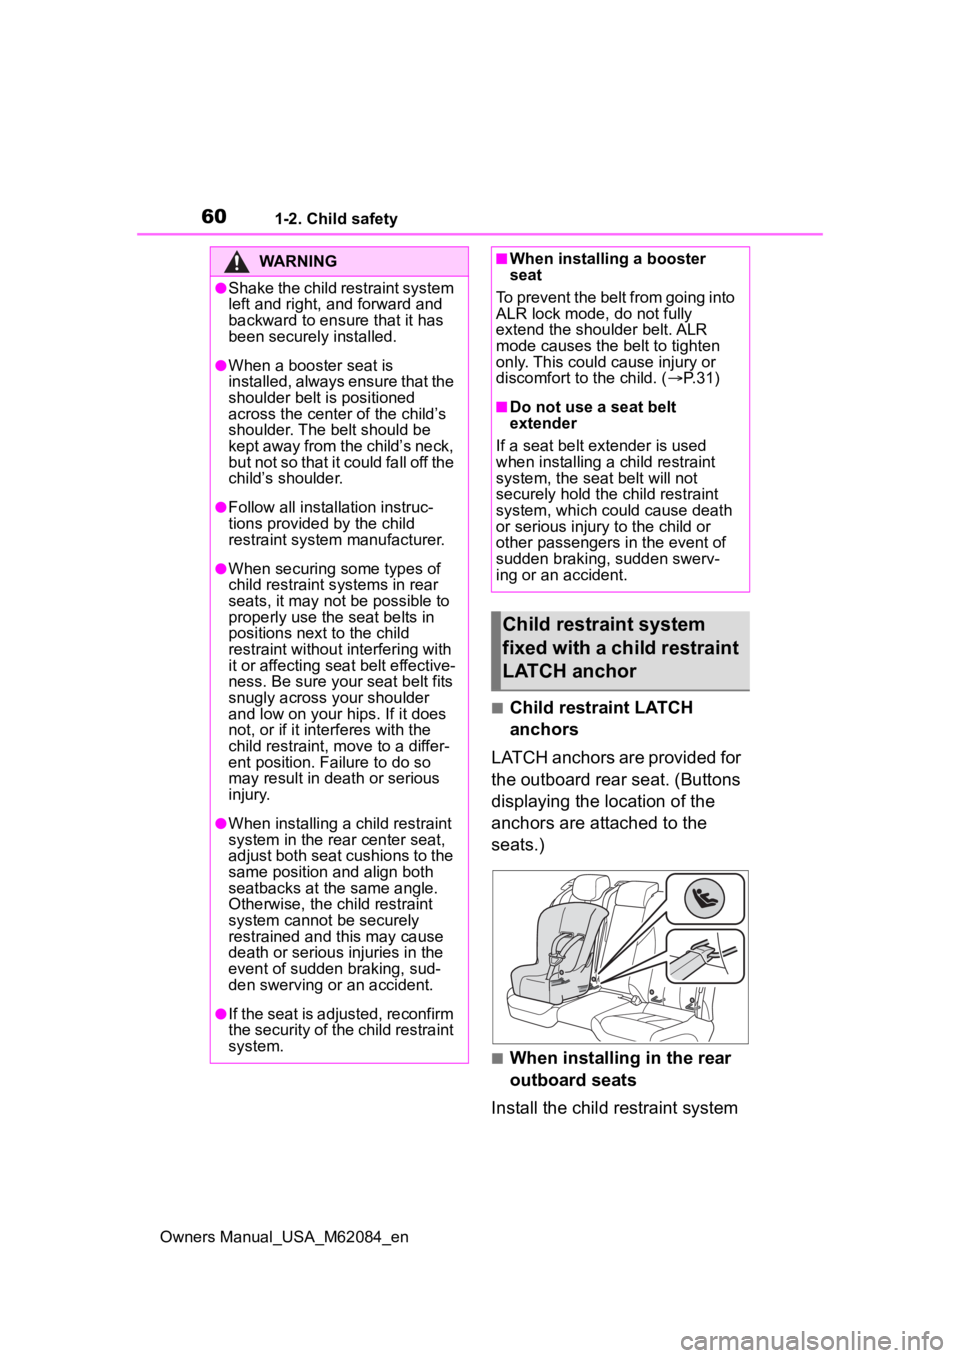
■Child restraint LATCH
anchors
LATCH anchors are provided for
the outboard rear seat. (Buttons
displaying the location of the
anchors are attached to the
seats.)
■When installing in the rear
outboard seats
Install the child restraint system
WARNING
●Shake the child restraint system
left and right, and forward and
backward to ensure that it has
been securely installed.
●When a booster seat is
installed, always ensure that the
shoulder belt is positioned
across the center of the child’s
shoulder. The belt should be
kept away from the child’s neck,
but not so that it could fall off the
child’s shoulder.
●Follow all installation instruc-
tions provided by the child
restraint system manufacturer.
●When securing some types of
child restraint s ystems in rear
seats, it may not be possible to
properly use the seat belts in
positions next to the child
restraint without interfering with
it or affecting seat belt effective-
ness. Be sure your seat belt fits
snugly across your shoulder
and low on your hips. If it does
not, or if it interferes with the
child restraint, move to a differ-
ent position. Failure to do so
may result in death or serious
injury.
●When installing a child restraint
system in the rear center seat,
adjust both seat cushions to the
same position and align both
seatbacks at the same angle.
Otherwise, the child restraint
system cannot be securely
restrained and t his may cause
death or serious injuries in the
event of sudden braking, sud-
den swerving or an accident.
●If the seat is adjusted, reconfirm
the security of the child restraint
system.
■When installing a booster
seat
To prevent the belt from going into
ALR lock mode, do not fully
extend the shoulder belt. ALR
mode causes the belt to tighten
only. This could cause injury or
discomfort to the child. ( P. 3 1 )
■Do not use a seat belt
extender
If a seat belt extender is used
when installing a child restraint
system, the seat belt will not
securely hold the child restraint
system, which could cause death
or serious injury to the child or
other passengers in the event of
sudden braking, sudden swerv-
ing or an accident.
Child restraint system
fixed with a child restraint
LATCH anchor
Page 118 of 556
1184-1. Key information
Owners Manual_USA_M62084_en
4-1.Key information
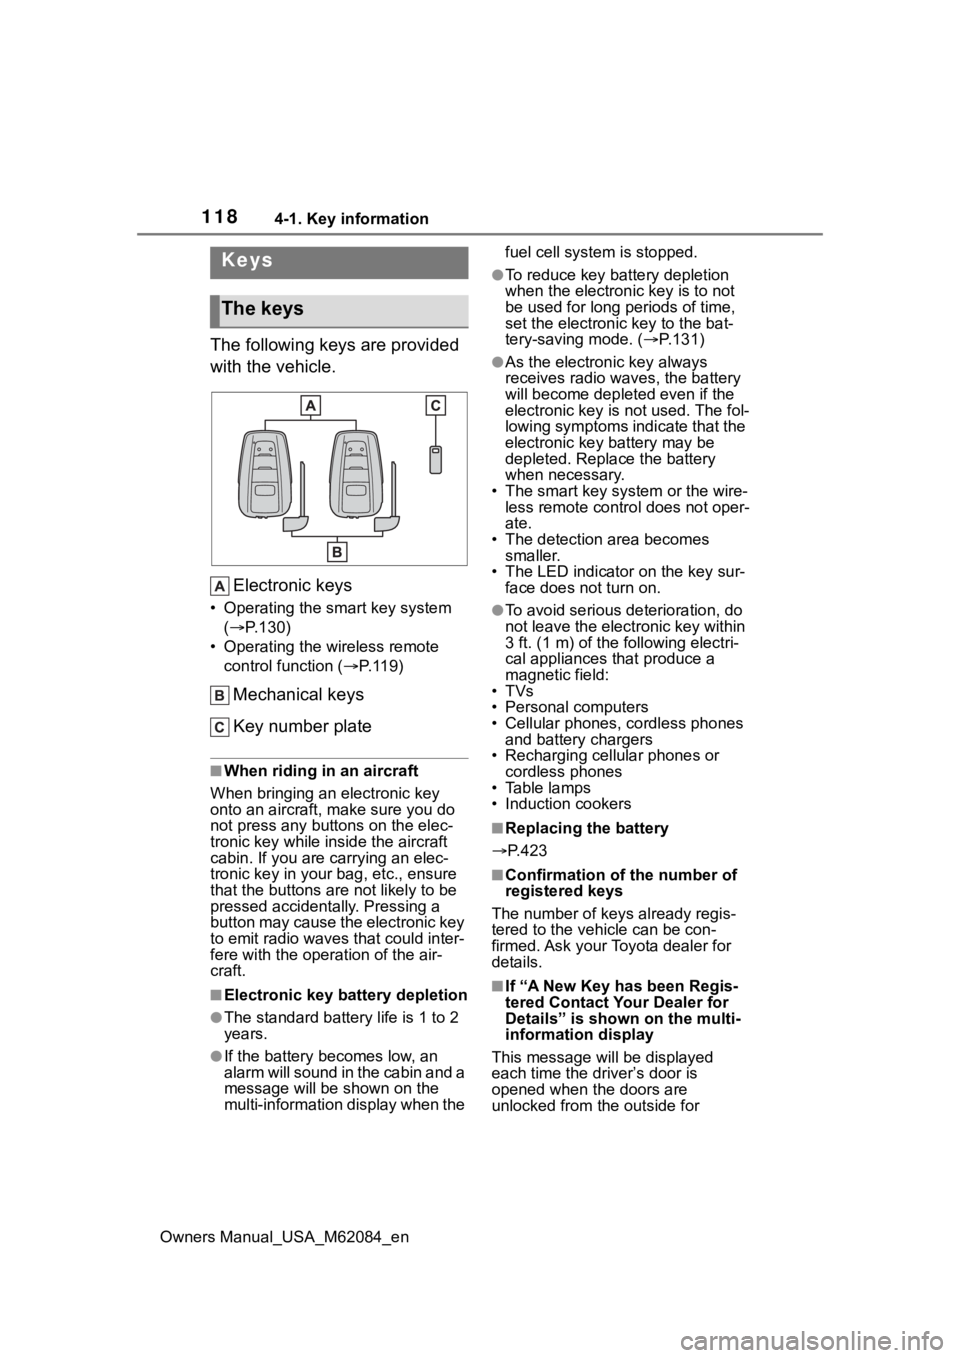
The following keys are provided
with the vehicle.Electronic keys
• Operating the smart key system ( P.130)
• Operating the wireless remote control function ( P. 1 1 9 )
Mechanical keys
Key number plate
■When riding in an aircraft
When bringing an electronic key
onto an aircraft, make sure you do
not press any buttons on the elec-
tronic key while inside the aircraft
cabin. If you are carrying an elec-
tronic key in your bag, etc., ensure
that the buttons are not likely to be
pressed accidentally. Pressing a
button may cause the electronic key
to emit radio waves that could inter-
fere with the oper ation of the air-
craft.
■Electronic key battery depletion
●The standard battery life is 1 to 2
years.
●If the battery becomes low, an
alarm will sound in the cabin and a
message will be s hown on the
multi-information display when the fuel cell system is stopped.
●To reduce key battery depletion
when the electronic key is to not
be used for long periods of time,
set the electronic key to the bat-
tery-saving mode. (
P.131)
●As the electronic key always
receives radio waves, the battery
will become depleted even if the
electronic key is not used. The fol-
lowing symptoms indicate that the
electronic key battery may be
depleted. Replace the battery
when necessary.
• The smart key system or the wire- less remote contro l does not oper-
ate.
• The detection area becomes smaller.
• The LED indicator on the key sur- face does not turn on.
●To avoid serious deterioration, do
not leave the electronic key within
3 ft. (1 m) of the following electri-
cal appliances that produce a
magnetic field:
•TVs
• Personal computers
• Cellular phones, cordless phones and battery chargers
• Recharging cellular phones or cordless phones
• Table lamps
• Induction cookers
■Replacing the battery
P.423
■Confirmation of the number of
registered keys
The number of keys already regis-
tered to the vehi cle can be con-
firmed. Ask your Toyota dealer for
details.
■If “A New Key has been Regis-
tered Contact Your Dealer for
Details” is shown on the multi-
information display
This message will be displayed
each time the driver’s door is
opened when the doors are
unlocked from the outside for
Keys
The keys
Page 121 of 556
1214-2. Opening, closing and locking the doors and trunk
Owners Manual_USA_M62084_en
4
Before driving
4-2.Opening, closing and locking the doors and trunk
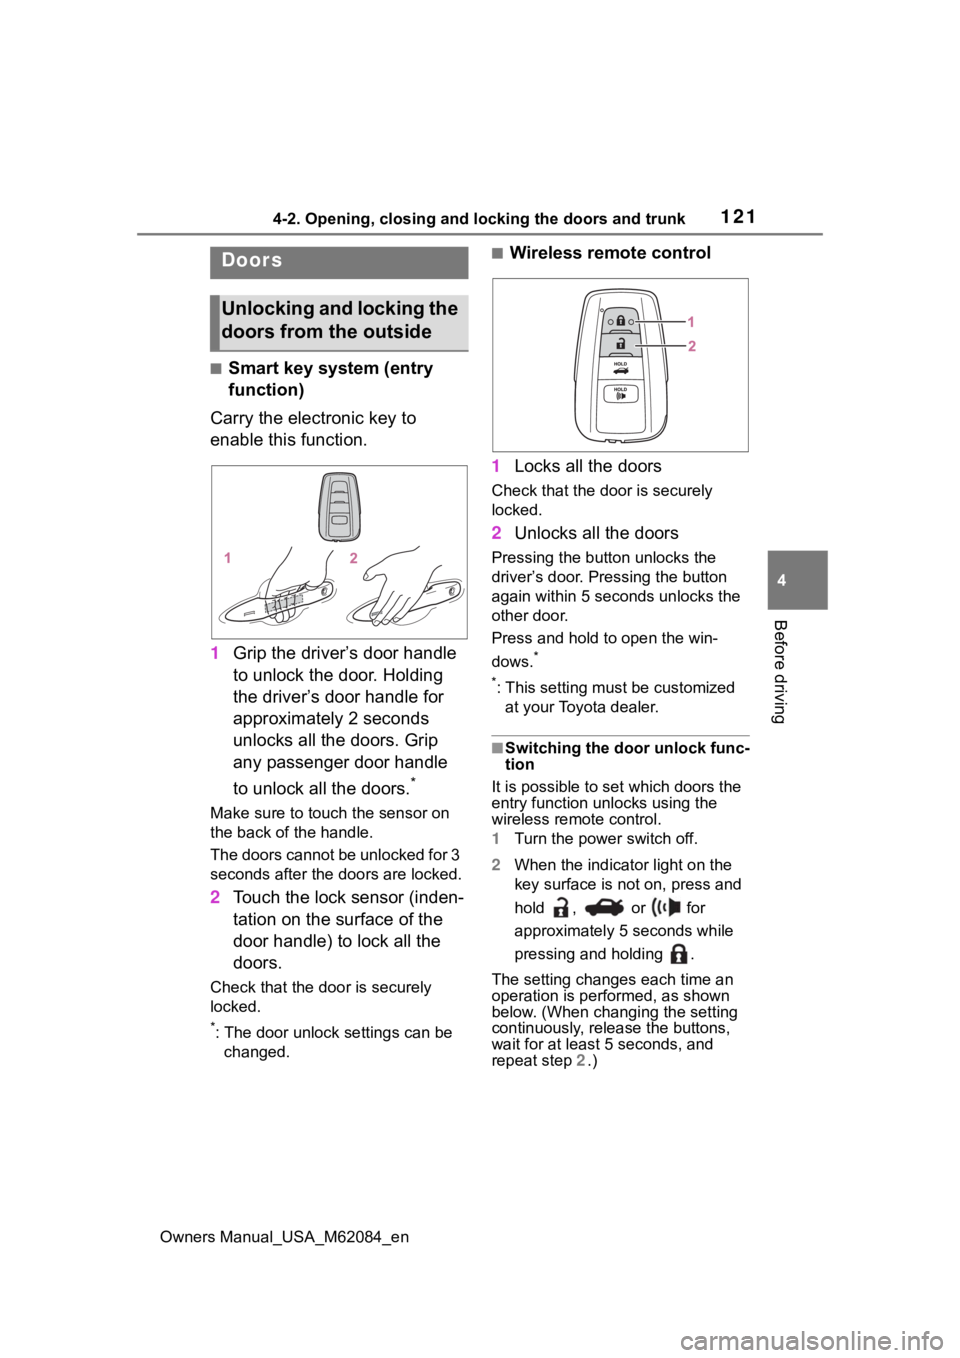
■Smart key system (entry
function)
Carry the electronic key to
enable this function.
1 Grip the driver’s door handle
to unlock the door. Holding
the driver’s door handle for
approximately 2 seconds
unlocks all the doors. Grip
any passenger door handle
to unlock all the doors.
*
Make sure to touch the sensor on
the back of the handle.
The doors cannot be unlocked for 3
seconds after the doors are locked.
2Touch the lock sensor (inden-
tation on the surface of the
door handle) to lock all the
doors.
Check that the door is securely
locked.
*: The door unlock settings can be
changed.
■Wireless remote control
1 Locks all the doors
Check that the d oor is securely
locked.
2 Unlocks all the doors
Pressing the button unlocks the
driver’s door. Pressing the button
again within 5 seconds unlocks the
other door.
Press and hold to open the win-
dows.
*
*
: This setting must be customized at your Toyota dealer.
■Switching the door unlock func-
tion
It is possible to set which doors the
entry function unlocks using the
wireless remote control.
1 Turn the power switch off.
2 When the indicator light on the
key surface is not on, press and
hold , or for
approximately 5 seconds while
pressing and holding .
The setting changes each time an
operation is per formed, as shown
below. (When changing the setting
continuously, release the buttons,
wait for at least 5 seconds, and
repeat step 2 .)
Doors
Unlocking and locking the
doors from the outside
Page 124 of 556
1244-2. Opening, closing and locking the doors and trunk
Owners Manual_USA_M62084_en
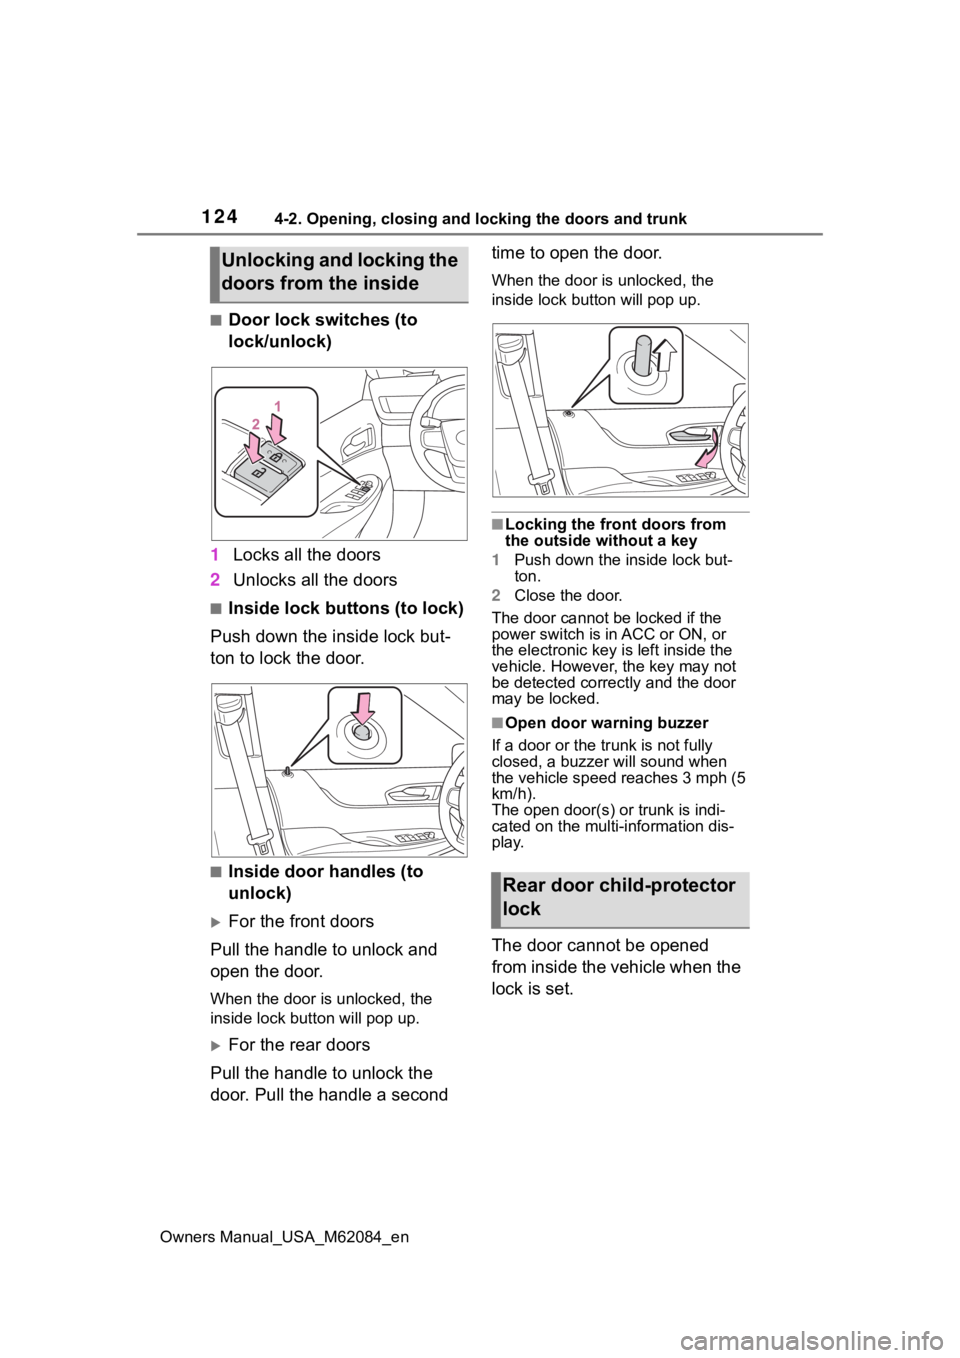
■Door lock switches (to
lock/unlock)
1 Locks all the doors
2 Unlocks all the doors
■Inside lock buttons (to lock)
Push down the inside lock but-
ton to lock the door.
■Inside door handles (to
unlock)
For the front doors
Pull the handle to unlock and
open the door.
When the door is unlocked, the
inside lock button will pop up.
For the rear doors
Pull the handle to unlock the
door. Pull the handle a second time to open the door.
When the door is unlocked, the
inside lock butt
on will pop up.
■Locking the front doors from
the outside without a key
1 Push down the inside lock but-
ton.
2 Close the door.
The door cannot be locked if the
power switch is in ACC or ON, or
the electronic key is left inside the
vehicle. However, the key may not
be detected correctly and the door
may be locked.
■Open door warning buzzer
If a door or the tr unk is not fully
closed, a buzzer will sound when
the vehicle speed reaches 3 mph (5
km/h).
The open door(s) or trunk is indi-
cated on the multi-information dis-
play.
The door cannot be opened
from inside the vehicle when the
lock is set.
Unlocking and locking the
doors from the inside
Rear door child-protector
lock
Page 131 of 556
1314-2. Opening, closing and locking the doors and trunk
Owners Manual_USA_M62084_en
4
Before driving
once for 5 seconds
●When an interior alarm sounds
continuously
■If “Smart Key System Malfunc-
tion See Owner’s Manual” is
displayed on the multi-informa-
tion display
The system may be malfunctioning.
Have the vehicle inspected by Toy-
ota dealer immediately.
■If “Key Detected in Vehicle” is
shown on the multi-information
display
An attempt was m ade to lock the
doors using the smart key system
while the electronic key was still inside the vehicle. Retrieve the elec-
tronic key from the vehicle and lock
the doors again.
■Battery-saving function
The battery-saving function will be
activated in ord er to prevent the
electronic key battery and the 12-
volt battery from being discharged
while the vehicle is not in operation
for a long time.
●In the following situations, the
smart key system may take some
time to unlock the doors.
• The electronic key has been left in
an area of approxi mately 6 ft. (2
m) of the outside of the vehicle for
10 minutes or longer.
• The smart key system has not been used for 5 days or longer.
●If the smart key system has not
been used for 14 days or longer,
the doors cannot be unlocked at
any doors except the driver’s door.
In this case, take hold of the
driver’s door handle, or use the
wireless remote c ontrol or the
mechanical key, to unlock the
doors.
■Turning an electronic key to
battery-saving mode
●When battery-saving mode is set,
battery depletion is minimized by
stopping the electronic key from
receiving radio waves.
Press twice while pressing and
holding . Confirm that the elec-
tronic key indicator flashes 4 times.
While the battery-saving mode is
set, the smart key system cannot be
used. To cancel the function, press
any of the electronic key buttons.
SituationCorrection procedure
An attempt was
made to lock the
vehicle while a door was open.Close all of the doors
and lock the
doors again.
The trunk was closed while the electronic key was still inside
the trunk and all the doors were locked.Retrieve the electronic
key from the trunk and close the trunk lid.
SituationCorrection procedure
The power switch
was turned to ACC while the driver’s
door was open (The driver’s door was
opened when the
power switch was in ACC).
Turn the power
switch off
and close
the driver’s door.
The power switch
was turned off while
the driver’s door was open.Close the driver’s door.
Page 137 of 556
1374-3. Adjusting the seats
Owners Manual_USA_M62084_en
4
Before driving
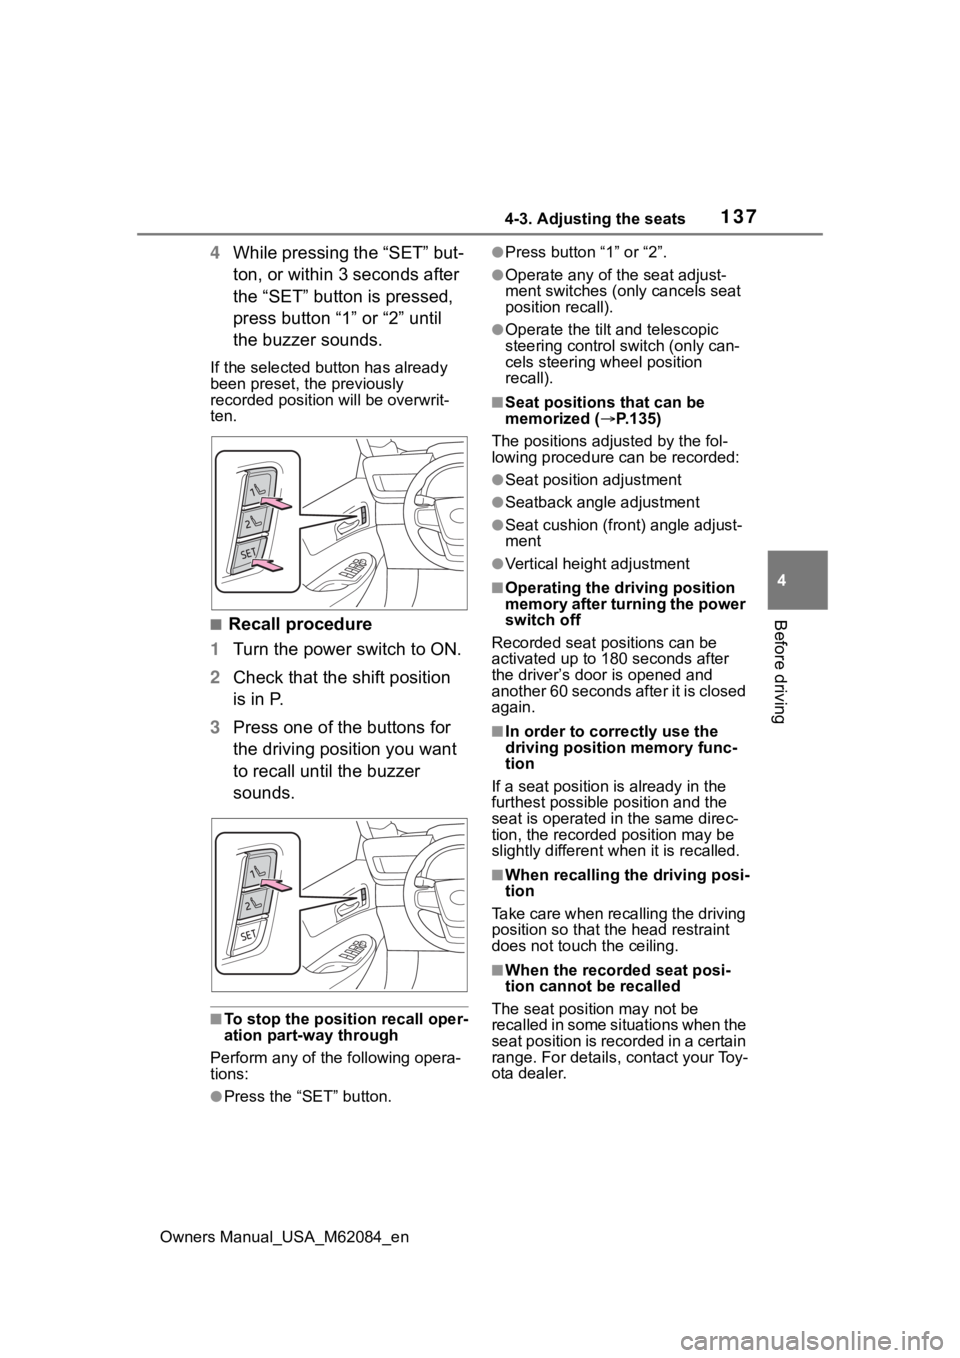
4 While pressing the “SET” but-
ton, or within 3 seconds after
the “SET” button is pressed,
press button “1” or “2” until
the buzzer sounds.
If the selected button has already
been preset, the previously
recorded position will be overwrit-
ten.
■Recall procedure
1 Turn the power switch to ON.
2 Check that the shift position
is in P.
3 Press one of the buttons for
the driving position you want
to recall until the buzzer
sounds.
■To stop the position recall oper-
ation part-way through
Perform any of the following opera-
tions:
●Press the “SET” button.
●Press button “1” or “2”.
●Operate any of t he seat adjust-
ment switches (only cancels seat
position recall).
●Operate the tilt and telescopic
steering control switch (only can-
cels steering wheel position
recall).
■Seat positions that can be
memorized ( P.135)
The positions adjusted by the fol-
lowing procedure can be recorded:
●Seat position adjustment
●Seatback angle adjustment
●Seat cushion (front) angle adjust-
ment
●Vertical height adjustment
■Operating the driving position
memory after turning the power
switch off
Recorded seat positions can be
activated up to 180 seconds after
the driver’s door is opened and
another 60 seconds after it is closed
again.
■In order to corre ctly use the
driving position memory func-
tion
If a seat position is already in the
furthest possible position and the
seat is operated in the same direc-
tion, the recorded position may be
slightly different w hen it is recalled.
■When recalling the driving posi-
tion
Take care when recalling the driving
position so that the head restraint
does not touch the ceiling.
■When the recorded seat posi-
tion cannot be recalled
The seat positi on may not be
recalled in some situations when the
seat position is recorded in a certain
range. For details, contact your Toy-
ota dealer.
Page 298 of 556
2985-5. Using the driving support systems
Owners Manual_USA_M62084_en
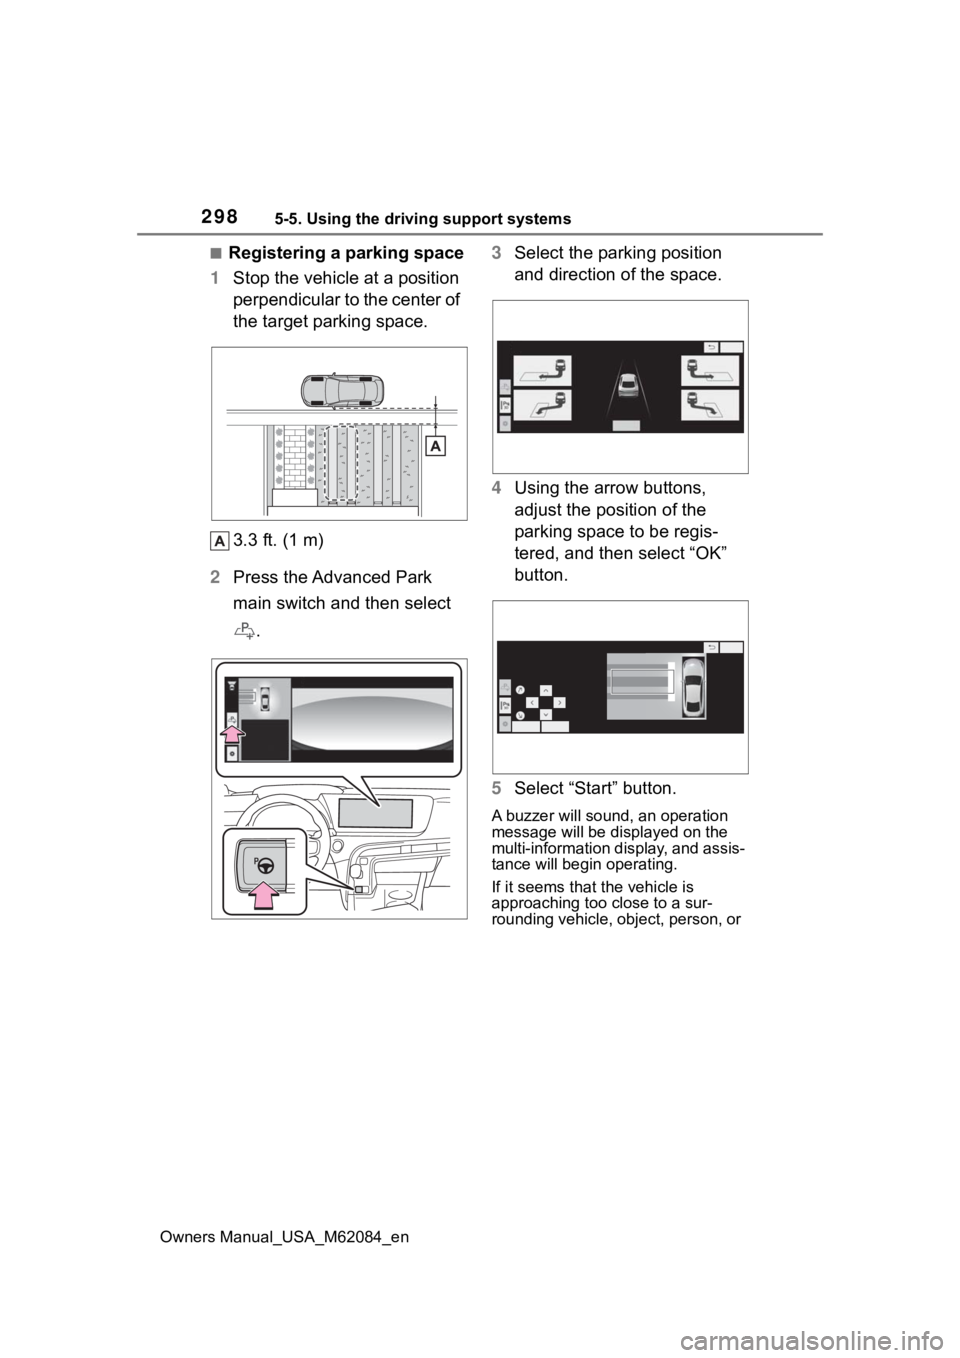
■Registering a parking space
1 Stop the vehicle at a position
perpendicular to the center of
the target parking space.
3.3 ft. (1 m)
2 Press the Advanced Park
main switch and then select
. 3
Select the parking position
and direction of the space.
4 Using the arrow buttons,
adjust the position of the
parking space to be regis-
tered, and then select “OK”
button.
5 Select “Start” button.
A buzzer will sound, an operation
message will be displayed on the
multi-information display, and assis-
tance will begin operating.
If it seems that the vehicle is
approaching too close to a sur-
rounding vehicle, object, person, or