start stop button TOYOTA MIRAI 2022 Owners Manual
[x] Cancel search | Manufacturer: TOYOTA, Model Year: 2022, Model line: MIRAI, Model: TOYOTA MIRAI 2022Pages: 556, PDF Size: 17.34 MB
Page 288 of 556
2885-5. Using the driving support systems
Owners Manual_USA_M62084_en or : Parking Space that
was selected.
: Select to chan ge to the par-
allel parking function
: Select to chan ge to the per-
pendicular parking function
Advice display
“Start” button
Select to start par king assistance.
“MODE” button
Select to change between the
memory function and the perpen-
dicular parking function/parallel
parking function. ( P.299)
Registration button
Select to begin registering a park-
ing space.
Customize setting button
Select to display the Advanced
Park setting screen.
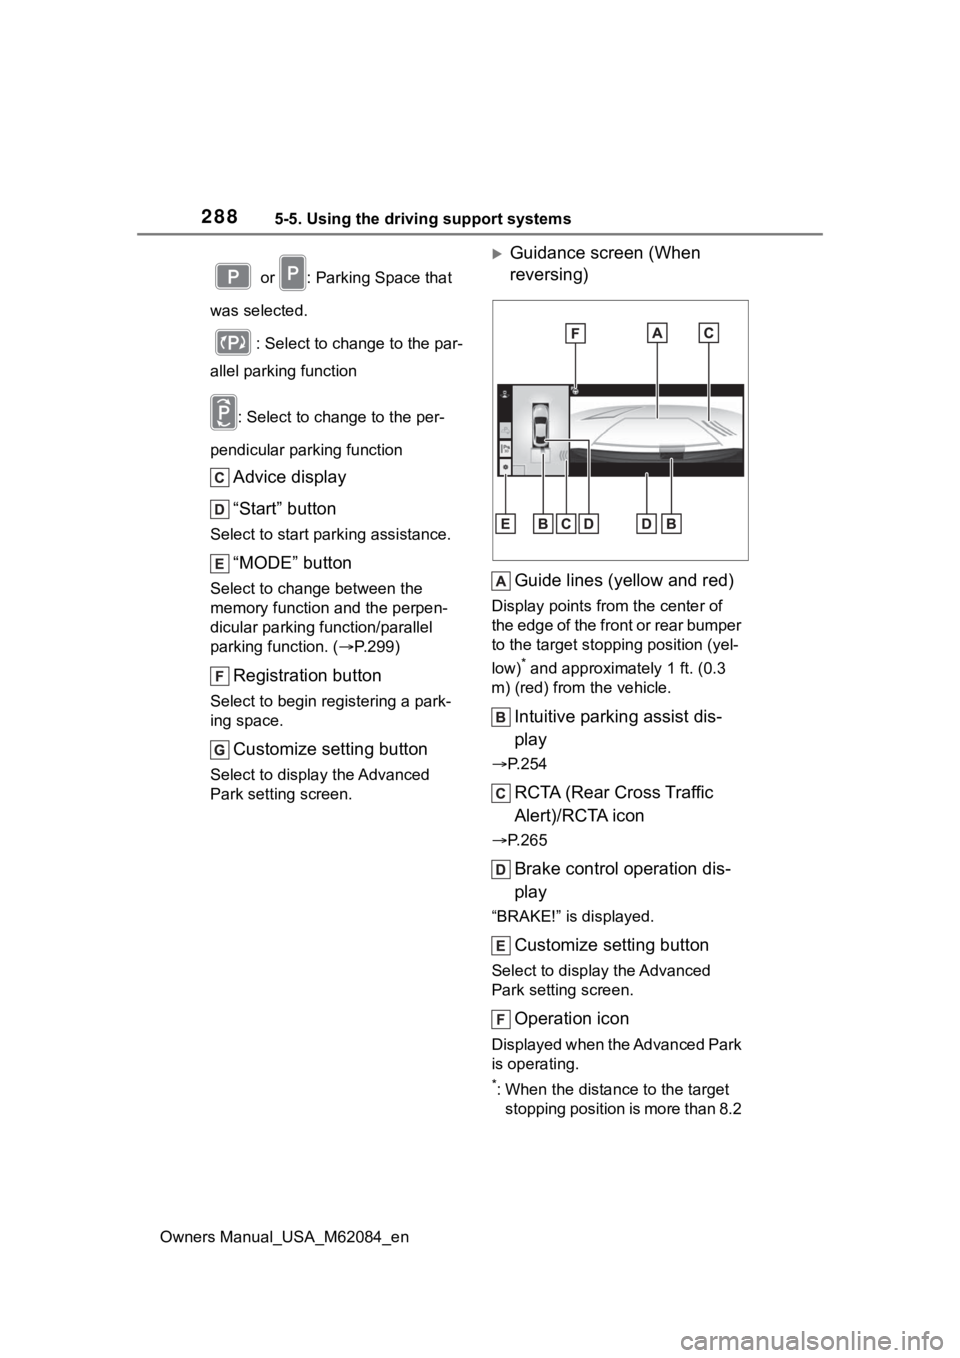
Guidance screen (When
reversing)
Guide lines (yellow and red)
Display points from the center of
the edge of the front or rear bumper
to the target stopp ing position (yel-
low)
* and approximately 1 ft. (0.3
m) (red) from the vehicle.
Intuitive parking assist dis-
play
P.254
RCTA (Rear Cross Traffic
Alert)/RCTA icon
P.265
Brake control operation dis-
play
“BRAKE!” is displayed.
Customize setting button
Select to display the Advanced
Park setting screen.
Operation icon
Displayed when the Advanced Park
is operating.
*: When the distance to the target
stopping position is more than 8.2
Page 290 of 556
2905-5. Using the driving support systems
Owners Manual_USA_M62084_en
Brake control operates
The PCS (Pre-Collision Sys-
tem) has operates
■Function description
The perpendicular parking func-
tion can be used if the target
parking space can be detected
when the vehicle is stopped
close and perpendicularly to the
center of the parking space.
Also, depending on the condi-
tion of the parking space, etc., if
it is necessary to change the
direction of travel of the vehicle,
the shift position can be
changed by assistance control.
■Parking using the perpen-
dicular parking function
1 Stop the vehicle at a position
close and perpendicular to
the center of the target park-
ing space.
3.3 ft. (1 m)
2 Press the Advanced Park
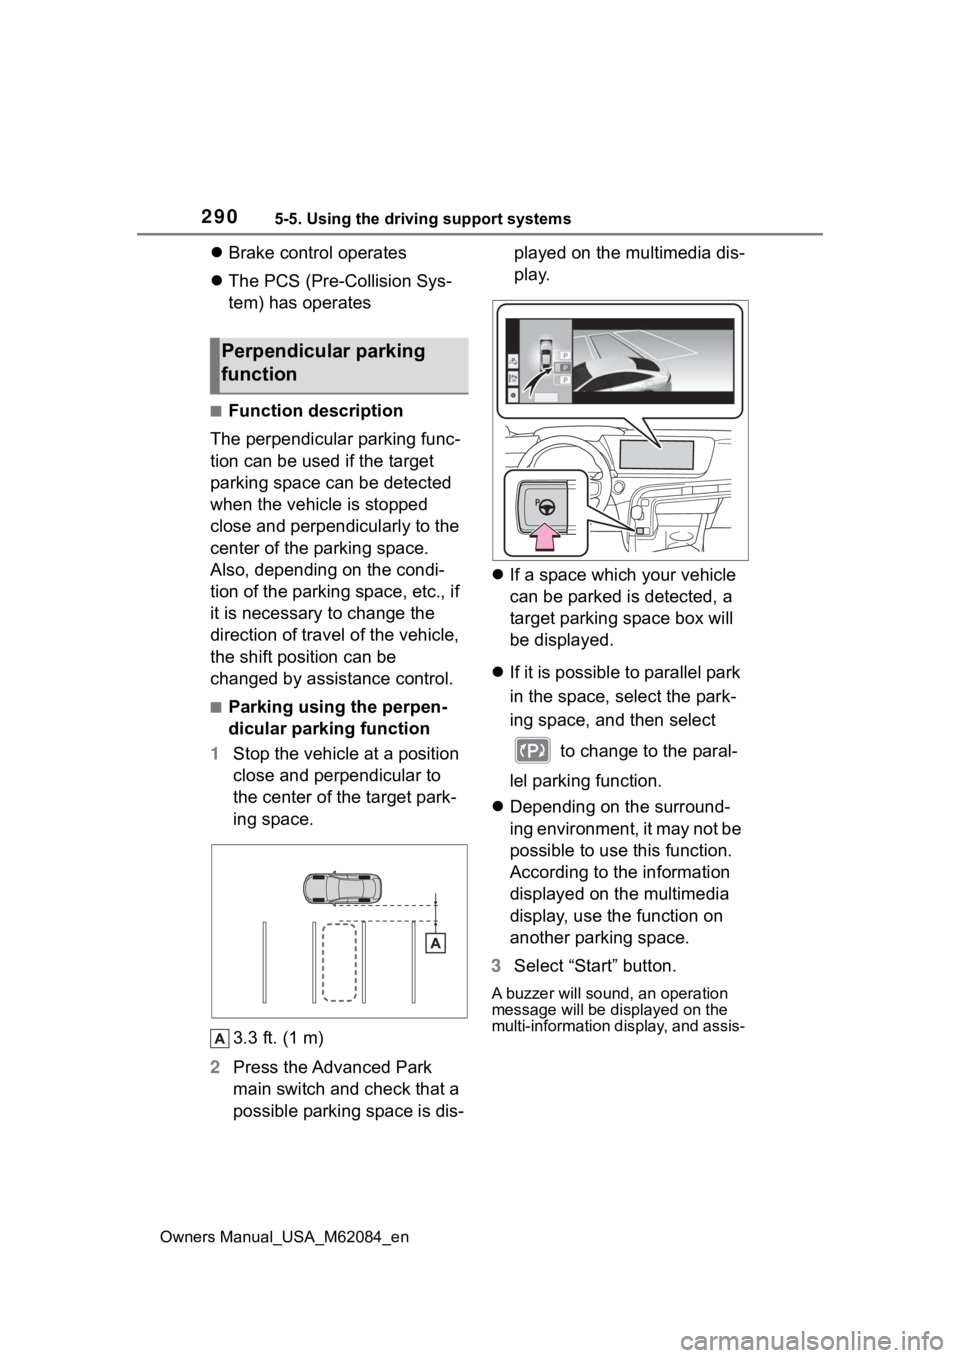
main switch and check that a
possible parking space is dis- played on the multimedia dis-
play.
If a space which your vehicle
can be parked is detected, a
target parking space box will
be displayed.
If it is possible to parallel park
in the space, select the park-
ing space, and then select
to change to the paral-
lel parking function.
Depending on the surround-
ing environment, it may not be
possible to use this function.
According to the information
displayed on the multimedia
display, use the function on
another parking space.
3 Select “Start” button.
A buzzer will sound, an operation
message will be displayed on the
multi-information display, and assis-
Perpendicular parking
function
Page 291 of 556
2915-5. Using the driving support systems
Owners Manual_USA_M62084_en
5
Driving
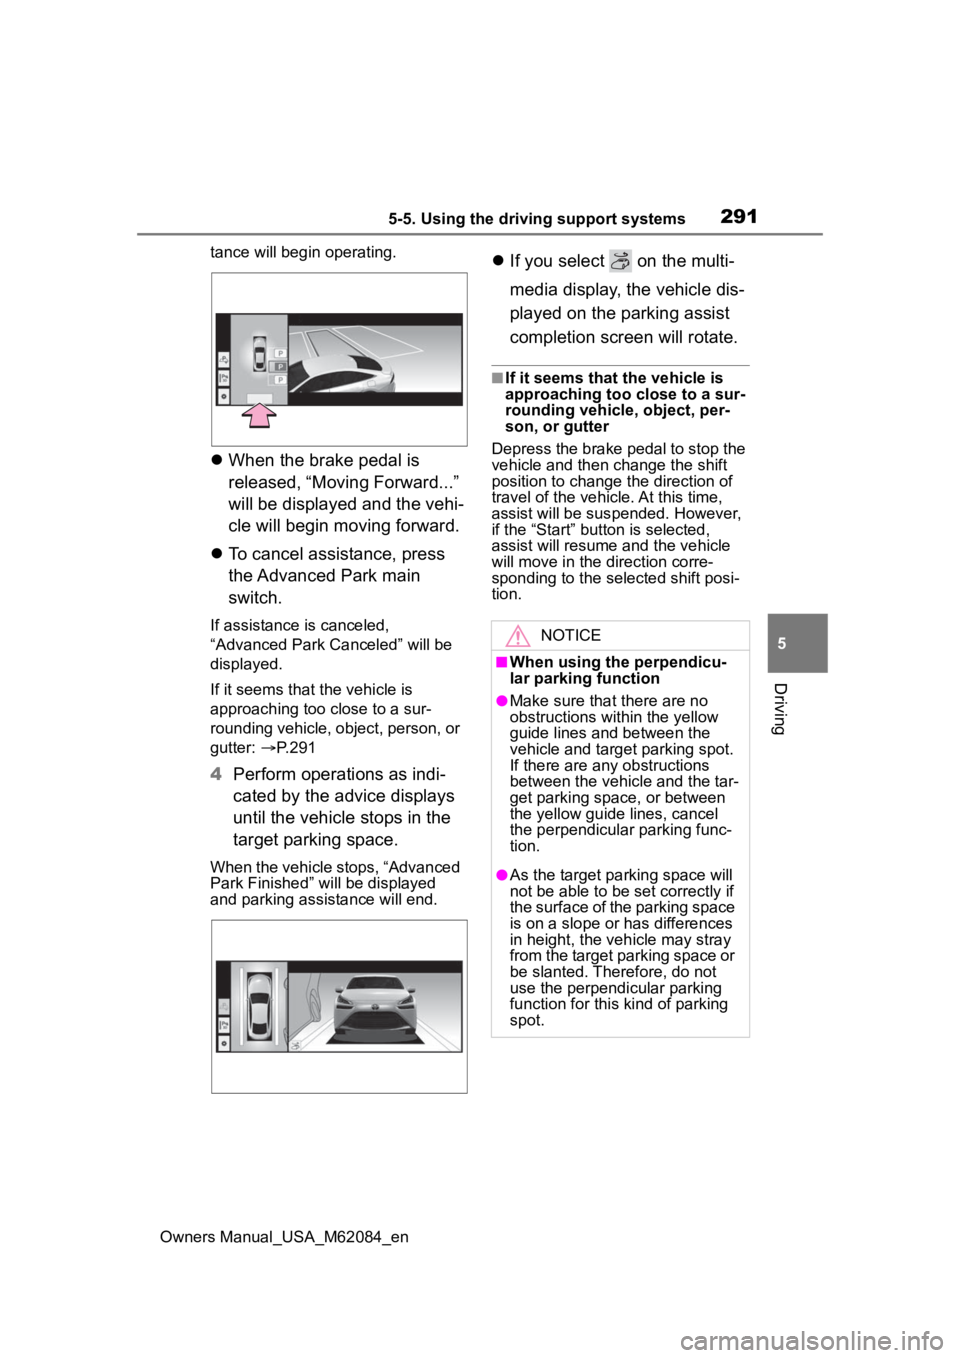
tance will begin operating.
When the brake pedal is
released, “Moving Forward...”
will be displayed and the vehi-
cle will begin moving forward.
To cancel assistance, press
the Advanced Park main
switch.
If assistance is canceled,
“Advanced Park Canceled” will be
displayed.
If it seems that the vehicle is
approaching too close to a sur-
rounding vehicle, object, person, or
gutter: P.291
4 Perform operations as indi-
cated by the advice displays
until the vehicle stops in the
target parking space.
When the vehicle stops, “Advanced
Park Finished” will be displayed
and parking assistance will end.
If you select on the multi-
media display, the vehicle dis-
played on the parking assist
completion screen will rotate.
■If it seems that the vehicle is
approaching too close to a sur-
rounding vehicle, object, per-
son, or gutter
Depress the brake pedal to stop the
vehicle and then change the shift
position to change the direction of
travel of the vehicle. At this time,
assist will be sus pended. However,
if the “Start” button is selected,
assist will resume and the vehicle
will move in the di rection corre-
sponding to the selected shift posi-
tion.
NOTICE
■When using the perpendicu-
lar parking function
●Make sure that there are no
obstructions within the yellow
guide lines and between the
vehicle and target parking spot.
If there are any obstructions
between the vehicle and the tar-
get parking space, or between
the yellow guide lines, cancel
the perpendicular parking func-
tion.
●As the tar get parking space will
not be able to be set correctly if
the surface of the parking space
is on a slope or has differences
in height, the veh icle may stray
from the target parking space or
be slanted. Therefore, do not
use the perpendicular parking
function for this kind of parking
spot.
Page 293 of 556
2935-5. Using the driving support systems
Owners Manual_USA_M62084_en
5
Driving
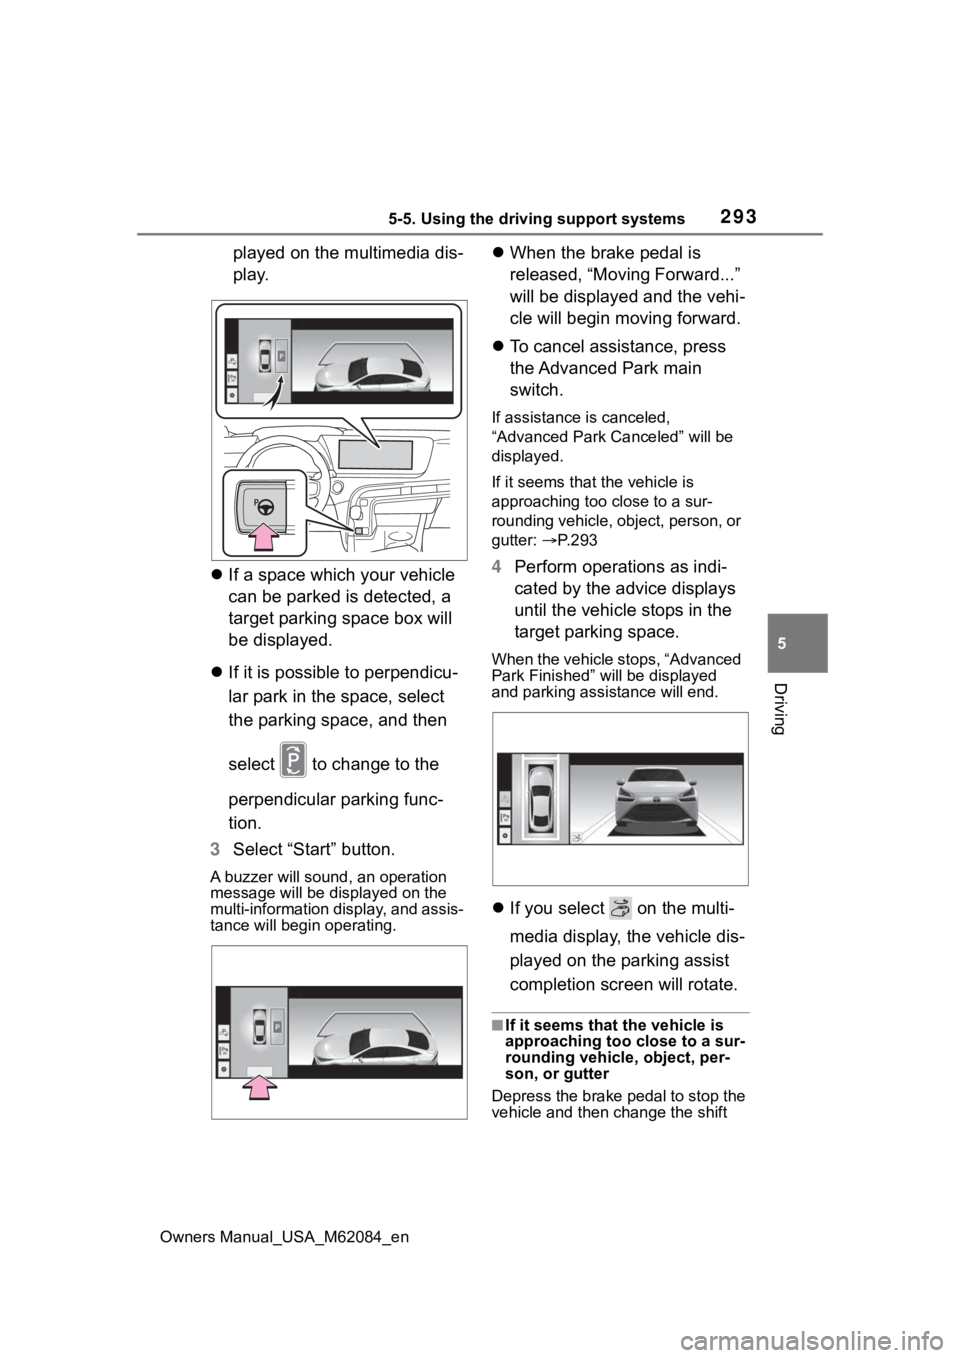
played on the multimedia dis-
play.
If a space which your vehicle
can be parked is detected, a
target parking space box will
be displayed.
If it is possible to perpendicu-
lar park in the space, select
the parking space, and then
select to change to the
perpendicular parking func-
tion.
3 Select “Start” button.
A buzzer will sound, an operation
message will be dis played on the
multi-information display, and assis-
tance will begin operating.
When the brake pedal is
released, “Moving Forward...”
will be displayed and the vehi-
cle will begin moving forward.
To cancel assistance, press
the Advanced Park main
switch.
If assistance is canceled,
“Advanced Park Canceled” will be
displayed.
If it seems that the vehicle is
approaching too close to a sur-
rounding vehicle, object, person, or
gutter: P. 2 9 3
4 Perform operations as indi-
cated by the advice displays
until the vehicle stops in the
target parking space.
When the vehicle stops, “Advanced
Park Finished” will be displayed
and parking assistance will end.
If you select on the multi-
media display, the vehicle dis-
played on the parking assist
completion screen will rotate.
■If it seems that the vehicle is
approaching too close to a sur-
rounding vehicle, object, per-
son, or gutter
Depress the brake pedal to stop the
vehicle and then change the shift
Page 295 of 556
2955-5. Using the driving support systems
Owners Manual_USA_M62084_en
5
Driving
■Function description
When departing from a parallel
parking spot, by selecting the
direction you wish to depart, the
parallel parking departure func-
tion will provide assistance,
through shift position changes,
steering wheel, brake pedal,
and accelerator pedal opera-
tions, to guide the vehicle to a
position which you can depart
from the parking space.
■Leaving a parking space
using the parallel parking
departure function
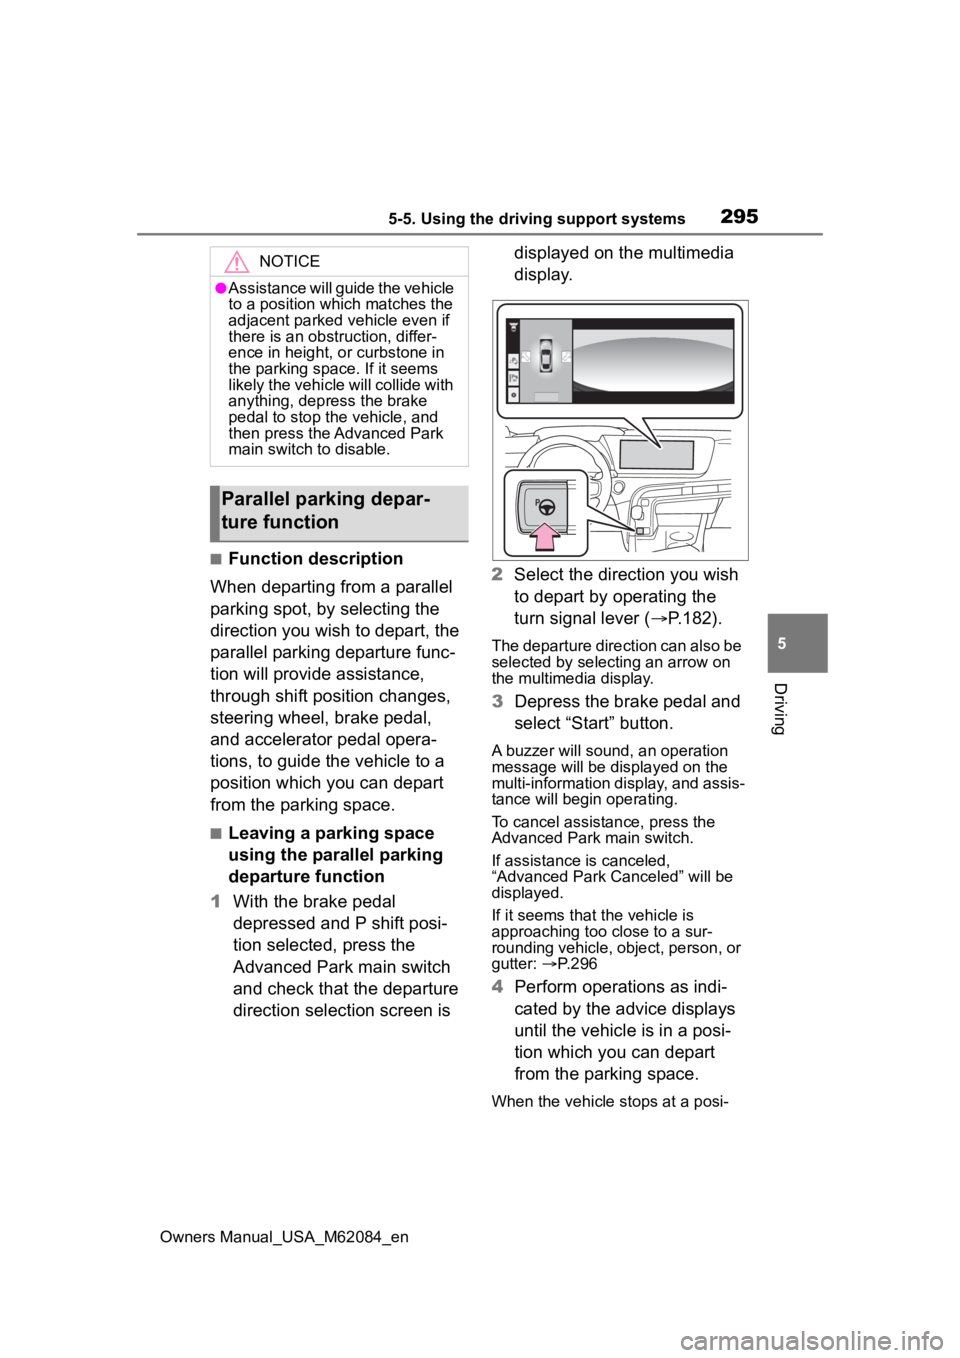
1 With the brake pedal
depressed and P shift posi-
tion selected, press the
Advanced Park main switch
and check that the departure
direction selection screen is displayed on the multimedia
display.
2 Select the direction you wish
to depart by operating the
turn signal lever ( P.182).
The departure direction can also be
selected by selecting an arrow on
the multimedia display.
3Depress the brake pedal and
select “Start” button.
A buzzer will sound, an operation
message will be displayed on the
multi-information display, and assis-
tance will begin operating.
To cancel assistance, press the
Advanced Park main switch.
If assistance is canceled,
“Advanced Park Canceled” will be
displayed.
If it seems that the vehicle is
approaching too close to a sur-
rounding vehicle, object, person, or
gutter: P. 2 9 6
4 Perform operations as indi-
cated by the advice displays
until the vehicle is in a posi-
tion which you can depart
from the parking space.
When the vehicle stops at a posi-
NOTICE
●Assistance will guide the vehicle
to a position which matches the
adjacent parked vehicle even if
there is an obstruction, differ-
ence in height, or curbstone in
the parking space. If it seems
likely the vehicle will collide with
anything, depress the brake
pedal to stop the vehicle, and
then press the Advanced Park
main switch to disable.
Parallel parking depar-
ture function
Page 298 of 556
2985-5. Using the driving support systems
Owners Manual_USA_M62084_en
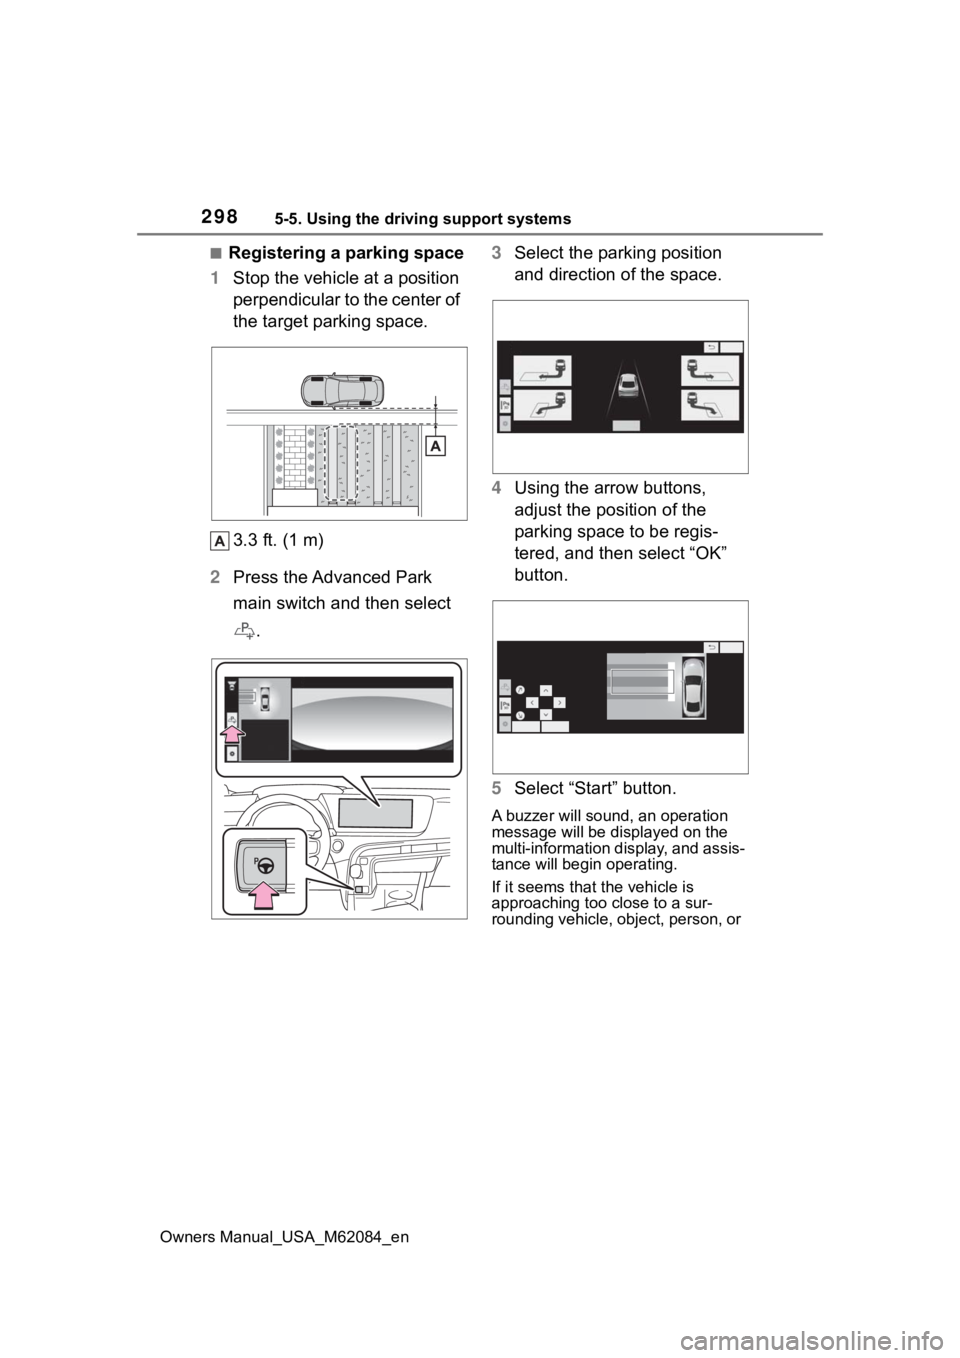
■Registering a parking space
1 Stop the vehicle at a position
perpendicular to the center of
the target parking space.
3.3 ft. (1 m)
2 Press the Advanced Park
main switch and then select
. 3
Select the parking position
and direction of the space.
4 Using the arrow buttons,
adjust the position of the
parking space to be regis-
tered, and then select “OK”
button.
5 Select “Start” button.
A buzzer will sound, an operation
message will be displayed on the
multi-information display, and assis-
tance will begin operating.
If it seems that the vehicle is
approaching too close to a sur-
rounding vehicle, object, person, or
Page 300 of 556
3005-5. Using the driving support systems
Owners Manual_USA_M62084_en
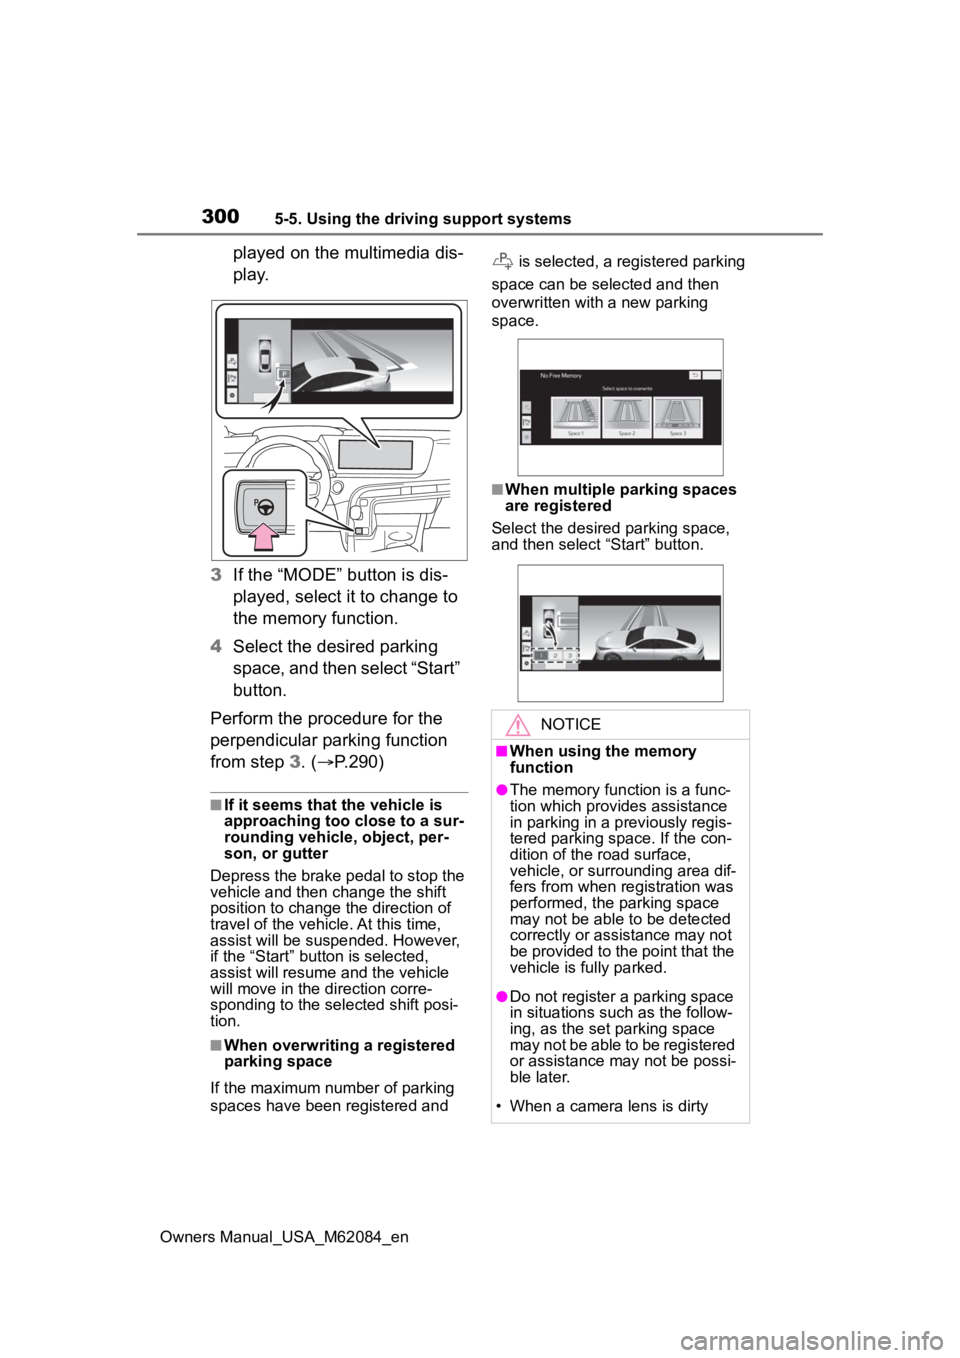
played on the multimedia dis-
p l a y.
3 If the “MODE” button is dis-
played, select it to change to
the memory function.
4 Select the desired parking
space, and then select “Start”
button.
Perform the procedure for the
perpendicular parking function
from step 3. (P.290)
■If it seems that the vehicle is
approaching too close to a sur-
rounding vehicle, object, per-
son, or gutter
Depress the brake pedal to stop the
vehicle and then ch ange the shift
position to change the direction of
travel of the vehicle. At this time,
assist will be suspended. However,
if the “Start” butt on is selected,
assist will resume and the vehicle
will move in the direction corre-
sponding to the selected shift posi-
tion.
■When overwriting a registered
parking space
If the maximum number of parking
spaces have been registered and is selected, a registered parking
space can be selected and then
overwritten with a new parking
space.
■When multiple parking spaces
are registered
Select the desired parking space,
and then select “Start” button.
NOTICE
■When using the memory
function
●The memory function is a func-
tion which provides assistance
in parking in a previously regis-
tered parking space. If the con-
dition of the road surface,
vehicle, or surrounding area dif-
fers from when registration was
performed, the parking space
may not be able to be detected
correctly or assistance may not
be provided to the point that the
vehicle is fully parked.
●Do not register a parking space
in situations such as the follow-
ing, as the set parking space
may not be able to be registered
or assistance may not be possi-
ble later.
• When a camera lens is dirty
Page 307 of 556
3075-5. Using the driving support systems
Owners Manual_USA_M62084_en
5
Driving
■When operation has been
suspended
“Side mirrors are
retracted”
The outside rear
view mirrors
were folded
while assistance
was being per-
formed
Extend the
outside rear view
mirrors and then
select “Start” but-
ton to start assis-
tance again.
“Press brake
pedal firmly”
The assist can-
not be canceled
i f t h e b r a k e i s n o t
firmly depressed.
Continue step-
ping on the
brake more than
the usual time.
MessageCondition/Cor- rective Action
MessageCondition/Cor- rective Action
“Steering wheel
was operated
manually”
Force was
applied to the
steering wheel
while assistance
was being per-
formed
Stop the vehi-
cle and select
“Start” button
while resting
your hands on
the steering
wheel without
applying any
force to start
assistance
again.
“Accelerator
pedal was
pressed”
The accelerator
pedal was
depressed while
assistance was
being performed
Release the
accelerator
pedal and then
select “Start” but-
ton to start assis-
tance again.
“Shift position
was changed
manually”
A shift position
was selected
when assistance
was being per-
formed
Select “Start”
button to start
assistance
again.
Page 376 of 556
3766-4. Using the other interior features
Owners Manual_USA_M62084_en
compatibility, refer to
www.homelink.com.)
1Within 5 seconds after pro-
gramming the garage door
opener has been completed,
if the garage door opener
motor is trained to Home-
Link
®, both garage door
operation indicators will flash
rapidly (green) and the light
on the garage door opener
motor will blink twice, indicat-
ing that 2-way communica-
tion is enabled.
If the indicators do not flash, per-
form 2 and 3 within the first 10
presses of the HomeLink
® button
after programming has been com-
pleted.
2 Press a programmed Home-
Link
® button to operate a
garage door.
3 Within 1 minute of pressing
the HomeLink
® button, after
the garage door operation
has stopped, press the
“Learn” or “Smart” button on
the garage door opener
motor. Within 5 seconds of
the establishment of 2-way
communication with the
garage door opener, both
garage door operation indica-
tors in the vehicle will flash
rapidly (green) and the light
on the garage door opener
motor will blink twice, indicat-
ing that 2-way communica-
tion is enabled.
■Reprogramming a single
HomeLink
® button
When the following procedure is
performed, buttons which
already have devices registered
to them can be overwritten:
1 Press and hold the desired
HomeLink
® button.
2 When the HomeLink
® indica-
tor starts flashing orange,
release the HomeLink
® but-
ton and perform “Program-
ming HomeLink
®” 1 (it takes
20 seconds for the Home-
Link
® indicator to start flash-
ing).
■Before programming
●Install a new battery in the trans-
mitter.
●The battery side of the transmitter
must be pointed away from the
HomeLink
® buttons.
Press the appropriate Home-
Link
® button. The HomeLink®
indicator light should turn on.
The status of the opening and
closing of a garage door is
shown by the indicators.
Operating HomeLink®
Page 537 of 556

Owners Manual_USA_M62084_en
Alphabetical Index537
Toyota Teammate Advanced Park .................................... 254
Service plug .............................. 79
Shift lever Shift position......................... 177
Shift lever light ....................... 346
Shift position .......................... 177 Driving mode select switch... 313
Side airbags .............................. 34
Side marker lights Light switch .......................... 191
Replacing light bulbs ............ 429
Side mirrors Adjustment ........................... 154
BSM (Blind Spot Monitor)..... 249
Folding ................................. 155
Heaters......................... 327, 334
Mirror position memory ........ 136
RCTA (Rear Cross Traffic Alert)........................................... 263
Side turn signal lights ............ 182 Replacing light bulbs ............ 429
Turn signal lever ................... 182
Side windows ...... ................... 156
Smart key system ................... 130 Antenna location .................. 130
Entry functions ..................... 121
Starting the fuel cell system . 172
Snow mode ............................. 314
Snow tires ............................... 320
Specifications ......................... 482
Speedometer ............................ 97
Steering lock Column lock release............. 173
Steering lock system warning message............................. 173
Steering wheel Adjustment ........................... 141
Heated steering wheel ......... 342
Meter control switches ......... 100
Power easy access system .. 136
Steering wheel position memory ...........................................136
Stop lights Replacing light bulbs ............429
Storage features ... ..................349
Stuck If the vehicle becomes stuck 480
Suggestion functi on ...............106
Sun visors ...............................368
Sunshade ................................355
Switch Rear automatic air conditioning system ........................339, 341
Switches Activating the Automatic High Beam ..................................193
Advanced Park main switch .285
ASC switch ...........................188
Automatic High Beam system ...........................................193
Brake Hold switch .................186
Display change button ............98
Door lock switches ...............124
Driving mode select switch ...313
Driving position memory switches..............................136
Dynamic radar cruise control with full-speed range switch237
Electronic sunshade switch ..355
Emergency flashers switch...432
Garage door opener switches ...........................................371
H
2O switch ...........................189
Heated steering wheel switch ...........................................342
HUD (Head-up display) switch ...........................................109
Light switches .......................191
LTA (Lane Tracing Assist) switch ...........................................229
Meter control switches..........100
Outside rear v iew mirror
switches..............................154