wheel TOYOTA PASEO 1996 User Guide
[x] Cancel search | Manufacturer: TOYOTA, Model Year: 1996, Model line: PASEO, Model: TOYOTA PASEO 1996Pages: 165, PDF Size: 2.57 MB
Page 95 of 165
92
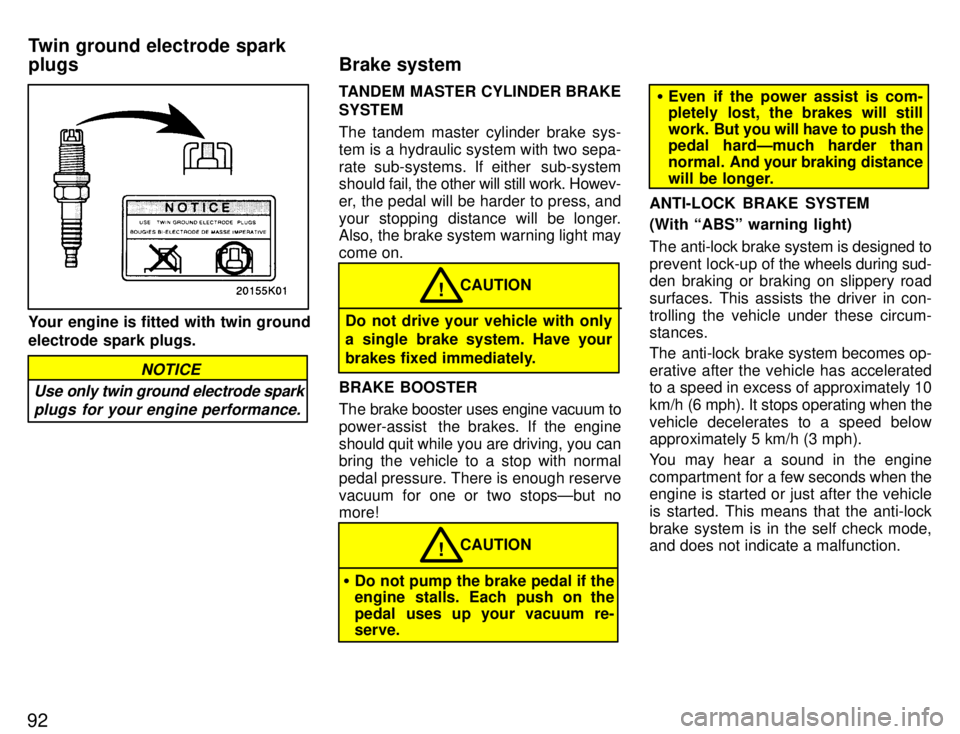
Your engine is fitted with twin ground electrode spark plugs.
Use only twin ground electrode sparkplugs for your engine performance.
NOTICE
TANDEM MASTER CYLINDER BRAKE SYSTEM
The tandem master cylinder brake sys-
tem is a hydraulic system with two sepa-
rate sub-systems. If either sub-system
should fa il, the other will still work. Howev-
er, the pedal will be harder to press, and
your stopping distance will be longer.
Also, the brake system warning light may come on.
CAUTION!
Do not drive your vehicle with only
a single brake system. Have your
brakes fixed immediately.
BRAKE BOOSTER
The brake booster uses engine vacuum to
power-assist the brakes. If the engine
should quit while you are driving, you can
bring the vehicle to a stop with normal
pedal pressure. There is enough reservevacuum for one or two stopsÐbut no more!
CAUTION!
� Do not pump the brake pedal if the
engine stalls. Each push on the
pedal uses up your vacuum re- serve.
�Even if the power assist is com-
pletely lost, the brakes will still
work. But you will have to push the
pedal hardÐmuch harder than
normal. And your braking distance
will be longer.
ANTI-LOCK BRAKE SYSTEM (With ABSº warning light)
The anti-lock brake system is designed to prevent lock-up of the wheels during sud-
den braking or braking on slippery roadsurfaces. This assists the driver in con-
trolling the vehicle under these circum- stances.
The anti-lock brake system becomes op- erative after the vehicle has accelerated
to a speed in excess of approximately 10
km/h (6 mph). It stops operating when the
vehicle decelerates to a speed below
approximately 5 km/h (3 mph).
You may hear a sound in the engine
compartment for a few seconds when the
engine is started or just after the vehicleis started. This means that the anti-lock
brake system is in the self check mode,
and does not indicate a malfunction.
Brake system
Twin ground electrode spark plugs
Page 101 of 165

98
Before starting the engine, be sure to fol-
low the instructions in (a) Before crank- ingº.
Normal starting procedure
The multiport fuel injection system/se-
quential multiport fuel injection system in
your engine automatically controls the
proper air-fuel mixture for starting. You can start a cold or hot engine as follows:
1. With your foot off the accelerator ped- al, crank the engine by turning the key to
STARTº. Release it when the enginestarts.
2. After
the engine runs for about 10 sec-
onds, you are ready to drive.
If the weather is below freezing, let the en-
gine warm up for a few minutes before driving.
If the engine stalls...
Simply restart it, using the correct proce- dure given in normal starting. If the engine will not startÐ
See If your vehicle will not startº in Part 4. �
Do not crank for more than 15 sec-
onds at a time. This may overheat
the starter and wiring systems.
�Do not race a cold engine.
�If the engine becomes difficult tostart or stalls frequently, have theengine checked immediately.
NOTICE� Always slow down in gusty cross- winds. This will allow you much better control.
� Drive slowly onto curbs and, if pos-
sible, at a right angle. Avoid drivingonto high, sharp-edged objects and
other road hazards. Failure to do so
can lead to severe tire damage result-
ing in tire bursts.
� When parking on a hill, turn the front
wheels until they touch the curb so that
the vehicle will not roll. Apply the park-
ing brake, and place the transmission in Pº (automatic) or in first or reverse
(manual). If necessary, block thewheels.
� Washing your vehicle or driving
through deep water may get the
brakes wet. To see whether they are
wet, check that there is no traffic near
you, and then press the pedal lightly. If
you do not feel a normal braking force,
the brakes are probably wet. To dry
them, drive the vehicle cautiously
while lightly pressing the brake pedal
with the parking brake pulled. If they
still do not work safely, pull to the side
of the road and call a T oyota dealer for
assistance.
(b) Starting the engine
Tips for driving in various conditions
Page 103 of 165

100
Use a washer fluid containing an anti-
freeze solution.
This product is available at your Toyota
dealer and most auto parts stores. Follow
the manufacturer's directions for how
much to mix with water.
Do not use engine antifreeze or any
other substitute because it may
damage your vehicle's paint.
NOTICE
Do not use your parking brake when there is a possibility it could freeze. When parking, put the transmission into
Pº (automatic) or into first or reverse
(manual) and block the rear wheels. Do
not use the parking brake, or snow or wa-
ter accumulated in and around the parkingbrake mechanism may freeze, making it
hard to release. Keep ice and snow from accumulating
under the fenders.
Ice and snow built up under your fenders
can make steering difficult. During bad winter driving, stop and check under the
fenders occasionally. Depending on where you are driving,
we recommend you carry some emer- gency equipment.
Some of the things you might put in the ve-
hicle are tire chains, window scraper, bag of sand or salt, flares, small shovel, jump- er cables, etc.
Toyota does not recommend towing a
trailer with your Paseo. It is not designed for trailer towing.
Trailer towing
Page 104 of 165
101
Getting
more kilometers/mileage from a li-
ter/gallon of fuel is easyÐjust take it easy.
It will help make your vehicle last longer,
too. Here are some specific tips on how to
save money on both fuel and repairs: � Keep your tires inflated at the cor- rect pressure. Underinflation causes
tire wear and wastes fuel. See Chapter
7-2 for instructions.
� Do not carry unneeded weight in
your vehicle. Excess weight puts a
heavier load on the engine, causinggreater fuel consumption.
� Avoid lengthy warm-up idling.
Once the engine is running smoothly,
begin drivingÐbut gently. Remember,
however, that on cold winter days this
may take a little longer.
� Accelerate slowly and smoothly.
Avoid jackrabbit starts. Get into high
gear as quickly as possible.
� Avoid long engine idling. If you have
a long wait and you are not in traffic, it
is better to turn off the engine and start
again later.
� Avoid engine lug or overrevving.
Use a gear position suitable for the
road on which you are travelling. �
Avoid continuous speeding up and
slowing down. Stop-and-go driving
wastes fuel.
� Avoid unnecessary stopping and
braking. Maintain a steady pace. Try
to time the traffic signals so you only
need to stop as little as possible or take
advantage of through streets to avoid
traffic lights. Keep a proper distance
from other vehicles to avoid suddenbraking. This will also reduce wear onyour brakes.
� Avoid heavy traffic or traffic jams
whenever possible.
� Do not rest your foot on the clutch
or brake pedal. This causes needless
wear, overheating and poor fuel econ-
omy.
� Maintain a moderate speed on highways. The faster you drive, the
greater the fuel consumption. By re-
ducing your speed, you will cut down
on fuel consumption.
� Keep the front wheels in properalignment. Avoid hitting the curb and
slow down on rough roads. Improper
alignment not only causes faster tire
wear but also puts an extra load on the
engine, which, in turn, wastes fuel. �
Keep the bottom of your vehicle
free from mud, etc. This not only
lessens weight but also helps prevent corrosion.
� Keep your vehicle tuned-up and in
top shape. A dirty air cleaner, improp-
er valve clearance, dirty plugs, dirty oil
and grease, brakes not adjusted, etc.
all lower engine performance and con-
tribute to poor fuel economy. For lon-
ger life of all parts and lower operating
costs, keep all maintenance work on
schedule, and if you often drive under severe conditions, see that your ve-
hicle receives more frequent mainte-
nance (For schedule maintenance in-
formation, please refer to the separate
Owner 's Manual Supplement/Main-
tenance Scheduleº).
CAUTION
Never turn off the engine to coast
down hills. Your power steering and
brake booster will not function with-
out the engine running. Also, theemission control system operates
properly only when the engine isrunning.!
How to save fuel and make
your vehicle last longer, too
Page 110 of 165

107
6. After the engine coolant temperature
has cooled to normal, again check the
coolant
level in the reservoir. If necessary,
bring it up to half full again. Serious cool- ant loss indicates a leak in the system.
You should have it checked as soon as
possible at your Toyota dealer. 1. Reduce
your speed gradually, keeping
a straight line. Move cautiously off the
road to a safe place well away from the
traffic. Avoid stopping on the center divid-
er of a highway. Park on a level spot with firm ground.
2. Stop the engine and turn on your emer-
gency flashers.
3. Firmly set the parking brake and put the transmission in Pº (automatic) or re- verse (manual).
4. Have everyone get out of the vehicle
on the side away from traffic.
5. Read the following instructions thor-
oughly.
When jacking, be sure to observe
the following to reduce the possibil-
ity of personal injury: � Follow jacking instructions.
� Use a jack only for lifting your ve- hicle during wheel changing.
� Never get beneath the vehicle
when supported by a jack.
� Do not start or run the engine
while your vehicle is supported by a jack. CAUTION
!
NOTICE
Do not continue driving with a deflated tire. Driving even a short
distance can damage a tire beyondrepair.
If you have a flat tireÐ
Page 111 of 165
108
Compact spare tire
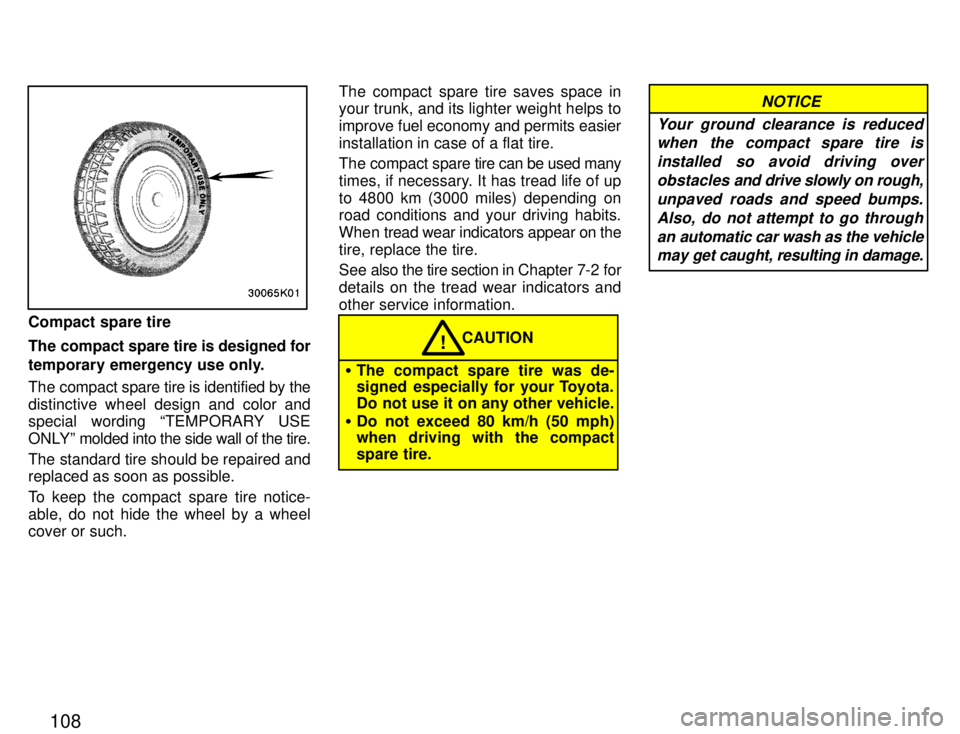
The compact spare tire is designed for
temporary emergency use only.
The compact spare tire is identified by the
distinctive wheel design and color and
special wording TEMPORARY USE
ONLYº molded into the side wall of the tire.
The standard tire should be repaired and replaced as soon as possible.
To keep the compact spare tire notice-
able, do not hide the wheel by a wheel cover or such.The compact spare tire saves space inyour trunk, and its lighter weight helps to improve fuel economy and permits easier
installation in case of a flat tire.
The compact spare
tire can be used many
times, if necessary. It has tread life of up
to 4800 km (3000 miles) depending on
road conditions and your driving habits.
When tread wear indicators appear on the
tire, replace the tire.
See also the tire section in Chapter 7-2 for
details on the tread wear indicators and other service information.
� The compact spare tire was de-
signed especially for your Toyota.
Do not use it on any other vehicle.
� Do not exceed 80 km/h (50 mph)
when driving with the compact spare tire. CAUTION
!
NOTICE
Your ground clearance is reduced when the compact spare tire is
installed so avoid driving overobstacles and drive slowly on rough,
unpaved roads and speed bumps. Also, do not attempt to go throughan automatic car wash as the vehiclemay get caught, resulting in damage.
Page 112 of 165

109
1. Get the required tools and spare tire.1. Wheel nut wrench
2. Jack handle
3. Jack
4. Spare tire
To prepare yourself for an emergency, you should familiarize yourself with the
use of the jack, each of the tools and their storage locations.Turn the jack joint by hand.
To remove: Turn the joint in direction 1 un- til the jack is free.
To store: Turn the joint in direction 2 until the jack is firmly secured to prevent it fly-
ing forward during a collision or suddenbraking.To remove the spare tire:
1. Remove the spare tire cover.
2. Loosen the bolt and remove it.Then t ake the spare tire out of the vehicle.
When storing the spare tire, put it in place with the outer side of the wheel facing up.Then secure the tire by repeating the
above removal steps in reverse order to
prevent it from flying forward during a col-
lision or sudden braking.
ÐRequired tools and spare tire
Page 113 of 165
11 0
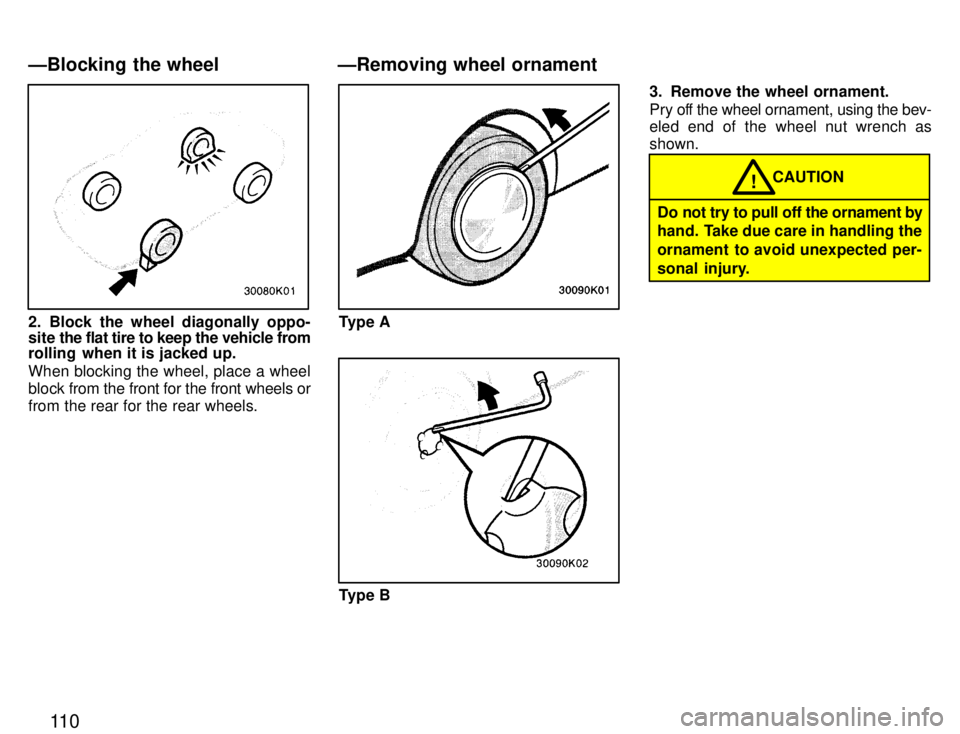
2. Block the wheel diagonally oppo-
site the flat tire to keep the vehicle from
rolling when it is jacked up. When blocking the wheel, place a wheel
block from the front for the front wheels or
from the rear for the rear wheels.Type A
Type B 3. Remove the wheel ornament.
Pry off the wheel ornament, using the bev-
eled end of the wheel nut wrench as shown.
Do not try to pull off the ornament by
hand. Take due care in handling the
ornament to avoid unexpected per-
sonal injury.
CAUTION
!
ÐBlocking the wheel ÐRemoving wheel ornament
Page 114 of 165
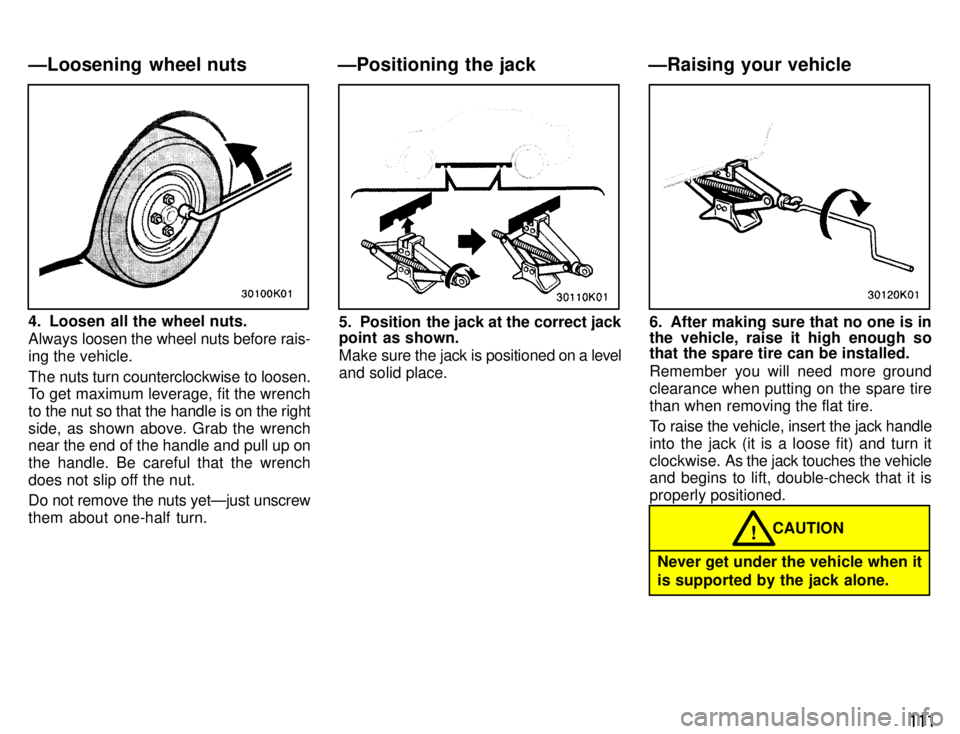
111
4. Loosen all the wheel nuts. Always loosen the wheel nuts before rais-
ing the vehicle.
The nuts turn counterclockwise to loosen.
To get maximum leverage, fit the wrench
to the nut so that the handle is on the right
side, as shown above. Grab the wrench
near the end of the handle and pull up on
the handle. Be careful that the wrench
does not slip off the nut.
Do not remove the nuts yetÐjust unscrew
them about one-half turn.5. Position the jack at the correct jack
point as shown.
Make sure the j ack is positioned on a l evel
and solid place.6. After making sure that no one is in
the vehicle, raise it high enough so
that the spare tire can be installed.
Remember you will need more ground
clearance when putting on the spare tirethan when removing the flat tire.
To raise the vehicle, insert the jack handle
into the jack (it is a loose fit) and turn it
clockwise. As the j ack touches the vehicle
and begins to lift, double-check that it is
properly positioned.
Never get under the vehicle when it is supported by the jack alone. CAUTION
!
ÐLoosening wheel nuts ÐPositioning the jack ÐRaising your vehicle
Page 115 of 165

11 2
7. Remove the wheel nuts and change tires.
Lift the flat tire straight off and put it aside.
Roll the spare wheel into position and
align the holes in the wheel with the bolts.
Then lift up the wheel and get at least thetop bolt started through its hole. Wigglethe tire and press it back over the other bolts.Before putting on wheels, remove any
corrosion on the mounting surfaces with a
wire brush or such. Installation of wheels
without good metal-to-metal contact at
the mounting surface can cause wheel
nuts to loosen and eventually cause a
wheel to come off while driving. Therefore
after the first 1600 km (1000 miles), check
to see that the wheel nuts are tight.8. Reinstall all the wheel nuts finger tight.
Reinstall the wheel nuts (tapered end in-
ward) and tighten them as much as youcan by hand. Press back on the tire back and see if you can tighten them more.
ÐChanging wheels
ÐReinstalling wheel nuts